HEX Weston User manual

Weston
Vertical Metal Storage Shed Assembly Guide
Doc Ref: 699-0800/D
Using the unique serial number, simply register your product at www.hexliving.co.uk
to access and download the Lifeme Warranty and Video Assembly Instrucons.
IMPORTANT: PLEASE REGISTER YOUR HEX LIVING PRODUCT BEFORE ASSEMBLY
Affix Serial Number
HERE
Weston: Advisory Data
i
Part Ref: FK9
Expansion Plug
Qty: x12
Part Ref: FK10
M8 x 50mm Coach Screw
Qty: x12
IMPORTANT: IT IS ADVISABLE THAT THE PRODUCT IS ASSEMBLED AT, OR AS CLOSE AS POSSIBLE TO WHERE IT WILL BE FINALLY LOCATED
The objecƟve of this instrucƟon is to illustrate the recommended assembly sequence for this product, any deviaƟon from this will be the sole
responsibility of whoever carries out the assembly.
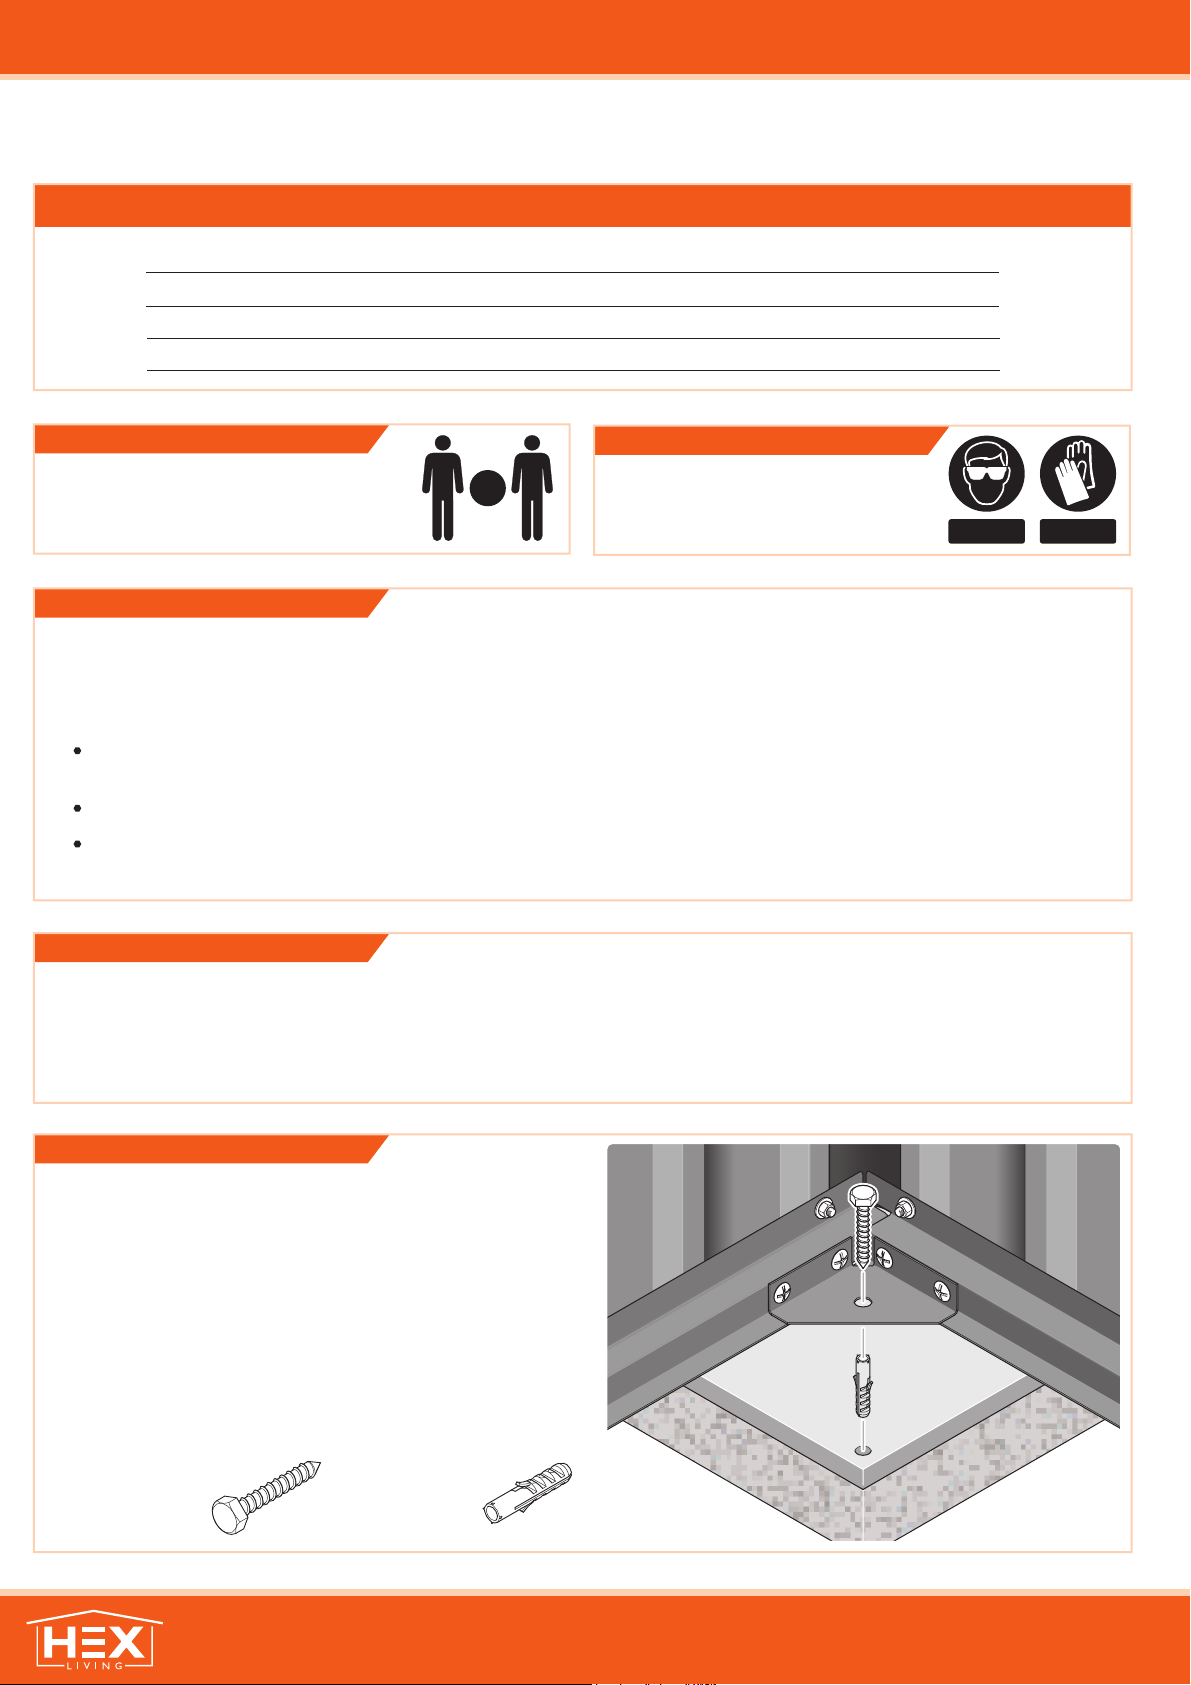
GROUND ANCHOR KIT
A Ground Anchor Kit is supplied, this is to secure the product to a solid
concrete base, the shed has x4 clamp plates in each corner.
WE STRONGLY ADVISE THAT THE SHED IS ANCHORED USING THIS KIT
The diagram illustrates the typical fixing method, once the shed is
assembled, access the clamp brackets by removing the appropriate
floor panel and secure as required.
We advise appropriate personal protecve
equipment is worn during assembly including
eye protecon and gloves.
Most procedures will not require two people but it may
be easier to have assistance. x2
Eye Protection Gloves
TWO PERSON ASSEMBLY
GROUND ANCHOR KIT
CARING FOR YOUR HEX LIVING PRODUCT
PRODUCT REGISTRATION
PERSONAL PROTECTION EQUIPMENT
PLEASE READ THIS DOCUMENT FULLY PRIOR TO STARTING ASSEMBLY PROCEDURE
Your HEX Living product is designed to stand the test of me, which is why we’re happy to offer a Lifeme Warranty on our products. With
zero maintenance required, simply assemble your HEX Living product and enjoy pung it to great use in your garden.
Periodically, you might want to give your product a clean, these simple care ps are not essenalto the performance of your product:
-Remove surface dirtwith plain waterusing a jet wash or sponge, the coang on our products will ensure dirt or mud simply
wipes away.
-Periodically clear the roof of fallen leaves.
- If your product has guering, remove leaves and garden debris as you would on your home.
IMPORTANT: Prior to assembly, please ensure you have registered your HEX Living product usingthe unique serial numberfound on the cover
of this document, please visit www.hexliving.co.uk to register your product and access the HEX Living Lifeme Warranty and video instrucons.
Ensure there is adequate clearance where the product is to be located:
1450 x 851 x 1846mm
Footprint dimensions (W x D) 1400 x 800mm
Clearance required for door to open (W x H) Doors open outwards 662 x 1669mm
Exterior dimensions including overhang (W x D x H)
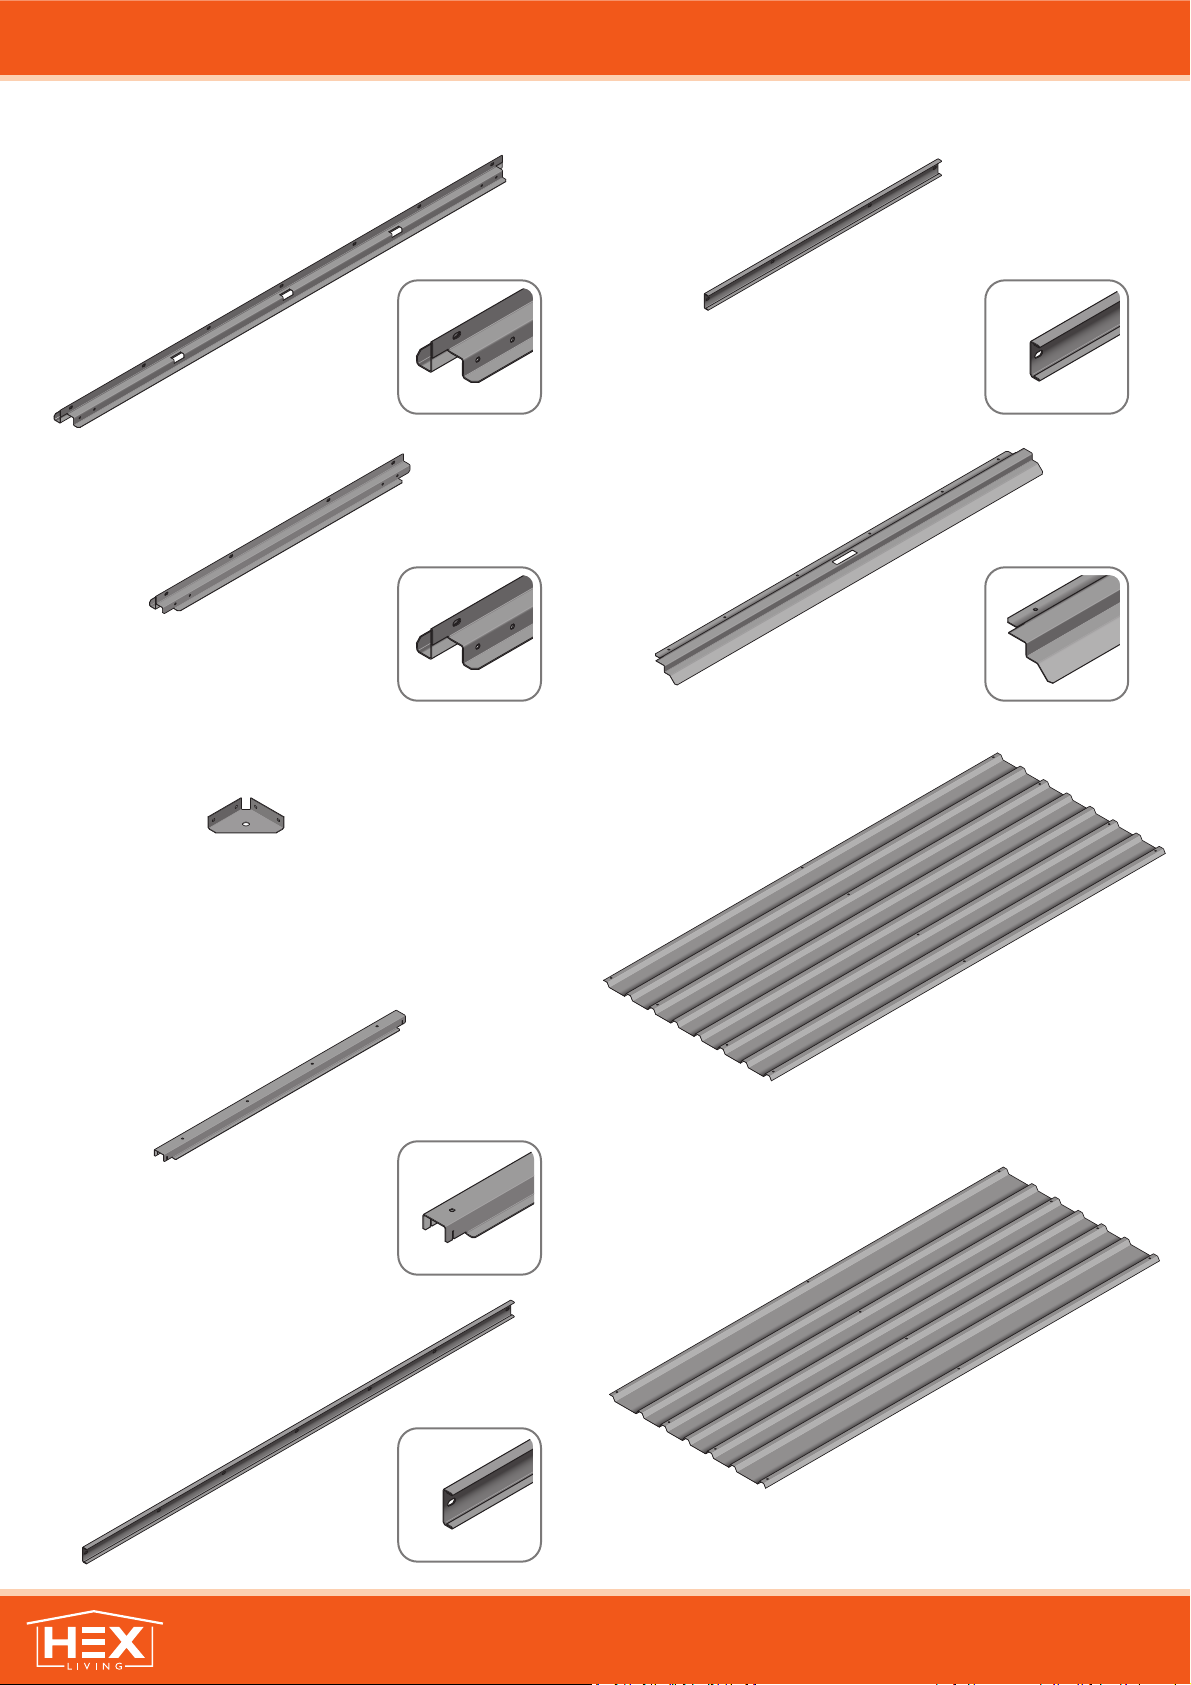
Weston: Assembly Guide
1
Part Ref: 0203-09 (725mm Wide)
Qty: x2
Part Ref: 0203-10 (675mm Wide)
Qty: x2
Part Ref: 0203-08
Qty: x1
Part Ref: 0203-07
Qty: x2
Part Ref: 0203-06
Qty: x1
Part Ref: 0203-04
Qty: x3
Part Ref: 0203-03
Qty: x4
Part Ref: 0203-02
Qty: x2
Part Ref: 0203-01
Qty: x2
ENSURE ALL ITEMS LISTED ARE PRESENT PRIOR TO STARTING ASSEMBLY PROCEDURE
SCALE OF ITEMS WILL VARY TO AID VISUAL IDENTIFICATION

2
Weston: Assembly Guide
Part Ref: 0203-16
Qty: x2
Part Ref: 0203-17
Qty: x2
Part Ref: 0203-18
Qty: x3
Part Ref: 0203-20
Qty: x1
Part Ref: 0203-11 (1735mm Long)
Qty: x2
Part Ref: 0203-12 (1800mm Long)
Qty: x2
Part Ref: 0203-13 (R/H)
Qty: x1
Part Ref: 0203-14 (L/H)
Qty: x1
ENSURE ALL ITEMS LISTED ARE PRESENT PRIOR TO STARTING ASSEMBLY PROCEDURE
SCALE OF ITEMS WILL VARY TO AID VISUAL IDENTIFICATION

3
Weston: Assembly Guide
Part Ref: 0205-39
Qty: x2
Part Ref: 0203-25 (Right-hand)
Qty: x1
Part Ref: 0203-26 (LeŌ-hand)
Qty: x1
Part Ref: 0203-38-01
Qty: x2
Part Ref: 0203-38-02
Qty: x2
Part Ref: 0203-42
Qty: x2
Part Ref: 0203-23 (R/H)
Qty: x1
Part Ref: 0203-24 (L/H)
Qty: x1
Part Ref: 0203-21
Qty: x1
Part Ref: 0203-22
Qty: x1
ENSURE ALL ITEMS LISTED ARE PRESENT PRIOR TO STARTING ASSEMBLY PROCEDURE
SCALE OF ITEMS WILL VARY TO AID VISUAL IDENTIFICATION
4
Weston: Assembly Guide
Part Ref: 0203-15
Qty: x4
ENSURE ALL ITEMS LISTED ARE PRESENT PRIOR TO STARTING ASSEMBLY PROCEDURE
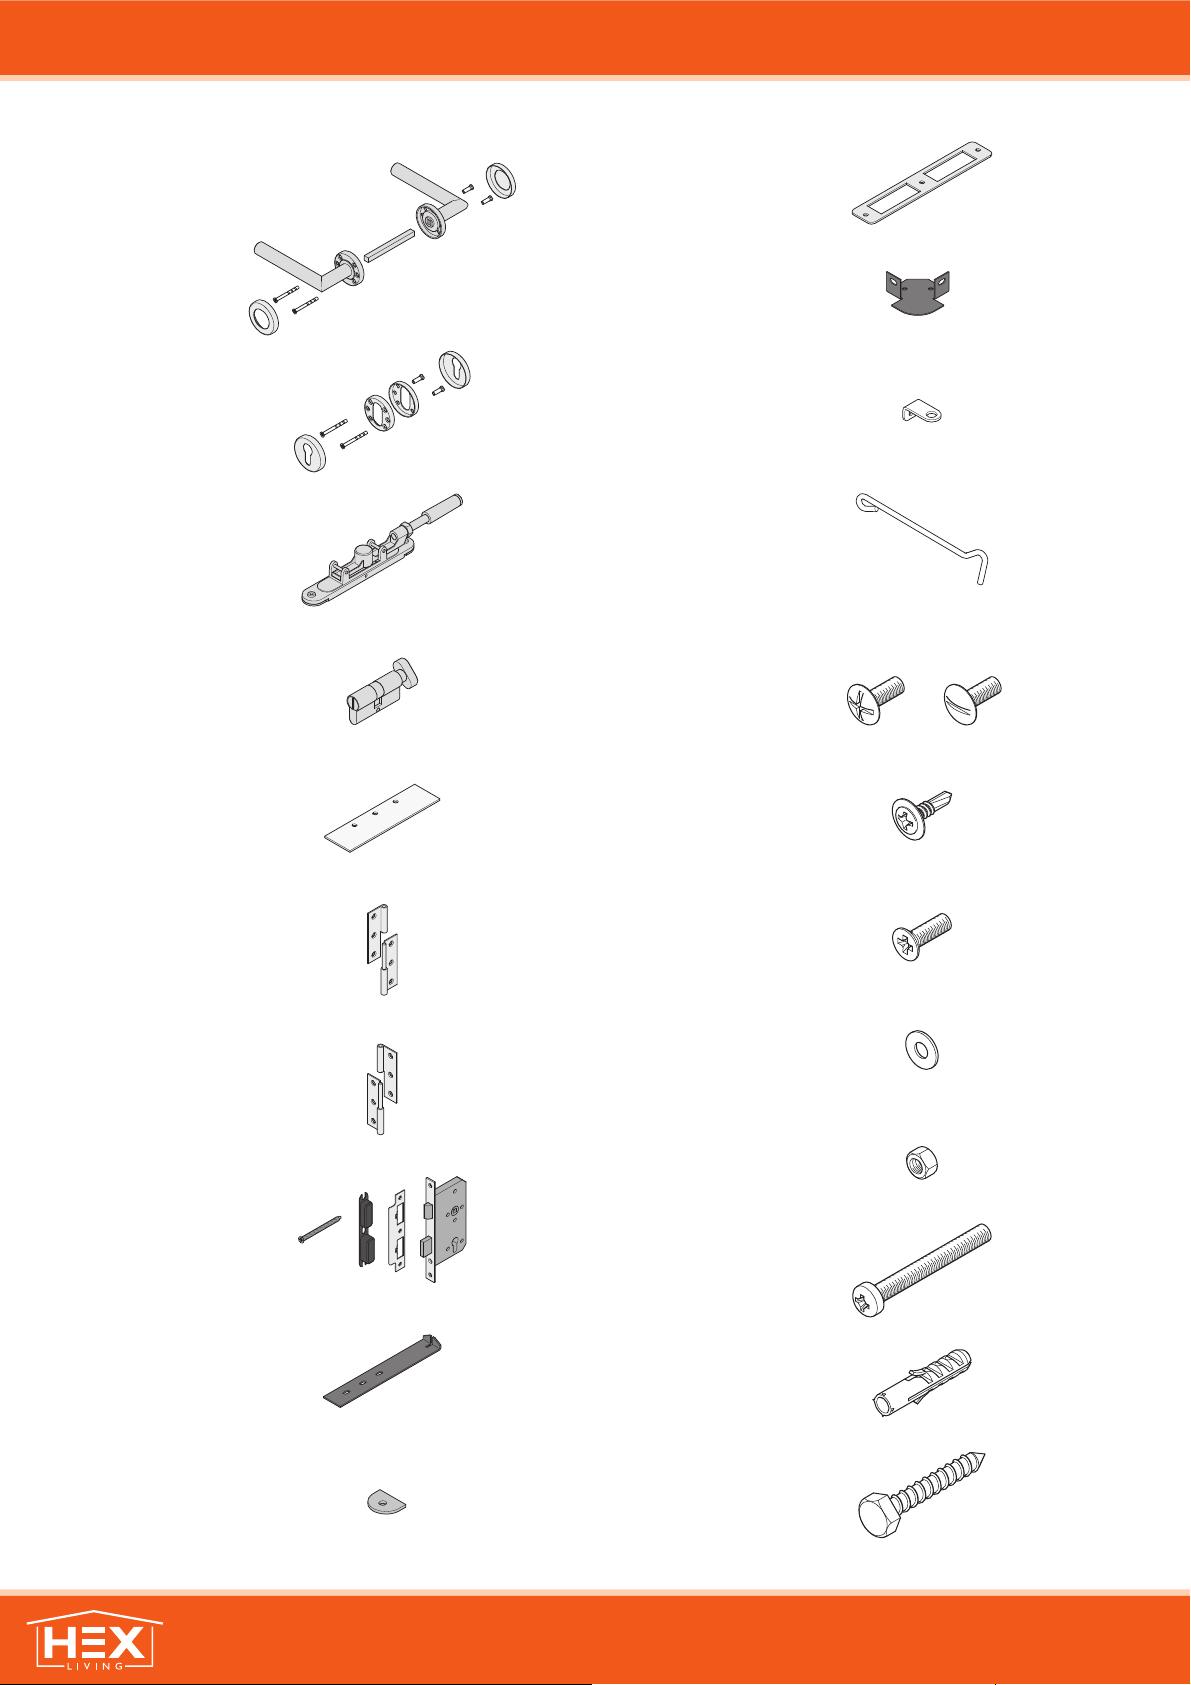
Part Ref: FK1
M4 x 10mm Roofing Bolt
This will be Pozi OR SloƩed
Qty: x119
OR
Part Ref: 0203-27 (L/H Assembly)
Qty: x2
Part Ref: 0203-28 (R/H Assembly)
Qty: x2
Part Ref: 0203-32 (Assembly)
Qty: x1
Part Ref: 0203-33 (Assembly)
Qty: x1
Part Ref: 0203-34 (Assembly)
Qty: x1
Part Ref: 0203-35
Qty: x2
Part Ref: 0203-36
Qty: x1
Part Ref: 0203-37
Qty: x4
Part Ref: 0203-39
Qty: x4
Part Ref: 0203-41
Qty: x1
Part Ref: 0203-51
Qty: x2
Part Ref: 0203-50
Qty: x2
Part Ref: FK3
No.8 x 13mm Eco Fix
Qty: x7
Part Ref: FK4
M4 x 12mm C’Sunk Pozi Pan
Qty: x31
Part Ref: FK5
M4 Form C Washer
Qty: x151
Part Ref: FK6
M4 Nut
Qty: x151
Part Ref: FK8
Expansion Plug
Qty: x4
Part Ref: FK9
M8 x 50mm Coach Screw
Qty: x4
SCALE OF ITEMS WILL VARY TO AID VISUAL IDENTIFICATION
Part Ref: 0203-40
Qty: x4
Part Ref: FK7
M4 x 40mm Pozi Pan Screw
Qty: x7
5
Weston: Assembly Guide
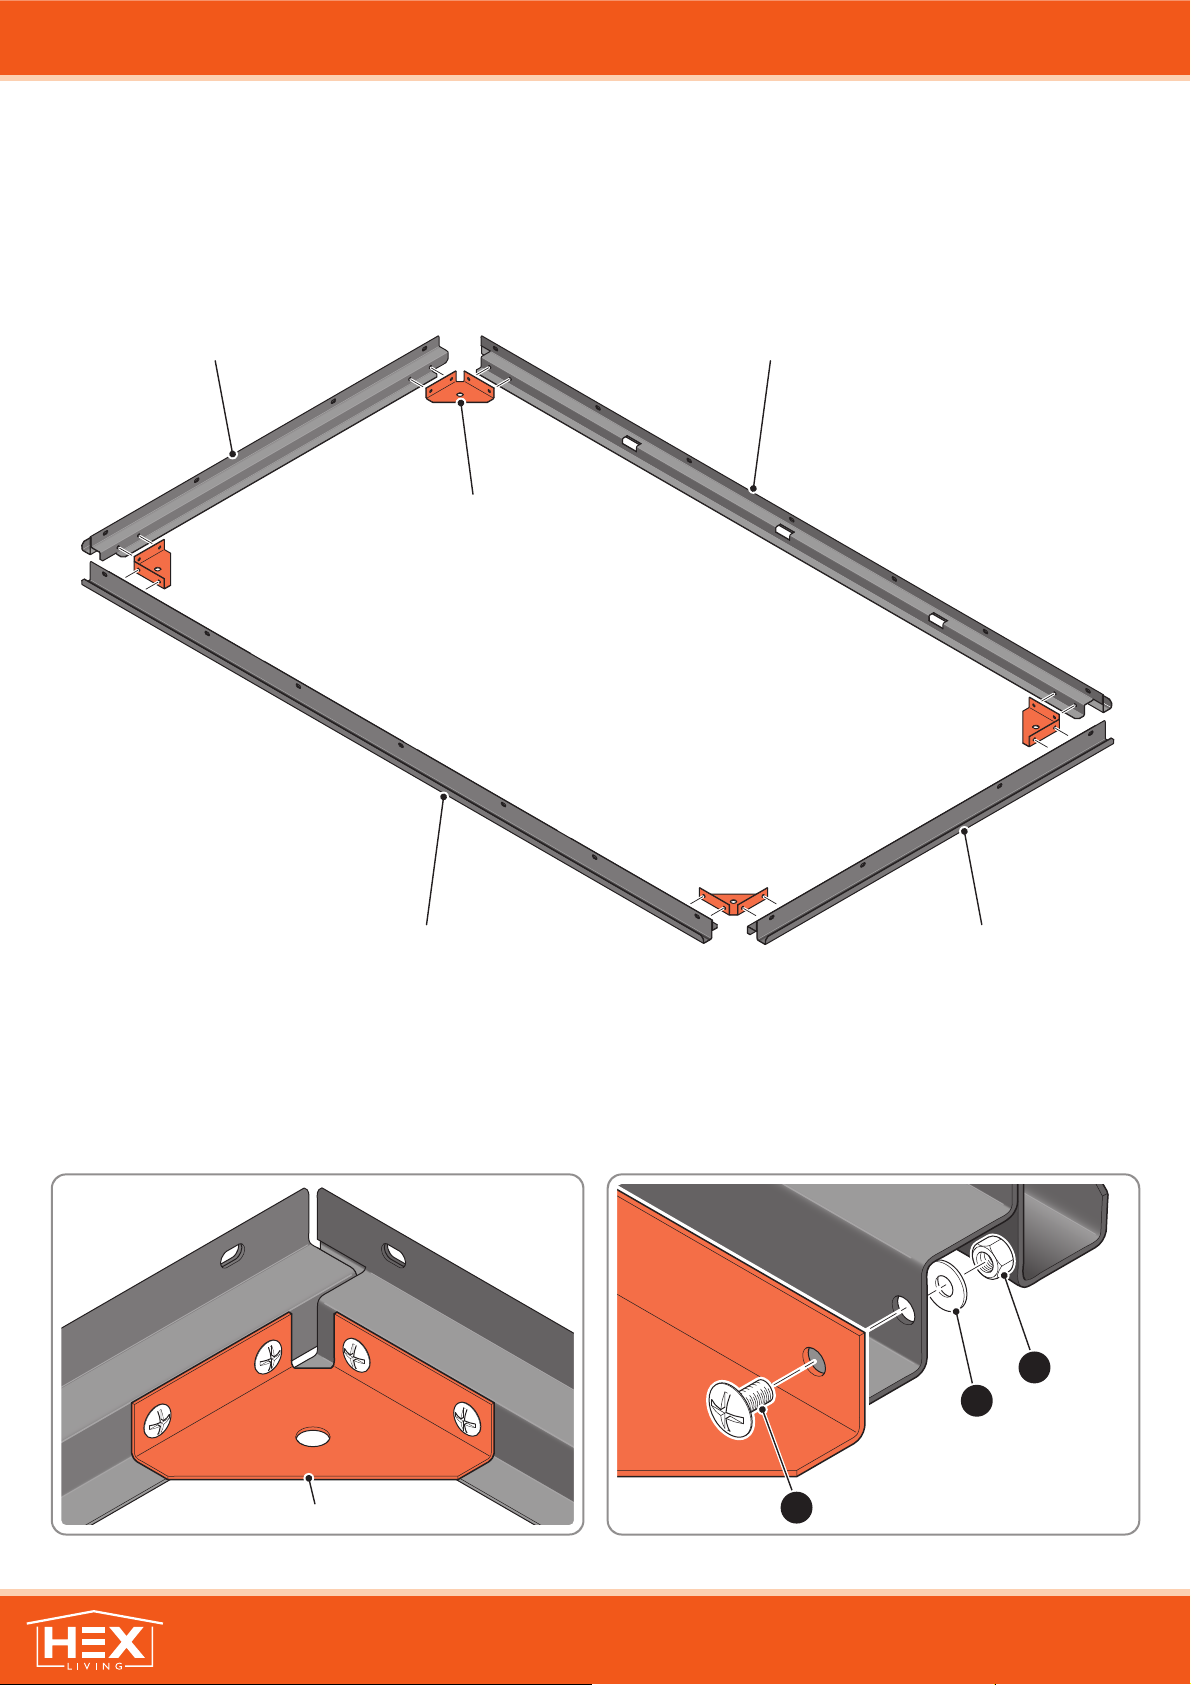
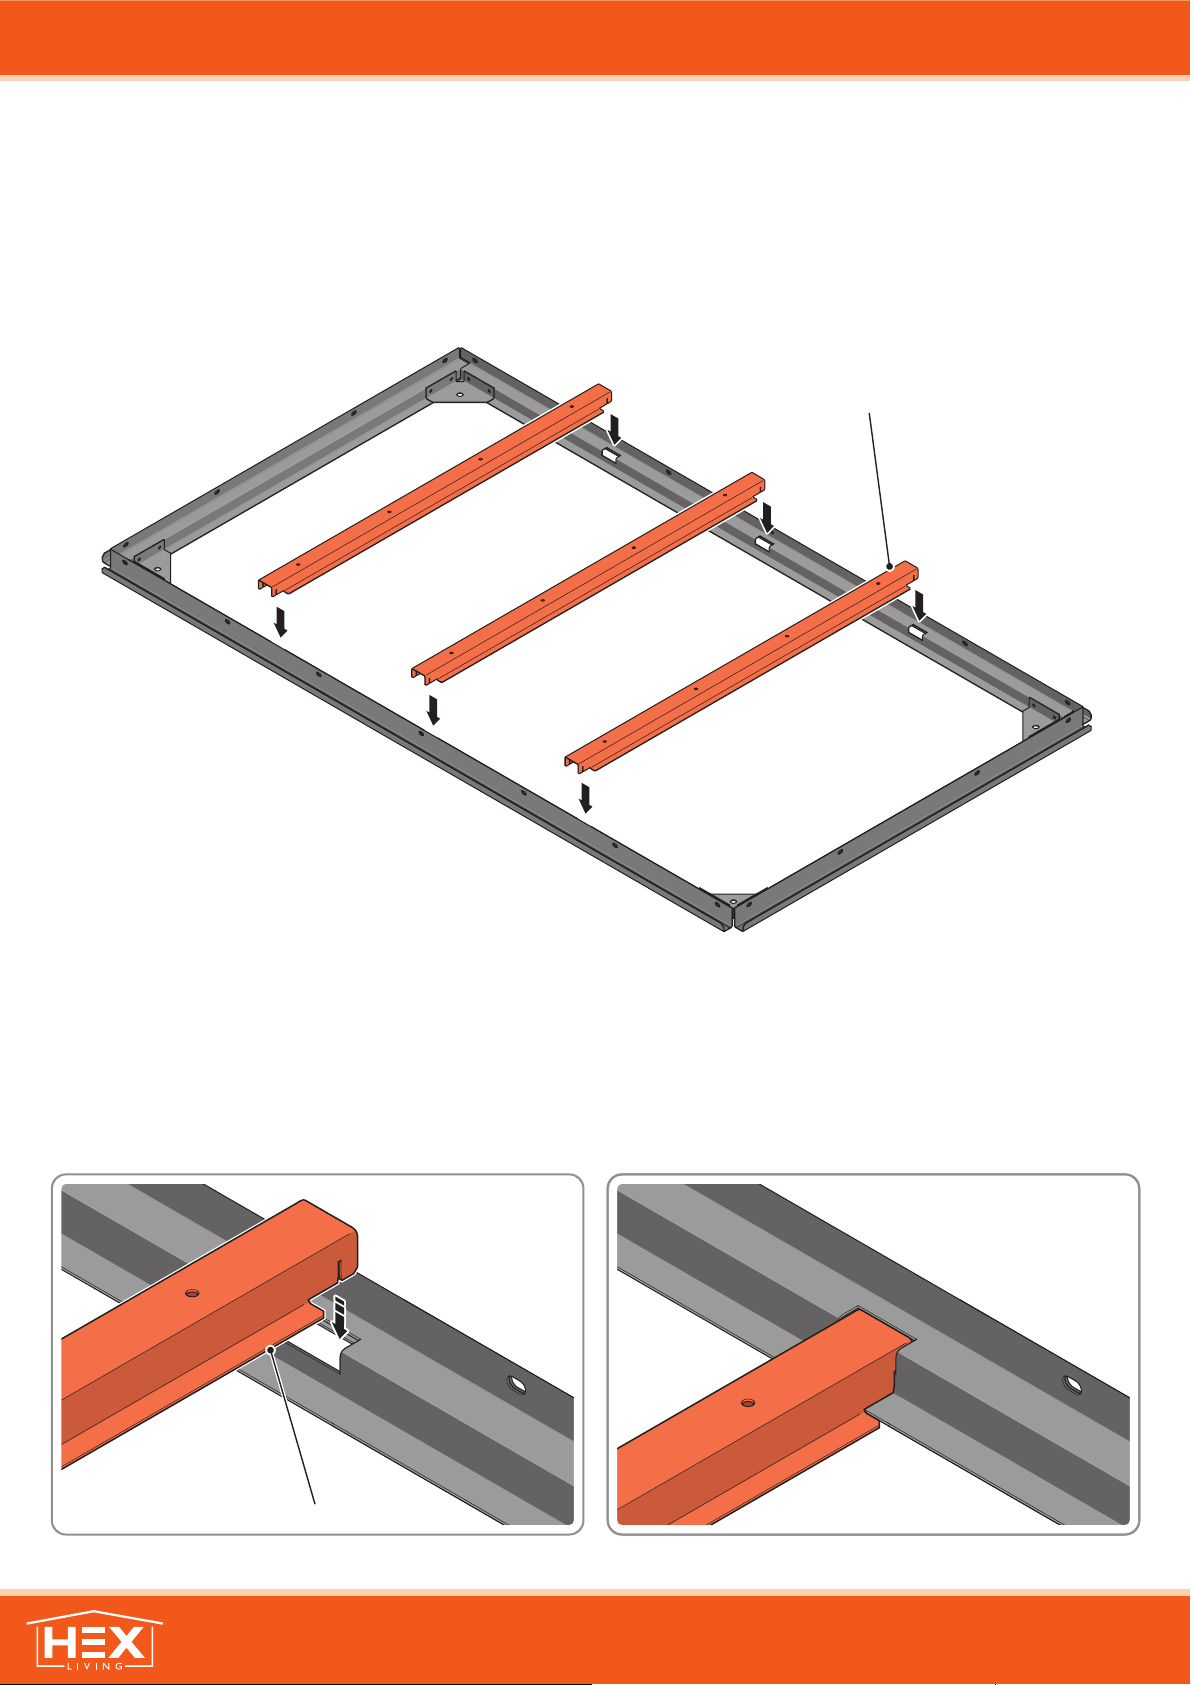
ASSEMBLY STAGE 1
SECURE EACH CORNER BRACE 0203-03 AS SHOWN ABOVE.
LOCATE AND SECURE A CORNER BRACE 0203-03 AT EACH LOCATION INDICATED.
0203-01
0203-01
0203-02
0203-02
0203-03 (x4)
0203-03
PLEASE NOTE: SECTION VIEW OF TYPICAL FIXING METHOD.
FK1
FK5
FK6
6
Weston: Assembly Guide
ASSEMBLY STAGE 2
0203-04 (x3)
0203-04
SLOT EACH FLOOR BRACE 0203-04 INTO POSITION AS SHOWN ABOVE.
LOCATE AND SECURE A FLOOR BRACE 0203-04 AT EACH LOCATION INDICATED.
PLEASE NOTE: ENSURE TOP OF FLOOR BRACE IS LEVEL WITH TOP OF FLOOR RAIL.

7
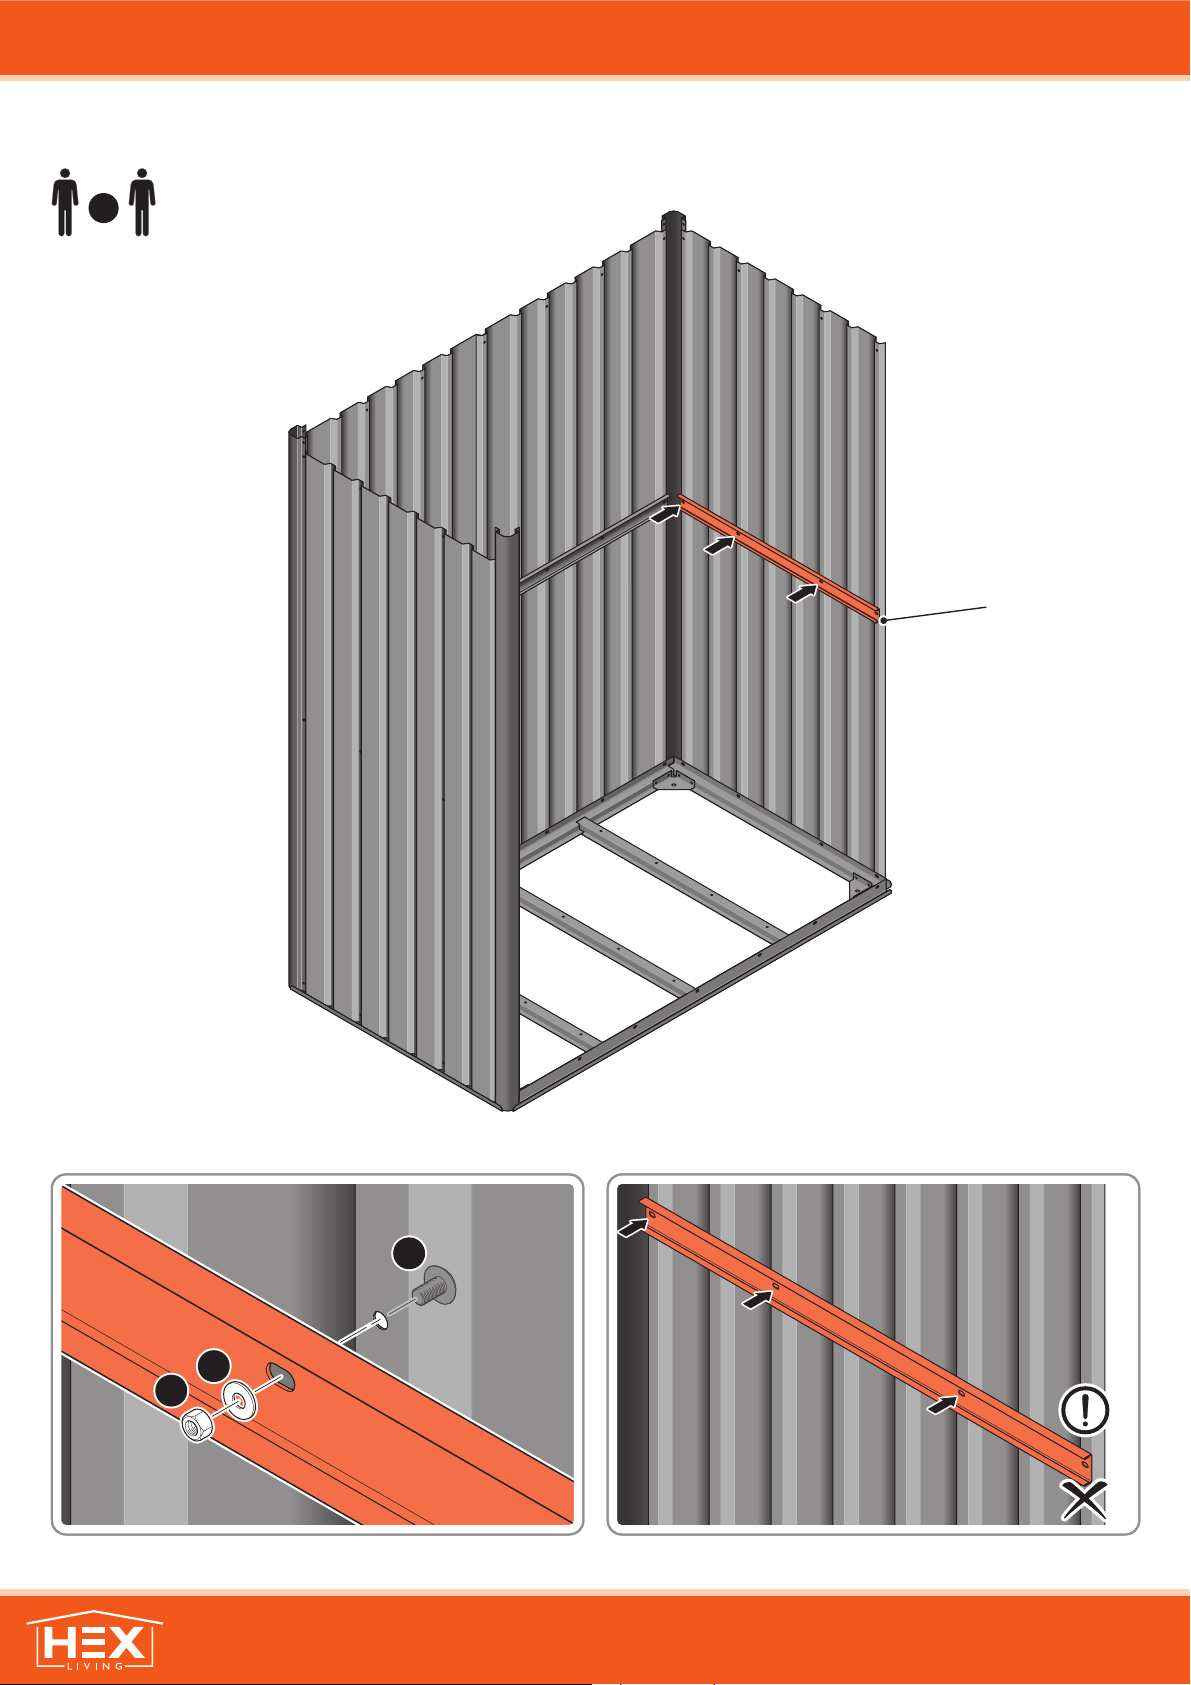
Weston: Assembly Guide
x2
ASSEMBLY STAGE 3
0203-09 (725mm)
LOCATE SIDE WALL PANEL 0203-09 INTO POSITION AS SHOWN ABOVE.
IMPORTANT: ENSURE PANEL IS IN THE CORRECT ORIENTATION. IMPORTANT: DO NOT SECURE AT OUTER FIXING POINTS AT THIS STAGE.
LOCATE SIDE WALL PANEL 0203-09 (725mm WIDE), PLEASE NOTE EACH PANEL DOES NOT HAVE A SPECIFIC TOP OR BOTTOM SO CAN BE LOCATED EITHER WAY.
LOOSELY ATTACH SIDE WALL PANEL ONTO FLOOR RAIL AT x2 LOCATIONS INDICATED.
0203-09 (725mm)
3A
3B
3B
3A 3B
FK1
FK5
FK6

8
Weston: Assembly Guide
x2
ASSEMBLY STAGE 4
LOCATE AND LOOSELY ATTACH SHORT CENTRE BRACE 0203-07 AS SHOWN AT
x2 LOCATIONS INDICATED ABOVE. IMPORTANT: DO NOT SECURE AT OUTER FIXING POINTS AT THIS STAGE.
LOCATE AND LOOSELY ATTACH SHORT CENTRE BRACE 0203-07 ONTO SIDE WALL.
LOOSELY ATTACH AT x2 LOCATIONS INDICATED ONLY.
0203-07
FK5
FK1
FK6
9
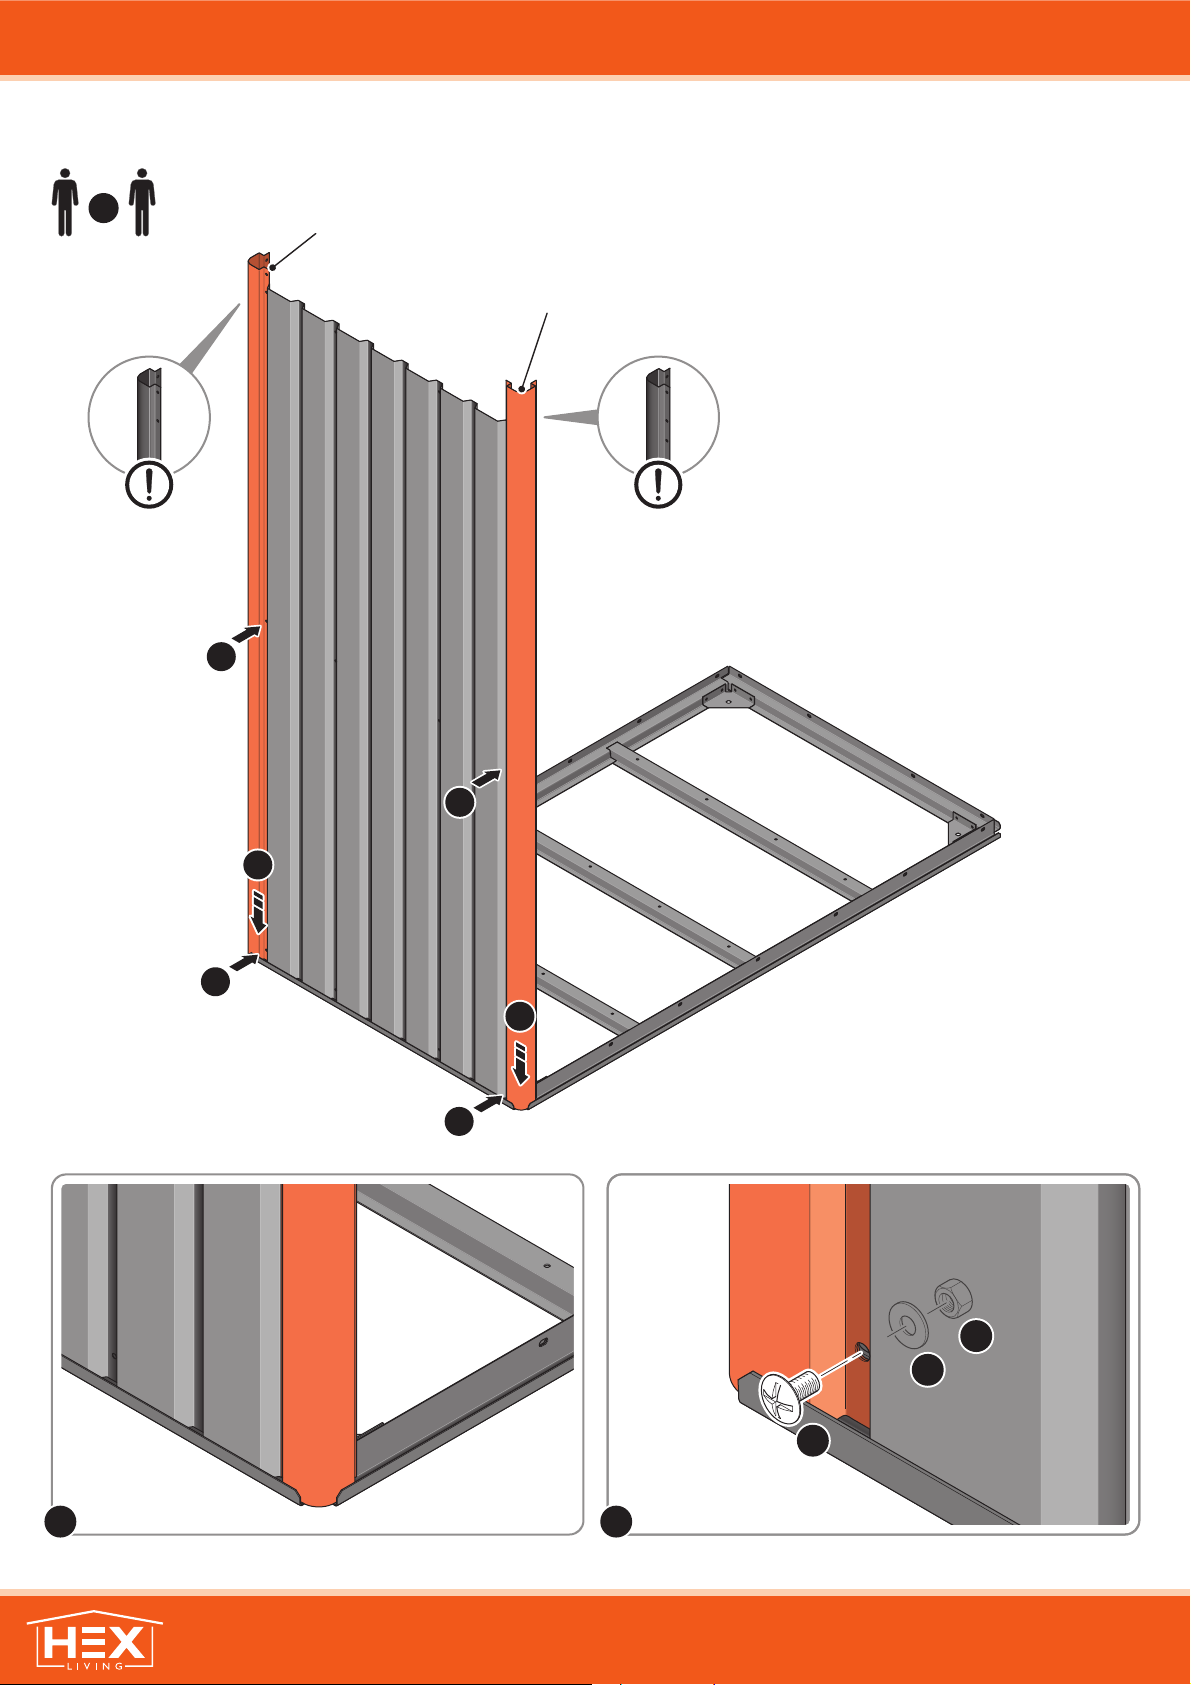
Weston: Assembly Guide
FK1
FK5
FK6
x2
ASSEMBLY STAGE 5
5B
5B
LOCATE CORNER POSTS 0203-11 & 0203-12 AS SHOWN AT x2 LOCATIONS ABOVE.
IMPORTANT: DO NOT SECURE AT UPPER FIXING POINTS AT THIS STAGE.
LOCATE AND LOOSELY ATTACH CORNER POSTS 0203-11 (1735mm) & 0203-12 (1800mm LONG) ONTO SIDE WALL.
LOOSELY ATTACH CORNER POSTS AT x4 LOCATIONS INDICATED ONLY.
0203-12 (1800mm LONG)
x3 HOLES AT TOP
0203-11 (1735mm LONG)
x2 HOLES AT TOP
5A
5A
5A 5B
5B
5B
10
Weston: Assembly Guide
IMPORTANT: DO NOT SECURE ANY FIXING POINTS OTHER THAN THOSE INDICATED.
LOOSELY ATTACH BACK WALL PANEL AT x3 LOCATIONS INDICATED ONLY.
FK1
FK5
FK6
x2
ASSEMBLY STAGE 6
LOCATE BACK WALL PANEL 0203-10 (675mm WIDE), PLEASE NOTE THE PANEL DOES NOT HAVE A SPECIFIC TOP OR BOTTOM SO CAN THEREFORE BE LOCATED EITHER WAY.
0203-11 (1735mm LONG)
0203-10 (675mm WIDE)
6A
6A 6B
LOCATE FIRST BACK WALL PANEL 0203-10 (675mm WIDE) AS SHOWN ABOVE.
IMPORTANT: ENSURE PANEL IS IN THE CORRECT ORIENTATION.
6B
6B
6B

11
Weston: Assembly Guide
LOCATE SECOND BACK WALL PANEL 0203-10 INTO POSITION AS SHOWN ABOVE.
IMPORTANT: ENSURE PANEL IS IN THE CORRECT ORIENTATION.
x2
ASSEMBLY STAGE 7
LOOSELY ATTACH BACK WALL PANELS 0203-10.
7A
IMPORTANT: DO NOT SECURE ANY FIXING POINTS OTHER THAN THOSE INDICATED.
LOOSELY ATTACH BACK WALL PANEL AT x3 LOCATIONS INDICATED ONLY.
FK1
FK5
FK6
7B
0203-10 (675mm WIDE)
7A
7B
7B
7B
12
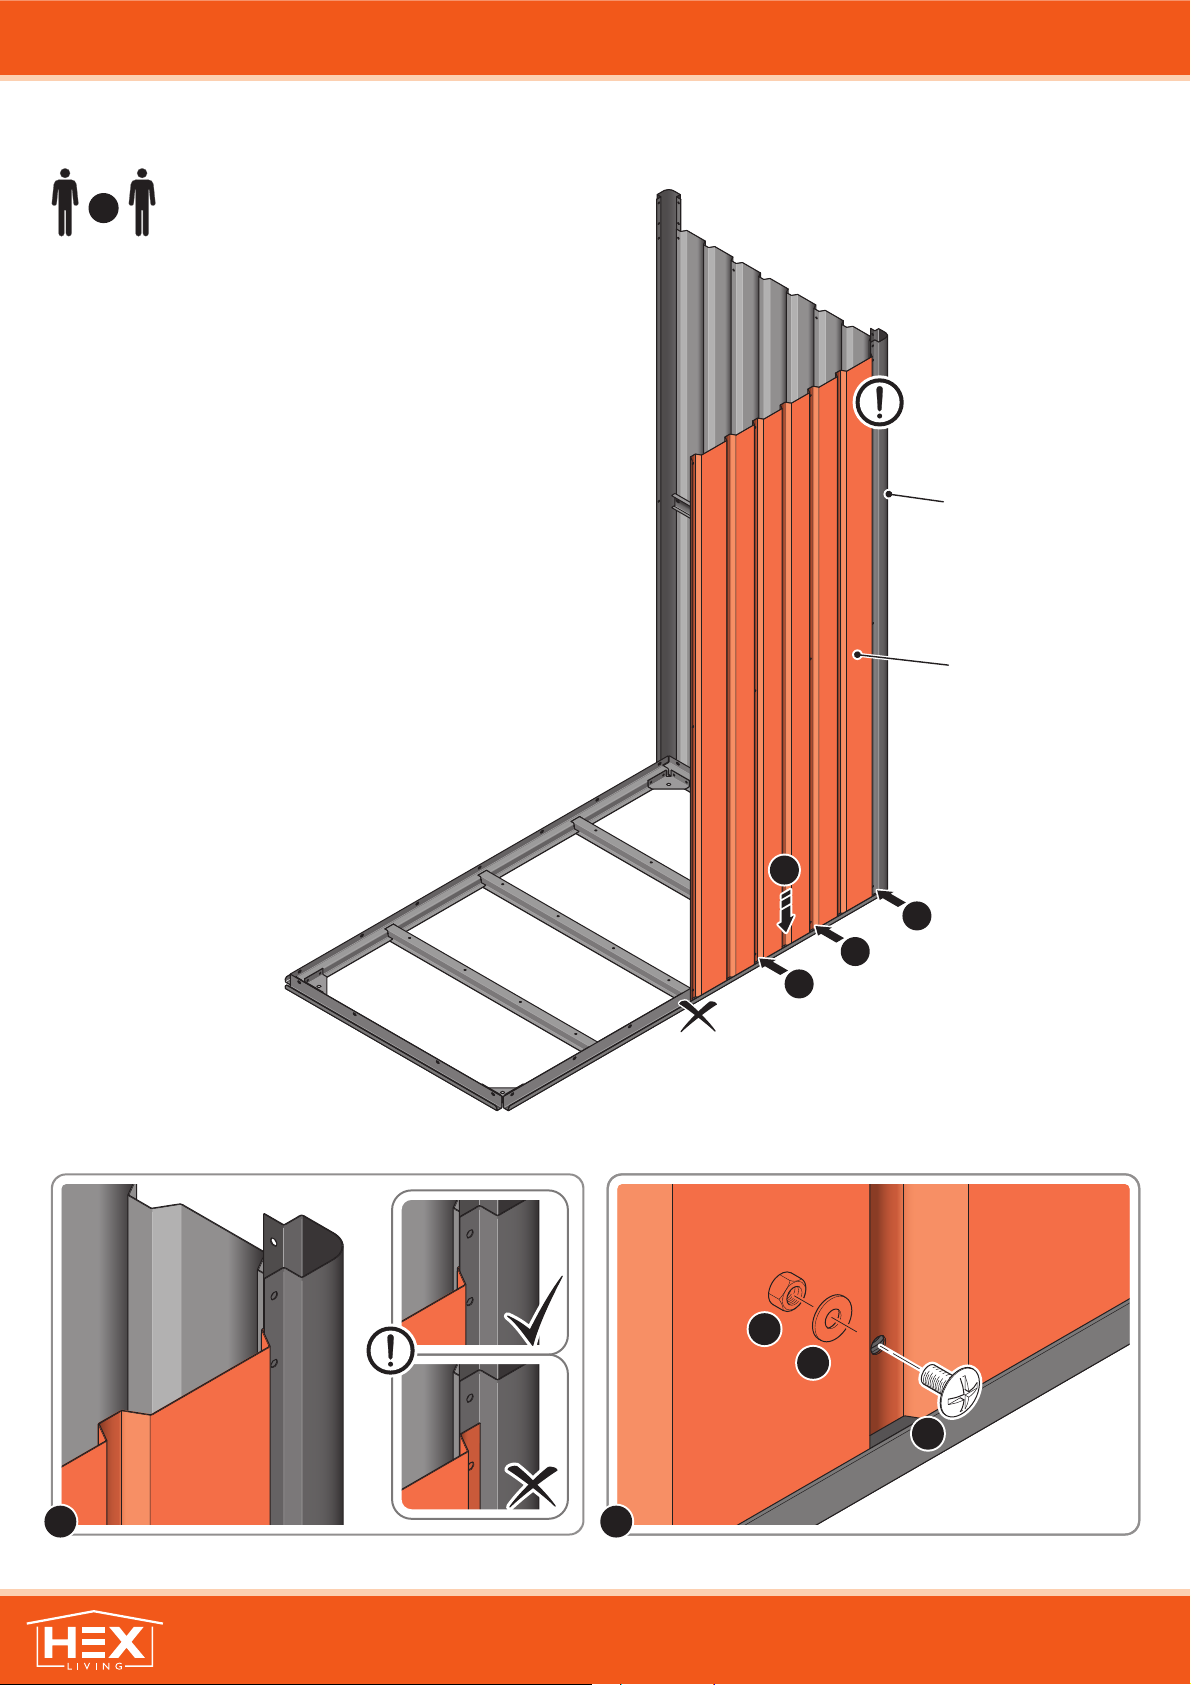
Weston: Assembly Guide
x2
ASSEMBLY STAGE 8
0203-06
LOCATE AND LOOSELY ATTACH LONG CENTRE BRACE 0203-06 ONTO BACK WALL.
LOCATE AND LOOSELY ATTACH SHORT CENTRE BRACE 0203-07 AS SHOWN AT
x2 LOCATIONS INDICATED ABOVE.
FK5
FK1
FK6
IMPORTANT: DO NOT SECURE OUTER FIXING POINT INDICATED AT THIS STAGE.
LOOSELY ATTACH AT x6 LOCATIONS INDICATED ONLY.

13
Weston: Assembly Guide
12B
12A
12B
FK1
FK5
FK6
LOCATE CORNER POST 0203-12 (1735mm) AS SHOWN ABOVE.
IMPORTANT: DO NOT SECURE AT TOP FIXING POINT AT THIS STAGE.
LOOSELY ATTACH CORNER POST AT x2 LOCATIONS INDICATED ONLY.
9B9A
0203-11 (1735mm LONG)
x2 HOLES AT TOP
x2
ASSEMBLY STAGE 9
LOCATE AND LOOSELY ATTACH CORNER POSTS 0203-11 (1735mm) ONTO SIDE WALL.

14
Weston: Assembly Guide
LOCATE SIDE WALL PANEL 0203-09 INTO POSITION AS SHOWN ABOVE.
IMPORTANT: ENSURE PANEL IS IN THE CORRECT ORIENTATION. IMPORTANT: DO NOT SECURE AT OUTER FIXING POINTS AT THIS STAGE.
LOOSELY ATTACH SIDE WALL PANEL ONTO FLOOR RAIL AT x3 LOCATIONS INDICATED.
FK1
FK5
FK6
10A 10B
x2
ASSEMBLY STAGE 10
LOCATE SIDE WALL PANEL 0203-09 (725mm WIDE), PLEASE NOTE THE PANEL DOES NOT HAVE A SPECIFIC TOP OR BOTTOM SO CAN BE LOCATED EITHER WAY.
9A
0203-09 (725mm)
9B
9B
9B
15
Weston: Assembly Guide
x2
ASSEMBLY STAGE 11
0203-07
LOCATE AND LOOSELY ATTACH SHORT CENTRE BRACE 0203-07 AS SHOWN AT
x3 LOCATIONS INDICATED ABOVE. IMPORTANT: DO NOT SECURE AT OUTER FIXING POINT AT THIS STAGE.
LOOSELY ATTACH AT x3 LOCATIONS INDICATED ONLY.
FK5
FK1
FK6
LOCATE AND LOOSELY ATTACH SHORT CENTRE BRACE 0203-07 ONTO SIDE WALL.

16
Weston: Assembly Guide
ASSEMBLY STAGE 12
x3 HOLES AT TOP
LOCATE AND LOOSELY ATTACH CORNER POST 0203-12 (1800mm LONG) ONTO SIDE WALL.
0203-12 (1800mm LONG)
12B
12A
12B
FK1
FK5
FK6
LOCATE CORNER POST 0203-12 (1800mm) AS SHOWN ABOVE.
IMPORTANT: DO NOT SECURE AT TOP FIXING POINT AT THIS STAGE.
LOOSELY ATTACH CORNER POST AT x2 LOCATIONS INDICATED ONLY.
12B12A
x2

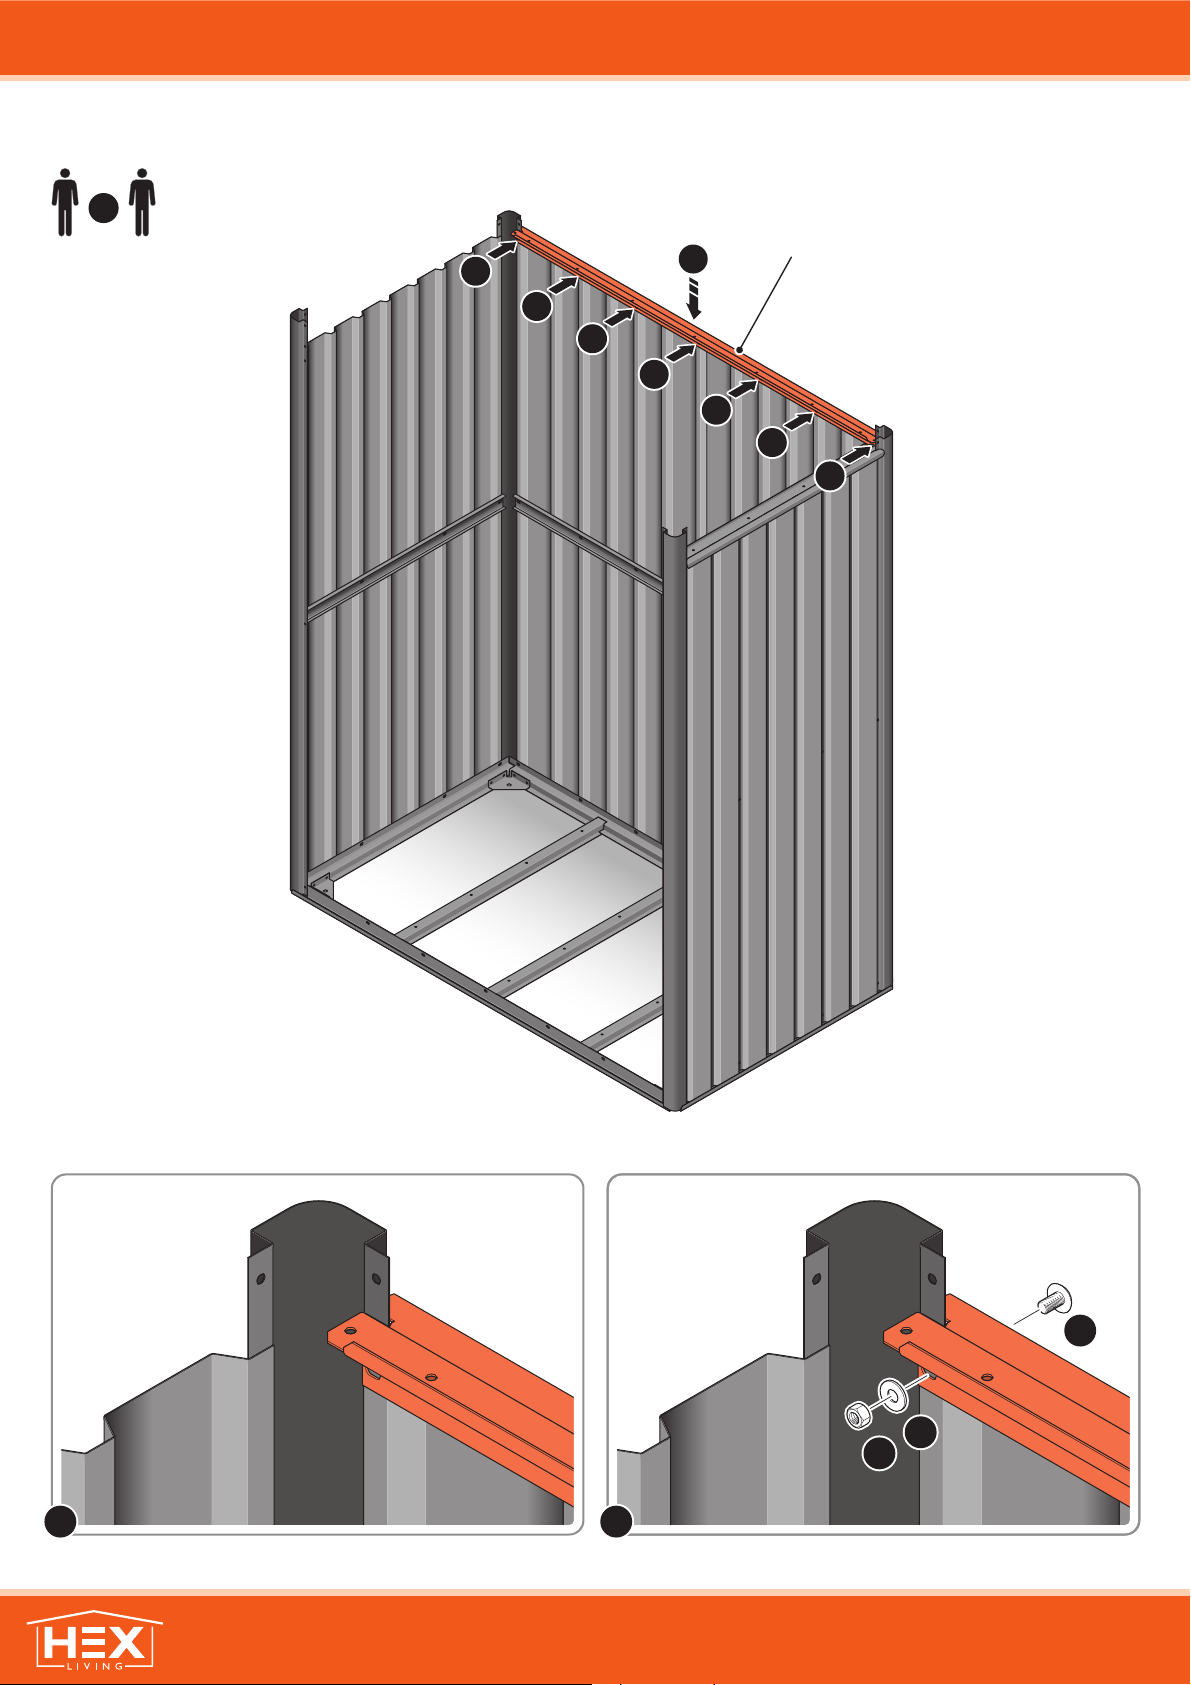
17
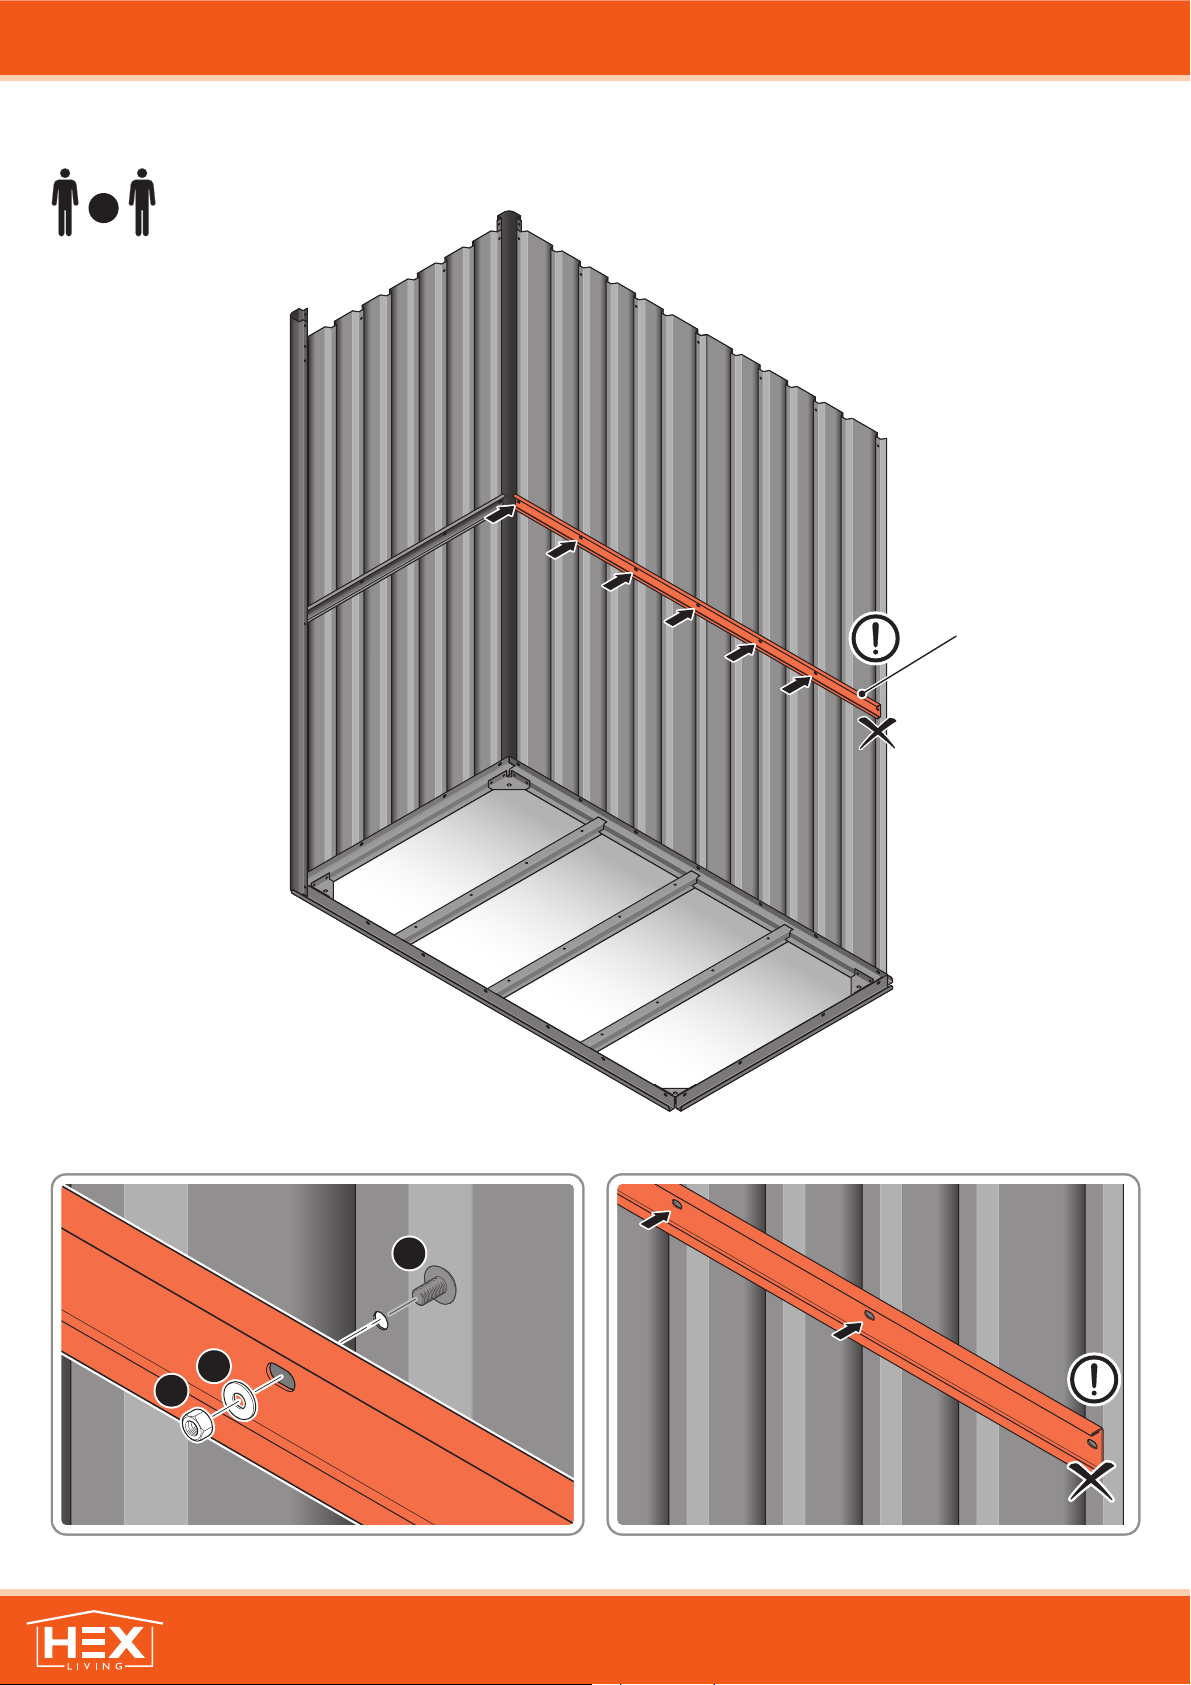
Weston: Assembly Guide
x2
ASSEMBLY STAGE 13
FK1
FK5
FK6
LOCATE SHORT TOP RAIL 0203-17 AS SHOWN ABOVE. LOOSELY ATTACH AT x4 LOCATIONS INDICATED.
13A 13B
LOCATE AND LOOSELY ATTACH SHORT TOP RAIL 0203-17.
13A
13B
13B
13B
13B
0203-17
18
Weston: Assembly Guide
x2
ASSEMBLY STAGE 14
LOCATE LONG TOP RAIL 0203-16 AS SHOWN ABOVE. LOOSELY ATTACH AT x7 LOCATIONS INDICATED.
14A 14B
LOCATE AND LOOSELY ATTACH LONG TOP RAIL 0203-16.
14A
14B
14B
14B
14B
14B
14B
0203-16
14B
FK1
FK5
FK6
Other manuals for Weston
1
Other HEX Storage manuals


