Hexagon GeoMax ZGP800 User manual

Central phone +41 71 447 17 00 GeoMax AG
Direct Phone +41 71 447 17 00 Espenstrasse 135
Direct E-Mail info@geomax-positioning com CH-9443 Widnau
Web www geomax-positioning com Switzerland
How_To_Configure_RTK_Radios_Setup doc
1/5
GeoMax ZGP800 – RTK Radio and
Base Setup
Setting up the ZGP800 with a radio to use as RTK can be easy, if you know how!
Below are instructions regarding the configuration of the ZGP800C controller to
devices (ZGP800A GPS antenna and ZRT100 radio) to carry out general RTK sur-
veying
Also provided is a couple of pointers on how to find and fix issues that you may
have
Devices may be configured to the ZGP800C via cables or using a Bluetooth con-
nection This document will concentrate on using Bluetooth Once the ZGP800C
is configured these settings will stay until configuration is changed i e the Blue-
tooth will connect automatically to the antenna once turned on
(1) Setting the con iguration set and radio device
From the main menu go to 5 Config > 4 Comm Config and select “RADIO
ROVER” from the list of Con ig Sets and press F1 CONT.
In the “Inter aces” panel select “Real Time” and press F3 EDIT.
First of all make sure you have the following settings…
R-Time Mode: Rover
R-Time Data: GeoMax
Port: Bluetooth
Ref Sensor: Unknown

2/5
Antenna: Unknown
Now you will need to connect the ZRT100 to the ZGP800c controller via
blueooth Select F5 DEVCE and from the list choose the “Radios” tab and select
“Satelline 3AS” Press F1 CONT to select this device You will then see it in the
“Device” field Now do a Bluetooth search by pressing F4 SRCH. Select the
ZTR100 you are going to use and press F1 CONT Your Real-Time Mode panel
should look like this (ID Address should be populated)…
Press F1 CONT to continue You will get a message line saying that the Blue-
tooth connection is OK In the interfaces panel select F4 CTRL to set the radio
channel you want From the interfaces panel press F1 CONT to continue…
(2) Rover Antenna Connection
The next thing to do is connect the rover ZGP800a antenna From the main
menu go into 5 Config > 2 Instr Config > 1 Antenna Here you will need to set
the “Comm” to Bluetooth and press F4 SRCH and select the ZGP800a antenna
from the list
Once you have select the antenna press F1 CONT to accept the antenna and
return the main menu This antenna connection is only for the “rover” GPS an-
tenna – this antenna is connected permanently to the ZGP800C The reference
antenna is configured in the “Setup Reference” Program
Now your rover is ready! You can now configure your base station
3/5
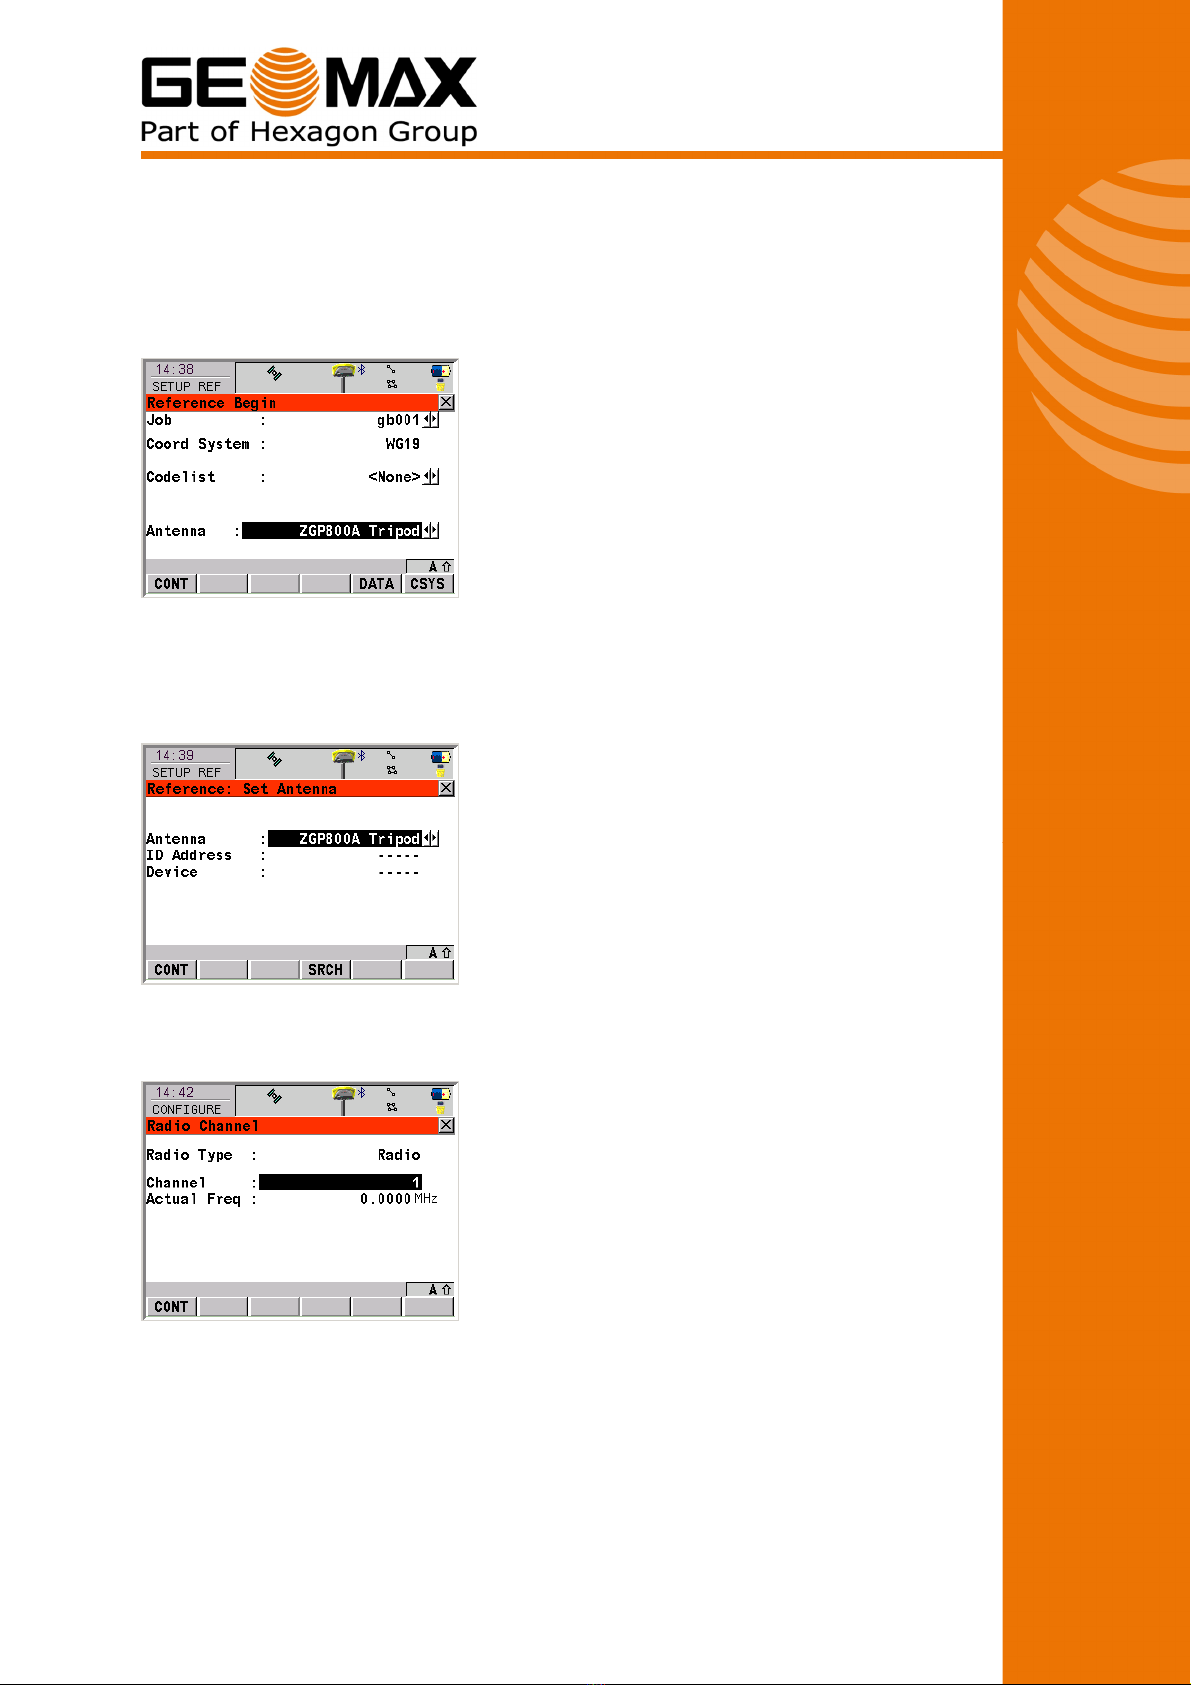
(3) Base Station Setup
From the Main menu go into 1 Programs > 2 Setup Reference This is a step-by-
step wizard to configure your base station Select your job and select the correct
antenna type Press F1 CONT to continue
Now you will have to do a Bluetooth search (F4 SRCH) to select the base an-
tenna Once you have found the correct antenna press F1 CONT and the base
station Bluetooth will be established Note: Your rover antenna connection
should not be affected
Next you will have to define the radio channel Select the same channel number
as you have already set on the rover radio
Once you have selected the correct channel press F1 CONT to continue The
next panel you will see in the wizard is the set point panel Here you can use the
“HERE” position or select a point from the job to use as a base point

4/5
Once you have selected your point press F1 CONT to continue The final panel in
the wizard is a confirmation panel You should see the base station’s position and
the flashing base station “lightning” indicating that it is sending out RTK correc-
tions Press F1 FINSH to finish the wizard, return to the main menu, start re-
ceiving RTK corrections and get a fixed position!
Tips or Bluetooth
The status of the Bluetooth connections can be checked by selecting the Blue-
tooth icon at the top of the screen This tells you what devices are attached to
which port If they are black then they are currently connected If they are gray
then they are not connected There are three Bluetooth ports and each one is
configured for a particular device
Port 1: Rover antenna,
Port 2: Reference antenna
Port 3: Bluetooth radio
Note that the first time you connect to a Bluetooth device it will ask for authenti-
cation The PIN is “0000” If it is the first time connecting to the Bluetooth device
it may take a few seconds to complete the connection
The Bluetooth connections can also be checked checking the Blue LED at the top
of the ZRT100 and ZGP800a
USB cable: If the communication to the antenna is via the USB cable then the
1 2m cable with red markings needs to be attached between the ZGP800C and
the ZGP800A “USB cable” need to be selected in Instrument Con ig > An-
tenna.
Issues
(A) Re erence antenna connected as a rover
If a Bluetooth connection is active on a device then that device will not be visible
when searching for a Bluetooth device Therefore if your ZGP800A is connected
as a rover you will not be able to search it as a reference antenna Turn on the
rover antenna and within “Antenna Configuration” for the rover establish the
connection to the correct antenna

5/5
It is advisable to distinguish each GPS antenna from each other, by writing the
serial number in a visibly on the casing.
If you are carrying out a lot of RTK surveys then make one antenna the refer-
ence antenna and the other the rover antenna Therefore your rover Bluetooth
connection is always configured to the correct antenna – save time configuring
A ZGP800A set as a reference once turned on will use the previous configured
information and send out corrections – this allows the user to set up the refer-
ence on the same mark without going through the “Setup Reference” program
Breaking Bluetooth connections
If you find you can not solve any Bluetooth problems and you want to break all
Bluetooth connection you can do this in the Windows “Bluetooth Manager”
Minimise the ZGP800 software Main Menu –Shi t- MIN and then open the
“Bluetooth Manager” from the “Control Panel” Select each of the “Trusted”
Bluetooth connections and move them to the “Untrusted” folder Then press
“ok”
All Bluetooth connections will now have to be setup again This includes Blue-
tooth authentication
GeoMax Product Management Team
GEOMAX AG
This manual suits for next models
2
Table of contents
Other Hexagon GPS manuals


