Heybike mars User manual


Home Page
Warning Message
Package Contents
Product Overview
Assembly
Start-up Procedure
Charge Your E-Bike
FAQS
Limited Warranty
Contact Us
This user manual will help you assemble
and operate your new electric bike. Be
this manual before riding.
NOTE TO ALL RIDERS UNDER 18 YEARS
OF AGE: It's very important that you get
parental permission before riding your
electric bike.
01
02
03
04
05
06
12
13
14
15
17
20
27
28
29
30
33
1

Warning Message
(We don't have a backup key
Avoid water -
Avoid prolonged exposure to sun or rain and avoid storage in places with high temperatures
Abuse -
Whenever you ride
Do not modify
Do not exceed
Avoid touching
Keep hands and all body parts away
Before riding -
Before riding -
Before riding -
Before riding -
Never exceed
The electric bike should never
Maximum Speed -
To conserve electricity,
17.
16.
15.
14.
13.
12.
11.
10.
9.
5.
4.
3.
2.
1.
6.
7.
8.

contact Heybike customer service for support: support@heybike.com
carefully set out all contents.Package Contents Product Overview
1×Electric Bike
Grip
LCD Display
LCD Display
Stem
Front Light
Suspension Front
Disc Brake
Tire
Pedals
Wheel Chain
Crankset
Seat Post
Saddle
Motor
Derailleur
Display Controls
1×Charger 2×Pedals
1×User Manual
2×Wrenches
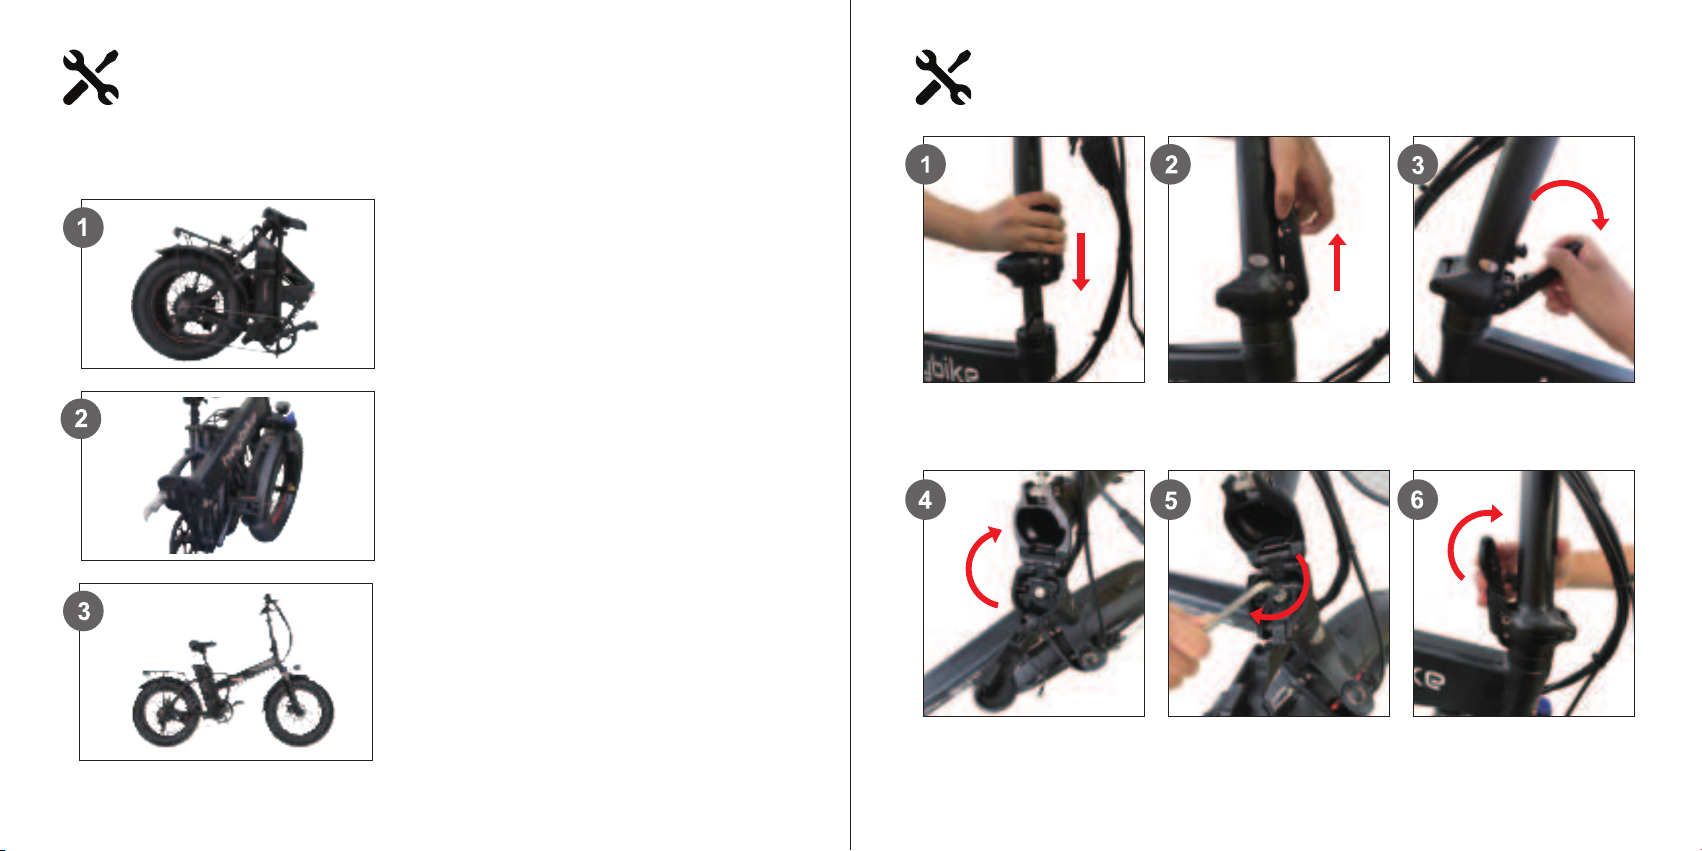
that it's parallel with the bike's frame then turn the
Assembly Assembly
6 7
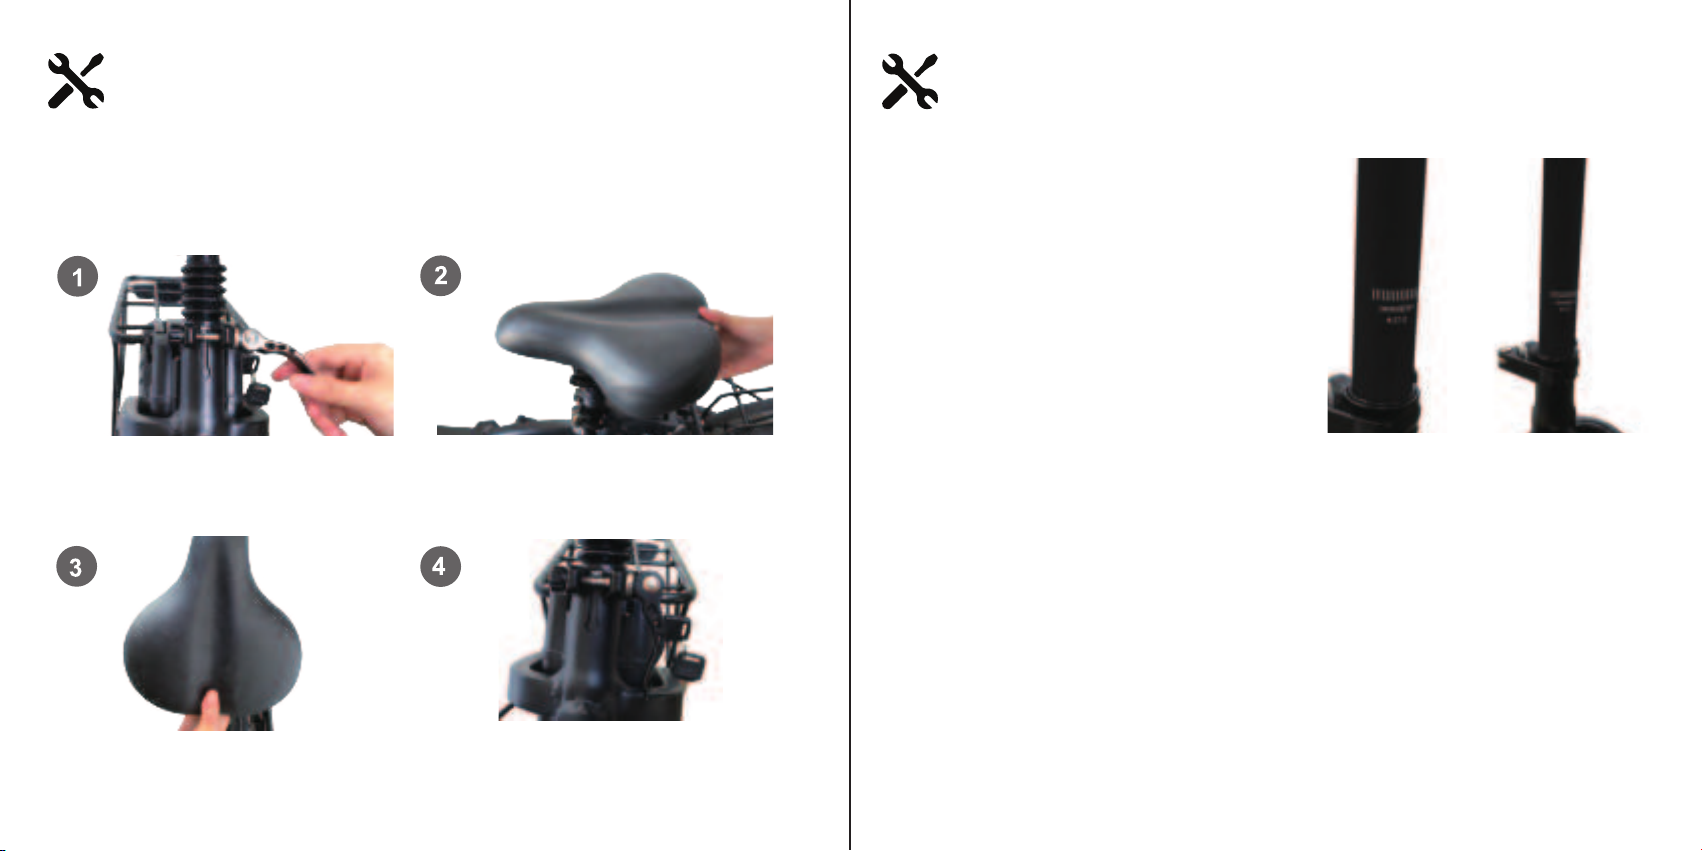
Assembly
Move the seat up and down by sliding the seatpost
Adujst the seat and the head of the seat is
8 9
(1)
(2)
Assembly
raise the seatpost beyond the minimum
projects from the frame beyond these
are inside the seat tube of the frame.×
10 11
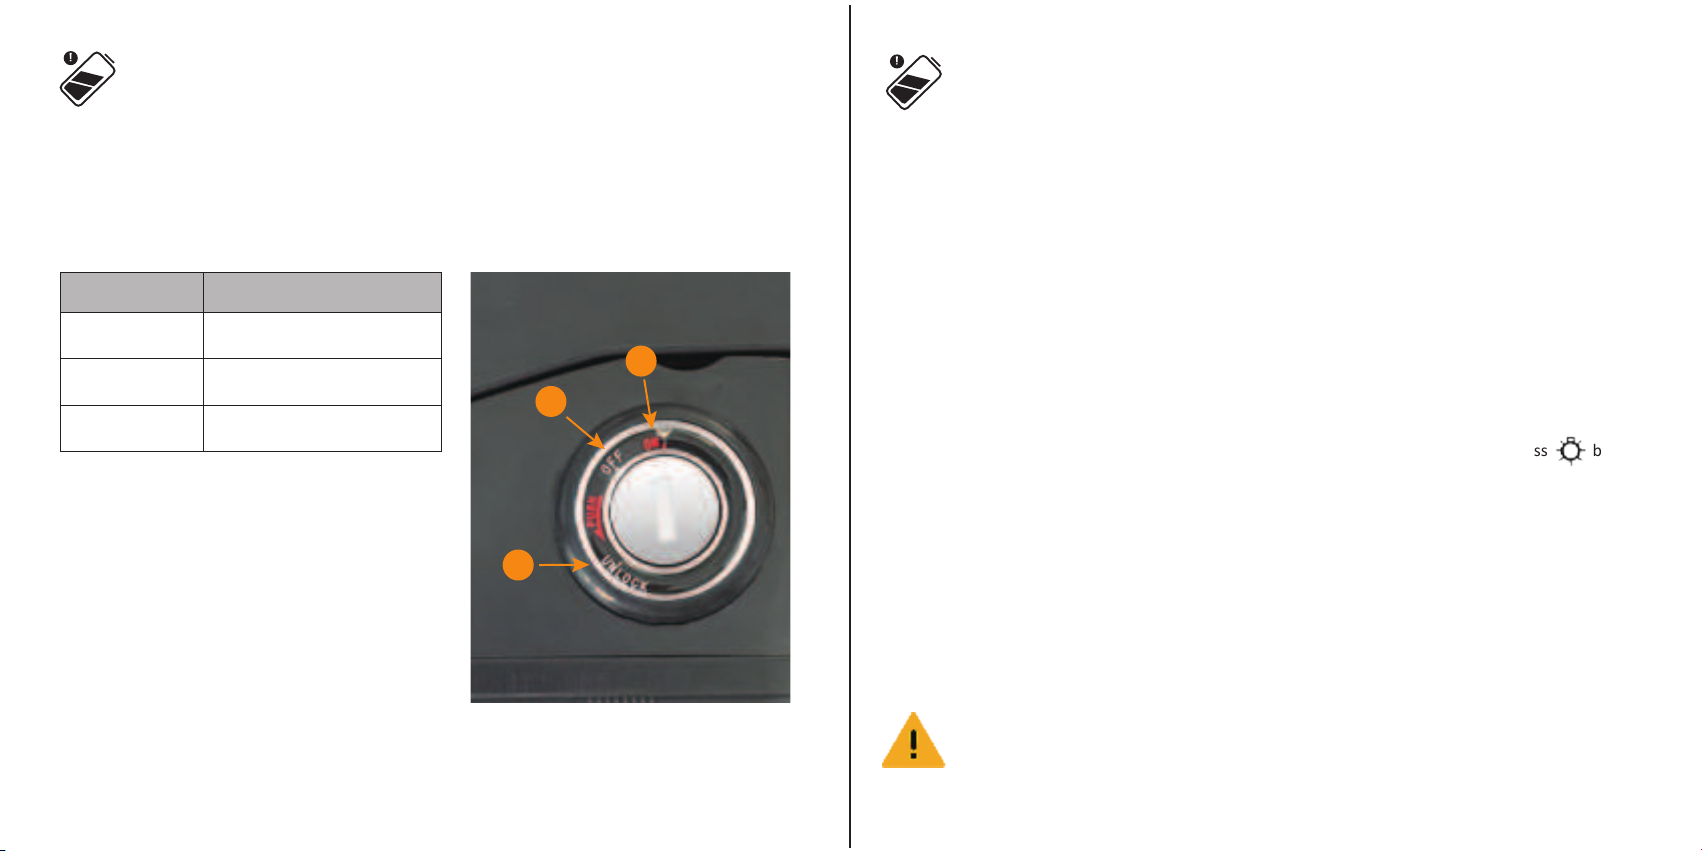
The suspension fork can move up and down up to 80mm to
cushion bumps in the riding sur which can make riding
on a rough road or trail smoother and more comfortab
Depending on a rider’s preferencethe suspension fork can
be locked out as a rigid forkwhich will typically yield higher
ncy while pedalin
The lockout lever (1) located on top of the right side of
the suspension focan be turned counterclockwise un
it stops to completely lock out the suspension fork’s travel
To unlock the lockout leverturn the knob clockwise un
stopn the lockout lever is unlockedresistance can
be adjusted by turnin
The preload adjustment knob (2)located on the top of the leside of the suspension
forTo soen the ridesubtract resistance by turning the preload adjustment knob
counterclockwis in the direcon of the small “-” on the knobTo make the suspension
s when going over bumpd resistance by turning the preload adjustment knob
clockwis in the direcon of the small “+” on the knob
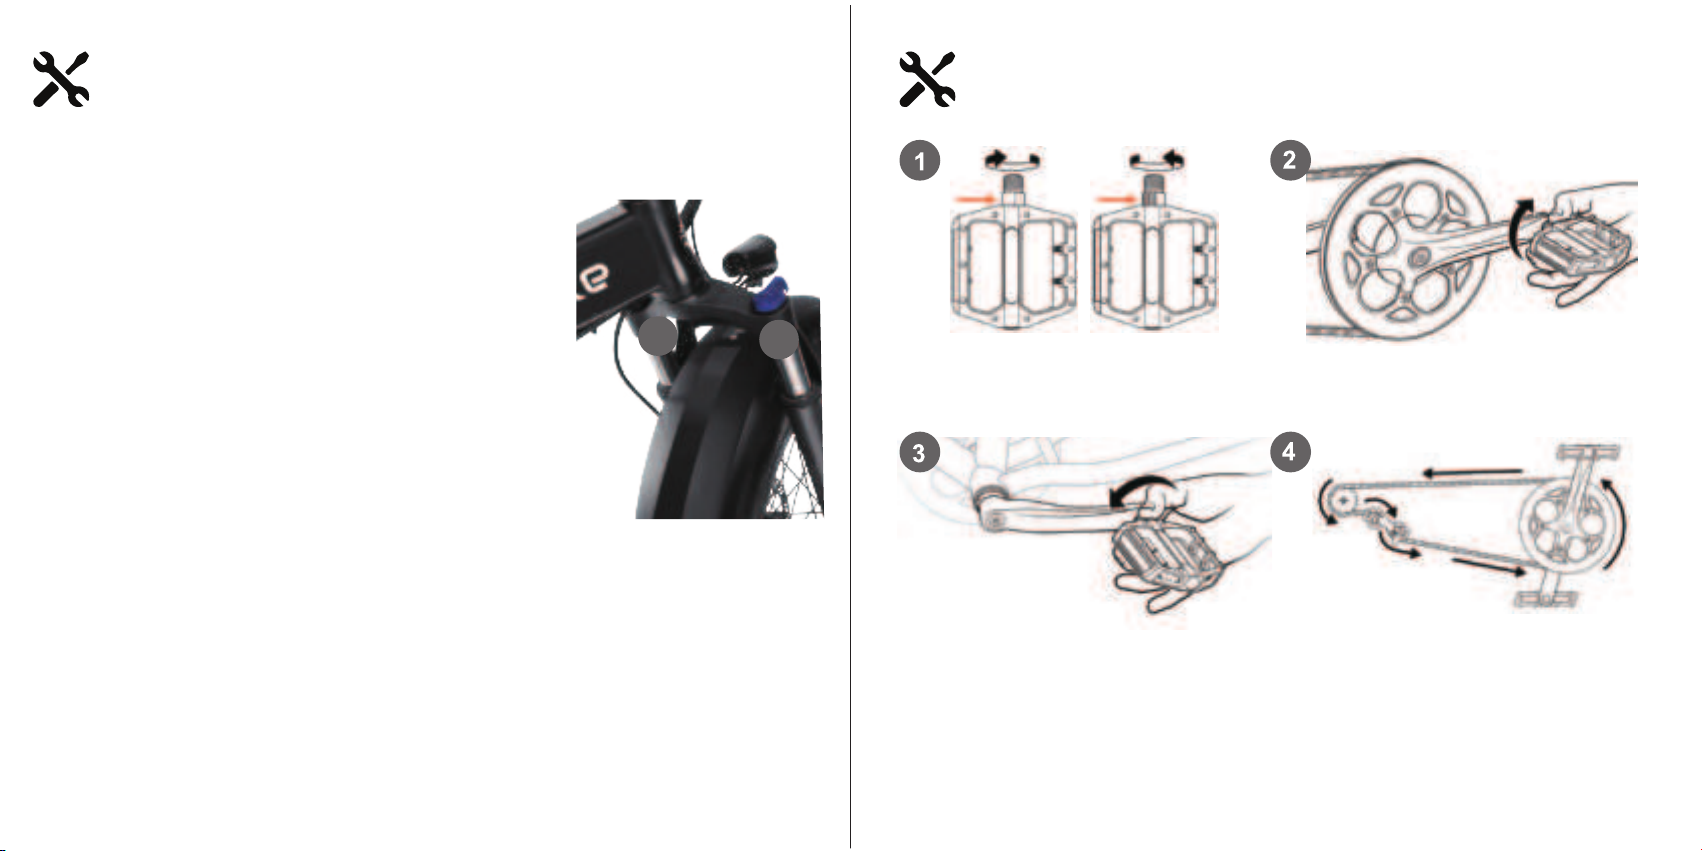
Assembly
21
Assembly
crank toward the back of the bike as though pedaling
Note: If the pedal/ chain doesn't run smoothly or something seems misaligned, please contact Heybike Support.
1312
B Key P
1
2
3
1
2
3
Start-up procedure
turn on the bike and select a pedal assist level following the steps below:

14
3.
4.
2.
1.
15
Charging
Port
Charge Your E-Bike

Remove the rubber cover on the charging port on the opposite side
will be indicated by the LED charge status lights on the charger
16
Charge Your E-Bike
17
TRIP:
.ODO:
MAXS:
AVG:
POWER ASSISTED MODE:
Speed
Walking Mode
Pedal Assisted Level
Speed Unit
Range/Power Unit
TRIP
ODO
TIME
MAX
AVG
18
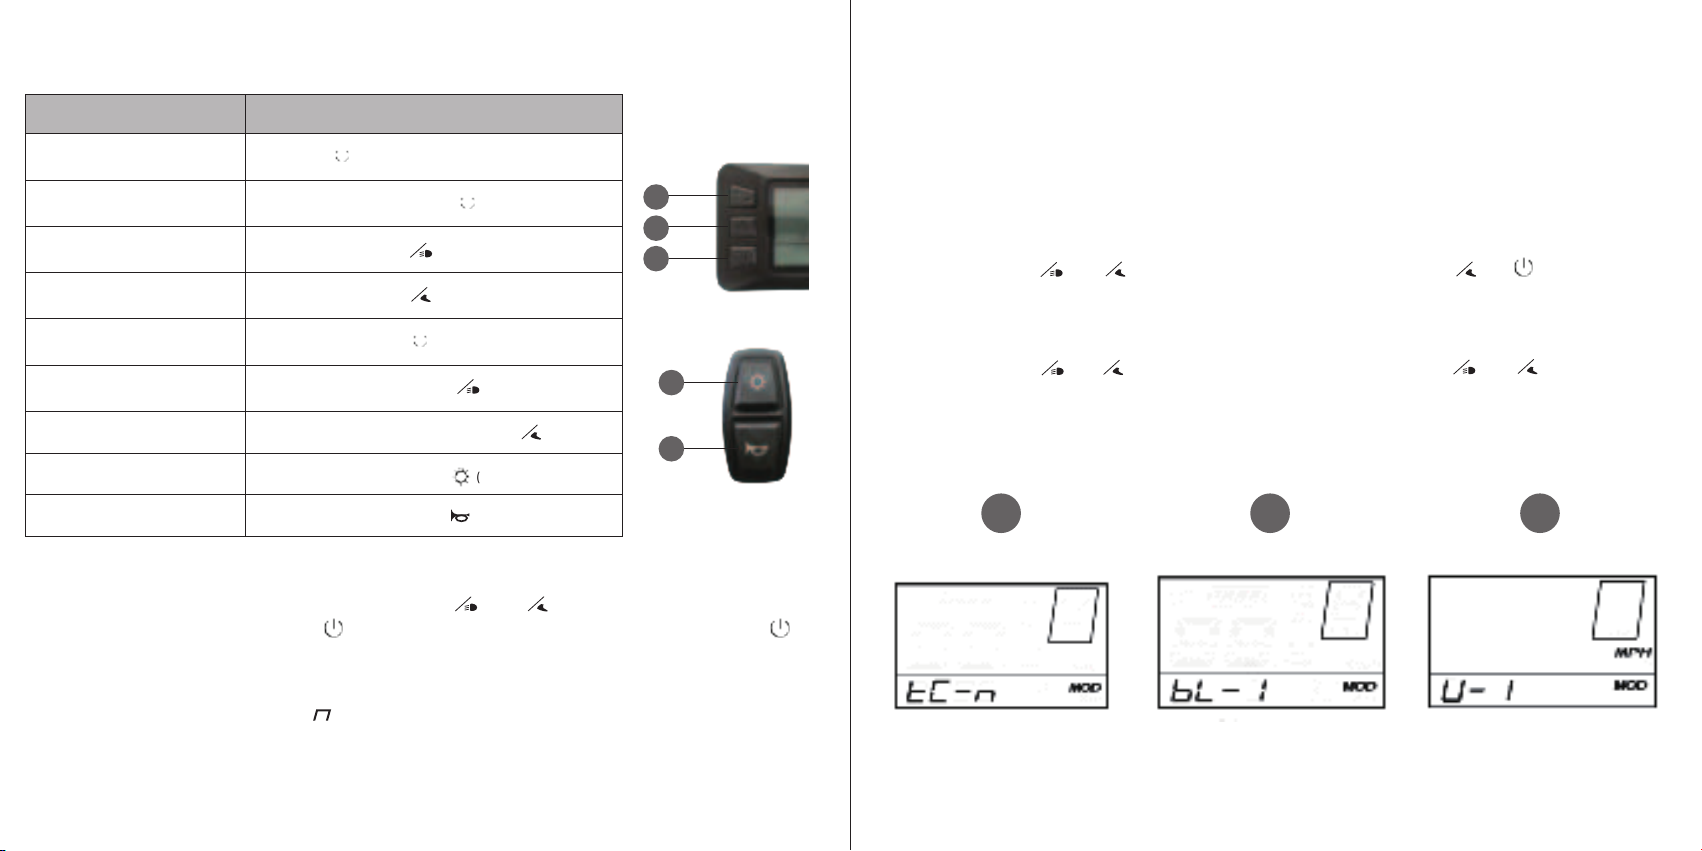
LCD Display Controls
Turn on bike
Decrease pedal assist (PAS) level
Press and hold ()
Press
Turn on backlight
Turn on walking mode
Turn on headlight
Press once
Press and hold (2)
(2)
(5)
Y
Press once (4)
++___Press and hold (1)
+19
to enter Wheel
1 2 3
+_+_+__45123

20
1 Do not change
2 The default mode is 0-3
3 Do not change
Number
Set up the item The screen appears
+_+_+_21
4Power assist sensor setup
,
5 Do not change
6
7
8
Start-on password
Do not change
Not unavailable
(do not change)

Regular inspecon and maintenance are key to ensure bikes from heybike funon as intended
and to reduce wear and tear on their systemRecommended service intervals are meant to be
used as guidelinReal world wear and td the need for servicewill vary with condons
of usWe generally recommend inspeconervic and necessary replacements be performed
at the me or mileage interval that come in the following table
100-200 mi
(160-321
km)
250-750 mi
(402-1207
km)
- Check drivetrain for proper alignment and
- Clean frame by wiping frame
- Use barrel adjuster(s) to tension
- Replace any components
reputable bike mechanic to be
damaged beyond repair or
- Replace brake pads if
- True and tension wheels if any
Every 6
750-1250mi
(1207-2011km)
reputable bike mechanic is
- Replace cables and housings
Recommended Service Intervals
Interval
Inspect Service Replace
23
Daily Care and Maintenance
Cleaning and Storage
Battery Maintenance
Storage and Disposal
22

Pre-Ride Safety Checklist
Pedals
Mechanical
Cables
Safety Check
24 25
Seat
Assembly and
Your cables, spokes, and chain will stretch after an initial break-in period of 50-100 mi (80-160 km), and bolted connections can loosen. Always have a certified, reputable bike mechanic perform a tune-up on your bike after your initial break-in period of 50-100 mi (80-160 km) (depending on riding conditions such as total weight, riding characteristics, and terrain). Regular inspections and tune-ups are particularly important for ensuring that your bike remains safe and fun to ride.
Safety Check

26
Tire Inflation and Replacement
Email:
heybike recommends 20 PSI
the rim. Failure to remove all air pressure from the inner tube could result in serious injury.
1
2
The bike does not
work
speed
The motor does not
respond when the
bike is powered on
Reduced range
charge
Wheel or motor
makes strange noises
support if range decline persists
excessive load
3
4
5
6
Symptoms Possible Causes
27
Model
Product Dimensions
Package Dimensions
Max Load
Package Weight
E Bike Weight
Max Speed
Pedal-Assist Mode
Pure Electric Mode
Max Angle of Climb
Charging Time
Tire Pressure
Charging Port
Frame Material
Mars
176×61×133 (cm)
98×45×76 (cm)
330 lbs (150kg)
66 lbs (30kg)
38-48 miles (60-77km)
30-37 miles (48-60km)
14 degrees
6-7 hours
Output Voltage 5V1A
Aluminium alloy
lp×4
ITEM SPECIFICATIONS
28 29
FAQS
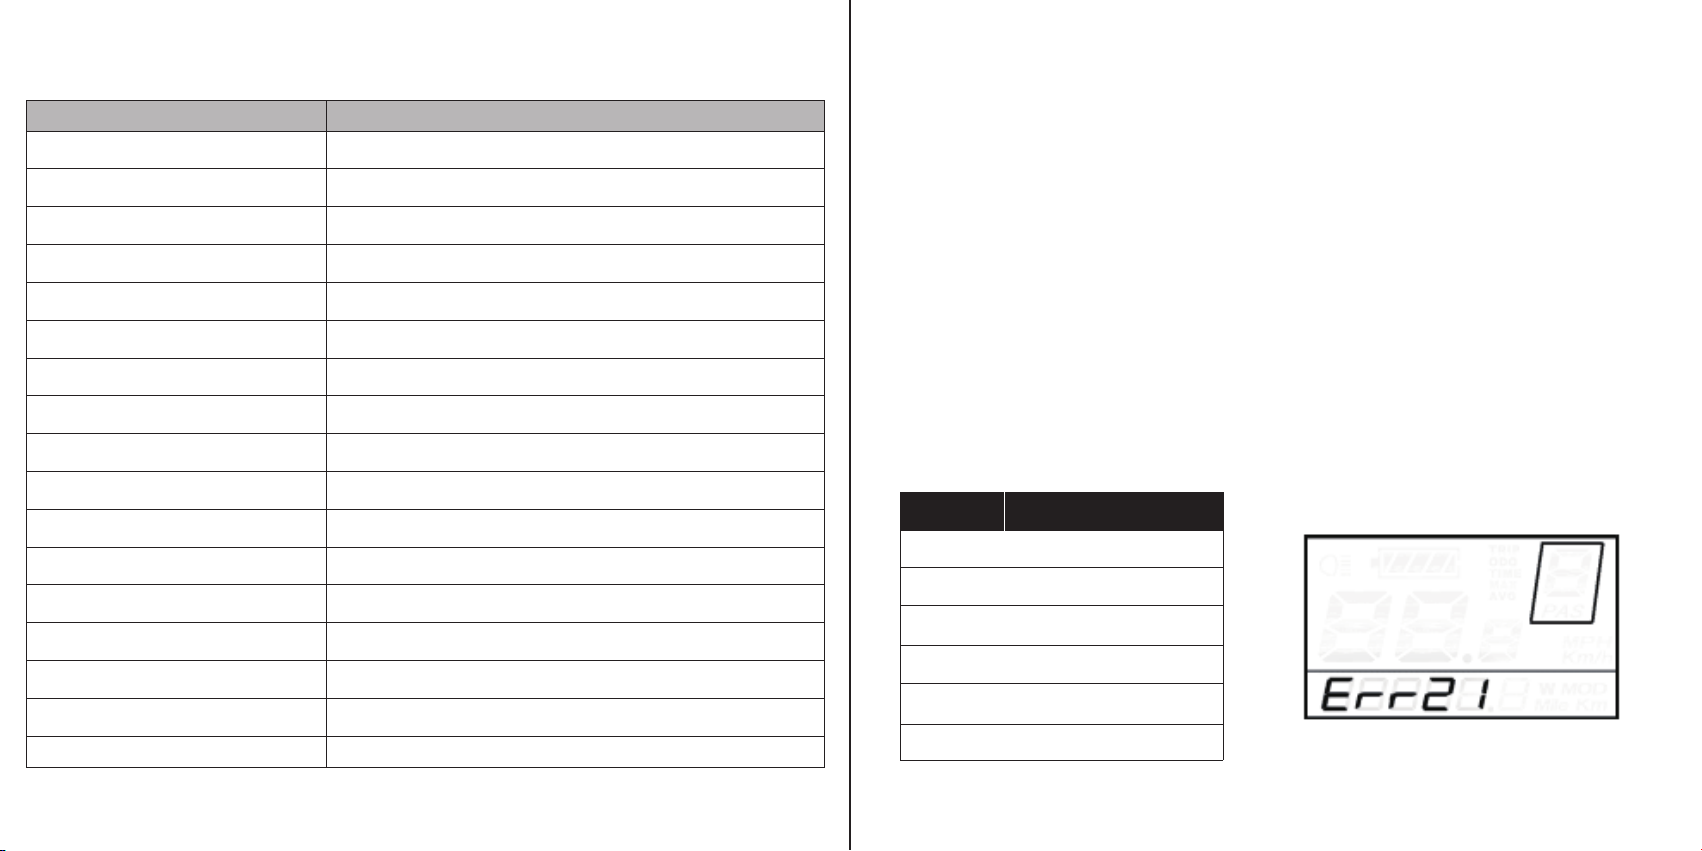
Error Code
Error Code
Q1:What if the e-bike arrived missing accessory or broken part?
A1: Please take a photo and send to Heybike Support Team by sending email:
Q2
A2
Q3
A3
Current issue
Power motor issue
Power motor signal issue
Braking handle issue
21
22
23
24
25
30

30
Received products that have damage determined to have been caused by the end-user
Limited Warranty
30DAYS SATISFACTION GUARANTEED RETURN POLICY
Team at
31
ebike and shall end immediately upon the earlier of the end of the Warranty Period or any
Heybike warrants the original purchaser that your Heybike product shall be free from
LIMITED PRODUCT WARRANTY
TO QUALIFY FORARE FUND, ALL THE FOLLOWING CONDITIONS MUST BE MET:

Limited Warranty Does Not Cover:
32
Contact Us
HEYBIKE LTD
maintenance and safety, or errors/faults with your HEYBIKE.
100N HOWARD ST STER, SPOKANE, WA, UNITED STATES
support@heybike.comsupport@heybike.com
33


Table of contents
Other Heybike Scooter manuals


