Wisper 905SE Sport User manual

Page|1
Wisper905SESportInstallationManual
1. Prepareaclearspacetoinstallyourbike.
2. Unpackyourbikeandcomponentsfromthe
Wispershippingboxandleanthesemi‐
assembledbikeupside‐downagainstawall
(orchair)soitwon’ttip.
3. YourWispershippingboxwillcontain:main
bikeframeassembly,seatandseatpost,two
smallcardboardboxes.Thesmallestbox
contains:pedals,cyclecomputer,rearlight,
frontreflector,2Xkeys,biketoolkit.The
otherboxcontainsyourbatterycharger.
4. Useapairofnippersorscissorsandcarefullysniptheplastictiesholdingthefrontwheelto
theframe.Placethewheelnearby.
5. Carefullyliftandturnthebikerightwayupandagainleanitagainstitssupport.Snipthe
threeplastictiesholdingthehandlebarstotheframeandlowerthehandlebarstothe
ground.Carefullyremoveallprotectivefoamandpaddingfromthebike(scissorsareuseful
here,butbeextremelycarefulnottoscratchtheframe,ordamageanycables).
6. Usethekeyssuppliedandunlockthebatterylock.Make
surethebatterypoweroutputcableisunpluggedfrom
thebattery,thenopenoutthebatteryhandleandpullthe
batteryuptoslideitfreefromthebike.
Important:Fullychargethebatterybeforeusing
thebike.RefertotheUserGuideforinstructions.
Important:Yourfirstthreechargecyclesneedto
bedeepcycles,asdetailedintheUserGuide.
7. Hint:Itisagoodideatobeginchargingthebatterynow,
soitisreadysooner.Tochargethenewbattery,unpack
thechargerfromthelargerofthecardboardboxes.
Removetherubberchargesocketprotectivecapfrom
thebattery(nexttothepowerterminalsocket)and,
withtheI/Oswitchonthechargeroff(O),plugthe
chargerleadintothechargesocketonthebattery.

Page|2
8. Nowplugthechargerintoapowerpointandturnonthepoweratthewall.Lastly,switchon
thecharger(thecharger’sI/Oswitchisnexttothe110/240vpowerinputcable).Onelight
willshowred,andtheotherwillshoworange(charging).Theorangelightwillturngreen
whenthefast‐chargecycleiscomplete.Itisbesttochargeovernightforthefirst3charge
cycles,asdetailedintheuserguide.
Note:Whencharging,alwaysthelaststepistoswitchthechargerswitchon.This
allowsthechargertoproperlysensethebatterychargelevels.
9. Slidetheseatpostintotheframeandtightenthequick‐releaselever.Iftheseatisnotfirm
withtheleverfastened,fullyfoldtheleverbackagain,thentightentheadjustmentnut
clockwiseahalfturn.Folddowntheleveragainandretry.Repeatuntiltheseatpostisheld
firm.
10. Slidetheplasticcapoffthehandlebarheadsetstem‐post,
thenslidethestem‐postintothebike.
11. Liftthequick‐adjustleverontheheadsetandalterthe
headsetangleuntilyoucanfitthesuppliedlargestallen
keyintothenutonthetopofthestem‐post.Makesure
thataboutaninchofsilverstem‐postisshowing(youcan
adjustthefinalheightlater)andthatthehandlebarsare
alignedwiththeforks,thentightenthisnutuntilthestem‐
postisheldfirm.
Note:recheckandtightenthisveryfirmly,once
thefrontwheelisinstalledlater.
12. Depressthequick‐adjustlevertolockitinplaceagain.
13. Carefullyturnthebikeupside‐downandlayitonarug,orsoftsurfacetoavoiddamage.
Leanitagainstachairorwalltoavoidittippingover.
14. Removetheplasticaxlerestfromthebaseof
thefrontforks.
15. Removethediscbrakeplasticgapspacer
frominsidethefrontdiscbrakeunit.
16. Removetheprotectiveend‐capsfromthe
axleofthefrontwheelandloosentheaxle
nutsuntiltheyareneartocomingoffthe
endsofthewheelaxle.

Page|3
17. Carefullyslotthewheelaxleintotheforks,makingsurethediscrotorslidesBETWEENthe
discpadsinthediscbrakeunit.Withdownwardpressureonthewheeltomakesureitis
firmlyintotheforks,lightlytightentheaxlenuts.Thentighteneachnutwiththespanner
supplieduntilveryfirm.
18. Spinthewheel.Ifyourdiscbrakesarerubbingbadly,theyneedfine‐tuning.Ifyouarenot
familiarwithdiscbrakemaintenance,thenforsafetypurposes,ignorethebraketuning
procedurebelow,andsimplytakeyourcompletedWisperbiketoyournearestcycleshopto
getthebrakesfine‐tuned.Itwillonlytakethemafewminutesandyoucanbesureyour
brakeswillbecorrectlytuned.
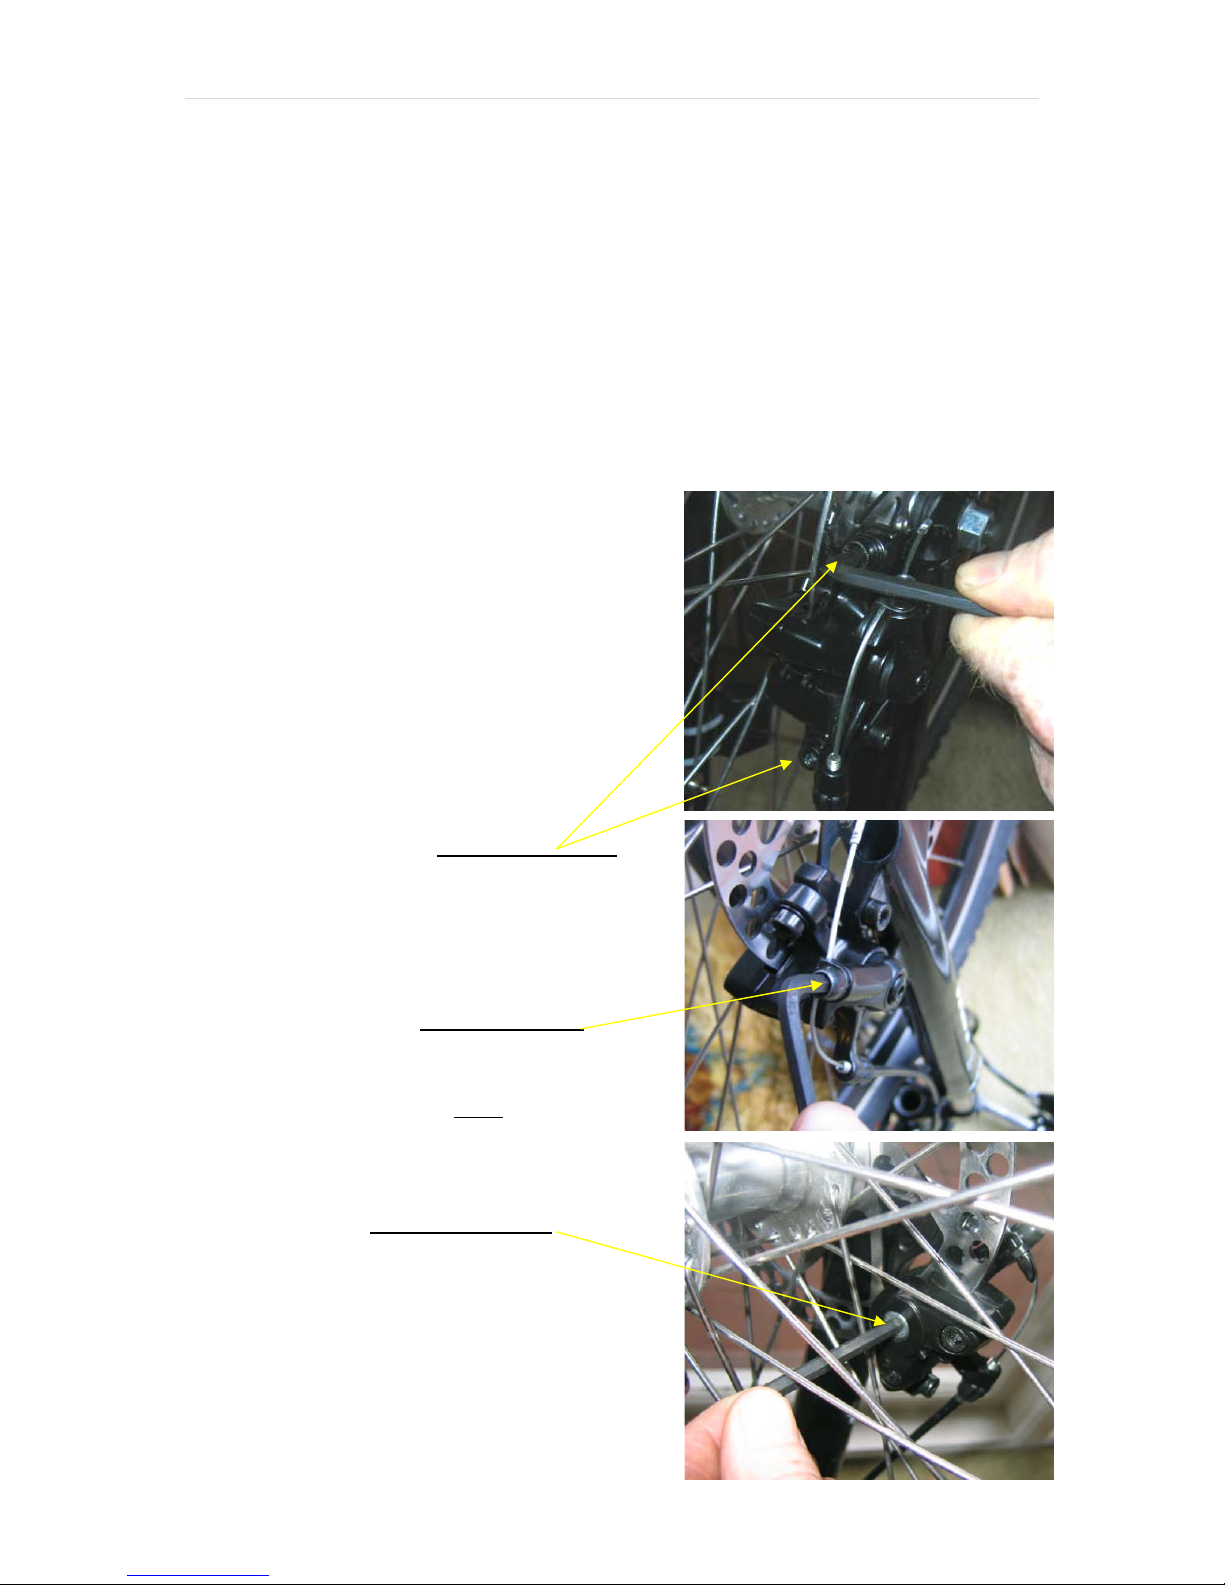
19. Fine‐tuningthediscbrake:Theaimistogetthe
padssetparalleltothediscrotorandascloseas
possiblewithoutrubbing.Thisisachievedbya
combinationofalteringtheangleandalignment
oftheunitonthefork,alteringcabletension,
andalteringthesettingoftheinsidepad.
Hint:Duringfine‐tuning,repeatedly
viewthediscrotorandpadsfromclose
tothewheel,soyoucanseethe
alignmentandspacingwell.
20. Adjustthealignmentofthebrakeunitonthe
forkbylooseningthetwoadjustmentnuts,then
shiftingthepositionofthebrakeunittogetit
parallelwiththediscrotor,andwiththeoutside
padasclosetotherotoraspossible.
Hint:Iftheoutsidepadstillrubs,
thenthebrakecableistootight.
Loosenthecablefasteningnut
toreleasethecableandallowthepads
toopen.Re‐tensionthecableand
tightenthenutfirmlyonceyouare
happywiththegaptotheoutsidepad.
21. Nowgettheinsidepadclosetothediscrotorby
adjustingtheinnerpadspacernut.
Hint:Alittlerubbingisokay,asthepads
needtowearin.
22. Ifpullingthebrakeleverfullydoesnotapply
enoughpressuretothebrakes,eitherthecable
istooloose,orthegapbetweenthepadstoo
great.Readjustusingtheappropriate
proceduresdescribedabove.

Page|4
23. Asthenewcablestretches,youcanretighteniteasilybyscrewingoutthecabletension
adjuster(thescrewcapwherethebrakecableentersthebrakeleverunit).Rememberto
loosenthelocknutringfirst.
24. Unpackthepedalsandcheckontheaxle‐endstosee
whichisleft(L)andwhichisright(R).
25. Placethebikeuprightandlowerthestand.
26. Threadthepedalsintothecorrespondingcrankand
tightenfirmlyusingthesupplied15mmwrench.
Hint:Becarefultonotewhichcrankisactually
therightandwhichistheleftwhenthebikeis
facingforwards.
27. Installthecyclecomputerinitsmountonthe
handlebar.
Hint:Ifthemountingunitistooclose
tothegearchangeryoucanslideitby
looseningtheadjustmentscrew
insideit,sliding,thenretightening.
28. Lineupthespokemagnetandthesensorattachedtothefork
andtwistthesensorontheforkuntilitisparallelwiththe
magnetandasclosetoitwithouthittingwhenthewheel
turns.
29. Liftthefrontwheelandgiveitaspintocheckifthecurrent
speedshows.
Hint:Readthecyclecomputermanualfordetailsof
thecomputer’smanyfunctions.
30. Installthefrontmudguardandreflectorbyremovingthenut
fromthebridgeoftheforks,thenreinsertingitthoughthe
mountingholeofmudguardandreflector,thenre‐screwingin
thenuttilltight.
31. Installtherearnightlightreflector,ifitisnotalreadyinstalled.

Page|5
32. Nowyourinstallationiscomplete.DonotrideyoureBikeuntilyouhavereadtheUserGuide
forfullinstructionsoncorrecteBikeuse.
33. Wisper Bikes ltd, and or any of its distributors, do not accept any legal liability for accident or
injury caused by improper installation of any of the components utilised on this electric
bicycle. If you are not fully competent with bicycle maintenance and tuning procedures, you
must have your bike checked over by a qualified bicycle technician before riding it.
This disclaimer does not affect your statutory rights.
Table of contents
Other Wisper Scooter manuals