hField Technologies HFWFG200 User manual

1
www.held.com
Long-range WiFi adapter
Installation Guide
Windows
Mac
Linux
Start Here
DRAFT

(877) 743.4353 (8.777.hField)
1
www.h eld.co m
Table Of Contents
What you need to get started 1
Windows XP/Vista 2-5
Max OS X 10.4 or 10.5 6-8
Linux Kernel 2.6.24+ 9-12
Using The Wi-Fire 13
How do I nd the best Wi-Fi Network? 14
FCC/IC Information 15
Warranty Information 16-17
Long-range WiFi adapter
• A computer with the following:
– USB 2.0 Port
– Windows, Mac, or Linux Operating System
– Access to public or private wireless networks
• Wi-Fire (included)
• USB 2.0 cable (included)
• Software installation disc (included)
– Or you can download the software installer here:
http://www.held.com/customer-service/
• Wireless network login information
- (WEP or WPA/2 passwords or passkeys) if you
plan to connect to a secure network.
What You Need to Get Started
DRAFT

2
(877) 743.4353 (8.777.hField)
Windows XP/Vista
3
www.h eld.co m
Windows XP/Vista
1. Installing the Wi-Fire Software
V ERY IMPORTANT: Install the software BEFORE plugging
your Wi-Fire into a USB Port.
1. Insert the Wi-Fire CD into your computer
2. The Wi-Fire Installer should open automatically.
a. If it does not automatically load, open your CD folder,
then double click on “autorun”
b. When the blue Wi-Fire Installation window opens,
click Install Wi-Fire.
c. The Installation Wizard will now run, proceed through
its instructions until it nishes the installation process.
This may take a few minutes.
3. Restart your computer if prompted.
Windows XP/Vista 2. Installing the Wi-Fire Drivers
1. Plug the Wi-Fire into your computer’s USB Port
2. Windows will automatically begin installing the correct drivers.
3. A balloon will appear in your System Tray telling you if the
drivers were installed successfully.
The Wi-Fire is now ready to use! Continue for usage tips.
DRAFT
4
(877) 743.4353 (8.777.hField)
Windows XP/Vista
5
www.h eld.co m
Windows XP/Vista
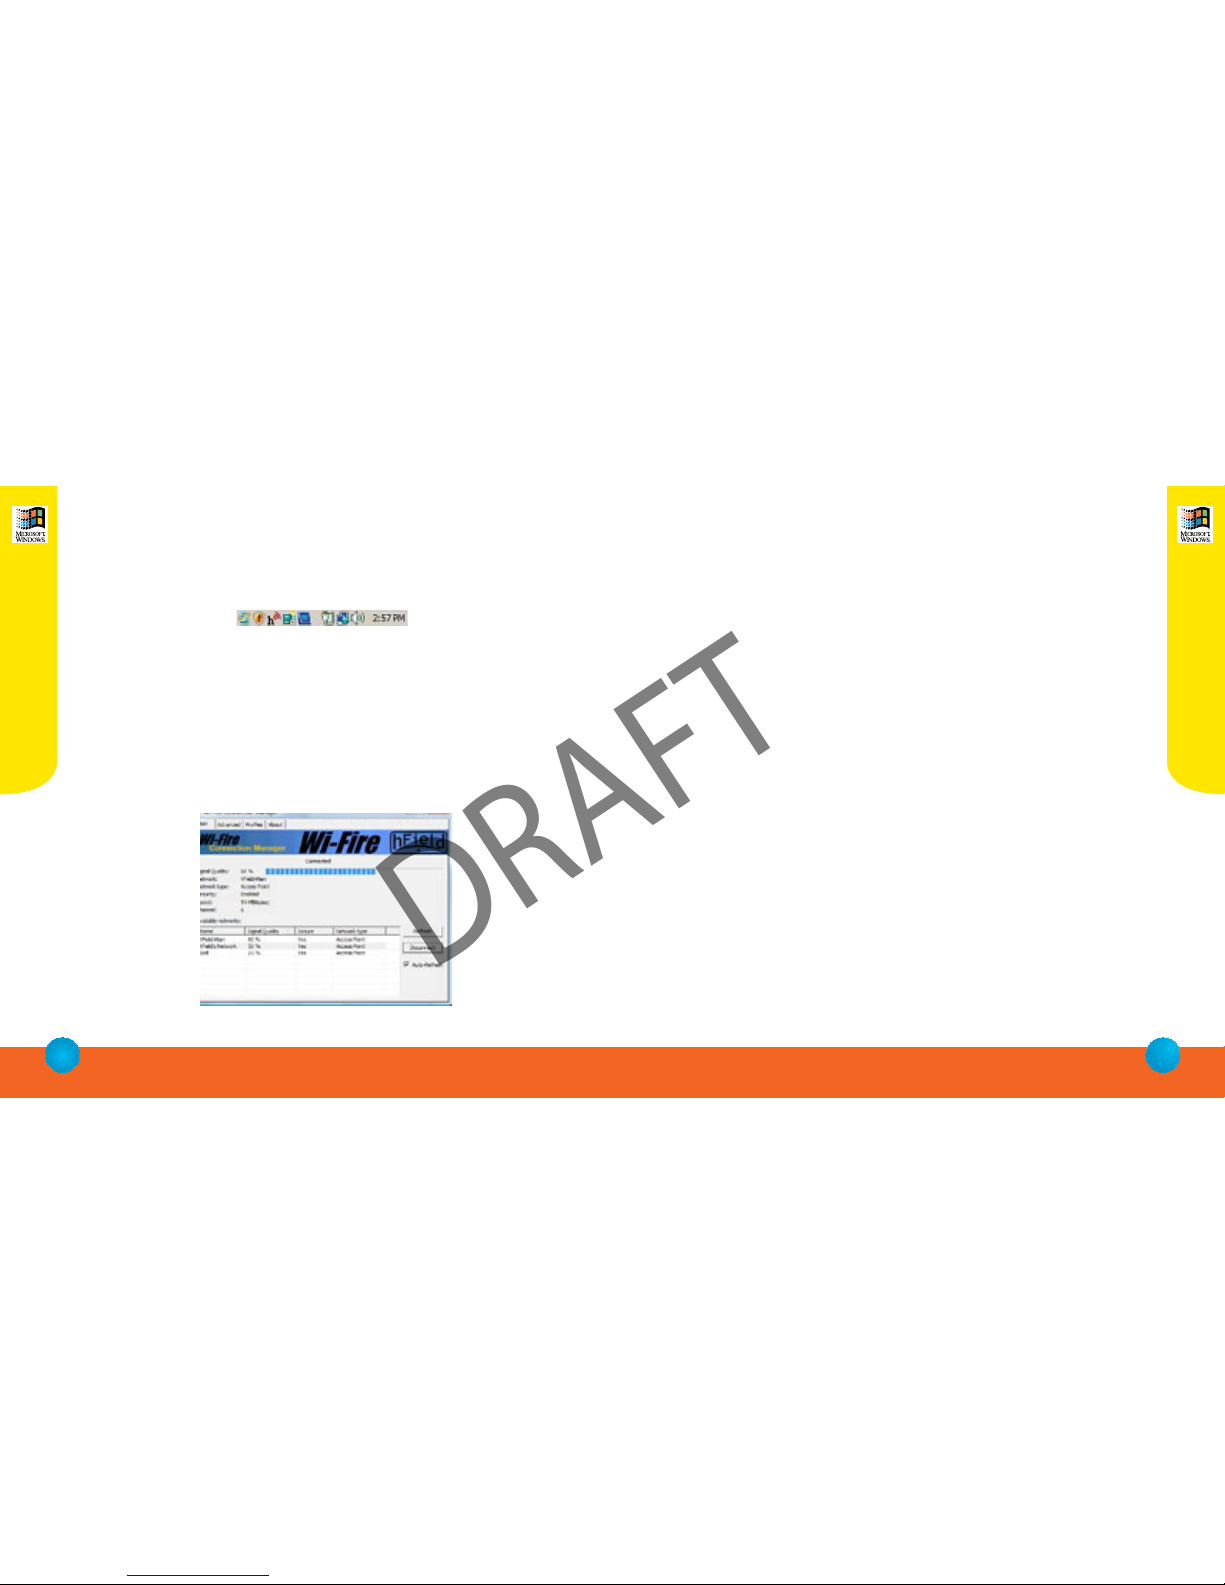
3. Conguring Wi-Fire Connections
1. Open the Wi-Fire Connection Manager by double clicking on
the icon in your System Tray (it is a lowercase “h”)
(If the Wi- Fire Connection Manager is not already in your
System Tray, open it by clicking on Start Menu -> All Programs
-> Wi-Fire Connection Manager)
2. In the Main Tab, you’ll see a list of available networks.
3. Double Click on the wireless network you’d like to connect to.
4. Connecting to a Secure Network
If you wish to connect to a secure network, you must enter the
appropriate login information when prompted by the Wi-Fire Connection
Manager. Contact the wireless network administrator if you do not know
this information.
(To Connect to a WPA-Enterprise (802.1x) network, you’ll need to connect
through the Windows interface. To do this, double click on the WiFi icon
in the system tray, then enter your WPA Enterprise settings and security
information when prompted. Additional information can be found at
www.held.com/8021x.htm )
DRAFT

6
(877) 743.4353 (8.777.hField)
Mac OS X
7
www.h eld.co m
Mac OS X
1. Installing the Wi-Fire Software
V ERY IMPORTANT: Install the software BEFORE plugging your
Wi-Fire into a USB Port.
1. Quit all other applications. The installation process requires
a restart of your computer before you can use the Wi-Fire.
2. Insert the Wi-Fire CD into your Mac.
3. Double-click on Wi-Fire For Mac.dmg
a. Next, open the folder that corresponds to your version
of OS X (10.4 or 10.5)
b. Double-click the .PKG installer le in that folder.
This will begin the install process.
c. Follow the installations that appear on screen.
4. Restart your computer when prompted.
2. Detecting the Wi-Fire
1. After the Wi-Fire is installed, it is time for your Mac to detect the
Wi-Fire as a new hardware device. Plug the Wi-Fire into any
available USB 2.0 port.
Mac OS X 10.4 or 10.5 2. Your Mac will automatically detect the Wi-Fire and prompt you to
open Network Settings to approve. Click “OK”, then Click “Apply Now”
3. If your Mac does not automatically detect the Wi-Fire, open the
Network Preference panel found in your System Preferences panel
under the Apple icon.
4. To add the Wi-Fire manually, click the “+” icon in the Network
Preferences panel. In the next dialogue box, select
“Ethernet Adapter (en2)” and click create.
5. The Wi-Fire will appear as “Ethernet Adapter” in your Network
preference panel. The indicator light to the left will be red and
the text will suggest that the network port is not plugged in. This
is normal and will go away as soon as the Wi-Fire is connected.
Close the Network preferences panel.
DRAFT

8
(877) 743.4353 (8.777.hField)
Mac OS X
9
www.h eld.co m
Linux
3. Conguring Wi-Fire Connections
1. The Wi-Fire Connection Manager will open in your dock.
While the Wi-Fire Connection Manager is the active application,
click Setup -> Open Setup Window or type Command + S to
open the conguration window.
2. From the Available Networks list, double click on the wire
less network you’d like to connect to.
3. Wi-Fire Connection Manager needs to be running to get
connected to a network. However, if you’d prefer it not load
automatically when you start your computer, open
System Preferences -> Account -> Login Items, and remove
Wi-Fire Connection Manager from the list.
4. Connecting to a Secure Network
If you wish to connect to a secure network, you must enter the
appropriate login information. You will need to know in advance
whether your network is using WEP or WPA/2 encryption. Contact
the network administrator if you do not know this information.
1. Installing the Wi-Fire Driver Modules
The Wi-Fire will work plug-and-play right out of the box on the
most widely used distributions of Linux.
In Linux the Wi-Fire uses the Open Source zd1211rw module. This
module is included in most general Linux distributions, including
Suse, Fedora, and Ubuntu. This driver is included in all kernels since
2.6.24, which was released in January 2008. If your kernel is a
previous version, we strongly recommend upgrading to a more
recent version.
To verify if your distribution of Linux contains this module, make
sure that you have /net/wireless/zd1211rw.c in your drivers’ directory.
If you do not have this module already, it can be downloaded from
www.linuxwireless.org.
Linux Kernel 2.6.24+
DRAFT

10
(877) 743.4353 (8.777.hField)
Linux
11
www.h eld.co m
Linux
2. Detecting the Wi-Fire
1. Plug the Wi-Fire into an available USB 2.0 port on your computer.
2. To verify the Wi-Fire is successfully recognized, open a Terminal
Console, and type “lsusb”. Included in the Console respons
should be the line:
0ace:1215 Zydas WLA-54L WiFi
3. To verify the zd1211rw module is successfully loaded, open a
Terminal Console, and type “lsmod”. Included in the Console
response should be the line:
ZD1211RW 44741 0
The numbers after “ZD1211RW” may be dierent for your system.
This dierence does not indicate a problem with the installation.
4. The Wi-Fire is now properly setup. If you experienced any
diculty with the preceding steps, please reference our Linux
Guide at http://www.held.com/PDF/Linux.pdf
Please note: Although we have made every eort to provide you with accurate
and informative Linux installation and usage instructions for the Wi-Fire, please
understand that due to the inherently complex nature of Linux environments, from
dierences in distributions, setups, and kernel versions, we will be unable to provide
technical support for the Wi-Fire on Linux machines. Most often, the best support is
found in the Linux community in Wiki’s and Forums, including the links shown above.
Of course, hField is eager to oer support and troubleshooting on other issues in -
cluding your WiFi environment and how to obtain the best performance out of your
Wi-Fire once it is installed.
3. Conguring the Wi-Fire Connection
1. Like any WiFi adapter, in Linux environments you may use either
your preferred Graphical User Interface, or congure the connec
tion through the Command Line interface.
a. Many of the common distributions of Linux come with a
Network Manager Graphical User Interface, such as
“knetmanager”.
b. Some users choose instead to use the built in command line
utilities from a Terminal Console. These command line utilities
include “iwcong”, “ifcong”, and “iwpriv”. The most
comon for use with the Wi-Fire is “iwcong”.
c. For example, to connect to a network called “myAP” with
the Wi-Fire (eth1 in this example), you would type “iwcong
eth1 essid myAP “. For a full listing of the commands, see
iwcong’s man page.
DRAFT

13
www.h eld.co m
12
(877) 743.4353 (8.777.hField)
Linux
4. Connecting to a Secure Network
1. If using a graphical user interface to control your WiFi connetions,
you will be prompted for a WEP or WPA password.
2. If using a command line utility, you will need to supply the
encryption key each time you connect
a. For example, to use the Wi-Fire (eth1 in this case) to
connect to AP “myAp”, with WEP and encryption key “1234567890”
type:“iwcong eth1 enc <1234567890> essid myAP” .
b. However, if using a WPA or WPA2 encrypted network, you will
need to start the WPA Supplicant process in the background before
attempting to connect.
Please reference our Linux Guide at
http://www.held.com/PDF/Linux.pdf
Using The Wi-Fire
1. You can use your Wi-Fire by bracing it on top of any at screen monitor,
like a laptop, or sitting it on a at surface like a tabletop.
2. The Wi-Fire is directional, which means you need to point it in the
direction of the strongest signal for the best reception.
3. To nd the best position, pivot and rotate the Wi-Fire while monitoring
the Signal Strength in the Wi-Fire Connection Manager software. If you are
gripping the Wi-Fire at any time while observing signal strength readings,
make sure you are only gripping the end with the USB connection.
Touching the area forward of that will distort signal readings during the
time you are touching it.
DRAFT

14
(877) 743.4353 (8.777.hField)
15
www .com
14
(877) 743.4353 (8.777.hField)
15
www .com
WiFi signals can be temperamental, which is why you need a powerful WiFi adapter
like the Wi-Fire to get the best possible signal. But you can help ensure you always
have the strongest connection possible even with the Wi-Fire.
One of the easiest ways is by always using the Wi-Fire Connection Manager
(WCM) software. WCM will report a signal strength between 0 and 100% - much more
precise than the 0-5 bars you normally see. We give you a wide range to help you
distinguish between stronger and weaker networks.
Remember that this range does not compare well to the bars you see in other
software. Those bars are typically overweighted toward the high end of the scale, so
when the WCM says 60%, you might still see 5 bars with another software.
Also remember that once you’re connected, the best measure of your WiFi
connection is to use your computer as you normally would. Browse the Web, check
e-mail, stream video, and see if the connection is reliable and adequate for your needs.
How do I get the most from my Wi-Fire? FCC:
This equipment has been tested and found to comply with the limits for a Class B digital
device, pursuant to Part 15 of FCC Rules. These limits are designed to provide reasonable
protection against harmful interference in a residential installation.
Operation is subject to the following two conditions:
1) This device may not cause harmful interface, and
2) This device must accept any interface received, including interface
that may cause undesired operation.
ations Not Expressly Approved By The Party Responsible For
Compliance Could Void The User’s Authority To Operate The Equipment.
IC(Industry Canada):
The term I.C. before the C ation/Registra at the Industry
Canada t ations were met.
Operation is subject to the following two conditions: “(1) this device may not cause
interference, and (2) this device must accept any interference, including interference
that may cause undesired operation of the device.
The IC and FCC language is obviously very repetitive. We should do som ethingto distin -
guish them but we’re trying to meet the mandatory requirement and not consume more
space than needed.
DRAFT
DRAFT
Interference Statement:
This equipment has been tested and found to comply with the limits for a Class B digital
device, pursuant to Part 15 of FCC Rules. These limits are designed to provide reasonable
protection against harmful interference in a residential installation.
Operation is subject to the following two conditions:
1) This device may not cause harmful interface, and
2) This device must accept any interface received, including interface that may cause
undesired operation.
This equipment generates, uses, and can radiate radio frequency energy and, if not installed
and used in accordance with the instructions, may cause harmful interference to radio
communications. However, there is no guarantee that interference will not occur in a
particular installation. The manufacturer is not responsible for any radio or TV interference caused
by unauthorized modication of this equipment.
If this equipment does cause harmful interference to radio or
on, the user is encouraged to try to correct the interference by one or more of the following measures:
1. Reorient or relocate the receiving antenna.
2. Increase the separation between the equipment and receiver.
the receiver is connected.
not expressly approved by the manufacturer could void the user’s authority to operate the equipment.
CAUTION:
1) To comply with FCC RF exposure compliance requirements, a separation distance of at
least 20 cm must be maintained between the antenna of this device and all persons.
2) This transmitter must not be co-located or operating in conjunction with any other
antenna or transmitter.

16
(877) 743.4353 (8.777.hField)
17
www.h eld.co m
IMPORTANT – READ CAREFULLY BEFORE OPENING
This is a legal agreement between You (Purchaser or You) and hField Technologies, Inc.
(hField or Company). By opening this package and using this product(s), you indicate
your acceptance of the following terms and conditions.
LICENSE AGREEMENT FOR hFIELD INTELLECTUAL PROPERTY
1. License Grant. hField grants you a non-exclusive, non-transferable, perpetual license
to use the accompanying Intellectual Property (IP), including host drivers, host
applications, rmware, and circuitry layouts, with your computer(s) in conjunction with
Wi-Fire Product(s) produced by hField. The software may be installed on more than one
of your computers as long as it is only used with hField- produced Wi-Fire Products.
2. Condentiality. You agree and acknowledge that the IP contains valuable trade
secrets of hField. You may not disclose any hField IP relating to any third party. You
must treat the hField IP with at least the same degree of condentiality and care as you
keep your own condential information, but not less than reasonable care. All
obligations of condentiality shall survive the termination of this Agreement.
3. Intellectual Property. All IP subject to this License Grant shall remain the exclusive
property of hField. You agree not to attempt to reverse engineer, disassemble,
decompile, copy, modify, translate, reproduce, transfer or distribute the hField IP.
LIMITED WARRANTY
hField warrants that every Wi-Fire Product(s) is free from physical defects in
workmanship and materials for a period of one year from the date of purchase. All
warranty claims must be requested of hField, prior to the expiration of the warranty
period, by calling hField Customer Service and obtaining a Return Authorization Number
(RMA). Returns must refer to the RMA number and be accompanied by the original
proof of purchase. This warranty is not transferable by the Purchaser. Purchaser’s sole
remedy, and hField sole liability for a covered warranty defect, shall be for hField, at
its sole discretion, to either replace or repair the defective Product. Purchaser is solely
responsible for all shipping and handling charges on returned products under warranty.
These warranties are void if the applicable product has been disassembled, altered in any
way or damaged by accident, misuse, or abuse, including but not limited to, the use of
unauthorized third party software or repairs, power surges, excessive heat, or humidity.
hField warranty obligations shall not be enlarged or diminished by hField provision of
technical advice to Purchaser.
LICENSE AND LIMITED WARRANTY
Limitation of Liability. IN NO EVENT SHALL hFIELD BE LIABLE FOR ANY SPECIAL,
INDIRECT, INCIDENTAL, PUNITIVE OR CONSEQUENTIAL DAMAGES THAT PUCHASER
MAY SUFFER DIRECTLY OR INDIRECTLY FROM THE PURCHASE OR USE OF THE
PRODUCT OR FROM USE WITH OTHER PRODUCTS. hFIELD’s MAXIMUM LIABILITY
FOR ANY CLAIM BY PURCHASER ARISING OUT OF PURCHASER’S PURCHASE AND
USE OF THIS PRODUCT SHALL IN NO EVENT EXCEED THE PURCHASE PRICE OF
THE APPLICABLE PRODUCT.
Disclaimer of Warranties. EXCEPT FOR THE EXPRESS WARRANTIES CONTAINED
HEREIN, hFIELD DISCLAIMS ALL OTHER WARRANTIES WHETHER EXPRESS OR
IMPLIED, STATUTORY, INCLUDING WITHOUT LIMITATION, THE IMPLIED WARRANTIES
OF MERCHANTABILITY, FITNESS FOR A PARTICULAR PURPOSE, NONINFRINGEMENT
OR THEIR EQUIVALENTS UNDER THE LAWS OF ANY JURISDICTION. THE REMEDIES
SET FORTH HEREIN SHALL BE THE SOLE AND EXCLUSIVE REMEDIES OF PURCHASER
WITH RESPECT TO ANY DEFECTIVE PRODUCT.
Severability. In the event of invalidity of any provision of this Agreement, the parties
agree that such invalidity shall not aect the validity of the remaining portions of this
Agreement.
Export. You agree to not export or re-export the Products without the appropriate
United States or foreign government licenses.
Taxes. You agree to be responsible for payment of any taxes, other than HField income
taxes, resulting from this Agreement.
Patents. hField Products are protected by patents pending with the U.S. Patent Oce.
Governing Law. The laws of the State of Pennsylvania, United States of America, shall
govern this Agreement.
DRAFT

hField Technologies
116 Research Drive Bethlehem, PA 18015 USA
(877) 743-4353 (8-777-hField)
www.held.com
Wi-Fire
—Making WiFi Networks More Accessible
“Welcome to the world of
Long Range
WIreless.”
DRAFT
Popular Adapter manuals by other brands


StarTech.com
StarTech.com ECESATA22 user guide

Paradyne
Paradyne 6512 installation instructions

NETGEAR
NETGEAR WNDA3100v2 - RangeMax Dual Band Wireless-N USB 2.0... Product data

StarTech.com
StarTech.com DKT30CHD manual

Cradlepoint
Cradlepoint USB-Host to Ethernet Adapter PS6U1UHE Quick connect guide

TIPTEL
TIPTEL cyberBOX 250 installation guide