HFM Rennfix E-Scooter 1 User manual

RENNFIX E-SCOOTER 1
RENNFIX E-SCOOTER 1
Order no. 10015300
Front cover
ORIGINAL BETRIEBS-
ANLEITUNG
OPERATING INSTRUCTIONS
INSTRUCTIONS
DE SERVICE
INSTRUCTIES
ISTRUZIONI PER IL
FUNZIONAMENTO
INSTRUCCIONES DE SERVICIO
ИНСТРУКЦИЯ ПО
ЭКСПЛУАТАЦИИ
INSTRUKCJA OBSŁUGI


3
Contents
1 | What's included 4
2 | General information 4
2.1 | Reading and keeping these instructions 4
2.2 | Explanation of symbols 5
3 | Safety 6
3.1 | Intended use 6
3.1.1 | Information for parents and legal guardians: 6
3.1.2 | Legal requirements 6
3.2 | Foreseeable misuse 6
3.3 | Safety instructions 6
4 | Preparation/assembly 9
5 | Using your electric scooter for the first time 11
5.1 | Inspecting the electric scooter before first use 11
5.2 | Switching the electrical system and display on/off 11
5.3 | Charging the battery 11
6 | Before riding your electric scooter 12
6.1 | Insurance sticker 12
6.2 | Before every trip 12
6.3 | Protective clothing 12
6.4 | Setting off 13
6.5 | Warning other road users 13
7 | Transportation 13
7.1 | Folding up your electric scooter 13
7.2 | Unfolding your electric scooter 14
8 | Storage 15
9 | Cleaning and care 15
10 | Servicing 15
11 | Maintenance 16
11.1 | Adjusting the brake 16
11.2 | Tightening the steering column 17
12 | Action in case of an accident 17
13 | Technical data 17
14 | Warranty 18
14.1 | General information on warranty cover 18
14.2 | Prohibition of tuning 18
15 | Disposal 18
16 | Contact 18
17.1 | Frame 19
17.2 | Front wheel 20
17.3 | Handlebar 21
17.4 | Lower steering column and fork 22
17.5 | Upper steering column with folding mechanism 23
17.6 | Rear wheel 24
18 | Declaration of conformity 25
19 | Service history log 26
Translation of original operating instructions
4
RENNFIX E-SCOOTER 1
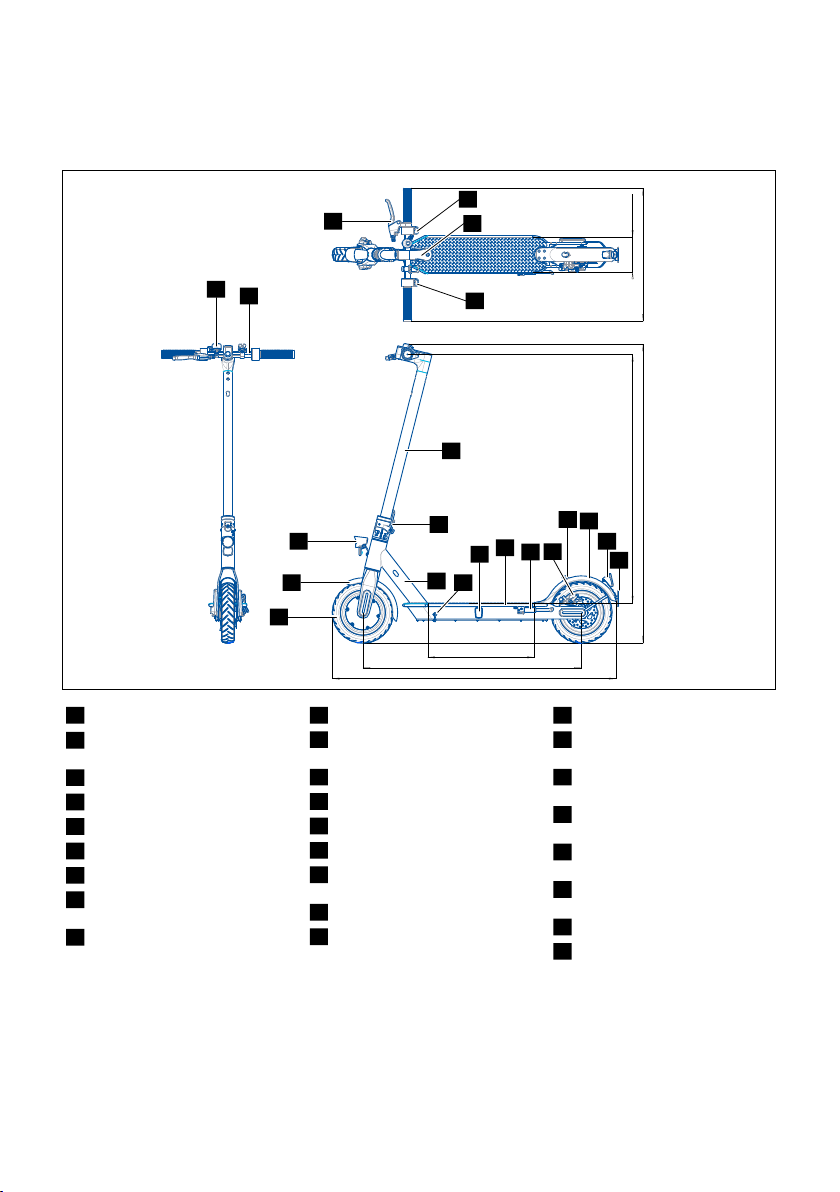
1| What's included
2| General information
2.1 | Reading and keeping these instructions
These Instructions for Use apply exclusively to the Rennx E-Scooter (for short: electric scooter).
They contain important information on use, safety, maintenance and the warranty. Read the
instructions carefully, in particular the safety instructions, before using the electric scooter. Failure to
2.2.1.1.: 402
2.2.2.1.: 131
2.2.1.: 1070
2.2.3.: 1128 2.2.2.: 502
2.2.3.1.: 938
2.2.4.: 825
Name SCOOTER_2_2
Date 26-01-20
2.2.
1Frame
2Footboard with
battery compartment
3Charging port
4Reflectors
5Side stand
6Mudguard (fender)
7Hook on rear mudguard
8Tail light with
integrated reflector
9Rear wheel with brake disc
and brake caliper
10 Licence plate holder
11 Folding mechanism
with quick release
12 Front light with reflector
13 Steering column
14 Handlebar
15 Display
16 Brake lever for rear brake
(mechanical)
17 Throttle lever
18 Brake lever for front
brake (electronic)
19 Bell
20 Front wheel with motor
and electronic brake
21 Instructions for Use
(not shown)
22 Type approval for Germany
(ABE)
(not shown)
23 Hexagon keys 3 mm + 5 mm
(not shown)
24 Tyre valve extension
(not shown)
25 Charger (not shown)
26 Reflector and mount
(not shown)
12
6
20
11
1
425
76
8
10
13
9
3
16
18
15
17
19 14
Order no. 10015300

5
adhere to these Instructions for Use can lead to damage to the vehicle, compromised riding safety
and accidents.
The Instructions for Use are based on the standards and regulations applicable in the European
Union and reect current state-of-the-art technology. They contain information for assembly,
components and care and maintenance only. They do not contain any information about learning to
ride an electric scooter. If abroad, you should also observe any specic national guidelines and laws.
It is imperative that you keep these instructions safe for later use. If you pass the Rennx E-Scooter
on to a third party, you must also hand over these Instructions for Use.
2.2 | Explanation of symbols
The following symbols and signal words are used in these instructions.
WARNING!
This symbol/signal word indicates a hazard with a medium
risk level which, if not avoided, may result in death or serious
injury.
CAUTION!
This symbol/signal word indicates a hazard with a low risk
level which, if not avoided, may result in minor or moderate
injury.
IMPORTANT! This signal word warns of possible material damage.
This symbol indicates useful additional information about
assembly or usage.
This symbol indicates that the packaging and product can be
recycled.
Declaration of conformity (see Section "Declaration of
conformity"): Products marked with this symbol comply
with all applicable Community regulations of the European
Economic Area.
This symbol indicates electrical devices which have double
protective insulation.
Devices marked with this symbol may only be operated
indoors.
Devices marked with this symbol must not be disposed of
with household waste.
The type plate shows the most important data, e.g. type
designation, vehicle identication number and type approval
number. The type plate must not be modied or removed.

6
3| Safety
3.1 | Intended use
The Rennx E-Scooter is an electrically propelled vehicle in accordance with eKFV (Small Electric
Vehicle Ordinance in Germany), and is for private use only. The electric scooter is a means of
transport for a single person on paved roads and footpaths. Luggage must be carried safely on
the rider's person. It must not be fastened to the footboard, mudguard (fender) or handlebar of the
electric scooter.
The minimum legal age for riding an electric scooter in Germany is 14 years. The maximum load is
125 kg (weight of rider plus luggage plus accessories).
The electric scooter must only be used for its intended purpose. The manufacturer and distributor
are not liable for any use other than the intended purpose. This applies in particular to failure to
adhere to the safety instructions and any resultant damage or injury.
3.1.1 | Information for parents and legal guardians:
The minimum age for riding an electric scooter is 14 years. Parents/legal guardians have full
responsibility for the safety of their children who are minors (usually under the age of 18).
They must make sure that the young person has learned thoroughly how to use the electric
scooter safely and responsibly and is fully aware of the hazards.
3.1.2 | Legal requirements
Before using the electric scooter on public roads, the user must thoroughly acquaint himself/herself
with the applicable national trac regulations and driver's licence requirements for riding electric
scooters in the respective country. The electric scooter must only be used on public roads if it
meets the applicable national requirements and the rider is in possession of the required licence.
A driver's licence is not currently required for use of this electric scooter in Germany. However,
electric scooters are subject to compulsory insurance in Germany if they are ridden on public ways.
Motor vehicle insurance must therefore be obtained and an ocial insurance plate must be attached
to the rear of the vehicle before use.
3.2 | Foreseeable misuse
The following are considered foreseeable misuse:
• Riding with more than one person
• Conveying excessive loads
• Modications to the Rennx E-Scooter which have not been agreed with the manufacturer
• Use of spare parts or wearing parts which have not been approved by the manufacturer
• Use of the electric scooter outside the specied conditions
• Towing a trailer
• Taking part in sports events or competitions
• Use off road, on a loose, very wet, uneven or slippery surface, in rain, and on snow or ice
• Riding through puddles
• Riding over steps or jumps, tricks, stunts
3.3 | Safety instructions
WARNING!
Risk of injury!
Read the following safety precautions before riding.
• You should only use the electric scooter if you have had sucient practice in
the use of kick scooters. Before the electric scooter is used on public roads, the
user must familiarise himself/herself thoroughly with the device, its handling
and braking performance, on quiet private land.
• Always wear suitable protective clothing, such as a helmet, gloves, non-slip
footwear and protectors.

7
• Before riding on public roads, you should acquaint yourself with the applicable
national trac regulations.
• Keep both hands on the handlebar at all times when riding.
• To change direction safely, pull over to the kerb and step onto the pavement
with your electric scooter. Perform the change of direction as a pedestrian and
then put your scooter back onto the road in a safe place and continue your ride
in the new direction.
• Do not increase speed when cornering. Always lean as little as possible when
taking bends and remain safety-aware. If you lean excessively, the tyres may
loose grip or the front wheel may swerve.
• Do not wear earphones or headphones, do not listen to music or make phone
calls when riding.
• Never use your electric scooter when under the inuence of medication,
alcohol or drugs.
• Before setting off, the side stand must always be folded up. Riding with the
side stand down can cause a crash.
• You should adjust your speed to your riding ability. Beginner riders should use
the "Reduced Speed" riding mode.
• You should always adjust your riding style and speed to the circumstances, the
condition of the riding surface and the weather conditions. The electric scooter
must not be used if the road is very wet or slippery or covered with snow. If the
road is damp, you should ride at reduced speed, as the braking distance may be
much longer and there is a risk of skidding.
• The electric scooter must not be used on sand, slippery, loose or very uneven
ground. It must only be used on even, paved roads/paths.
• The motor of the electric scooter heats up during operation. You should not
touch the motor immediately after riding. There is a risk of burns!
WARNING!
Danger for children and persons with reduced physical, sensory or mental abil-
ities (e.g. partially disabled persons, elderly persons with reduced physical and
mental abilities) or lack of experience and knowledge (e.g. older children)!
• Keep the electric scooter out of the reach of children, even when at home or on
private land. Users under 14 years of age are not permitted to use the electric
scooter on public roads in Germany.
• Cleaning and maintenance must not be carried out by children without
supervision.
• The packaging lm and small parts must be kept away from children, as there
is a risk of asphyxiation.
WARNING!
Risk of explosion and fire!
Improper handling of the vehicle's integrated rechargeable battery increases the
risk of explosion and re.
• Never expose the battery to heat, e.g. direct sunlight, naked ames etc.
• Keep the vehicle and the battery away from hot surfaces.

8
• Do not use or charge the vehicle in an explosive atmosphere or in the vicinity of
highly ammable liquids, gases or dust.
• Never charge the battery any longer then necessary.
• Avoid any strong impacts with the electric scooter in the vicinity of the battery.
If the battery is deformed, the integrated safety mechanism may be damaged.
There is a risk of consequential damage and chemical leaks. If the frame
is damaged in the vicinity of the battery, the electric scooter must not be
ridden and a damaged battery must not be recharged. The damage must be
inspected/repaired by a specialist workshop.
• The battery is designed exclusively for use on this electric scooter. If used in
any other way, improperly or incorrectly, there is a risk of injury and re, and the
warranty will be rendered null and void.
WARNING!
Risk of electric shock!
Improper use of the charger increases the risk of electric shock.
• This charger is designed to protection class 2 and must only be operated with
a properly installed, standard domestic AC voltage supply of 220-240V/AC
(50/60Hz). The power outlet (wall socket) must be near to the charger and
easily accessible.
• Only use the mains charger supplied to charge the battery.
• Only charge the electric scooter with the mains charger in dry indoor rooms.
• Never touch the charger or accessories with wet or damp hands.
• The charger is only approved for indoor operation in dry, frost-free, closed
rooms.
• The vehicle has IPX3 protection against spraying water. However, this does not
mean that it is suitable for riding through deep puddles or in heavy rain fall.
• Never unplug the mains charger by pulling on the power cable. Always grip the
plug itself.
• Route the power cable so that it does not cause a trip hazard.
• Do not bend the power cable and do not place it over sharp edges.
• Never attempt to pick up an electrical device if it has fallen into water.
• When your electric scooter is not in use, or if you wish to clean it, or if a fault
occurs, always disconnect the mains charger from the power outlet.
• Do not operate the electric scooter if it or the battery shows signs of visible
damage, or if the cables or plugs/connectors are faulty.
• The charger must not be used if it or the cables show any visible signs of
damage. Do not touch the charger if it is still connected to the power outlet
(risk of death). First shut off the power supply to all terminals for the power
outlet in use (switch off/remove the fuse or circuit breaker, then switch off the
residual current device). The charger can then be disconnected from the power
outlet.
• Do not open the housing or make any modications to the battery pack or the
accessories.

9
IMPORTANT!
Risk of damage!
• It is imperative that you ride your scooter with caution in order to avoid
endangering/injuring/damaging yourself or third parties and objects.
• Do not use the electric scooter in adverse weather conditions and only use it on
surfaces that are as even, dry and clean as possible.
• Dismount on steep slopes.
• In case of strong winds, rain and frost, make sure that you have a suitable
protected parking place.
• If you put a cover over your scooter, park it in a sheltered place because the
cover can easily be caught by the wind.
• Never exceed the maximum load.
• Never stand on the rear mudguard (fender).
• Do not ride over kerbs or similar, as the battery compartment and the licence
plate holder may hit the ground.
• Check that all screws are tight before setting off.
• It is imperative that you have repairs carried out by qualied mechanics.
Contact a specialist workshop for this purpose. In case of unauthorised
repairs/modications to the vehicle, removal of original parts, improper
connection or incorrect use, all liability and warranty claims shall be excluded.
• Check the basic functions of the electric scooter before each trip (see "Before
riding your electric scooter"/"Before every trip"). Insucient checks on the
vehicle can lead to accidents and serious damage/injury.
• At the end of the trip, switch off your electric scooter immediately to avoid
running down the battery unnecessarily.
• The electric scooter must be serviced regularly by a specialist workshop, i.e.
approximately every 200 km or after being recharged 15 times, in order to keep
it in a safe condition for use on public roads.
• Before each trip, the electric scooter must be checked for damage. The electric
scooter must not be ridden if damage is discovered.
• The use of non-original parts may invalidate the type approval, and the
distributor is not liable for any such parts. Only use parts and accessories
which have been approved by the distributor or manufacturer.
4 | Preparation/assembly
First remove the scooter, together with the foam padding, from the box. Carefully remove the foam
padding and fold down the side stand (1).
Then unfasten the handlebar locking mechanism on the rear mudguard (2) and pivot the steering
column into its upright position (3). Then lock the steering column with the quick-release (4) and
secure it with the locking mechanism to prevent it from being opened unintentionally (5).
Connect the handlebar with stem to the steering column, and secure it with the 4 hexagon socket
screws (6), using the 3 mm hexagon key supplied. Max. tightening torque 3 Nm.

10
To attach the reector (7), rst unfasten the two screws (8) of the licence plate holder. Then push
the reector mount (9) between the licence plate holder (10) and the base plate and align it so that
the reector is fastened with the screws of the licence plate holder.
1
2
3
5
4
Name INSTRUCTION_01
Date 29-01-20
Scale 0.300
6
SCOOTER_FRAME
01
02
03 04
05
06
07
08
14
15
16
17
18 19
21
22
23
26
27
21
28
29
30
33
31
32
34
44
43
45
9
7
10
8
11
5 |Usingyourelectricscooterforthersttime
5.1 |Inspectingtheelectricscooterbeforerstuse
• Is the steering column locked and secured?
• Are the handlebar, controls and grips rmly tightened?
• Are the cables on the steering column free of kinks and routed so that they are not put under any
strain when you turn the steering to full lock?
• Are the wheels securely screwed on and the tyres pumped up (pressure for cold tyres should be
from 2 to 3 bar front and rear, depending on what feels comfortable)?
• Are all screws and the non-slip covering on the footboard rmly secured?
• Does the bell work?
• Do the brakes work? Is the rear wheel brake properly adjusted (sucient but not excessive lever
travel so that you get the max. braking effect just before the lever touches the handlebar)
• Is the battery fully charged (see Section "Charging the battery").
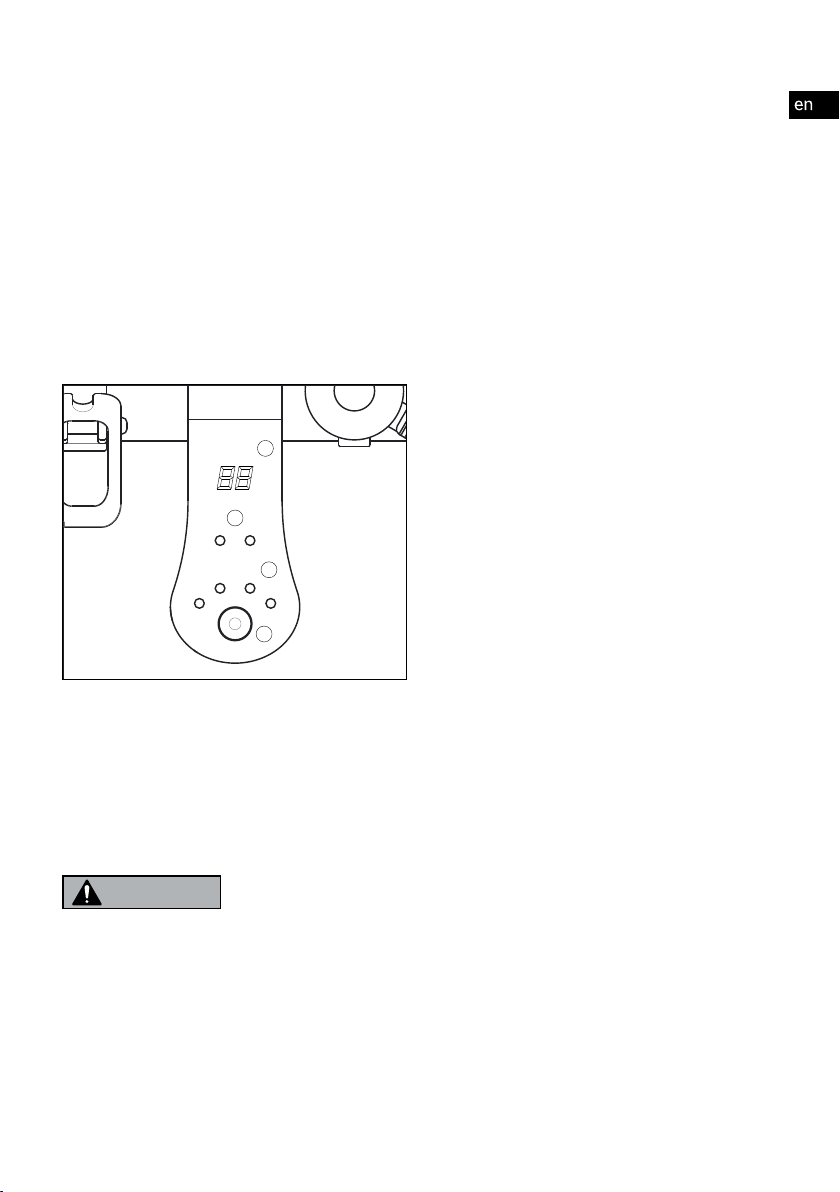
5.2 | Switching the electrical system and display on/off
To switch on the electrical system, press and hold the round button (4) in the middle of the
handlebar until the display comes on. Press the button again once to switch on the lights. Press the
button twice in quick succession to toggle between the mode (2) for reduced speed (up to 15 km/h,
the left-hand blue diode lights up) and for max. speed (20 km/h, the right-hand red diode lights up).
To switch off, press and hold the button (4) until the system, the display and the lights are
switched off.
The button commands are each accompanied by a beep.
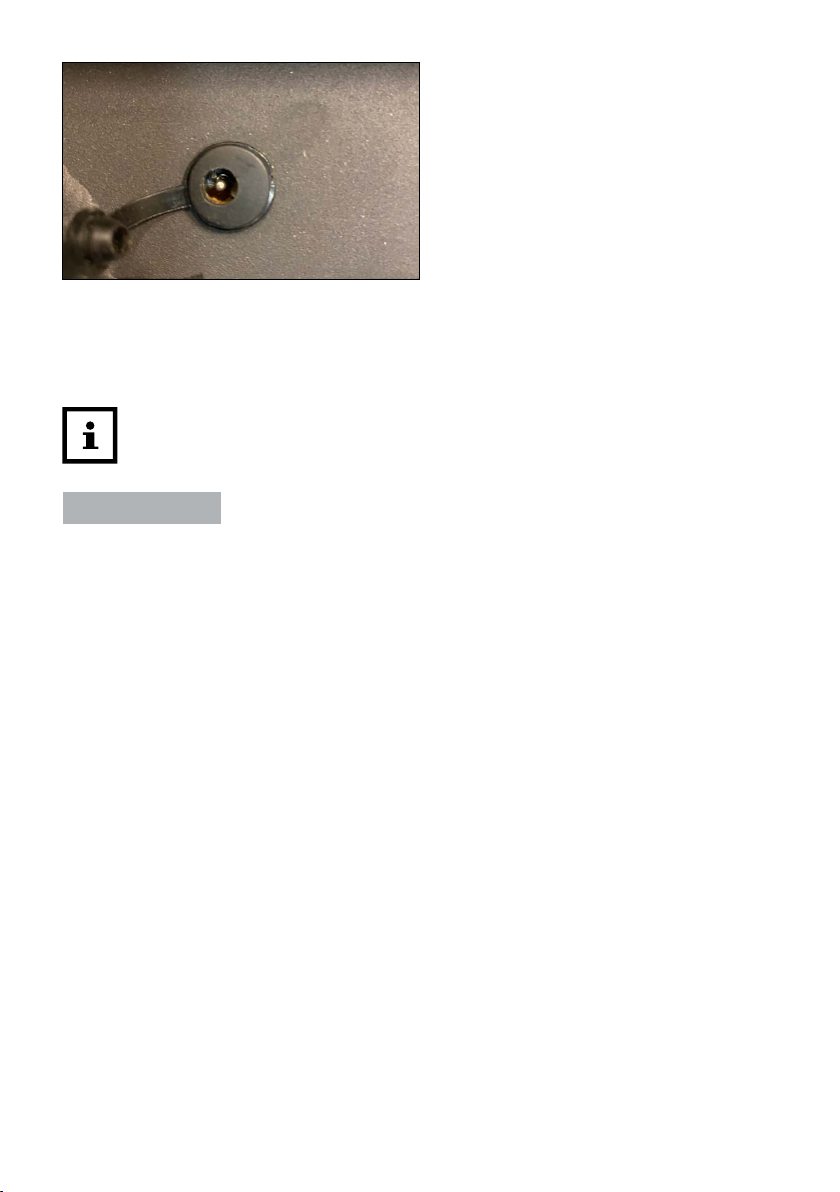
5.3 | Charging the battery
WARNING!
Risk of fire!
Charging must only be carried out in dry, frost-free rooms and under supervision.
The charger and the electric scooter must not be covered during charging (risk
of short-circuit and re), and both must be placed on a non-ammable surface.
The electric scooter's battery is permanently installed in the vehicle frame
underneath the footboard. It has a charge of approximately 75% when the
scooter is delivered. There is a charging port at the front of the footboard for
topping up the charge. A full recharge takes approximately 3.5 - 4 hours.
Name INSTRUCTION_02
Date 17-02-20
Scale 1.000
1
2
3
4
1. Speed display in km/h
2. Riding mode display
3. Battery capacity
4. Power button
12
Open the dust cover on the charging port and insert the charger plug. Now connect the power plug to
a suitable power outlet (220 - 240 V/AC 50/60 Hz). A red indicator light will light up on the charger.
The electric scooter's battery is fully charged when the colour of the indicator light changes to green.
Then disconnect the charger from the power supply and from the electric scooter, and close the
charging port again. During the charging process, make sure that the electric scooter is switched off.
A sudden temperature change may cause condensation to form on the contacts of the
charging port. To avoid this, allow the electric scooter to reach room temperature before
charging. Always make sure that the charging port is dry.
IMPORTANT!
Risk of damage!
• Do not charge the battery immediately after a trip, as it may be too not.
6 | Before riding your electric scooter
6.1 | Insurance sticker
The electric scooter is subject to eKFV (Small Electric Vehicle Ordinance in Germany) regulations
and must only be ridden on public roads if a valid insurance sticker is tted as per §2, paragraph 1,
sentence 2 of eKFV. You need to apply to an insurer for the sticker and then attach it to the licence
plate holder (10).
6.2 | Before every trip
The basic functions of the electric scooter should be checked regularly. Check the frame and
steering column for cracks or other damage, and also check the wheels and tyres for damage and
wear. Are the tyres at the right pressure? Are the lights and brake working? Is the battery charge
sucient for the distance you plan to go? What weather conditions are expected? If you discover any
worn, bent, broken, loose or otherwise defective parts, you must not ride your electric scooter under
any circumstances. Take your scooter to a specialist workshop for inspection and any repairs that
may be necessary.
6.3 | Protective clothing
You are not required by law to wear protective clothing on your electric scooter, but we recommend
wearing light-coloured clothing that will get you seen, plus a helmet, protectors and sturdy footwear.

13
6.4 | Setting off
Put one foot (your standing leg) on the footboard and pull the rear brake lever (16). Press and hold
the power button in the middle of the handlebar until the display lights up. The four LED indicator
lights arranged in a semi-circle indicate the capacity of the battery (if all 4 lights are illuminated, the
battery charge is between 75% and 100%). Press the power button a second time to switch on the
lights on your electric scooter.
CAUTION!
Risk of crashing!
When you try out your scooter for the rst time, you should do it somewhere safe
where there is plenty of space and no trac or obstacles. Keep both hands on
the handlebar at all times when riding.
Fold up the side stand (5), then release the brake lever and set the electric
scooter in motion by pushing off with your kicking leg. Then put your kicking
leg on the footboard and, using your right thumb, carefully operate the
electric scooter's throttle lever (17). The electric motor kicks in at a speed of
approximately 4 km/h – and gets faster, the further you press down the throttle.
The electric scooter has powerful propulsion, so you should operate the throttle
switch gently. On your rst test ride, you should go slowly and, in particular,
practice braking gently. The front wheel is braked electrically by the motor
brake (red lever - 18 - on the left side of the handlebar), while the rear wheel is
equipped with a disc brake (brake lever - 16 - on the right side of the handlebar).
CAUTION!
Risk of crashing!
Both brakes are very effective and are capable of stopping the electric scooter
abruptly if you do not brake gently. This is particularly important on slippery
surfaces, such as sand, snow or wet ground.
Do not take your electric scooter on public roads until you have familiarised
yourself suciently with how it handles and brakes.
6.5 | Warning other road users
Use the bell to warn pedestrians and other road users by pulling back the spring-loaded button on the
bell with your thumb and then releasing it. This will make a loud and clear warning sound.
7 | Transportation
7.1 | Folding up your electric scooter
Your electric scooter can be folded up for storage and easy transportation:
1. Switch off the electrical system and fold down the side stand (6).
2. Press the locking mechanism of the quick release (located near the bottom of the steering
column) to the right (7).
3. Grip the steering column with one hand and rmly push the quick release down with the other
hand (8). The steering column can now be folded down towards the footboard.
4. Twist the steering column slightly so that the catch on the handlebar engages in the hook on the
rear mudguard (fender) (9).
5. Then fold up the side stand.

14
7.2 | Unfolding your electric scooter
When you next want to use your electric scooter, lift the steering column into the upright position
so that the two anks of the hinge rest at against each other, and press the quick release rmly
upwards. Then push the locking mechanism to the left in front of the quick release and check that
the steering column is rmly locked in place (see also Section 4).
CAUTION!
Risk of crashing!
Never ride your scooter without rst securing the quick release. The electric
scooter is only safe to ride when the locking mechanism is positioned in front of
the quick release.
Then check that all the screw connections are tight and check that the electrical
system, lights and brake are fully functional.
Unfortunately it is not possible to transport your electric scooter by aeroplane, as the
battery is classed as hazardous cargo. If you plan to take it with you on any other means of
public transport, you should rst ask the operator for permission. You may be able to nd
the information you need on their website or telephone hotline.
9
7
8
6

15
8 | Storage
Store your electric scooter and the battery in a dry and well ventilated place at room temperature
(18°C) and air humidity no higher than 80% (non-condensing). If the electric scooter and the battery
are not used for longer than 3 months, it is advisable to store it with a charge of 40% – 70%. The
battery will then age more slowly than with a 100% charge. You should check the charge level about
every 2 months. Never store the battery for a long period when it is very low, as there is then a
risk of deep discharge with irreversible cell damage. If the battery is completely at, it needs to be
recharged as quickly as possible.
9 | Cleaning and care
To keep your electric scooter in good condition and ensure that it will give you many years of reliable
service, you should clean it regularly. At the same time you can check for any damage.
When cleaning, you should always consider the environment. Use a biodegradable vehicle cleaner
and prevent any cleaner from draining into the ground.
IMPORTANT!
Risk of damage!
Do not use use running water, a steam jet cleaner or pressure washer etc, as
they drive moisture/water into the bearings and seals on the electric scooter and
can also damage the electrics and the motor.
Always make sure that your front and tail lights are clean. A mild soapy solution can be used for
cleaning, but no harsh cleaners, alcohol, petroleum ether or solvents. It is best to just wipe your
scooter down with a damp cloth. Before cleaning, switch off your electric scooter and make sure the
charging port is sealed. After washing, apply a polishing wax designed for matt paintwork to protect
it from the elements and seal the surface. Take care not to get any polish on the brake disc, tyres
or footboard. Never attempt to open the battery. No water, liquids, dirt or other particles must be
allowed to penetrate into the display or the battery compartment.
10 | Servicing
Any parts on your electric scooter that are not maintained, and become worn, weakened or damaged,
can cause a crash and lead to serious accidents. So it's important for your electric scooter to be
serviced by a specialist workshop following the service schedule approximately every 200 km or
after recharging 15 times, depending on your riding style.
• Test front and tail lights
Adjust the front light so that the centre of the light beam is only half as high as the front light itself
at 5 metres distance. The LED bulb cannot be replaced if it fails, but instead the complete light
must be replaced. Spare parts are available from the distributor or manufacturer.
• Test bell
• Test all switches and levers
• Test display, including LEDs
• Check grips are not damaged or loose
• Check handlebar fastening is fully tightened
• Check steering bearing play
• Check rear brake function, clean with brake cleaner, adjust, replace the brake pad/disc as necessary
• Check control cable for cracks or damage, lubricate with PTFE spray
• Test front wheel brake (motor brake) V1.3_20203016_Bern 14
• Check tyres for damage and tread depth (0.5 mm minimum); check tyre pressure (2 to 3 bar front
and rear, depending on what feels comfortable)
• Check condition of wheels/rims and that they run smoothly
• Check that folding mechanism/quick release are secure and check for wear
• Check all screw connections are tight and undamaged
16
• Check cables and electrical connections (including in the battery compartment) for damage
• Test the charger; check that charging works correctly
• Check frame for damage (e.g. cracks, twisting)
• Check covering on the footboard
• Defective or missing parts must be replaced
• Lubricate moving parts on the scooter
11 | Maintenance
While it is imperative that servicing is carried out by a specialist workshop, you can do maintenance
work yourself if you have the appropriate skills
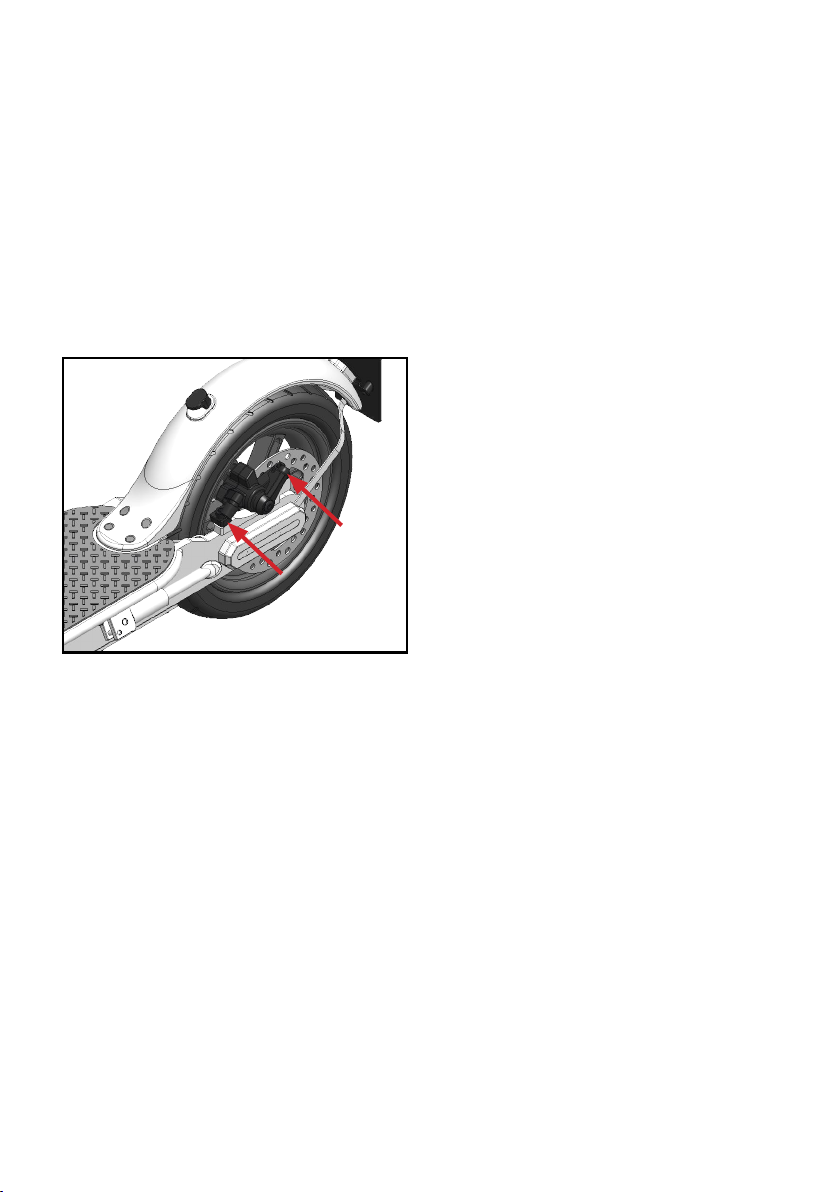
11.1 | Adjusting the brake
The procedure for adjusting the response of the rear disc brake is as follows.
Use the 5 mm hexagon key supplied to unfasten the two screws that secure the brake caliper, and
then align the brake caliper parallel to the brake disc so that the brake disc and rear wheel run freely.
Then tighten the two screws again, without overtightening.
If the brake lever has too much travel, use the 5 mm hexagon key to unfasten the screw on the
cable tensioner and pull the brake cable a little further. The brake pads must not grind, and the gap
between pad and brake disc should not be more than 1 mm. Then re-tighten the screws (5 Nm max.).
17
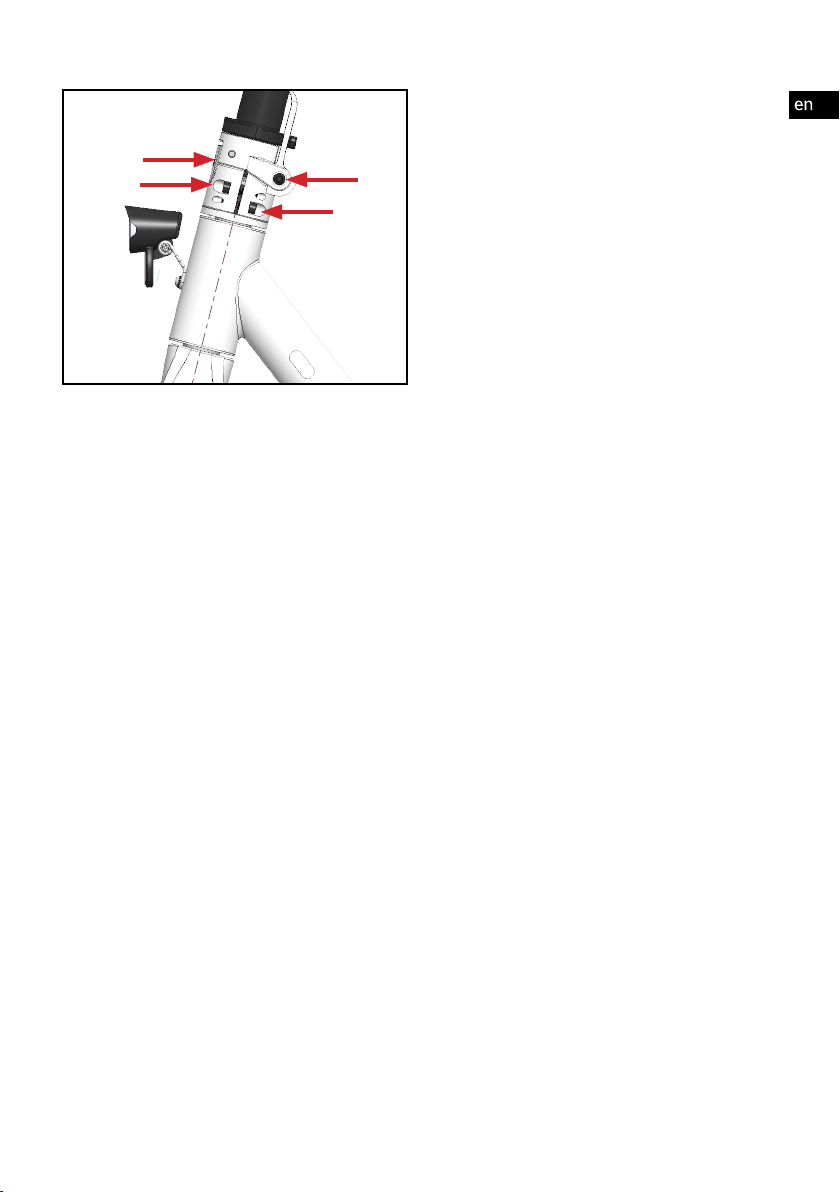
11.2 | Tightening the steering column
If road vibration causes the steering column to work loose, tighten these screws with the hexagon
keys supplied. The screws must be checked regularly to make sure that they are tight.
12 | Action in case of an accident
After an accident, the entire electric scooter should be checked for any damage, cracks, twisting,
dents and distortion. Bent, cracked or deformed aluminium components cannot be re-straightened
safely (frame, wheels), as hidden cracks can later cause the component to break, leading to serious
accidents and injuries. If you detect changes or damage to your electric scooter, it must be assessed
by a specialist workshop, wherever possible, and any damage repaired. Do not ride your scooter until
this has been done.
13 | Technical data
Model designation: Rennx E-Scooter 1
Weight: approx. 12.5 kg
Frame: Aluminium
Max. load incl. rider and luggage: 125 kg
Permissible gross weight: 137.5 kg
Dimensions: 1054 mm x 436 mm x 1150 mm (ready to ride)
1054 mm x 436 mm x 480 mm (folded up)
Rated output: 350 W, operating voltage: 36 V
Rechargeable battery: Lithium-ion, 36 V, 6.6 Ah,
Charging time: 3.5-4hours
Range: 25 - 28 km (depending on weight of rider, riding speed
road conditions, outside temperature etc.)
Operating conditions: 0°C to +35°C
Wheel size: 8.5"
Tyres: Pneumatic tyres 8.5"
Protection rating: IPX3
Charger: Input: 100 - 240 V AC, 50/60 Hz, 3 A
Output: 42 V ; 2.0 A
Protection class: II
Protection rating: IP20
18
14 | Warranty
14.1 | General information on warranty cover
The usual two-year warranty period applies for the electric scooter. The warranty period begins
on the date of purchase as per the proof of purchase. The warranty does not cover normal wear
and tear, wear to the tyres, brake pads, handlebar grips or the footboard, discolouration or fading
of surfaces, improper use and damage caused by an accident, improper handling, acts of nature,
manipulation or attempted repairs by unauthorised or unqualied persons, or technically modied
electric scooters. Failure to have the stipulated servicing carried out by a specialist workshop
(approximately every 200 km or after recharging 15 times) will render the warranty cover null and
void. The warranty cover is also null and void if the device is used for commercial purposes or other
than its intended purpose. Damage caused by transportation or improper storage is also excluded
from the warranty.
14.2 | Prohibition of tuning
No technical modications to the electric scooter are permitted. Any manipulation or constructional
modication to the chassis or for the purpose of performance enhancement/increased speed may
have serious legal and safety-related consequences for the user.
The scooter's chassis and motor may be seriously damaged as a result of overload.
The electric scooter will lose its approval for use on public roads, in conjunction with possible legal
consequences. The manufacturer does not accept any liability or provide any warranty in such a
case.
15 | Disposal
Dispose of packaging material and the product itself in accordance with applicable local
regulations.
Used electrical devices must not disposed of with household waste!
Should the Rennx E-Scooter no longer be suitable for use, every consumer is legally
obliged to take used electrical devices to an appropriate collection point separately from
household waste. This ensures that used electrical devices are recycled properly and
prevents negative effects on the environment. For this reason, electrical devices are
marked with the symbol shown here.
Batteries must not be disposed of with household waste
As a consumer, you are required by law to take all batteries, regardless of whether or not
they contain harmful substances*, to a collection point in your municipality/district or to a
retailer so that they can be disposed of in an environmentally friendly manner.
*marked with: Cd = cadmium, Hg = mercury, Pb = lead
16 | Contact
If you have any questions about the product and/or these instructions, before using the product for
the rst time, please contact our Service Centre by e-mail at: [email protected]. We will help you as
quickly as possible. This is the best way to ensure that the product is used correctly.

19
17 | Exploded view
17.1 | Frame
SCOOTER_FRAME
01
02
03 04
05
06
07
08
09
10
11
12
13
14
15
16
17
18 19
20
21
22
23
24
25
26
27
21
28
29
30
33
31
32
34
39
35
38
37
36
40
41
42
44
43
45
46
47
01 Frame
02 Cover, steering head, bottom
03 Cover, steering head, top
04 Screw, steering head cover
05 Bearing, steering head
06 Inner centring, bearing
07 Guide, steering head
08 Cover, steering head
09 Axle guide
10 Screw, axle guide
11 Cover, rear axle
12 Screw, rear axle cover
13 Reector sticker (optional)
14 -
15 Side stand
16 Screw, side stand
17 Cover, frame rear
18 Cover, frame front
19 Screw, frame cover rear
20 Mudguard (fender), rear
21 Screw, controller & mudguard
22 Sealing plug, small
23 Sealing plug, large
24 Brake caliper
25 Screw, brake caliper
26 Controller
27 Battery
28 Charging port
29 Rubber cover, charging port
30 Nut, charging port
31 Base cover
32 Screw, base cover
33 Grip tape, footboard
34 Front headlight
35 Licence plate holder
36 Screw, licence plate holder
37 Retaining bracket, mudguard
38 Screw, retaining hook
39 Retaining hook
40 Tail light
41 Washer, tail light
42 Nut, tail light
43 Lock washer, front headlight
44 Screw, front headlight
45 -
46 Reector mount
47 Reector
20
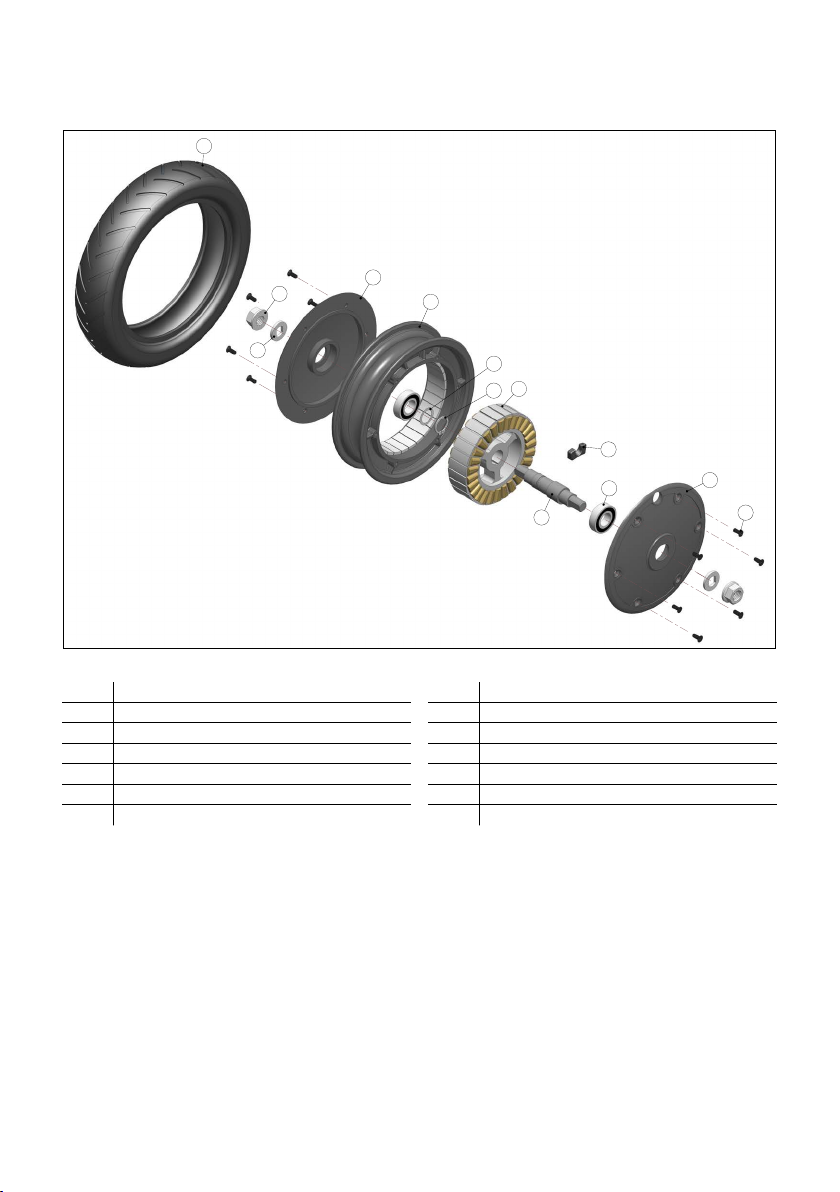
17.2 | Front wheel
SCOOTER_FRONT_WHEEL
01
03 02
04
05
06
07
08
09
10
11
12
14
01 Axle, front
02 Stator
03 Retaining ring
04 Washer, bearing
05 Ball bearing
06 Washer, wheel nut
07 Wheel nut
08 Cover, motor, right
09 Rim, front
10 Bearing cup
11 Cover, motor, left
12 Screw, motor cover
13 -
14 Tyre, 8½ x 2 inches
This manual suits for next models
1
Table of contents
Popular Scooter manuals by other brands

medemagroup
medemagroup Mini Crosser X1 Cabin user manual

HONEY JOY
HONEY JOY TS10043 user manual

Tucano Urbano
Tucano Urbano TERMOSCUD R236X instruction manual

AMLADCYKLER
AMLADCYKLER Electrical Cargo Bike Assembly & instruction manual

Green Bull
Green Bull GB-250b user manual

Gulfstream
Gulfstream Travel Trailer owner's manual


