Xtreme XMB-420 User manual

1
X-Treme™ Electric Scooters
XMB-420
Electric Mobility Scooter
Read this manual completely before riding.

2
BATTERY MAINTENANCE and CHARGING INSTRUCTIONS
1. You MUST charge completely prior to initial use. (Follow charging instructions in
your Product Handbook)
2. Charge immediately after each use.
3. Charge before storage. You must charge every 30 days if not in use.
4. Charge the unit for 6-8 hours or until the light on the charger turns red & green.
5. DO NOT allow this unit to deep discharge the battery.
6. For safety purposes, DO NOT charge for over 8 hours.
7. Turn the unit OFF when not in use.
This PRODUCT IS NOT INTENDED FOR EXTREME or
OFF-ROAD Use! Please take care of your scooter!
DO NOT JUMP or ABUSE THIS PRODUCT!
DO NOT RIDE IN WET/ICY CONDITIONS!
Failure to follow these instructions will
VOID YOUR WARRANTY
IMPORTANT!
Failure to follow these INSTRUCTIONS will
VOID YOUR WARRANTY!

3
WARNING
This product does not conform to Federal Motor Vehicle Standards and is
not intended for operation on public streets, roads or highways. Serious
injury can result from the unsafe operations of this product. Operator can
minimize these risks by using certain safety equipment such as: safety
helmet, goggles, gloves, elbow and kneepads and appropriate footwear.
DO NOT operate this product in traffic, on wet, frozen, oily or unpaved
surfaces or under the influence of drugs and/or alcohol. Avoid uneven
surfaces, potholes, surface cracks and obstacles.
DO NOT use a water hose to clean this product. See Product Handbook
for more information.
This product is recommended for riders 16 YEARS OF AGE and older.
SAFETY
Persons without excellent vision, balance, coordination, reflex,
muscle and bone strength and good decision-making capabilities
should not use this product.
Minors without adult supervision should not use this product.
Persons unwilling or unable to take responsibility for their own actions
should not use this product.
The user of this product assumes ALL risks associated with its use. To
minimize these RISKS, the user must wear safety helmet, goggles,
gloves, elbow and kneepads and appropriate footwear.
This product is ELECTRIC! DO NOT ride this product in wet
conditions, puddles or rainy weather.
IMPORTANT
PLEASE READ THIS BEFORE
USING THIS PRODUCT
READ THIS FIRST!

4
SAFETY GUIDE
The recommended minimum age for riding this scooter is 16 years old.
To avoid damage to the motor and footplate, do not overload the
scooter.
Never ride with more than one person.
Inspect your scooter thoroughly before each use for loose or missing
parts.
Avoid unintentional starts by turning the scooter off while not in use.
To avoid the risk of a short circuit in the electrical parts, do not use your
Electric scooter in the rain and never spray or wash off your scooter with
water.
Do not place the battery near fire or heat.
To avoid damage to the battery, do not use the charger if it has been
damaged in any way.
Keep hands, face, feet and hair away from all moving parts.
Do not touch the motor or wheels while they are rotating.
Brakes are designed to control speed as well as stop the scooter.
Practice braking for proper slowing down and smooth stops.
Maintain your scooter as recommended in this Product Handbook.
Use only quality replacement parts as recommended by the
manufacturer.
Inspect the entire scooter prior to each use. Replace any part that is
cracked, chipped or damaged before use.
*NEVER ALLOW CHILDREN TO OPERATE THE SCOOTER WITHOUT
ADULT SUPERVISION.
*NEVER ATTEMPT TO OPERATE THE SCOOTER WHILE UNDER THE
INFLUENCE OF ALCOHOL.
If a situation arises that is not covered in the manual,
proceed with caution and use good judgment.
QUICK REFERENCE
SAFETY GUIDE

5
DO NOT RETURN TO STORE!
Do not use this vehicle for the first time until
you have inflated the tires to the correct PSI and
completely charged the battery.
Failure to follow these instructions may damage
your vehicle and void your warranty.
If you need Help
CALL OR GO ONLINE
1-253-777-0690
www.x-tremescooters.com/support/

6
TABLE OF CONTENTS
Important Information……………………………………………………. 2-3
Quick Reference Safety Guide……………………………………………. 4
Table of Contents…………………………………………………………. 6
Riding Safety……………………………………………………………… 7-9
Safety Basics: Do’s & Don’ts……………………………………….. 7-8
Operating Reminders and Suggestions………………………………. 8
Wet Weather Riding………………………………………………….. 8-9
Night Riding………………………………………………………….. 9
Other Reminders……………………………………………………… 9
Specifications……………………………………………………………… 10
Getting To Know Your XMB-420…………………………………………. 11-13
Assembly and Set-Up……………………………………………………… 14
Routine Operation…………………………………………………………. 15
Pre-Ride Check………………………………………………………. 15
Steps To Startup……………………………………………………... 15
Battery Care and Maintenance……………………………………………. 16-18
What To Expect of Your Batteries, Ideally…………………………… 16
What To Expect, Realistically…………………………………………16
In Summary………………………………………………………….. 16
What’s Inside Your XMB-420 Battery……………………………….. 16
Battery Trouble………………………………………………………. 16-17
Battery Temperature Sensitivity……………………………………… 17
Battery Charging…………………………………………………….. 17-18
Other Maintenance………………………………………………………… 19
Front and Rear Brakes……………………………………………….. 19
Front and Rear Tires…………………………………………………. 19
Fuse………………………………………………………………….. 19
Lubrication…………………………………………………………… 19
Cleaning………………………………………………………………. 19
Scheduled Maintenance…………………………………………………… 20
Troubleshooting Guide……………………………………………………. 21

7
RIDING SAFETY
This is NOT your typical Mobility scooter!
**This is a fast and powerful scooter that is capable of bringing the front wheel up and off the
ground if not careful. Having the seat slid completely back as well as the speed set to high
increases its ability to “Pop a Wheelie” when the throttle is engaged. Use caution!
Like any sport, cycling carries the risk of injury and damage. By choosing to ride the XMB-420,
you assume all responsibility for these risks. Thus, you need to know and practice the rules of
safe and responsible riding.
YOUR INSURANCE POLICIES MAY NOT PROVIDE COVERAGE FOR ACCIDENTS
INVOLVING THE USE OF THIS CYCLE. TO DETERMINE IF COVERAGE IS PROVIDED
YOU SHOULD CONTACT YOUR INSURANCE COMPANY OR AGENT.
Safety Basics: Do’s and Don’ts
The Do’s
oAlways conduct a Safety Check before you ride your XMB-420. Be thoroughly familiar
with the controls of your XMB-420.
oAlways wear an approved helmet when riding your XMB-420. Follow the helmet
manufacturer’s instructions for fit, use and care of your helmet.
oAlways keep body parts and other objects away from the spinning wheels of your XMB-420.
oAlways wear shoes that will stay on your feet and will stay on the floorboard.
oWear bright, visible clothing that is not so loose that it can catch on moving parts of the
XMB-420 or objects at the side of the road or trail.
oThink about your speed, and keep your speed consistent with safe operating conditions.
The Don’ts
oNever ride with headphones. They mask traffic sounds, distract you from concentrating on
your surroundings, and their wires can tangle in the moving parts of the XMB-420M, causing
you to lose control.
oNever carry a passenger. The maximum carrying capacity is 350 lbs.
oNever ride barefoot or wearing sandals.
oDon’t jump with your XMB-420. It puts great stress on everything from frame and forks to
drive train. Riders who jumping their XMB-420 risk serious damage to their XMB-420 and
will void their warranty.
oNever carry anything which obstructs your vision or your complete control of the XMB-420
or which could become entangled in the moving parts of the XMB-420.

8
oNever hitch a ride by holding on to another vehicle.
oNever ride your XMB-420 while under the influence of alcohol or other drugs.
oIf possible, avoid riding in bad weather, when visibility is obscured, at dusk or in the dark, or
when you are very tired. Each of these conditions increases the risk of accident.
oNever allow children to ride. Never allow others to ride without reading and understanding
these instructions.
Operating Reminders and Suggestions
oReview all instructions carefully before riding the XMB-420.
oFollow all rules and regulations in your area for operating a motorized scooter. Obey the same
road laws as all other road vehicles, including yielding the right-of-way to pedestrians, and
stopping at red lights and stop signs.
oRide predictably and in a straight line. Never ride against traffic.
oUse the signal lights to indicate turning or stopping.
oRide defensively. To other road users, you may be hard to see.
oConcentrate on the path ahead. Avoid potholes, gravel and dirt, wet road, oil, curbs, speed
bumps, drain grates and other obstacles.
oBe alert for unexpected events, such as opening car doors or cars backing out of concealed
driveways.
oBe extra careful at intersections and when preparing to pass other vehicles.
oFamiliarize yourself with all the bike's features. Practice signal lights, braking and use of the
horn.
oDon't carry packages or passengers that will interfere with your visibility or control of the
bike. Don't use items that may restrict your hearing.
oMaintain a comfortable stopping distance from all other riders, vehicles and objects. Safe
braking distance and forces are subject to the prevailing weather and road conditions.
Wet Weather Riding
Wet weather impairs traction, braking and visibility, both for the rider and for other vehicles
sharing the road. The risk of accident is dramatically increased in wet conditions. In wet
weather you need to take extra care. In wet conditions, the stopping power of your brakes (as
well as the brakes of other vehicles sharing the road) is dramatically reduced. This makes it
harder to control speed and easier to lose control. To make sure that you can slow down and
stop safely in wet conditions, apply your brakes earlier and more gradually than you would
under normal, dry conditions.
Decrease your riding speed, avoid sudden braking, and take corners with additional caution.
Keep in mind that there is a direct, but inverse, relationship between speed and controllability.
Be more visible on the road. Wear reflective clothing and use safety lights.

9
Potholes and slippery surfaces such as lane markings and train tracks all become more
hazardous when wet.
Night Riding
A rider is very difficult for motorists to see at dusk, at night, or at other times of poor visibility. If
you must ride under these conditions, check and be sure you comply with all local laws about
night riding; follow the Rules of the Road, and take the following precautions:
Make sure that your XMB-420 is equipped with correctly positioned and securely mounted
reflectors. Make sure your clothing or cargo does not obstruct a reflector or light. Ensure that the
front lights are on.
Wear light colored, reflective clothing and accessories, any reflective device or light source that
moves will help you get the attention of approaching motorists, pedestrians and other traffic.
Ride slowly. Avoid hazards, such as potholes and curbs.
Avoid areas of heavy traffic, dark areas, and roads with speed limit over 35 mph. If possible, ride
on routes already familiar to you.
Ride at night only if necessary. Slow down and use familiar roads with street lighting, if possible.
Other Reminders
The XMB-420 works best on level ground. Use caution while going down an incline, such as a
hill or a ramp. Hill climbing and repeated acceleration/braking will exhaust the battery much
more rapidly.
The XMB-420 has an electrical brake cutoff system. When you engage either brake, the throttle
becomes inoperative. Release the throttle before braking. Do not “ride” the brakes.
The battery does NOT require deep discharging. If your XMB-420 is put into storage, re-charge
its battery at least once every 90 days.
Do not store your XMB-420 in direct sunlight for an extended time.
Store your XMB-420 in a dry place. Exposing your XMB-420 to rain, snow, or other precipitation
may result in damage.

10
SPECIFICATIONS
Battery Voltage
24Volt Dc,20Ah
Motor Wattage
400w
Wheel Size
16”*2.6
Top Speed
15km/h
Charging Time
4-8h
Distance of full charge
50km
Grade ability
15°
Max rider weight
150kgs
Left and Right Indicators
Yes
Rear View mirrors
Yes
11
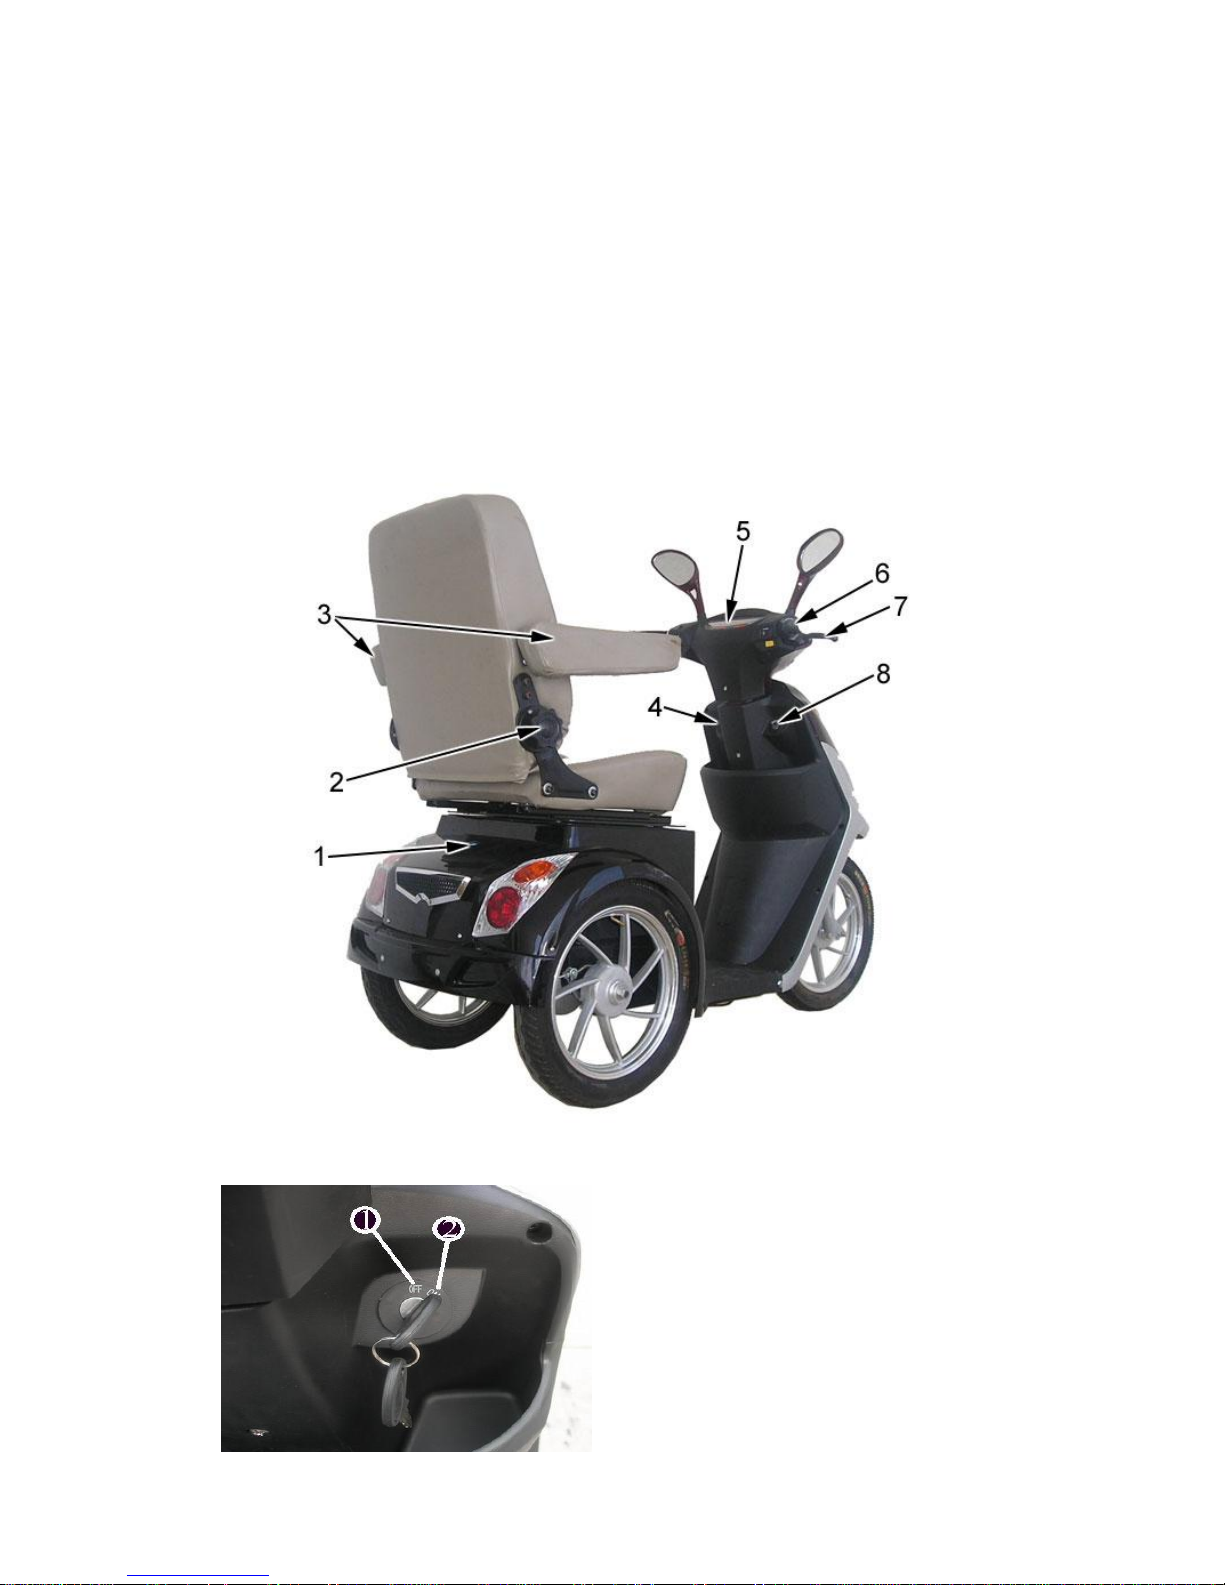
Getting To Know Your XMB-420
1. Battery Storage Access (Tilt Seat Forward) –(4) 12V24Ah Batteries Total
2. Seat Recline Adjuster
3. Drop-Down Arm Rests
4. Forward/Reverse Switch
5. Instrument Panel
6. Throttle
7. Brake Lever
8. Ignition Switch
Figure 1
On/Off Power Switch
Position 1 –Power Off
Position 2 –Power On

12
Figure 2
Hi/Low Speed Switch
Position 1 –Low Speed
Position 2 –Hi Speed
Figure 3
When you are seated on your scooter,
you will see these switches on the right
side of the handlebars.
A. Light Switch
Position 1 –Lights Off
Position 2 –Turn on Speedometer and
Tail Light
Position 3 –Turn on Headlight
B. Forward/Reverse Switch
Position 4 –Forward Function
Position 5 –Backward Function
C. Throttle
Figure 4
When you are seated on your scooter
you will see these switches on the left
side of the handlebars.
A. Headlight Hi/Low Switch
Position 1 –Hi Beam
Position 2 –Low Beam
B. Turn Signal Switch
Position 1 –Left Turn Signal
Position 2 –Right Turn Signal
C. Horn Switch
A
B
C
A
B
C
13
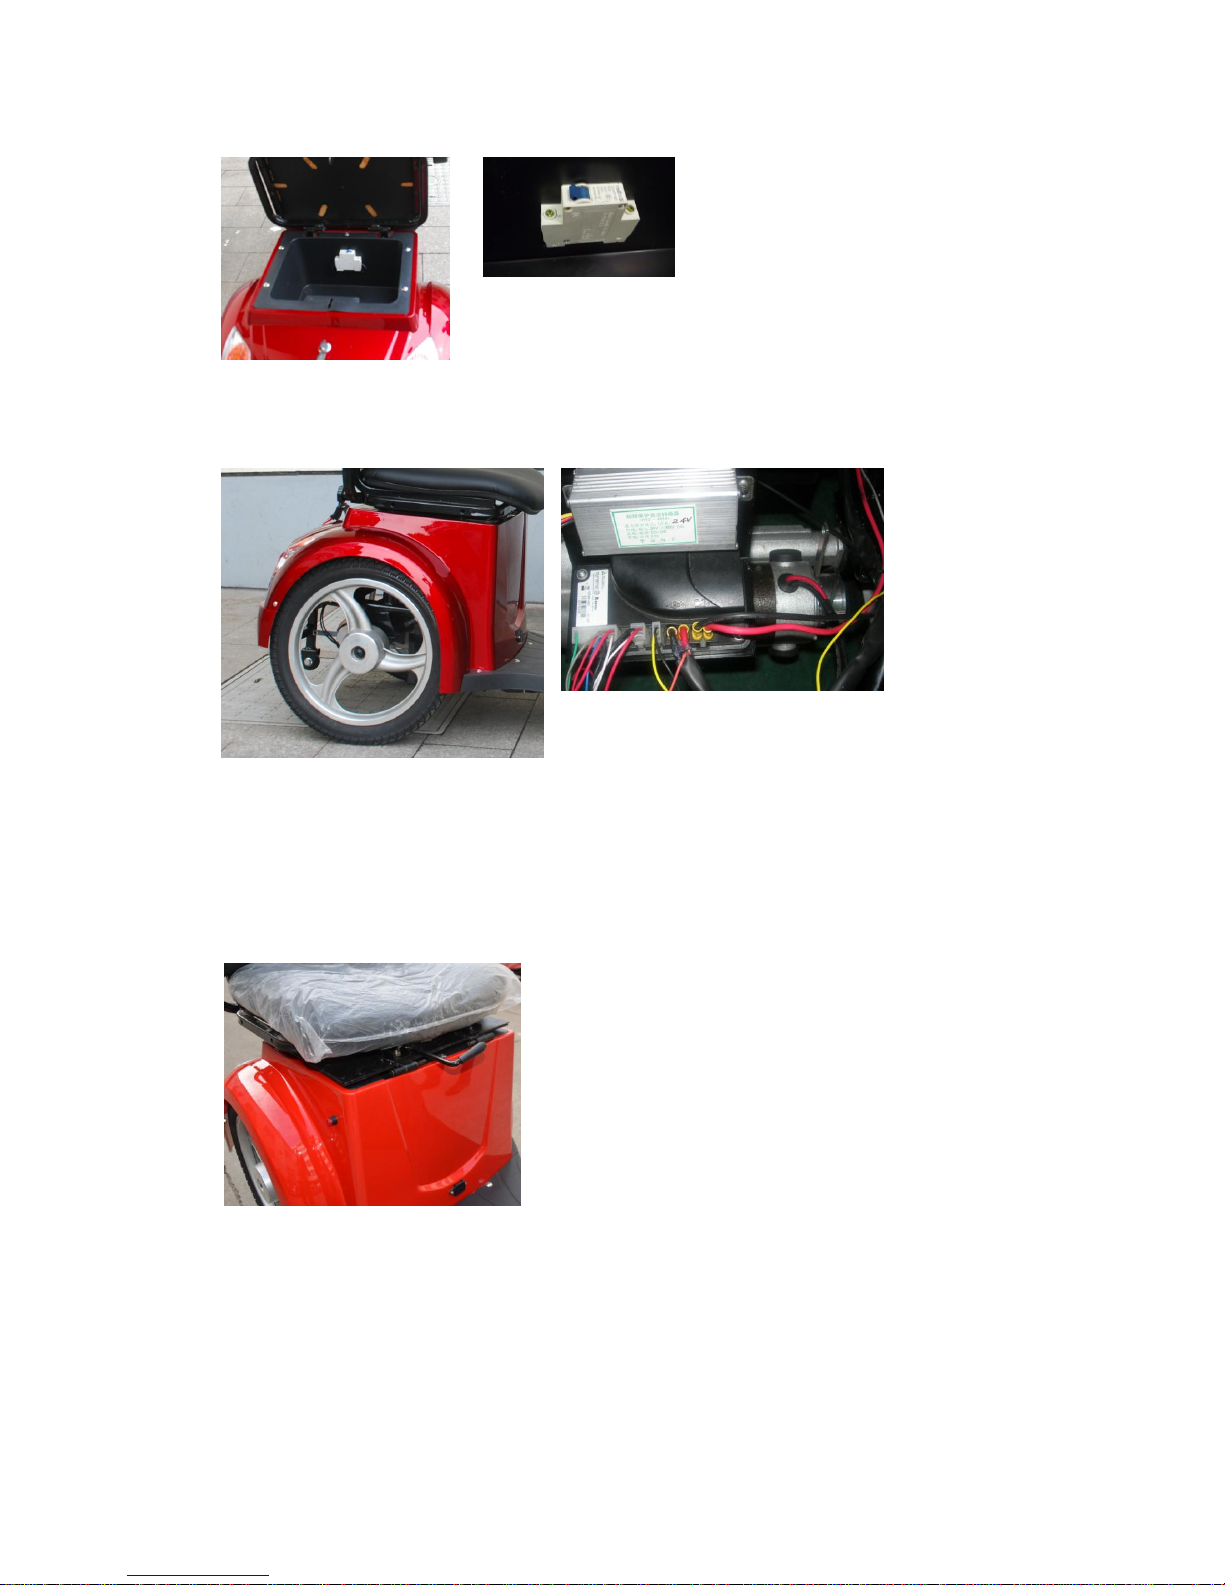
Figure 5 Figure 6
The circuit breaker switch (Figure 6)
can be located underneath the seat in
the seat barrel compartment (Figure 5).
While the operating current exceeds
the rated current, the circuit breaker
would cut the current, but with this circuit breaker switch you can
reconnect the current. If the scooter stops suddenly you, you
should check to see if this switch is turned off.
Figure 7 Figure 8
The different gear lever is used to cut off power to the
throttle. In the “down position” (Figure 7) the
different gear motor can be controlled by the throttle. In the “up position (Figure 8) the different
gear motor cannot be controlled by the throttle and will not allow you to increase speed.
**Note: If you want to change positions of the lever you must turn the power to power off and
then turn the power back on to change functions.
Figure 10
The seat adjustment lever (Figure 9) allows you to move
your seat forward or backwards. While sitting on the
seat, press the lever down and move forward or backwards
to find a suitable riding position.

14
ASSEMBLYAND SETUP
1) With the cardboard, steel frame top & sides, and packing material removed you are ready to
begin assembly. The tools needed for setup are included in the XMB-420 tool kit (located in the
compartment under the seat).
2) Attach the front wheel:
a. Remove the Axel Bolt from the Front Fork from where it is attached to the steel
frame base (be careful not to loose the carter key as you will be reusing it).
b. Place a solid support about 10” high under the floor board section to raise the
front of the scooter just enough to easily install the front wheel. Recommend two
people to raise XMB-420.
c. Slide the brake assembly (that is hanging down) into the wheel cavity.
d. Position the wheel between the forks with the spacer on the side of the wheel that
does not contain the brake assembly.
e. Slide the axle bolt through the center of the wheel hub.
f. Tighten the nut on the axle bolt and insert the cotter (safety) pin.
g. Inflate the front and rear tires to 35 psi.
h. With front wheel installed lift and remove the spacer under the floorboard.
i. Remove the wire ties holding the two rear wheels and roll XMB-420 off of steel
frame.
3) To make sure the alignment is correct, stand in front of the vehicle, using both legs to hold the
front wheel in a straight-forward position. Use both hands to grab the handle bar and turn it into
normal driving position (90 degree angle from the front wheel).
4) Attach the Rear View Mirrors into the mounting holes and carefully screw on. Use a wrench
to tighten the lock nuts at the base of each mirror when aligned.
5) Check if the brakes are properly adjusted. The brake handles should stop short of touching the
handgrip, when fully engaged. The rear brake cable can be adjusted in two places:
At the cable end bracket, just before the lever, with 8 and 10 mm wrench adjustments, and
At the end of the lever, with a 10 mm nut fastener.
Figure 10
The front brake is adjusted at the end of the cable, at the saddle
nut, as shown in Figure 10.
6) Install the cargo basket. Attach the cargo basket to the four
bolts on the back of the seat and secure it tightly.
7) Circuit Breaker. Using the ignition key, open the rear
storage compartment located under the seat. Locate the circuit breaker and switch it from off to
on
8) Your XMB-420 has been in transit and storage. You must charge the batteries before riding it.
See page 17 for battery charging instructions.

15
ROUTINE OPERATION
Pre-Ride Check
1) Be sure the tires 35 PSI air pressure. Alow tire pressure risk rim pinching (tube failure),
lowers your range (distance per charge) and may damage the differential.
2) Be sure the battery is fully charged. Riding on a low state-of-charge will reduce range,
and may damage the battery.
3) Verify the front and rear brakes are proper adjusted.
4) Make sure the XMB-420 is in good mechanical order. Visually inspect and hand-check
the vehicle, and snug any loose bolts, screws, and electrical terminals.
Steps to Startup
1) Confirm adjustment of the Rear View Mirrors so that you can see clearly behind you.
2) Insert the key into the key switch and turn the key from OFF to ON.
3) The XMB-420 has an onboard Voltmeter, indicating the Battery’s approximate
state-of-charge. It is normal for this reading to “sag” somewhat during acceleration.
Excessive Voltage “sag” is a sign of a depleted or damaged battery. When a battery is
exhausted, if you force it to supply energy, it will dramatically damage the battery. At this
time, the low-voltage protector will shut off the power automatically, protecting the
battery from further damage.
4) Lights: Light switch is located on the right side of the handle bars and can be controlled
by thumb. Push to center position for driving lights and to the left position for the
headlight.
5) Hold onto the handlebars with both hands.Assume a well-balanced position. Your right
hand will control the throttle. Push the throttle slowly to avoid a sudden rush of speed
forward. The speed of the bike will increase as you push the throttle. Release the
throttle and apply the brakes to stop your bike. You will control the speed of the bike by
using the throttle along with the brakes. When the brake handle is squeezed it cuts power
to the accelerator.
6) Give the XMB-420 some throttle and gradually increase the speed to adjust maximum
speed. Try not to brake and accelerate needlessly.
7) Return the key to the OFF position and take out the key after riding, to secure your
property and to save battery power.

16
Battery Care and Maintenance
What to Expect of Your Batteries, Ideally
The battery is a sealed lead-acid type, with a gel electrolyte. With normal use, it can last for well
over 300 charge/discharge cycles.
Know that normal use should mean partial, and not complete discharging. If you employ
“shallow” discharge cycles, using less than 30% of battery’s capacity, the battery can achieve up to
1,200 charge/discharge cycles.
Thus, it is good to charge the battery after each ride. A partial discharge will require less time on
the chargers.
What to Expect, Realistically
The battery can keep its performance for about 200 charge/discharge cycles, with high current and
deep (80%) discharging. The storage capacity of the battery will decline after 200 times
recharging. If you re-charge the battery before it is exhausted, you will dramatically extend the
battery’s cycle life.
In Summary
Always try to recharge the Battery Pack within 24 hours after use to maximize battery cycle life
and prevent damage.
What’s Inside Your XMB-420’s Battery
The Battery is composed of four 12 Volt, 24 Amp-hour capacity batteries, in series, for a total
capacity of 48 Volt 24 Ah.
The component batteries are a standard, commercially available size. Keep three things in mind,
however, should you choose to service your battery.
1) The batteries are soldered into place. Replacing batteries will require soldering
equipment and skills.
2) Batteries can be extremely dangerous. If allowed to short-circuit, they can cause burns,
create blinding arcs, or explode, causing serious injury. If you accept this risk, work
slowly, and exercise utmost care! Work with only one wire at one time.
3) Batteries solder, and soldering vapors contain lead, a toxic substance that can build up in
your body. Minimize your exposure to lead by wearing gloves, providing good
ventilation when soldering, and washing hands after soldering or handling batteries.
You should NEVER simultaneously solder and eat foods!
Battery Trouble
Should a battery ever leak, do not touch the battery liquid. If you are exposed to the solution, flush
17
the affected area with water. If you must handle the battery, wear disposable gloves. Replace the
battery if there are leaks, visible breaks or cracks. Dispose of used batteries by taking them to a
recycling center, or according to state and local laws.
Battery Temperature Sensitivity
Ambient temperature will affect almost every kind of battery. Usually, the battery shows good
discharging capability at higher air temperature. When the air temperature is under 0 ºF, the
battery power will decline more than one third. So it is natural that the XMB-420 will not reach its
normal mileage in winter or in cold weather. When the air temperature is up to 68 ºF, the
XMB-420 will achieve its normal range capability.
When the ambient temperature is over 110 ºF (as when exposed to summer sunshine for a long
period), batteries and other electric components usually run in an abnormal fashion.
What Does “Maximum Range” mean?
To determine the XMB-420’s maximum per-charge distance, the testing environment was:
Rider weight: 180 lbs
Air temperature: 77 ºF
No headwind, smooth, level road, infrequent braking and steady speed.
Under these conditions, the XMB-420’s maximum range is up to 35 miles.
Frequent braking and acceleration, driving into headwinds, up hills or with cargo will all cost a lot
of battery energy. In these conditions, the XMB-420 will not reach its normal range.
Battery Charging
Be sure to charge the battery completely if you will not use it for a long period. Ideally, you should
charge it every 20 days. Even a healthy battery will discharge itself slowly. Even with its power
off, the XMB-420 Battery state-of-charge will decline gradually over time.
Remember to fully charge the battery before your first ride. The battery may be low when you
receive your new XMB-420.
1) While charging the Battery, keep the key switch OFF.
2) Verify that you are using the correct charger for your vehicle, and that the charger input
power is compatible the “house current” in your area.

18
3) Keep the charger and battery away from water to prevent electrical shock and shorting.
The charger is intended for use in a covered dry area only.
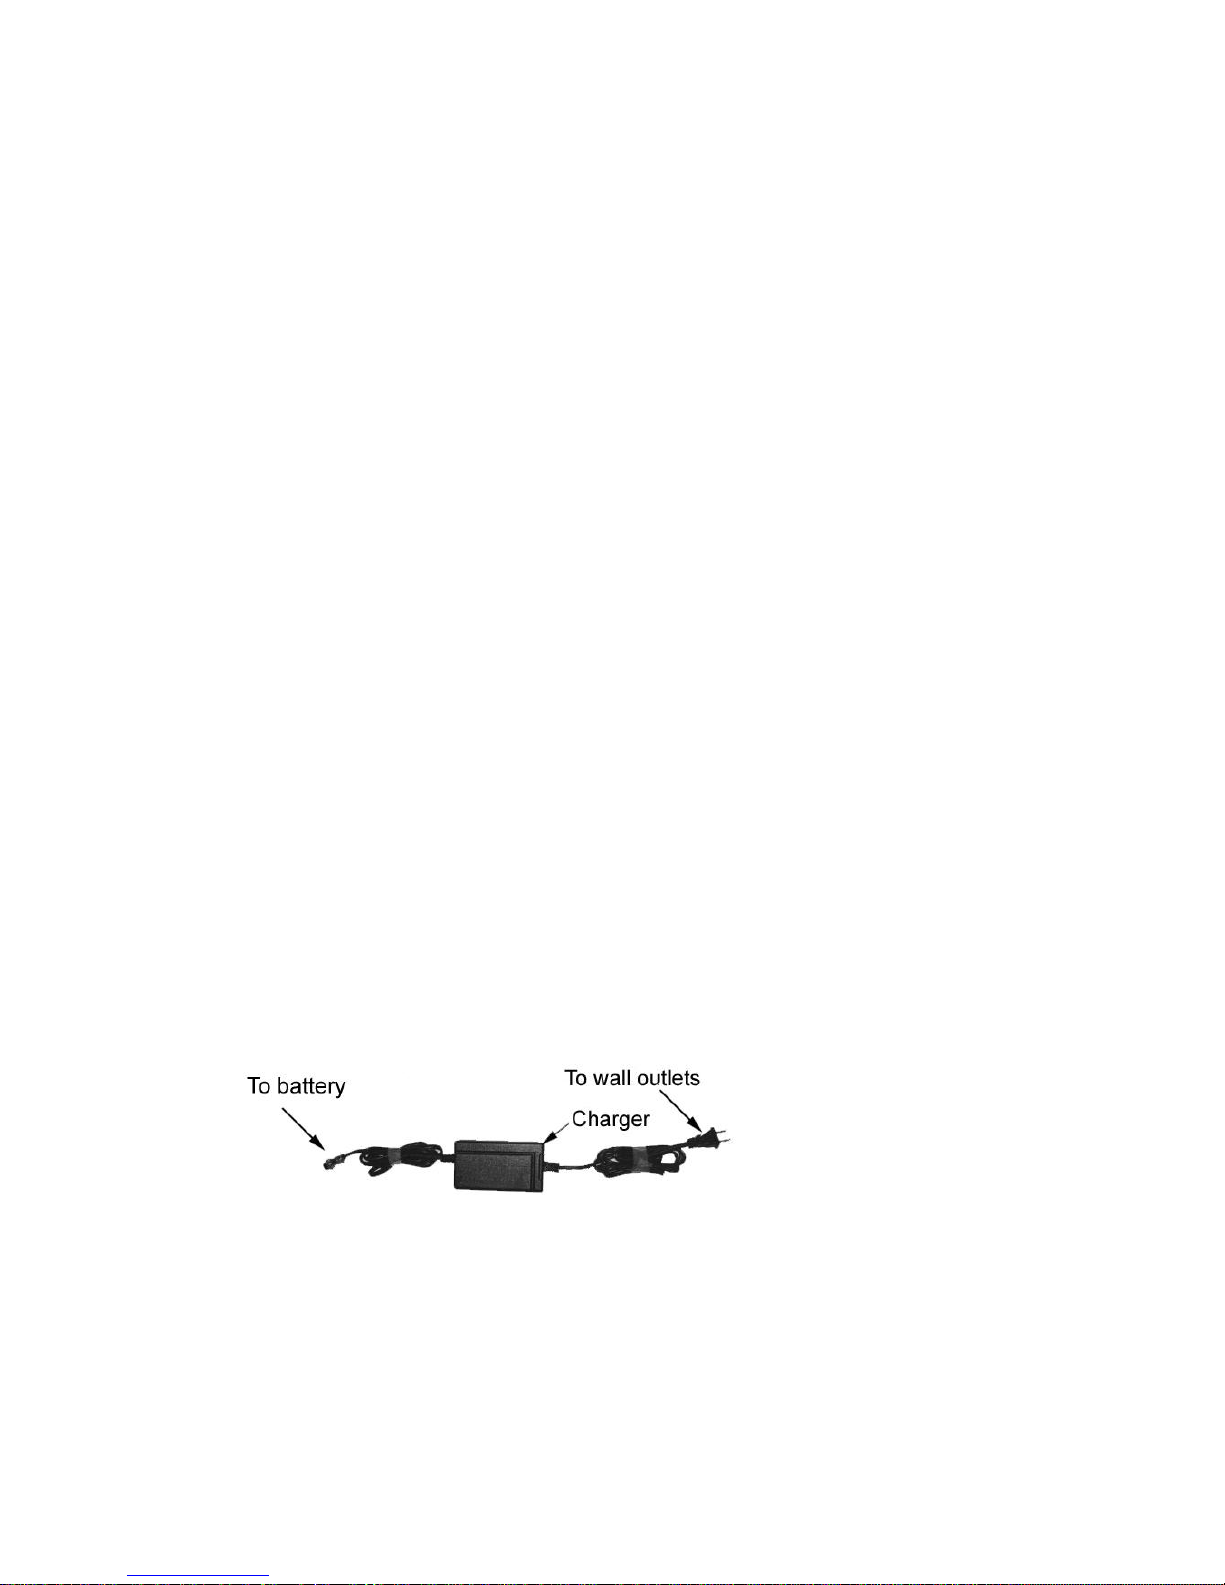
4) Plug the end of the charger’s cord into the socket of the adaptor first. Next connect the
adaptor to the XMB-420 (the charger port in located below the front of the seat). Then
plug the chargers’ AC cords into the wall outlet.
5) Read the charger label to learn about the charger indicator lights, and their meanings.
6) Generally, a short drive will require a short time to re-charge, and a long ride will require
a longer time. A complete (90%) discharge may require 6 hours to recharge. To
prevent electrolysis (battery fluid loss by hydrogen generation,) do not charge for longer
than eighteen hours.
Before riding the electric scooter for the first time, you must charge the batteries for 4-6 hours
using the supplied charger. To charge, pull the protective cover from the charging sockets.
Then plug the charger into the charging socket, and plug the charger into a wall outlet.
**IMPORTANT** The electric bike is powered by four 12V/24Ah batteries wired in series to
provide 48 volts of potential. All batteries charge simultaneously. You should charge your
XMB-420 after each ride. You should charge your XMB-420 if it has not been used for 30 days
or more.
**WARNING** Do not place the battery near heat or fire. Do not expose the chargers to water.

19
OTHER MAINTENANCE
Your XB-420M should be checked once a year for a thorough inspection and adjustment. This
can guarantee the comfort, safety and the normal operating life of the XMB-420.
Front and Rear Brakes
The adjustment of the front brake is the same as in a common motorcycle. It is very important to
brake effectively and to be sure that the battery shut-off device is in good condition. When the
brake lever is released, the wheel should spin without resistance. If it drags, it will waste a lot of
electric power. You should change the brake’s shoes when they are worn to one-third of their
original thickness.
The rear drum brake is very similar to the brakes on electric scooter products. When this brake is
exhausted, a squealing sound will be heard upon brake application.
Front and Rear Tires
The changing method of the front tire is the same as common bicycle. It is more complex to
change the rear tire because of the motor and brake assemblies, and associated wiring and cabling.
If you are not comfortable with undertaking this operation, you can ask your servicing dealer or
mechanic to change it.
Fuse
The XMB-420 comes with one 10AGlass Fuse. The fuse is located under the headlight fairing.
Lubrication
You should inspect and maintain your XMB-420 and lubricate the mechanical power transmission
components. The brake cables may also need lubrication
Lubricate the brake cables with silicone or graphite lubricant. Maintenance period: one month.
Lubricate the fork Shock Absorber tube, axle rim, and the axle ball bearing with SH/T0386
lubricant, scooter or lithium grease. Maintenance period: one year.
Cleaning
1) Never wash the scooter using high-pressure water, as it will cause damage to the electric
bike.
2) Never use lubricant to clean the metal parts of the scooter and never apply lubricant to the
drum brake and the tire.

20
Scheduled Maintenance
XMB-420 should be checked from time to time. Refer to the maintenance schedule in the
following chart:
Check ● adjust ◆change ▲ lubricate ■
Parts
daily
30
days
180
days
Bolts, nuts, screws, etc-to ensure that nothing is loose.
●
● ◆
● ■
Footboard-to ensure it is not worn out
●
● ■
● ■
Tire pressure-to ensure good tire pressure
●
Drive equipment-to ensure good position; not too loose, nor
too tight.
●
● ◆
● ■
Brake pads-to ensure it is not worn out.
● ◆
● ◆
Wheel rim- to ensure it is not distorted.
●
●
Steering Linkage- to ensure it is not distorted.
●
● ■
Front light, bugle-to ensure functioning properly.
●
Brake-to ensure it is working properly.
●
● ◆
● ◆
Throttle- to ensure that it is working properly.
●
Steering system-to ensure operation is normal.
●
■
Wheel axle- to ensure if it is loose
●
■
Motor-to see if it is working properly.
●
◆
◆
If you find problems that you cannot solve them yourself during your inspection and
maintenance, please send your scooter to your servicing dealer for help. Never take apart or
repair the scooter by yourself. If it causes any problem and voids the warranty, a service fee
will be imposed.
Table of contents
Other Xtreme Scooter manuals

Xtreme
Xtreme X-140 User manual

Xtreme
Xtreme X-250 User manual

Xtreme
Xtreme X-600 User manual

Xtreme
Xtreme X-010 User manual

Xtreme
Xtreme X-360 User manual

Xtreme
Xtreme X-10 User manual

Xtreme
Xtreme XG-575DS User manual

Xtreme
Xtreme X-600 User manual

Xtreme
Xtreme Rubicon 48V User manual

Xtreme
Xtreme X-140 User manual

Xtreme
Xtreme X-560 User manual

Xtreme
Xtreme XM-5000Li Troubleshooting guide

Xtreme
Xtreme METRO EXPRESS User manual

Xtreme
Xtreme XR-301 User manual

Xtreme
Xtreme XG-565 A-Blaze Signature Series User manual

Xtreme
Xtreme X-250 User manual

Xtreme
Xtreme XT300 User manual

Xtreme
Xtreme X-360 User manual

Xtreme
Xtreme XR-302 User manual

Xtreme
Xtreme XB-700Li User manual


