Hi-Z Antennas Hi-Z 8A-160 User manual
1
Hi-Z 8A Element Man. 3.0 © 2011 Hi-Z Antennas™ www.hizantennas.com
HIGH PERFORMANCE
HF RECEIVING SYSTEMS & COMPONENTS
Hi-Z Antennas™ 8 Element Narrow Systems **
Hi-Z 8A-160 (160 meters) 200 Foot Diameter Circle
Hi-Z 8A-80 (80 meters) 100 Foot Diameter Circle
(A models have the Pre-amp external)
Level1 PLUS Amps, Level2 with PLUS6 Amps
Hi-Z Amp & Hi-Z Amp PLUS6 Information located at the end of this manual
Constructing a LOW-Band (160, 80 meter) Receiving Narrow 8
Element Circular Antenna System
Please read the entire manual before proceeding with your install.
Specifications Hi-Z 8A –160 & Hi-Z 8A –80
13.5db RDF, Super Directive Array
8 crisp directions every 45 degrees, with 52 degree view per direction for total direction control
Power is 13.8VDC at 420ma
Upgradeable –future Hi-Z optional modules expanding capabilities
Check to see that all parts were received.

2
Hi-Z 8A Element Man. 3.0 © 2011 Hi-Z Antennas™ www.hizantennas.com
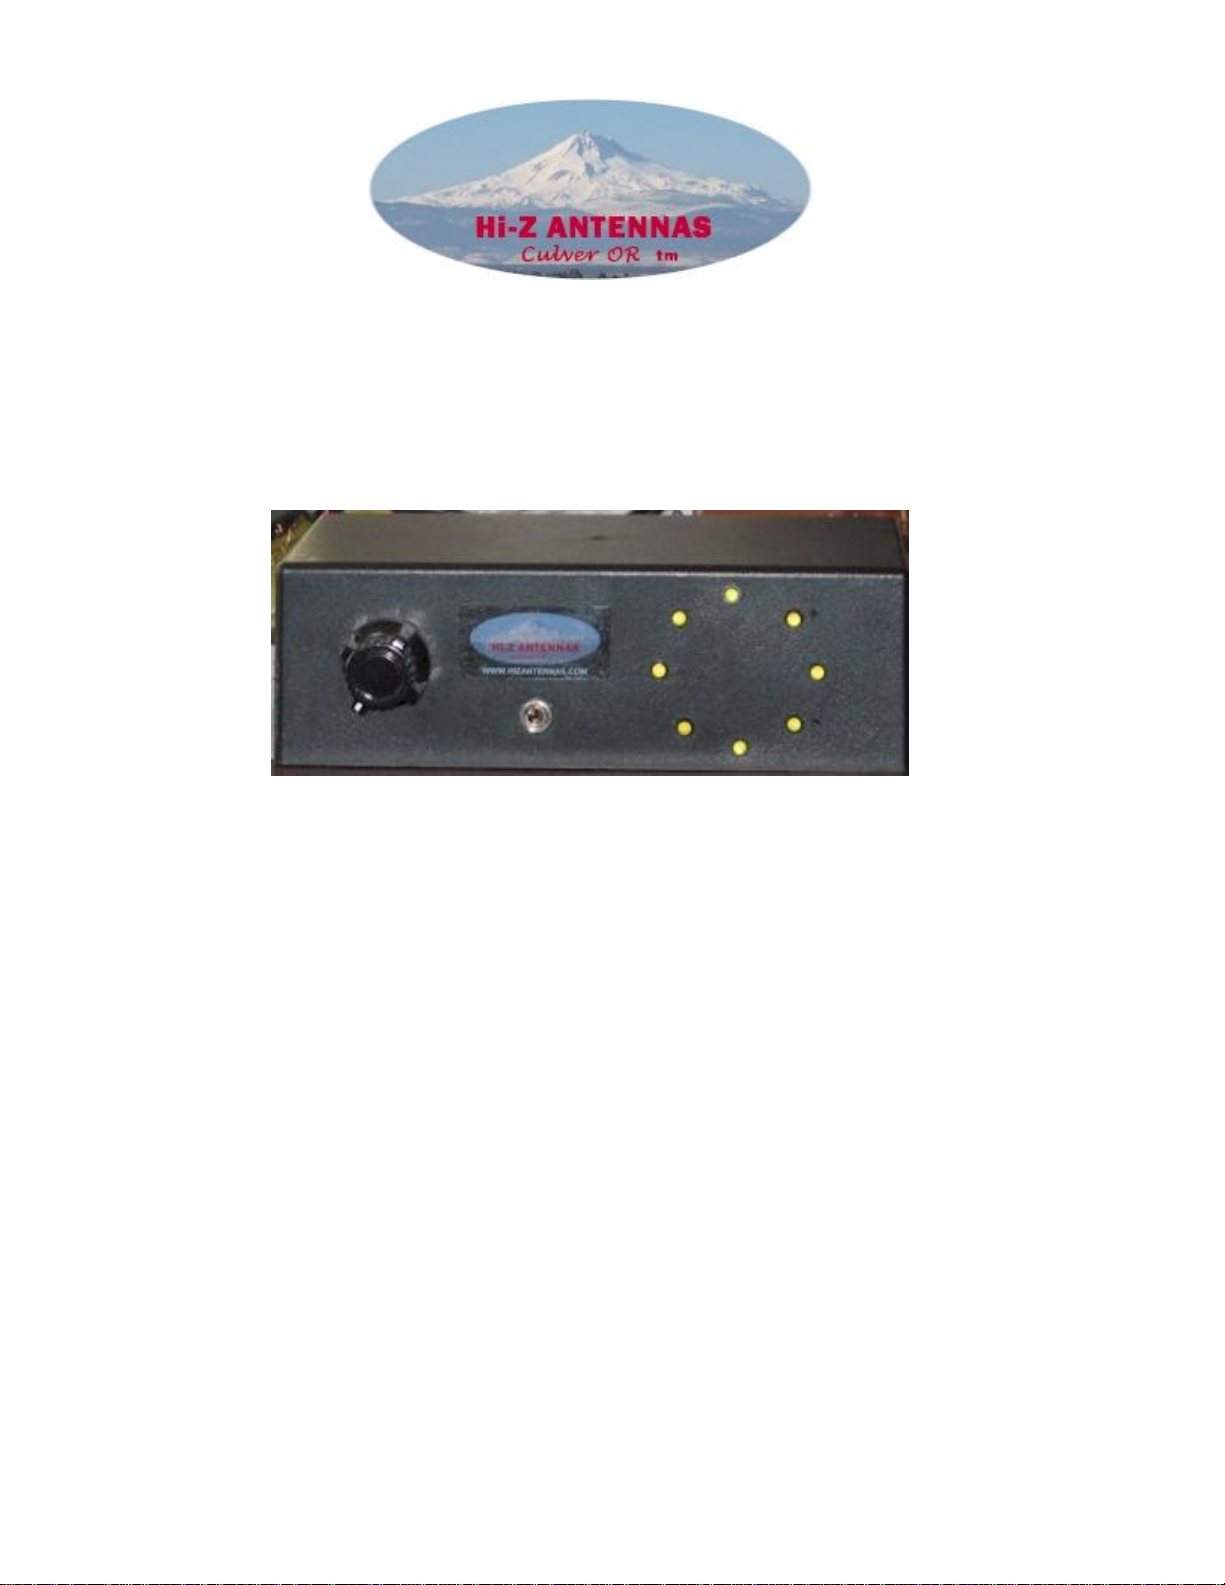
8125 Hi-Z 8A Phase Controller
1 –Hi-Z 8 direction Shack Switch
8 –Hi-Z Amp PLUS or PLUS6
1 –Hi-Z 75Ω In-line Pre-amp PLUS
1 –Hi-Z 75Ω to 50Ω Transformer
1 –2 foot long RG6 cables (to inserted the Pre-amp)
1 –2 foot long wire with terminals (power to Inline pre-amp)
Options
BCB Filter
HPF
At the end of this manual there is a chart of measurements to layout your array.
Material That the Customer Supplies –
1. Control cable (7 conductor –5 wires for control and 2 for power)
2. Short two conductor cable for DC power. Hi-Z supplies the connector for the shack switch.
3. 8 verticals See: http://www.hizantennas.com/hiz_verticals.htm
4. 8 short ground rods. Depending on soil type, in the range of 2 –3 feet long.
5. RG6 coax and connectors (connecting the verticals to the phase controller and from phase controller / in-line
pre-amp to shack receiver location). RG6 coax is more than adequate to lengths out to 1000 feet long.
6. Make 16 9-10” long wires. Wire size can be made from 18 –20 gauge wire. Terminate each end with #6 ring
terminals. Recommend that after the terminals are crimped, that these terminals are soldered for reliability.
For Hi-Z Amp terminations.
7. Weatherproofing the electronics. You will need an adequate cover or enclosure that will keep rain and snow
off the phase controller, in-line pre-amp and filters if installed, and the Hi-Z Amps at the base of each vertical.
Water getting inside of these enclosures WILL cause DAMAGE.
The Hi-Z Antennas 8 elements receiving system utilizing shortened vertical elements has been designed to provide
a high-performance receiving antenna for the Amateur low bands covering 160 or 80 meters. The unique
advantage of the 8-element system is that it can be switched electrically to provide receiving capability in eight
different directions. This system is also somewhat unique in that it uses high-impedance amplifiers at each antenna
to extract the signals. Using these amplifiers negates the need for an extensive ground radial system around each
antenna element in most areas with decent (1-2 foot deep dirt, not rock) ground conditions. This system can be
used in place of the well-known Beverage receiving antennas that use very long wire elements and only provide
one or two receiving directions per wire. This system can also be used in place of various types of receiving loops
and arrays of multiple loops. This system when well built will outperform most all other low-band receiving antenna
types.
See the antenna comparison chart here: http://www.hizantennas.com/comparison.pdf
What Can be Achieved With the Narrow 8 Circle Array
Most receiving systems being compared against another are most often compared for their front to back response
ratio and their directivity. Front to back ratio is generally expressed in dB and then directivity, Relative Directivity
Factor (RDF) in dB as well. There have been many spacing layout dimensions evaluated in order to get maximum
performance from these arrays. The results of this evaluation has shown that for an emphasis on 160 meter band
operation the circle dimension 200 feet diameter will give great performance on 160 meters. The same
performance on 80 meters requires only a 100-foot diameter. The following plots are based on a 160 meter band
diameter of 200 feet and they show the resulting performance characteristics. The phasing delay cable values
required in the 8 circle controller has been chosen for optimum performance. .
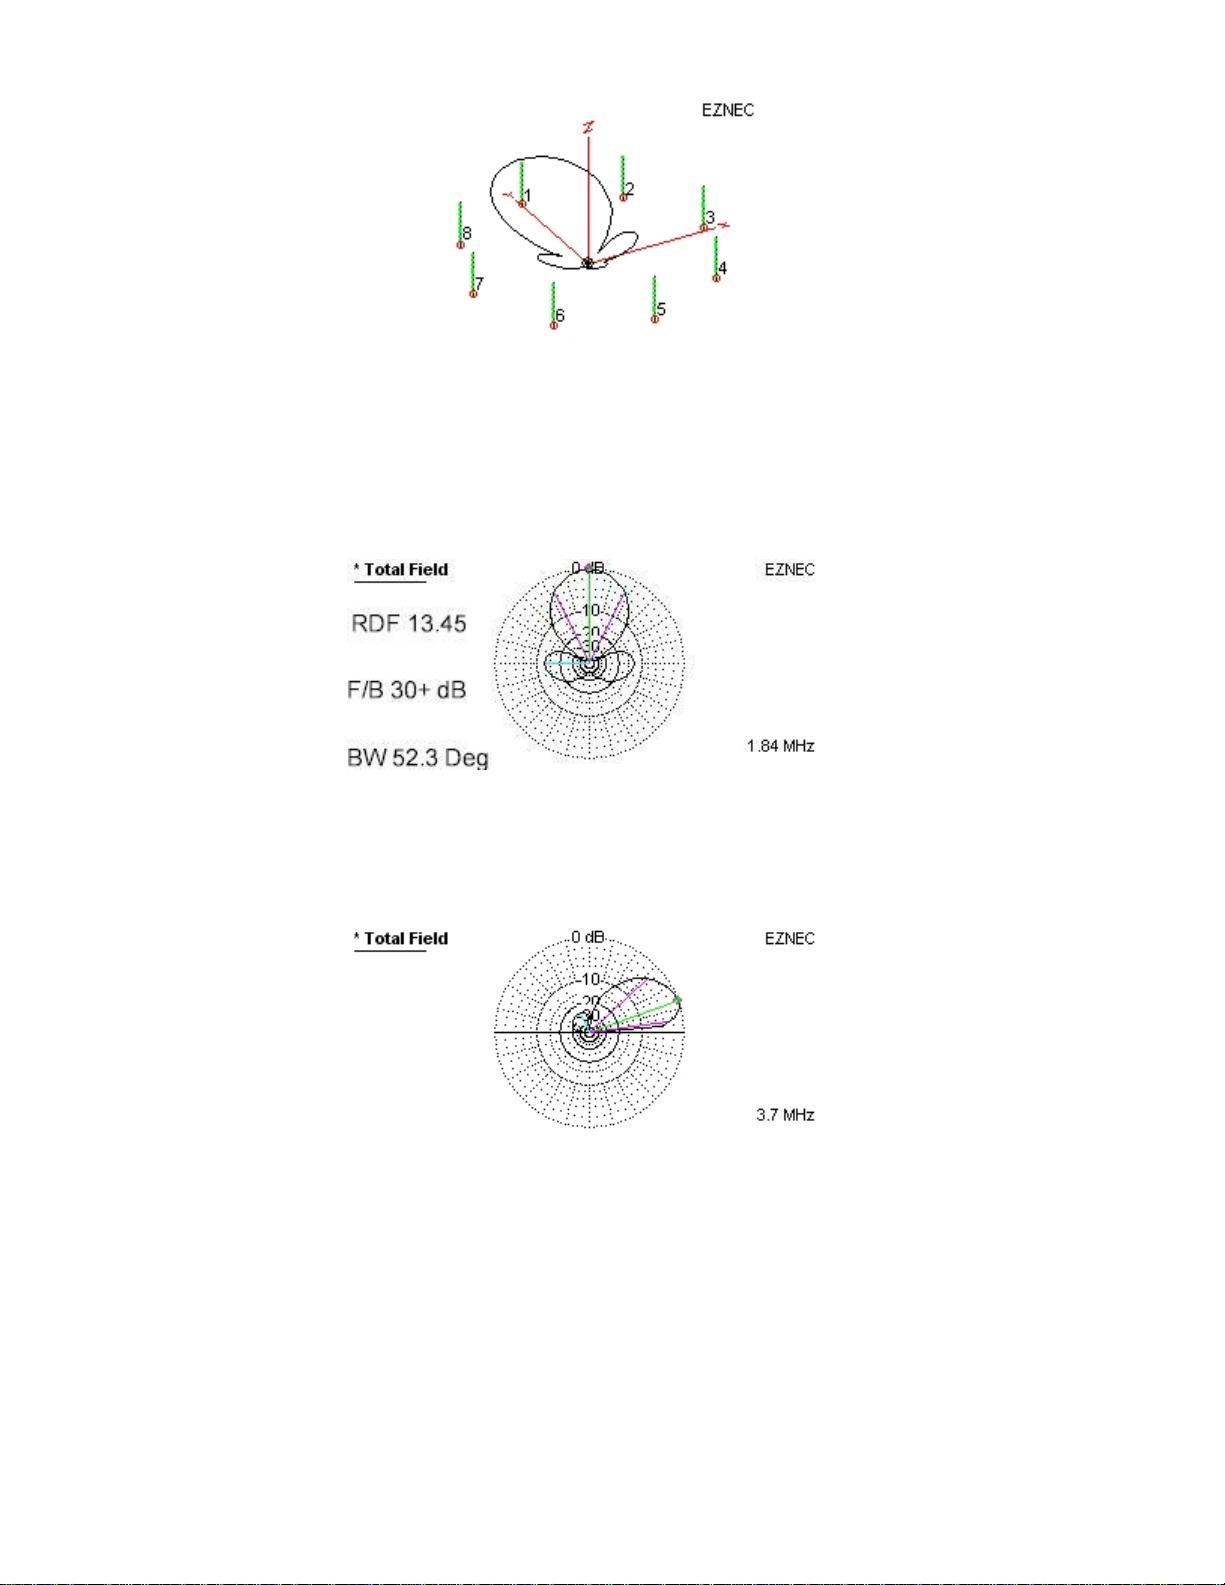
Basic Narrow 8 Circle Element Physical Layout
3
Hi-Z 8A Element Man. 3.0 © 2011 Hi-Z Antennas™ www.hizantennas.com
The Narrow 8-Circle physical layout with direction Switchable pattern overlay
as seen in the above layout the main lobe of the response is pointing directly at element 1. Electrically this pattern
can be switched to point at any of the elements, 1 through 8. .
Narrow 8 –200 Foot (160 meters), 8- 100 Foot (80 meters) Diameter Azimuth Plot
The long and short phasing cables are supplied and tested to provide best overall system performance.
Narrow 8 Elevation Plot
4
Hi-Z 8A Element Man. 3.0 © 2011 Hi-Z Antennas™ www.hizantennas.com
Constructing Elements for The Array
There are likely as many ways to construct elements for an 8-Circle array, as there are people in the world.
What the array needs is 8 insulated vertical elements that are as near identical as possible. Each vertical
needs a companion ground rod. For array operation at 160 meters and below the elements should be 15 to
20 feet in length. The 20-foot length has been established to be optimum for best signal output level
combined with voltage and phasing accuracy. The penalty in performance when dropping to 15-foot length
is indeed real but difficult to measure and there are successful systems using this length. If one were not
concerned with 160-meters but only higher bands such as twice the frequency at 80 meters and 100 foot
diameter, then a 10-foot element would be fine. There is one 160-meter system presently operating with just
6-foot elements and lowest band performance is marginal at best. It also required measuring and adjusting
element voltages and phases very accurately. If you want the best performance, stick with 15 to 24 foot
length elements with 20-24foot length being the best.
The diameter of the element has very little effect on the array. Some have used metal tubing while others
have used fiberglass fishing rods with small wire strung through the hollow center. A mounting arrangement
that utilizes large conducting surfaces close to the element will decrease the signal output of the element.
Even wet wood posts should be kept a minimum of 4 inches away from the elements. Plastic or ceramic
insulators are the best choice. PVC pipe works well. Each element will require a ground rod driven into at

5
Hi-Z 8A Element Man. 3.0 © 2011 Hi-Z Antennas™ www.hizantennas.com
least 1 to 2 feet of soil. For areas of really bad and dry soil it is recommended to use two or even 3 short
ground rods. Two feet length is fine. Pre-made Elements are available at.
http://www.hizantennas.com/hiz_verticals.htm
Over rocky, low conductivity areas it is unclear how well the system will work due to some phase and
amplitude shifts in received signal. In the worst of cases it may be necessary to install 6 or so short radials
of 6 foot in length. Identical radial layout has been measured to be a necessity with these arrays! There are
real and measurable inaccuracies when using radials below these Hi-Z elements. The best
recommendation when radials are needed would be stringent accuracy in layout of 6 to 8 each 6-foot long
radials below each element. Wire as small as 18 Ga. Would be fine. Do not use radials unless absolutely
necessary.
Connecting Cables
The antennas are arranged in a circle configuration with a diameter of 200 feet (160 meters) and 100 feet
(80 meters).
To calculate the needed connecting cables required for sending the signals from each antenna to the center
controller one can use the following formula.
Formula: Circle RADIUS plus 4 feet extra cable giving 100 feet plus 4 feet or 104 feet for 160 meters or 54
feet for 80 meters.
The length of these cables is not critical except that they all be the same length and from the same spool of
cable. This ensures the phase delay for each cable will be equal and therefore not require any length
compensations. Actual length is unimportant due to the impedance matching used in the system.
The way to get identical cables it to utilize one 1000-foot spool of RG-6. Cut 8 each 102-foot lines from
the spool for 160 meters or 8 each at 52 feet long for 80 meters. Use quality RG-6 connectors.
The following plot shows the overlap between two selected directions in the Narrow 8 array on 160
meters.
Hi-Z Amp PLUS & Hi-Z Amp PLUS6
The Hi-Z Amp requires weatherproofing, see our website for suggestion to wx-proof these amps.
The PLUS6 amps do not require wx-proofing, BUT the RG6 connection must be correct so as not
to leak WATER INTO THE COAX CONNECTION AND ULTIMATELY MIGRATE THE WATER
INTO THE INSIDE OF THE ENCLOSURE. Connect 8-10 inch wires to the input terminals of either
amp. The Antenna terminal connects to the base of each vertical element and the GND connects
to the ground rod at the base of each vertical.

6
Hi-Z 8A Element Man. 3.0 © 2011 Hi-Z Antennas™ www.hizantennas.com
LEVEL 1 Hi-Z Amp PLUS
Level 2 Hi-Z Amp PLUS6
Plus and PLUS6 amps look exactly the same from the outside. PLUS6 is a higher gain amplifier.
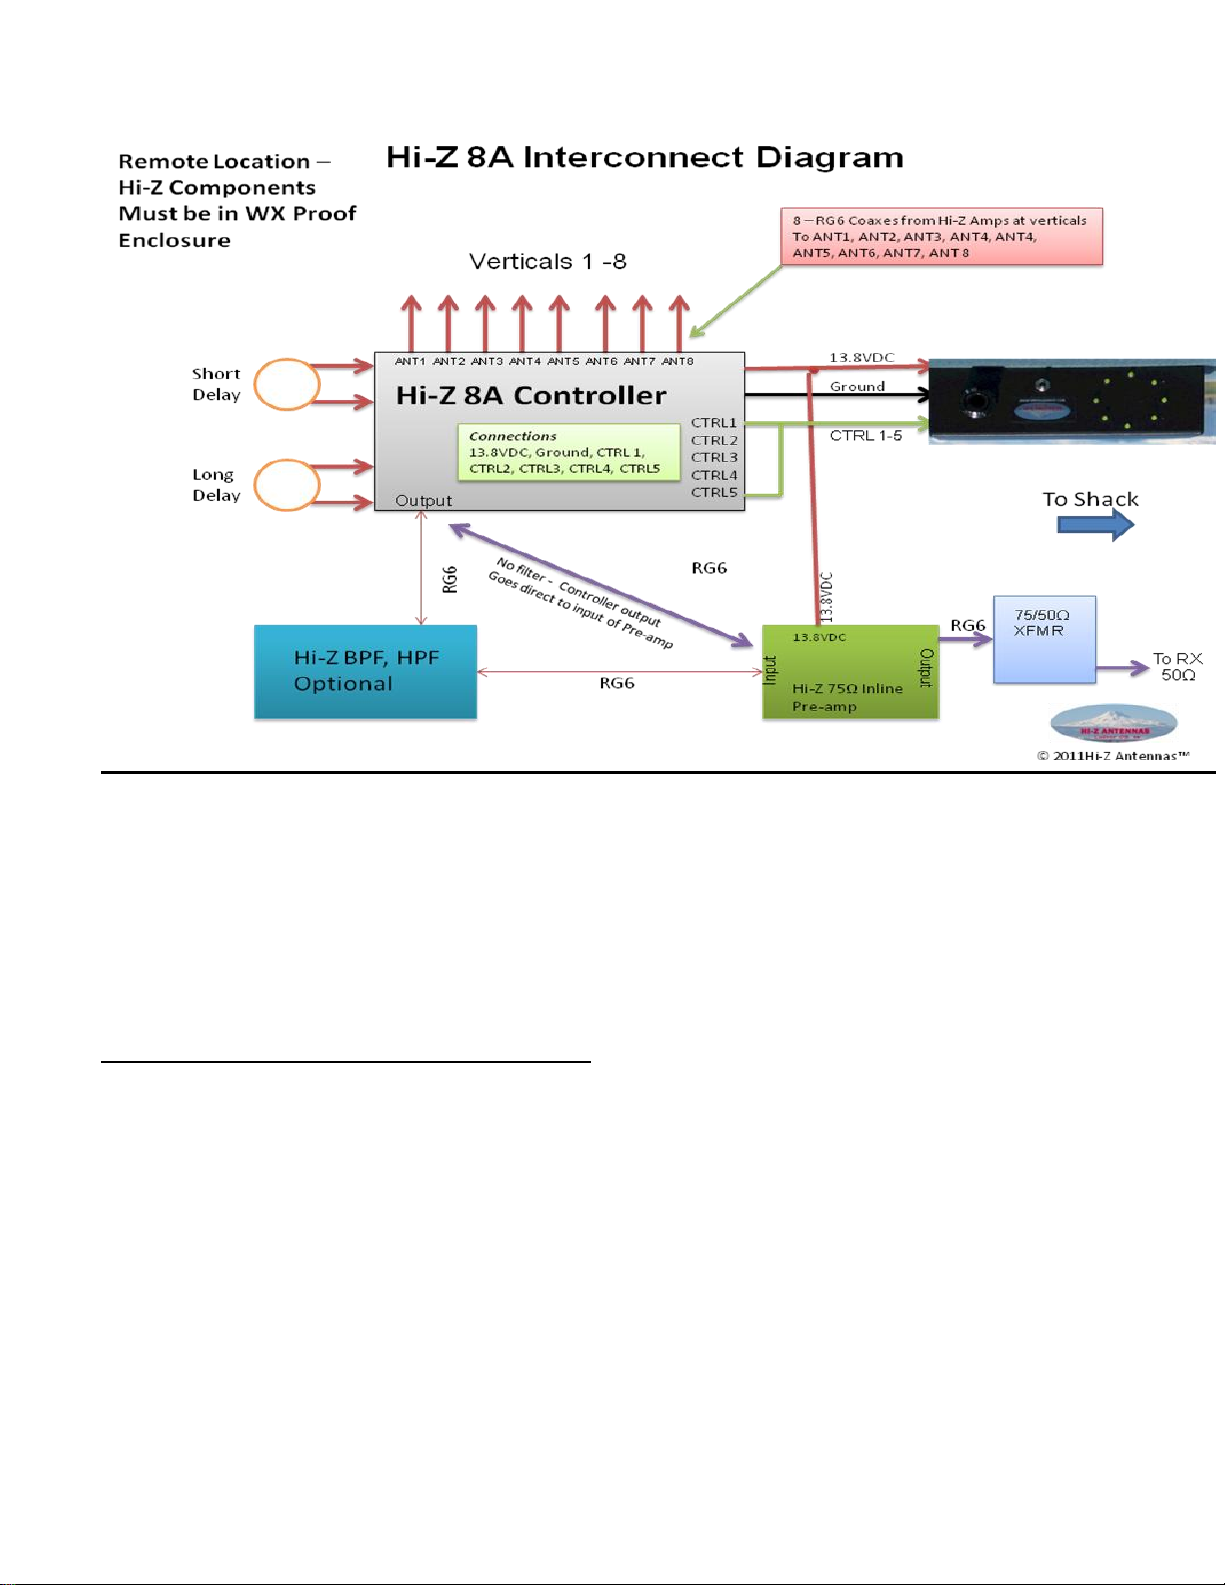
Connecting The Elements
It is very important to connect the elements to the center controller in numerical and shack switch matching
order as shown in the antenna view. One can certainly physically put your antenna 1 in any direction of the
compass. Direction 1 is typically North. That way when the Hi-Z antennas shack switch is used the LED indicators
will indicate direction just like looking at a North Up map.
7
Hi-Z 8A Element Man. 3.0 © 2011 Hi-Z Antennas™ www.hizantennas.com
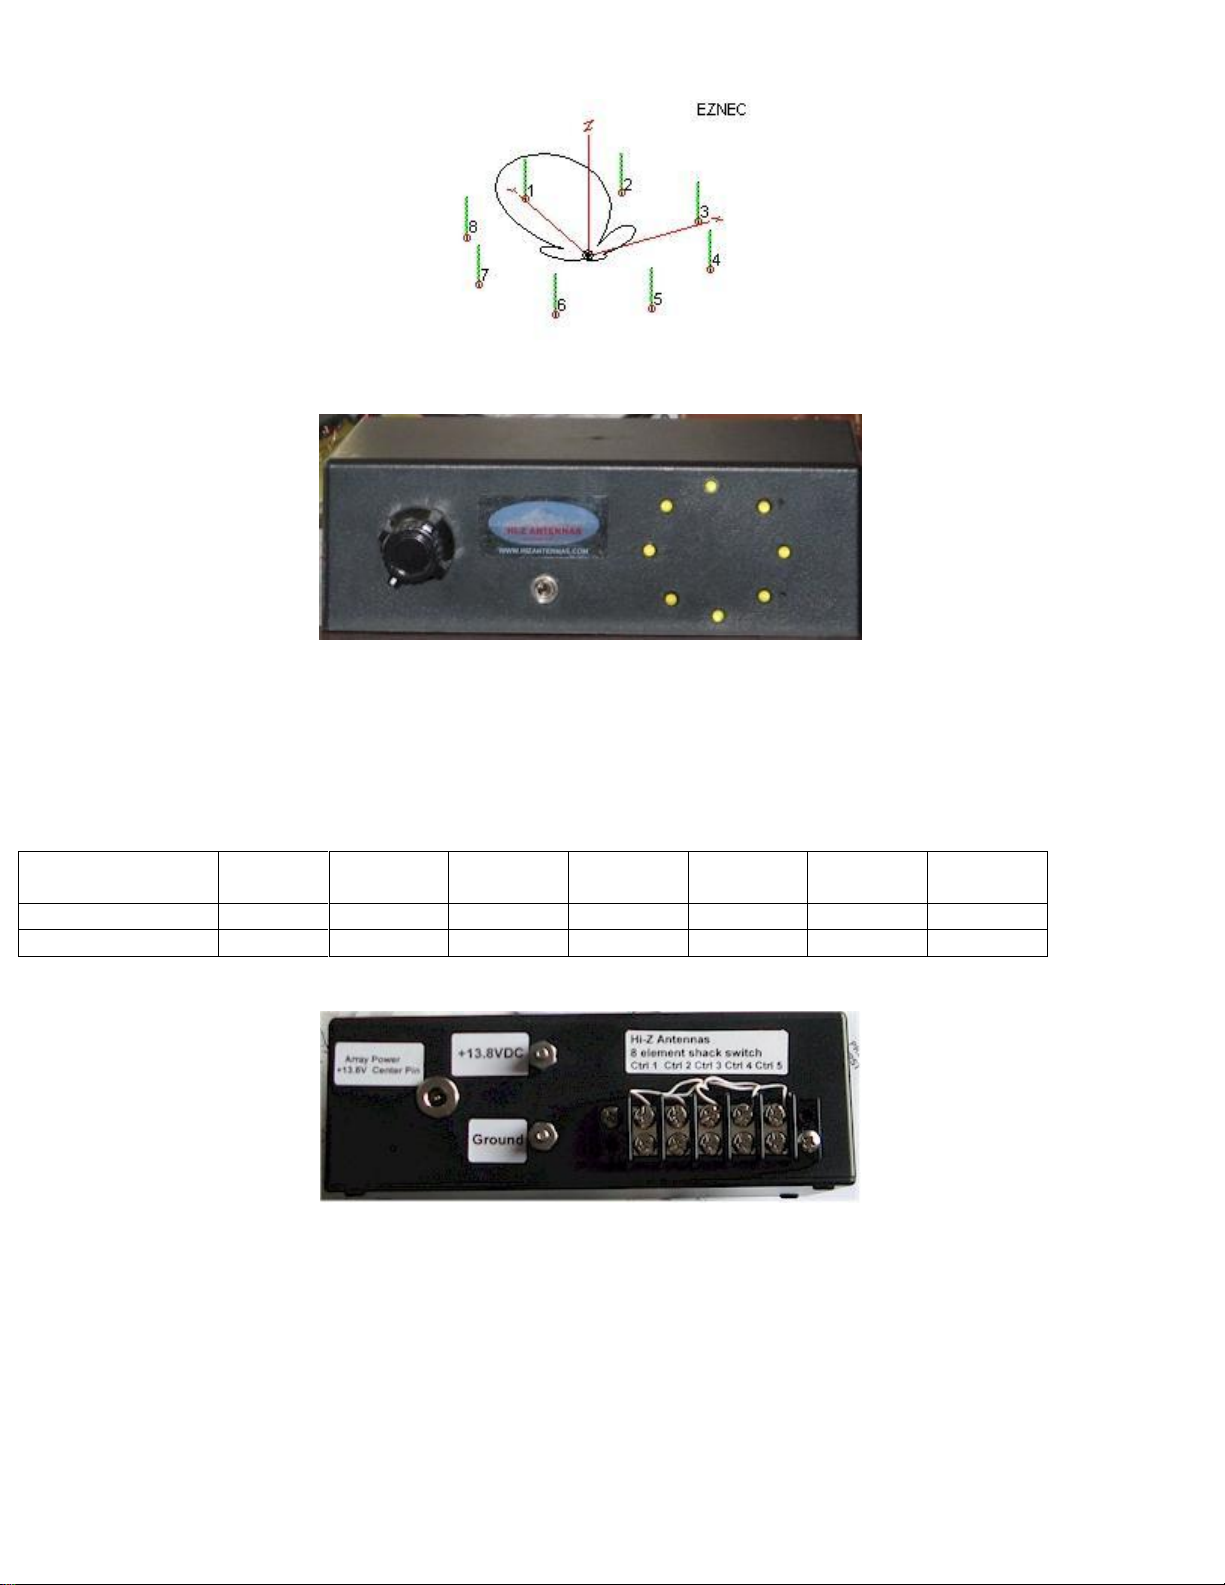
Shack Switch
The controller has 5 directional control connections plus a ground and +13.8V supply terminal. It is highly
recommended that you use a good copper round wire in addition to the coax shield to reduce DC voltage drop to
the controller. For runs up to 500 feet a control cable of #16 or #17 wire are adequate. Actually the control lines can
be smaller gauge, but the DC wires must be larger. Number 18 gauge or similar would be adequate for the
direction control lines.
CONNECTIONS
Between
13.8VDC
GNND
CTRL1
CTRL2
CTRL3
CTRL4
CTRL5
Shack Switch
X
X
X
X
X
X
X
Phase Controller
X
X
X
X
X
X
X
Rear View –Shack Switch
The control cable should be connected between the shack switch and the controller connections as seen below.
The supplied delay cables (SHORT, LONG) should be connected to “Short Delay” connectors and the “Long
Delay” connectors on the phase controller.
Array power is supplied through the array power connector. This allows the front panel toggle switch on the
front panel of the shack switch to switch the entire array on and off. The +13.8 terminal is used for sending power
out the control cable to the controller in the center of the array.
There is a 2 foot RG6 cable and 2 foot wire with fork lugs supplied with system. The 2 foot RG6 cable connects
from the Phase Controller Output to the Input of the 75ΩPre-amp. Connect one end of the 2 foot wire to +13.8VDC

8
Hi-Z 8A Element Man. 3.0 © 2011 Hi-Z Antennas™ www.hizantennas.com
at the Phase controller to +13.8VDC terminal on the 75ΩPre-amp, this supplies power. The ground connection is
made through the RG6 coax shield. The OUTPUT from the Pre-ampPLUS is connected to the RG6 feed coax to
the shack. On the shack end of the coax insert the 75/50ΩTransformer. The output of the Transformer requires a
BNC male connector. This end will connect to your RX port / connector.
Long Delay Cable & Control View Short Delay Cable and Power View
Antennas 1 –4 View
Antennas 5-8 View

9
Hi-Z 8A Element Man. 3.0 © 2011 Hi-Z Antennas™ www.hizantennas.com
Hi-Z 75ΩPre-amp PLUS
Hi-Z 75Ωto 50ΩTransformer
The direction-switching table is as follows.
DIRECTION
1= Ground Ctrl 1 N
2= Ground Ctrl 2 NE
3= Ground Ctrl 3 E
4= Ground Ctrl 4 SE
5= Ground Ctrl 1 & Ctrl 5 S
6= Ground Ctrl 2 & Ctrl 5 SW
7= Ground Ctrl 3 & Ctrl 5 W
8= Ground Ctrl 4 & Ctrl 5 NW
The output impedance of the array is 75 ohms. Although you could likely get away with just connecting it to you
50-ohm receiver under a lot of conditions, it is best if you use a matching 75 to 50 ohm transformer. This allows the
included preamplifier to give maximum IMD performance.
The Coax Power In terminal is provided to disconnect the +13.8VDC sent out to all the controller antenna
inputs for powering the Hi-Z amps at the elements. Removing the factory jumper removes the voltage on
the antenna inputs.
Signal Sources (handy device for testing and troubleshooting) http://www.hizantennas.com/signal_source.htm
For BCI:
Hi-Z Band Pass Filter (BPF) http://www.hizantennas.com/high_pass.htm
Hi-Z High Pass Filter (HPF) http://www.hizantennas.com/band_pass.htm
Troubleshooting:
Please look on our website at http://www.hizantennas.com/hiz_faq.htm

10
Hi-Z 8A Element Man. 3.0 © 2011 Hi-Z Antennas™ www.hizantennas.com
Technical Support: contact@hizantennas.com
Other Resources: http://www.hizantennas.com/application_notes.htm
Quick Start Guide
1. Lay out the 200-foot diameter (160 meters) or the 100 foot circle (80 meters) where nothing can come
within about 5 to 10 feet of each element.
2. Install the 8 Hi-Z type elements in the spacing of your choice. Check each element to make sure they are
insulated with very low leakage.
3. If the mounting post cannot be used as a ground rod then install a ground rod at each element. In really
dry, or shallow earth, two or more short rods should be used.
4. Prepare the element interconnecting cables by using the spool technique suggested in the connecting
cables paragraph. Install F connectors on each end of the cables.
5. Connect the Hi-Z amps PLUS or PLUS6 to the elements making sure the antenna terminal connects to
the element and the ground terminal goes to the ground rod.
6. Connect the interconnect cables to the F connector on each Hi-Z amp and arrange the free end of the
cables toward the center of the array.
7. Connect the delay cables to the controller. The system is shipped with factory made LONG and SHORT
delay cables and these are connected to their respective connectors on the phase controller.
8. Place the Hi-Z antennas 8 element controller in the center of the array. Connect the first left of North
(element 1) element to antenna 1 input on the controller. Proceed clockwise around the array in a circle
connecting the elements to input 2,3, and up to 8.
10. Connect a +13.8 VDC supply to the power terminals on the controller. It is also possible to use a 6-wire
control cable from the shack to the controller. The Shield of the feed line from the shack can be used for
the power ground connection and another conductor to supply the +13.8VDC. It is highly recommended
that you use a separate ground wire for long runs to the shack. It is imperative the supplied voltage at
the controller terminal does not go below 12 VDC under load.
11. Connect the Hi-Z 8 element controller shack switch box to the power supply at the shack and the control
lines to the correct terminals on the controller at the array.
12. The array should be complete and ready to use when the feed line is connected to a receiver. Install
the Hi-Z 75 to 50 ohm transformer to feed the normally 50-ohm input of the receiver. External receive
antenna ports are best to use, as the array will not survive an accidental transmission of RF into the
array output!

11
Hi-Z 8A Element Man. 3.0 © 2011 Hi-Z Antennas™ www.hizantennas.com
8 Circle Array Layout of Verticals
V1 –V8 = Verticals 1-8. Each vertical is 45 degrees spacing.
MODEL
Diameter
Radius
A
B
C
Hi-Z 8A –
160
200
100
76’ 6 7/16”
54’ 1 7/16”
Hi-Z 8A –80
100
50
92’ 4 5/8”
38’ 3 ¼”
27’ 11/16”
NOTE: All measurements are rounded to the nearest 1/16”.
All coaxes from controller to the vertical are equal length (Radius + 4 feet).

12
Hi-Z 8A Element Man. 3.0 © 2011 Hi-Z Antennas™ www.hizantennas.com
HIGH PERFORMANCE
HF RECEIVING SYSTEMS & COMPONENTS
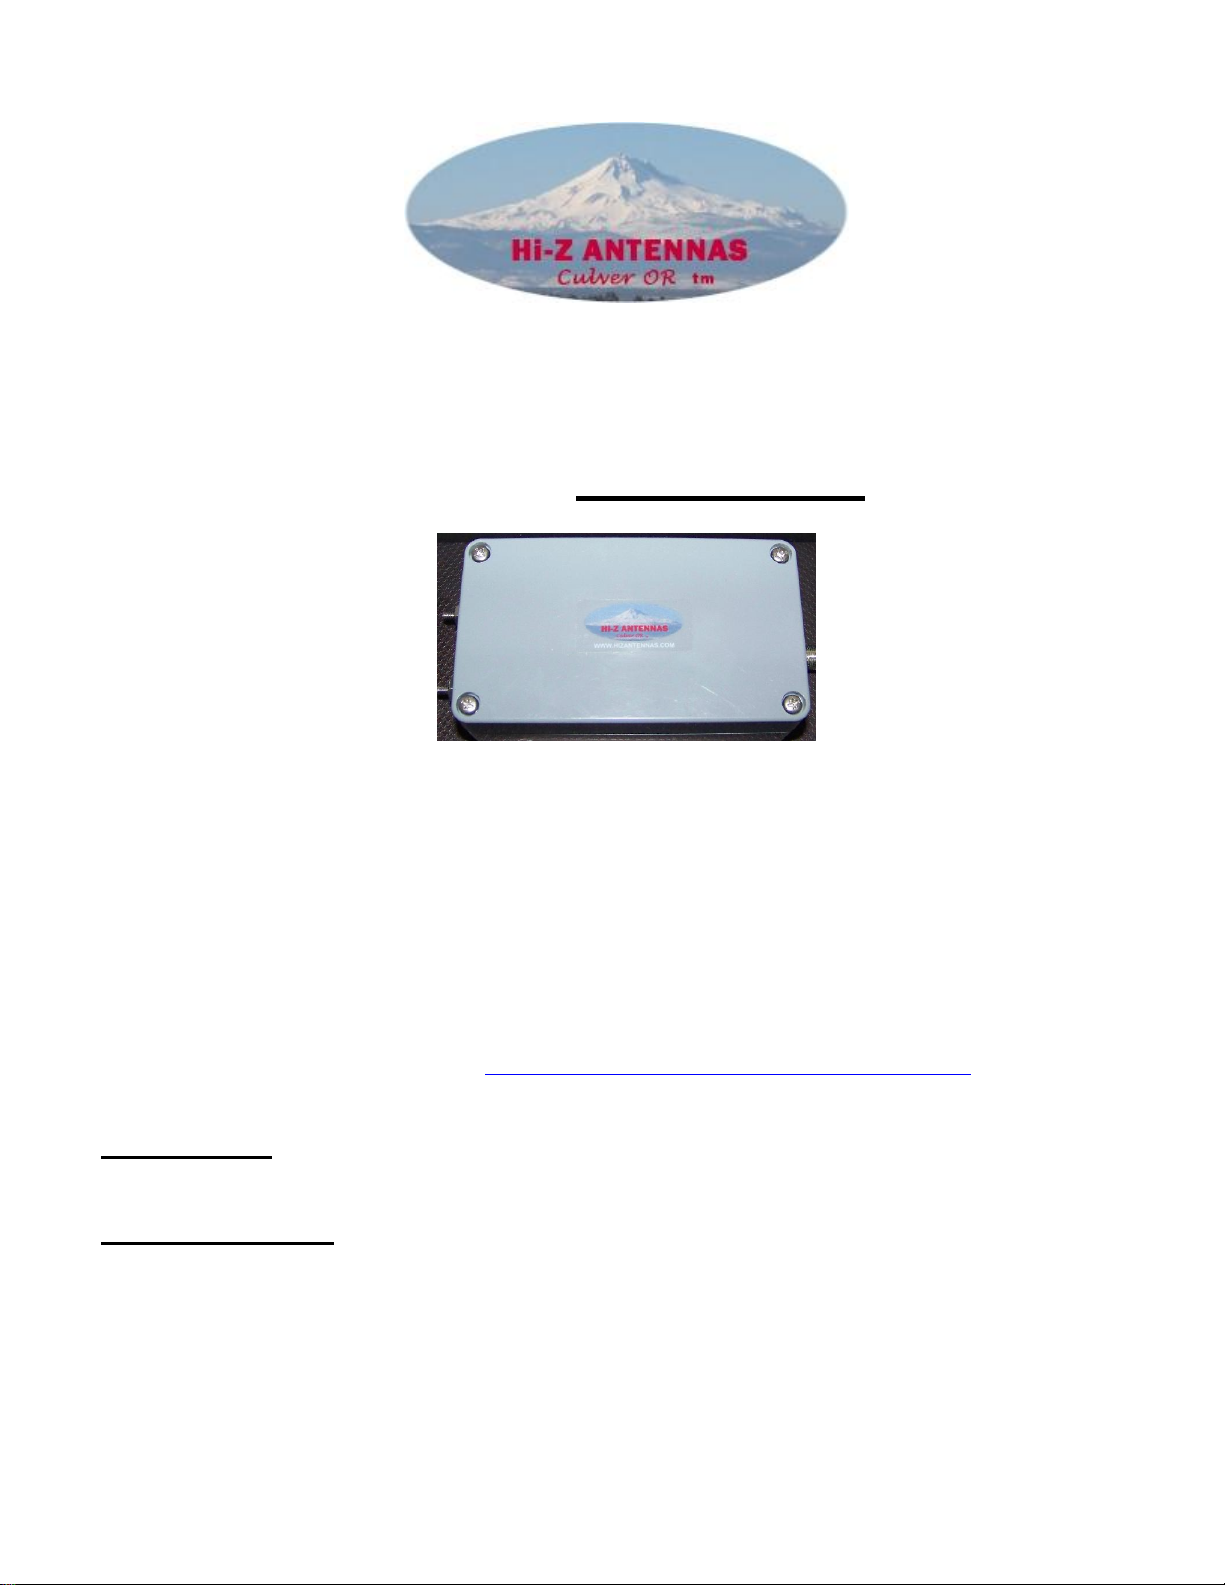
Hi-Z Antennas™ Hi-Z Amplifier PLUS
Hi-Z Amplifier PLUS
The Hi-Z Amplifier PLUS or PLUS6 were designed to provide amplification and matching between the short verticals
and the phase controller in the Hi-Z phased array control systems. This amplifier is used on ALL Hi-Z phased array
products. The amp is located at the base of each short vertical. The connecting wires must be short, in the range or 8-
10 inches long. When dressing or routing the wires between the vertical and ground rod to the Hi-Z Amps, maintain as
much separation between the ground and antenna wires as possible. If these wires are to close it will degrade the
system performance. The Hi-Z Amp MUST be Weatherproofed!!
Please review our application and technical notes to gain ideas for mounting the Hi-Z amplifiers near the base of the
verticals. See: http://www.hizantennas.com/hiz_verticals.htm
Features:
Relay input (lightning and static protection, when power is off)
Easy connections to the base of the vertical and ground
Terminals to Ground and Vertical Hi-Z Amp RG6 Output
Hi-Z Antennas™
8125 SW Larch Drive
Culver, OR 97734
USA
13
Hi-Z 8A Element Man. 3.0 © 2011 Hi-Z Antennas™ www.hizantennas.com
HIGH PERFORMANCE
HF RECEIVING SYSTEMS & COMPONENTS
Hi-Z Antennas™ Hi-Z Amplifier PLUS6
Hi-Z Amp PLUS6
The Hi-Z Amplifier PLUS and PLUS6 was designed to provide amplification and matching between
the short verticals and the phase controller in the Hi-Z phased array control systems. This amplifier
is used on ALL Hi-Z phased array products. The amp is located at the base of each short vertical.
The connecting wires must be short, in the range or 8-10 inches long. When dressing or routing
the wires between the vertical and ground rod to the Hi-Z Amps, maintain as much separation
between the ground and antenna wires as possible. If these wires are too close it will degrade the
system performance.
Please review our application and technical notes to gain ideas for mounting the Hi-Z amplifiers
near the base of the verticals. See: http://www.hizantennas.com/hiz_verticals.htm
Specifications:
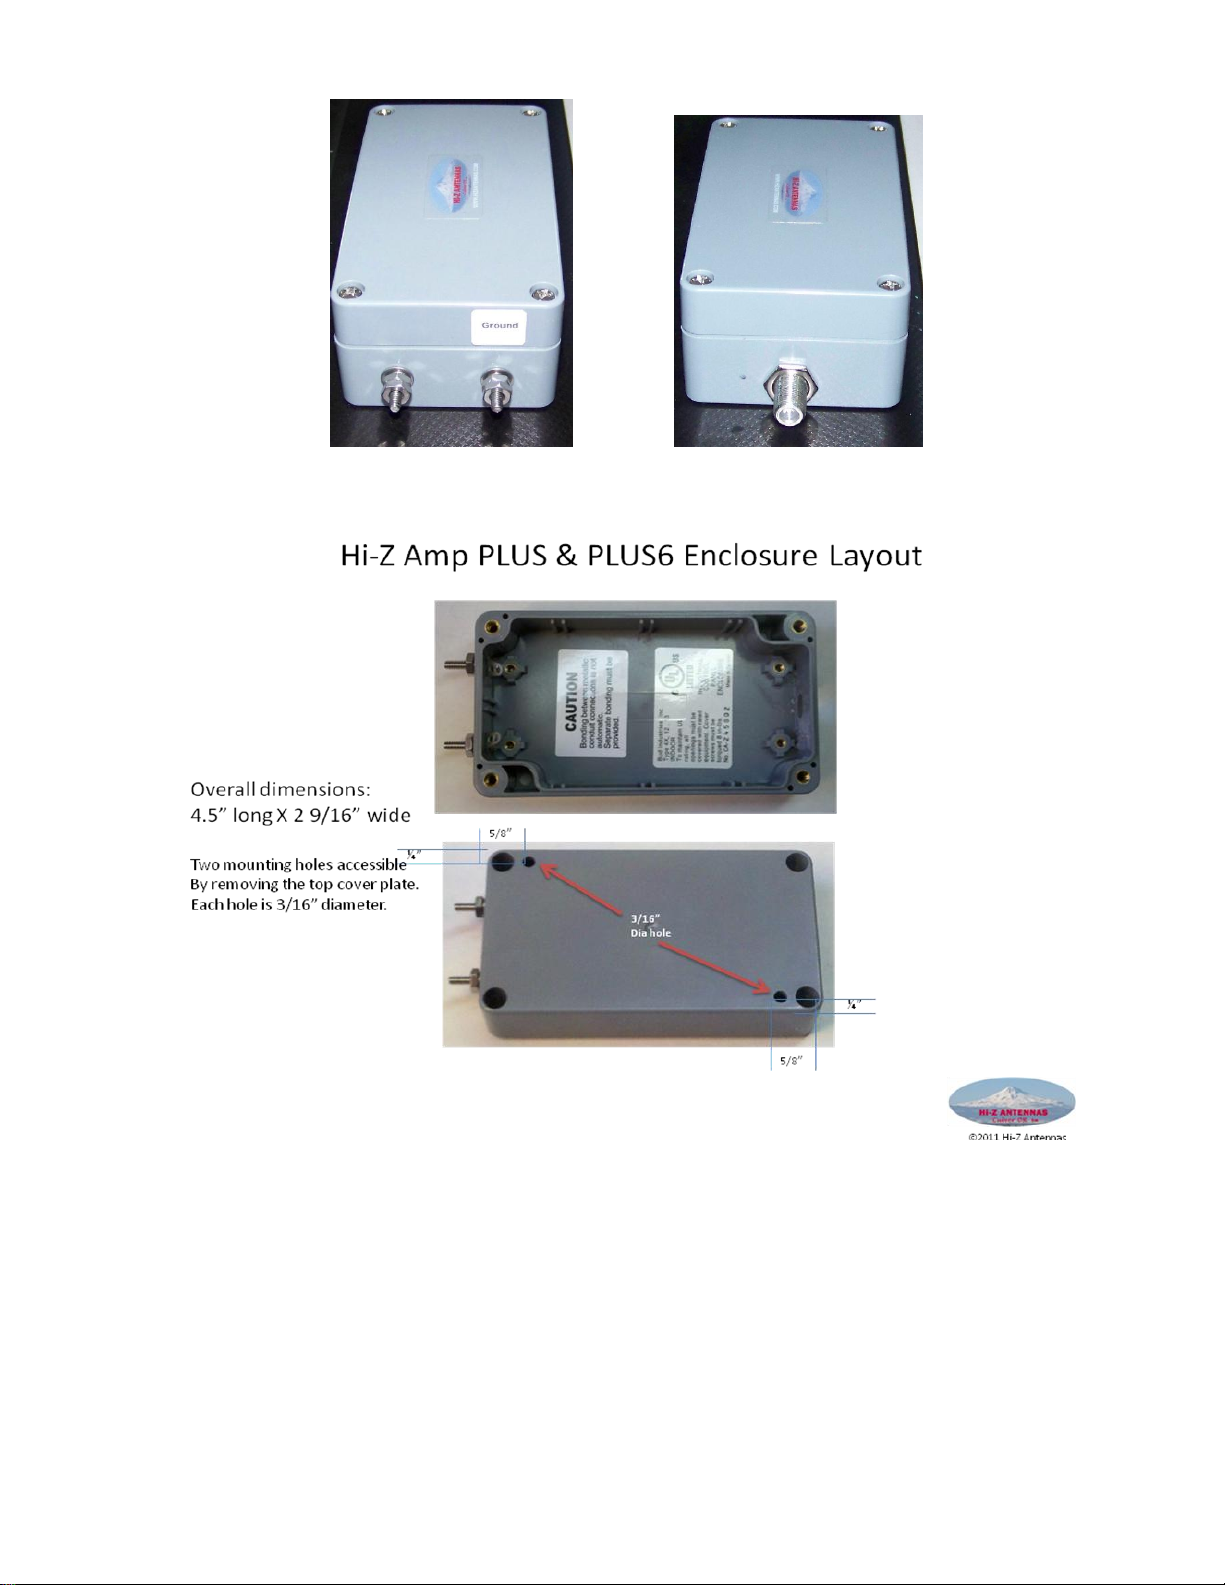
Increased gain model –PLUS6 0dB (both models maintain 75 ohm output impedance)
L=4.6 W=2.6 H=1.6 (not including the terminals or connectors)
Features & Benefits:
Rugged weatherized enclosure
No need to cover the amp, simplified mounting
Reduces cost (enclosures) and time to mount and connect the Amp to the vertical elements
14
Hi-Z 8A Element Man. 3.0 © 2011 Hi-Z Antennas™ www.hizantennas.com
Terminals to Ground and Vertical Hi-Z Amp RG6 Output
Mounting Detail:
THANK YOU for selecting Hi-Z Antennas™.
Hi-Z Antennas™
8125 SW Larch Drive
Culver, OR 97734
USA
** The Hi-Z 4, Hi-Z 8N, and the Hi-Z 8W products are being sold as permitted under the terms of a
certain License Agreement among PDS Electronics, Inc. dba DX Engineering, as the Licensor,
and Hi-Z Antennas and Lee Strahan, as the Licensees.
This manual suits for next models
1
Table of contents
Other Hi-Z Antennas Antenna manuals


Popular Antenna manuals by other brands

M2 Antenna Systems
M2 Antenna Systems 406-6SX quick start guide

Ubiquiti
Ubiquiti UniFi UAP-AC-M quick start guide

prodelin
prodelin TIER II Assembly manual

Emerson
Emerson 781S quick start guide

Panorama Antennas
Panorama Antennas LPB-6-60 installation instructions

Panorama Antennas
Panorama Antennas SW3-935 Installation instruction


