HIGH ONE 973156 User manual

EN
WARRANTY CONDITION
This product is guaranteed for a period of 2 years from the date of purchase* against any failure
resulting from a manufacturing or material defect. This warranty does not cover defects or
damage resulting from incorrect installation, improper use or abnormal wear of the product.
*as shown on the sales receipt.
FR
CONDITION DE GARANTIE
Ce produit est garanti pour une période de 2 ans à partir de la date d’achat*, contre toute
défaillance résultant d’un vice de fabrication ou de matériau. Cette garantie ne couvre pas
les vices ou les dommages résultant d’une mauvaise installation, d’une utilisation incorrecte
ou de l’usure anormale du produit.
*sur présentation du ticket de caisse.
NL
GARANTIEVOORWAARDEN
Dit product wordt gegarandeerd voor een periode van 2 jaar vanaf de aankoopdatum*, voor
elke storing die het gevolg is van een fabricagefout of het materiaal. Gebreken of schade
door slechte installatie, onjuist gebruik of abnormale slijtage van het product worden niet
gedekt door deze garantie.
*op vertoon van kassabon.
ES
CONDICIONES DE GARANTÍA
El certicado de garantía de este producto tiene una duración de 2 años a partir de la fecha
de compra* que se limita a los defectos de fabricación y averías del material. Se excluyen de
la garantía deciencias o daños originados por una mala instalación, errores en la manipu-
lación o por un uso inadecuado.
*previa presentación del comprobante de compra.
973156 - DHP 7 A++ W701T
ELECTRO DEPOT
1 route de Vendeville
59155 FACHES-THUMESNIL - FRANCE
INSTRUCTIONS FOR USE ....................02
CONSIGNES D'UTILISATION ....................36
GEBRUIKSAANWIJZINGEN ....................70
INSTRUCCIONES DE USO ...................104
04/2022-V2
Tumble dryer
Sèche-linge
Droogkast
Secadora
2/2

1
2
3
6
11
9
8
10
5
7
4

3EN
Preview of the appliance
A
3EN
Table of contents
2EN
Thank you!
Thank you for choosing this HIGHONE product.
Selected, tested, and recommended by ELECTRO
DEPOT,
the products of the HIGHONE brand are easy to use,
reliable and of an impeccable standard.
With this appliance, you can be confident that you'll
be satisfied every time you use it.
Welcome to ELECTRO DEPOT.
Visit our website: www.electrodepot.fr
AAppliance overview
CPractical information
BUsing the appliance Installation
Preparing the laundry
Using the tumble dryer
Cleaning and maintenance
Machine noise
Troubleshooting
Automatic fault warnings and what to do
Appliance description
5EN
Using the appliance
B
4EN
Preview of the appliance
A
Appliance description
1Top 7Maintenance ap
2Control panel 8Nameplate
3Door 9Lint lter
4Panel opening slot 10 Drawer cover
5Lower panel 11 Air inlet
6Adjustable feet
Installation
Connection to the water outlet (with optional drain hose)
On products with a condenser unit, water builds up in the water container during the drying
process. You must empty the water that has built up after each drying process. Instead of regularly
emptying the water container, you can also use the water drain hose provided with the product
so that the water drains straight out.
Connecting the water drain hose
1Pull and remove the end of the hose from the back of the tumble dryer. Do not use any tools to
withdraw the pipe.
2
Attach one end of the water drain hose (provided) into the slot, from where you removed
the hose.
3Attach the other end of the water drain hose directly to the water outlet or sink.
1
2 3
CAUTION:
The pipe must be connected in such a way that it cannot be
moved. If the hose comes out while the water is draining, it
could ood your home.

6 7
EN EN
Using the appliance Using the appliance
B B
IMPORTANT:
The water drain pipe must be tted at a maximum height of 80
cm.
The water drain hose must not be bent or raised between
the outlet and the machine.
Adjusting the feet
• To reduce the noise level and vibrations generated when the dryer is running, it must be stable
and balanced on its feet. Adjust the feet to ensure that the appliance is balanced.
• Rotate the feet clockwise/anticlockwise until the dryer is level and stable.
IMPORTANT:
Do not remove the adjustable feet.
Power supply connection
CAUTION:
There is a risk of a re and electric shock.
• The tumble dryer is set to 220-240 V and 50 Hz.
• The electric cable of the dryer is tted with a special plug. This plug must be connected to an
earthed outlet protected by a 16 amp fuse as specied on the nameplate. The rated current of
the fuse of the power supply to the socket concerned should also be 16 amps. Consult a qualied
electrician if such a socket or fuse is not available.
• Our company shall not be held liable for any damage resulting from a power supply that does
not have an earth connection.
IMPORTANT:
Using the appliance at low voltages will shorten its lifespan and
make it work less well.
Installation under a worktop
• When tting the appliance under a worktop, leave a gap of at least 3 cm between the side and
rear walls of the machine, and the underside of the worktop.
• Appliances to be installed under a worktop must be assembled/disassembled by an authorised
service agent.

8 9
EN EN
Using the appliance Using the appliance
B B
Preparing the laundry
Sorting the laundry before drying
Follow the instructions on the labels of the laundry to be dried. Only use the tumble dryer to dry
items that say "can be tumble dried" or have the equivalent symbol on the label.
• Do not load the machine with quantities and types of laundry that are not in keeping with those
specied in the Loading capacity section.
Suitable for drying in
a tumble dryer
Does not need to be
ironed
Dry on a delicate
cycle
Do not dry in a
tumble dryer
Do not dry Do not dry clean At any heat level On high heat
On medium heat On low heat No heat Extended drying
Dry at Hang when wet to
dry Dry in the shade Suitable for dry
cleaning
Do not dry ne, multi-layered or heavy fabrics together, as they will dry at dierent speeds. For this
reason, put clothing of a similar structure and type of fabric together. This method is used to achieve
consistent drying results. If you nd that the laundry is still damp, select an additional drying program.
Dry big items of laundry (e.g. duvets) and small items separately so that the laundry can dry
properly.
IMPORTANT:
Delicate fabrics, embroidered fabrics, woollen or silk fabrics,
clothes made of delicate and expensive fabrics, airtight clothes
and tulle curtains are not suitable for drying in the tumble dryer.
Preparing the laundry before drying
CAUTION:
Risk of an explosion and re!
Remove any items, such as lighters and matches, from the
pockets.
CAUTION:
The drum of the tumble dryer and the fabrics may be damaged.
• The clothes may have become tangled during the washing process. Separate them from each other
before putting them in the dryer.
• Remove any items from the pockets of the clothing and follow the instructions below.
• Fasten cloth belts, apron laces, etc., to each other or use a laundry bag.
• Close the zips, clasps and fasteners, and unbutton bedcover buttons.
• To obtain the best drying results, sort the laundry according to the type of fabric and drying
program.
• Remove the clips and other similar metal parts from clothing.

10 11
EN EN
Using the appliance Using the appliance
B B
• Woven materials like shirts and knitted garments generally shrink when they are dried for
the rst time. Use a protection program.
• Do not over-dry synthetics. Because it could cause creases.
• When washing the laundry that is to go in the tumble dryer, adjust the amount of fabric softener
according to the recommendations of the washing machine manufacturer.
Loading capacity
Follow the instructions in the "Program selection and consumption table" section. (See: Program
selection and consumption table). Do not load the machine with more laundry than the capacities
specied in the table.
IMPORTANT:
Do not load the tumble dryer with more laundry than that
showninthe gure.When overloaded,the drying quality drops,
which can cause damage to the tumble dryer and the laundry.
Laundry Dry weight (g)
Sheets (double) 725
Pillowcases 240
Bath towel 700
Hand towels 225
Shirt 190
Cotton shirt 200
Jeans 650
Fabric - Gabardine trousers 400
T-shirt 120

12 13
EN EN
Using the appliance Using the appliance
B B
Using the tumble dryer
Control panel
12
1Program selection button
2Electronic indicator and additional functions
Program selection button
Use the program selection button to select the drying program you want
60
40
20
Electronic indicator and additional functions
3h
6h
9h
End
End
Display symbols:
Indicator of the level of water in the container
Lint lter cleaning warning indicator
Condenser cleaning warning indicator
Drying indicator:
Drying
Cooling
End
End
• The electronic indicators display the progress of a current program. At the beginning of each step
of the program, the corresponding LED indicator lights up and the LED indicator of the completed
step goes out.
Program selection and consumption table
Press the On/O button to start the program. The On/O LED indicator which shows the start of the
program and the drying LED indicator lights up.

14 15
EN EN
Using the appliance Using the appliance
B B
Program Load
(kg)
Washing
machine
Spin speed
Approximate amount
of residual moisture
Duration
(minutes)
Extra drying of
the cotton (Extra
drying)
71000 60% 167
Cotton cupboard
dry 71000 60% 155
Cotton iron dry 71000 60% 130
Synthetics
cupboard dry 3.5 800 40% 68
Synthetics iron
dry 3.5 800 40% 58
Delicate 2600 50% 55
Mixed 41000 60% 112
Baby 31000 60% 78
Jeans 41000 60% 110
60 min - - - 60
40 min - - - 40
20 min - - - 20
Refresh - - - 10
Express 34' 11200 50% 34
Shirts 20' 0.5 1200 50% 20
Energy consumption values
Program Load (kg)
Washing
machine
Spin speed
Approximate
amount of
residual
moisture
Energy
consumption
values (kWh)
Cotton cupboard
dry 71000 60% 1.70
Cotton iron dry 71000 60% 1.50
Synthetics
cupboard dry 3.5 800 40% 0.76
Power consumption in "O mode" PO(W) 0.5
Power consumption in "O mode" PL(W) 1.0
The cotton cupboard dry program is the standard drying program which can be run with a full or
partial load. The information for this is on the product label and invoice. This program is the most
energy ecient for drying damp cotton clothes.
*Energy labelling standard program (EN 61121:2013)
All the values in the table have been determined in accordance with the EN 61121:2013 standard.
The consumption values may vary from the values given in the table depending on the type of
fabric, spin speed, ambient conditions and voltage.
60
40
20

16 17
EN EN
Using the appliance Using the appliance
B B
Secondary functions
The table that summarises the options that can be selected in the programs is given below.
Option Description
Anti-crease
If you select the "Anti-crease" option and do not open the door at the
end of the program, the Anti-Crease phase scheduled for 1 hour will
take 2 hours. After selecting the Anti-Crease option, you will hear
an audible warning signal. You can press the same button again to
cancel this option. If you open the door or press the Start/Pause
button while the anti-crease process is still in progress, this step
will be cancelled.
Delaying the start
You can delay the start time of the program by selecting the 3 hours, 6
hours or 9 hours option. You can enable the required delay by pressing
the On/O button. When the time comes, the selected program starts
automatically. During the time delay, the options that are compatible
with the program can be enabled/disabled.
Cancel the warning
sound
The dryer emits an audible warning when you turn the program
selection button and when you press the buttons at the end of the
program. To cancel these warnings, press and hold the "Delicate
Drying Option" button for 3 seconds. If you press this button, you will
hear a warning sound indicating that the option has been cancelled.
Option Description
Child lock
There is a child lock option to prevent changes to the program
when buttons are pressed during the program. To enable the child
lock, the user must press and hold the "Delay Timer" and "Anti-
crease" buttons at the same time for 3 seconds. When the child
lock is enabled, all the buttons are disabled. The child lock is not
automatically disabled at the end of the program. To disable the child
lock at the end of the program, turn the program selection button
to the "O" position. Then, turn the program selection button to the
rst position. The child lock stays active. To disable the child lock,
the user must press and hold the "Delay timer" and "Anti-crease"
buttons at the same time for 3 seconds. When you enable/disable
the child lock, the "Anti-crease" option light ashes and an audible
signal sounds. Warning: if you turn the program selection button
when the product is running or the child lock is enabled, you will hear
an audible warning. Even if you set the program selection button to
another program, the previously selected program will continue to
run. To select a new program, you must disable the child lock before
resetting the program selection button.

18 19
EN EN
Using the appliance Using the appliance
B B
Starting the program
The Start/Pause LED will ash during program selection. Press the Start/Pause button to start the
program. The Start/Pause LED, which indicates that the program has started, and the drying LED will
come on.
Program Description
Extra drying
of the cotton
(Extra dry)
This program dries thick and multi-layered fabrics, such as cotton towels,
sheets, pillowcases and bathrobes at a high temperature so that they can
be immediately folded away in a cupboard.
Cotton
cupboard dry
This program dries cotton pyjamas, underwear, tablecloths, etc., so that
they can be immediately folded away in a cupboard.
Cotton iron dry
This program dries cotton laundry so that it is ready to be ironed. When the
laundry comes out of the machine, it is damp.
Synthetics
cupboard dry
This program dries synthetic fabrics, such as shirts and blouses, at a lower
temperature than the "cottons" program so that they can be immediately
folded away in a cupboard.
Synthetics iron
dry
This program dries synthetic fabrics, such as shirts, T-shirts and blouses
at a lower temperature than the "cottons" program to make them ready to
be ironed. When the laundry comes out of the machine, it is damp.
Delicate
This program dries light garments, such as shirts, blouses and silk linens,
at a low temperature to make them ready to wear.
Mix This program dries laundry composed of a mix of cotton and synthetic fabrics,
whose colours does not fade, to make them ready to wear.
Baby care
This program dries delicate children's clothes at a low temperature to make
them ready to wear.
Jeans This program is used to dry jeans.
Time programs
To attain the required drying level at low temperatures, you can use the 20
min, 40 min and 60 min timed programs. Regardless of the drying level, the
program stops at the required time.
Refresh
This program provides 10 minutes of ventilation without heat so that your
clothing can cool down.
Express 34'
1 kg of cotton shirts spun at high speed in the washing machine are dried
in 34 minutes.
Shirts 20' 2 to 3 shirts are ready to be ironed after 20 minutes.
IMPORTANT:
Do not open the door when the program is running. If you have
to open the door, do not leave it open for a long time.
Energy-saving mode
If you do not press any button for 15 minutes at the program selection stage, the dryer will go into
energy-saving mode to reduce the consumption of energy. The "End" light ashes, i.e. it alternates
between being on for 0.5 seconds and o for 3 seconds. To select a program and start it, you have to
switch the dryer o and on again.
Program progress
The program monitoring indicator displays the progress of the current program. At the beginning
of each step of the program, the corresponding LED indicator lights up and the LED indicator
of the completed step goes out.
Dry:
• It stays on during the whole drying process until the drying level reaches "Cooling".
Cooling:
• It lights up when the drying level reaches "Cooling" and stays on until the next step.
End:
• It lights up at the end of the programme.
During the program
• If you open the door while the program is running, the machine switches to standby mode.
Once the door is closed, press the Start/Stop button to resume the programme.
• Do not open the door when the program is running. If you have to open the door, do not leave
it open for a long time.

20 21
EN EN
Using the appliance Using the appliance
B B
End of the program
When the program is nished, the On/O, container water level, lter cleaning and condenser
cleaning LED indicators light up. What's more, a warning sound is emitted at the end of the
program. You can remove the laundry to prepare the machine for a new load.
IMPORTANT:
Clean the lint lter after each program. Empty the water
container after each program.
If you do not remove the laundry at the end of the program,
the 1-hour Anti-Crease phase will automatically be enabled.
This program rotates the drum at regular intervals to
prevent creasing.
Drum lighting information
• This product includes a drum lighting LED. The light switches on automatically when you open
the door. It automatically switches o after a few seconds.
• The user cannot choose to turn it on or o at will.
• Do not attempt to replace or change the LED light.
PROGRAMS
OPTIONS
Timer
Cancelling the
end-of-cycle
alarm
Child
lock
Drying
level Anti-crease
Extra drying of the cotton
(Extra dry) ✓ ✓ ✓ ✓ ✓
Cotton cupboard dry ✓ ✓ ✓ ✓ ✓
Cotton iron dry ✓ ✓ ✓ ✓ ✓
Synthetics cupboard dry ✓ ✓ ✓ ✓ ✓
Synthetics iron dry ✓ ✓ ✓ ✓ ✓
Delicate ✓ ✓ ✓ ×✓
Mix ✓ ✓ ✓ ✓ ✓
Baby care ✓ ✓ ✓ ✓ ✓
Jeans ✓ ✓ ✓ ✓ ✓
60 min ✓ ✓ ✓ ×✓
40 min ✓ ✓ ✓ ×✓
20 min ✓ ✓ ✓ ×✓
Refresh ✓ ✓ ✓ ×✓
Express 34' ✓ ✓ ✓ ×✓
Shirts 20' ✓ ✓ ✓ ×✓
22 23
EN EN
Useful information Useful information
C C
Cleaning and maintenance
IMPORTANT:
Do not use industrial chemicals to clean the tumble dryer. Do
not use a tumble dryer that has been cleaned with industrial
chemicals.
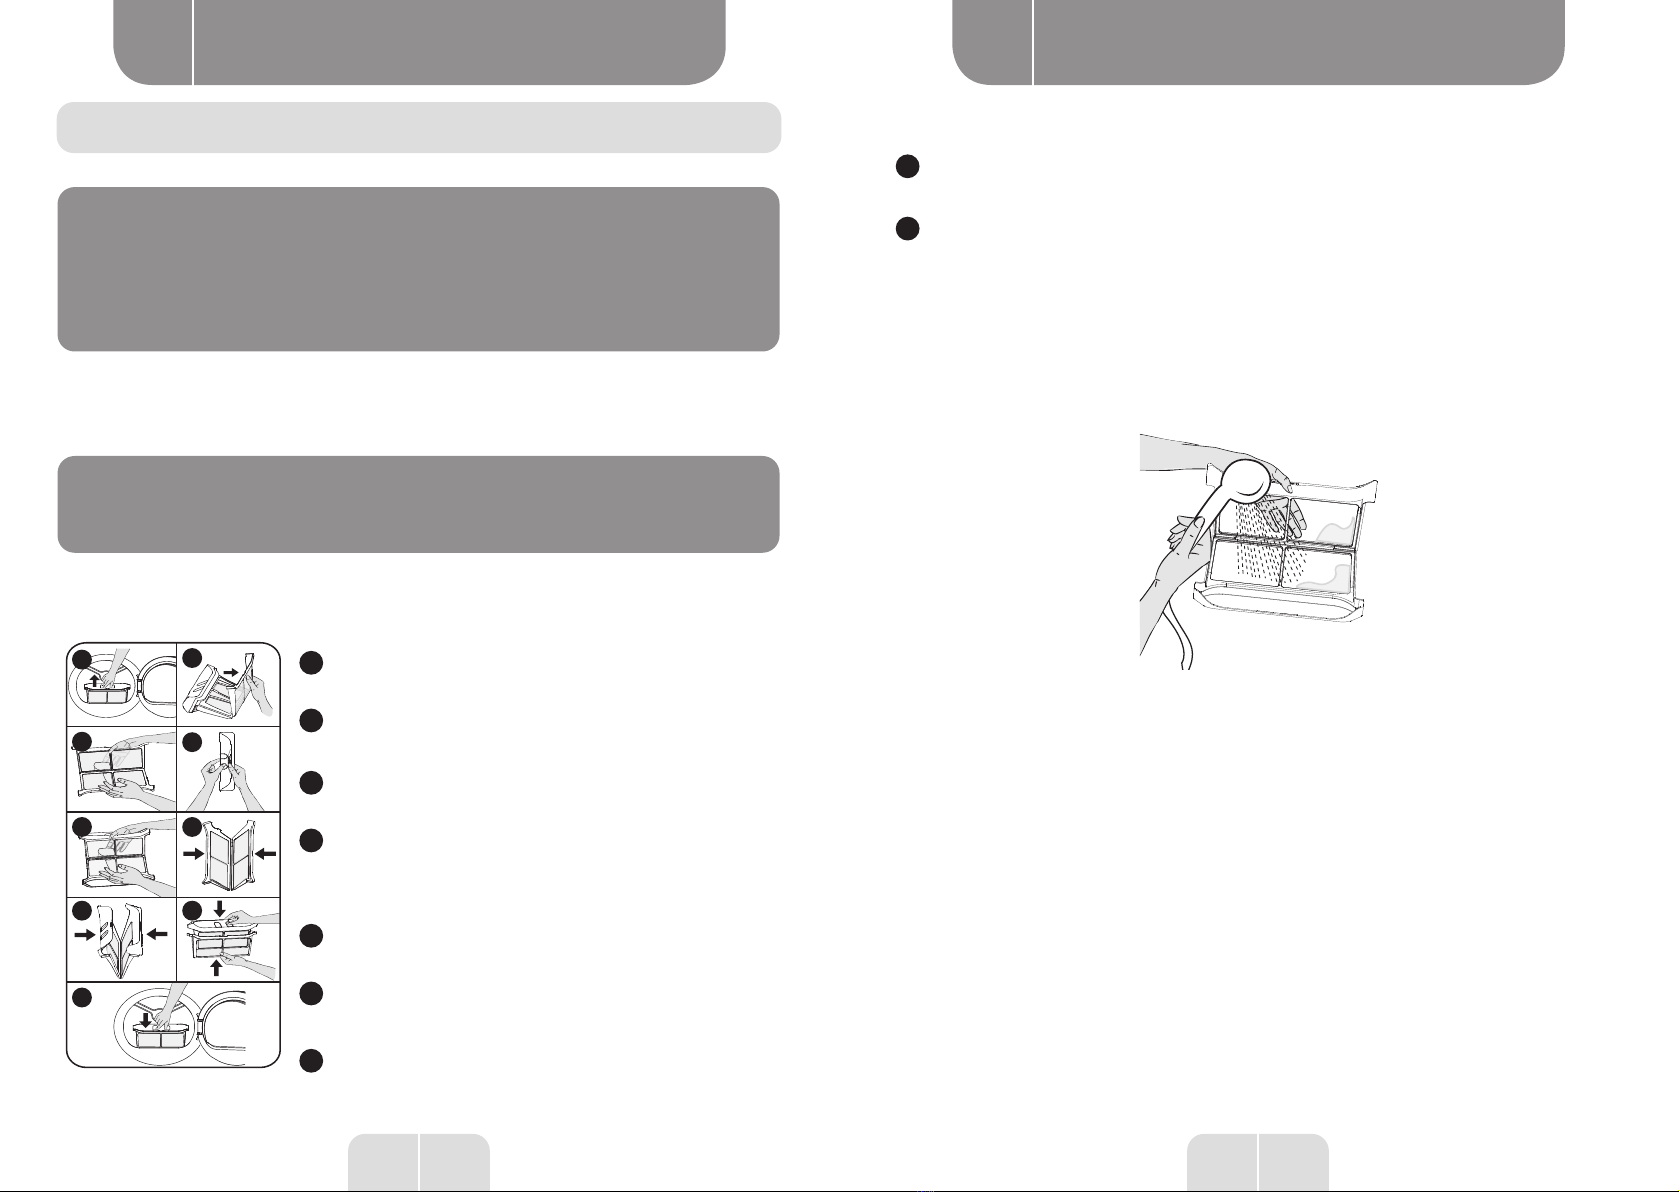
Cleaning the lint filters
IMPORTANT:
Remember to clean the lint lters after each use.
To clean the lint lter:
12
34
5 6
7 8
9
1Open the door.
2Pull the lint lter upwards to remove it.
3Open the outer lter
4Clean the outer lter with your hands or
using a soft cloth.
5Open the inner lter
6Clean the inner lter with your hands or
using a soft cloth
7Close the lters and adjust the hooks
8Place the inner lter inside the outer lter
9Cleaning the lint lter
After using the dryer for a certain period of time, if you notice
that a layer of lint has built up, which could clog the surface
of the filter, wash the filter with warm water to remove this
layer. Thoroughly dry the lter before putting it back.

24 25
EN EN
Useful information Useful information
C C
Emptying the water container
1
2
1Pull the drawer lid and carefully
pull out the container.
2Drain the water from the
container.
3If lint builds up on the drain cap
of the container, clean it with water.
4Re-insert the water container.
IMPORTANT:
Neverremovethewatercontainerwhiletheprogramisrunning.
The condensed water in the water container is not suitable for
human consumption.
Remember to empty the water container after each use.
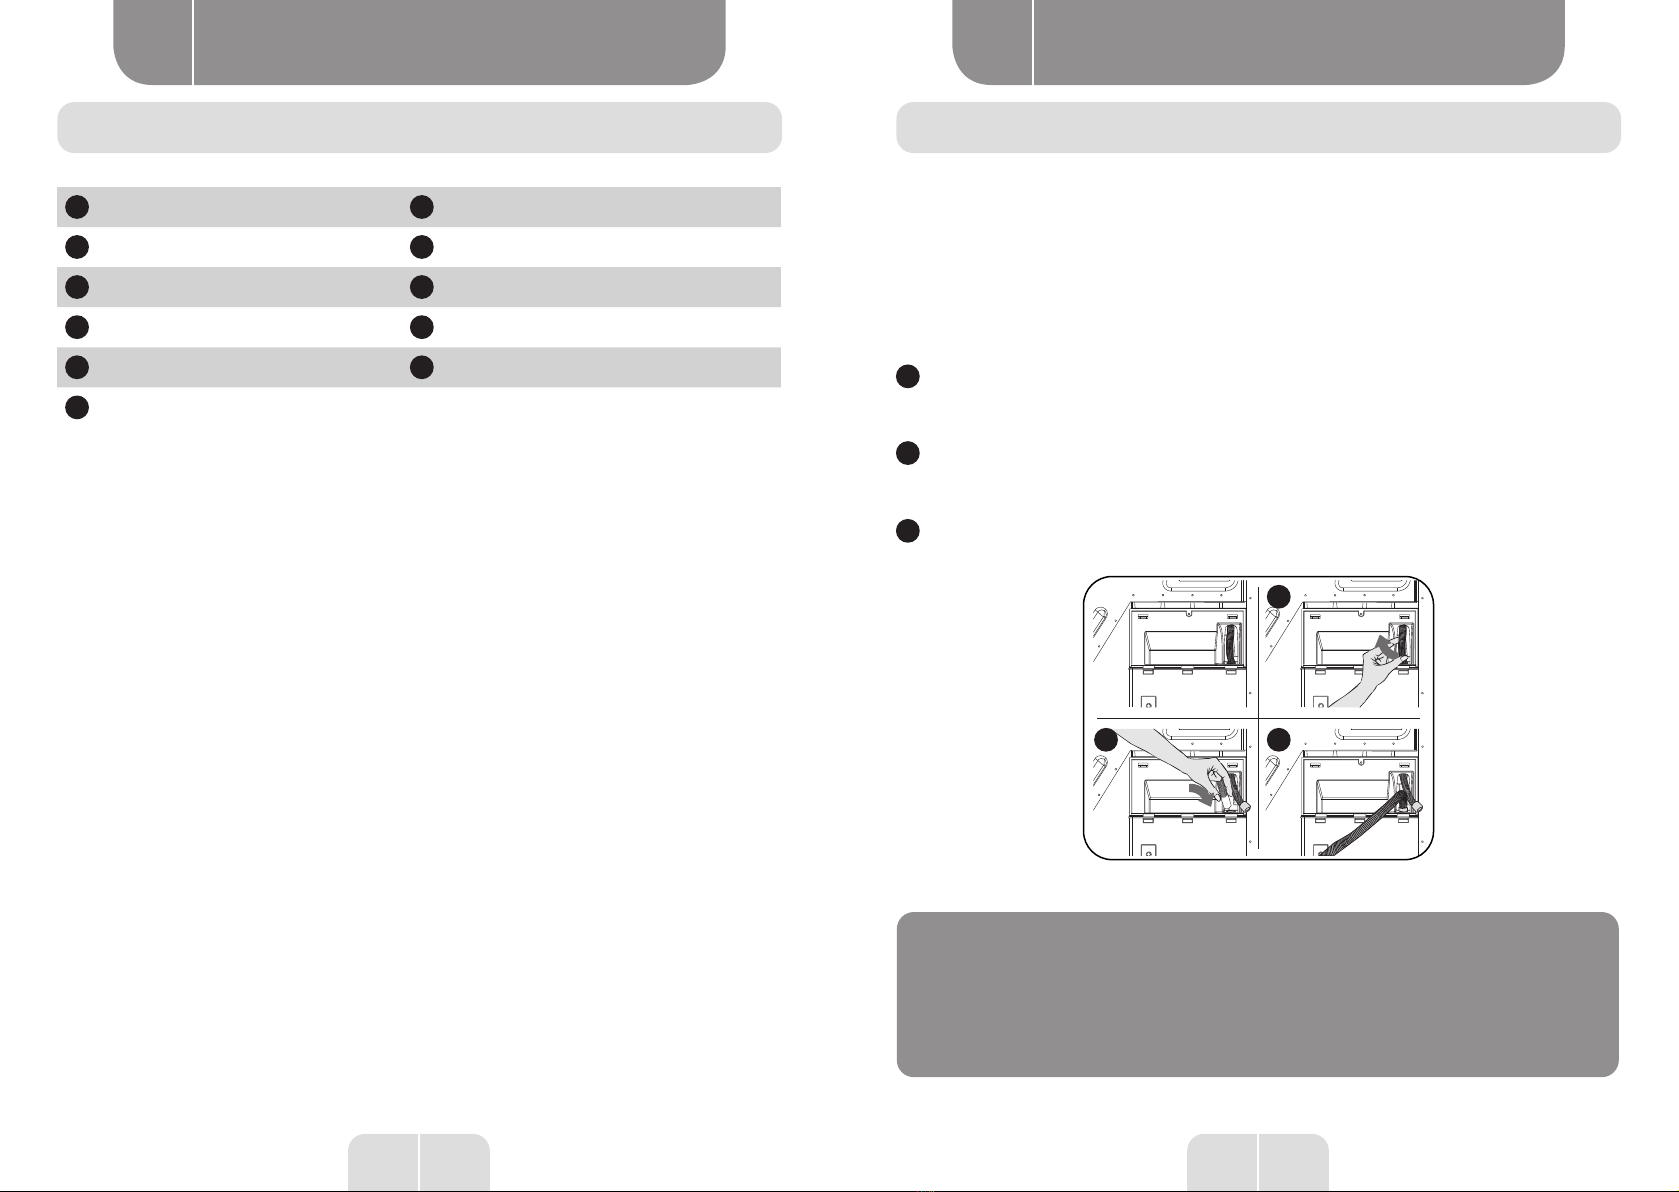
Cleaning the heat exchanger
IMPORTANT:
Clean the heat exchanger when the "Cleaning the heat
exchanger" warning message appears.
Even if the "heat exchanger cleaning warning light" is not
on: clean the heat exchanger after every 30 drying cycles or
once a month.
1
2
3
4
5
6
7
At the end of the drying process, open the door
and wait for it to cool down.
1Open the maintenance ap as shown.
2Unlock the heat exchanger cover by turning
the tabs in the direction shown by the arrows.
3Remove the heat exchanger cover as shown.
4Clean the front surface of the exchanger as
shown.
5Position the heat exchanger cover as shown.
6Lock the heat exchanger cover by turning
the tabs in the direction shown by the arrows.

26 27
EN EN
Useful information Useful information
C C
7Close the maintenance ap as shown.
WARNING:
Do not clean with bare hands as the heat exchanger ns are
sharp. You risk injuring your hands.
Cleaning the humidity sensor
Inside the machine are humidity sensors that detect whether
the laundry is dry or not.
To clean the sensors:
1Open the door of the machine.
2If the machine is still hot after a drying cycle, wait for it to cool
down.
3Using a soft cloth moistened with cleaning vinegar, wipe the
metal surfaces of the sensor and dry them.
IMPORTANT:
Clean the metal surfaces of the sensor 4 times a year.
Do not clean the metal surfaces of the sensor with metal
tools.
WARNING:
Given the risk of a re and explosion, do not use cleaning
solutions and products, or similar products when cleaning the
sensors.
Cleaning the inside of the door
IMPORTANT:
Remember to clean the inner surface of the door after each
drying process.
Open the door and clean all the internal surfaces and the door
gasket with a soft, damp cloth.

28 29
EN EN
Useful information Useful information
C C
Machine noise
SOURCE OF NOISE DEFINITION
Pump noise
The pump is activated when the machine starts
and at certain intervals during operation. It is
normal to hear the sound of the pump and water
during this process.
Compressor noise
It is normal to occasionally hear a metallic noise
from the compressor while the machine is
running.

30 31
EN EN
Useful information Useful information
C C
Troubleshooting
The tumble dryer has systems that continually carry out checks during the drying process to
take the necessary measures and warn you in the event of a malfunction.
WARNING:
If the problem persists, even after carrying out the steps in this
section, contact your dealer or an authorised service provider.
Never attempt to repair a product that is out of order.
PROBLEM REASON SOLUTION
The drying process takes a
long time.
The surface of the lint lter
may be clogged.
Wash the lter in warm
water.
The heat exchanger may be
clogged. Clean the heat exchanger
The air inlet at the front of
the machine may be closed.
Open the doors/windows
to prevent the room
temperature from getting
too hot.
The humidity sensor may be
covered with limescale. Clean the humidity sensor.
The tumble dryer may be
overloaded. Do not overload the dryer.
After spin-drying, the
laundry is not dry enough.
Select a higher spin speed
on the washing machine.
PROBLEM REASON SOLUTION
The laundry comes out
damp at the end of the
drying process.
Laundry, that comes out warm at the end of the drying
process, is usually more damp.
The program used may not
be suitable for the type of
laundry.
Check the care labels
on the clothes, choose a
program, that is compatible
with the type of laundry, and
use the time programs as
well.
The surface of the lint lter
may be clogged.
Wash the lter in warm
water.
The heat exchanger may be
clogged. Clean the heat exchanger
The tumble dryer may be
overloaded. Do not overload the dryer.
After spin-drying, the
laundry is not dry enough.
Select a higher spin speed
on the washing machine.
The dryer does not open
or the program does not
start. The dryer does not
start when the settings have
been adjusted.
The dryer may not be
plugged in.
Make sure it is plugged into
the power outlet.
The door can be opened. Make sure the door is
properly closed.
You may not have set a
program or pressed the
Start/Pause button.
Make sure the program
has been set and the dryer
is not in Standby (Pause)
mode.
The child lock may be
enabled.
Disable the child lock
function.
The program was stopped
for no reason.
The door may not be
properly closed.
Make sure the door is
properly closed.
There may have been a
power cut.
Press the Start/Pause
button to start the program.
The water container may
be full. Empty the water tank.
The clothes have shrunk,
bobbled or deteriorated.
The program used may not
be suitable for the type of
laundry.
Check the care labels on
the clothes and choose a
program that is compatible
with the type of laundry.

32 33
EN EN
Useful information Useful information
C C
PROBLEM REASON SOLUTION
Water is leaking from the
door.
Lint may have built up on
the internal surfaces and
on the surfaces of the door
gasket.
Clean the internal surfaces
and the surfaces of the door
gasket.
The door opens by itself. The door may not be
properly closed.
Push the door until you hear
the closing click.
The water container
warning symbol is on or
ashing.
The water container may
be full. Empty the water tank.
The water drain hose may
be bent.
If the machine is connected
directly to the water outlet,
check the water drain hose.
The lter cleaning warning
symbol is lit.
The lint lter may be dirty. Clean the lter.
The seat of the lter may be
clogged with lint. Clean the seat of the lter.
The surface of the lint lter
may be clogged.
Wash the lter in warm
water.
The heat exchanger
cleaning warning symbol
is lit.
The heat exchanger may be
dirty. Clean the heat exchanger.
Automatic fault warnings and what to do
Your tumble dryer has an integrated fault detection system. They are indicated by a
combination of flashing indicator lights. The most common problem codes are described
below.
Error code Solution
3h
6h
9h
End
End
E03
Empty the water container, if the problem
is not resolved, contact the nearest
authorised service centre.
3h
6h
9h
End
End
E04
Contact the nearest authorised service
centre.
3h
6h
9h
End
End
E05
Contact the nearest authorised service
centre.
3h
6h
9h
End
End
E06
Contact the nearest authorised service
centre.
3h
6h
9h
End
End
E07
Contact the nearest authorised service
centre.

34 35
EN EN
Useful information
CNote
Error code Solution
3h
6h
9h
End
End
E08
The voltage supplied by the network
may be uctuating. Wait until the
voltage is compatible with the operating
specications.
37 FR
Aperçu de l’appareil
A
37 FR
Table de matières
36 FR
Merci !
Merci d’avoir choisi ce produit HIGHONE.
Choisis, testés et recommandés par ELECTRO DEPOT,
les produits de la marque HIGHONE vous assurent
une utilisation simple, une performance fiable et
une qualité irréprochable.
Grâce à cet appareil, vous savez que chaque utilisation
vous apportera satisfaction.
Bienvenue chez ELECTRO DEPOT.
Visitez notre site Internet: www.electrodepot.fr
www.electrodepot.be
VVOOTRETRE AAVISVIS CCOMPTE !OMPTE !
PARTAGEZ
VOTRE EXPERIENCE
SUR LES PRODUITS
Parce que votre satisfaction est notre priorité, nous vous proposons
de donner votre avis sur ce produit. Il sera transmis et analysé par
nos équipes afin d’améliorer continuellement le produit.
Donnez votre avis sur http://www.electrodepot.fr/avis-client
AAperçu de l’appareil
CInformations
pratiques
BUtilisation de
l’appareil
Les notices sont aussi disponibles sur le site
http://www.electrodepot.fr/sav/notices/
http://www.electrodepot.be/fr/sav/notices
Installation
Préparation du linge
Utilisation du sèche linge
Nettoyage et entretien
Bruit de la machine
Dépannage
Avertissements automatiques de défauts et ce
qu’il faut faire
Description de l’appareil
This manual suits for next models
1
Table of contents
Languages:
Other HIGH ONE Dryer manuals


Popular Dryer manuals by other brands

Alliance Laundry Systems
Alliance Laundry Systems 505048R2 Installation and operation

NEW POL
NEW POL NWT84HP.1 user manual

Frigidaire
Frigidaire 137410100A Use & care guide

Rinnai
Rinnai RDT-600 operating instructions

Bosch
Bosch WTR85V21GB Installation and operating instructions

Refteco
Refteco RCS Series Installation and maintenance instruction


