HIGH ONE DAV 7 C W566C User manual

966343_DAV 7 C W566C
ELECTRO DEPOT
1 route de Vendeville
59155 FACHES-THUMESNIL - FRANCE
INSTRUCTIONS FOR USE ....................02
CONSIGNES D'UTILISATION ....................14
GEBRUIKSAANWIJZINGEN ....................26
INSTRUCCIONES DE USO ................... 38
2/2 07/2021-V2
Dryer
Sèche-linge
Droogkast
Secadora
EN
WARRANTY CONDITION
This product is guaranteed for a period of 2 years from the date of purchase* against
any failure resulting from a manufacturing or material defect. This warranty does not
cover defects or damage resulting from incorrect installation, improper use or abnormal
wear of the product.
*as shown on the sales receipt.
FR
CONDITION DE GARANTIE
Ce produit est garanti pour une période de 2 ans à partir de la date d’achat*, contre
toute défaillance résultant d’un vice de fabrication ou de matériau. Cette garantie ne
couvre pas les vices ou les dommages résultant d’une mauvaise installation, d’une
utilisation incorrecte ou de l’usure anormale du produit.
*sur présentation du ticket de caisse.
NL
GARANTIEVOORWAARDEN
Dit product wordt gegarandeerd voor een periode van 2 jaar vanaf de aankoopdatum*,
voor elke storing die het gevolg is van een fabricagefout of het materiaal. Gebreken of
schade door slechte installatie, onjuist gebruik of abnormale slijtage van het product
worden niet gedekt door deze garantie.
*op vertoon van kassabon.
ES
CONDICIONES DE GARANTÍA
El certificado de garantía de este producto tiene una duración de 2 años a partir de la
fecha de compra* que se limita a los defectos de fabricación y averías del material.
Se excluyen de la garantía deficiencias o daños originados por una mala instalación,
errores en la manipulación o por un uso inadecuado.
*previa presentación del comprobante de compra.


3 EN
Table of contents
2 EN
Thanks!
Thank you for choosing this HIGHONE product.
Chosen, tested and recommended by ELECTRO DEPOT,
the products of the HIGHONE brand are easy to use,
reliable and of an impeccable standard.
Thanks to this appliance, you can be sure that each
use will bring you satisfaction.
Welcome to ELECTRO DEPOT.
Visit our website: www.electrodepot.fr
www.electrodepot.be
BUsing the appliance
APreview of the
appliance
The instructions are also available on the site
http://www.electrodepot.fr/sav/notices/
Description of the appliance
Control panel
Technical Information
Installation
Use
Drying programme table
CUseful information Cleaning and maintenance
Troubleshooting
Disposing of your old appliance

5EN
Using the appliance
B
4EN
Preview of the appliance
A
Description of the appliance
1Top platform 6Side panel
2Control panel 7Drum hatch
3Door 8Switch
4Lint filter 9Power cord
5Front panel 10 Hose
Control panel
1On/Off
2Start/Pause
3Programme (Blend/Cotton/Synthetic/1 Hour)
4Drying level (Extra/Standard/Low)
5Anti-crease
NOTE
•Press the [Program] button to select the desired program.
•Press the [Drying level] button to select the desired drying level.
•Press the [Anti-crease] button to activate the Anti-crease function.
•Press the [Start/Pause] button.
•To activate the childproof function, press the [Programme] and [Drying level]
buttons simultaneously for 3 seconds.
•The tumble dryer will sound an audible alarm when the cycle is complete. Press
the [ON/OFF] button and unplug the power cord.
•Clean the filter, body and drum.
• This symbol is associated with the energy efficiency of the standard cotton
programme. This is best suited for drying standard cotton textiles loaded to capacity.
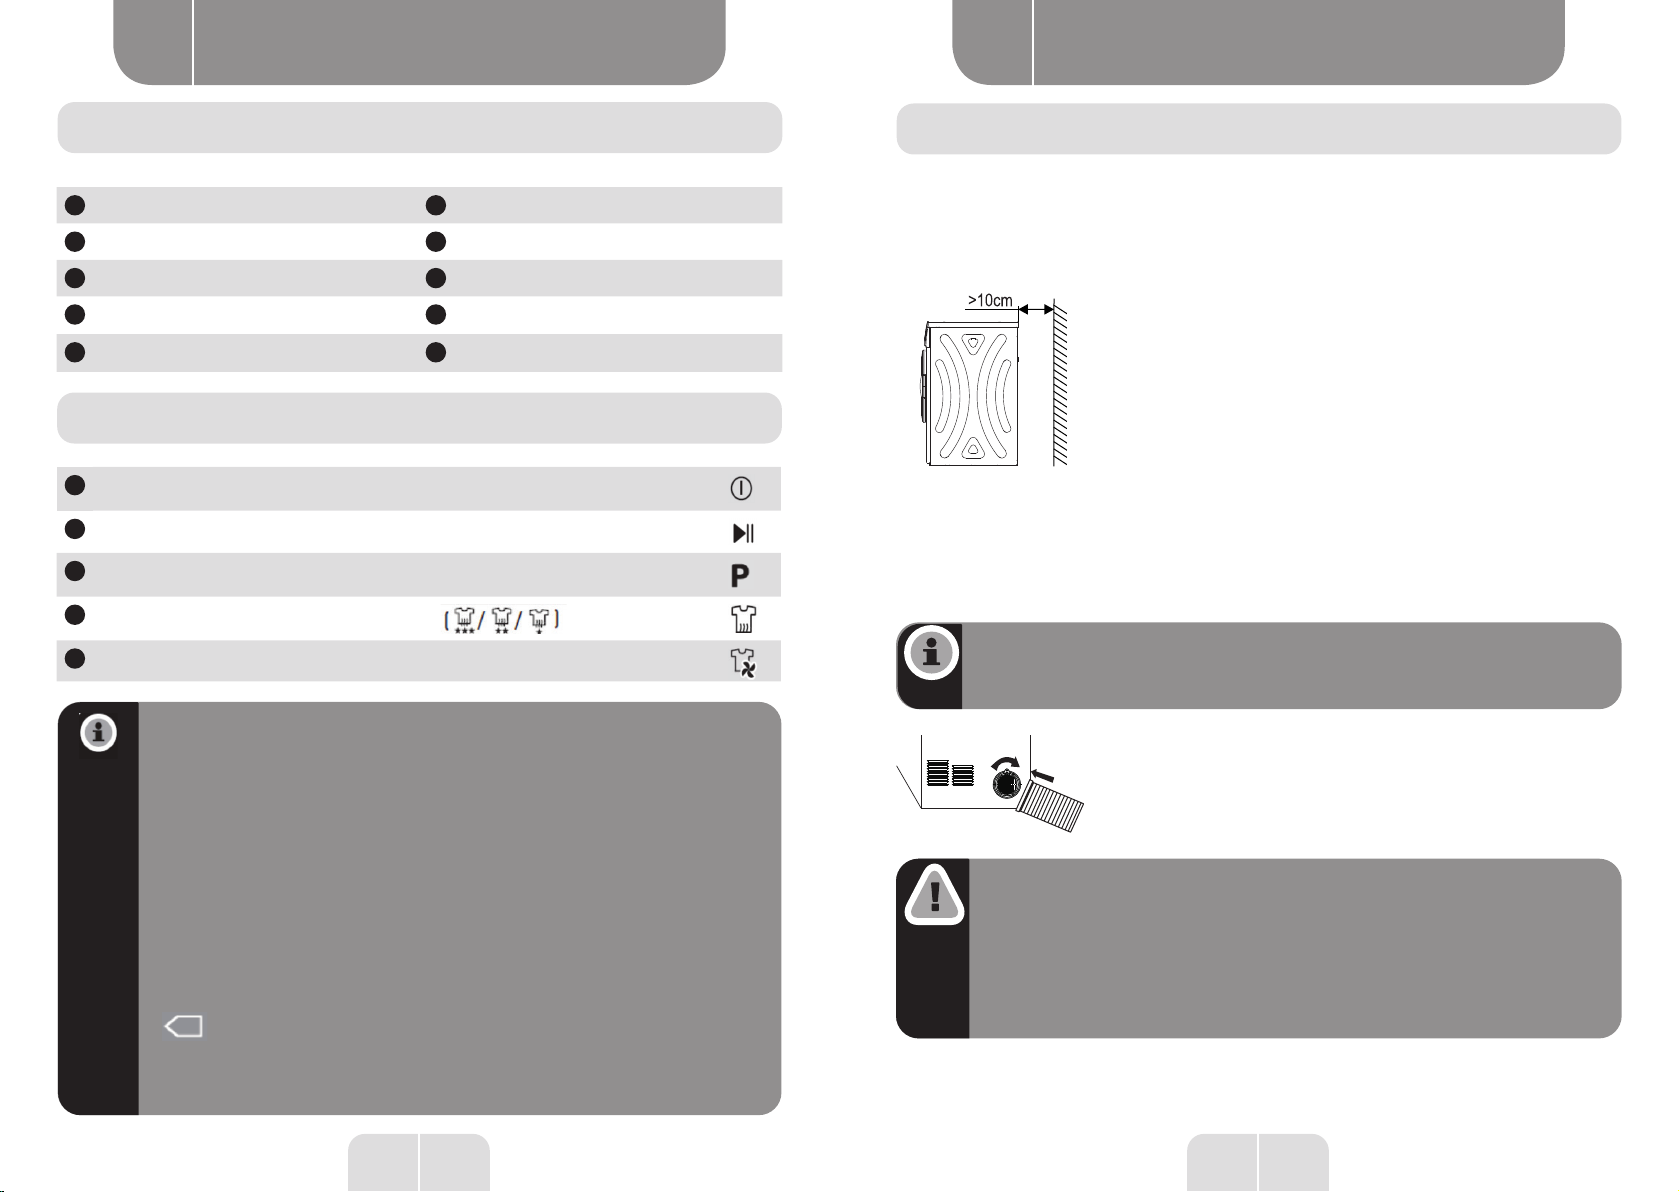
Installation
• The dryer should be installed in a ventilated environment, at least 10 cm from the wall.
There should be no obstacles within 1.5 m of the front of the dryer. The room must also be
properly ventilated.
Horizontal adjustment:
Attach a weight to a string at the front and sides of the machine. Refer to the illustration
below. If distance A=A' and distance B=B', the dryer is installed horizontally. If this is not the
case, place a wedge on the floor.
NOTE
If the dryer cannot be installed horizontally (inclination greater than 2°), it will
operate unbalanced and intermittently.
WARNING
• Do not install the device outdoors or in an environment exposed to rain;
• Make sure that the back of the unit is not near a curtain or anything else which
may blow in the wind;
• Do not install the appliance near a gas source or flammable area.

6 7EN EN
Using the appliance Using the appliance
B B
Hose attachment:
• Connect one end of the hose to the hole at the back of the machine. Tighten without straining.
• The other end of the hose should face outwards. Refer to the illustrations below describing
the installation mode.
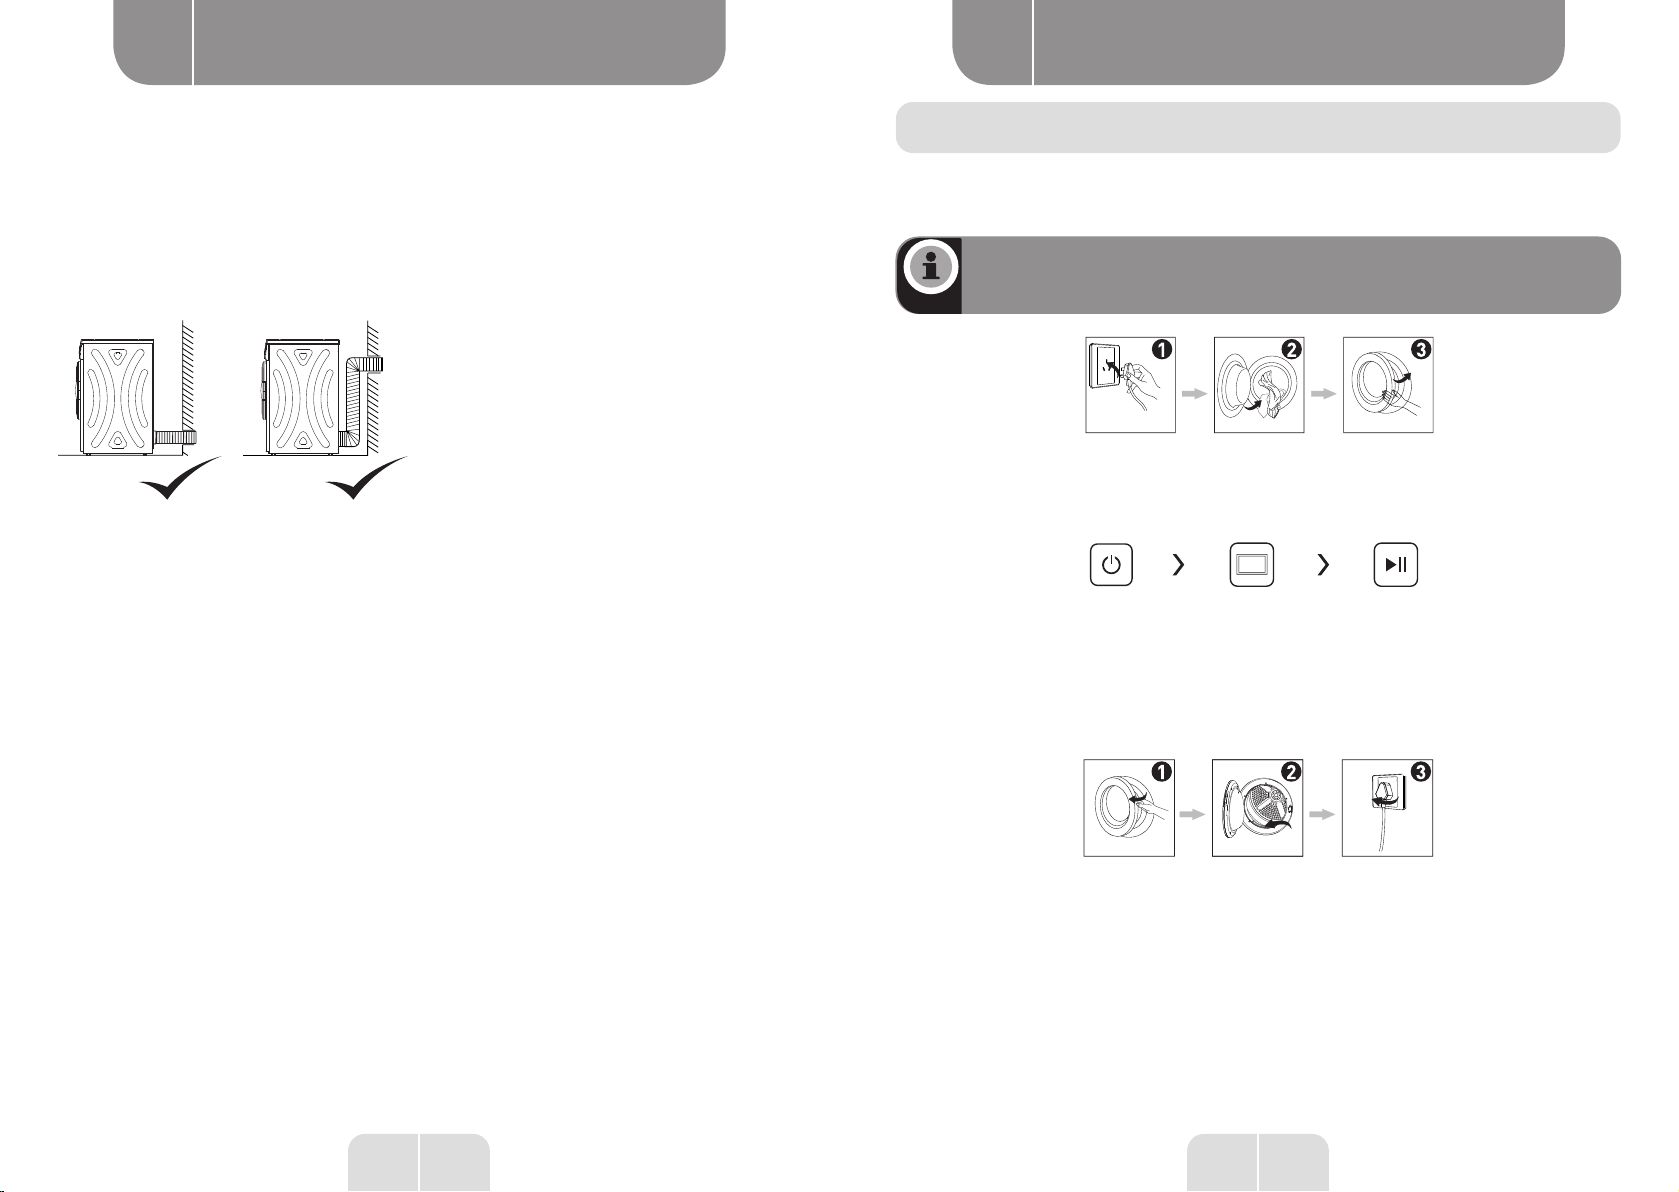
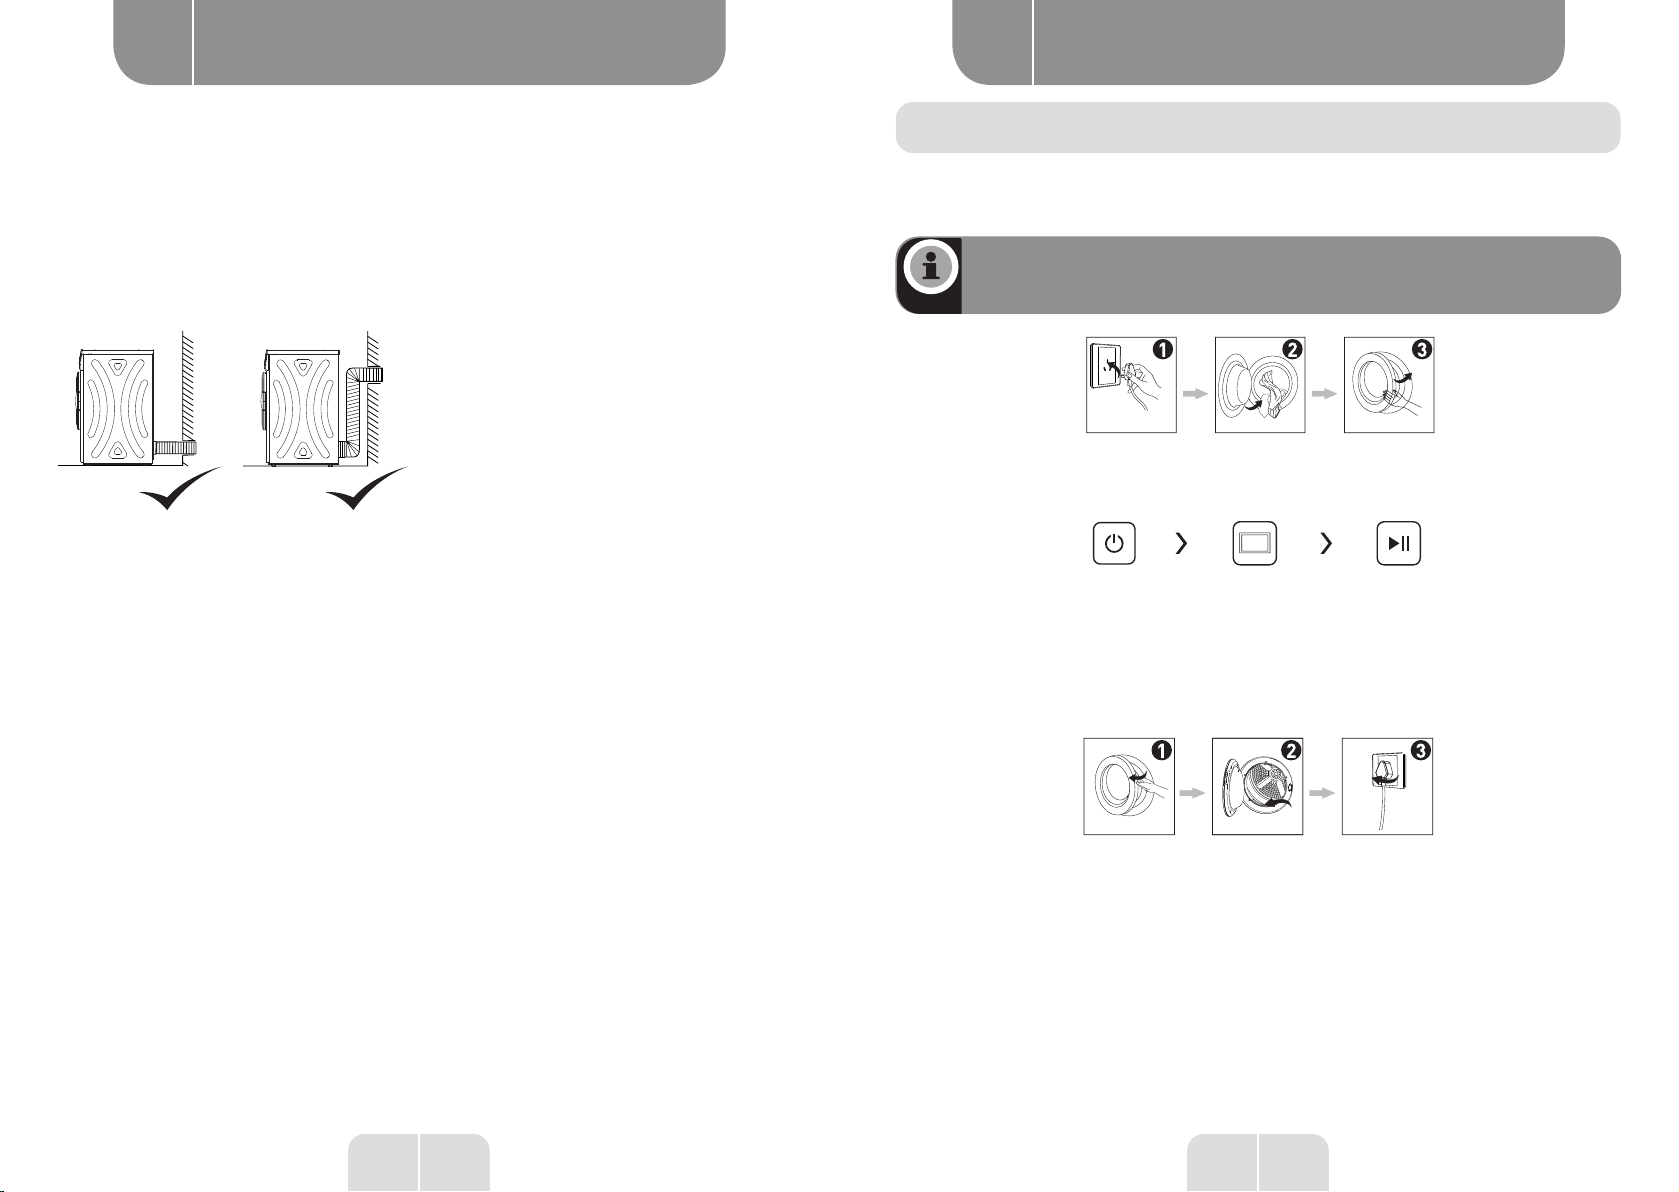
Quick operation
NOTE
Before use, ensure that the appliance is correctly installed.
Plug in Load Close the door
Drying
Turn on Select the default
function or mode
Start
After drying
The alarm sounds or the message “0:00” is displayed.
Unload Clear the lint filter Unplug
Before every drying cycle
1. Before you start drying, make sure your clothes have been spun in the washing machine.
High-speed spinning reduces drying time and saves energy.
2. To ensure that your clothes dry evenly, sort your clothes according to the type of fabric and
the correct drying programme.
3. Before drying, close zips, hooks or eyelets, button your clothes and fasten fabric belts, etc.
Use
8 9EN EN
Using the appliance Using the appliance
B B
4. Do not over-dry your clothes; excessive drying may crease your laundry.
5. Do not dry laundry containing rubber or any other similar elastic material.
6. The door can only be opened when the dryer has finished its cycle. Be careful not to open
the door too quickly, as hot surfaces of the machine and condensation may cause burns.
7. Always clean the filter and empty the tank after use to avoid increased drying times and
energy consumption.
8. Never dry dry-cleaned clothes.
Reference weight of dry clothes (per unit)
Clothing made up of several different fabrics approx. 800 g
Jacket approx. 800 g, cotton
Jeans approx. 800 g
Towels approx. 900 g, cotton
Sheet approx. 600 g, cotton
Work clothes approx. 1120 g
Night clothes approx. 200 g
Long-sleeved shirt approx. 300 g, cotton
Short-sleeved top approx. 180 g, cotton
Underwear approx. 70 g, cotton
Socks approx. 50 g, blended materials
NOTE
• Never overload the drum.
• Do not load soaking wet laundry. The dryer may be damaged or catch fire.
• Not suitable for drying wool or silk materials.
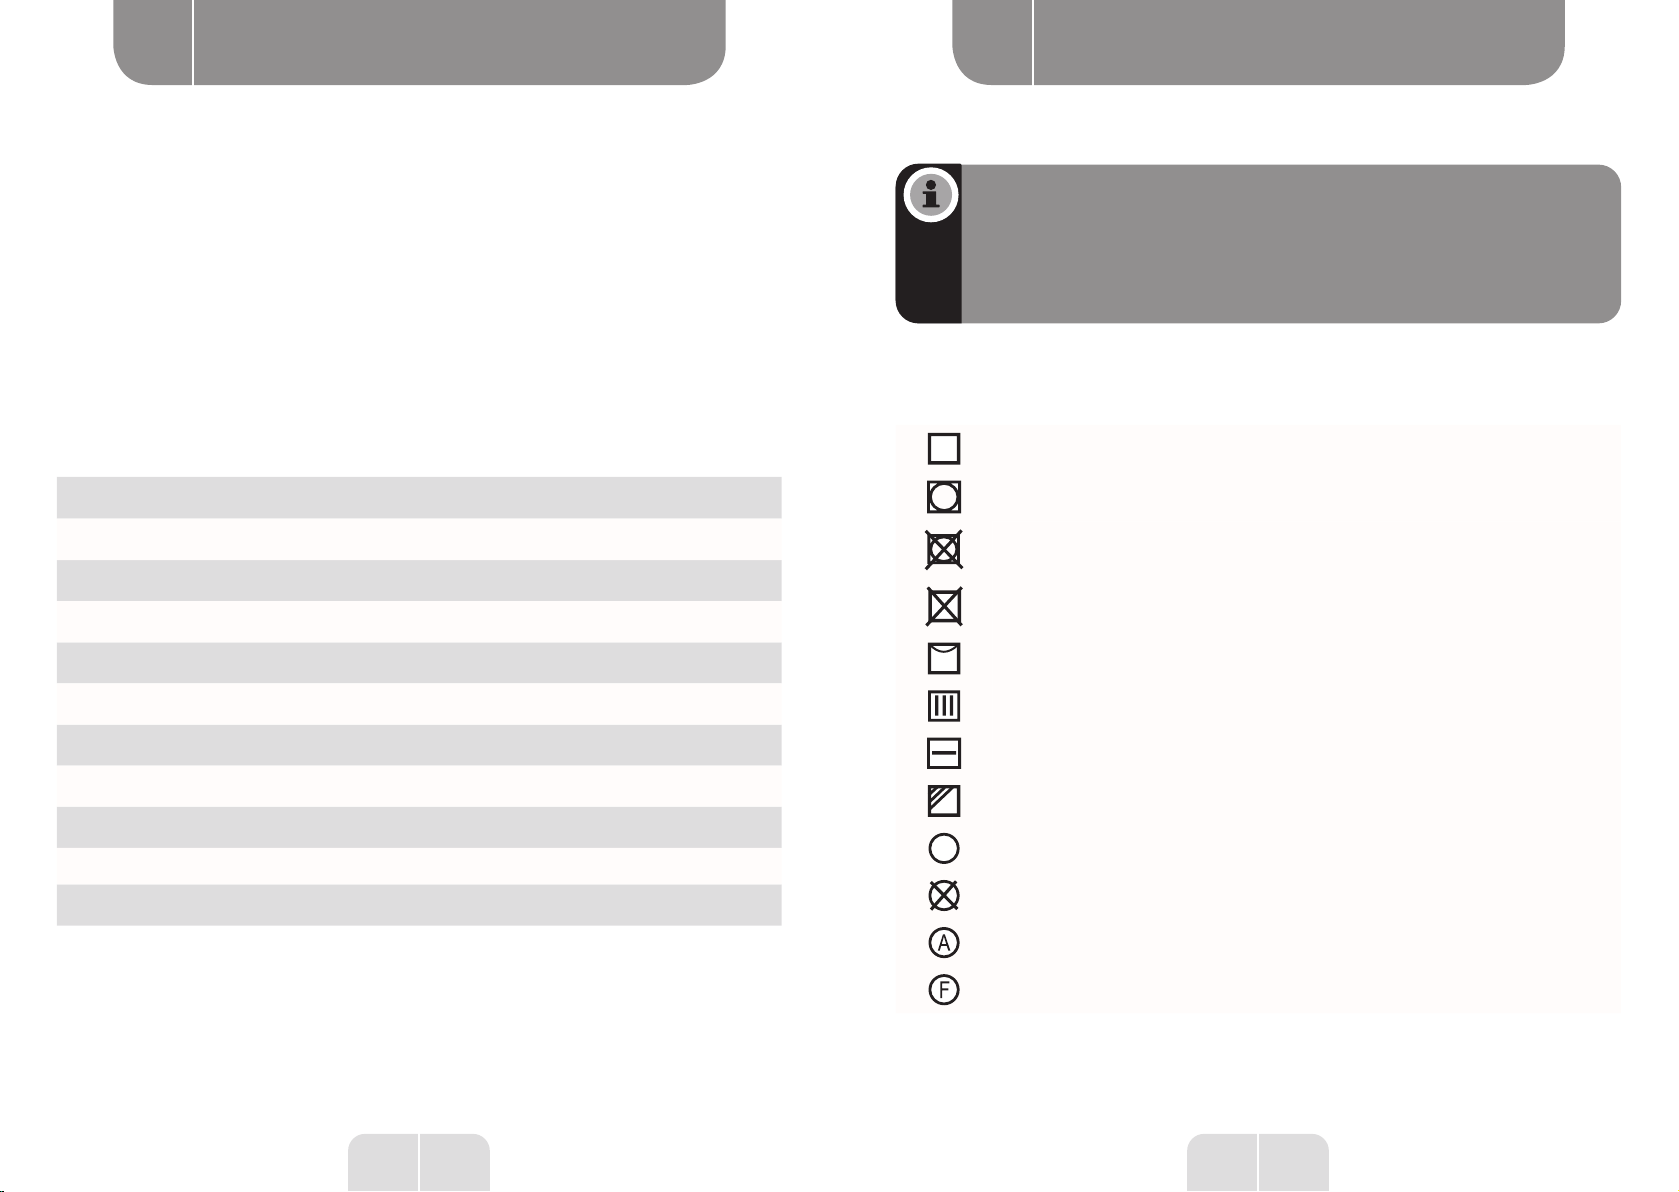
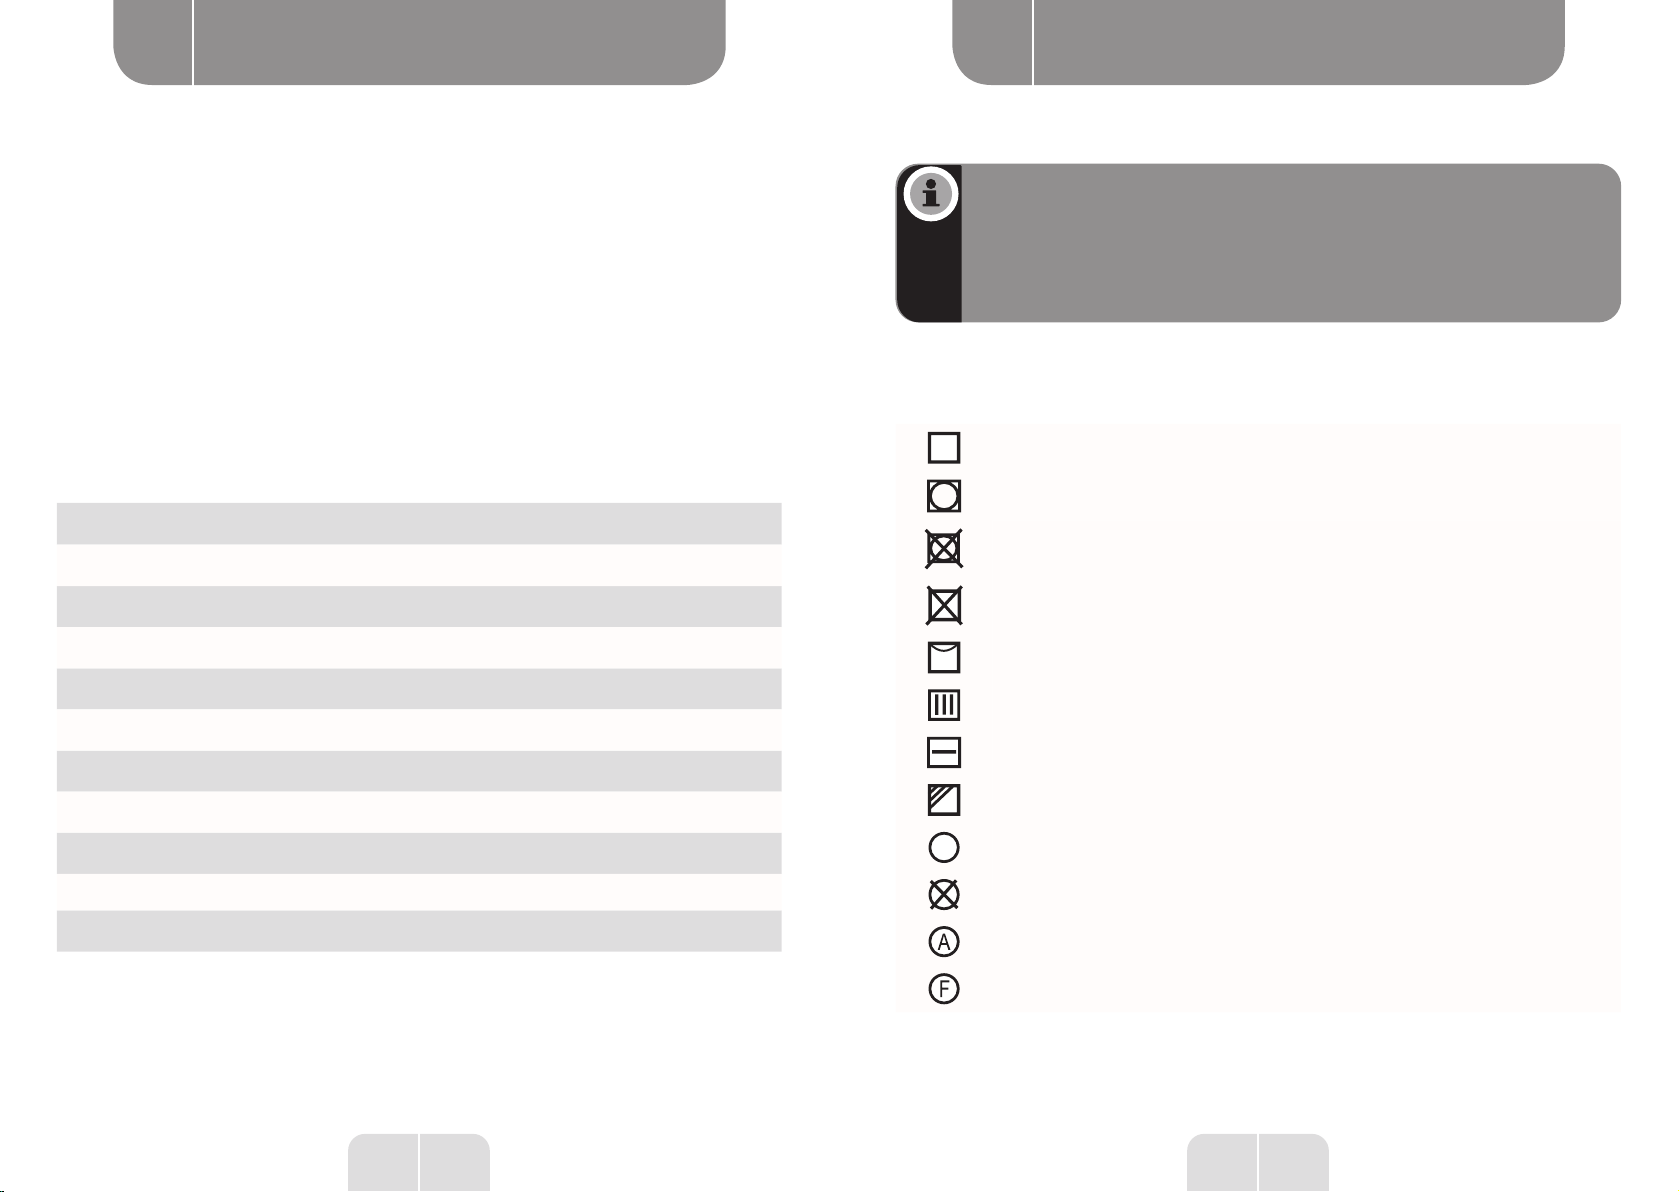
Please note that some textiles are not suitable for tumble drying.
Always refer to the following symbols:
Drying
Normal machine-dry
Machine-drying prohibited
Do not dry
Air-dry/Hang
Drip-dry
Dry flat
Dry in the shade
Dry-clean
Do not dry clean
Dry-clean normal cycle with any solvent type
Dry-clean normal cycle with petroleum solvent only

11 EN
Useful information
C
10 EN
Using the appliance
B
Clothing type
Approximate
residual
moisture
level
Capacity
(kg) Programmes Drying level NOTE
Cotton
70% 7/3.5/1 Cotton Extra Please
select the
programme
and drying
degree
according to
the type of
clothes and
capacity.
60% 7/3.5/1 Cotton Standard
7/3.5 Cotton Low
Blend 70% 7/3.5/1 Blend Extra
60% 7/3.5/1 Blend Standard
Synthetics 50% 3.5/1 Synthetics Extra
40% 3.5/1 Synthetics Standard
Cotton ______ 1 1 hour ______
NOTE
• The cold air function means that only cold air is blown in for 3 minutes before the
drying process is completed. (Excluding the 1-hour programme, which activates
cold air for 10 minutes).
• When the Anti-crease option is selected, the cycle can take up to 2 hours. When
not selected, the cycle takes 30 minutes less.
• Both the indoor temperature and humidity have an impact on the drying time.
• Refer to the label on your clothes to select the time and temperature according
to the instructions.
• Recommendation:
when the weight of the loaded laundry is less than 0.5 kg, select the 1-hour
programme and the Extra function.
Drying programme table
Cleaning the filter
• Clean the filter after each use.
• Pull up to remove it.
• Cleaning the filter
Use a cloth or your fingers.
• Reinsert the filter
If the filter is cleaned with a damp cloth or water, let it dry before reinstalling it.
Cleaning the machine body and drum
• Clean the body and inner drum with a soft damp cloth.
• Do not rinse directly with water.
• Do not use a scouring product.
• Do not use spirits or alcohol.
• Be sure to leave the appliance door open for ventilation after cleaning the drum.
Safety Reset
•
This dryer has an integrated safety circuit breaker that is activated depending on the
temperature.
• The safety reset button is located on the back of the unit. If your dryer stops drying, this
button must be pressed before the dryer can be operated again. You must wait 10 minutes
for the appliance to cool down completely.
• Overheating is most often caused by a clogged filter.
• Clean the filter after each use to prevent the appliance from overheating.
The circuit breaker may trip for the following reasons:
• The filter is clogged.
• The exhaust vents at the back of the unit are clogged.
• There is insufficient ventilation within the laundry room. Open a window or door.
• A small piece of cloth, such as a handkerchief, has passed into the filter.
Safety reset button
With your finger or a pen, press the button until you feel the “click”.
Cleaning and maintenance

12 13EN EN
Useful information Useful information
C C
Problem Cause Solution
The appliance will not start.
Power outage. Wait until the power is
restored.
The plug is not correctly
connected.
Check the plug and make
sure the connection is
correct.
The laundry load is too
heavy.
Laundry placed in the
dryer must have been
spun beforehand. The
total weight of laundry
introduced may not exceed
7 kg
The thermal circuit
breaker has tripped.
Consult a professional to
replace the temperature
fuse.
The appliance emits heat or
a burning smell.
The filter is soiled. Make sure to clean the filter
regularly.
The air inlet or outlet is
dirty. Clear out the duct.
Laundry is too dry.
Too much laundry is being
loaded.
Be careful not to overfill the
drum.
The laundry is not taken
out of the machine quickly.
Take the laundry out
immediately after the cycle
is finished. See page 7.
The clothes were not
sorted properly.
Follow the label on the
clothing.
The temperature is too
high.
Troubleshooting
Problem Cause Solution
The laundry shrinks. Over-drying.
Follow the label on the
garments. If the fabric is
likely to shrink, examine
your clothes carefully when
dry. Take your laundry out
when it is not very wet or too
dry, then hang it out until it
is completely dry.
Pilling on clothing.
Synthetic and other coated
fibres often produce
pilling. This phenomenon
is due to friction.
Use a fabric softener to
smooth the fibres. Spray
starch on sleeves and
collars when ironing. Dry
your clothes inside out to
reduce friction.
• Noise from the dryer may be caused by:
Wet and heavy clothes spin and shake, causing noises.
•
Shaking: during drying, the machine generates steam from a hose and this causes the
bottom of the drum to shake.
Description of other functions
Error code Description Criteria Action Status display
E3
Problem
with the
temperature
sensor
The
temperature
sensor or the
circuit board is
defective.
Interrupt the
programme
and have the
temperature
sensor
checked.
The LEDs of
the Low and
Standard
programs are
flashing
E4
Problem
with the
temperature
sensor
The
temperature
sensor is
weak or the
circuit board is
defective.
Interrupt the
programme
and have the
temperature
sensor
checked.
The LED of the
Extra program
flashes

15 FR
Table de matières
14 FR
Merci !
Merci d’avoir choisi ce produit VALBERG.
Choisis, testés et recommandés par ELECTRO DEPOT,
les produits de la marque VALBERG vous assurent
une utilisation simple, une performance fiable et
une qualité irréprochable.
Grâce à cet appareil, vous savez que chaque utilisation
vous apportera satisfaction.
Bienvenue chez ELECTRO DEPOT.
Visitez notre site Internet: www.electrodepot.fr
www.electrodepot.be
VVOOTRETRE AAVISVIS CCOMPTE !OMPTE !
PARTAGEZ
VOTRE EXPERIENCE
SUR LES PRODUITS
Parce que votre satisfaction est notre priorité, nous vous proposons
de donner votre avis sur ce produit. Il sera transmis et analysé par
nos équipes afin d’améliorer continuellement le produit.
Donnez votre avis sur http://www.electrodepot.fr/avis-client
BUtilisation de
I’appareil
AAperçu de l’appareil
Les notices sont aussi disponibles sur le site
http://www.electrodepot.fr/sav/notices/
Description de l’appareil
Panneau de commande
Spécifications techniques
Installation
Utilisation
Tableau des programmes de séchage
CInformations
pratiques
Nettoyage et entretien
Dépannage
Mise au rebut de votre ancien appareil
17 FR
Utilisation de l’appareil
B
16 FR
Aperçu de l’appareil
A
Description de l’appareil
1Plateau supérieur 6Panneau latéral
2Panneau de commande 7Trappe du tambour
3Hublot 8Interrupteur
4Filtre 9Cordon d'alimentation
5Panneau avant 10 Tuyau souple
Panneau de commande
1On/Off
2Démarrage/pause
3Programme (Mélange/Coton/Synthétique/1 heure)
4Degré de séchage (Extra/Standard/Faible)
5Anti-froissage
REMARQUE
•Appuyez sur la touche [Programme] afin de sélectionner le programme de votre
choix.
•Appuyez sur la touche [Degré de séchage] afin de sélectionner le degré de séchage
de votre choix.
•Appuyez sur la touche [Anti-froissage] afin d’activer la fonction Anti-froissage.
•Appuyez sur la touche [Démarrage/pause].
•Pour activer la sécurité enfants, appuyez simultanément sur les touches
[Programme] et [Degré de séchage] pendant 3 secondes.
•L’alerte sonore du sèche-linge retentit une fois le cycle terminé. Appuyez sur la
touche [On/Off] et débranchez le cordon d’alimentation.
•Nettoyez le filtre, la caisse et le tambour.
• Ce symbole est associé à l’efficacité énergétique du programme coton
standard. Celui-ci est le mieux adapté au séchage des textiles en coton standard
chargés selon la capacité prévue.
Installation
• Le sèche-linge doit être installé au sein d’un environnement ventilé, à 10 cm de distance
du mur au minimum. Aucun obstacle ne doit se trouver à moins d’1,5 m de l’avant du sèche-
linge. La pièce doit également être correctement ventilée.
Réglage horizontal :
Reliez un poids à une ficelle à l’avant et sur les côtés de l’appareil. Reportez-vous à l’illustration
ci-dessous. Si la distance A=A’ et la distance B=B’, le sèche-linge est installé à l’horizontale.
Si tel n’est pas le cas, placez une cale sur le sol.
REMARQUE
Si le sèche-linge ne peut être installé à l’horizontale (inclinaison supérieure à 2°),
celui-ci fonctionnera de manière déséquilibrée et par intermittence.
AVERTISSEMENT
• N’installez pas l’appareil en plein air ou dans un environnement exposé à la pluie ;
• Veillez à ce que l’arrière de l’appareil ne se trouve pas à proximité d’un rideau
ou de tout autre élément exposé au vent ;
• N’installez pas l’appareil à proximité d’une source de gaz ou d’une zone
inflammable.
18 19FR FR
Utilisation de l’appareil Utilisation de l’appareil
B B
Prise en main rapide
REMARQUE
Avant toute utilisation, assurez-vous que l’appareil est correctement installé.
Branchez Chargez Fermz le hublot
Séchage
Mise en
marche
Sélection de la
fonction ou mode
par défaut
Démarrage
Après séchage
L’alarme retentit ou le message « 0:00 » s’affiche.
Déchargez Nettoyez Le filtre Débranchez
Avant chaque séchage
1. Avant de débuter le séchage, veillez à bien essorer votre linge en machine. Un essorage
haute vitesse permet de réduire le temps de séchage et de réaliser des économies d’énergie.
2. Pour un séchage uniforme de votre linge, triez vos vêtements selon le type de tissu et selon
le programme de séchage adéquat.
3. Avant le séchage, fermez les fermetures Éclair, crochets ou œillets, boutonnez vos vêtements
et attachez les ceintures en tissu, etc.
Utilisation
Fixation du tuyau souple :
• Reliez l’une des extrémités du tuyau souple à l’orifice situé à l’arrière de la machine. Serrez
sans forcer.
• L’autre extrémité du tuyau doit être dirigée vers l’extérieur. Reportez-vous aux illustrations
ci-dessous pour connaître le mode d’installation.
20 21FR FR
Utilisation de l’appareil Utilisation de l’appareil
B B
REMARQUE
• Ne surchargez jamais le tambour.
• Ne chargez pas de linge détrempé. Le sèche-linge pourrait être endommagé ou
prendre feu.
• Ne convient pas au séchage de matière en laine ou en soie.
Attention, certains textiles ne sont pas adaptés au séchage au sèche-linge.
Reportez-vous systématiquement aux pictogrammes qui suivent :
Séchage
Séchage en machine normal
Séchage en machine interdit
Ne pas sécher
Sécher sur fil / Suspendre
Séchage par égouttage
Séchage à plat
Séchage à l'ombre
Nettoyage à sec
Nettoyage à sec interdit
Nettoyage à sec en cycle normal avec tout type de solvant
Nettoyage à sec en cycle normal avec solvant pétrolier uniquement
4. Ne séchez pas excessivement votre linge ; un séchage excessif peut froisser votre linge.
5. Ne séchez pas de linge contenant du caoutchouc ou toute autre matière élastique similaire.
6. La porte ne peut être ouverte que si le sèche-linge a terminé son cycle. Attention à ne
pas ouvrir la porte trop rapidement, les surfaces chaudes de la machine et la condensation
peuvent entraîner des brûlures.
7. Nettoyez le filtre et videz le réservoir systématiquement après utilisation afin d’éviter que
les temps de séchage et la consommation d’énergie n’augmentent.
8. Ne séchez jamais les vêtements ayant subi un nettoyage à sec.
Poids de référence des vêtements secs (à l’unité)
Vêtements composés de mélanges de tissus environ 800 g
Veste environ 800 g, en coton
Jeans environ 800 g
Serviettes environ 900 g, en coton
Drap environ 600 g, en coton
Vêtements de travail environ 1120 g
Vêtements de nuit environ 200 g
Chemise à manches longues environ 300 g, en coton
Haut à manches courtes environ 180 g, en coton
Sous-vêtements environ 70 g, en coton
Chaussettes environ 50 g, mélange de matières

23 FR
Informations pratiques
C
22 FR
Utilisation de l’appareil
B
Nettoyage du filtre
• Nettoyez Le filtre après chaque utilisation.
• Tirez vers le haut pour l’extraire.
• Nettoyage du filtre
Servez-vous d’un chiffon ou de vos doigts.
• Réinstallez le filtre
Si le filtre est nettoyé à l’aide d’un chiffon humide ou à l’eau, laissez-le sécher avant de le
réinstaller.
Nettoyage de la caisse de l’appareil et du tambour
• Nettoyez la caisse et le tambour interne à l’aide d’un chiffon doux humide.
• Ne rincez pas directement à l’eau.
• N’utilisez pas de produit à récurer.
• N’utilisez pas d’essence ni d’alcool.
•
Veillez à laisser le hublot de l’appareil ouvert à des fins d’aération, après le nettoyage
du tambour.
Réinitialisation de sécurité
• Ce sèche-linge intègre un disjoncteur de sécurité qui s’active selon la température.
•
Le bouton de réinitialisation de sécurité se trouve à l’arrière de l’appareil. Si votre sèche-
linge ne sèche plus, ce bouton doit être actionné avant que le sèche-linge ne puisse
fonctionner à nouveau. Vous devez patienter 10 minutes avant que l’appareil ne soit
complètement refroidi.
• Le plus souvent, les surchauffes sont causées par un filtre bloqué.
• Nettoyez le filtre après chaque utilisation afin d’éviter toute surchauffe de l’appareil
Le disjoncteur peut se déclencher pour les raisons qui suivent :
• Le filtre est bloqué.
• Les bouches d’extraction à l’arrière de l’appareil sont obstruées.
• La ventilation au sein de la laverie ou de la pièce est insuffisante. Ouvrez une fenêtre ou
une porte.
• Une petite pièce de tissu, comme un mouchoir, est passée dans le filtre.
Bouton de réinitialisation de sécurité
Avec votre doigt ou un stylo, appuyez sur le bouton jusqu’à ce que vous sentiez le « clic ».
Nettoyage et entretien
Type de
vêtements
Niveau
approximatif
d'humidité
résiduelle
Capacité
(KG) Programmes Degré de
séchage Remarque
Coton
70 % 7/3,5/1 Coton Extra Veuillez
sélectionner
le
programme
et le degré
de séchage
en fonction
du type de
vêtements
et de la
capacité.
60 % 7/3,5/1 Coton Standard
7/3,5 Coton Faible
Mélange 70 % 7/3,5/1 Mélange Extra
60 % 7/3,5/1 Mélange Standard
Synthétique 50 % 3,5/1 Synthétique Extra
40 % 3,5/1 Synthétique Standard
Coton ______ 1 1 h ______
REMARQUE
• La fonction d’air froid implique que seul de l’air froid est soufflé durant 3 minutes,
avant la fin du séchage. (Hors programme d’une heure, qui active l’air froid durant
10 minutes.)
• Lorsque l’option Anti-froissage est sélectionnée, le cycle peut durer jusqu’à 2
heures. Lorsqu’elle n’est pas sélectionnée, le cycle dure 30 minutes de moins.
• La température intérieure ainsi que l’humidité ont un impact sur la durée du
séchage.
• Reportez-vous à l’étiquette de vos vêtements afin de sélectionner la durée et la
température en fonction des indications.
• Recommandation :
lorsque le poids du linge chargé est inférieur à 0,5 kg, sélectionnez le programme
d’une heure et la fonction Extra.
Tableau des programmes de séchage

24 25FR FR
Informations pratiques Informations pratiques
C C
Problème Cause Solution
Le linge rétrécit. Séchage excessif.
Conformez-vous à l'étiquette
présente sur les vêtements,
si le tissu est susceptible
de rétrécir, examinez bien
vos vêtements une fois secs.
Sortez votre linge lorsqu'il
est peu humide ou trop sec,
puis étendez-le jusqu'à ce
qu'il soit complètement sec.
Bouloches présentes sur le
linge
Les fibres synthétiques
et autres fibres enduites
produisent souvent des
bouloches. Ce phénomène
est dû aux frottements.
Utilisez un adoucissant
afin de lisser les fibres.
Pulvérisez de l'amidon sur
les manches et cols lors
du repassage. Séchez vos
vêtements sur l'envers afin
de limiter les frottements.
• Les bruits provenant du sèche-linge peuvent être dus à :
Les vêtements humides et lourds tournent et provoquent des secousses, causant des bruits.
• Secousses : durant le séchage, la machine génère de la vapeur provenant d’un tuyau et
ce phénomène cause des secousses au bas du tambour.
Descriptif des autres fonctions
Code d'erreur Description Critères Mesure à
prendre Indicateur
E3
Problème lié
au capteur de
température
Le capteur de
température
ou la carte de
circuit imprimé
sont défectueux.
Interrompez
le programme
et faites
vérifier l'état
du capteur de
température.
Les LED des
programmes
Faible et
Standard
clignotent
E4
Problème lié
au capteur de
température
Le capteur de
température
est faible ou La
carte de circuit
imprimé est
défectueuse.
Interrompez
le programme
et faites
vérifier l'état
du capteur de
température.
La LED du
programme
Extra clignote
Problème Cause Solution
L'appareil ne démarre pas.
Panne d'électricité. Attendez que le courant soit
rétabli.
La fiche n'est pas
correctement branchée.
Contrôlez la prise, assurez-
vous que le branchement
est correct.
La charge de linge est trop
importante.
Le linge introduit dans le
sèche-linge doit avoir été
préalablement essoré. Le
poids total du linge introduit
ne peut dépasser 7 kg
Le coupe-circuit thermique
s'est déclenché
Consultez un professionnel
pour remplacer le fusible
de température.
De La chaleur ou une odeur
de brûlé se dégage de
l'appareil.
Le filtre est sale. Veillez à nettoyer le filtre
régulièrement.
L'arrivée ou la sortie d'air
est sale. Videz le conduit.
Le Linge est trop sec.
La quantité de linge
introduite est trop
importante.
Veillez à ne pas remplir
excessivement le tambour.
Le linge n'est pas sorti
rapidement de la machine
Sortez immédiatement
le linge une fois le cycle
terminé. Reportez-vous à la
page 7.
Les vêtements n'ont pas
été triés correctement.
Conformez-vous à
l'étiquette présente sur les
vêtements.
La température est trop
élevée.
Dépannage

27 NL
AOverzicht van het
toestel
CPraktische informatie
BGebruik van het
toestel
Installatie
Gebruik
Tabel met droogprogramma’s
Reiniging en onderhoud
Herstelling
Afdanken van uw oude toestel
Beschrijving van het toestel
Bedieningspaneel
Technische eigenschappen
26 NL
Bedankt!

29 NL
Gebruik van het toestel
B
28 NL
Overzicht van het toestel
A
Beschrijving van het toestel
1 6
2 7
38
49
510
Bedieningspaneel
1On/Off
2Start/Pauze
3Programma (Gemengd/Katoen/Synthetisch/1 uur)
4Droogtegraad (Extra/Standaard/Zwak)
5Kreukbeveiliging
OPMERKING
• Druk op de toets [ Programma ] om het programma van uw keuze te kiezen.
• Druk op de toets [ Droogtegraad ] om het droogtegraad van uw keuze te kiezen.
• Druk op de toets [ Kreukbeveiliging ] om de kreukbeveiligingsfunctie in te
selecteren.
• Druk op de knop [ Start/Pauze ].
• Om de kinderveiligheid te activeren, drukt u tegelijkertijd op de toetsen [
Programma ] en [ Droogheid ] gedurende 3 seconden.
• Er gaat een geluidsalarm af zodra de cyclus is afgerond.
Druk op de knop [ On/Off ] trek de stekker uit het stopcontact.
• Reinig de filter, de behuizing en de trommel.
• Dit symbool wordt geassocieerd met de energetische doeltreffendheid van
het standaard katoenprogramma. Dit is het beste aangepast aan het drogen van
katoenen stoffen geladen volgens de voorziene capaciteit.
Installatie
• De droogtrommel dient geïnstalleerd te worden in een geventileerde omgeving, op een
afstand van ten minste 10 cm van de muur. Geen enkel obstakel mag zich op minder dan 1,5
m van de voorkant van de droogkast bevinden. De kamer dient correct geventileerd te worden.
Horizontale afstelling:
Hang een gewicht aan een draad aan de voorkant en zijkanten van het toestel. Zie onderstaande
tekening. Wanneer de afstand A=A’ en de afstand B=B’, staat de droogtrommel waterpas.
Wanneer dit niet het geval is, steekt u een wig onder de bodem.
OPMERKING
Wanneer de droogtrommel niet waterpas geïnstalleerd kan worden (hoek van meer
dan 2°) zal deze onevenwichtig en intermitterend werken.
OPGELET
• Installeer het toestel niet in de open lucht of in een omgeving waar deze
blootgesteld wordt aan regen;
• Let erop dat de achterzijde van het toestel zich niet in de buurt van een gordijn
of een ander aan de wind blootgesteld element bevindt;
• Installeer het toestel niet in de buurt van een gasbron of ontvlambare zone.
30 31NL NL
Gebruik van het toestel Gebruik van het toestel
B B
Snelle ingebruikname
OPMERKING
Vergewis u ervan dat het toestel correct geïnstalleerd is vóór elk gebruik.
Steek de stekker in
het stopcontact Laad Sluit de deur
Drogen
Inwerkingstelling
Selecteer
de functie of
standaardmodus
Inschakeling
Na het drogen
Het alarm weerklinkt of het bericht ‘0:00’ wordt weergegeven.
Laad uit Trek de
stekker uit het
stopcontact
Vóór elke droogbeurt
1. Alvorens van startte gaan met het drogen, dient u uw wasgoed goed te centrifugeren in de machine.
Door te centrifugeren aan hoge snelheid kunt u de droogtijd verlagen en zo energie besparen.
2. Voor het gelijkmatig drogen van uw wasgoed, sorteert u uw wasgoed naargelang het type
stof en kiest u het passende droogprogramma.
3. Vóór het drogen dient u ritssluitingen, haken of ogen en knopen van uw kleding te sluiten,
stoffen riemen vast te maken, enz.
Gebruik
Bevestiging van de slang:
• Verbind één van de uiteinden van de slang met de opening aan de achterzijde van de machine.
Zet vast zonder kracht te gebruiken.
• Het andere uiteinde van de slang dient naar buiten gericht te worden. Zie bovenstaande
tekeningen om de installatiewijze te kennen.

32 33NL NL
Gebruik van het toestel Gebruik van het toestel
B B
OPMERKING
Sommige textielsoorten zijn niet geschikt om in de droogkast gedroogd te worden.
Kijk systematisch naar de volgende pictogrammen:
Drogen
Normaal drogen in de machine
Drogen in de machine verboden
Niet drogen
Drogen op draad / ophangen
Drogen door te laten uitdruipen
Plat drogen
Drogen in de schaduw
Droogkuis
Droogkuis verboden
Droogkuis in normale cyclus met elk type oplosmiddel
Droogkuis in normale cyclus met petroleumoplosmiddel
4. Droog uw wasgoed niet overmatig; door overmatig te drogen zal uw wasgoed gaan kreuken.
5. Droog nooit wasgoed met rubber of een vergelijkbare elastische stof.
6. De deur mag pas geopend worden wanneer de droogkast zijn cyclus afgerond heeft. Let
erop de deur niet te snel te openen, warme oppervlakken van de machine en de condens
kunnen brandwonden veroorzaken.
7. Reinig de filter en ledig het reservoir systematisch na elk gebruik om te voorkomen dat de
droogtijden en het energieverbruik toenemen.
8. Droog nooit kleding die een droogkuisbehandeling ondergingen.
Referentiegewicht van de droge kledij (in de eenheid)
Kledij samengesteld uit stofmengelingen ongeveer 800 g
Jas ongeveer 800 g, in katoen
Jeans ongeveer 800 g
Handdoeken ongeveer 900 g, in katoen
Laken ongeveer 600 g, in katoen
Werkkledij ongeveer 1120 g
Nachtkledij ongeveer 200 g
Hemd met lange mouwen ongeveer 300 g, in katoen
Top met korte mouwen ongeveer 180 g, in katoen
Ondergoed ongeveer 70 g, in katoen
Sokken ongeveer 50 g, gemengde stoffen

35 NL
Praktische informatie
C
34 NL
Gebruik van het toestel
B
Reiniging van de filter
• Reinig de filter steeds na elk gebruik.
• Trek naar boven om deze eruit te halen.
• Reiniging van de filter
• Gebruik een vod of uw vingers.
• Plaats de filter terug
•
Deze filter wordt gereinigd met behulp van een vochtige doek of in water en laat deze
drogen alvorens deze terug te plaatsen.
Reiniging van de toestelbehuizing en de trommel
• Reinig de behuizing en interne trommel met behulp van een vochtige zachte doek.
• Spoel niet rechtstreeks met water.
• Geen schuurmiddelen gebruiken.
• Gebruik geen benzine of alcohol.
• Let erop de deur van het toestel open te laten om te verluchten, na het reinigen van de
trommel.
Veiligheidsherstart
•
Deze droogtrommel heeft een veiligheidszekering die het toestel uitschakelt aan de hand
van de temperatuur.
• De veiligheidsherstartknop bevindt zich aan de achterkant van het toestel. Wanneer uw
droogkast niet meer droogt, dient deze knop ingedrukt te worden alvorens de droogkast
opnieuw werkt. U dient 10 minuten te wachten voor het toestel volledig afgekoeld is.
• Oververhittingen worden het vaakst veroorzaakt door een geblokkeerde filter.
• Reinig de filter na elk gebruik om oververhitting van het toestel te voorkomen
De zekering kan ingeschakeld worden om de volgende redenen:
• De filter is geblokkeerd.
• De extractiemonden aan de achterzijde van het toestel zitten verstopt.
• De ventilatie in de waskamer of de kamer is onvoldoende. Open een venster of deur.
• Er zit een klein stuk stof, zoals een zakdoek, in de filter.
Knop voor de veiligheidsherstart
Druk met uw vinger of een balpen op de knop tot wanneer u een ‘klik’ hoort.
Reiniging en onderhoud
Type kleding
Restvochtig-
heidsgehalte bij
benadering
Volume
(kg) Programma's
Droogtegraad
Opmerking
Katoen
70 % 7/3,5/1 Katoen Extra
Gelieve het
programma
en de
droogtegraad
te selecteren
naargelang
het type
kleding en de
capaciteit.
60 % 7/3,5/1 Katoen Standaard
7/3,5 Katoen Zwak
Gemengd 70 % 7/3,5/1 Gemengd Extra
60 % 7/3,5/1 Gemengd Standaard
Synthetisch 50 % 3,5/1 Synthetisch Extra
40 % 3,5/1 Synthetisch Standaard
Katoen ______ 1 1 u ______
OPMERKING
• De functie koude lucht betekent dat enkel koude lucht ingeblazen wordt gedurende
3 minuten, op het einde van de droogcyclus. (Naast het programma van een uur,
die de koude lucht gedurende 10 minuten activeert)
• Wanneer de optie kreukbeveiliging geselecteerd is, kan de cyclus tot 2 uur duren.
Wanneer deze niet geselecteerd is, duurt de cyclus 30 minuten minder lang.
• De binnentemperatuur alsook de vochtigheid hebben een impact op de droogduur.
• Bekijk het etiket van uw kleding om de passende duur en temperatuur te kiezen
naargelang de indicaties.
• Aanbeveling:
wanneer het gewicht van het geladen wasgoed minder is dan 0,5 kg, selecteert u
het programma van een uur en de functie Extra.
Tabel met de wasprogramma’s

36 37NL NL
Praktische informatie Praktische informatie
C C
Het wasgoed krimpt. Overmatig drogen.
Volg de voorschriften op
het etiket van de kleding,
wanneer de stof kan krimpen,
onderzoekt u uw kleding goed
wanneer deze droog is. Haal
uw wasgoed eruit wanneer
het een beetje vochtig is of
te droog is, en wacht tot het
volledig droog is.
Pluisjes op het wasgoed
Synthetische vezels en
andere gecoate vezels
pluizen vaak. Dit wordt
veroorzaakt door de
wrijvingen.
Gebruik een wasverzachter
om de vezels glas te maken.
Verstuif stijfsel op de
mouwen en kragen bij het
strijken. Laat uw kleding
binnenstebuiten drogen om
wrijving te beperken.
• Lawaai uit de droger kan te wijten zijn aan:
Vochtige en zware kleding die draait en schokken veroorzaken, die lawaai veroorzaken.
• Schokken: tijdens het drogen genereert de machine damp die afkomstig is uit een slang
en dit fenomeen veroorzaakt schokken onderaan de trommel.
Descriptif des autres fonctions
Foutcode Omschrijving Criteria Te treffen
maatregelen Indicator
E3
Probleem
met de
temperatuur-
sensor
De temperatuur-
sensor of de
printkaart is
defect.
Onderbreek het
programma en laat
de temperatuur-
sensor controleren.
De leds van de
programma's
Zwak en
Standaard
knipperen
E4
Probleem
met de
temperatuur-
sensor
De temperatuur-
sensor is zwak
of de printkaart
is defect.
Onderbreek het
programma en laat
de toestand van
de temperatuur-
sensor controleren.
De led van het
programma
Extra knippert
Probleem Oorzaak Oplossing
Het toestel start niet.
Elektriciteitspanne Wacht tot er opnieuw
stroom is.
De stekker zit niet correct
in het stopcontact.
Controleer het stopcontact
en controleer of de
aansluiting correct is.
Er zit te veel wasgoed in de
machine.
Het wasgoed in de
droogtrommel dient eerst
gecentrifugeerd te worden.
Het totale gewicht van het
wasgoed in de trommel
mag niet meer dan 7 kg
bedragen
De thermische kortsluiting
is ingeschakeld
Raadpleeg een vakman om
de temperatuurzekering te
laten vervangen.
Er komt warmte of een
verbrande geur uit het
toestel.
De filter is vies. Let erop de filter regelmatig
te reinigen.
De luchtaanvoer of -afvoer
is vies. Maak de leiding leeg.
Het wasgoed is te droog.
Er zit te veel wasgoed in de
machine.
Let erop de trommel niet te
vol te doen.
Het wasgoed werd niet
snel uit de machine
gehaald
Haal het wasgoed
onmiddellijk uit de trommel
wanneer de cyclus afgerond
is. Zie pagina 7.
De kleding werd niet
correct gesorteerd.
Stel u in overeenstemming
met het etiket op de kledij.
De binnentemperatuur is
te hoog.
Probleem Oorzaak Oplossing
Probleemoplossing
This manual suits for next models
1
Table of contents
Languages:
Other HIGH ONE Dryer manuals


