HighPoint Thunderbolt NA762TB User manual

HighPoint Technologies Inc. 1
NA762TB
High-Performance Thunderbolt™ Storage
User’s Guide
V1.00
Mar. 9, 2014

HighPoint Technologies Inc. 2
Table of Contents
1. Introduction ..................................................................................................................................... 3
2. SYSTEM REQUIREMENTS.................................................................................................................. 3
3. What’s in the Box? ........................................................................................................................... 3
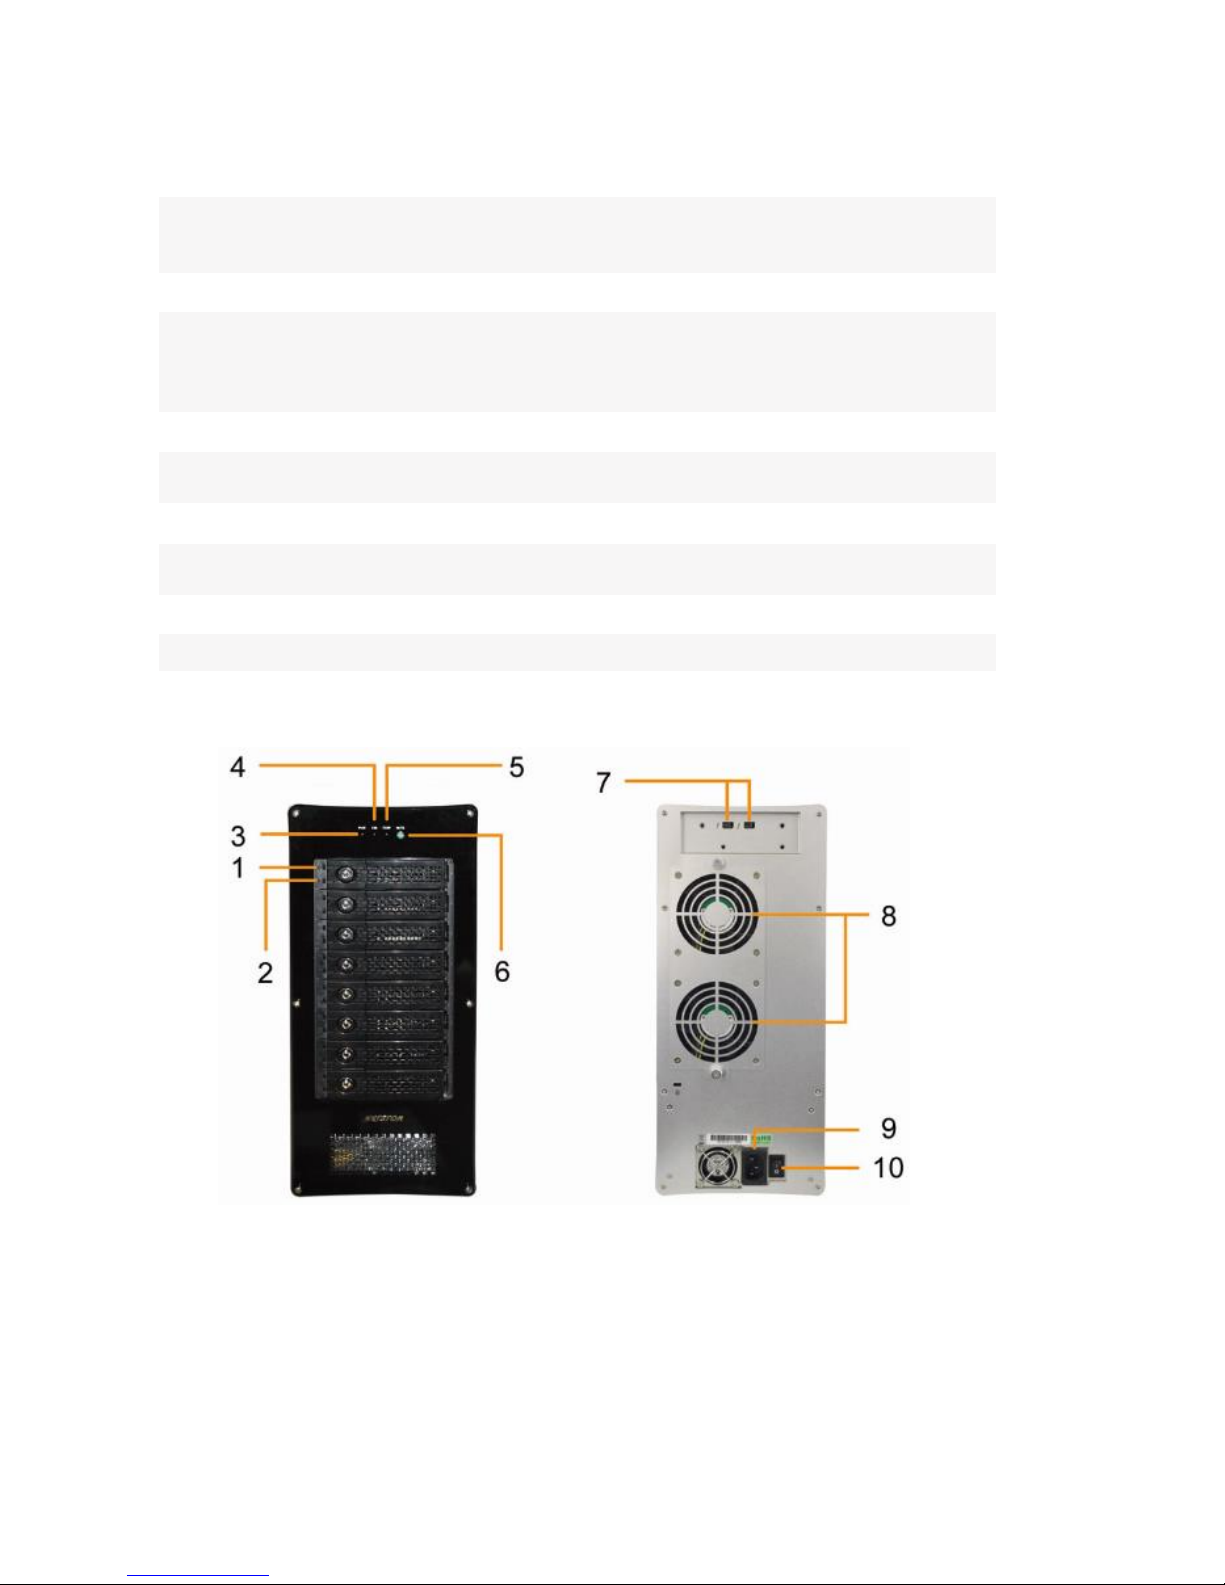
4. NA762TB Overview .......................................................................................................................... 4
5. Setting up the NA762TB................................................................................................................... 6
5.1 HDD Installation ......................................................................................................................... 6
5.2 Connecting the NA762TB to a Mac System. .............................................................................. 7
5.3 Install the software for NA762TB............................................................................................... 7
6. Configuring RAID Arrays................................................................................................................... 9
6.1 Configuring RAID Arrays............................................................................................................. 9
6.2 Using the RAID disk with Mac OS X.......................................................................................... 13
7. Deleting RAID Storage.................................................................................................................... 15
8. RAID Disk Failure Recovery ............................................................................................................15
9. Expanding RAID Storage Capacity..................................................................................................17
10. NA762TB Audible Alarm................................................................................................................. 17
11. Technical Support........................................................................................................................... 18
12. LIMITED WARRANTY ...................................................................................................................... 18
APPENDIX A - Using the WebGUI (full guide)........................................................................................ 19
APPENDIX B - Web RAID Management ICON Definition List.................................................................38
APPENDIX C - RAID Technology Explanation .........................................................................................40
APPENDIX D - Thunderbolt Daisy Chain configuration.......................................................................... 41

HighPoint Technologies Inc. 3
1. Introduction
HighPoint's NA762TB Thunderbolt™ Storage Solution delivers high-performance, hardware RAID
storage from a single cable connection!
The fully integrated hardware RAID controller and eight removable disk modules were designed for
today's fastest 6 Gb/s storage devices - perfect for professional, I/O intensive applications such as
digital content creation and media post production. The NA762TB's robust, stylish aluminum
construction ensures your storage stays cool while running at optimum efficiency.
Key Features
Stylish, compact and Whisper-Quiet Enclosure
Thunderbolt™ interface with 10Gbps of throughput in both channels
Eight (3.5”) SAS/SATA Removable Disk Tray Module
RAID level 0, 1, 10, 5, 6, 50, & JBOD
Comprehensive Storage Management Suite
Simplified Cabling Solution
Temperature/fan failure LEDs and mutable buzzer alarm
2. SYSTEM REQUIREMENTS
Apple Mac system with Thunderbolt support.
Mac OS X 10.8.x or higher
3. What’s in the Box?
A. NA762TB Enclosure x 1
B. Disk module x 8 (Installed)
C. Thunderbolt™ cable x 1 (2 meters)
D. Power Cord x 1
E. Hard Disk Drive mounting screw x 32
F. Key for HDD tray x 2

HighPoint Technologies Inc. 4
4. NA762TB Overview
Specifications
Host Interface :
•Thunderbolt™
• 10Gbps Bi-directional
Controller & RAID Feature :
• Supports RAID Level 0, 1, 10, 5, 6, 50, Single Disk or JBOD
• Multiple RAID Selection
• Online Array Roaming
• Greater than 2TB Capacity per Disk Drive Support
Storage :
• Supports up to 8 SAS/SATA 3Gb/s or 6Gb/s 3.5" HDDs
(Hard Disks Sold Separately)
•Stylish Aluminum Housing with Solid Metal Structure
• Thunderbolt™ Port for Daisy-chain up to 6 Devices
• Individual Key lock of each HDD tray for physical security
Monitors/Indicators :
•Web base GUI RAID Manager for Remote Management
• SMTP Support for Email Notification
• FAN fail LED
•Over Temperature LED
• HDD fail LEDs
Cooling Fans:
•Two 80x 80x 25mm
• Hot-Swappable

HighPoint Technologies Inc. 5
Power Supply:
• Server-grade 300W Single Power Supply
•Low-noise Design
• Universal: 100~240VAC, 50/60Hz
Environmental Requirements:
•Operation Temperature: 5°C ~ 50°C
• Storage Temperature: -20°C~ 70°C
•Operation Humidity: 10% ~ 80%, non-condensing
• Storage Humidity: 5% ~ 95%
Dimensions :
•231(D) x 156(W) x 365(H) mm
• 9.1(D) x 6.1(W) x 14.4(H) inch
Operating System Support:
• Mac OS X 10.6.x/ 10.7.x/ 10.8.x /10.9.x
(Driver was integrated by Apple OS X 10.9.x)
Scalability :
• Thunderbolt™ port for daisy-chain up to 6 devices
Panel Layout
1.
HDD Power LED:
White - Power On Indicator
2. HDD Status LED: Flash Blue - HDD Access Indicator, Red - HDD Failure Indicator
3. Power on LED: White - Enclosure power on
4. Fan Status LED: Normal - Green, Failure - Red (too slow RPM or stop)
5. Temperature LED: Normal - Green; Over-temperature - Red

HighPoint Technologies Inc. 6
6. Mute Button: Reset for Buzzer Beeping
7. Thunderbolt™ connectors:
Connecting Thunderbolt™ cables to host, upstream and downstream device
8. Hot-swappable cooling fans
9. Power cord receptacle
10. Power switch
5. Setting up the NA762TB
5.1 HDD Installation
The NA762TB has 8 Disk modules. It can support both SATA and SAS hard disk drives.
Note: Use only enterprise RAID edition series hard disks for RAID applications.
step 1. Place the NA762TB on a level surface and remove each disk
module.
step 2. Carefully insert the HDD into each disk module and secure them with the provided
mounting screws. Once complete, insert each disk module back into the front panel of the
NA762TB.

HighPoint Technologies Inc. 7
5.2 Connecting the NA762TB to a Mac System.
step 1. Connect the NA762TB to the host system with the Thunderbolt™ cable, and then connect
the NA762TB with a power source.
step 2. With the power cord connected to the power source, turn on the NA672TB using the power
switch on the rear panel (switch to the “I” position to power on the NA762TB).
Note: The NA762TB is designed to be powered on and powered off simultaneously with the HOST
system, when the NA762TB is connected to the HOST system with the Thunderbolt™ cable. Therefore,
power on HOST first –the NA762TB will automatically power on. (NA762TB supports hot-plug and
hot-unplug for powering-on and powering-off)
5.3 Install the software for NA762TB
1) Driver installation.
step 1. Driver Installation.
Please visit (http://www.hptmac.com/series_NA762TB-Resources.php) for the latest
driver package. Once downloaded, unzip the package, and follow the procedure
below:
a. Double-click the “uninstall.command” script file to uninstall the currently installed
driver.
b. Double-click the “HighPointIOP.mpkg” icon to install the driver package. You will
be asked to input the administrator’s password in order to complete this. Once

HighPoint Technologies Inc. 8
complete, you will be asked to reboot the system. Confirm the prompt to
proceed.
step 2. Verifying driver installation.
After the driver has been installed and the system rebooted, verify the NA762TB
device status using OS X System Information pane.
To verify the NA762TB driver status;
Click the Apple icon on top left of the screen, and select About This Mac, and then
select More Info. Next, select System Report, and click PCI Cards on left side of the
System Information pane. The Driver Installed entry for controller pci1103, 4520
should be “Yes”
2) RAID Management software installation.
All hard disks installed into the NA762TB will be configured as single drives by default, and
will be recognized by OS X Disk Utility. In order to configure RAID array you will need to install
the Web RAID Management software (also known as the WebGUI).
step 1. WebGUI Installation
Download and install the RAID Management software from the NA762TB product
page:
http://www.hptmac.com/series_NA762TB-Resources.php
step 2. Running the WebGUI

HighPoint Technologies Inc. 9
Unzip the package and double-click the “HighPoint WebGUI” icon to install WebGUI.
You’ll be asked to input system administrator’s password to complete installation.
After installation is complete, a WebGUI icon will be displayed on desktop screen.
Double-click this icon to open the WebGUI. The system’s default web browser will
open a login page. To login, use the default user name: RAID and password: hpt.
6. Configuring RAID Arrays
6.1 Configuring RAID Arrays
The NA762TB RAID controller supports multiple RAID levels. The steps below describe how to
quickly configure a RAID5 array.
step 1. Verify the physical device status.
Click the Physical tab to make sure all of the HDD’s are detected. Each drive will be
designated as Device 1-N, where N refers to the disk module number. Click device
icon, it will display detail device information. If any of the disks are not detected,
check the corresponding disk module and make sure the drive is securely installed
(see page 6 for more information).

HighPoint Technologies Inc. 10
step 2. Verify the Logical Device status.
Click the Logical tab to check if any of the disks were previously part of another RAID
array. If a RAID configuration is reported, click on Maintenance, displayed toward the
right of the Status column and delete the array. Back up data first if you need to keep
the data on this array before doing array deletion.
step 3. Creating a RAID Array.

HighPoint Technologies Inc. 11
The following procedure demonstrates how to configure a RAID5 array. A RAID5
array’s usable capacity is calculated using the following formula: N-1, multiplied by
the capacity of the smallest disk (where ‘N’ refer to the total number of disks). For
more detailed instructions, see section 4.1 – Logical: Create Array, on page 20.
Note: We recommend using identical hard disk when creating a RAID array. In addition, only use
enterprise class RAID edition hard drives.
Follow the steps below to create a RAID 5 Array.
A. Click the Create Array button on the left panel.
B. Select the Array Type (RAID level): RAID 5
C. Select the Initialization Method: Foreground
Note: For RAID5, only foreground or background initialization is recommended. The
initialization time is dependent on array capacity. The initialization process will zero out all
disks so a correct parity can be generated during disk writes. Correct, consistent parity
information is essential for the integrity of data when rebuilding RAID 5 arrays.
D. Select the Available Disks: Click the Select all button.
E. Click the Create button to create the array.

HighPoint Technologies Inc. 12
The following diagram displays RAID5 foreground initialization in progress.
step 4. After the array has been created, it will be displayed under the Logical tab.

HighPoint Technologies Inc. 13
6.2 Using the RAID disk with Mac OS X.
A newly created RAID Array will be recognized as an empty disk. OS X must initialize it before
it can be used.
step 1. Initializing the RAID disk.
After a RAID array has been created, OS X will display a pop-up window with options to
initialize, Ignore or Eject. Click Initialize to open Disk Utility.
step 2. Erase the Disk
Select the RAID volume, and select the Erase tab. Enter a name in the Name: field, and
click the Erase button towards the bottom right-hand corner to format the array. Once
complete, the RAID array will be ready for use, and will be mounted on the desktop.

HighPoint Technologies Inc. 14
After the RAID disk is erased, the RAID5 disk volume icon will be found on the desktop
and finder as a new disk volume.
step 3. Ejecting the RAID array
To eject the RAID array using Mac OS X, select Go from the Desktop, and select
Computer. Click on the RAID array (it will be displayed using the name you selected on
step 2), and click on File. Select Eject from the drop-down menu to eject the RAID array.
Note: The NA762TB supports Thunderbolt power management. While the NA762TB is connected to the
host system using the Thunderbolt cable, shutting down the host will automatically power down the
NA762TB

HighPoint Technologies Inc. 15
7. Deleting RAID Storage
To delete a RAID array:
1) Log-in to the WebGUI.
2) Switch to the Logical tab.
3) Locate the RAID array that you wish to delete.
4) Click the Maintenance link to the right of the RAID array.
5) Click the Delete button from the Array Maintenance pop up window.
6) Confirm the deletion by click OK button.
Note: All data on the selected RAID array will be deleted after you confirm this selection.
8. RAID Disk Failure Recovery
The NA762TB’s RAID controller continually monitors the health of each of the disk drives. In the event of a disk
failure, an audible alarm will sound. The web GUI will also report the failed drive and its physical position.
NOTE: For redundant RAID arrays (RAID 1, 5, 6, 10 or 50), a drive failure does not result in data loss. However,
the array is now in an unprotected state and the failed drive should be replaced as soon as possible to avoid
data loss.

HighPoint Technologies Inc. 16
NOTE: If the NA762TB was configured in RAID 6 mode, up to two drives can fail with no loss of data. Replace any
failed drive as soon as possible.
Follow the steps below to identify and replace a failed drive.
1) Launch the WebGUI
2) Mute the alarm with the Beeper Mute button.
3) The WebGUI will display information like that shown below. An exclamation mark on the RAID array icon
indicates that the “Status” of the array is Critical. The lower portion of the GUI indicates which drive in
which disk unit has failed.
Note: In this example drive 4 of the RAID 5 Array of has failed.
4) Unlock the disk module Key and remove the failed drive by gently sliding the drive module out of the
enclosure.
WARNING: Make absolutely sure that you remove the failed drive indicated by the GUI. The HDD status LED
can also help locate the Failed disk. When the disk has failed, the NA762TB’s HDD status LED will emit a
solid red light. Reinstall the disk module immediately if you remove the wrong disk module.
5) Replace the failed drive with a new disk module and secure in place. Once the drive has spun up to speed,
the GUI will indicate that the array is rebuilding (The “Status” shows Rebuilding and the percentage
complete) as shown below. The rebuild time is approximately 2 hours per TB.
6) Once the rebuild is complete, the RAID array will return to the Normal status. Your data is now secure.

HighPoint Technologies Inc. 17
9. Expanding RAID Storage Capacity
Note: Mac OS X cannot support partition expansion –DO NOT attempt to use the WebGUI’s OCE or ORLM
functions with a Mac system.
To Expand RAID storage capacity:
a. Back up all original data to a separate storage device.
b. Delete the current RAID array
c. Create a new array using the original and added disks.
d. Restore the data from the backup source to the new array.
10. NA762TB Audible Alarm
The NA762TB has two internal Alarm buzzers. These two Alarm buzzers will emit different types of
sound when an error condition is detected.
10.1 Storage controller buzzer:
This buzzer is for HDD failure (offline) status notification and it will emit a high pitch continuous
sound. This alarm will sound when a disk failure occurs or a disk or an array is removed without using
the “unplug” feature in the WebGUI. When the sound is triggered, follow the steps below to check
the HDD status and mute the alarm.
a. Open the WebGUI and switch to the logical tab. The alarm can be stopped using the
WebGUI’s Mute button, or the Rescan function found under the Physical or Logical tabs.
b. Check the physical device status if there are any disabled drives.
c. Locate the disk module number. The NA762TB’s HDD status LED will emit a solid red light if a
disk has failed. Check the HDD status LED and locate the failed disk.
d. If the RAID is in critical status, please follow “Chapter 8 RAID Disk Failure Recovery” to
recover the RAID disk
e. For other RAID status, please refer p.37 for RAID recovery
10.2 Enclosure buzzer
The alarm buzzer will emit an intermittent sound when a cooling fan has failed, or the enclosure is
overheating. Follow the steps below to check the enclosure status and mute the alarm.
a. Use the mute button on the front panel of NA762TB to mute the alarm.
b. Check if the FAN and Temperature LED from the front panel of NA762TB is light on red.
c. If the enclosure alarm actives, this is usually related to NA762TB hardware problem. Please
contact Technical Support and report the issue.

HighPoint Technologies Inc. 18
11. Technical Support
If you encounter any problems while utilizing the HighPoint NA762TB, or have any questions about
this or any other HighPoint Technologies, Inc. product, feel free to contact our Customer Support
Department.
Web Support: http://www.highpoint-tech.com/websupport/
Thunderbolt™ Support:
Phone: (408)240-6108
Skype: HighPoint.Thunderbolt
12. LIMITED WARRANTY
HighPoint warrants your Product against any defect in material and workmanship, under normal use, for the
designated warranty period. If the Product should become defective within the warranty period, HighPoint will
at its discretion, repair or replace the Product. Repair or replacement parts or Products will be furnished on an
exchange basis and will be either new or reconditioned. All replaced parts or Products shall become the
Property of HighPoint. This warranty shall not apply if the Product has been damaged by accident, misuse,
abuse or as a result of unauthorized service or parts. Warranty service is available to the purchaser by
obtaining a Return Material Authorization number (RMA) and by delivering the Product during the warranty
period to an authorized HighPoint service facility or to HighPoint. The purchaser shall bear all shipping, packing
and insurance costs and all other costs, excluding parts and labor, necessary to effectuate repair,
replacement or refund under this warranty. All returned products must be shipped to HighPoint in the
original shipping container. For more information on how to obtain warranty service, an RMA number or to
acquire shipping materials, contact HighPoint Technical Support. The support information is listed on Chapter
11 section.
IN THE EVENT A PRODUCT BECOMES DEFECTIVE DURING THE WARRANTY PERIOD, THE PURCHASER’S
EXCLUSIVE REMEDY SHALL BE REPAIR OR REPLACEMENT AS PROVIDED ABOVE. INCIDENTAL OR
CONSEPROUENTAL DAMAGES, INCLUDING WITHOUT LIMITATION LOSS OF DATA, ARISING FROM BREACH
OF ANY EXPRESS OR IMPLIED WARRANTY ARE NOT THE RESPONSIBILITY OF GTECH AND, TO THE
EXTENT PERMITTED BY LAW, ARE HEREBY EXCLUDED BOTH FOR PROPERTY DAMAGE, AND TO THE
EXTENT NOT UNCONSCIONABLE, FOR PERSONAL INJURY DAMAGE

HighPoint Technologies Inc. 19
APPENDIX A - Using the WebGUI (full guide)
HighPoint’s web-based RAID Management Software (also known as the WebGUI) is used to monitor
and configure hard disks and RAID arrays attached to HighPoint RocketRAID host adapter which is
intergraded to the NA762TB.
1. Running the HighPoint Web RAID Management software (WebGUI)
After downloading and installing the WebGUI, open the WebGUI by double-clicking the icon found
on the desktop:
Login to the WebGUI and configure the RAID arrays. Use the default user name: RAID and password:
hpt to login
Remote Login
Users connected to a local network can remotely access the WebGUI through the IP address the
machine is located on.
Open a terminal and type in the following command: ifconfig
Once the IP address is obtained users can remotely access the machine by typing in the following
address:
http://IP Address:7402

HighPoint Technologies Inc. 20
2. Web RAID Management Software - Global View
A
Controller(0):
Drop-down menu that displays the controller that is currently
being managed.
B
Host Adapter Model:
Name of the RAID controller
C
Enclosure Count:
Total number of HighPoint Rocket EJ (Port Multiplier) devices
connected. It should be always “0”
D
Physical Drive:
Total physical drives detected by this RAID controller
E
Legacy Disk:
Total physical drives which has partition information created
detected by this RAID controller
F
RAID Count
Total RAID array count has been detected by this RAID controller
G
Total Capacity:
Total capacity of all detected HDD’s
H
Configured Capacity:
Total GB of capacity configured for in Logical devices
I
Free Capacity:
Total GB of capacity that is free for use in creating a JBOD or
RAID array
Other manuals for Thunderbolt NA762TB
1
Table of contents
Other HighPoint Storage manuals

HighPoint
HighPoint rDrive 6628TM User manual

HighPoint
HighPoint Thunderbolt NA762TB User manual

HighPoint
HighPoint NA381TB3 User manual

HighPoint
HighPoint 644L User manual

HighPoint
HighPoint rDrive 6628AM User manual

HighPoint
HighPoint RocketStor 6421TS User manual

HighPoint
HighPoint RocketStor SMART RAID User manual

HighPoint
HighPoint rDrive 6628AW User manual

HighPoint
HighPoint rDrive 6628TW User manual