HiHi HiHi2 Specification sheet

How To Use & Maintain
YOUR NEW HiHi DESKPHONE

Contents
YOUR NEW HiHi DESKPHONE
How to use your HiHi Deskphone
How to make, answer & put a call on hold 4
Transferring calls
Direct Transfer 6
Consult Transfer 8
Adding a colleague to your call (Conferencing) 10
How to add favourite contacts 11
How to maintain your HiHi Deskphone
How to maintain your phone’s connection
Handset Connection 12
Ethernet and WiFi Connection 13
Cleaning your device to gain optimum performance 14
Checking for updates on your device 15
HiHi Assist
You can access HiHi Assist from your HiHi2 homescreen
by selecting the icon as shown above.
HiHi Assist gives you additional support for your HiHi
handset and apps.

How to make, answer
& put a call on hold
HOW TO USE YOUR HiHi DESKPHONE
How to make a call
1) To make a call, press the Phone icon on your homescreen. Enter the numbers using the
keypad and press the green phone icon to initiate the call.
2) If you are calling a saved contact, you can scroll through your Contacts, Favourites and
Recent Calls lists to nd the name. Select the name or number you wish to dial.
4
3) If they have multiple numbers saved, their Contact Card will appear. Select the number and it
will initiate a call.
How to answer a call
1) When your HiHi2 rings, you can either lift the receiver to answer the call or press the green
phone icon on the screen. If you press this, the call will be handsfree.
How to put a call on hold
1) Whilst on a call, press the Hold icon in the Call Control Panel. Once you are ready to continue
with the call, press Resume.
HOW TO MAKE, ANSWER & PUT A CALL ON HOLD
5
Receiver
6 7
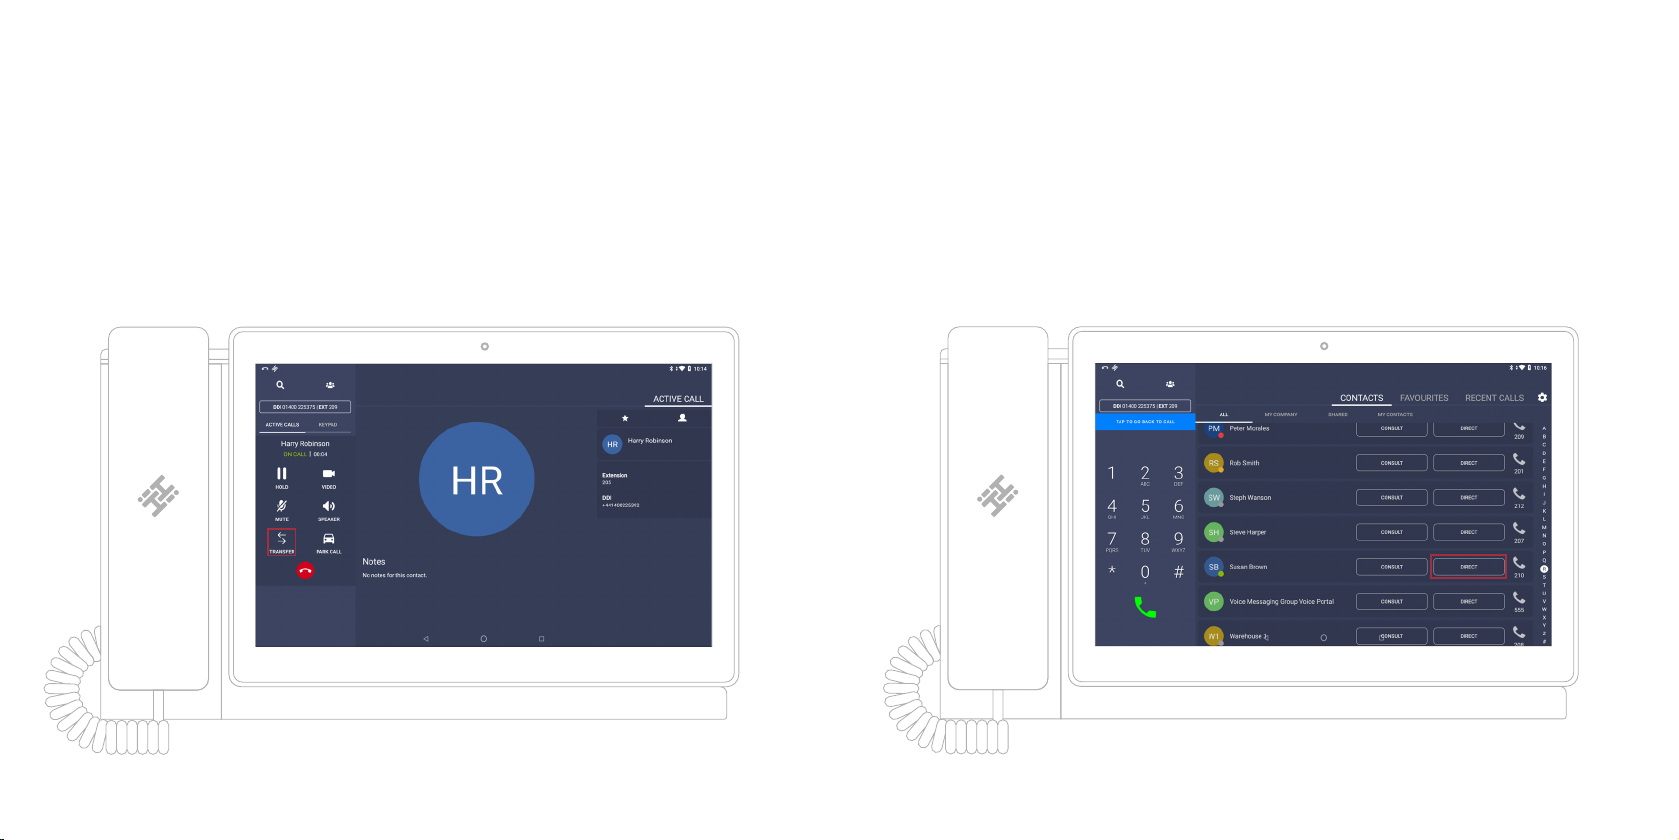
Transferring a call
HOW TO USE YOUR HiHi DESKPHONE
Direct Transfer
1) Whilst on a call, press the Transfer icon, in the Call Control Panel.
6
2) This will take you to the Contacts page. Against each contact, there are two or three
options available. Press the Direct button on the desired contact you wish to transfer the
call to.
3) The call has now been transferred.
TRANSFERRING A CALL
7

8 9
Consult Transfer
1) Whilst on a call, press the Transfer icon in the Call Control Panel.
2) This will take you to the Contacts page. Press the Consult button next to the contact
you wish to transfer the call to. If they have more than one number saved, their Contact
Card will appear for you to select the chosen number.
TRANSFERRING A CALL
8
3) Once you have begun dialling the recipient, the original call will be placed on hold. Once the
new call has connected and you are ready, you can press Transfer.
4) A pop-up window showing Transfer To will appear, containing a list of all your active calls.
Press on the Contact you wish to connect the caller to.
5) Selecting the Contact in this list will transfer the call and you will be then be taken back to
the Contacts page.
TRANSFERRING A CALL
9
10
HOW TO USE YOUR HiHi DESKPHONE
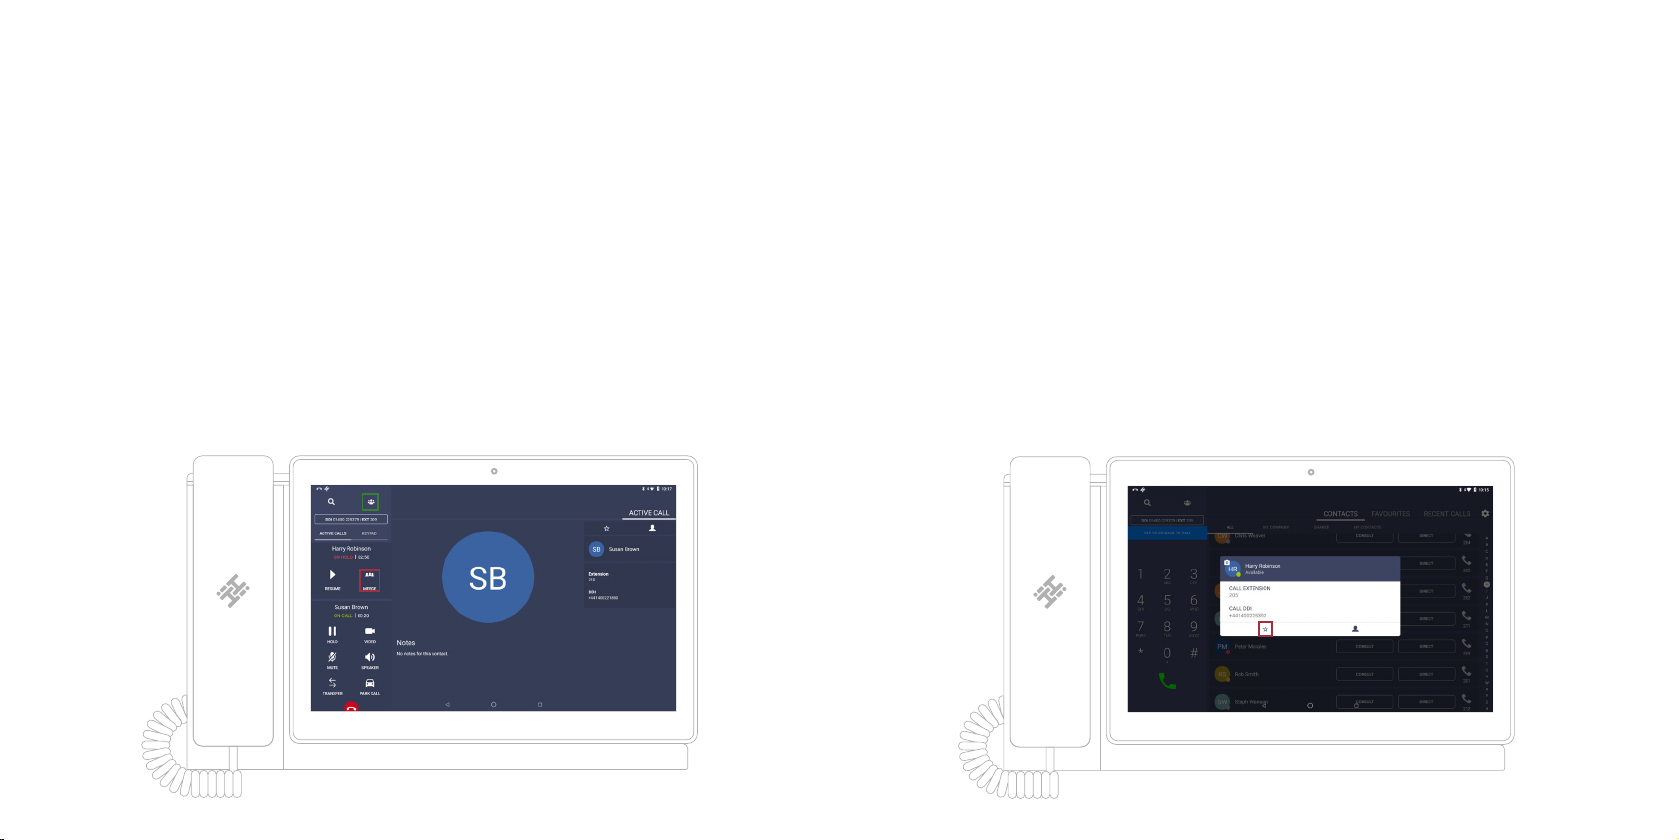
Adding a colleague to
your call (Conferencing)
1) Whilst already on a call, press the Contacts icon. You can dial a number using the keypad,
or locate a contact from the contacts list. When you press ‘call’, your rst contact will be placed
on hold.
2) When they answer, press the Merge icon.
3) Your rst call will be resumed and you will be on a conference call. This process can be
repeated to add more participants.
How to add
favourite contacts
HOW TO USE YOUR HiHi DESKPHONE
1) Select the Contacts icon. Find the contact you wish to add as a ‘Favourite’ by using the
search bar. Select the contact and a pop-up will appear.
2) Press the star icon shown on the pop-up. The contact will be added to your Favourites
list.Favourite contacts are shown within a separate list of your phonebook and also on the
Favourites widget on your homescreen (if added).
11

12
How to maintain your
phone’s connection
HOW TO MAINTAIN YOUR HiHi DESKPHONE
Handset Connection
To supply power and an internet connection to your handset, ensure
you connect the Ethernet Cable and Power Supply Unit Lead into the
correct ports, as shown below. Your Receiver Curly Cord can also be
plugged directly into your HiHi2 base unit.
Ethernet and WiFi Connection
You can conrm if your HiHi2 is connected via Ethernet or WiFi by checking if the symbols are
visible in the top right-hand corner of the screen.
Next to the battery icon, you may see a variation of some of the below symbols, depending on
the status of your connection.
You can setup a WiFi Connection by following the below steps:
1) Swipe up from the bottom of the homescreen to display all the applications on your device.
Select the Settings icon. Select the top option, Network & Internet.
2) Select WiFi. This will display a list of available WiFi networks that you can connect to.
3) Select the WiFi network you would like to connect to. A pop-up will appear asking for the
password. Enter the password and then press Connect.
4) If successful, it will display as Connected. Your HiHi2 is now connected to the internet.
HOW TO MAINTAIN YOUR PHONE’S CONNECTION
Ethernet Cable
Connected
13
PC
Receiver
USB
Slot
Power Supply
Unit Lead
Receiver
Curly Cord
Ethernet
Cable
Connect PC
to this port
(optional)
55
WiFi Network
Connected
No WiFi Network
Connected

Base Pogos
(Pins)
14 15
Cleaning your device to
gain optimum performance
HOW TO MAINTAIN YOUR HiHi DESKPHONE
1) Please remove the tablet from its docking station and with a dry lint-free cloth, wipe the
pins on the underside of your tablet. Next, wipe the pogos (pins) on the plinth of the docking
station.
2) Clean the screen of your tablet, including the camera. You can now redock your tablet into
the base unit.
Checking for updates
on your device
HOW TO MAINTAIN YOUR HiHi DESKPHONE
1) Swipe up from the bottom of the homescreen to display all the applications on your
tablet. Select the HiHi System Update icon.
2) A new screen will appear telling you if there is either an update or not. If there is an
update readily available, please follow the prompts to install it. If there is no update
available, great news, your HiHi2 is already up-to-date.

© 2021 Copyright HiHi Ltd. All Rights Reserved.
HiHi Ltd. Registered at Companies House, England and Wales 07590894
Table of contents


