Leadtek MetaEye IVP256 User manual

MetaEye®IVP256
User’s Manual
Leadtek Research Inc.

Copyright ©2000 by Leadtek Research Inc. All rights reserved.
No part of this document may be copied or reproduced in any form or by any
means without the prior written consent of Leadtek Research Inc
Leadtek makes no warranties with respect to this documentation and disclaims
any implied warranties of merchantability, quality, or fitness for any particular
purpose. The information in this document is subject to change without notice.
Leadtek reserves the right to make revisions to this publication without
obligation to notify any person or entity of any such changes.
MetaEye®is a registered trademark of Leadtek Research Inc. Other trademarks
or brand names mentioned herein are trademarks or registered trademarks of
their respective owners.
Leadtek Research Inc.
International Headquarters
18F, No. 166, Chien-Yi Rd., Chung Ho,
Taipei Hsien, Taiwan (235)
Tel: +886-2-8226-5800
Fax: +886-2-8226-5801
ISDN: +886-2-8024-1092
http://www.leadtek.com.tw
E-mail: service@leadtek.com.tw
United States Headquarters
46721 Fremont Blvd.,
Fremont, CA94538, U.S.A.
Tel: +1-510-490-8076
Fax: +1-510-490-7759
http://www.leadtek.com
MetaEye IVP256 User’s Manual
Version A
December 2000

Contents
Chapter 1 Introduction...............................................................1
1.1 Overview.................................................................... 1
1.2 Features..................................................................... 2
Chapter 2 Getting Started.......................................................... 3
2.1 Important Safety Instructions.................................. 3
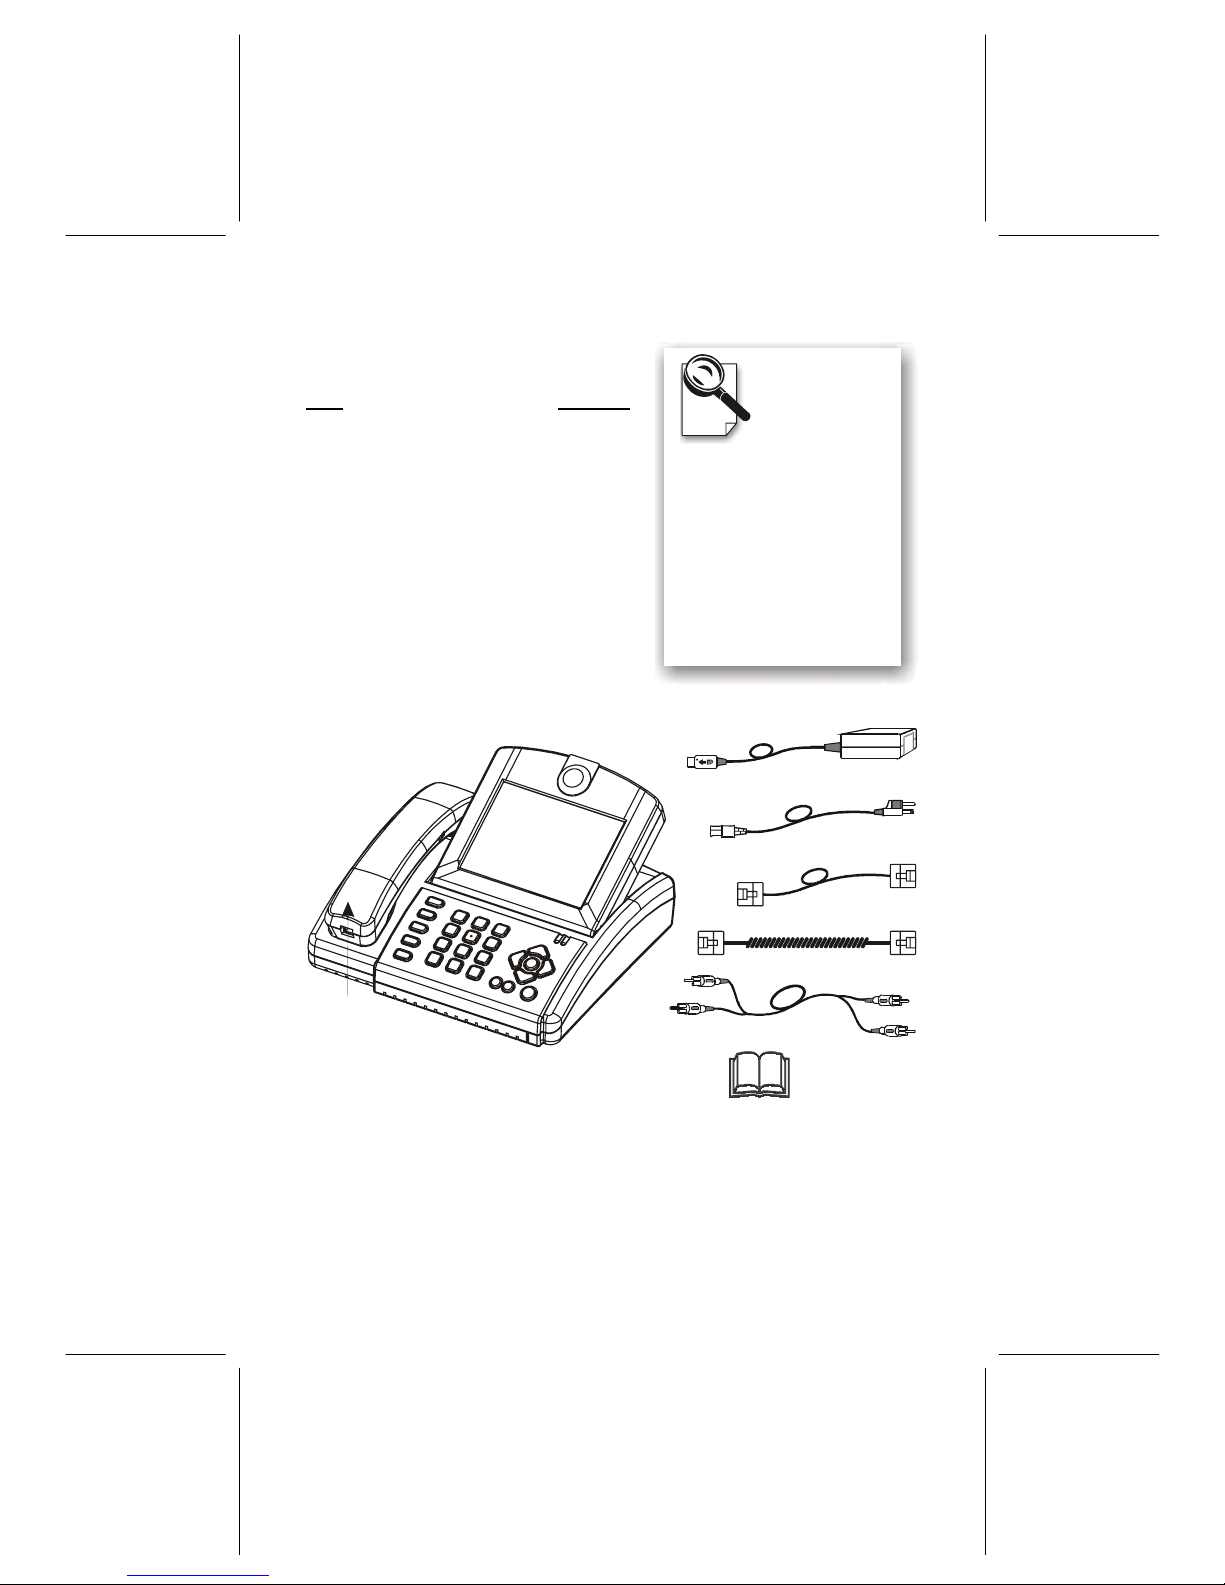
2.2 Package Contents..................................................... 4
2.3 Panel Description ..................................................... 5
2.3.1 Front Panel....................................................... 5
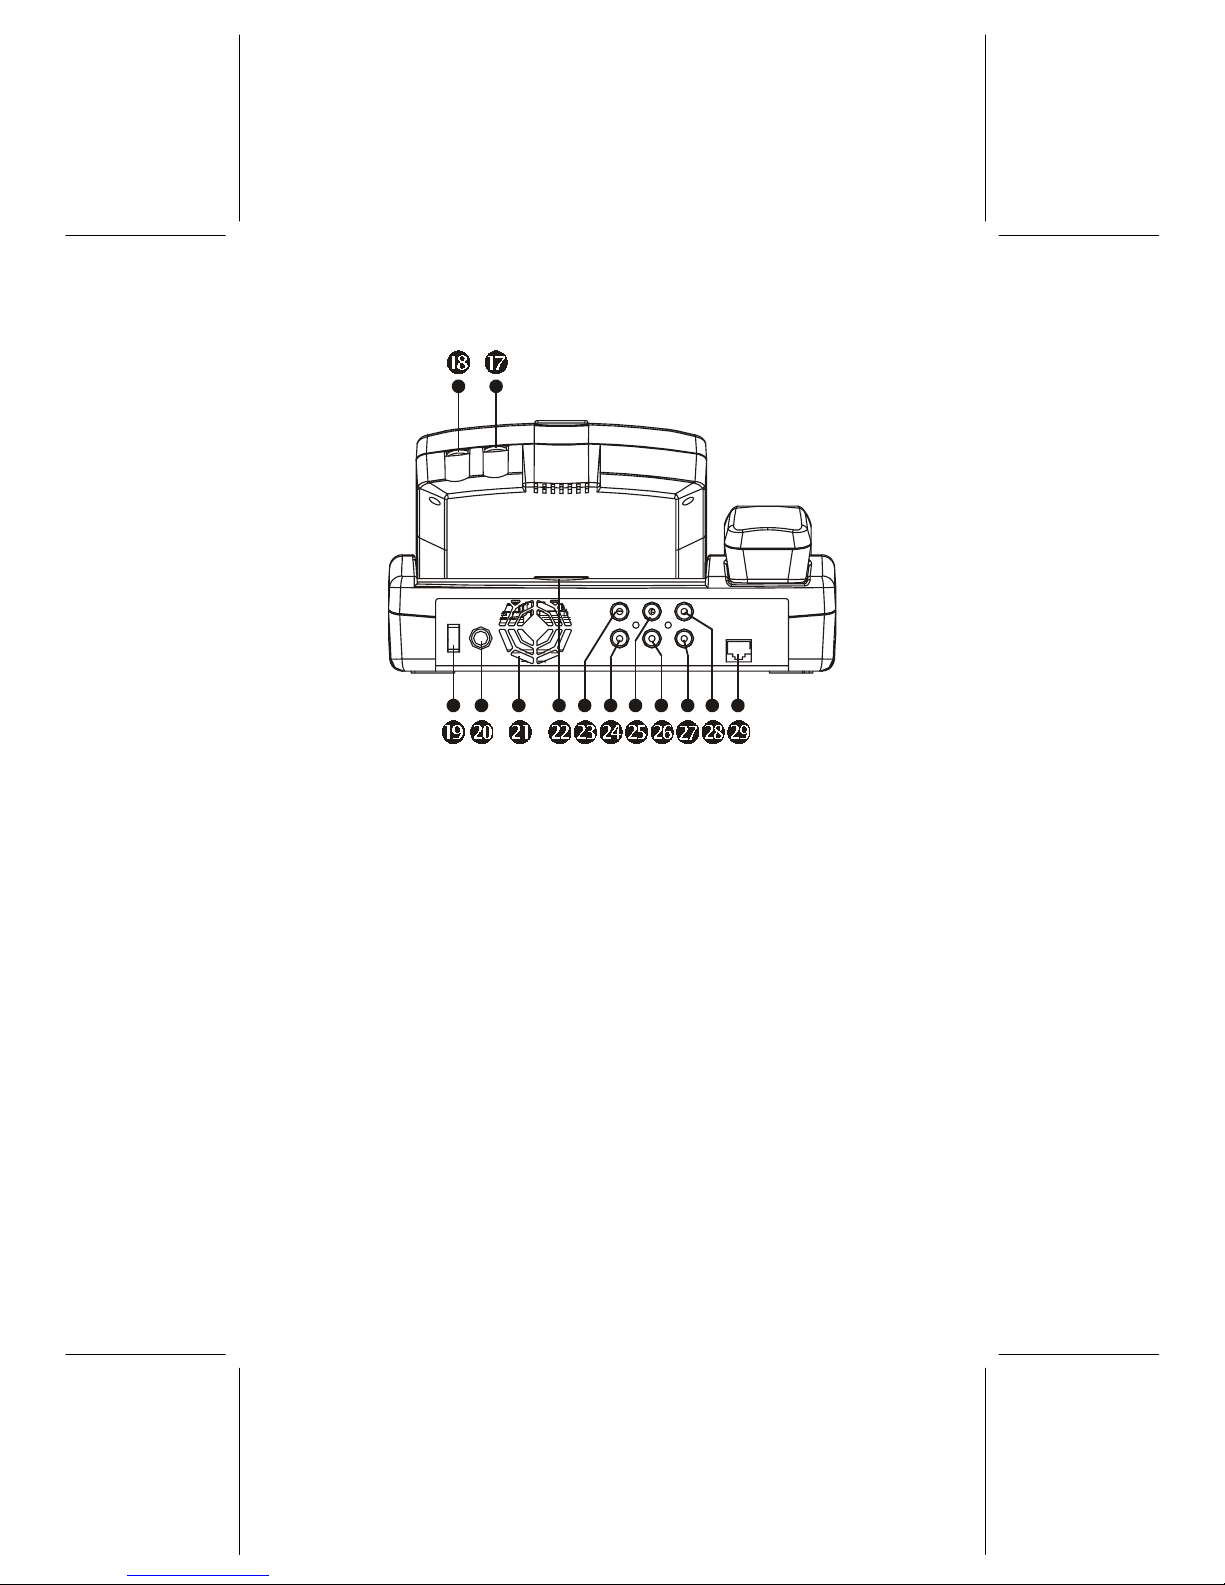
2.3.2 Rear Panel & Connectors................................. 6
2.3.3 Side Panel & Switches..................................... 7
2.4 Controls and Buttons............................................... 8
Chapter 3 Quick and Easy Operation ..................................... 10
3.1 Before you start...................................................... 10
3.2 Quick Installation and Operation.......................... 11
3.3 Power Saving Mode................................................ 13
Chapter 4 OSD Introduction.................................................... 15
4.1 Before the Video Connection Established........... 15
4.1.1 Auto Answer Setup......................................... 15
4.1.2 Phone Book Editor ......................................... 16
4.1.3 A/V Setup ....................................................... 16
4.1.4 ISDN Setup..................................................... 19
4.2 After the Video Connection Established.............. 20
4.2.1 View Setup ..................................................... 20
4.2.2 A/V Setup ....................................................... 21
Chapter 5 Advanced Operation............................................... 24
5.1 Phone Book............................................................. 24
5.1.1 Phone Book Editor ......................................... 24

5.1.2 Phone Book Dialing........................................ 24
5.2 Auto Answer............................................................ 25
5.3 Firmware Upgrade.................................................. 25
5.4 Connecting TV Set.................................................. 26
5.5 Connecting External Cameras .............................. 27
5.6 Connecting VCR ..................................................... 28
Appendix A. Operation Tree ............................................................ 29
Appendix B. Troubleshooting .......................................................... 31
Appendix C. Technical Support ....................................................... 32
Appendix D. Limited Warranty ......................................................... 32

Introduction 1
Chapter 1 Introduction
1.1 Overview
Thank you for purchasing Leadtek MetaEye IVP256. This product is
specifically designed for you to see the one you are communicating with
during a phone call. You can use this VideoPhone for family chatting, friends
talking, business conferencing, medical consulting, and even job interviews.
Leadtek MetaEye IVP256 is designed to avoid the complicated installation
procedures. Simply connecting this product to the power outlet and an ISDN
line, you can make or receive a color video call with this product. And with
the direct access video control keys or the cursor keys, you can bring up the
user-friendly on screen menu (OSD) for further controls for you to operate
and control more easily.
The MetaEye IVP256 has a built-in high quality camera and an active matrix
liquid display, and transmit images up to 30 frames per second. Using this
product, you will enjoy seeing the real time and brilliant color images of your
correspondents with self-view, remote view, and both view function. When
you do not want the caller or receiver to see you while using MetaEye
IVP256, by pushing one-touch button and you can have a totally private
mode connection.
The MetaEye IVP256 can auto-answer the incoming phone and allows you to
remotely monitor your house while you are away from home.
The MetaEye IVP256, designed under conformation of ITU-T H.320
standards for video conferencing communication, can be used with any ISDN
VideoPhone products that are compatible with this standard.

2 MetaEye IVP256 User’s Manual
1.2 Features
• Stand-alone H.320 compliant video phone
• Built-in true color CCD camera with cover protection
• 5.6-inch high quality TFT-LCD Display
• User friendly operation through telephone keypads
• Phone book dialing function
• Auto Answer with password protection
• 2 A/V inputs & TV output for large display
• On-line software Upgradable

Getting Started 3
Chapter 2 Getting Started
Important Safety Instructions
Always follow these basic safety precautions when using any piece of electronic
equipment. This will reduce the risk of fire, electric shock, and injury.
Please read and understand all the instructions before proceeding:
1. Turn off the power of this product by disconnecting the AC main source
before cleaning. Do not use liquid or aerosol cleaners. Use a soft, damp cloth
for cleaning exposed surfaces.
2. Do not operate this product near water or when your hands or body is wet.
Immersion in water could cause electric shock.
3. Do not place this product on sofa, bed, rug, or other soft surface, which
might block these ventilation slots. Do not place this product near a heating
register or radiator.
4. Install this product securely on a stable surface. Serious damage to this
product may result if it falls.
5. Do not allow anything to be rested on the power cord. Do not place this
product where a person can step or trip on the power cord, television or
telephone cords.
6. Do not disassemble this product. There are no user-serviceable parts inside.
7. Do not put lighted candles, cigarettes, cigars, etc., on this product.
8. Do not overload the AC main source and power extension cords. This will
increase the risk of fire and electric shock.

4 MetaEye IVP256 User’s Manual
2.1 Package Contents
Item Quantity
MetaEye IVP256 1
Power Adapter 1
Power Cord 1
ISDN Cable (RJ-45) 1
Handset 1
Handset Cable 1
Audio/Video Cable 1
User’s Manual 1
Audio/Video Cable
Power Adapter
Power Cord
MetaEye IVP256
Handset
Handset Cable
ISDN Cable
User's Manual
Please unpack
the product
package with
caution; inspect
the Items closely. If you
find any damaged item,
please contact your local
distributor immediately.
Also, please keep the
box and packing
material for future use in
the event of future
shipments.

Getting Started 5
2.2 Panel Description
2.2.1 Front Panel
1. CCD Camera – Local video input source with focus adjusting support
2. Handset – For speaking and private listening
3. Quality – Adjustable video quality and performance
4. PIP – Switch sub screen position
5. View – Switch video display
6. Privacy – Black out user’s image
7. Camera – Switches the input camera sources
8. Keypad – 12-key alphanumeric keypad
9. Video/Voice – Voice or video response
10. Redial – Redial the last number dialed
11. Speaker – For handsfree speaking and dialing
12. Cursor Panel – For OSD operation
13. M– Pop up OSD menu
14. Power – Power on indicator
15. Video – Video connection indicator
16. LCD Panel – Video display

6 MetaEye IVP256 User’s Manual
2.2.2 Rear Panel & Connectors
17. Brightness – Adjusts the brightness
18. Cotrast – Adjusts the video contrast
19. Power Switch – Turns the power on/off
20. DC IN – Connects to the DC output of power adapter
21. Heat Fan – Prevents overheating
22. Cover Holder – Holds the cover of CCD lens
23. Audio Out – Audio output connector
24. Video Out – Video output connector
25. Audio In 2 – Audio input connector 2
26. Video In 2 – Video input connector 2
27. Video In 1 – Video input connector 1
28. Audio In 1 – Audio input connector 1
29. ISDN – ISDN connector

Getting Started 7
2.2.3 Side Panel & Switches
On Off On OffOn Off
ISDN
HI LO
TERMINATOR SETTING UPGRADE RINGER VOLUME
HANDSET
30. Terminator – ISDN device terminator switch (Default setting is ‘On’)
31. Setting – ISDN setting switch (Default setting is ‘On’)
32. Upgrade – Software upgrade mode switch (Default setting is ‘Off’)
33. Ringer – Volume control of the ringer
34. Volume – Controls vocal volume
35. Handset jack – Handset cable (RJ-45) connector
2.2.4 Handset
36. Handset Volume Switch
– The volume of the voice from the other
end of the line can be adjusted on the
handset to give you more options and for
the convenience of users with minor
hearing problems. The options are Hi (High)
and Lo (Low). Default setting is Hi.

8 MetaEye IVP256 User’s Manual
2.3 Controls and Buttons
!
!!
!LED Indicators
Video Indicator: Lights orange when the main unit is in
video transmission. No light when in voice connection only.
In privacy mode, the video indicator blinks.
Power Indicator: Lights green when the power is on.
Lights intermittently green and red when the power saving
function is on. The power saving function activates only
when you are not making any movement after the welcome
screen appears.
"Hot Keys
Quality: To pop up the OSD Quality menu, press to adjust
the frame quality.
PIP: To pop up the PIP (Picture in Picture) screen and to
switch its position.
View: To select the video displayed on the screen from
local image, remote image and both images.
Privacy: To enable or disable your self-view image and
audio to be shown and heard on the other party.
Camera: To switch video input sources among built-in
camera, and external cameras.

Getting Started 9
#Number keypad
Number 0-9: To dial the telephone numbers or to input
data required for accessing the OSD command.
$Cursor Panel
<M>: Used with OSD menus; to pop up the OSD.
Up arrow: To go back to previous OSD menu.
Down arrow: To go on to next menu or to execute the
adjustments made.
Left arrow: To move the cursor to the left on OSD menus.
Right arrow: To move the cursor to the right.
Video/Voice: To switch between the voice call and video
call.
Redial: To dial the number last dialed.
Speaker: To dial the correspondent’s number without
picking up the handset.

10 MetaEye IVP256 User’s Manual
Chapter 3 Quick and Easy Operation
3.1 Before you start
Avoid having lights behind you that
might shine into the camera lens.
Do not point the MetaEye IVP256
at a mirror or bright light.
Keep a distance of 0.5 meters
away from MetaEye IVP256.
Make sure of the most
appropriate lighting source,
preferably from the front with
the beam on your face.
Here are a few things you need to consider before making a video call.
Use the self-view image and focus knob to get the
best shot of yourself.
Adjust the hue and brightness of the screen for
best image.
On Off On OffOn Off
Switc hing Ty pe Termin ator Downlo ad
On Off On Of fOn Off
Switching Type Terminator Do wnload
On Off On OffOn Off
SwitchingType Terminator Download
On Off On OffOn Off
SwitchingType Terminator Download
0.5 m
Avoid having a
lot of movement
in the background
and try not to
move around
excessively. Too
much movement
tends to slow
down the frame
rate of the video
image, resulting
in a jerky picture.

Quick and Easy Operation 11
3.2 Installation and Operation
Before proceeding the connection, please make sure the handset is placed on
hook, and the handset cable is connected to the handset cable connector of
MetaEye IVP256.
Step 1: Choose an appropriate location for your MetaEye IVP256. Make sure
the lighting is sufficient and the background is soft and evenly
painted.
Step 2: Place your MetaEye IVP256 on top of a counter, desk, or table with
the CCD camera opening in front.
Step 3: Connect the handset and the MetaEye IVP256 main unit with handset
cable.
Step 4: Plug one end of the ISDN cable to the jack labeled “LINE” on
MetaEye IVP256, the other end to the ISDN jack.
Step 5: Connect the power cord between the wall outlet and the power
adapter. Plug the free end of the power adapter into the power
connector (DC IN) on MetaEye IVP256.
Now you have completed the basic installation of the MetaEye
IVP256, you are ready to make video phone calls.
Step 6: Turn on the power of MetaEye IVP256. The opening screen
(MetaEye) shows on the LCD screen, indicating that you can start a
video call.
Step 7: Pick up the handset. The LCD screen shows the local view of your
self-view image.
Step 8: Dial the phone number directly.
Step 9: Waiting for the connection.
Step 10: The connection established after the correspondent answered the call.
Step 11: To end the connection, simply hang up the handset.
If there is difficulty in making connection, please check the MetaEye IVP256 has
been properly installed. There will be a normal dial tone heard from the receiver.

12 MetaEye IVP256 User’s Manual
If not, check the connection between MetaEye IVP256 and the ISDN jack, or
please refer to the following instruction of ISDN Setup.
Before proceeding the ISDN Setup, you have to turn on the “Switching Type”
switch first. Pick up the handset, and then press the [M] button. A menu bar of
four setup commands will be popped up at the bottom of the LCD panel as:
1-Auto Answer 2-Phone Book 3-A/V Setup 4-ISDN Setup
Move the cursor to item 4 to set up the ISDN in which there are three ISDN
setup menus: 1-Call Type 2-Switch Type 3-Voice Type.
The call types you connected to are
1. 1x56K
2. 2x56K
3. 1x64K
4. 2x64K
The default setting of ISDN Setup is 2x64K, which uses 2B channels and gives
you the best video quality. But in some regions, the ISDN service provider only
provides 56K as 1B channel. If you are not sure about the call type, please
contact your ISDN service provider.
The ISDN switch types you connected to are:
1. DSS1: Generally used in European, Taiwan, and China
2. NI1: Generally used in North American area
3. 5ESS: Generally used in USA, AT&T switch
4. DMS 100: Generally used in North American area
5. NTT: Generally used in Japan
If your ISDN switch type is DSS1/NTT, you have to enter the Local Number,
which is designated by the ISDN service provider with the default value of
Empty. Use the “0” ~ “9” keys to input the number.
If your ISDN switch type is NI1/5ESS/DMS100, you have to set SPID and Local
(ISDN phone) number: 1. SPID: The maximum SPID digital number is 20.
ISDN service provider assigns the SPID number. 2. Local: The maximum Local
digital phone number is 20. ISDN service provider assigns the Local Number.
The voice types you connected are:
1. A-Law: general used in the European area and China.
2 µ-Law: general used in the North American area, Taiwan and Japan.
After finished all the settings, please hang up the handset to store them.

Quick and Easy Operation 13
Now, pick up the handset, and you can hear the dial tone, turn on the “Switching
Type” switch, and then you can go back to previous steps 6 to retry the
connection.
If the MetaEye IVP256 is not working properly, or if you don’t know how to
setup the ISDN switch type, please contact your ISDN service provider.
3.3 Power Saving Mode
The MetaEye IVP256 has been designed into a power saving circuit to protect its
internal components so as to extend its service life.
After turning on the power switch, there is an opening screen (MetaEye) on the
LCD screen. If the MetaEye IVP256 has been kept without any use for 10
minutes, the screen will be shut downs automatically, and turns into a blank
screen. The power indicator flashes red and green in interval slowly.
The screen will come back to work when you pick up the handset.


OSD Introduction 15
Chapter 4 OSD Introduction
There are two types of OSD (On Screen Display) in setting up the MetaEye
IVP256: one is before the video connection established, and the other after. Note
that the settings before the video connection established could be stored, while
the one after could not.
4.1 Before the Video Connection Established
After finished the basic installation steps, you can turn on the power switch and
proceed with the following setting procedures before the video connection
established.
Pick up the handset, and then press the [M] button. A menu bar of four setup
commands will be popped up at the bottom of the LCD panel as:
1-Auto Answer 2-Phone Book 3-A/V Setup 4-ISDN Setup
NOTE: While using the cursor panel to select any item, you can also do the
selection by directly pushing the corresponding digits of that item number.
4.1.1 Auto Answer Setup
Pick up the handset and press the [M] button to pop up the OSD menu, then go
to 1-Auto Answer menu, you will find out there are two items of Auto Answer
Setup which you can operate each of them according to your need:
• 1-# Rings
This item allows you to set the numbers of phone ringing.
Step 1: Press or to move to 1-# Rings menu and press to enter.
Step 2: Input 0~9 for the numbers of phone ringing, or press to disable
auto answer function. Press again when finished.
Step 3: Press the button to leave this menu.
• 2-Security Code
This item allows you to protect the Auto Answer function from being abused.
Step 1: Press or to move to 2-Security Code and press to enter.

16 MetaEye IVP256 User’s Manual
Step 2: Input 4-digit password from 0~9, or press to disable the auto
answer function.
Step 3: Press the button to leave this menu.
NOTE: After each set up procedure, you can leave it without further action for
over 30 seconds to let the OSD menu disappear by itself. All the settings will be
stored automatically only when you hang up the handset.
4.1.2 Phone Book Editor
Pick up the handset and press the [M] button to pop up the OSD menu, then go
to 2-Phone Book menu, you will find out there are two items of Phone Book
which you can operate each of them according to your need:
• 1-Dial
This item allows you to easily dial out the phone number from your phone book.
Step 1: Press or to move to 1-Dial menu and press to enter.
Step 2: Press or to select the number set (0~9) and press to dial.
Step 3: Press the button to leave this menu.
• 2-Edit.
This item allows you to edit and store the frequently used phone numbers.
Step 1: Press or to move to 2-Edit menu and press to enter.
Step 2: Press or to select the number set (0~9) and press to edit.
Step 3: Input the name you want to edit through the keypad (refer to the
keypad definition as shown below).
Step 4: After selected a digit, press to select the next digit, or press to
move backward a digit.
Step 5: After finished the name input, press again to go to phone number
setting.
Step 6: Input the phone number 1 through the keypad, and then the phone
number 2 (if necessary). Press again when finished.
Step 7: Press the button to leave this menu.
4.1.3 A/V Setup
Pick up the handset and press the [M] button to pop up the OSD menu, then go
Table of contents
Other Leadtek Telephone manuals