hikam A7 Manual

A7 IP Kamera
High Infinity Technology GmbH https
://www.hikam.de
Die Kamera für ein sicheres Zuhause.
Kurzanleitung für die erste Inbetriebnahme (v6.0 / 09.2017) –Seite 1 & 2
Deutsch
Vorbereitung:
Schritt 1: Bitte UNBEDINGT folgendes prüfen bzw. beachten:
- Ihr Router verfügt über 2.4 GHz Frequenzband.
- Das Smartphone ist mit demselben WLAN verbunden, zu welchem Sie die Kamera hinzufügen möchten.
- Das Smartphone, die Kamera und der Router sollten während der Installation nicht mehr als drei Meter voneinander
entfernt sein (Nach der Installation können Sie die Kamera dann am auch weiter entfernten Wunschort anbringen).
- Das WLAN-Passwort ist Ihnen bekannt.
Schritt 2: Kamera einschalten
- Montieren Sie bitte die WiFi-Antenne und 433-Antenne am jeweiligen Anschluss.
- Schließen Sie daraufhin die Kamera ans Stromnetz an. Sie wird leise zu piepsen beginnen: Di - Di - Di …
- Wenn dies nicht der Fall ist, versuchen Sie bitte, die Kamera zurückzusetzen:
Bitte drücken Sie im eingeschalteten Zustand das „Reset" am Reset-Kabel der Kamera 3 Sekunden, bis ein „Cash“-Signalton zu
hören ist. Danach warten Sie ca. 30 Sekunden; die Kamera ist nun zurückgesetzt. Somit sind alle Konfigurationen (Netzwerk,
Passwort, Alarm…) gelöscht bzw. zurückgesetzt.
Schritt 3: HiKam-App
- Suchen Sie bitte nach „HiKam Kamera” im App Store (für iPhone) oder bei Google Play (für Android). Laden Sie die
App herunter und installieren Sie sie. Das ist natürlich kostenfrei.
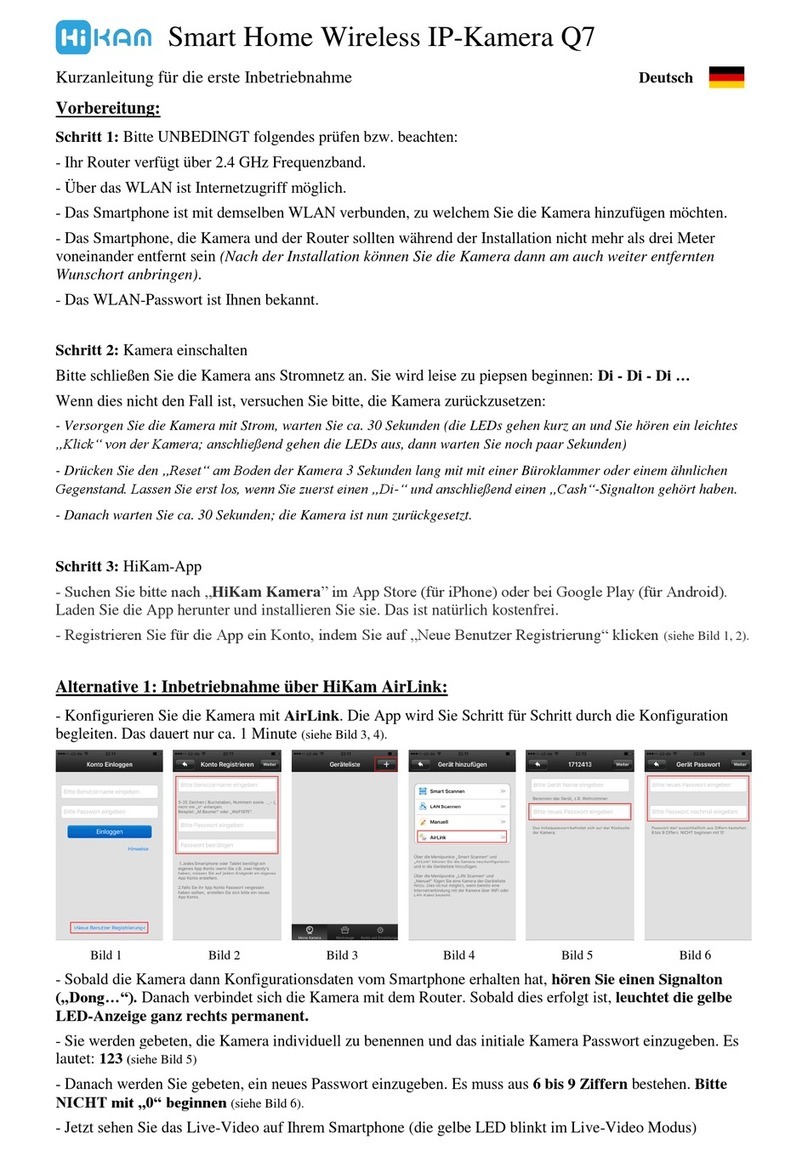
- Registrieren Sie für die App ein Konto, indem Sie auf „Neue Benutzer Registrierung“ klicken (siehe Bild 1, 2).
Inbetriebnahme über HiKam AirLink:
- Konfigurieren Sie die Kamera mit AirLink. Die App wird Sie Schritt für Schritt durch die Konfiguration begleiten.
(siehe Bild 3, 4).
Bild 1
Bild 2
Bild 3
Bild 4
Bild 5
Bild 6
- Sobald die Kamera dann Konfigurationsdaten vom Smartphone erhalten hat, hören Sie einen Signalton („Dong…“).
Danach verbindet sich die Kamera mit dem Router. Sobald dies erfolgt ist, leuchtet die blaue LED-Anzeige permanent.
- Sie werden gebeten, die Kamera individuell zu benennen und das initiale Kamera Passwort einzugeben. Es lautet: 123
(siehe Bild 5)
- Danach werden Sie gebeten, ein neues Passwort einzugeben. Es muss aus 6-30 Zeichen bestehen (0-9, a-z, A-Z);
Sonderzeichen sind nicht erlaubt. (siehe Bild 6).
- Jetzt sehen Sie das Live-Video auf Ihrem Smartphone

Alternative : Inbetriebnahme über Kabel:
HiKam A7 können Sie alternativ über LAN Kabel konfigurieren und betreiben. Sie können, falls gewünscht, die
Verbindung später von LAN auf WLAN umstellen.
- Verfahren Sie weiter, wie in Vorbereitung Schritt 1 ,2, 3 beschrieben (siehe oben).
- Schließen Sie die Kamera mit einem LAN-Kabel an den Router an. Stellen Sie bitte sicher, dass der Router
Internetzugang hat und DHCP aktiviert ist.
- Öffnen Sie die App und warten ein paar Sekunden. Die Kamera wird automatisch erkannt (siehe Bild 7). Falls nicht,
können Sie die Kamera auch manuell hinzufügen (siehe Bilder 8, 9, 10). Die Kamera-ID finden Sie auf der Unterseite der
Kamera, bitte die Nummer notieren und gut aufbewahren.
Bild 7
Bild 8
Bild 9
Bild 10
Bild 11
Bild 12
- Sie werden nun gebeten, die Kamera zu benennen und das initiale Kamera Passwort einzugeben. Es lautet: 123 (siehe Bild
5)
- Danach werden Sie gebeten, ein neues Passwort einzugeben. Es muss aus 6-30 Zeichen bestehen (0-9, a-z, A-Z);
Sonderzeichen sind nicht erlaubt. (siehe Bild 6).
- Jetzt sehen Sie das Live-Video auf Ihrem Smartphone
- Nun können Sie, falls gewünscht, von LAN auf WLAN umschalten, ansonsten können Sie diesen Schritt auslassen:
Meine Kamera -> Einstellung -> Netzwerk Einstellungen -> Auf das gewünschte WLAN klicken -> Bestätigen ->
WLAN-Passwort eingeben (siehe Bilder 13 bis 17)
Bild 13
Bild 14
Bild 15
Bild 16
Bild 17
Bild 18
- Sobald der grüne Haken neben dem WLAN-Netzwerk erscheint, bedeutet das: Der Wechsel von LAN auf WLAN war
erfolgreich. (siehe Bild 18)
Für Montage-Informationen lesen Sie bitte Seite 3 & 4.
Technischer Support:
http://support.hikam.de
Hier finden Sie weitere Anleitungen, Video-Anleitungen, PC-Software,
Datenblätter, Spezifikationen, FAQs.
service@hikam.de
Eine Rückmeldung innerhalb von 24 Stunden ist garantiert, meist
erhalten Sie schon innerhalb von 4 Stunden eine Antwort.

A7 IP Camera
The Camera for Secure Home.
Quick Guide for Initial Setup (v6.0/09.2017)
English
Before starting setup
Step 1: Make sure of the following:
- Your router supports the 2.4GHz frequency band.
- Your smartphone is connected to the Internet with a WLAN/Wi-Fi that the camera will connects with.
- You smartphone, camera, and router should be within approximately 9 feet during setup. After your camera is set up,
you can move the camera to your preferred location.
- You know the WLAN/Wi-Fi password.
Step 2: Download and install HiKam App. Go directly to Step 3 if the HiKam app is already in your smartphone.
- Get HiKam App from App Store (iPhone/iPad) or Google Play (Android), search "HiKam camera".
- Create your account in the app. (see picture 1)
Step 3: Start camera
- Remove the camera from its packaging and thread the two antennas to their corresponding labeled connectors.
- Connect the power cord to power on the camera.
- Wait for camera to beep.
If beeping is not heard within one minute press and hold the reset button till a successful reset signal, which is a metallic
clash sound, is heard. Wait another 30 seconds for the camera completing reset. The camera will then start beeping.
Start setup
You can choose either setup via wireless (see Setup Mode 1) or via an Ethernet cable (see Setup Mode 2).
Setup Mode 1: Set up using 'AirLink'
- Log in HiKam app and follow picture 2 through 4. The app will guide you through configurations step by step.
Picture 1
Picture 2
Picture 3
Picture 4
Picture 5
Picture 6
- After click “Next” button (see picture 4) the app starts to configure the camera with Wi-Fi. Once the camera receives all
configurations from your smartphone, you will hear a sound ("Dong…") signifying that your camera has begun to
connect to the app server through the Wi-Fi router. Once connection is completed you will see the notify “WiFi
configuration successful” in the app, otherwise you will see "Airlink Timeout". In the latter case try one more time. If the
connection fails to complete again, move to Setup Mode 2.
- You will be asked to name the camera and to enter the initial password 123 (see picture 5).
- You will then be asked to enter a new password for your camera, consisting of 6-30 characters (see picture 6). A
successful operation will be notified by “Modify successfully” in the app. If this does not happen within one minute, force
quit the app, reset your camera by pressing and hold the reset button, and move to Setup Mode 2.
- You can now follow the live video stream on your smartphone.

Setup Mode 2: Set up using an Ethernet Cable
HiKam A7 can be set up and operated using an Ethernet cable. You can switch from LAN to WLAN at any time after the
camera finishes setup.
- Connect the camera to the router using an Ethernet cable. Make sure the router is connected to the internet and DHCP is
enabled.
- Log in the app and wait for a few seconds. If the camera is detected automatically (see picture 7), follow steps depicted in
pictures 11 and 12; otherwise, follow steps depicted in pictures 8 through 12. The device ID is on the underside of the
camera. The ID should be recorded and kept for further use (see picture 10).
Picture 7
Picture 8
Picture 9
Picture 10
Picture 11
Picture 12
- You will be asked to name the camera and enter the initial password 123 (see picture 11).
- You will then be asked to enter a new password (see picture 12). New password should consist of 6-30 characters. A
successful operation will be notified by “Modify successfully” in the app.
- Optionally, you can now switch from LAN to WLAN by following these steps: My Camera -> Settings -> Network
Settings -> Choose WLAN in the WiFi List -> Confirm -> Enter WLAN password (see pictures 13 through 17).
- Wait for 1 minute, refresh the WiFi List by going back and re-entering the menu, the green CHECK behind the WiFi
indicates a successful switch from LAN to WLAN. (see picture 18)
Picture 13
Picture 14
Picture 15
Picture 16
Picture 17
Picture 18
- You can now follow the live video stream on your smartphone.
Now A7 can be mounted to any desired places. For mounting instruction please read pages 3&4.
Need help?
Watch video instructions, search FAQs, get troubleshooting support
, get PC Client software and submit support
request at http://supportus.hi-kam.com.
To get support from a customer service expert tutorials, email service.us@hi-kam.com. Guarantee
feedback
within 24hrs, often within 4hrs.

A7 Caméra IP
High Infinity Technology GmbH
http://www.hikam.fr
La caméra qui rend votre maison plus sûre.
Notice abrégée pour la première mise en service (v6.0 / 09.2017) - Page 1 & 2
Français
Préparation :
1 : Très IMPORTANT : veuillez vérifier les points suivants :
- votre routeur utilise la bande de fréquence de 2.4 GHz.
- Le smartphone est connecté au même réseau sans fil auquel vous souhaitez ajouter la caméra.
- Pendant l’installation, le smartphone, la caméra et le routeur se trouvent à une distance ne dépassant pas 3 m. (Après
l’installation, la caméra peut être installée à l’endroit de votre choix, plus éloigné du routeur).
- Vous connaissez le mot de passe du réseau sans fil.
2 : Mise sous tension de la caméra
- Veuillez brancher les antennes wifi et 433 sur les prises correspondantes.
- Veuillez brancher la caméra sur le secteur. Elle commencera à émettre des bips : di- di-di…
- Si ce n’était pas le cas, veuillez réinitialiser la caméra :
La caméra doit être allumée. Veuillez appuyer, à l’aide d’un cure-dent ou d’un autre objet semblable, sur le bouton « Reset » sous la
caméra et maintenez-le appuyé pendant 3 secondes jusqu’à ce que la caméra émette un signal sonore « « Cash ». Patientez 30
secondes, la caméra a été réinitialisée. Ceci signifie que toutes les configurations (réseau, mot de passe, alertes…) ont été supprimées
ou réinitialisées.
3: Application HiKam
- Recherchez „HiKam” dans l’App Store (pour iPhone) ou dans Google Play (pour Android). Téléchargez l’application et
installez-la. Elle est, bien sûr, gratuite.
- Veuillez enregistrer un compte pour l’application en cliquant sur « Nouvel enregistrement d’utilisateur » (voir images 1 et
2).
Configuration via HiKam AirLink :
- Configurez la caméra via AirLink. L’application vous accompagnera, pas à pas, tout au long de la configuration. (voir
images 3 et 4).
Image 1
Image 2
Image 3
Image 4
Image 5
Image 6
- Dès que la caméra aura reçu les données de configuration depuis le smartphone, vous entendrez un signal sonore
(« dong »). Ensuite, la caméra se connectera au routeur. Dès que cette connexion sera établie, l’indicateur LED restera
allumé en bleu.
- Vous aurez ensuite à attribuer un nom à la caméra et à saisir le mot de passe initial pour la caméra. Il s’agit du 123 (voir
image 5)
- Vous aurez ensuite à saisir un nouveau mot de passe. Le mot de passe doit comporter entre 6 et 30 caractères (0-9; a-z;
A-Z). Les caractères spéciaux ne sont pas admis.(voir image 6).
- Vous pouvez maintenant visionner la vidéo en live sur votre smartphone.

Mise en service alternative : Mise en service à l’aide de câbles ethernet :
Vous pouvez également mettre en service et faire fonctionner la HiKam A7 à l’aide de câbles ethernet. Si vous le
souhaitez, vous pourrez passer d’une connexion ethernet à une connexion wifi ultérieurement.
- Continuez comme décrit sous « Préparation 1,2,3 (voir plus haut).
- Reliez la caméra au routeur à l’aide d’un câble ethernet. Vérifiez que le routeur a accès a internet et que DHCP est
activé.
- Ouvrez l’application et patientez quelques secondes. La caméra sera détectée automatiquement (voir image 7). Si ce n’est
pas le cas, vous pouvez ajouter la caméra manuellement. (voir images 8, 9, 10). Vous trouverez l’ID de l’appareil sous celui-
ci, veuillez penser à noter et à conserver ce numéro.
Image 7
Image 8
Image 9
Image 10
Image 11
Image 12
- L’application vous demandera ensuite d’attribuer un nom à la caméra et de saisir le mot de passe initial pour la caméra.
Il s’agit du 123 (voir image 11)
- L’application vous demandera de saisir un nouveau mot de passe. Le mot de passe doit comporter entre 6 et 30
caractères (0-9; a-z; A-Z). Les caractères spéciaux ne sont pas admis.(voir image 6).
- Vous verrez maintenant la vidéo en live sur votre smartphone (la LED jaune clignote en mode vidéo live).
- Si vous le souhaitez, vous pouvez désormais passer du réseau ethernet au wifi, sinon, passez ce point : Ma caméra ->
Réglages -> Réglages de réseau -> Cliquez sur le réseau wifi souhaité -> Confirmer -> Saisir le mot de passe wifi (voir
images 13 à 17)
Image 13
Image 14
Image 15
Image 16
Image 17
Image 18
- Dès que le crochet vert apparaît à côté du réseau wifi cela signifie que le passage de l’ethernet vers le wifi a réussi (voir
image 18)
Veuillez lire l’annexe pour les pages 3&4 :
Support
technique :
http://support.hikam.fr
Vous y trouverez des notices supplémentaires, des tutoriels vidéo, le logiciel PC, les
fiches produits, les spécifications, FAQ.
service@hikam.fr
Nous vous garantissons une réponse sous 24 h,
le plus souvent, nous vous répondrons en
4 heures.

A7 IP-Telecamera
High Infinity Technology GmbH
http://www.hikam.it
La videocamera per una casa sicura.
Istruzioni sommarie per la prima messa in servizio (v6.0 / 09.2017) –Pagina 1 & 2
Italiano
Preparazione:
Passo 1: Si prega di controllare e osservare ASSOLUTAMENTE lo seguente:
- il router ha una banda di frequenza di 2,4 GHz.
- Lo smartphone è collegato alla stessa rete wireless a cui si desidera aggiungere alla telecamera.
- Lo smartphone, la telecamera e il router devono essere usati a non più di tre metri di distanza durante
l'installazione (dopo l'installazione è possibile installare la fotocamera ad un posto ancora più lontano).
- La password Wi-Fi è nota a voi.
Passo 2: Accendere la camera
Si prega di installare l'antenna Wi-Fi e antenna 433 alla connessione respettiva.
Dopo di ché collegare la camera alla rete elettrica. Iniziarà con un debole beep: Di - Di - Di ...
Se questo non avviene, provare a resettare la telecamera:
Quando la camera è accesa, premere il "Reset" sul cavo di reset della fotocamera per 3 secondi fino al momento che si sente un segnale "Cash". Poi
attendere circa 30 secondi; ora la telecamera resettata. Così tutte le configurazioni (rete, la password, allarme ...) sono cancellate o resettate.
Passo 3: App HiKam
- Si prega di ricercae " HiKam Camera" nell’App Store (per iPhone) o Google Play (per Android). Scaricare
l'applicazione e installarla. Questo è naturalmente gratuito.
- Registrare un account per l'applicazione cliccando su "Registrazione nuovo utente" (vedere figura 1, 2).
Messa in servizio tramite HiKam AirLink:
- Configurare la fotocamera con AirLink. L'applicazione vi guiderà passo per passo attraverso la configurazione. Questo
richiederà solo circa 1 minuto (vedere figura 3, 4).
Figura 1
Figura 2
Figura 3
Figura 4
Figura 5
Figura 6
- Appena la fotocamera poi riceve i dati di configurazione dal telefono, si sente un segnale acustico ("Dong ...").
Successivamente, la telecamera si collega al router. Una volta collegata, il LED blu rimane acceso.
- Viene richiesto di assegnare un nome singolare alla telecamera e inserire la password iniziale della fotocamera. Si legge:
123 (vedere figura 5)
- Dopo di che verrà chiesto di inserire una nuova password. La password deve consistere di 6-30 segni (0-9, a-z, A-Z).
Segni speciali non sono permessi. (vedere foto 6).
- Ora si vede il video in diretta sul telefono

Alternativa: Messa in servizio tramite cavo:
E possibile configurare e utilizzare la HiKam A7 in alternativa tramite cavo LAN. Se lo si desidera, è possibile cambiare
dopo il passaggio del collegamento da LAN a WLAN.
- Proseguire come descritto in Preparazione Passo 1, 2, 3 (vedi sopra).
- Collegare la fotocamera a un cavo LAN al router. Si prega di fare in modo che il router ha accesso al Internet e che il
DHCP è attivato.
- Aprire l'applicazione e attendere qualche secondo. La fotocamera viene riconosciuta automaticamente (vedere figura 7).
In caso contrario, è possibile aggiungere la fotocamera manualmente (vedi figure 8, 9, 10). È possibile trovare l'ID del
dispositivo sulla parte inferiore della fotocamera, si prega di prendere nota del numero e tenerlo a portata di mano.
Figura 7
Figura 8
Figura 9
Figura 10
Figura 11
Figura 12
- Ora verrà chiesto di identificare la telecamera e inserire la password iniziale della fotocamera. Si legge: 123 (vedi figura 5)
- Dopo di che verrà chiesto di inserire una nuova password. La password deve consistere di 6-30 segni (0-9, a-z, A-Z).
Segni speciali non sono permessi. (vedere foto 6).
- Ora si vede il video in diretta sul telefono
- Ora è possibile, se lo si desidera, passare da LAN a WLAN, altrimenti si può saltare questo passaggio: La mia camera ->
Impostazioni -> Impostazioni di rete -> cliccare sulla WLAN desiderata -> Conferma -> Inserire la password WLAN
(vedi figure 13 a 17)
Figura 13
Figura 14
Figura 15
Figura 16
Figura 17
Figura 18
- Appena si vede il segno di spunta verde accanto alla rete Wi-Fi, questo significa che il passaggio da LAN a WLAN ha
avuto successo. (vedi Figura 18)
Per informazioni sull'installazione, consultare le pagine 3 & 4.
Supporto:
http://support.hikam.it
Qui si possono trovare altre Istruzioni, istruzioni video, software per PC, schede
tecniche, specifiche, FAQ. È possibile creare un ticket di assistenza per potere contattarci
direttamente.
service@hikam.it
Garantiamo una risposta entro 24 ore, di solito si ottiene già una risposta entro 4 ore.

IP Camera A7
Seiten / Pages / Les pages / Le pagine 3&4 V6.0 / 19.09.2017
Interface / Schnittstelle
Mounting / Montage
Waterproof LAN Connector / Wasserdicht LAN Verbindung

Fehlerdiagnose:
LED-Anzeigen Status
AN AN Eingeschaltet
Blinken AUS AirLink
Blinken Blinken AP Modus
AN AUS Die Kamera ist über WLAN mit dem Router
verbunden. Diese LED kann abgeschaltet werden.
AUS Blinken
Falsches WLAN
-
Passwort. Bitte setzen Sie die
Kamera zurück und versuchen Sie die
Inbetriebnahme erneut.
AUS AN WLAN-Signalstärke schwach. Bitte bringen Sie
die Kamera näher an den Router
AN Blinken
Vergabe der IP
-
Adresse fehlgeschlagen. Bitte im
Router DHCP aktivieren und MAC-Filterung
deaktivieren.
Error diagnostics:
LED indicators Status
ON ON Power up
Blink OFF AirLink
Blink Blink AP mode
ON OFF The camera is connected to the router via WiFi.
This status LED can be switched off in HiKam app
OFF Blink Wrong WiFi password. Please reset the camera
and launch it again
OFF ON WiFi signal strength weak. Please move the
camera closer to the router.
ON Blink
Receipt of an IP address failed. In the router
settings, please enable DHCP and disable MAC
filter.
:
Indicateur LED Statut
Allumé Allumé Caméra allumée
Clignote
Éteint AirLink
Clignote
Clignote
Mode AP
Allumé Éteint La caméra est connectée au routeur en WiFi.
Cette LED peut être désactivée.
Éteint Clignote
Mot de passe WiFi
erroné. Veuillez réinitialiser
la caméra et réessayer la mise en service via
AirLink.
Éteint Allumé Signal WiFi faible. Veuillez rapprocher la
caméra du routeur.
Allumé Clignote
réglages de votre routeur, veuillez activer DHCP
et désactiver le filtrage MAC.
Diagnostica di errori:
Indicatori LED
Stato
Acceso Acceso
Accensione
Lampeggiante Spento
AirLink
Lampeggiante Lampeggiante
Modalità AP
Acceso Spento
La videocamera è collegata al
router via WiFi. Questo LED può
essere disattivato
Spento Lampeggiante
Password del WiFi errata. Si
prega di fare il reset della
videocamera e riavviarla
Spento Acceso
Il segnale Wifi è troppo debole.
Spostate la videocamera più
vicina al router.
Acceso Lampeggiante
La ricezione di un indirizzo IP
non è riuscita. Nelle impostazioni
del router, abilitare il DHCP e
disattivare il filtro MAC.
Other manuals for A7
1
Table of contents
Languages:
Other hikam IP Camera manuals
