Hilde HH-S91190SS User manual

INSTALLATION AND OPERATION MANUAL
HH-S91190SS / HH-S91190BK
SLIM HOOD
Page 2 of 12
Model: HH-S91190SS / HH-S91190BK SLIM HOOD
CONTENT PAGE
SAFETY PRECAUTIONS ................................................................................. 3
SPECIFICATIONS .......................................................................................... 5
INSTALLATION ............................................................................................. 7
OPERATION ................................................................................................. 9
MAINTENANCE AND CARE ........................................................................ 10
TROUBLE-SHOOTING ................................................................................. 11
To all, please provide this manual to the user without fail.
Thank you very much for your purchase of our cooker hood.
Before using this appliance for the first time, please read this manual thoroughly
to
install, operate and care for the appliance correctly and safely.
This manual contains instructions related to installation, use and maintenance of the
appliance.
Please register your product warranty at:
www.hilde.com.sg

Page 3 of 12
SAFETY PRECAUTIONS
When unpacking
● Do not use the appliance if there are obvious signs of transportation damage.
● If the supply cord has been damaged, it must be replaced by the manufacturer, its service agents or
qualified personnel in order to avoid a hazard. Please contact us in an event like this.
Installation
● This hood can be installed in recirculation mode only.
● It can be installed over gas and electric cooktop. The cooker hood should be placed at a distance
of 700 mm above the cooktop for the best effect and to avoid fire hazard.
● This cooker hood is intended for hobs with at most 4 hob elements or burners.
● Always mount the hood over the centre of the hob.
● Use a cooker hob range with a narrower width than that of cooker hood.
● Do not install the cooker hood in wet area/ rooms as it may result in electric shock or damage.
● Ensure that the appliance is installed in a location with good permanent ventilation.
● Installation and repair should be attempted by qualified technical personnel only.
● Electrical connection must be made in accordance with local standards only. Incorrect wiring may
result in fire or electric shock.
● Take note to plug the unit into a properly earthed outlet.
Green & Yellow: Earth/ Blue: Neutral/ Brown: Live

Page 4 of 12
SAFETY PRECAUTIONS
Usage
● This hood is designed for domestic kitchen use to eliminate unpleasant odours from the kitchen.
Do not use or install this hood for any other uses than its specific purpose.
● This appliance can be used by children aged 8 years and above and also persons with reduced
physical, sensory or mental capabilities if they have been given supervision or instruction
concerning the use of the appliance in a safe way and understand the hazards involved.
● Young children should not play or operate the appliance.
● Refrain from modifying any part of this appliance. Tampering with electrical connections or
mechanical parts can cause operation faults and may put the user at risk.
● Ensure that the power supply chord is free from any heat source or sharp objects.
● Multiple plugs and extension cables must not be used. Overloading may cause a fire.
● Do not put anything on the cooker hood as it may cause fire, failure or injury by dropping.
● Do not switch on the cooker hood if there is a possibility of a gas leak from your gas hob as it may
result in a gas explosion.
● Accessible parts may become hot when used with cooking appliances. Do not touch the filter or
parts around it while cooking.
● Always cover lit burners with cookware, do not leave high naked flames under the cooker hood
when it is in operation.
● Do not flambé or grill with an open flame directly under the cooker hood. Flames could be drawn
up into the hood by the suction and the grease filters may catch fire.
● Do not operate the cooker hood without a grease filter.
● Always disconnect the unit from the power supply before carrying out any cleaning or
maintenance work on the hood, including replacement of light bulbs to avoid the possibility of
electric shock.
● Replace defective lights immediately to prevent the remaining lights from overloading.
● Clean and/or replace the filters at appropriate intervals. Grease deposits build-up increases the risk
of fire.
Disposal
● Before disposing of an old appliance, disconnect it from the power supply and remove the power
cord to prevent hazards.
● Please dispose the packaging in a proper manner and recycle any old appliances.
Note: The manufacturer will not be held liable for any damages resulting from improper installation
nor failure to adopt proper safety measures during installation and operational use of the app
liance.

Page 5 of 12
SPECIFICATIONS
Model: HH-S91190BK HH-S91190SS
Power Rating:
24
4
W
1
6
4
W
Voltage:
220
-
240V~
220
-
240V~
Power Frequency:
50Hz
50Hz
Power of Motors:
3 x 80W
2 x 80W
Power of Lamps:
2 x
2.0
W
2 x
2.0
W
Length of the cable:
1.5m
1.5m
Appliance Dimensions:
120 x 895 x 420 mm
120 x 895 x 420 mm
Net Weight:
11.5 KGS
10 KGS
*The manufacturer reserves the right to effect any technological
improvement or modification without prior notice.

Page 6 of 12
SPECIFICATIONS
HH-S91190BK
Qty
Product Parts
1
Hood Body
3
Charcoal filters
3
Aluminum grease filters
2 Rectangular LED light
1 Bottom Panel
Qty Installation Accessories
2
ø5*ø8 Wall plug
2 Screw ST4*30
4 Screws M5*26
Qty Documentation
1
Installation Manual
1
Warranty sticker
HH-S91190SS
Qty
Product Parts
1
Hood Body
2
Charcoal filters
3
Aluminum grease filters
2 Rectangular LED light
1 Bottom Panel
Qty Installation Accessories
2
ø5*ø8 Wall plug
2 Screw ST4*30
4 Screws M5*26
Qty Documentation
1
Installation Manual
1
Warranty sticker
Note: Power plug is
not included.
If needed, please use
power plug in
accordance with
local standards only.

Page 7 of 12
INSTALLATION
This appliance can be installed in recirculation mode only.
Mounting
Do ensure that the appliance is mounted on a solid surface which could withstand the appliance’s weight.
In the case of boarded wall,
- If the thickness is more than 20mm, mount the cooker hood directly to the wall.
- If the thickness is less than 20mm, embed a reinforcing board and mount the cooker hood to this
board.
In the case of a concrete/tile faced wall,
- Embed a reinforcing board in the wall in advance, or use a curl plug or the like.

Page 8 of 12
INSTALLATION
A. Wall Mounting
Step 1 (Fig. 7)
● Determine where the hood should be
positioned and lightly mark where the
lower edge of the appliance should be on
the wall. Determine where the middle
should be based on the hob.
● Mark where the screws should be inserted
according to the center distance of the hole
on the back of the slim hood.
● Drill 2* 8mm diameter holes to a depth of
40mm for fastening the appliance and
press in the plastic wall plugs flush with
the wall.
● Tighten 2pcs of the provided ST4 x30
screws into the plastic wall plugs.
B. Cabinet Mounting
Step 1
● Determine where the hood should be
positioned on the bottom of the cabinet.
Determine where the middle should be
based on the hob.
● Drill 4* 6mm diameter holes for fastening
the appliance.
Step 2
● Mount the cooker hood onto the tightened
screws.
Step 2
● Align the cooker hood with the holes and
fix position by screwing in with 4pcs of
the provided M5*26 screws.
S
tep 3
● Ensure that charcoal filters have been inserted before operating the appliance.
● Remove plastic packaging for charcoal filter before insert.
Note: Installation and repair should be attempted by qualified technical personnel only.
The manufacturer will not be held liable for any damages resulting from improper installation
nor failure
to adopt proper safety measures during installation and operational use of the appliance.

Page 9 of 12
OPERATION
This appliance is equipped with 3 speed controls. Function controls of the cooker hood can be found
below.
Note: Touch the sensor buttons gently to operate this appliance.
To achieve better air extraction, it is advisable to switch on the cooker hood a few minutes before starting
to cook and to leave it on for approximately 15 minutes after cooking (or at least until all cooking smell is
completely removed).
Button Function
On / Off Button. Used for turning on/off the fan.
Speed decrease button. For decreasing speed of the fan.
Speed increase button. For increasing speed of the fan.
Light button. Touch for on/off.
Digital display.
Fan speed display: “1” for low speed, “2” for medium speed, “3” for high speed.
Page 10 of 12
MAINTENANCE AND CARE
Always ensure the appliance is disconnected from the main power supply before carrying out any
cleaning or maintenance activities. It is important to clean and/or replace the filters at appropriate
intervals as grease deposits build-up increases the risk of fire.
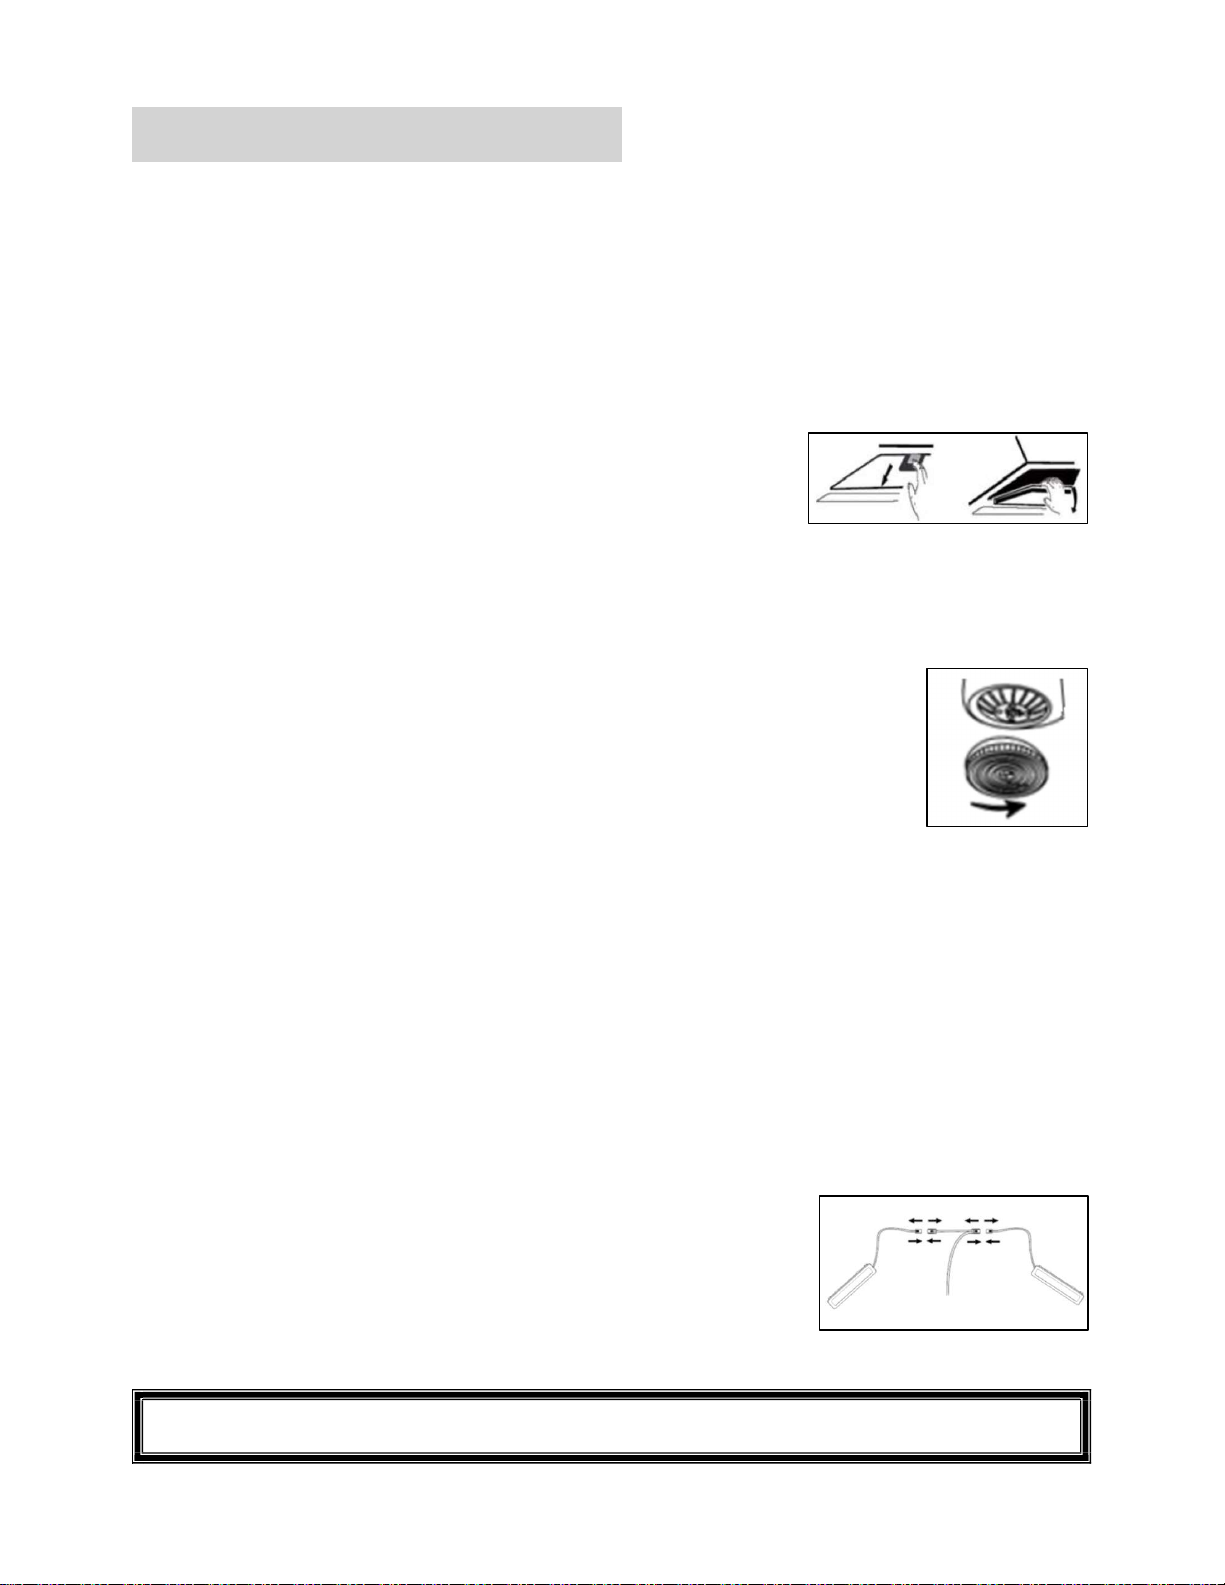
Grease Filters
● Do not operate the cooker hood without a grease filter, they are used to absorb the grease particles
formed during the cooking process.
● Filters must be removed and cleaned once a month or depending on how often the appliance is used.
● Filter should be washed by hand. To do so, remove them from the
cooker and soak in detergent solutions of not more than 60°C for an
hour before rinsing off.
● If utilising the dishwasher, filters should be positioned vertically to
improve the cleaning process.
● Take care not to bend the filters during washing.
● Please see diagram for directions on removing and inserting the filter.
Charcoal Filters
● Charcoal filters are recommended to be replaced every 6 to 12 months or when
it's noticeably dirty or discoloured, depending on conditions of use.
● These filters are not reusable and has to be disposed of appropriately after
replacement. Regular maintenance is necessary as clogged filters restrict airflow
and may cause the motor to overheat.
● Lock the filter in place by turning clockwise and loosen by turning anti-clockwise.
Cleaning the appliance body
● Use a soft cloth moistened with hand-warm mildly soapy water or household cleaning detergent to
wipe down the exterior of the cooker hood and wipe any moisture off using a dry cloth.
● Do not use metal pads, chemical or abrasive material or stiff brush to clean the appliance as it may
damage the surface.
● Prevent electric parts such as the motor, switch, connectors from coming into contact with water.
Replacing the LED
● Ensure that the appliance is disconnected from the main power supply.
● Replace the LED with another which has the same characteristics as a higher voltage lamp could
damage the electrical unit.
● Remove the grease filters and push out the light.
● Disconnect the wire from the terminal.
● Replace the light and reconnect the terminal.
● Press the light back into cavity and place back grease filters.
● Please reach out to the Hilde Service Care Team for LED light replacement if you face any
difficulties.
Note: The manufacturer will not be held liable for any damages resulting from improper installation
nor failure to adopt proper safety measures during installation and operational use of the appliance.

Page 11 of 12
TROUBLE-SHOOTING
Listed below are common problems encountered by users and suggested ways to resolve them. If in
doubt, feel free to reach out to our customer service team on www.hilde.com.sg and we will further
advise on the next steps. If problems still persist after the checks, please reach out to Hilde Service Care
Team for further assistance.
For service calls, please provide the model number of your appliance and note that it is necessary to
provide your proof of purchase for warranty purposes.
Problem Possible Cause Solution
Light is working but the
fan is not running.
The fan blade is damaged Switch off the unit and reach out to
qualified service personnel for
repair.
The motor is damaged
Both light and fan not
working.
The LED is not working, Check connection is tight/ Replace if
LED is damaged.
The power cord is loose Check that plug is safely connected
and main power is switched on
Hood suction is not
effective
Inadequate ventilation Ensure that the kitchen is sufficiently
ventilated to allow entry of fresh air
Distance between the cooker hood
and the cooktop are too far apart
Readjust the distance to be minimum
of 700mm
Charcoal filters are not installed Install charcoal filters for
recirculation mode use
Grease filters are clogged. Clean grease filter and refit when
dry.
Charcoal filters are clogged. Replace charcoal filter.
Serious vibration of the
unit
The fan blade is damaged Switch off the unit and reach out to
qualified service personnel for
repair.
The fan motor is not fixed tightly

Page 12 of 12
www.hilde.com.sg
The Company reserves the right to change the information of this installation and operation manual at any
time without prior notice. In the event that any changes are made, the revised information shall be posted
on www.hilde.com.sg immediately. Please check the latest information posted herein to inform yourself
of any changes.
This manual suits for next models
1
Table of contents
Other Hilde Ventilation Hood manuals

Popular Ventilation Hood manuals by other brands


Bosch
Bosch DWG068D50I installation instructions

INOXPAN
INOXPAN Pando V1300 ECO installation manual

Klimawent
Klimawent ALAN-U/E-10-HD-N Use and maintenance manual

Blodgett
Blodgett IN-VENT VIB3870-1 Features & dimensions

Kuppersberg
Kuppersberg INNOVA V 60 Technical Passport

Teka
Teka DG1-60 instruction manual