Hills HH2362 User manual
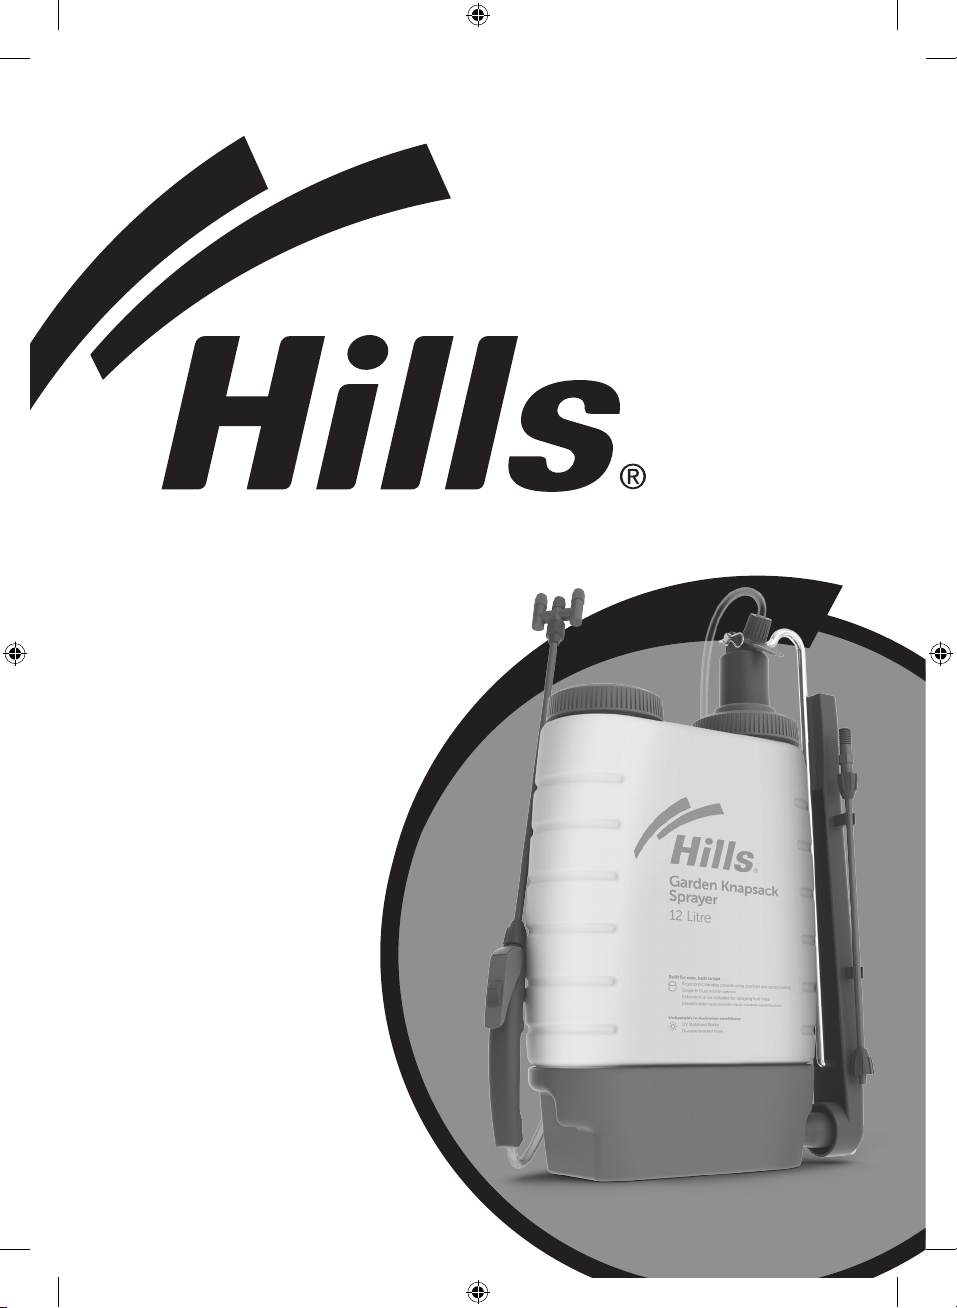
12 litre model
The Garden
Knapsack
Sprayer
Product Manual
455644_HH2362_12L_Pressure_Manual.indd 1 29/10/2015 3:45 pm

2Introduction
Warning
This sprayer is designed for domestic use only
with water based garden chemicals.
Not to be used for any other purpose. To be
used by adults only.
Important: Under normal use and conditions
the sprayer bottle has a maximum life of five (5)
years after purchase date.
The purchase date, place of purchase and
product number should be recorded in this
Product Manual.
Spare Parts
0100710 – Nozzle and Lance Kit
Accessories
0100709 – Cone Spray Shield and Cup
0100708 – Lawn Edger Shield
A single nozzle is included for use instead of the
twin nozzle. The single nozzle has two types of
spray patterns. One is for a mist spray pattern
and one is for a jet spray pattern.
Choose the one suitable for your particular
spraying application.
An extension lance E(page 5) is included for
longer reach.
Please retain this Product Manual. Record the following information for
future reference.
Product Number (printed on carton):
Date of purchase:
Name and location of store:
Made in China
®
455644_HH2362_12L_Pressure_Manual.indd 2 29/10/2015 3:45 pm

3
Safety
Instructions
Safety Instructions
Caution: Contents under pressure. Read this
before operating.
• Release pressure from the sprayer unit before
refilling or replacing parts. This is done by
pressing the on/o trigger and letting out as
much air or liquid as possible through the
lance and nozzle assembly.
Note: Even though the bottle may have no
liquid left inside, the actual pump chamber
may still contain residual fluid in it.
To empty the residual fluid, press and lock
the on/o trigger for continuous spraying,
then pump handle for a few times and ensure
that all liquid and air is fully expelled before
unscrewing either the container or pump cap.
• Inspect the condition of all fittings before
each use. Replace any worn or damaged
parts. Do not attempt to use with damaged or
suspect parts.
• The sprayer is made from dierent types
of plastic material, and although the liquid
you may wish to use is packed in a plastic
container, it is not guaranteed that it will not
damage the sprayer. The sprayer is designed
to be used with a broad range of domestic
water based pesticides, herbicides, and
fertilisers. The use of heavy duty industrial
strength chemicals may be detrimental to the
safe operation of the sprayer.
• For correct chemical usage follow chemical
suppliers on-pack instructions.
Do’s
Release pressure before filling/servicing
Release pressure and clean after use
Wear safety goggles and gloves
Wear protective clothing and mask
Spray water soluble chemicals
Ensure adequate ventilation
Wash hands and face after use
Store away from sunlight
Hand tighten fittings only
Rinse inside of bottle before use
Read and understand chemical
manufacturers’ safety directions
Don’ts
Spray flammable liquids or solvents
Eat, drink or smoke when spraying
Direct spray on humans or animals
Spray in windy conditions
Spray in confined spaces
Leave within reach of children
Overfill the bottle
Over pressurise
Stand sprayer near naked flame or
hot surfaces
Tighten fittings with pliers etc.
Allow children to use as a toy
Modify bottle or safety valve
Leave bottle unattended, especially if
containing chemicals
455644_HH2362_12L_Pressure_Manual.indd 3 29/10/2015 3:45 pm

4
B
A
D
C
E
LEFTRIGHT
Assembly
Please note: Pump can be
assembled for left or right
handed operation.
455644_HH2362_12L_Pressure_Manual.indd 4 29/10/2015 3:45 pm

5
Assembly
Please note: The diagram above
depicts the internal pump assembly
for reference purposes only.
Identification tag assembly detail
455644_HH2362_12L_Pressure_Manual.indd 5 29/10/2015 3:45 pm

6Operation
Operating Instructions
Important: Rinse the inside of the container
with cold water before use. Before using any
chemicals including herbicides, pesticides,
insecticides and weed killers etc., it is advisable
to familiarise yourself with the sprayer operation
by filling it with water and testing the various
spray patterns. Thick mixtures can clog the
spray nozzle. Solutions of this kind should be
strained and diluted to prevent blockages. Wash
the container, all attachments and your hands
thoroughly after each use.
• Refer to diagram for assembly guidance.
• Left or right-handed operation can be
achieved by changing the pump mechanism
from position LEFT to position RIGHT.
• Unscrew container cap Aand fill liquid to the
required level. Ensure that filter is sitting inside
bottle as shown on diagram. DO NOT exceed
the 12L mark on the 12L Knapsack Sprayer.
• Replace container cap Aand tighten firmly
by hand. Make sure that the other container
cap is also tight to prevent air escaping
during use.
• Firmly screw Lance Assembly Dto the Handle
Assembly C.
• Adjust straps for comfort.
• Pump handle Band start spraying by pressing
the on/o trigger on handle assembly C. The
handle assembly is equipped with a lock for
continuous spraying. Press trigger and slide
it forward until locked. To unlock, slide the
trigger back and release it.
• Pump handle periodically to maintain
pressure for ongoing spray flow.
• Adjust the twin nozzles for required spray
pattern. To use only single nozzle, replace any
of the two outside nozzles with the centre
nozzle cap.
455644_HH2362_12L_Pressure_Manual.indd 6 29/10/2015 3:45 pm

7
Storage and
Maintenance Advice
After Use
• Release pressure from the sprayer unit before
refilling or replacing parts. This is done by
pressing the on/o trigger and letting out as
much air or liquid as possible through the
lance and nozzle assembly.
• After you have ensured the sprayer contains
no pressure, remove the container cap Aand
empty any liquid left inside the container.
Note: Even though the bottle may have no
liquid left inside, the actual pump chamber
may still contain residual fluid in it.
To empty the residual fluid, press and lock the
on/o trigger for continuous spraying, then
pump handle a few times and ensure that all
liquid and air is fully expelled.
• Refill the bottle with approximately 2 litres of
clean tap water, then with the on/o trigger
pressed and locked for continuous spraying,
pump handle and start expelling all the water
until empty.
• Make sure that the sprayer is not pressurised
and contains no liquid. Do not store in direct
sunlight and store out of reach of children.
Refer to detailed safety instructions
on page 3.
Important: Ensure all caps are securely and
firmly tightened. After tightening, check that
hose and lances do not slip out.
Maintenance Advice
Over a period of time herbicides and
insecticides can leave a build up of residue
which normal cleaning will not remove.
This build up can collect around the seals
and inside the hoses and pump. If left, this
build up will eventually prevent the sprayer
from working.
To overcome this problem we recommend
that the sprayer bottle be half filled with hot
(not boiling) water from your domestic hot
water supply. By keeping the on/o trigger
pressed and locked for continuous spraying,
pump handle and start expelling all the water
until empty.
The hot water should dissolve the built up
residue and the sprayer will continue to operate
normally.
Important: For safety, ensure you wear
protective clothing, goggles and gloves during
this operation.
Important: If for some reason your sprayer
needs to be returned for warranty purposes,
PLEASE wash it out thoroughly to protect our
service technicians from exposure to unknown
substances.
455644_HH2362_12L_Pressure_Manual.indd 7 29/10/2015 3:45 pm

8Alternate Nozzles
Single Nozzle
Your sprayer comes with an additional single
nozzle attachment for controlled spraying.
• To fit single nozzle, remove the twin nozzle.
Refer to Fig. 1.
• Fit single nozzle. Refer to Fig. 2.
Fig. 1
Fig. 2
Strip Spray
Your sprayer comes with an additional strip
spray nozzle attachment to aid in controlled
spraying.
• To fit strip spray, remove the green nozzle
from the grey attachment cap.
Refer to Fig. 3 and 4.
• Remove the nozzle from cap. Refer to Fig. 5.
• Re-assemble the two green halves of nozzle
and store safely.
• Place strip spray nozzle into rear of
attachment cap along with filter.
Refer to Fig. 6.
• Replace assembly onto end of nozzle elbow.
Refer to Fig. 7.
Fig. 3
Fig. 4 Fig. 5
Fig. 6 Fig. 7
455644_HH2362_12L_Pressure_Manual.indd 8 29/10/2015 3:45 pm

9
Substance Identification Tag
• Your Hills Knapsack Sprayer comes with a
substance identification tag allowing you
to quickly and easily identify what substance
is inside your sprayer.
• For your convenience the tag comes with
a sheet of pre-printed inserts that display
common spraying substances.
• The sheet comes with a number of blank
inserts that allow you create your own
personalised tags. Note: Use a permanent
marker when writing on the inserts to prevent
writing coming o.
To Fit Inserts:
• Open the folding lid by unclipping the two
side located snaps.
• Fit required insert with the text facing
upwards (towards folding lid).
• Snap folding lid back into closed position
to secure.
Substance
Identification Tag
455644_HH2362_12L_Pressure_Manual.indd 9 29/10/2015 3:45 pm

10
In addition to all rights and remedies to which
you may be entitled under the Australian
Competition and Consumer Act 2010 (Cth) or
the New Zealand Consumer Guarantees Act
(1993) and any other relevant legislation, Hills
Home Living or Hydrox Brands Limited warrants
the Garden Sprayer to be free from defects in
materials or workmanship for 3 years from the
date of purchase.
In the event of a claim, you must take the
product with proof of purchase and an
explanation of the fault to the place of purchase
or contact Hills and provide your proof of
purchase. All costs associated with the return
of the good (and other expenses incurred
in claiming under this warranty) are your
responsibility. We will, at our option, either repair
or replace the product.
Hills’ liability under this warranty is subject to
Hills being satisfied that a defect was caused
by defective workmanship or materials and
was not caused by or substantially contributed
to by other factors including (but not limited
to) maintenance or repair, adjustments or
modifications of the product in a manner not
recommended by the manufacturers or any
neglect, misuse or excessive use.
In Australia, our goods come with guarantees
that cannot be excluded under the Australian
Consumer Law. You are entitled to a
replacement or refund for a major failure and
for compensation for any other reasonably
foreseeable loss or damage. You are also
entitled to have the goods repaired or replaced
if the goods fail to be of acceptable quality and
the failure does not amount to a major failure.
This warranty is provided by Hills Home Living,
3 City View Road, Pennant Hills NSW 2120,
Ph 1300 300 564 for goods purchased within
Australia. For goods purchased within
New Zealand, this warranty is provided
by Hydrox Brands Limited, 60 Kerrs Road,
Wiri2104, New Zealand, Ph 0800 021 027.
Warranty
455644_HH2362_12L_Pressure_Manual.indd 10 29/10/2015 3:45 pm

11
Hills Contacts
We are committed to providing you with
complete customer satisfaction. If you have any
questions or comments about our products or
services please contact your nearest Customer
Service Centre during their local business hours:
Australia
1300 300 564
New Zealand
0800 021 027
Hills Websites
hillshome.com.au
Hills Home Living
hillshome.com.au/need-help/
Hills Consumer Advice
Contact Details
455644_HH2362_12L_Pressure_Manual.indd 11 29/10/2015 3:45 pm

12
Hills Home Living
A.B.N. 92 138 990 584
Issue October 2015
HH2362a
455644_HH2362_12L_Pressure_Manual.indd 12 29/10/2015 3:45 pm
Table of contents
Other Hills Paint Sprayer manuals