Hills extenda 4 User manual

the
garden
pump
sprayer
product
manual 4, 5, 7 & 8
litre models
4 7&8
HLS0070_GardenSprayer_Produc_Manual_v5.indd 1 20/06/13 12:47 PM
2
Warning
This sprayer is designed for domestic use
only with water based garden chemicals.
Not to be used for any other purpose.
To be used by adults only.
Important: under normal use and conditions
the sprayer bottle has a maximum life
of ve (5) years after purchase date.
The purchase date, place of purchase and
product number should be recorded in this
Product Manual.
Contents
Refer to diagram on page 5 for parts listed.
1 x sprayer bottle assembly
1 x internal pump assembly
1 x lance assembly with nozzle
1 x product manual
1 x strip nozzle
1 x I.D. Tag (5 Litre and 8 Litre models only)
1 x I.D. Tag insert sheet (5 Litre and 8 Litre
models only)
Please retain this Product Manual. Record the following
information for future reference.
Product Number (printed on carton):
Date of purchase:
Name and location of store:
Made in China
®
Spare Parts
100710 – Nozzle and Lance Kit
100711 – Service Kit
Includes: bucket washer, pump valve, bucket
support washer, valve plunger, valve cap seal,
safety valve and O ring.
Accessories
100709 – Cone Spray Shield and Cup
100708 – Lawn Edger Shield
Two nozzles are included. One is for cone
spray pattern and one is for strip spray pattern.
Choose the one suitable for your particular
spraying application.
Introduction
HLS0070_GardenSprayer_Produc_Manual_v5.indd 2 20/06/13 12:47 PM

3
Safety
Instructions
Safety Instructions
Caution: contents under pressure.
Read this before operating.
• Releasepressurefromthebottlebefore
relling or replacing parts. This is done by
slowly pulling up the safety valve and holding
until all air has been released. Then unscrew
the container cap. Note: some remaining air
may be expelled.
• Inspecttheconditionofallttingsbefore
each use. Do not attempt to use your
sprayer with worn or damaged parts.
These parts should be replaced. Refer to
spare parts list.
• Safetyvalveoperation:overpumpingwill
cause the safety valve to open and release
excess pressure. It will close when safe
operating pressure is reached.
• Safetyvalvetest:llthebottletothe
maximum lling level with clean water.
Pressurise by pumping a few times. Once it
has reached full pressure the valve should
lift, allowing the red indicator to become
visible and air to escape. If this does not
happen, replace the safety valve.
• Yoursprayerismadefrommanydifferent
types of plastic materials, and although
the liquid you may wish to use is packed in
a plastic container, it is not guaranteed
thatitwillnotdamageyoursprayer.Your
sprayer is designed for use with a broad
range of domestic water based herbicides,
fungicides, insecticides and fertilisers.
Do not use other types of chemicals as they
may be detrimental to the safe operation
of your sprayer.
• Followchemicalsupplierson-packinstructions.
HLS0070_GardenSprayer_Produc_Manual_v5.indd 3 20/06/13 12:47 PM

4
Do's
3Release pressure before filling/servicing
3Release pressure and clean after use
3Wear safety goggles and gloves
3Wear protective clothing and mask
3Spray water soluble chemicals
3Ensure adequate ventilation
3Wash hands and face after use
3Store away from sunlight
3Hand tighten fittings only
3Rinse inside of bottle before use
3Maintain and service regularly
3Read and understand chemical
manufacturers’ safety directions
Dont’s
7Spray flammable liquids or solvents
7Leave full bottle unattended
7Eat, drink or smoke when spraying
7Direct spray on humans or animals
7Spray in windy conditions
7Spray in confined spaces
7Leave within reach of children
7Over fill the bottle
7Over pressurise
7Stand sprayer near naked flame
or hot surfaces
7Tighten fittings with pliers etc.
7Allow children to use as a toy
7Modify bottle or safety valve
Safety
Instructions
HLS0070_GardenSprayer_Produc_Manual_v5.indd 4 20/06/13 12:47 PM
5
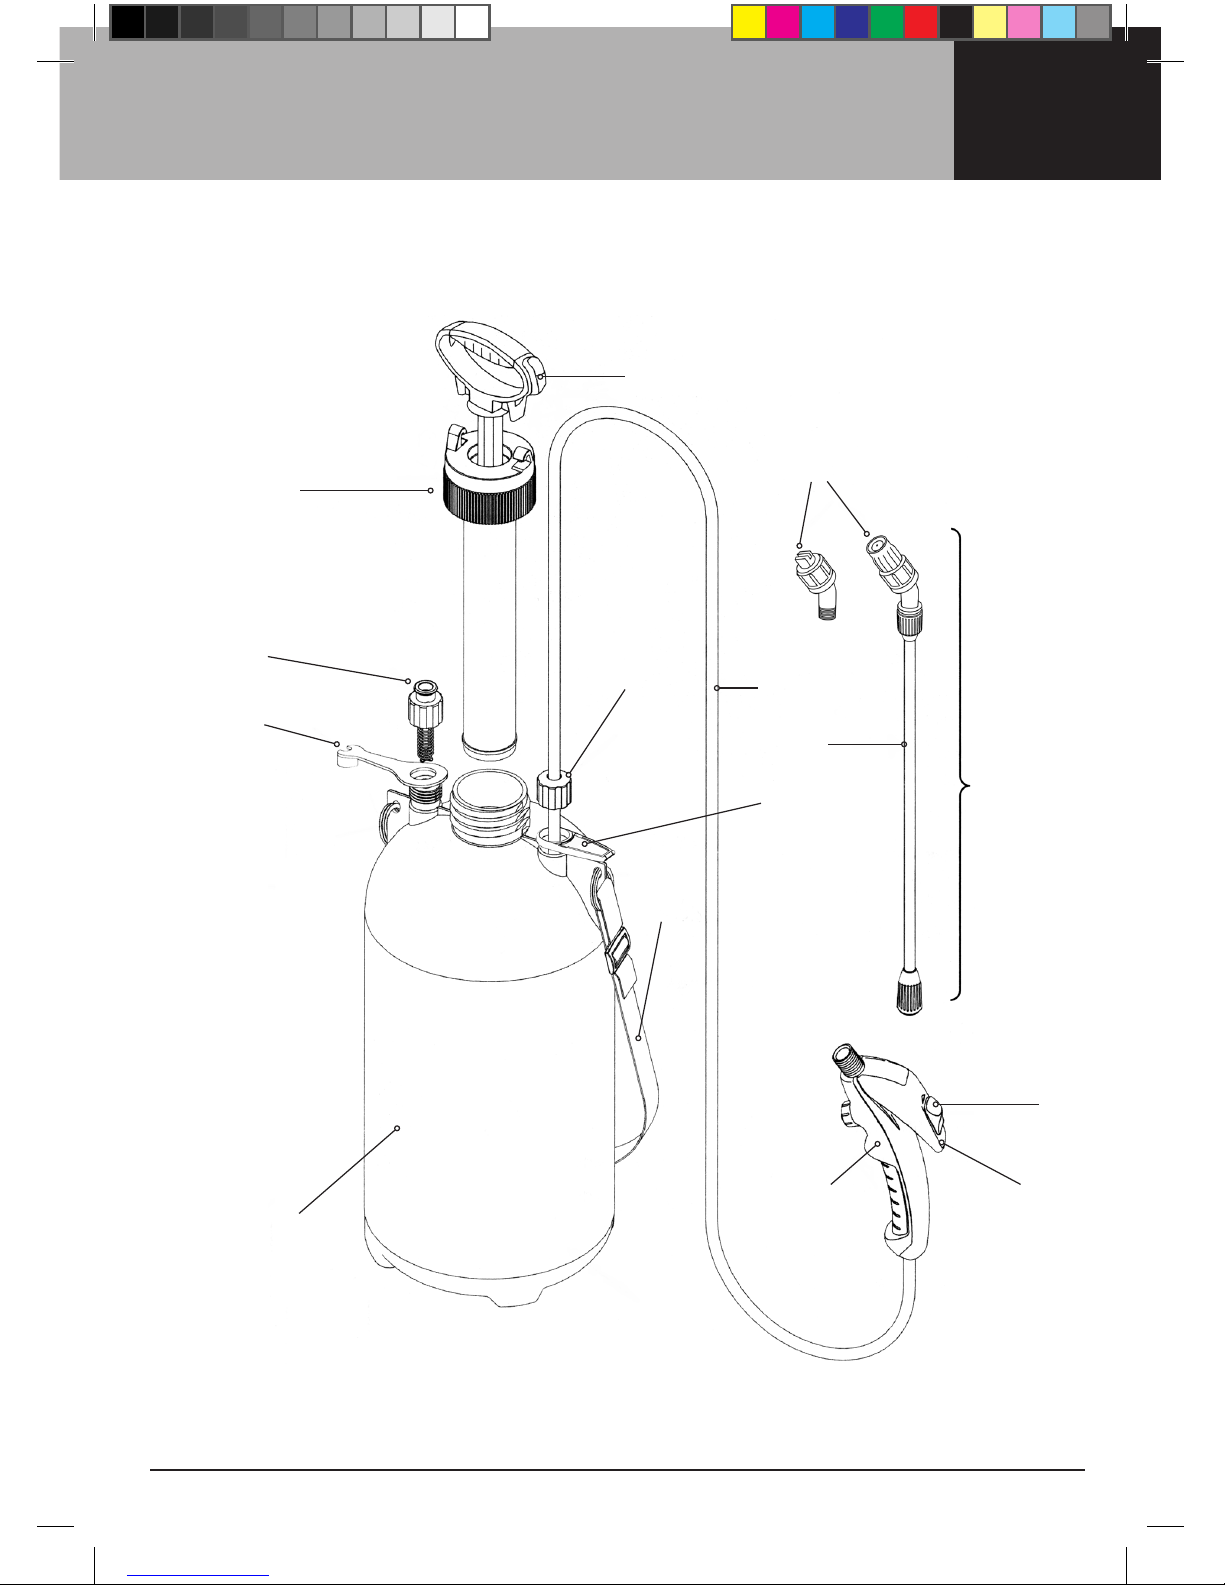
Hose
retainer
cap Hose
Lance
Nozzles
Container cap
Trigger
handle
Trigger
lock
On/off
trigger
Bottle
Lance
retainer clip
Safety valve
Identification
Tag*
Strap
Lance
assembly
Pump handle
Important: ensure all caps, safety valve, hose and lance assembly are firmly tightened.
*5 Litre and 8 Litre models only.
Internal
pump
assembly
Assembly
HLS0070_GardenSprayer_Produc_Manual_v5.indd 5 20/06/13 12:47 PM

6Operation
Operating Instructions
Important: Rinse the inside of the bottle with
cold water before use. Before using with any
chemicals it is advisable to familiarise yourself
with the sprayer by trialing it rst with water
only. Thick mixtures can clog the spray
nozzle. Mixtures of this kind should be
strained to prevent blockages. Wash the
bottle, attachments and your hands
thoroughly after use.
Before Use
• Removetheinternalpumpassemblyby
unscrewingthecontainercap.Fillliquid
to the required level. Do not exceed the
“MAXIMUM FILLING” level.
• Insertinternalpumpassemblyandtighten
container cap rmly by hand.
• Makesurethesafetyvalveandhoseretainer
cap are tight to prevent air escaping.
• Firmlyscrewthelanceassemblytothe
trigger handle.
Operation
• Pumpthesprayeruntilthesafetyvalvestarts
toopenandvent.Yoursprayerisdesigned
tooperateat40P.S.I.(275kpa).Youwill
notice that when the sprayer is at full
pressure the safety valve will lift and a red
indicator becomes visible.
• Pumpperiodicallytomaintainconstant
spraying pressure.
• Lockpumphandleintocontainercap.This
allowsyoutocarrythesprayer.Youcanalso
use the strap supplied.
• Startsprayingbypressingtheon/offtrigger.
The trigger is equipped with a lock for
continuous spraying. To lock, press the
trigger and slide the trigger lock forward.
To unlock, slide the trigger lock back and
release the on/off trigger.
• Choosethetypeofnozzleaccordingtoyour
spraying application. Turn the nozzle
to obtain the desired spray pattern.
HLS0070_GardenSprayer_Produc_Manual_v5.indd 6 20/06/13 12:47 PM

7
Operation
After Use
• Whenyouhavefinished,releasepressure
from the bottle by slowly pulling up the
safety valve and holding until all air has
been released. Do not release pressure
by unscrewing the container cap.
• Afteryouhaveensuredthesprayercontains
no pressure, unscrew the container cap and
carefully dispose of any liquid left inside the
bottle. To clean your sprayer, rinse the bottle,
then fill the bottle with clean water to the
2L level, pressurise your sprayer and allow
it to empty.
Storage
• Makesurethatthesprayerisnotpressurised
and contains no liquid. Do not store in
direct sunlight and store out of reach of
children. Refer to detailed safety instructions
on page 3 and 4.
HLS0070_GardenSprayer_Produc_Manual_v5.indd 7 20/06/13 12:47 PM

8
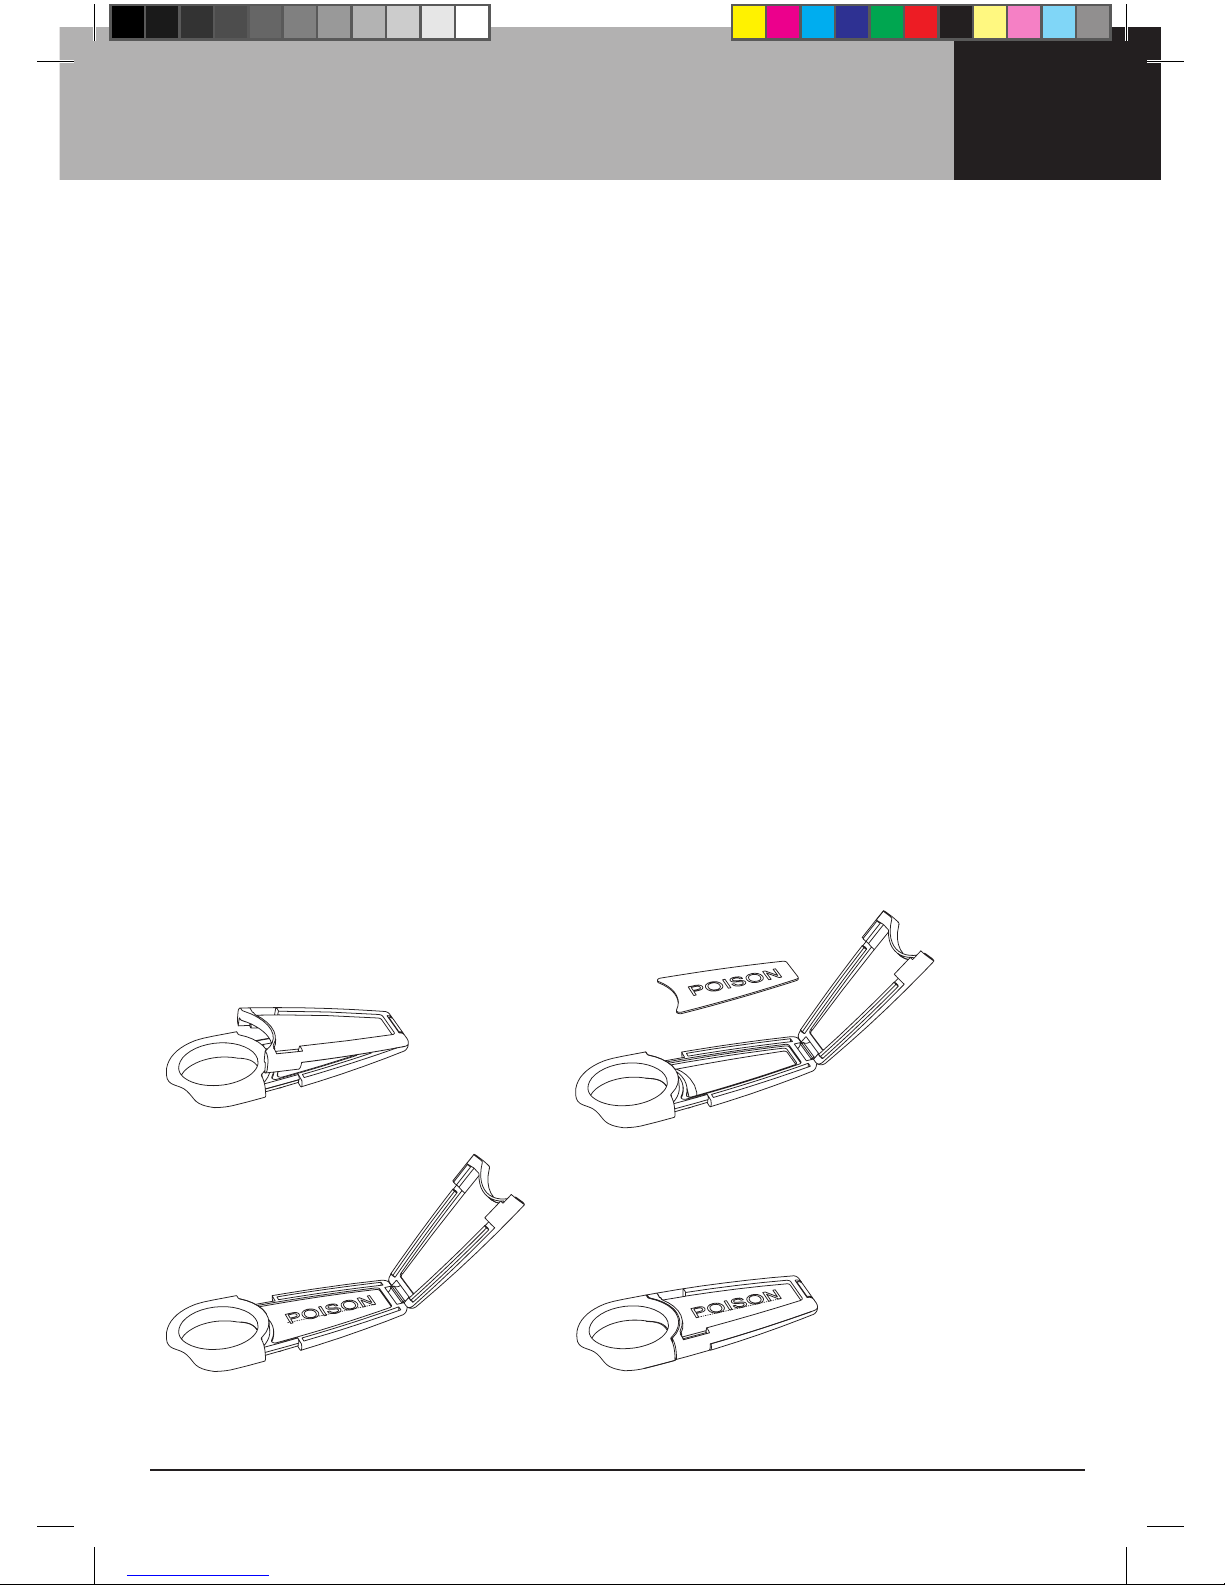
Fig. 1
Fig. 4
Fig. 2
Fig. 5
Fig. 3
Operation
Maintenance Advice
Over a period of time some chemicals can
leave a build up of residue which normal
cleaning will not remove. This build up can
collect around the seals in your sprayer, which
may eventually stop the sprayer from working.
To overcome this problem we recommend that
the bottle be half lled with hot (not boiling)
water. Pressurise and spray for a few minutes.
The hot water should dissolve any built up
residue allowing your sprayer to
operate normally.
Important:Forsafety,donotleavethesprayer
unattended during this operation.
Important: If for some reason your sprayer
needs to be returned for warranty purposes,
PLEASE wash it out thoroughly to protect
our service technicians from exposure to
unknown substances.
Strip Spray
Yoursprayercomeswithanadditional
strip spray nozzle attachment to aid in
controlled spraying.
• Totstripspray,removethegreennozzle
from the grey attachment cap.
Refer to Fig. 1 and 2.
• Removethenozzlefromcap.RefertoFig. 3.
• Re-assemblethetwogreenhalvesofnozzle
and store safely.
• Placestripspraynozzleintorearof
attachment cap along with lter.
Refer to Fig. 4.
• Replaceassemblyontoendofnozzleelbow.
Refer to Fig. 5.
HLS0070_GardenSprayer_Produc_Manual_v5.indd 8 20/06/13 12:47 PM
9
*Substance Identification Tag not supplied with 4 Litre or 7 Litre Garden Sprayers.
Assembly
Substance Identification Tag
• YourHillsGardenSprayercomeswitha
substance identication tag allowing you
to quickly and easily identify what
substance is inside your sprayer.
• Foryourconveniencethetagcomeswith
asheetofpre-printedinsertsthatdisplay
common spraying substances.
• Thesheetcomeswithanumberofblank
inserts that allow you create your own
personalised tags. Note: Use a permanent
marker when writing on the inserts to
prevent writing coming off.
To Fit Inserts:
• Openthefoldinglidbyunclippingthetwo
side located snaps.
• Fitrequiredinsertwiththetextfacing
upwards (towards folding lid).
• Snapfoldinglidbackintoclosedposition
to secure.
HLS0070_GardenSprayer_Produc_Manual_v5.indd 9 20/06/13 12:47 PM

10 Warranty
1. Hills provides consumers with the following
warranty in relation to this Product, in
addition to complying with the requirements
of any relevant legislation, including the
Competition and Consumer Act 2010 (Cth)
inAustraliaandtheConsumerGuarantees
Act 1993 in New Zealand (the Acts),
except where a New Zealand consumer
acquires the relevant Product for the
purposes of a business.
2. In this warranty, we have used the
following denitions:
(a)Hills, our or we means Hills Holdings
Limited (ABN 35 007 573 417) of
159 Port Road Hindmarsh South
Australia 5007;
(b)Products means the following goods
manufactured by Hills (including
products manufactured for Hills by
its contract manufacturers): Hills
Garden Sprayers;
(c) Material means a material or
component used by Hills in the
manufacture of the Products;
(d)Warranty Period means 3 years from
the date of purchase of the relevant
Product. If the Product or part (as the
case may be) is repaired or replaced,
there will be no extension to the original
warranty period; and
(e)Workmanship means the handling,
assembly and manufacturing
processes performed by or on
behalf of Hills in order to manufacture
the Products.
3. Hills warrants that for the duration of the
Warranty Period, all Products will be free
of faults arising from defects in Workmanship
or Materials, on the terms and conditions set
out in this warranty.
4. Hills undertakes that if during the Warranty
Period any Product, or any part
of a Product, has failed to operate correctly
due to faulty Workmanship or defective
Material, it will repair or replace the Product
or part (as the case may be) free of charge
provided that the following procedure is met:
(a)The consumer must contact Hills upon
becoming aware of any defect to a
Product. The contact details for Hills are
set out in this warranty and under
the heading “Hills Contacts”.
(b)FollowingconsultationwithHills,Hills
will determine whether there is a defect,
and if so Hills agrees to (at Hills’ option):
i. in the case of goods – repair, replace
or supply equivalent goods, or pay
the cost of any of those remedies to
the consumer; or
ii.in the case of services – supply the
services again or pay the cost of
having the services supplied again.
(c) If Hills requests the return of the
applicable Product or part, Hills will be
responsible for the collection and freight
costs of returning that Product or part.
The consumer agrees to assist Hills with
any reasonable request to enable Hills
to collect such Product or part.
(d)Hills also agrees to be responsible for the
freight costs to deliver any new Product
or replacement part to the consumer.
HLS0070_GardenSprayer_Produc_Manual_v5.indd 10 20/06/13 12:47 PM

11
Warranty
5.Thiswarrantyisinadditiontoanynon-
excludable legal rights or remedies conferred
on the consumer under any applicable Act
and any similar laws. To the extent permitted
bylaw,Hills'liabilityforanynon-excludable
condition or warranty is limited to rectifying
any defect at its option, as set out in
paragraph 4(b).
6. Subject to the requirements of any
applicable Act or legislation and to the extent
permitted by law, no liability (whether
expressed or implied) of any nature
whatsoever, is accepted by Hills for any
consequential loss, damage or injury arising
as a result of any fault in the Products.
7. This warranty does not extend to damage to
Products which occurs during transit
or transportation, or which is caused by any
abuse, accident or improper installation,
connection, use, adjustment or repair or use
of goods otherwise than in accordance with
instructions issued by Hills.
8. The warranty on Products is waived if any
addition or attachment to the Products
do not have Hills' specic approval or are not
sold as Hills products. The Products are
designed to perform specic tasks under
established test loads and unauthorised
attachments may produce stresses for which
the design is not appropriate.
9. The following applies to consumers who
purchased a relevant Product in Australia:
Our goods come with guarantees
that cannot be excluded under the
AustralianConsumerLaw.Youare
entitled to a replacement or refund for
a major failure and compensation for
any other reasonably foreseeable loss
ordamage.Youarealsoentitledto
have the goods repaired or replaced
if the goods fail to be of acceptable
quality and the failure does not amount
to a major failure.
Hills Contacts
We are committed to providing you with
complete customer satisfaction. If you have
any questions or comments about our
products or services please contact your
nearest Customer Service Centre during their
local business hours:
Australia
1300 300 564
New Zealand
09 262 3052
Rest of the World
Refer to Hills Website
www.hills.com.au/en/contact-us
Hills Websites
www.hills.com.au
Hills Branded Products
www.hillsholdings.com.au
Hills Holdings Limited
HLS0070_GardenSprayer_Produc_Manual_v5.indd 11 20/06/13 12:47 PM

Hills Holdings Limited
A.B.N. 35 007 573 417
Issue July 2013
PH1159f
HLS0070_GardenSprayer_Produc_Manual_v5.indd 12 20/06/13 12:47 PM
Other manuals for extenda 4
1
This manual suits for next models
3
Table of contents
Other Hills Paint Sprayer manuals


