HiLook DVR-108G-M1 User manual

Digital Video Recorder
User Manual
Legal Informaon
©2023 Hangzhou Hikvision Digital Technology Co., Ltd.
About this Manual
Pictures, charts, images and all other informaon hereinaer are for descripon and explanaon
only. The informaon contained in the Manual is subject to change, without noce, due to
rmware updates or other reasons. Please nd the latest version in the company website ( hps://
www.hikvision.com/ ). Please use this user manual under the guidance of professionals.
Trademarks
and other Hikvision's trademarks and logos are the properes of Hikvision in
various jurisdicons.
Other trademarks and logos menoned are the properes of their respecve owners.
: The terms HDMI and HDMI High-Denion Mulmedia Interface, and the HDMI
Logo are trademarks or registered trademarks of HDMI Licensing Administrator, Inc. in the United
States and other countries.
Disclaimer
TO THE MAXIMUM EXTENT PERMITTED BY APPLICABLE LAW, THIS MANUAL AND THE PRODUCT
DESCRIBED, WITH ITS HARDWARE, SOFTWARE AND FIRMWARE, ARE PROVIDED “AS IS” AND “WITH
ALL FAULTS AND ERRORS”. HIKVISION MAKES NO WARRANTIES, EXPRESS OR IMPLIED, INCLUDING
WITHOUT LIMITATION, MERCHANTABILITY, SATISFACTORY QUALITY, OR FITNESS FOR A PARTICULAR
PURPOSE. THE USE OF THE PRODUCT BY YOU IS AT YOUR OWN RISK. IN NO EVENT WILL HIKVISION
BE LIABLE TO YOU FOR ANY SPECIAL, CONSEQUENTIAL, INCIDENTAL, OR INDIRECT DAMAGES,
INCLUDING, AMONG OTHERS, DAMAGES FOR LOSS OF BUSINESS PROFITS, BUSINESS
INTERRUPTION, OR LOSS OF DATA, CORRUPTION OF SYSTEMS, OR LOSS OF DOCUMENTATION,
WHETHER BASED ON BREACH OF CONTRACT, TORT (INCLUDING NEGLIGENCE), PRODUCT LIABILITY,
OR OTHERWISE, IN CONNECTION WITH THE USE OF THE PRODUCT, EVEN IF HIKVISION HAS BEEN
ADVISED OF THE POSSIBILITY OF SUCH DAMAGES OR LOSS.
YOU ACKNOWLEDGE THAT THE NATURE OF THE INTERNET PROVIDES FOR INHERENT SECURITY
RISKS, AND HIKVISION SHALL NOT TAKE ANY RESPONSIBILITIES FOR ABNORMAL OPERATION,
PRIVACY LEAKAGE OR OTHER DAMAGES RESULTING FROM CYBER-ATTACK, HACKER ATTACK, VIRUS
INFECTION, OR OTHER INTERNET SECURITY RISKS; HOWEVER, HIKVISION WILL PROVIDE TIMELY
TECHNICAL SUPPORT IF REQUIRED.
YOU AGREE TO USE THIS PRODUCT IN COMPLIANCE WITH ALL APPLICABLE LAWS, AND YOU ARE
SOLELY RESPONSIBLE FOR ENSURING THAT YOUR USE CONFORMS TO THE APPLICABLE LAW.
ESPECIALLY, YOU ARE RESPONSIBLE, FOR USING THIS PRODUCT IN A MANNER THAT DOES NOT
INFRINGE ON THE RIGHTS OF THIRD PARTIES, INCLUDING WITHOUT LIMITATION, RIGHTS OF
PUBLICITY, INTELLECTUAL PROPERTY RIGHTS, OR DATA PROTECTION AND OTHER PRIVACY RIGHTS.
Digital Video Recorder User Manual
i

YOU SHALL NOT USE THIS PRODUCT FOR ANY PROHIBITED END-USES, INCLUDING THE
DEVELOPMENT OR PRODUCTION OF WEAPONS OF MASS DESTRUCTION, THE DEVELOPMENT OR
PRODUCTION OF CHEMICAL OR BIOLOGICAL WEAPONS, ANY ACTIVITIES IN THE CONTEXT RELATED
TO ANY NUCLEAR EXPLOSIVE OR UNSAFE NUCLEAR FUEL-CYCLE, OR IN SUPPORT OF HUMAN
RIGHTS ABUSES.
IN THE EVENT OF ANY CONFLICTS BETWEEN THIS MANUAL AND THE APPLICABLE LAW, THE LATTER
PREVAILS.
Digital Video Recorder User Manual
ii

Regulatory Informaon
FCC Informaon
Please take aenon that changes or modicaon not expressly approved by the party responsible
for compliance could void the user's authority to operate the equipment.
FCC compliance: This equipment has been tested and found to comply with the limits for a Class A
digital device, pursuant to part 15 of the FCC Rules. These limits are designed to provide
reasonable protecon against harmful interference in a residenal installaon. This equipment
generates, uses and can radiate radio frequency energy and, if not installed and used in accordance
with the instrucons, may cause harmful interference to radio communicaons. However, there is
no guarantee that interference will not occur in a parcular installaon. If this equipment does
cause harmful interference to radio or television recepon, which can be determined by turning
the equipment o and on, the user is encouraged to try to correct the interference by one or more
of the following measures:
●Reorient or relocate the receiving antenna.
●Increase the separaon between the equipment and receiver.
●Connect the equipment into an outlet on a circuit dierent from that to which the receiver is
connected.
●Consult the dealer or an experienced radio/TV technician for help.
FCC Condions
This device complies with part 15 of the FCC Rules. Operaon is subject to the following two
condions:
●This device may not cause harmful interference.
●This device must accept any interference received, including interference that may cause
undesired operaon.
EU Conformity Statement
This product and - if applicable - the supplied accessories too are marked
with "CE" and comply therefore with the applicable harmonized European
standards listed under the EMC Direcve 2014/30/EU, LVD Direcve 2014/
35/EU, the RoHS Direcve 2011/65/EU.
2012/19/EU (WEEE direcve): Products marked with this symbol cannot be
disposed of as unsorted municipal waste in the European Union. For
proper recycling, return this product to your local supplier upon the
Digital Video Recorder User Manual
iii

purchase of equivalent new equipment, or dispose of it at designated
collecon points. For more informaon see: hp://www.recyclethis.info .
2006/66/EC (baery direcve): This product contains a baery that cannot
be disposed of as unsorted municipal waste in the European Union. See
the product documentaon for specic baery informaon. The baery is
marked with this symbol, which may include leering to indicate cadmium
(Cd), lead (Pb), or mercury (Hg). For proper recycling, return the baery to
your supplier or to a designated collecon point. For more informaon
see: hp://www.recyclethis.info .
Industry Canada ICES-003 Compliance
This device meets the CAN ICES-3 (A)/NMB-3(A) standards requirements.
Digital Video Recorder User Manual
iv

Applicable Model
This manual is applicable to the following models.
Series Model
DVR-E00G-B DVR-E04G-B
DVR-E08G-B
DVR-E16G-B
DVR-E00G-XB DVR-E04G-XB
DVR-E08G-XB
DVR-E16G-XB
DVR-E00G-D DVR-E04G-D
DVR-E08G-D
DVR-E00G-XD DVR-E04G-XD
DVR-E08G-XD
DVR-E00G-E DVR-E04G-E
DVR-E00G-XE DVR-E04G-XE
DVR-E00Q-B DVR-E04Q-B
DVR-E08Q-B
DVR-E00Q-XB DVR-E04Q-XB
DVR-E08Q-XB
DVR-E00Q-D DVR-E04Q-D
DVR-E00Q-XD DVR-E04Q-XD
DVR-E00U-B DVR-E04U-B
DVR-E00U-XB DVR-E04U-XB
DVR-200Q-K1 DVR-216Q-K1
DVR-200Q-K2 DVR-216Q-K2
DVR-200Q-M1 DVR-204Q-M1
DVR-208Q-M1
DVR-216Q-M1
Digital Video Recorder User Manual
v
Series Model
DVR-200Q-M2 DVR-216Q-M2
DVR-232Q-M2
DVR-200U-M1 DVR-204U-M1
DVR-208U-M1
DVR-200U-M2 DVR-216U-M2
DVR-100G-K1 DVR-104G-K1
DVR-108G-K1
DVR-116G-K1
DVR-200G-K1 DVR-204G-K1
DVR-208G-K1
DVR-216G-K1
DVR-100G-M1 DVR-104G-M1
DVR-108G-M1
DVR-116G-M1
DVR-200G-M1 DVR-204G-M1
DVR-208G-M1
DVR-216G-M1
DVR-200G-M2 DVR-232G-M2
Digital Video Recorder User Manual
vi

Symbol Convenons
The symbols that may be found in this document are dened as follows.
Symbol Descripon
Danger
Indicates a hazardous situaon which, if not avoided, will or could
result in death or serious injury.
Cauon
Indicates a potenally hazardous situaon which, if not avoided, could
result in equipment damage, data loss, performance degradaon, or
unexpected results.
Note Provides addional informaon to emphasize or supplement
important points of the main text.
Digital Video Recorder User Manual
vii

Safety Instrucon
●Proper conguraon of all passwords and other security sengs is the responsibility of the
installer and/or end-user.
●In the use of the product, you must be in strict compliance with the electrical safety regulaons
of the naon and region.
●Firmly connect the plug to the power socket. Do not connect several devices to one power
adapter. Power o the device before connecng and disconnecng accessories and peripherals.
●Shock hazard! Disconnect all power sources before maintenance.
●The equipment must be connected to an earthed mains socket-outlet.
●The socket-outlet shall be installed near the device and shall be easily accessible.
●For the device with the sign indicang hazardous live, the external wiring connected to the
terminals requires installaon by an instructed person.
●Never place the device in an unstable locaon. The device may fall, causing serious personal
injury or death.
●Input voltage should meet the SELV (Safety Extra Low Voltage) and the LPS (Limited Power
Source) according to the IEC62368.
●High touch current! Connect to earth before connecng to the power supply.
●If smoke, odor or noise rise from the device, turn o the power at once and unplug the power
cable, and then please contact the service center.
●Use the device in conjuncon with an UPS, and use factory recommended HDD if possible.
●This equipment is not suitable for use in locaons where children are likely to be present.
●CAUTION: Risk of explosion if the baery is replaced by an incorrect type.
●Do not ingest baery. Chemical Burn Hazard!
●This product contains a coin/buon cell baery. If the coin/buon cell baery is swallowed, it
can cause severe internal burns in just 2 hours and can lead to death.
●Improper replacement of the baery with an incorrect type may defeat a safeguard (for
example, in the case of some lithium baery types).
●Do not dispose of the baery into re or a hot oven, or mechanically crush or cut the baery,
which may result in an explosion.
●Do not leave the baery in an extremely high temperature surrounding environment, which may
result in an explosion or the leakage of ammable liquid or gas.
●Do not subject the baery to extremely low air pressure, which may result in an explosion or the
leakage of ammable liquid or gas.
●Dispose of used baeries according to the instrucons.
●Keep body parts away from fan blades and motors. Disconnect the power source during
servicing.
●Keep body parts away from motors. Disconnect the power source during servicing.
●Use only power supplies same with the original model, or LPS power supplies with the same
voltage and electric current.
●In order to prevent data leakage, please use the Secure Erase funcon to clear data before
discarding your SSD device.
Digital Video Recorder User Manual
viii

Prevenve and Cauonary Tips
Before connecng and operang your device, please be advised of the following ps:
●The device is designed for indoor use only. Install it in a well-venlated, dust-free environment
without liquids.
●Ensure recorder is properly secured to a rack or shelf. Major shocks or jolts to the recorder as a
result of dropping it may cause damage to the sensive electronics within the recorder.
●The device shall not be exposed to water dripping or splashing, and no objects lled with liquids,
such as vases, shall be placed on the device.
●No naked ame sources, such as lighted candles, should be placed on the device.
●The venlaon should not be impeded by covering the venlaon openings with items, such as
newspapers, table-cloths, curtains, etc. The openings shall never be blocked by placing the
equipment on a bed, sofa, rug or other similar surface.
●For certain models, ensure correct wiring of the terminals for connecon to an AC mains supply.
●For certain models, the equipment has been designed, when required, modied for connecon
to an IT power distribuon system.
● idenes the baery holder itself and idenes the posioning of the cell(s) inside the
baery holder.
●+ idenes the posive terminal(s) of equipment which is used with, or generates direct current.
- idenes the negave terminal(s) of equipment which is used with, or generates direct current.
●If the device has been powered o or placed for a long me, its coin/buon cell baery may run
out power.
●When the coin/buon cell baery runs out power, the system me would be incorrect, please
contact the aer-sales service to replace the baery.
●Keep a minimum 200 mm (7.87 inch) distance around the equipment for sucient venlaon.
●For certain models, ensure correct wiring of the terminals for connecon to an AC mains supply.
●Do not touch the sharp edges or corners.
●When the device is running above 45 °C (113 °F), or its HDD temperature in S.M.A.R.T. exceeds
the stated value, please ensure the device is running in a cool environment, or replace HDD(s) to
make the HDD temperature in S.M.A.R.T. below the stated value.
●Provide a surge suppressor at the inlet opening of the device under special condions such as
the mountain top, iron tower, and forest.
●Do not touch the bare components (such as the metal contacts of the inlets) and wait for at least
5 minutes, since electricity may sll exist aer the device is powered o.
●The USB port of the equipment is used for connecng to a mouse, keyboard, USB ash drive, or
Wi-Fi dongle only. The current for the connected device shall be not more than 0.1 A.
●The serial port of the device is used for debugging only.
●If the power output port of the device does not comply with Limited Power Source, the
connected device powered by this port shall be equipped with a re enclosure.
●If a power adapter is provided in the device package, use the provided adapter only.
Digital Video Recorder User Manual
ix
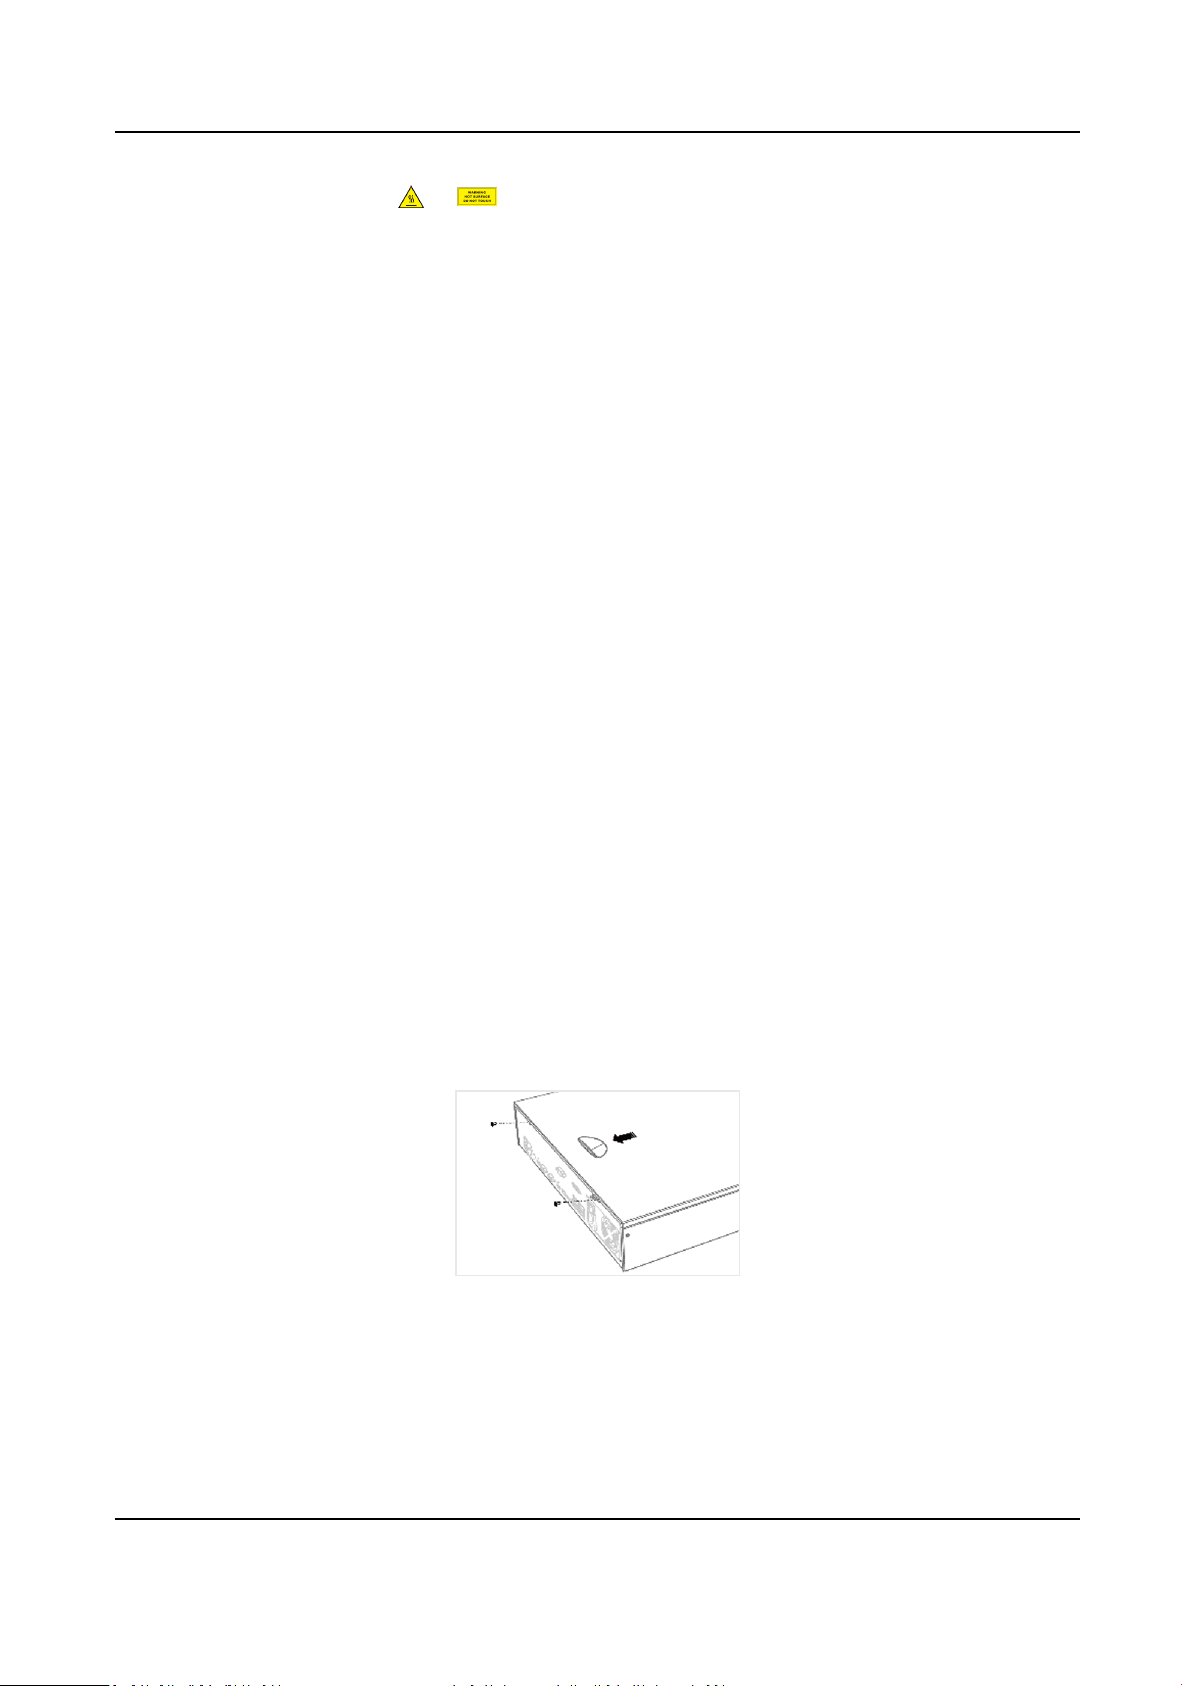
●For the device with scker or , pay aenon to the following cauons: CAUTION: Hot
parts! Do not touch. Burned ngers when handling the parts. Wait one-half hour aer switching
o before handling the parts.
●If the device needs to be installed on the wall or ceiling,
1. Install the device according to the instrucons in this manual.
2. To prevent injury, this device must be securely aached to the installaon surface in
accordance with the installaon instrucons.
●Under high working temperature (40 °C (104 °F) to 55 °C (131 °F)), the power of some power
adapters may decrease.
●Make sure that the power has been disconnected before you wire, install, or disassemble the
device.
●If the device needs to be wired by yourself, select the corresponding wire to supply power
according to the electric parameters labeled on the device. Strip o wire with a standard wire
stripper at corresponding posion. To avoid serious consequences, the length of stripped wire
shall be appropriate, and conductors shall not be exposed.
●If smoke, odor, or noise arises from the device, immediately turn o the power, unplug the
power cable, and contact the service center.
HDD Installaon
If your device does not support HDD hot swapping, disconnect the power from the device before
installing a hard disk drive (HDD). A factory recommended HDD should be used for this installaon.
Bracket Installaon
Bracket installaon is applicable when it requires to remove the device cover, and install HDD on
the internal bracket.
Steps
1. Unfasten screws on the back, and push the cover backwards to remove the cover.
Figure 1-1 Remove Cover
2. Fix the HDD on the bracket with screws.
Digital Video Recorder User Manual
x

Note
Please uninstall the upper layer bracket rst before installing HDD on the lower layer bracket.
Figure 1-2 Fix HDD
3. Connect the data cable and power cable.
Figure 1-3 Connect Cable
Note
You can repeat the steps above to install other HDDs.
4. Reinstall the device cover and fasten screws.
Front Panel Plug-Pull Installaon
Front panel plug-pull installaon is applicable when you need to open the device front panel with
key and install the HDD.
Steps
1. Fix mounng ears to HDD with screws.
Digital Video Recorder User Manual
xi

Figure 1-4 Fix Mounng Ears to HDD
2. Unlock the front panel with the aached key, and press the buons on both sides of the front
panel to open it.
Figure 1-5 Open Front Panel
3. Insert the HDD unl it is xed rmly.
Digital Video Recorder User Manual
xii

Figure 1-6 Insert HDD
4. Oponal: Repeat the steps above to install other HDDs.
5. Close the front panel and lock it with key.
Fix-on-Boom Installaon
Fix-on-boom installaon is applicable when you need to install and x the HDD on the device
boom.
Steps
1. Remove the cover from device by unfastening the screws on panels.
Figure 1-7 Remove Cover
2. Connect the data cable and power cable.
1) Connect one end of data cable to the device motherboard.
Digital Video Recorder User Manual
xiii

2) Connect the other end of data cable to HDD.
3) Connect one end of power cable to HDD.
4) Connect the other end of power cable to the device motherboard.
Figure 1-8 Connect Cables
3. Set the device up, match HDD screw threads with the reserved holes on the device boom, and
x HDD with screws.
Figure 1-9 Fix HDD to Device Boom
4. Oponal: Repeat the steps above to install other HDDs.
5. Reinstall the device cover and fasten screws.
Digital Video Recorder User Manual
xiv

Coin/Buon Cell Baery Replacement
The coin/buon cell baery should be replaced when the device has been powered o or placed
for a long me, and the system me is incorrect.
Before You Start
Power o your device.
Steps
1. Remove the device chassis cover.
2. Find the coin/buon cell baery on motherboard.
3. Use tweezers to push the metal latch at the middle from its inside, and the baery would
automacally pop up.
Figure 1-10 Remove Baery
4. Take out the old baery and press a new baery with the same model in to the baery slot.
Note
The baery posive terminal (+ idenes the posive terminal) should be placed upward.
Digital Video Recorder User Manual
xv

Figure 1-11 Replace Baery
5. Reinstall the device chassis cover.
What to do next
If the system me is incorrect, please go to congure the me.
Digital Video Recorder User Manual
xvi

Contents
Chapter 1 Startup ....................................................................................................................... 1
1.1 Acvate Your Device .............................................................................................................. 1
1.2 Login ...................................................................................................................................... 2
1.2.1 Log in via Unlock Paern .............................................................................................. 2
1.2.2 Log in via Password ....................................................................................................... 3
Chapter 2 Live View .................................................................................................................... 4
2.1 GUI Introducon .................................................................................................................... 4
2.2 PTZ Control ............................................................................................................................ 5
2.2.1 Congure PTZ Parameter .............................................................................................. 5
2.2.2 PTZ Control Panel Introducon ..................................................................................... 7
2.2.3 Customize Preset .......................................................................................................... 7
2.2.4 Customize Patrol ........................................................................................................... 7
2.2.5 Customize Paern ......................................................................................................... 8
Chapter 3 Playback ..................................................................................................................... 9
3.1 GUI Introducon .................................................................................................................... 9
3.2 Normal Playback .................................................................................................................... 9
3.3 Event Playback ..................................................................................................................... 10
3.4 Back up Clip .......................................................................................................................... 11
3.5 Backup Device Playback ....................................................................................................... 11
Chapter 4 Search File ................................................................................................................ 12
4.1 Search Human by Face Picture ............................................................................................. 12
4.2 Quick Backup ....................................................................................................................... 13
Chapter 5 Conguraon (Easy Mode) ....................................................................................... 14
5.1 System Conguraon ........................................................................................................... 14
5.1.1 General ........................................................................................................................ 14
5.1.2 User ............................................................................................................................. 14
Digital Video Recorder User Manual
xvii

5.1.3 Excepon .................................................................................................................... 15
5.2 Network Conguraon ........................................................................................................ 16
5.2.1 General ........................................................................................................................ 16
5.2.2 Email ........................................................................................................................... 17
5.2.3 HiLookVision ............................................................................................................... 18
5.3 Camera Management .......................................................................................................... 19
5.3.1 Network Camera ......................................................................................................... 19
5.3.2 Moon ........................................................................................................................ 21
5.3.3 OSD Sengs ................................................................................................................ 22
5.4 Congure Alarm Linkage Acon ........................................................................................... 23
5.5 Congure Arming Schedule ................................................................................................. 24
5.6 Recording Management ....................................................................................................... 24
5.6.1 Storage Device ............................................................................................................ 24
5.6.2 Congure Recording Schedule .................................................................................... 26
5.6.3 Congure Recording Parameter .................................................................................. 28
Chapter 6 Conguraon (Expert Mode) .................................................................................... 30
6.1 System Conguraon ........................................................................................................... 30
6.1.1 General ........................................................................................................................ 30
6.1.2 Live View ..................................................................................................................... 31
6.1.3 User ............................................................................................................................. 33
6.2 Network Conguraon ........................................................................................................ 33
6.2.1 TCP/IP .......................................................................................................................... 33
6.2.2 DDNS ........................................................................................................................... 35
6.2.3 PPPOE ......................................................................................................................... 35
6.2.4 NAT .............................................................................................................................. 36
6.2.5 Wi-Fi ............................................................................................................................ 37
6.2.6 NTP .............................................................................................................................. 38
6.2.7 Log Server Sengs ...................................................................................................... 38
Digital Video Recorder User Manual
xviii

6.2.8 Ports (More Sengs) .................................................................................................. 41
6.2.9 HiLookVision ............................................................................................................... 43
6.2.10 Email ......................................................................................................................... 43
6.3 Camera Management .......................................................................................................... 43
6.3.1 Congure Signal Input ................................................................................................. 43
6.3.2 Network Camera ......................................................................................................... 44
6.3.3 Display Sengs ........................................................................................................... 48
6.3.4 Privacy Mask ............................................................................................................... 49
6.4 Event Conguraon ............................................................................................................. 50
6.4.1 Normal Event .............................................................................................................. 50
6.4.2 Perimeter Protecon ................................................................................................... 54
6.4.3 Face Recognion ......................................................................................................... 58
6.4.4 Congure Arming Schedule ........................................................................................ 60
6.4.5 Congure Alarm Linkage Acon .................................................................................. 61
6.5 Recording Management ....................................................................................................... 63
6.5.1 Congure Recording Schedule .................................................................................... 63
6.5.2 Congure Recording Parameter .................................................................................. 66
6.5.3 Storage Device ............................................................................................................ 68
6.5.4 Congure Storage Mode ............................................................................................. 69
6.5.5 Advanced Sengs ....................................................................................................... 71
Chapter 7 Maintenance ............................................................................................................ 73
7.1 Restore Default .................................................................................................................... 73
7.2 Search Log ............................................................................................................................ 73
7.3 System Service ..................................................................................................................... 73
7.4 Buzzer Switch ....................................................................................................................... 74
7.5 Device Maintenance ............................................................................................................ 74
7.5.1 Schedule Reboot ......................................................................................................... 74
7.5.2 Device Status ............................................................................................................... 75
Digital Video Recorder User Manual
xix
Table of contents
Other HiLook DVR manuals


