Hilti TPS-K User manual

TPS-K 377271
*377271*
377271
Bedienungsanleitung de
Operating instructions en
Mode d’emploi fr
Istruzioni d’uso it
Manual de instrucciones es

1
햳햲

2
1
2
3
4
3

*377271*
Hilti Corporation
FL-9494 Schaan
Tel.:+423/2342111
Fax:+423/2342965
www.hilti.com
Hilti = registered trademark of Hilti Corp., Schaan W 2777 0103 10-Pos. 1 1 Printed in Liechtenstein © 2003
Right of technical and programme changes reserved S. E. & O.
377254/C

1
de
TPS Diebstahlschutz
1. Allgemeine Hinweise
1.1 Signalworte und ihre Bedeutung
-VORSICHT-
Für eine möglicherweise gefährliche Situation, die zu
leichtenKörperverletzungenoderzuSachschadenführen
könnte.
-HINWEIS-
Für Anwendungshinweise und andere nützliche Infor-
mationen.
1.2 Piktogramme
Inhalt Seite
1.Allgemeine Hinweise 1
2.Beschreibung 2
3.Zubehör 2
4.Technische Daten 2
5.Sicherheitshinweise 2
6.Bedienung 2
7.Pflege undInstandhaltung 3
8.Fehlersuche 4
9.Entsorgung 4
10.Garantie 4
11.EG-Konformitätserklärung 5
Abbildung
Batteriefach
Anhängeöse
Die Zahlen verweisen jeweils auf Abbildungen. Die
AbbildungenzumTextfindenSieaufdenausklappbaren
Umschlagseiten.HaltenSiediesebeimStudiumderAnlei-
tunggeöffnet.
Ort der Identifizierungsdetails auf dem Freischalt-
schlüssel
DieTypenbezeichnung und die Serienkennzeichnung sind
auf dem Typenschild Ihres Freischaltschlüssels ange-
bracht. Übertragen Sie diese Angaben in Ihre Bedie-
nungsanleitung und beziehen Sie sich bei Anfragen an
unsere Vertretung oder Servicestelle immer auf diese
Angaben.
Typ: TPS
Serien Nr.:
Warnzeichen
Warnung
vor allgemeiner
Gefahr
Vor Benutzung
Bedienungs-
anleitung lesen
Die Batterien dürfen nicht
über den Müll entsorgt
werden
Hinweis auf
Diebstahl-
schutz
Symbole
Lesen Sie die Bedienungsanleitung vor
Inbetriebnahme unbedingt durch.
Bewahren Sie diese Bedienungsanleitung
immer beim Gerät auf.
Geben Sie das Gerät nur mit Bedienungs-
anleitung an andere Personen weiter.

allenHilti-FreischaltschlüsselndiesesspeziellenKunden
freischalten.
Anzeigen mit Lichtsignal:
– Anzeige vonDiebstahlschutz am Gerät(gelb blinkend).
Zum Lieferumfang der Standardausrüstung
gehören:
–Einbauteile imGerät
–Freischaltschlüssel
2
de
2. Beschreibung
Der Diebstahlschutz (TPS) für handgeführte Elektro-
werkzeugevonHiltischütztdiesewirkungsvollvorunbe-
rechtigterBenutzung.
DasGerätkannbeivorhandenemDiebstahlschutz(TPS-
ModulistimGerätintegriert)nurbetriebenwerden,wenn
der Benutzer im Besitz eines elektronischen Freischalt-
schlüssels ist. Freischaltschlüssel sind bei Hilti erhält-
lich. Die Freischaltschlüssel sind kundenbezogen; das
heisstallevoneinemKundenbeiHiltierworbenen Gerä-
te, die über Diebstahlschutz verfügen, lassen sich von
3. Zubehör
Freischaltschlüssel TPS-K
Kartefür Arbeitsgemeinschaft(Aktivieren)
Kartefür Arbeitsgemeinschaft(Deaktivieren)
4. Technische Daten
Reichweitemit Batterie 50–70cm
Lithium-Batterie CR2032
Technische Änderungen vorbehalten
5. Sicherheitshinweise
●DieBatteriedarf nicht in die Hände von Kindern gelan-
gen. Hat ein Kind eine Batterie geschluckt, kontaktieren
Siesofort einenArzt.
●Überhitzen Sie die Batterie nicht und setzen Sie sie
nichtdemFeueraus.DieBatteriekannexplodierenoder
eskönnen toxischeStoffe freigesetztwerden.
●VermeidenSieeine schnelle Entladung.
●LadenSie dieBatterie nichtauf.
●VerlötenSie die Batterie nicht im Freischaltschlüssel.
●-VORSICHT- Schliessen Sie die Batterie nicht kurz,sie
kann sich dadurch überhitzen und Verbrennungen ver-
ursachen.
●Öffnen Sie die Batterie nicht und setzen Sie sie nicht
übermässigermechanischer Belastungaus.
6. Bedienung
6.1 Gerät
6.1.1 Gerät Freischalten
1. SteckenSie den Netzstecker des Geräts in die Steck-
dose. Die gelbe Diebstahlschutzlampe blinkt. (Das
GerätistnunaktiviertundsuchtmittelsFunkübertra-
gungnach einemgültigen Freischaltschlüssel.)
2. Bringen Sie den Freischaltschlüssel in die Nähe des
Geräts (ca. 50–70 cm). Sobald die gelbe Diebstahl-
schutzlampeerlischt,istdasGerätfreigeschaltet.(Das
System ist so gestaltet, dass der Freischaltschlüssel
für die Freigabe des Geräts üblicherweise nicht aus
derHosentasche genommenwerden muss.)
-HINWEIS-
DieFreischaltung desGerätsbleibterhalten,solangedas
Gerätnicht vonder Netzspannunggetrennt wird.

3
de
6.1.2 Notbetrieb
Um eine komfortable Reichweite zu erhalten, sind die
FreischaltschlüsselmiteinerBatterie(CR2032Lithium-
Batterie)ausgestattet.DasGerätlässtsichauchbeilee-
rerodernichtvorhandenerBatterieimFreischaltschlüs-
sel freischalten, indem der Freischaltschlüssel dicht an
die mit dem in der Abbildung dargestellten Symbol
gekennzeichnetenStelle aufdem Gerätgehalten wird.
-VORSICHT-
Entfernen Sie entladene Batterien aus dem Freischalt-
schlüssel.
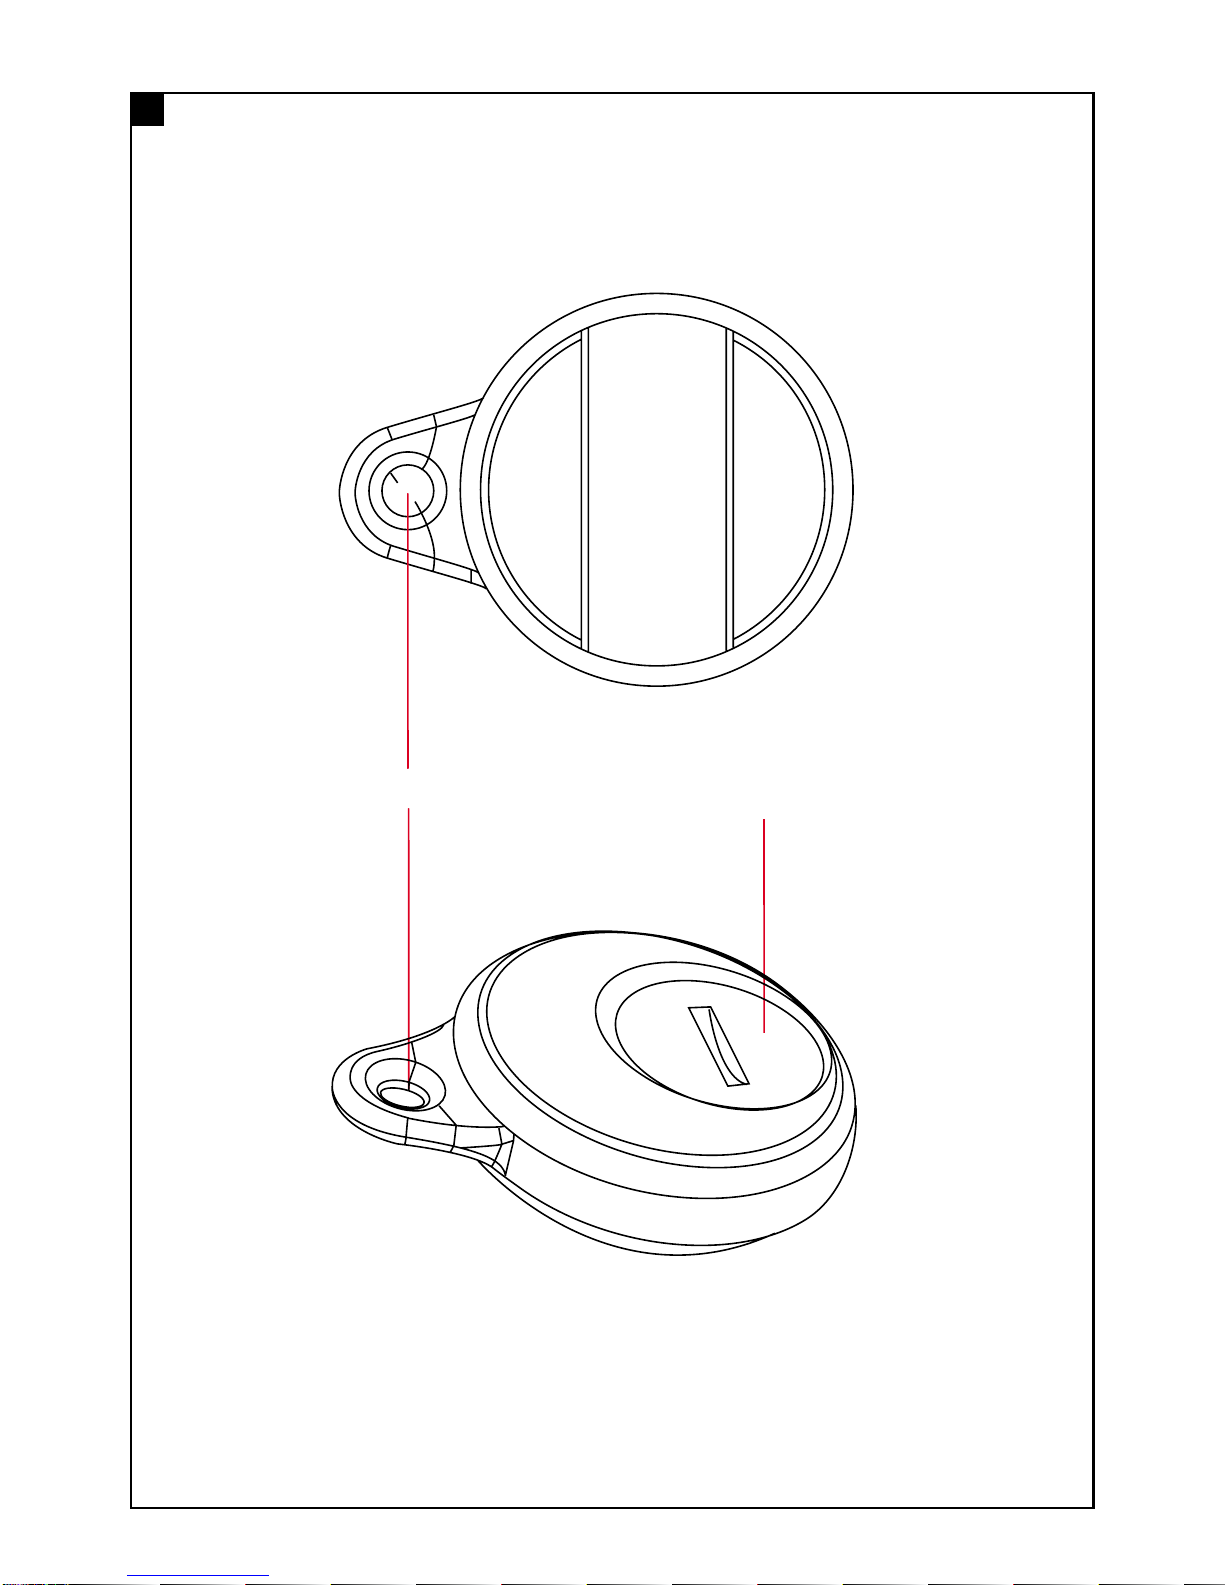
6.2 Freischaltschlüssel
6.2.1 Batteriewechsel beim Freischaltschlüssel
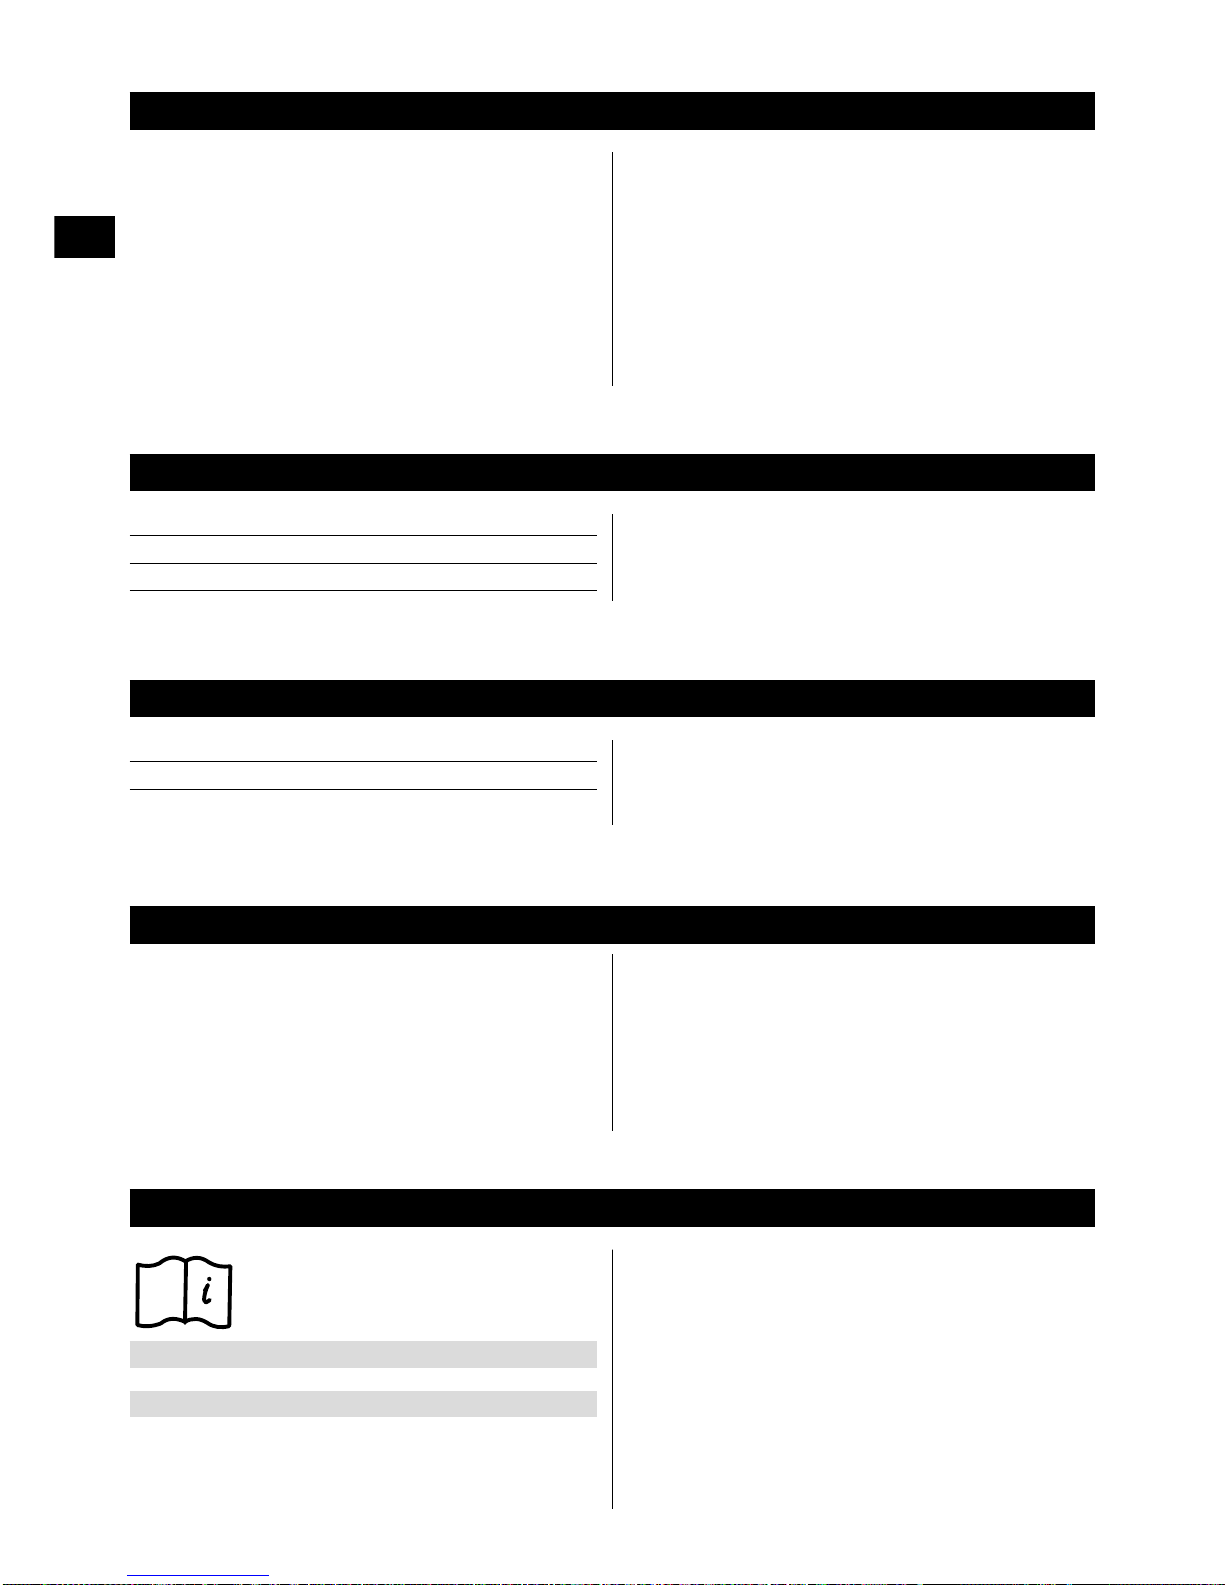
1. Öffnen Sie die Verschlussschraube mit einer Münze
(Linksdrehung).
2. EntnehmenSie dieBatterie ausdem Batteriefach.
3. Setzen Sie dieneueBatterie,mitdem„+“Zeichennach
oben,in dasBatteriefach.
4. Schliessen Sie das Batteriefach mit der Verschluss-
schraube.
6.2.2 Nachbestellen von Freischaltschlüsseln
FreischaltschlüsselkönnenbeiHiltinachbestelltwerden.
DerVerkaufeines Freischaltschlüssels erfolgtunterAnga-
be der Kundennummer im Hilti Center oder Customer
Service. Der Freischaltschlüssel wird an die jeweils zu
der Kundennummer gespeicherten Adresse versendet,
bzw.ausgehändigt, wennsich derKunde ausweist.
6.2.3 Überprüfen des Freischaltschlüssels
Wechseln Sie die Batterie im Freischaltschlüssel (siehe
Punkt 6.2.1), falls die Reichweite zum Freischalten des
GerätsabnimmtodernurmehreinFreischaltenimNot-
betrieb(vergleiche auchPunkt 6.1.2)möglich ist.
Ein nicht funktionierender Freischaltschlüssel kann im
HiltiCenteraufFehleranalysiertwerden.Fallsersichals
defekt herausstellt, muss ein neuer Freischaltschlüssel
mitdenkundenspezifischenDatenprogrammiertwerden.
6.3 Arbeitsgemeinschaftskarte
UmdasFreischaltendesGerätsdurchFreischaltschlüs-
sel von Partnerfirmen in einer Arbeitsgemeinschaft zu
ermöglichen,kannbeimHiltiCenteroderCustomerSer-
viceeine Arbeitsgemeinschaftskartebestellt werden.
UmdieArbeitsgemeinschaftimGerätzuaktivieren,gehen
Siebitte folgendermassenvor:
1. SteckenSie den Netzstecker des Geräts in die Steck-
dose.Die gelbeDiebstahlschutzlampe blinkt.
2. Sorgen Sie dafür, dass sich kein Freischaltschlüssel
inderNähederMaschinebefindet,daeineProgram-
mierungmitderArbeitsgemeinschaftskarteausSicher-
heitsgründen nur im nicht freigeschalteten Zustand
desGeräts möglichist.
3. Halten Sie die Arbeitsgemeinschaftskarte an die mit
deminderAbbildungdargestelltenSymbolgekenn-
zeichneten Stelle auf das Gerät bis die Diebstahl-
schutzlampeerlischt.
-HINWEIS-
Vor diesem Schritt muss die gelbe Diebstahlschutz-
lampenochblinken(Gerätistnichtfreigeschaltet).Die
erfolgreiche Programmierung wird mit einem Freischal-
tendesGerätsbestätigt(Diebstahlschutzlampeerlischt).
4. Stecken Sie den Stecker des Geräts aus der Steck-
dose.
5. Testen Sie das Freischalten des Geräts mit einem
Schlüsseleiner Partnerfirma (siehe Punkt 6.1.1).
6.4 Arbeitsgemeinschafts-Lösch-Karte
1. SteckenSie den Netzstecker des Geräts in die Steck-
dose.Die gelbeDiebstahlschutzlampe blinkt.
2. Sorgen Sie bitte dafür, dass kein Freischaltschlüssel
sich in der Nähe der Maschine befindet, da eine Pro-
grammierung mit der Löschkarte aus Sicherheits-
gründen nur im nicht freigeschalteten Zustand des
Gerätesmöglich ist.
3. HaltenSiedieLöschkarteandiemitdeminderAbbil-
dungdargestelltenSymbolgekennzeichnetenStel-
leaufdasGerätbisdieDiebstahlschutzlampeerlischt.
-HINWEIS-
Vor diesem Schritt muss die gelbe Diebstahlschutz-
lampenochblinken(Gerätistnichtfreigeschaltet).Die
erfolgreiche Programmierung wird mit einem Freischal-
tendesGerätsbestätigt(Diebstahlschutzlampeerlischt).
4. ZiehenSie denNetzstecker ausder Steckdose
5. SteckenSie denNetzstecker indie Steckdose.
6. Testen Sie das Löschen der Arbeitsgemeinschaft im
Gerät mit einem Schlüssel einer Partnerfirma (siehe
Punkt6.1.1).DasGerätdarfsichvondiesemSchlüs-
selnicht mehrfreischalten lassen.
7. Pflege
7.1 Pflege des Freischaltschlüssels
DieäussereGehäuseschaledesFreischaltschlüsselsist
aus einem schlagfesten Kunststoff gefertigt. Reinigen
Sie die Aussenseite regelmässig mit einem leicht ange-
feuchteten Tuch. Verwenden Sie kein fliessendes Was-
serzurReinigung(DieFunktiondesFreischaltschlüssels
kann beeinträchtigt werden. Dies hat aber keinen Ein-
flussauf dieelektrische Sicherheitdes Geräts).

4
de
8. Fehlersuche
Fehler Mögliche Ursache Behebung
Freischaltennur bei SchwacheBatterie Batteriewechsel
geringemFreischaltabstand
möglich
Freischaltennur im Schwacheoder leereBatterie Batteriewechsel
Notbetriebmöglich Mehrere Freischaltschlüsselbefinden Alle Freischaltschlüsselbis aufeinen aus
sichgleichzeitig inder Nähedes Geräts derNähe desGeräts entfernenund
Freischaltvorgangwiederholen
Programmierungder Gerät warzum Zeitpunktder 1.Stecker ausder Steckdoseziehen
Arbeitsgemeinschaftnicht Programmierung derArbeits- 2.Sicherstellen, dasskein Freischalt-
möglich gemeinschaftbereits freigeschaltet schlüsselin derNähe desGeräts
vorhandenist (Diebstahlschutzlampe
blinkt)
3.Programmierung wiederholen
Löschender Arbeitsge- Gerätwar zumZeitpunkt desLöschens 1. Steckeraus derSteckdose ziehen
meinschaftnicht möglich derArbeitsgemeinschaft bereits 2.Sicherstellen, dasskein Freischalt-
freigeschaltet schlüsselin derNähe desGeräts
vorhandenist (Diebstahlschutzlampe
blinkt)
3.Löschvorgang wiederholen
10. Garantie
Hiltigarantiert,dassdasgelieferteGerätfreivonMaterial-
oder Fertigungsfehlern ist. Diese Garantie gilt unter der
Voraussetzung,dass dasGerätinÜbereinstimmungmit
derHiltiBedienungsanleitungrichtigeingesetztundge-
handhabt,gepflegtundgereinigtwird,dassalleGarantie-
ansprücheinnerhalbvon12Monaten(sofernnichtzwin-
gendenationaleVorschrifteneine längere Mindestdauer
vorschreiben)abdemVerkaufsdatum(Rechnungsdatum)
erfolgen und dass die technische Einheit gewahrt wird,
d.h.dassnurOriginalHiltiVerbrauchsmaterial,Zubehör-
undErsatzteile mitdem Gerätverwendet werden.
Diese Garantie umfasst die kostenlose Reparatur oder
denkostenlosenErsatzderdefektenTeile. Teile, die dem
normalenVerschleissunterliegen,fallennichtunterdiese
Garantie.
Weitergehende Ansprüche sind ausgeschlossen, soweit
nicht zwingende nationale Vorschriften entgegenste-
9. Entsorgung
Entsorgen Sie die Batterien nach den nationalen oder
regionalenVorschriften
hen. Insbesondere haftet Hilti nicht für unmittelbare
oder mittelbare, Mangel- oder Mangelfolgeschäden,
Verluste oder Kosten im Zusammenhang mit der Ver-
wendung oder wegen der Unmöglichkeit der Verwen-
dung des Geräts für irgendeinen Zweck. Stillschwei-
gende Zusicherungen für Verwendung oder Eignung
für einen bestimmten Zweck werden ausdrücklich aus-
geschlossen.
FürReparaturoderErsatzsindGerätund/oderbetroffe-
neTeileunverzüglich nach Feststellung des Mangels an
diezuständige HiltiMarktorganisation zusenden.
Die vorliegende Garantie umfasst sämtliche Garantie-
verpflichtungenseitensHiltiundersetztallefrüherenoder
gleichzeitigen Erklärungen, schriftlichen oder mündli-
chenVerabredungenbetreffend Garantien.

5
de
11. EG-Konformitätserklärung
Bezeichnung: Diebstahlschutz
Typenbezeichnung: PS mit TPS-K
Konstruktionsjahr: 2002
WirerkläreninalleinigerVerantwortung,dassdiesesPro-
duktmitdenfolgendenRichtlinienundNormen überein-
stimmt:EN300220-1,-3/EN300330/EN301489-1,-3/
EN60950.
Hilti Corporation
Daniel Schillinger David Hruza
Senior Vice President Development
Drilling and Demolition Drilling and Demolition
Business Unit Business Unit
December 2002 December 2002

7
en
TPS theft protection system
1. General information
1.1 Signal words and their meaning
-CAUTION-
Usedtodrawattentiontoapotentiallydangeroussitua-
tion which could lead to minor personal injury or dam-
ageto theequipment orother property.
-NOTE-
Used to draw attention to an instruction or other useful
information.
1.2 Pictograms
Contents Page
1.General information 7
2.Description 8
3.Accessories 8
4.Technical data 8
5.Safety precautions 8
6.Operation 8
7.Care andmaintenance 9
8.Troubleshooting 10
9.Disposal 10
10.Warranty 10
11.EC declarationof conformity 11
Illustration
Battery compartment
Securing eye
These numbers refer to the corresponding illustra-
tions.Theillustrationscanbefoundonthefold-outcov-
erpages.Keepthesepagesopenwhilestudyingtheoper-
atinginstructions.
Location of identification data on the tool
Thetypedesignationandserialnumbercanbefoundon
the rating plate on the tool. Make a note of this data in
your operating instructions and always refer to it when
makinganenquirytoyourHiltirepresentativeorservice
department.
Type: TPS
Serial no.:
Warning signs
General
warning
Read the
operating
instructions
before use.
Do not dispose of batteries
with general refuse. Equipped
with theft
protection
system
Symbols
It is essential that the operating instructions
are read before the tool is operated for the
first time.
Always keep these operating instructions
together with the tool.
Ensure that the operating instructions are
with the tool when it is given to other
persons.

Indicator lamp
– Indicatesthatthetheftprotectionsystemisactive(blinks
yellow).
The basic system consists of the following items:
–Built-in modulein theelectric tool
–Activation key
8
en
2. Description
The theft protection system (TPS) for Hilti hand-held
electrictools effectivelyprevents unauthorizeduse.
Whenequippedwiththetheftprotectionsystem(theTPS
module is an integral part of the electric tool), the tool
can be operated only when the user is in possession of
anelectronicactivationkey.Activationkeysareavailable
from Hilti. Activation keys are customer-specific; this
means that all tools purchased from Hilti, which are
equipped with the theft protection system, can be acti-
vatedbyallHiltiactivationkeysforthisspecificcustomer.
3. Accessories
Activationkey TPS-K
Workgroupcard (activation of group mode)
Workgroupcard (cancellation of group mode)
4. Technical data
Rangewith battery 50–70cm
Lithiumbattery CR2032
Rightof technicalchanges reserved
5. Safety precautions
●Thebattery must not be allowed to fall into the hands
of children. Contact a doctor immediately if a battery is
swallowedby achild.
●Do not expose the battery to heat or fire. The battery
mayexplode ormay releasetoxic substances.
●Avoidrapiddischarge.
●Donot rechargethe battery.
●Donot solderthe batteryinto theactivation key.
●-CAUTION- Donot dischargethe batteryby short-cir-
cuitingtheterminalsasitmayoverheatandcauseburns.
●Donotattempttoopenthebattery and donotsubject
itto excessivemechanical stress.
6. Operation
6.1 Electric tool
6.1.1 Activating the tool
1. Plugthesupplycordoftheelectrictoolintothemains
socket. The yellow theft protection indicator lamp
blinks. (The tool is now under power and ready for
activationbycontactlesscommunicationwithavalid
electronicactivation key.)
2. Bringtheactivationkeywithinrangeofthetool(approx.
50–70 cm). The tool is then activated and ready for
use as soon as the yellow theft protection indicator
lampnolongerlights.(Thesystemisdesignedsothat
theactivationkeyforthetoolnormallydoesnothave
tobe takenout ofthe trouserpocket.)
-NOTE-
The tool remains activated and ready for use so long it
isnot disconnectedfrom themains supply.

9
en
6.1.2 Activation in backup mode
The activation key is equipped with a battery (CR2032
lithiumbattery)topermitacomfortableoperatingrange.
Whennobattery is installed in the activation key,orifthe
battery hasbecomedischarged,the tool can be activat-
ed in backup mode by holding the activation key close
tothetool,betweenthemotorsectionandgrip,asshown
in the illustration .
-CAUTION-
Removea dischargedbattery from the activation key.
6.2 The activation key
6.2.1 Changing the battery in the activation key
1. Use a coin to unscrew the cover (turn in a counter-
clockwisedirection).
2. Removethe batteryfrom thebattery compartment.
3. Insertthenewbatteryinthebatterycompartmentwith
the"+" symbolfacing upwards.
4. Close the battery compartment by screwing on the
cover.
6.2.2 Reordering activation keys
Activation keys can be reordered from Hilti. The cus-
tomer'snumbermustbestatedwhenpurchasinganacti-
vationkeyataHilticenterorthroughHiltiCustomerSer-
vice.TheactivationkeywillbesenttotheaddressinHilti's
recordsforthiscustomernumberor,alternatively,hand-
edovertothecustomeronpresentationofidentification.
6.2.3 Checking operation of the activation key
Fit a new battery in the activation key (see 6.2.1) if the
activationrangedecreasesorwhenactivationispossible
onlyasdescribedat 6.1.2"Activationinbackupmode".A
defectiveactivationkeycanbecheckedforfaultsat aHilti
center. A new activation key must be programmed with
thecustomer'sdataiftheoldkeyisfoundtobedefective.
6.3 Work group mode activation card
Cardsforsettingthetooltoworkgroupmode,thusper-
mitting activation of the electric tool by activation keys
owned by partner companies in a work group, can be
orderedfrom aHilti Centeror HiltiCustomer Service.
Tosetthetooltoworkgroupmode,proceedasfollows:
1. Plugthesupplycordoftheelectrictoolintothemains
socket. The yellow theft protection indicator lamp
blinks.
2. Check that no activation key is in the vicinity of the
electric tool as, for security reasons, setting to work
group mode with the card is possible only when the
toolis ina deactivatedstate.
3. Hold the work group mode card against the electric
toolatthepositionmarkedwiththesymbolasshown
intheillustrationuntilthetheftprotectionlampno
longerlights.
-NOTE-
The theft protection indicator lamp must be blinking
before the card is held against the tool (tool not yet
activated). Confirmation that setting to work group
mode has been successful is given by the theft pro-
tectionindicatorlamp (lamp goesout),showing that
thetool hasbeen activated.
4. Plugthesupplycordoftheelectrictoolintothemains
socket.
5. Check that the tool can be activated by a key belong-
ingtoapartnercompanyintheworkgroup(see6.1.1).
6.4 Work group mode cancellation card
1. Plugthesupplycordoftheelectrictoolintothemains
socket.Theyellowtheftprotectionindicatorlampblinks.
2. Check that no activation key is in the vicinity of the
electric tool as, for security reasons, cancellation of
workgroupmodewiththecardispossibleonlywhen
thetool isin adeactivated state.
3. Hold the work group mode cancellation card against
theelectric tool at theposition marked withthe sym-
bol asshown inthe illustration untilthe theft pro-
tectionlamp nolonger lights.
-NOTE-
The theft protection indicator lamp must be blinking
before the card is held against the tool (tool not yet
activated).Confirmationthatcancellationofworkgroup
mode has been successful is given by the theft pro-
tectionindicatorlamp (lamp goesout),showing that
thetool hasbeen activated.
4. Unplug the supply cord of the electric tool from the
mainssocket.
5. Plugthesupplycordoftheelectrictoolintothemains
socket.
6. Check that the tool is no longer in work group mode
by attempting to activate it with a key from a partner
company(see6.1.1).Activationbyakeybelongingto
apartner companyshould nowbe impossible.
"This device complies with Part 15 of the FCC rules.
Operation is subject to the following two conditions:
1. Thisdevice maynot causeharmful interference.
2. This device must accept any interference received,
includinginterferencethatmaycauseundesiredoperation"
"Changes or modifications to this unit not expressly
approved by the party responsible for compliance could
void the user authority to operate this equipment."
7. Care and maintenance
7.1 Care and maintenance of the activation key
Theoutercasingoftheactivationkeyismadefromimpact-
resistantplastic.Cleanitsoutersurfaceatregularinter-
valsusingaslightlydampcloth.Donotuserunningwater
forcleaning.(Thismay negatively affect functionality of
the activation key but has no influence on the electrical
safetyof thetool).

10
en
8. Troubleshooting
Fault Possible cause Remedy
Thetool canbe activated Weakbattery Fita newbattery.
onlywhen thekey isheld
closeto it.
Activationpossible only Weakordead battery Fita newbattery.
inbackup mode Severalactivation keysare inthe Remove allactivation keysexcept onefrom
vicinityof the electrictool atthe same the vicinityof theelectric tool andrepeat the
time activationprocedure.
Workgroupmode cannot The tool was already activated before 1.Unplug thesupply cordfrom themains
beset attemptingto setit towork group socket.
mode. 2. Ensurethat noactivation keyis inthe
vicinityof theelectric tool(theft protec-
tionindicator mustbe blinking).
3. Repeatthe procedurefor settingwork
groupmode.
Workgroupmode cannot Thetool wasalready activatedbefore 1. Unplug the supply cord from the mains
becancelled attemptingto cancelwork group socket.
mode. 2. Ensurethat noactivation keyis inthe
vicinityof theelectric tool(theft protec-
tionindicator mustbe blinking).
3.Repeat theprocedure forcanceling work
groupmode.
10. Warranty
Hilti warrants that the tool supplied is free of defects in
materialandworkmanship.Thiswarrantyisvalidaslong
as the tool is operated and handled correctly, cleaned
and serviced properly and in accordance with the Hilti
operatinginstructions,allwarrantyclaimsaremadewithin
12months(unlessothermandatorynationalregulations
prescribealongerminimumperiod)fromthedateofthe
sale (invoice date), and the technical system is main-
tained.ThismeansthatonlyoriginalHilticonsumables,
componentsand spareparts maybe usedin thetool.
Thiswarrantyprovidesthefree-of-chargerepairorreplace-
ment of defective parts only. Parts requiring repair or
replacementas a resultof normal wearand tear arenot
coveredby thiswarranty.
Hilti is not obligated for direct, indirect, incidental or
consequential damages, losses or expenses in con-
9. Disposal
Dispose of batteries in accordance with the applicable
nationalor localregulations.
nectionwith,orbyreasonof, the use of, or inability to
use the tool for any purpose. Implied warranties of
merchantabilityorfitnessforaparticularpurposeare
specifically excluded.
Sendthetooland/orrelatedpartsimmediately upon dis-
covery of a defect to the local Hilti marketing organisa-
tionfor repairor replacement.
This constitutes Hilti’s entire obligation with regard to
warrantyand supersedes all prior or contemporaneous
comments and oral or written agreements concerning
warranties.

11
en
11. EC declaration of conformity
Designation: Theft protection system
Type: TPS with TPS-K
Year of design: 2002
Wedeclare, onoursole responsibility,thatthisproduct
complies with the following directives and standards:
EN 300220-1, -3 / EN 300330/ EN 301489-1, -3 /
EN 60950.
Hilti Corporation
Daniel Schillinger David Hruza
Senior Vice President Development
Drilling and Demolition Drilling and Demolition
Business Unit Business Unit
December 2002 December 2002
This manual suits for next models
1
Table of contents
Languages: