HIMO ZB20 User manual

DESIGN BY
Instruction Manual

Contents
FuseWins

About the Instruction Manual and manufacturer ·············· 2
Keep this instruction manual properly ···························· 2
Text design features ··················································· 2
Picture design features ··············································· 2
Applicable documents················································· 3
Digital rights······························································ 3
Manufacturer's contact information································ 3
Safety cautions·························································· 3
Expected usage ··························································· 3
Unauthorized modification prohibited ···································· 4
Rider’s height ····························································· 4
User and rider’s qualifications············································ 4
Personal protective equipment ··········································· 4
Basic safety instructions·············································· 4
Avoid bicycle damage················································· 5
Avoid injury to riders and bicycles·································5
Important notices, labels and signs for bicycle safety ······· 8
Warning and information signs ····································· 9
Bicycle and its parts ·················································· 10
Power assist ···························································· 11
Brake system ··························································· 11
Speed change·························································· 12
Pedal······································································ 12

Open the packing box and check the articles in the box ····13
Before the first ride ····················································15
Check the dimensions of the bicycle ·····································15
Adjust the saddle··························································15
Charging the battery ······················································16
Check tire pressure ·······················································16
Bicycle control···························································16
Braking ····································································16
Change speed·····························································17
Turn on/turn off the front/rear light ···································17
Unfold the bicycle ·························································17
Fold the bicycle ···························································17
Instrument manual ························································18
Turn on/turn off the instrument ···········································18
Choose the assist level ···················································18
Turn on/turn off Headlight ················································19
Riding ······································································19
While riding ································································19
Safe riding tips ····························································19
Power assist riding ························································20
Riding without power assist ··············································21
Failure handling·························································21
Transportation of bicycles············································21

Bicycle maintenance ··················································22
Battery maintenance ·····················································22
Motor and controller maintenance········································22
Maintenance plan ·························································22
Service Record Book······················································23
Bicycle recycling ························································24
Warranty terms and conditions ···········································24
Additional Information·················································24
Durability test ······························································25
Testing method ····························································25
Component fixation ·······················································26
Recommended height of rider ············································26
Lubrication ·································································27
Chain tension······························································27
Gear adjustment ··························································27
Wheel damage and wear ·················································28
Inflation pressure··························································28
Some notes on battery maintenance and charging ·····················28
Parts and accessories list············································29
Bicycle card ······························································29
Declaration of Conformity ············································30
02
About the Instruction Manual and manufacturer
This instruction manual is for the purpose of helping you use safely the electric folding bicycle.
Unless otherwise being functionally differentiated, this electric bicycle is hereinafter referred to as
"bicycle".
This manual is compiled according to the IEC 82079-1 standard (compilation of planning, content
and demonstration).
Text design features
Various elements of this manual are provided with fixed design features for easy distinction:
Normal text
Action steps
Level 1 list
Picture design features
The pictures may contain numbers indicating the corresponding parts, which are described at the
corresponding numbers below the pictures.
Keep this instruction manual properly
This manual is part of this bicycle.
Always keep this manual with your bicycle.
Make sure that this manual is easily accessible to users.
Provide this manual when selling or distributing bicycles.

03
Applicable documents
The manufacturer’s documents contain additional information and instructions regarding bicycle
components. Such documents are also part of this manual. Please keep them with this manual and
provide them when selling or distributing bicycles.
The nonobservance of relevant documents and regulations may result in injury.
Please read and observe all other applicable documents before using the bicycle.
Applicable documents include the following type f documents:
Declaration of conformity
Digital rights
The information contained in this manual is protected by copyright. Without the written consent of
HIMO, this manual may not be copied, printed, photographed, processed, copied or distributed in
any way or form.
HIMO reserves all rights.
Manufacturer's contact information
Shanghai Himo electric technology co., Itd
Room K50, Floor 1, Building 6, No.4299 Jindu Road, Minhang District, Shanghai, P.R. China
Phone: +86(021)37655820-817
Email: [email protected]
Network address: www.himo-tech.com
Safety cautions
Expected usage
This bicycle is for single-person driving and can be used on auxiliary roads and public roads. The
tires must always be in contact with the ground during driving. It is for private use only and not for
other purposes. When using, it must be equipped with necessary safety equipment, such
equipments are usually included in the assembly list.
Bicycles are not suitable for:
jump
stair riding
mountain biking
ice riding
deep water cycling
participating in sports events
The use of the bicycle also includes maintenance at the recommended interval, as well as reading
and understanding this manual.

04
Unauthorized modification prohibited
Rider’s height
Minimum 160 cm
Maximum 190 cm
Modifications or improper modifications to the bicycle, especially improper operation and modifica-
tion of electrical components such as motors and controllers, may cause serious damage and are
not covered by the warranty.
User and rider’s qualifications
This appliance is not intended for use by persons (including children) with reduced physical,
sensory or mental capabilities, or lack of experience and knowledge, unless they have been given
supervision or instruction concerning use of the appliance by a person responsible for their safety.
Children should be supervised to ensure that they do not play with the appliance.
Personal protective equipment
Serious injuries may occur while riding.
When riding, be sure to wear an approved helmet, and adjust, use and maintain the helmet in
accordance with the manufacturer's corresponding instructions.
Make sure to wear durable shoes with slip resistant soles (such as shaped rubber soles).
Make sure to wear gloves.
Be sure to wear tight clothes to avoid being caught by bicycles or objects on the road.
Be sure to wear (transparent) anti-fouling, dust-proof, and insect-proof glasses.
When the sun is shining, make sure to wear sunglasses.
Basic safety instructions
Avoid serious or fatal injuries due to mechanical failure and improper use of bicycles.
Due to mechanical failure or improper use, serious injuries or even death may occur during riding.
Be sure to conduct a safety test before riding.
Please familiarize yourself with the brakes, pedals and gear positions before riding.
Be sure to adjust the riding speed according to the riding conditions.
Note: The left brake lever controls the rear wheel disc, the right brake lever controls
the front wheel disc
The content of this manual is for educated riders.
A rider need to have the following knowledge and experience:
Use effectively the bicycle described in the seller's manual.
Realize that improper use of bicycles may cause accidents.
He is capable to use the bicycle in accordance with the requirements of this manual.

05
Improper handling of the battery and charger may cause electric shock or explosion, resulting in
serious injury or death. When charging, please use the original charger to charge the battery.
Only use the equipped battery.
Do not connect the positive and negative terminals of the battery.
Protect the battery and avoid exposure to direct sunlight.
Do not disassemble or clean the battery.
Only use the equipped charger to charge the battery.
Only use the charger indoors.
The charger plug is used to disconnect the power supply. Please make sure that the power socket is close to
the charger for ease of use.
The charger can only be used on a 220V grounded socket. Please be sure to avoid contact between the charger
and water or any type of liquid.
Keep the metal contacts clean, and clean them with a soft dry cloth if necessary.
Do not charge a battery with obvious damage such as a broken case.
Do not drop the battery.
Charge the battery in the temperature range of 10°C to 30°C.
Ensure that only people with no physical, sensory or mental disabilities can use the charger.
Avoid bicycle damage
Avoid electric shock or explosion due to improper operation of battery and charger
Avoid injury to riders and bicycles
Avoid serious injuries and caused by contact between body parts and bicycle parts
While riding, body parts or other objects may come into contact with bicycle sprockets, movable
chains, rotating pedals and cranks, and rotating wheels, resulting in serious injury. Be sure to avoid
contact of body parts with the above components.
When riding a bicycle, please make sure that your body parts do not come into contact with the
above-mentioned parts of the bicycle.。
Avoid accident which causes serious injuries or death in rainy days
Rainy and humid weather can affect the road holding, braking force and visibility of riders and other
road users. At this time, your (and other road users) braking force will drop exponentially, tire treads
will not work as well as on dry roads, speed control will become more complicated, and the risk of
loss of control of the bicycle will increase, which may result in serious injuries.
Please ride slowly in rainy and humid weather.
Be sure to brake carefully in rainy and humid weather.
Turn off the motor or minimize the motor assistance and ride carefully.

06
Avoid serious injuries due to damage or looseness of reflectors and lights
The reflectors of bicycle can capture and reflect light from street lamps, car headlights and other light
sources, making it easier for the rider to be identified. Damaged, bent or loose reflectors may cause
unclear recognition and cause serious injuries or death.
To avoid this kind of accident, you should:
Ask the dealer to replace damaged, bent or loose reflectors and lights.
Check reflectors and lights regularly.
Avoid serious injury caused by improper maintenance, maintenance and cleaning
Improper maintenance and cleaning can cause serious injuries or death.
Only carry out the activities listed in the maintenance plan.
Use only commercially available lubricants and cleaners.
Other repairs and maintenance work should be performed by qualified dealers
Avoid serious injuries when riding off-road or crossing the kerb
Riding on terrain roads or footways, if the speed is not properly controlled, the bicycle may fall and
cause serious injuries or death.
Be sure to adjust the riding speed according to the riding environment.
Properly replace parts or add accessories to avoid serious injuries or death.
Before installing, using and maintaining components, be sure to consult your dealer.
Please be sure to read and follow the attached instructions for use.
Many components and accessories are available to improve the comfortability performance and
appearance of the bicycle. You will be responsible for the risk cause by adding components or
accessories. These components or accessories may not have been tested for compatibility, reliability
or safety by the bicycle manufacturer. Unconfirmed compatibility, reliability, or safety, and improper
installation, use, and maintenance of bicycle components or accessories can cause serious injuries
or death.
Avoid accident which causes serious injuries or death while riding at dusk or night
Riding in dim light at night is more dangerous than riding in daytime, because it is more difficult for
the rider to identify other road users, which may result in serious injuries or death.
Avoid riding in dim light at night.
Please ride carefully.
Please be sure to equip with lights and reflectors when riding.
Please avoid road Section with dusky light and heavy traffic.
Be sure to avoid obstacles on the road.
If possible, be sure to ride on a familiar route.
Avoid component damage and serious injury
When riding off-road or on the kerb, the motor, crank, or bottom bracket may be damaged, causing
serious injury.
Ride only on permitted roads.
In case of obstacles, please get off the bicycle and lift the bicycle to pass.
If the bicycle is damaged, please visit the dealer for a check.
Note: When riding on the road, the lights and reflectors must comply with local regulations

07
Avoid component damage which may cause serious injuries or death
The bicycle and its components are subjected to wear and tear (scratches, cracks, abrasion and discolor-
ation). Damaged components may suddenly fail, resulting in injuries or death.
Regularly check the wear and tear of various components (such as brake disc, tire, etc.).
Damaged bicycle parts should be replaced (if possible) or repaired bt qualified dealer/expert.
Avoid leg injuries
If the distance between the pedals is too small, it may cause (Q-value related) damage to the legs. The
rider may feel uncomfortable with the installed pedals.
In this case, please visit a professional dealer for checking the bicycle immediately.
Avoid dehydration while riding
Riding is strenuous physical exercise.
Make sure that there is an adequate supply of liquid.
Avoid injury or discomfort
Sitting on the saddle frequently for a long time may cause prostate disease for men.
If necessary, install a ergonomic saddle suitable for women/men.
Take preventive measures when necessary.
Avoid vibration
Improper assembly, wear, and overload (for example, starting the motor when riding on bumpy
roads, kerbs), or loose parts may cause abnormal operation of the motor.
Bicycles can only be used on permitted roads.
If there are cracks or obvious damage, please consult a dealer/expert for repair.
Before each ride, check whether the riding device responds correctly (for example, shifting gears
on a flat surface) or functions normally.
Avoid difficulties in breathing and asphyxia
New materials (such as paint) and the high temperature of the motor will generate volatile gas.
When bicycles are stored indoors, volatile gases accumulate, which may cause difficulties in
breathing and asphyxia.
Please be sure to park your bicycle in a well-ventilated room.
Avoid burns
When riding a bicycle, bicycle parts (brakes, wheels, etc.) may become hot, and touching these
parts may cause burns.
Allow the thermal component to cool down before use, or wear a heat-resistant protective device.
08
Avoid frostbite
Riding in cold weather can easily lead to frostbite.
In cold weather, please be sure to wear suitable clothes, including masks, hats, and gloves.
Avoid falling down due to sudden electric assist
Sudden application of electric assist may cause loss of control and rollover.
Be sure to test the electric assist function before riding for the first time.
Be sure to wear personal protective equipment.
Be sure to check the default speed setting of the bike.
Be sure to check the brake force and speed function manual carefully before riding.
Avoid material damage
Improper battery handling may cause property damage.
Make sure that the battery is not fully discharged.
Store the battery only in a dry place.
Please charge the battery at least once every two months to ensure that it has 80% power.
Environmental issues
Damaged bicycle components (such as batteries, electrical or electronic components) may cause
toxic substances or gaseous escape and cause environmental poisoning.
Discard used batteries and bicycle electrical/electronic components in accordance with the law.
Please follow the manufacturer's relevant product instructions.
Important notices, labels and signs for bicycle safety
In this manual, there are the following warnings:
Warnings with the word "WARNING" are those of potentially dangerous
situations, which, if not avoided, may result in death or serious injuries.
WARNING
WARNING
Warnings with the word "Caution" are those of situations that may cause
minor injuries or moderate injuries.
09
Warning and information signs
Ensure that all warning and information signs affixed on the bicycle are always clearly visible and
readable.
Replace damaged or missing warning and information labels immediately.
General warning sign
Very hot surface
Sign Description
Do not use high pressure washer
Do not open electrical components such as motors and controllers
Please follow the instructions
The following warning and information signs are affixed to the bicycle.
This type of warning is used to warn of conditions that cause material
damage.
WARNING
Design features for signs of material changes:

10
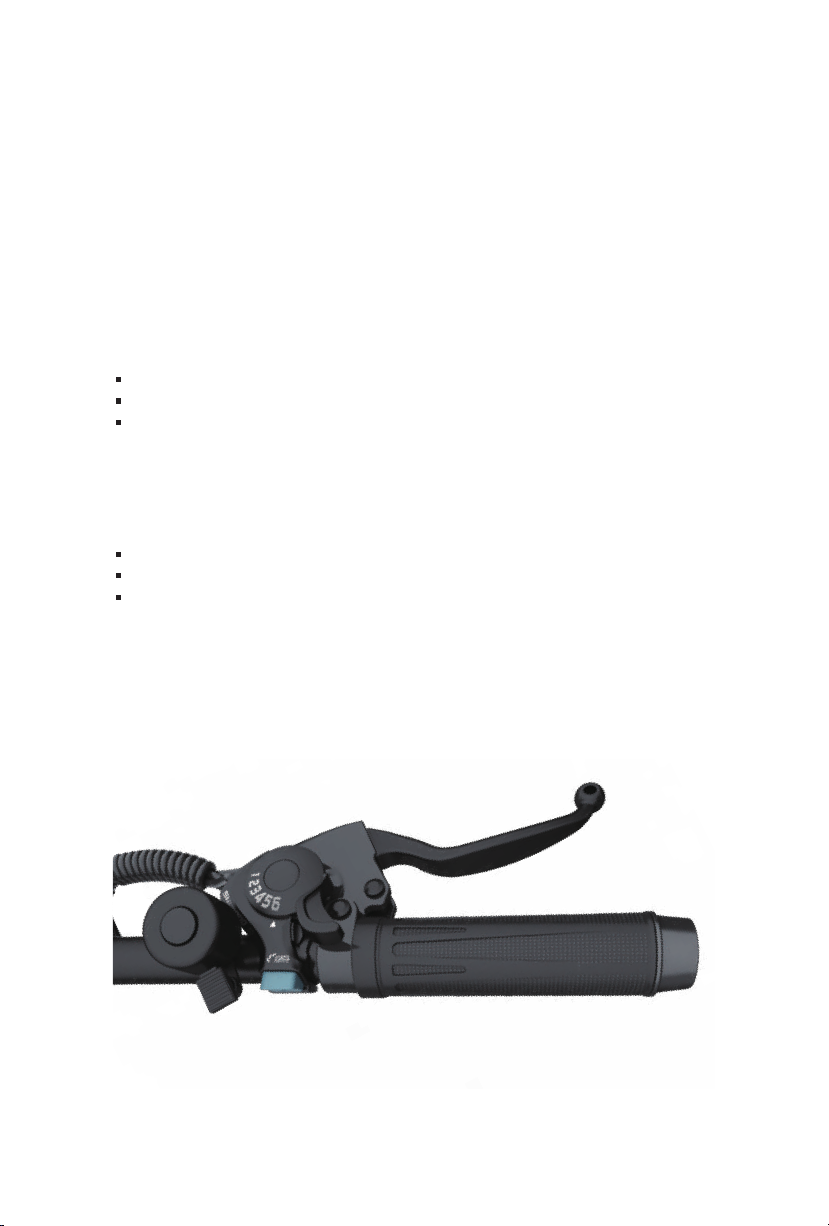
Instrument
Shift lever set
Brake lever
Folding aheadset stem
Front light
Reflector, front wheel
Disc-Brake
Saddle
Tail light
Seat tube
Quick release of seat tube
Bicycle body folder
Battery compartment
Controller
Folding pedal
Ladder
Chain
Rear disc-brake
Motor
Rear derailleur
Reflector, rear wheel
Reflecting plate
1
2
3
4
5
6
7
8
9
10
11
No.
12
13
14
15
16
17
18
19
20
21
22
No.Description Description
Bicycle and its parts
This bicycle is suitable for use on auxiliary roads, public roads and trails. It can be folded with
existing joints and hinges in just a few simple steps. The necessary assembly materials are usually
included in the assembly list. Before riding for the first time, make sure that the safety equipment
is in place and in working condition. The materials need to be assembled by you or the bicycle
dealer.
10
16
17
11
9
8
19
18
21
20
15
13
12
6
7
5
4
1
23
22

11
Foldable bicycle
The packing list of this folding bicycle includes:
Pre-installed folding bicycle with battery
Charger
Two keys for removing the battery (a spare key)
Power assist
Electric motor
The electric motor of this type of bicycle acts directly on the rear wheel and can provide you with
pedaling support. With the existing control system, you can adjust the degree of motor assistance
and choose different riding levels. The electric motor can help you reach a maximum speed of 25
km/h.
Brake system
The brake can control the speed of the bicycle, let the bicycle slow down or stop.
Disc-brake
Disc-brakes are mechanical drive devices installed on the handlebars, front wheel and rear wheel.
When braking, by manipulating the brake lever on the handlebar, we realize the friction between
the brake and the disc, so as to decelerate. The brake lining will wear out, please check and
replace it regularly.
Battery
Controller
The bicycle is equipped with a controller for adjusting power assist. The controller calculates and
completes the power output of the motor based on the preset speed, actual speed and pedal
stress. The maximum speed of the bicycle is 25 km/h, and no assistance is provided at higher
speed.
Battery Type (Model ZB20): Lithium-Ion Battery, 48 V, 10Ah
The power assist system needs to be equipped with a battery. The battery of this type of bicycle is
located in the frame.
The battery can be removed from the frame with equipped key for charging, and it can also be
charged through the charging port on the bicycle frame.
Only use the equipped battery charger to charge the battery.
Lithium-ion batteries, like most large batteries, are hazardous substances according to the
transportation regulations and are only allowed to be transported when the battery compartment is
installed on a bicycle. For air transportation and ocean transportation, the regulations on hazardous
substances must be complied with. (Please check the local transportation instructions), a hazard
label must be affixed on packing box for the transportation of the batteries.

12
Brake cable
Brake adjusting screw
Brake arm
Brake cable locking screw
Brake lining
Disc
Brake lever
1
2
3
4
No.
5
6
7
8
No.Description Description
7
1
2
3
4
65
Speed change
This bicycle is equipped with derailleur.
The following terms have the following meanings:
Downshifting means shifting to a lower gear position, making it easier to pedal.
Upshifting means shifting to a higher and faster gear position, making it more difficult to pedal.
Derailleur
The derailleur consists of the following parts:
The prerequisite for a perfect gear shift operation is that the transmission chain moves forward and
is at least under tension.
You can use the appropriate gear position according to the riding situation.
For example, you can shift to a high gear before going uphill to accelerate in advance, so as to
consume less energy.
Gear box or threaded sprocket on the rear wheel
Rear derailleur
Pallet/chain ring
Transmission/drive chain
Shift lever/ gear lever
Pedal
The pedals are installed at the ends of the two cranks. Stepping on the pedal can turn the chain
and drive the sprocket.
This bicycle is equipped with two folding pedals as to facilitate folding and transportation.

13
Open the packing box and check the articles in the box
There is a risk of suffocation when playing with film.
Children may wear it on their heads and cause suffocation.
Make sure that children do not play with the film.
Keep the film out of the reach of children.
WARNING
To unpack the bicycle, the steps are as follows:
Open the box.
Take the bicycle out of the box.
Take the battery charger out of the box.
Take out the two keys used to remove the battery from the box.
Check the assembly list.
Don't let children play with the packaging film, in order to avoid suffocation.
Dispose of packaging materials in accordance with local instructions and regulations.
Install the front wheel
123
1. After the front wheel is inflated,
buckle the claws on both sides of the
front fork into the center shaft of the
front wheel, and ensure that the
disc-brake is inserted into the gap of
the brake.
2. Install the gasket and
tighten the nut.
3. Turn the front wheel to
check the brake system and
complete the front wheel
assembly.
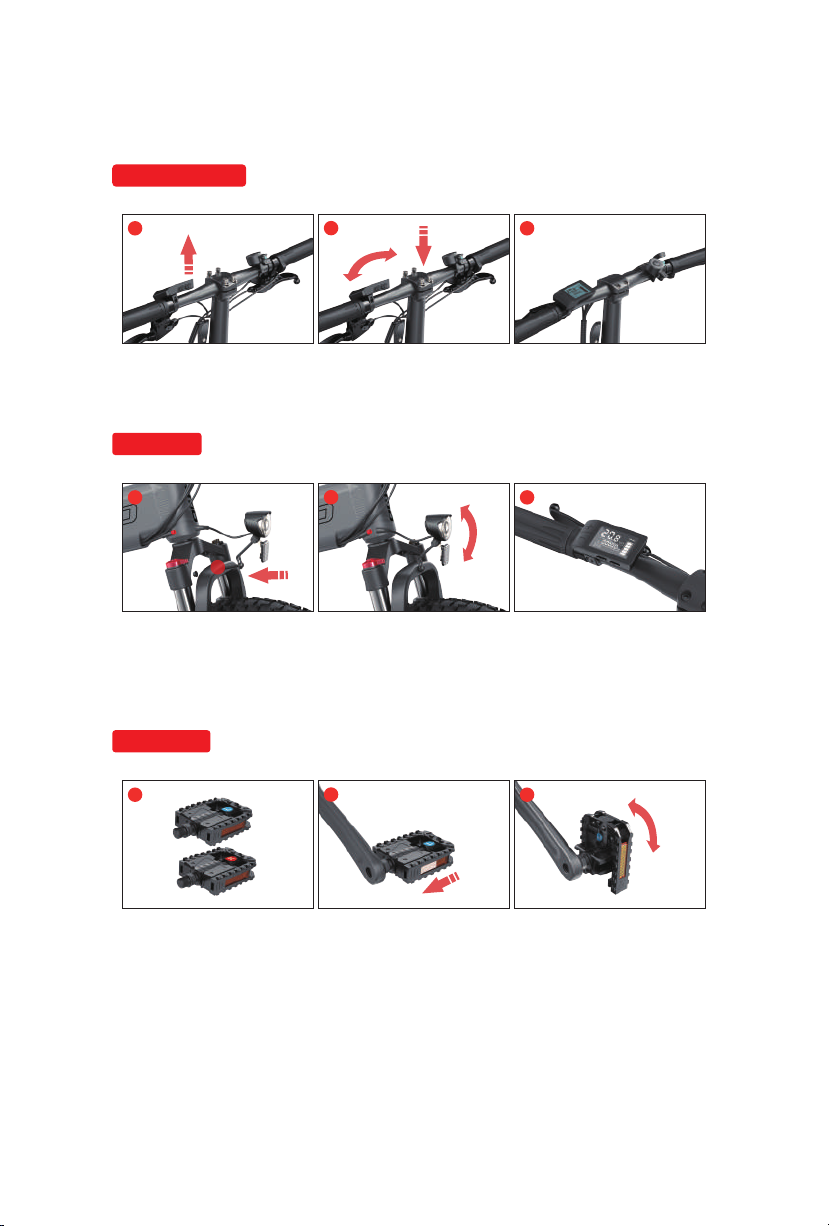
Install the aheadset stem
1. Use a wrench to loosen the
standpipe screw and take out
the washer.
2. Open the folding handle,
assemble the standpipe base
to the front fork standpipe and
tighten the standpipe screws.
3. Close the folding handle,
adjust the angle of the handle bar
(the handle bar is perpendicular
to the front wheel) and tighten the
standpipe base screws.
123
Note: The flexibility of the handlebars can be achieved
by adjusting the standpipe screws
14
Install handle bars
1. Loosen the screw of
handle bar
2. Adjust the angle of the
handle bar and tighten the
screws.
3. Complete the handlebar
adjustment.
Install lights
123
123
1. Remove the headlight
bolts and nuts, fix the
headlight on the front fork
mounting hole and lock it
tightly.
2. Adjust the beam Angle of
the headlight and install the
power cord of the light
3. After the instrument is
turned on, long press "+" to
test whether the front light
can be turned on.
Install pedals
123
1. Pay attention to the letter
indicating that the left and right
pedals are distinguished. L
represents the left pedal, and R
represents the right pedal.
2. When installing the pedal,
make sure that the end face
of the pedal bolt should be
perpendicular to the crank
installation hole, and the left
pedal should be rotated
counterclockwise (clockwise
for right pedal ) and locked.
3. If you need to fold the
pedals, press the pedals
axially and fold it upwards.
15
Adjust the saddle
Correct adjustment of the saddle is essential to riding safety. You can freely adjust the height of the
saddle.
Please verify whether the height of the saddle is adjusted correctly by carrying out the following
steps:
When your foot is on the pedals and your legs are nearly but not fully straight, the height is correct.
Please adjust the height of the saddle as follows:
Then you can move the saddle upward and downward to adjust the height.
Sit on the saddle.
Keep sitting.
Place one of the pedals in downward position.
Put your feet on the pedal.
Loosen and open the quick release seat post clamp.
Adjust according to your need.
Damage to the seat post may cause a fall and cause serious injury.
Make sure that the minimum insertion limit mark (minimum insertion amount)
on the seat post is inside the seat tube and is not visible.
WARNING
Reinstall the seat by closing the quick release seat post clamp.
Check whether the seat height is proper after adjustment.
If not, repeat the adjustment procedure.
Sitting on the saddle, the rider should be able to correctly manipulate the brake lever and gear lever
by tilting the elbow slightly while riding.
Check the dimensions of the bicycle
Loss of control due to the incorrect size of the bicycle can cause the bicycle to
fall over, which may cause serious injuries.
Make sure that the size of the bicycle matches your height.
Do not ride a bicycle that does not match your height.
WARNING
The handlebars, the driver's reaction, steering and braking can have an
adverse effect.
WARNING
Before the first ride
Proper adjustment of the bicycle is essential for safety, performance and riding comfort. You need
to have certain experience and use professional tools to adjust the bike on order to get the correct
settings which suit your body and riding conditions. If you don’t understand, be sure to have an
expert set up your bike. If you have experience, knowledge and tools, please accept an expert's
inspection before riding.
16
Charging the battery
Using the wrong charger may cause the explosion of battery which will result in
serious injuries or death.
Only use the equipped charger.
Read and follow the instructions in the charger manual.
WARNING
Braking
Bicycle control
Check tire pressure
You can find the allowable inflation pressure range on the side wall of the tire. Test the appropriate
tire inflation pressure.
We recommend using a bicycle foot-operated air pump with a pressure gauge/manometer, in order
to check and correct the tire pressure.
The role of the brake is not only to stop the bicycle, but also to control its speed. The maximum
braking force of the wheel refers to the stress when the tire is just " locking-up" (not rotating) and
slips. Once the tire slips, most of the braking force will be lost and all control over the bicycle will
be lost. Please practice slightly braking and slowly stopping, that is, the technique of gradual
braking technique, in order to avoid tire locking-up.
Push the brake lever toward the handle bar to gradually increase the braking force.
If you feel that the wheel is locked, please reduce the braking so that the wheel can rotate
without being locked.
The battery of this bicycle should be charged with an ambient temperature between 10℃and 30℃.
Please follow the steps below to charge the battery:
Take out the battery.
Ensure that the battery has no visible damage such as a broken case.
When charging, place the battery on a non-flammable surface, for example, ceramics.
Follow and observe the instructions (if included) provided in the charger manual.
Insert the charger plug into the corresponding socket on the battery.
Insert the charger plug into a 220V, 50Hz power socket. At this time, the charging indicator on the
charger will light up in red. The charging process takes about 4-6 hours. When the charger
indicator turns green, it means that the battery has been fully charged.
Unplug the plug from the socket.
Unplug the plus in the battery socket.
Reinstall the battery.
Do not use modified or damaged batteries.
Exhausted batteries are to be removed from the appliance and safely disposed of.
Different types of batteries or new and used batteries are not to be mixed.
16
Table of contents
Other HIMO Bicycle manuals


