Himunication TS19 User manual

HIMUNICATION
VHF MARINE RADIO
TS19
User Manual

http://www.himunication.com
Please Scan the QR Code to Download
EN/FR/ES/ITA Multi-language User Manual

1
Contents
EU REGULATORY CONFORMANCE ......................................................................................................................2
CAUTION...................................................................................................................................................................2
TS19 PRODUCT DESCRIPTION .............................................................................................................................4
PTT BUTTON............................................................................................................................................................5
DISTRESS BUTTON.................................................................................................................................................5
SHORTCUT KEYS....................................................................................................................................................6
ICON..........................................................................................................................................................................6
1. MAIN .............................................................................................................................................................6
2. DSC ..............................................................................................................................................................9
3. MOB ............................................................................................................................................................10
4. H/M/L ..........................................................................................................................................................10
5. SCAN ..........................................................................................................................................................10
6. LOCK ..........................................................................................................................................................11
7. GPS ............................................................................................................................................................11
8. DIM .............................................................................................................................................................11
9. CHAN ..........................................................................................................................................................11
10. CH16 .........................................................................................................................................................11
11. CH09 .........................................................................................................................................................11
12. NIGHT .......................................................................................................................................................11
13. PSCAN .....................................................................................................................................................11
14. DUAL ........................................................................................................................................................11
15. TRIW .......................................................................................................................................................12
16. MEM .........................................................................................................................................................12
17. SAVE ........................................................................................................................................................12
18. P2nd .........................................................................................................................................................12
19. BAND ........................................................................................................................................................12
20. LANG ........................................................................................................................................................12
21. DASH ........................................................................................................................................................12

2
OTHER FEATURES AND SOLUTIONS ..........................................FOUT! BLADWIJZER NIET GEDEFINIEERD.
TX Time Out.....................................................................................................................................................13
How to update the software of TS19................................................................................................................13
The local time and date on screen...................................................................................................................13
Appendix A –Near Lightning Strike Test..........................................................................................................15
Appendix B –Channel List...............................................................................................................................17
International Marine VHF Channels & Frequencies........................................................................................17
U.S. Marine VHF Channels and Frequencies..................................................................................................20
Canadian Marine VHF Channels and Frequencies.........................................................................................23
European Private Channels and Frequencies.................................................................................................27
Weather Channels and Frequencies ...............................................................................................................28
Specifications...................................................................................................................................................29
Declaration of Conformity.................................................................................................................................21
TS19 User Manual
EU Regulatory Conformance
As certified by the qualified laboratory, the product is in compliance with the essential requirements and other
relevant provisions of the Directive 2014/53/EU. Please note that the above information is applicable to EU
countries only.
Manufacturer: HIMUNICATION
Trademark number: 11005103
Address:7th Floor,13 building, Run Dong Sheng Industrial Park, National Road 107, Longzhu community,
Xixiang, Baoan district, Shenzhen,China
Cautions
1. Risk of explosion if battery is replaced by an incorrect type. Dispose of used batteries according to the
instructions.
2. Adapter shall be installed near the equipment and shall be easily accessible.

3
3. The device operating temperature range is -15~+55℃.
4. The plug considered as disconnect device of adapter.
5. The device complies with RF specifications when the device used at 25mm from your front face and 0mm from
your body.
6. Declaration of Conformity.
The information listed above provides the user with information needed to make him or her aware of a RF
exposure, and what to do to assure that this radio operates within the CE exposure limits of this radio.
The device complies with RF specifications when the device used at 25mm from your front face and 0mm from
your body. Third-party belt-clips, holsters, and similar accessories used by this device should not contain any
metallic components. Body-worn accessories that do not meet these requirements may not comply with RF
exposure requirements and should be avoided. Maximum SAR Value (10g):0.459W/Kg.
Hereby, Shenzhen Himunication Technology Co ., Ltd declares that this Maritime Radio is in compliance with
essential requirements and other relevant provisions of Directive 2014/53/EU.
Installation and charging of the Li-Polymer battery pack
Place the battery on the device and secure it with the clip.
The battery pack can be charged when installed on the VHF radio, or separately on its supplied charger.
1. Insert the adapter connector into the charger.
2. Plug the adapter into a 220V AC socket.
3. Place the battery and VHF radio, installed on the VHF radio or separately, on the base of charge.
Note: The battery pack charges only on its base. The charging temperature of the charger base is -20~+40℃.

4
TS19 Product Description
Antenna
PTT
GPS position
Shortcut keys
Knob
Speaker
Headset jack
DISTRESS key
Icon
MIC

5
Figure 1 - TS19 VHF Hand Held Radio Figure 2 - TS19 AC/DC adapter and charge base
When turned on, the top of the interface is the information display: battery power, high and low power, DSC, etc.
The large word shows the current channel. You can click the large word and select the channel in the pop up
interface. You can scroll up large word by swiping it up and down.
GPS information is displayed in the middle of the screen. When the radio receive the GPS information, the screen
will show the GPS time, date, latitude and longitude. If the radio did not receive the GPS, the screen will display
"SEACHING GPS". It means the GPS is being searched.
PTT button
When you press the PTT button, the radio will start to transmit if the current channel is available for transmission,
and the radio will end the transmit after you release the PTT button.
DISTRESS button
Press the DISTRESS button to enter the DISTRESS interface, then select the DISTRESS that need to be
transmit, and press the DISTRESS button for 3 seconds to launch.

6
Knob
After power off, long press the knob until the screen display and then released the knob, the radio will power on.
After power on, long press the knob until the screen turns black and release to turn off, the radio will power off.
After power on, turn the knob or lower pressure knob to enter VOL adjustment; press down the knob again to
adjust SQL, then press the knob again to adjust the channel. The radio will exit adjustment operating (mode) if
there is no operation within 5 seconds.
Shortcut keys
This is the return function key.
This is the display desktop function key.
When the radio is not in priority channel, press this key to enter priority channel; If it is in priority
channel, press this button to exit priority channel.
This is the display confirmation function key
Icon
1. MAIN
Click MAIN icon to enter the main menu interface.
Main Menu
VHF Operation
>
GPS Setup
>
ATIS Operation
>
DSC Operation
>
System Config
>
Shake the water
>
Exit
Enter

7
VHF Operation
You can enter the setting of VHF Operation when you click the VHF Operation submenu.
VHF Operation
Channel Band Set
>
Priority 2nd Ch
>
You can enter the setting of BAND when you click the Channel Band Set submenu.
Click Priority 2nd Ch to enter the setting of the second Priority channel. You can turn the page to the left or right,
or click the two triangles in the upper right corner to turn the page to find the channel you want to set. Then click
the corresponding position to display the selected second Priority channel
GPS Setup
You can enter the setting of GPS when you click the GPS Setup submenu.
GPS Setup
GPS Setting
>
GPS ON/OFF
>
GPS Source
>
GPS ON/OFF is the function switch of GPS. You can set the GPS information signal source from the built-in or
via 2.4G channel.
ATIS Operation
You can enter theATIS setting when you click theATIS Operation submenu.
ATIS Operation
MYATIS ID
>
ATIS Function
>
Click MYATIS ID: ifATIS ID has been set, ATIS ID will be displayed. If not, you can set the ATIS ID. ClickATIS
Function to enable or disableATIS Function.
You must enter your userATIS ID before you can access theATIS functions. This is a once-only operation.
To change yourATIS ID please contact your local dealer.
Note: whenATIS mode is enabled, the following occurs:
DSC, DUAL watch, Tri Watch, Scan and PScan functions are disabled.

8
DSC Operation
You can click the DSC Operation submenu to enter DSC setting.
DSC Operation
MY MMSI ID
>
DSC Function
>
Click MY MMSI ID: if the MMSI ID is set, the MMSI ID will be displayed. If not, you can set the MMSI ID. Click
DSC Function to enable or disable the DSC Function.
You must enter your user MMSI ID before you can access the DSC functions. This is a once-only operation. To
change your MMSI ID please contact your local dealer.
Note: when DSC mode is enabled, theATIS function is disabled.
System Configuration
Click System Config submenu to enter the function interface of the setting System.
System Config
Powersaving Time
>
Key Beep
>
Version Info
>
Factory Reset
>
Language Select
>
Speed Unit
>
Dash simulator
>
2.4G ON/OFF
>
◆Powersaving time: It is how long it takes to enter the power saving mode after no operation. After setting the
power saving, if there is no operation for five seconds, the backlight will be dimmed
◆Key Beep: To set the key beep
◆Version Info :You can check the SW Version number
◆Factory Reset: To enter the system reset
◆Language Select: Select the language you want (English, French and Spanish languages are available)
◆Speed Unit: To set the unit of wind speed of the instrument panel (kts or m/s)
◆Dash simulator: To simulate the dashboard display

9
2.4G ON/OFF
You can set the 2.4G switch by click the 2.4G ON/OFF.
2.4G ON/OFF
⚫ON
Off
2. DSC
You can enter the DSC operation interface (mode) when you click DSC icon, and you can swipe the screen up
and down or click the scroll bar to display other menus.
DSC Menu
Individual Call
>
Position Request
>
All Ship Call
>
Group call
>
Test Call
>
Receive Call Log
>
Send Call Log
>
Phone Book
>
DSC Setup
>
My MMSI ID
>
Exit
Enter
◆Individual Call
Click and enter the Individual Call interface, then click the InputAddress to enter the MMSI which need to be sent
to the target.After completion, click Enter to enter the next page, and then click Enter to enter the next page. Click
Call launch, click Call to transmit. You can select the MMSI to send the target From Phonebook if you have saved
Phonebook.
◆Position Request
Click and enter the Position Call interface, click the InputAddress to enter the MMSI which need to be sent to the
target. After completion, click Enter to enter the next page, and then click Enter to enter the next page. You can
select the MMSI to send the target From Phonebook if you have saved Phonebook.

10
◆All Ship Call
Click into the interface ofAll ShipCall and select Safety or Urgency, then click Enter to enter the next page and
select the channel which need to be sent, then go to the next page and click Call to transmit.
◆Group Call
Click to enter the Group Call interface, click the InputAddress to enter the Group ID of the targetwhich need to be
sent, click Enter to enter the next page after completion, then click Enter to enter the next page, and click Call to
transmit. You can select the Group ID of the target which need to be sent from Phonebook If you have your
Phonebook saved.
◆Test Call
Click and enter the TestCall interface: click the InputAddress to enter the MMSI of the target which need to be
sent, click Enter to enter the next page after completion, then click Enter to enter the next page, and click Call to
transmit. You can select the MMSI to send the target From Phonebook If you have your Phonebook saved.
◆Receive Call Log
To check the CALL that you received.
◆Send Call Log
To check the CALL that you transmit.
◆Phone Book
Click in and edit Phone Book, there are Buddy List and Group List, you can edit or modify the number that you
want to save.
◆DSC Setup
Click in and set whether Position Reply and Test Ack will Reply automatically or manually after receiving the
CALL.
◆MY MMSI ID
Click MY MMSI ID: the MMSI ID will be displayed if the MMSI ID was set; If not, then you can set the MMSI ID.
And you can click DSC Function to enable or disable the DSC Function.
3. MOB
Click MOB Icon to enter the function interface of transmitting MOB, and then long press DITRESS for 3 seconds
to transmit MOB.
4. H/M/L
The radio will convert the current channel to transmit High (H), Mid (M) or Low (L) output power when you click
this Icon.
5. SCAN

11
To click SCAN icon to start scanning all channels, and click "STOP" on the scan screen to STOP scanning.At the
channel display, you can swipe up to change the scan direction to increase, and swipe down to change the scan
direction to decrease.
Note: this function does not work inATIS mode.
6. LOCK
Click LOCK icon on the touch screen to lock display: long press the switch knob to unlock.
7. GPS
You can enter the GPS display mode when you click GPS Icon.
8. DIM
To adjust screen brightness.
9. CHAN
Click and enter the interface of selecting working channel. 'x' indicates the same frequency of transmitting and
receiving, while no 'x' , it indicates the different frequency of transmitting and receiving. You can swipe the screen
left and right or click the triangle in the upper right corner to turn the page and then to find the working channel
that you want to set, then click the channel to complete the setting.
10. CH16
Click and enter the priority channel (channel 16), and click it again to exit priority channel.
11. CH09
Click and enter the second priority channel (the default channel is channel 09), and click it again to exit the
second priority channel.
12. NIGHT
Conversion of Day and night display mode.
13. PSCAN
Click PSCAN Icon to enter priority scan, and click "STOP" on the scan screen to STOP scanning. At the channel
display, swipe up to change the scan direction to increase, and swipe down to change the scan direction to
decrease.
Note: this function does not work inATIS mode.
14. DUAL
12
When you click and enter the DUAL mode, the current channel and priority channel will be scanned circularly.
Click "STOP" on the scan screen to STOP scanning.
Note: this function does not work inATIS mode.
15. TRIW
When you click and enter TRIW mode. the current channel, priority channel and second priority channel will be
scanned circularly. Click "STOP" on the scan screen to STOP scanning.
Note: this function does not work inATIS mode.
16. MEM
To click it enter the storage mode If you have already saved the channel, click again to exit the reservoir mode. If
the channel is not saved, an error tone will appear when clicking.
17. SAVE
Click it to save the current channel, click again to cancel the save of current channel.
18. P2nd
Click this icon to enter the interface of selecting the second priority channel, to find the channel you want to select,
and click it to complete the setting.
19. BAND
Chick BAND Icon to enter the BAND interface.
20. LANG
You can click LANG Icon to enter the language selection interface.
21. DASH
Click DASH Icon to enter the instrument panel display interface.
The instrument is at the top of the instrument panel interface, below is the selection of instrument panel.
When the instrument panel signal is received, the interface will display the instrument data.
13
TX Time Out
The transmission will be automatically turn off after PTT key pressed over 5 consecutive minutes. The TX mode
will be terminate and the radio back to Rx mode. To indicate the PTT key as the stuck condition. Once the PTT
key is released, the TX time out timer will be reset. PTT key will work back normally.
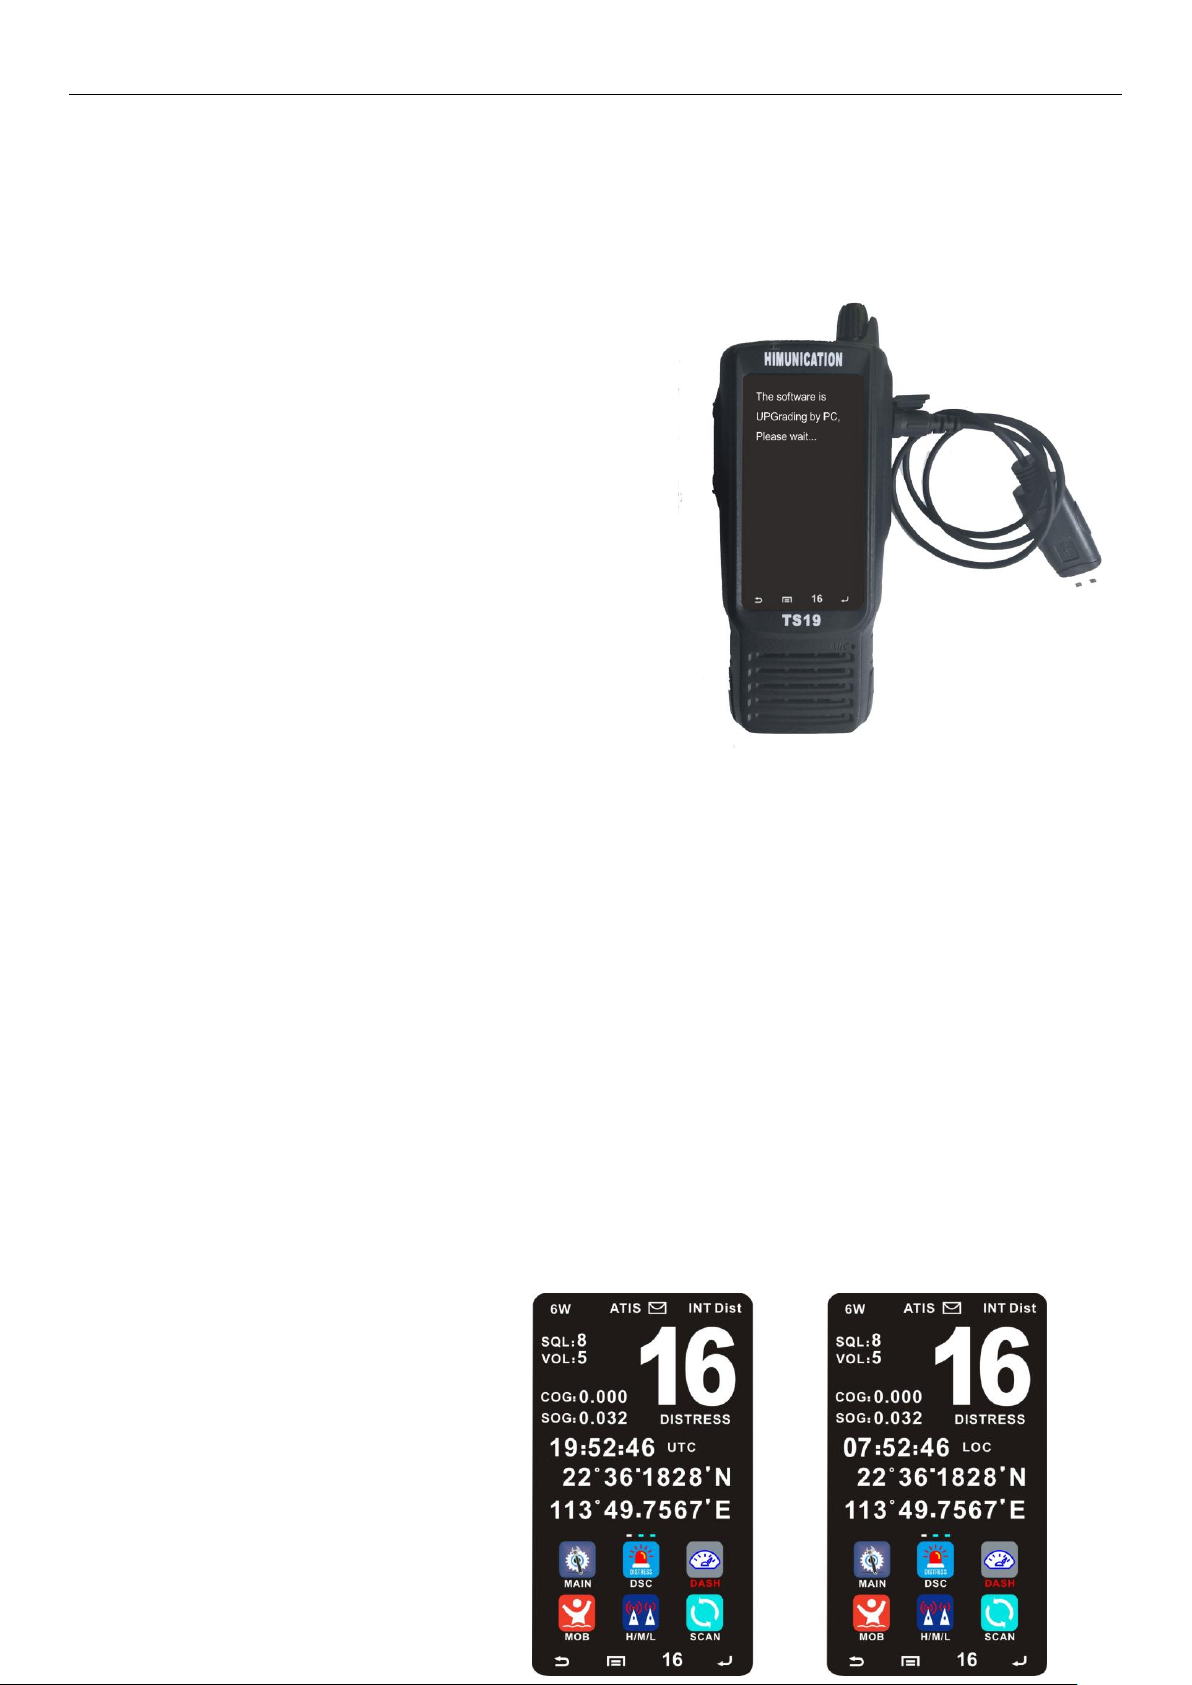
How to update the software of TS19
◆In the off state, press and hold the distress button,
meanwhile press the knob to turn on the radio. Then
connect the radio to the computer via the programming
cable and you will see the radio show as follow
◆Put the file to be upgraded in the same directory as the
TS19.exe.Note: there can only be one file to be
upgraded. Delete all files that are not upgraded.
◆Open TS19.exe. If the COMM port is displayed, then click
the UPDATE to update the software. Finally, wait for the
update to be finished.
Figure 3 - TS19 software update
The local time and date on screen
When the TS19 is unable to receive the GPS signal to display the current position, the screen will automatically
display the UTC local time and date. The user can press the menu to switch the local time according to the UTC
time. Click MAIN ICON, then GPS Setup, then enter GPS Setting, then enter Time Offset, you can set the LOCAL
and UTC time difference, then press Enter to confirm.

14
UTC TIME LOCAL TIME
Generally, it all likes when you operate your
locate time at your computer or laptop
Time offset
UTC - 00:00
Exit ▲▼ Enter

15
Appendix A –Near Lightning Strike Test
This appendix describes the general procedure for evaluating the immunity to near lightning strikes (NLS) of the
TS19 VHF Radio. The test simulates a slow, high-energy pulse produced by an NLS event.
Related External Documents
•BS EN 61000-4-5 : 2006
•EMC Directive 2004/108/EC
List of Abbreviations
Safety
The high voltage interference pulse can contain a very large quantity of energy and every precaution shall be
taken to avoid contact with EUT during a test. It is highly recommended that at least one other person is present
(or very close by) during the test.
Test Configuration
EUT Setup
The EUT shall be setup in a typical system configuration on an isolated wooden bench with NO GROUNDPLANE.
The power to the EUT and auxiliary equipment shall be from 12V or 24V sealed lead-acid batteries via a suitable
fuse. The length of the EUT power cable shall be no more than 2m. Any screens within the system shall be
terminated at the battery –ve connection.
EUT Operating Configuration
All operating configurations should be tested with appropriate performance criteria defined for each test.
AE
Auxiliary Equipment
CE
Conducted Emissions
EMC
Electromagnetic Compatibility
EN
European Norm
EUT
Equipment Under Test
FTB
Fast Transient Burst
MED
Marine Equipment Directive
QP
Quasi Peak

16
Performance Criteria
From BS EN 61000-4-5 : 2006
Performance criteria C: Temporary loss of function or degradation of performance, the correction of which
requires operator intervention.

17
Appendix B –Channel List
International Marine VHF Channels & Frequencies
CH
TX Freq
RX Freq
Mode
FreqUse
1
156.050
160.650
Public Correspondence, Port Operations and Ship Movement
2
156.100
160.700
Public Correspondence, Port Operations and Ship Movement
3
156.150
160.750
Public Correspondence, Port Operations and Ship Movement
4
156.200
160.800
Public Correspondence, Port Operations and Ship Movement
5
156.250
160.850
Public Correspondence, Port Operations and Ship Movement
6
156.300
156.300
Simplex
Inter-ship [1]
7
156.350
160.950
Public Correspondence, Port Operations and Ship Movement
8
156.400
156.400
Simplex
Inter-ship
9
156.450
156.450
Simplex
Inter-ship, Port Operations and Ship Movement
10
156.500
156.500
Simplex
Inter-ship, Port Operations and Ship Movement [2]
11
156.550
156.550
Simplex
Port Operations and Ship Movement
12
156.600
156.600
Simplex
Port Operations and Ship Movement
13
156.650
156.650
Simplex
Inter-ship Safety, Port Operations and Ship Movement [3]
14
156.700
156.700
Simplex
Port Operations and Ship Movement
15
156.750
156.750
Simplex
Inter-ship and On-board Communications at 1W only [4]
16
156.800
156.800
Simplex
Distress, Safety and Calling
17
156.850
156.850
Simplex
Inter-ship and On-board Communications at 1W only [4]
18
156.900
161.500
Public Correspondence, Port Operations and Ship Movement
19
156.950
161.550
Public Correspondence, Port Operations and Ship Movement
1019
156.950
156.950
Public Correspondence, Port Operations and Ship Movement
2019
161.550
161.550
Public Correspondence, Port Operations and Ship Movement
20
157.000
161.600
Public Correspondence, Port Operations and Ship Movement
1020
157.000
157.000
Public Correspondence, Port Operations and Ship Movement

18
2020
161.600
161.600
Public Correspondence, Port Operations and Ship Movement
21
157.050
161.650
Public Correspondence, Port Operations and Ship Movement
22
157.100
161.700
Public Correspondence, Port Operations and Ship Movement
23
157.150
161.750
Public Correspondence, Port Operations and Ship Movement
24
157.200
161.800
Public Correspondence, Port Operations and Ship Movement
25
157.250
161.850
Public Correspondence, Port Operations and Ship Movement
26
157.300
161.900
Public Correspondence, Port Operations and Ship Movement
27
157.350
161.950
Public Correspondence, Port Operations and Ship Movement
28
157.400
162.000
Public Correspondence, Port Operations and Ship Movement
60
156.025
160.625
Public Correspondence, Port Operations and Ship Movement
61
156.075
160.675
Public Correspondence, Port Operations and Ship Movement
62
156.125
160.725
Public Correspondence, Port Operations and Ship Movement
63
156.175
160.775
Public Correspondence, Port Operations and Ship Movement
64
156.225
160.825
Public Correspondence, Port Operations and Ship Movement
65
156.275
160.875
Public Correspondence, Port Operations and Ship Movement
66
156.325
160.925
Public Correspondence, Port Operations and Ship Movement
67
156.375
156.375
Simplex
Inter-ship, Port Operations and Ship Movement [2]
68
156.425
156.425
Simplex
Port Operations and Ship Movement
69
156.475
156.475
Simplex
Inter-ship, Port Operations and Ship Movement
71
156.575
156.575
Simplex
Port Operations and Ship Movement
72
156.625
156.625
Simplex
Inter-ship
73
156.675
156.675
Simplex
Inter-ship [2]
74
156.725
156.725
Simplex
Port operations and Ship movement
75
156.775
156.775
Simplex
See Note [5]
76
156.825
156.825
Simplex
See Note [5]
77
156.875
156.875
Simplex
Inter-ship
78
156.925
161.525
Public correspondence, Port Operations and Ship Movement
1078
156.925
156.925
Public correspondence, Port Operations and Ship Movement
Table of contents
Other Himunication Radio manuals


