JMB GSDAB2001 User manual


CONTENT
Safety and warning ........................................................................................................1-2
C ....................................................................................................2
G ...............................................................................................................3-4
O ....................................................................................................4-6
Guarantee ......................................................................................................................7
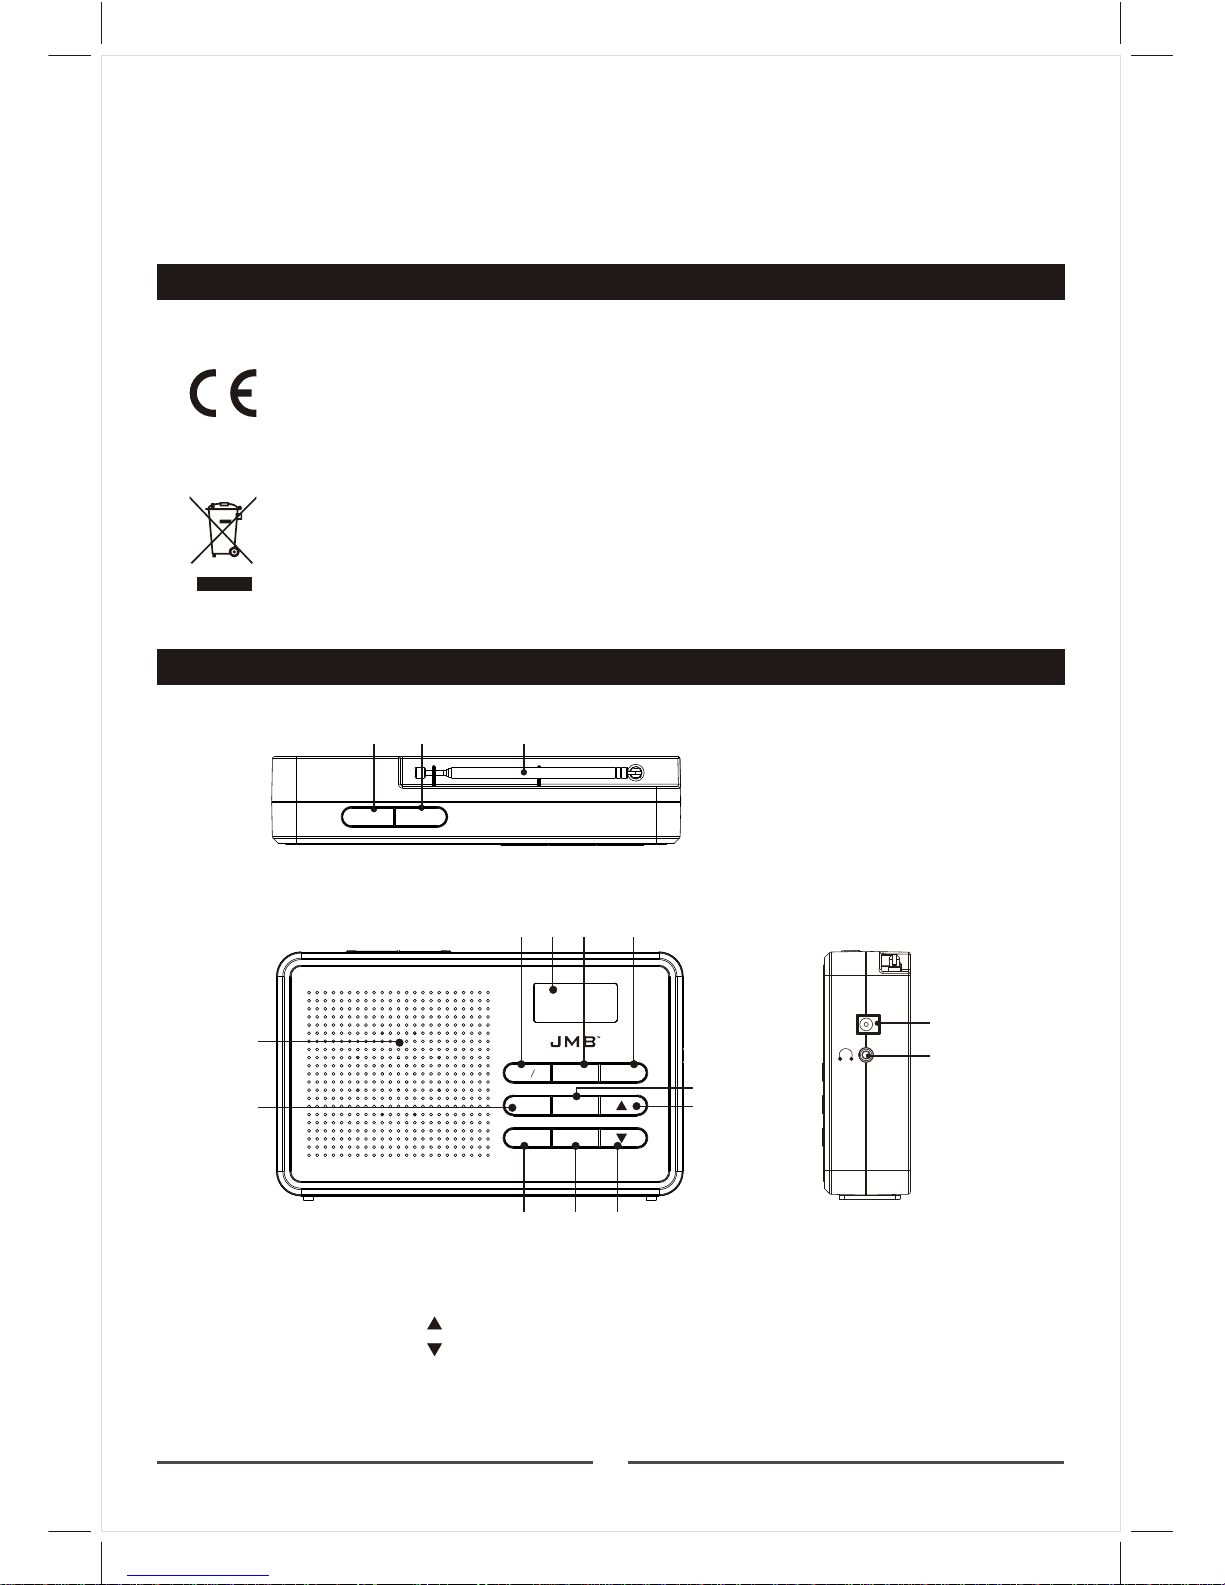
ontrols and indications
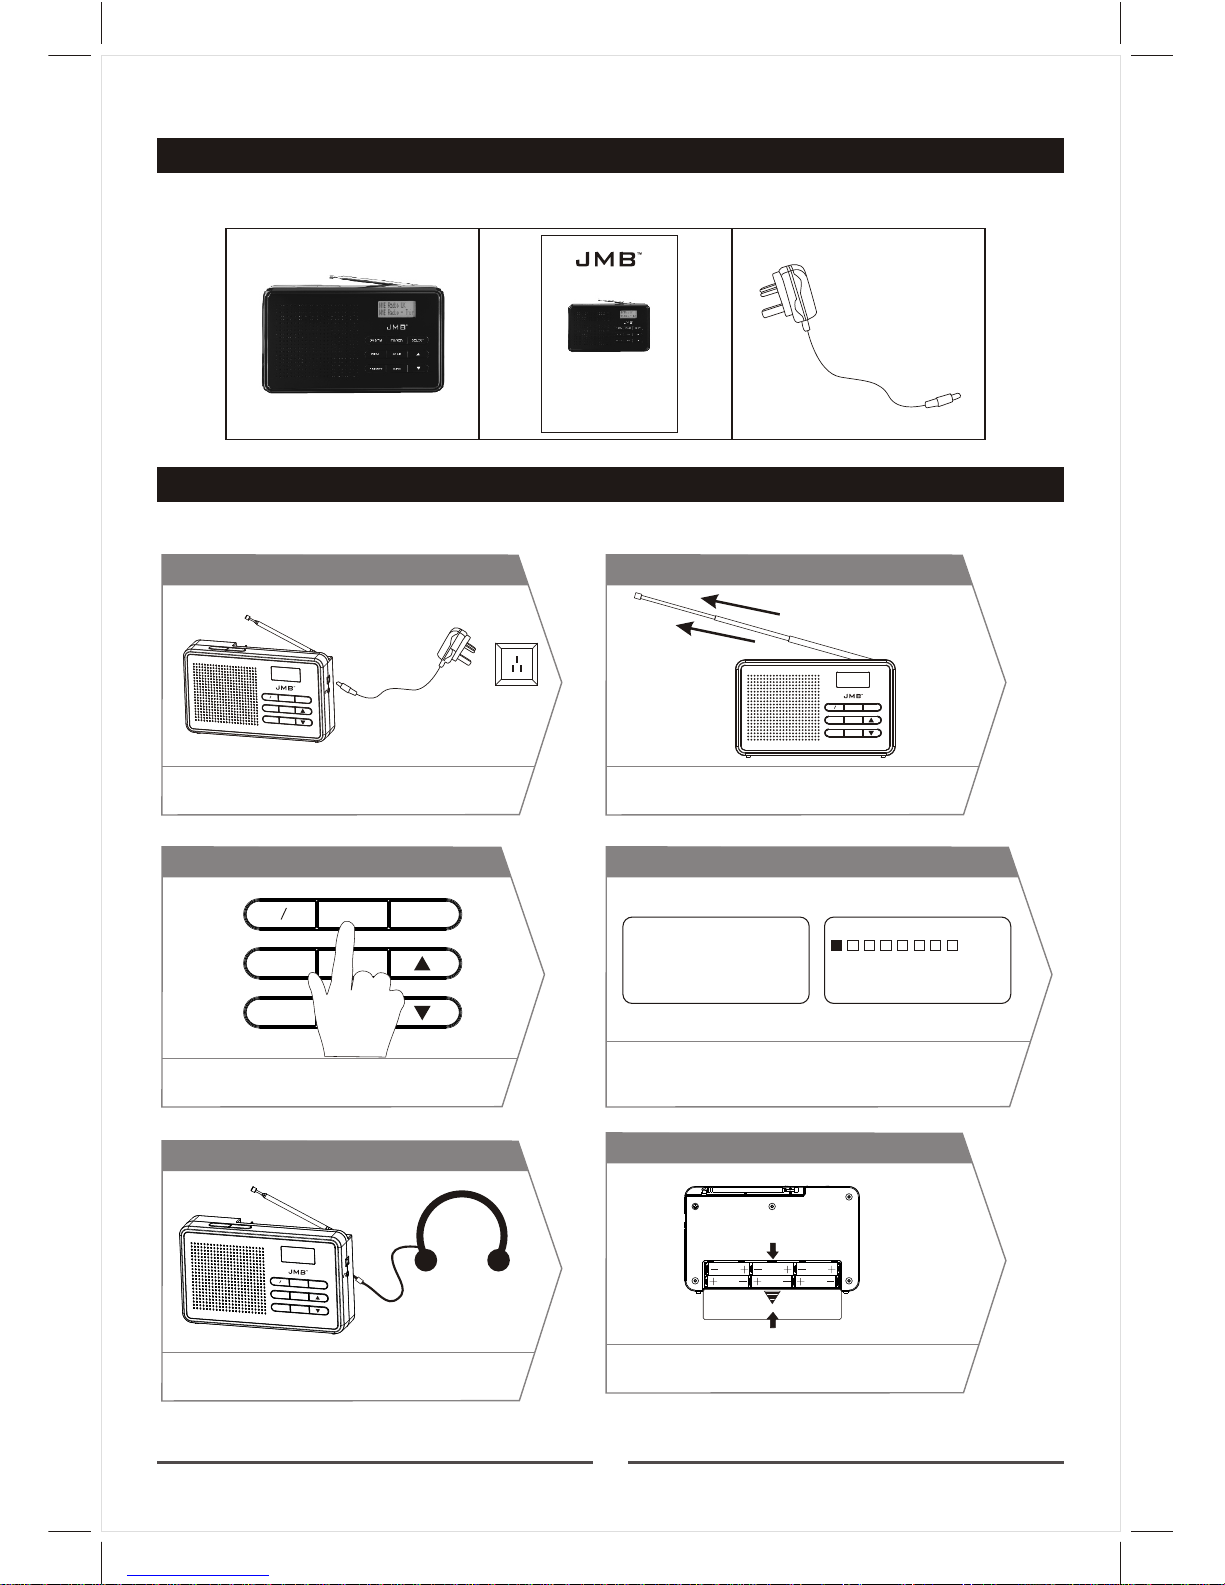
etting started
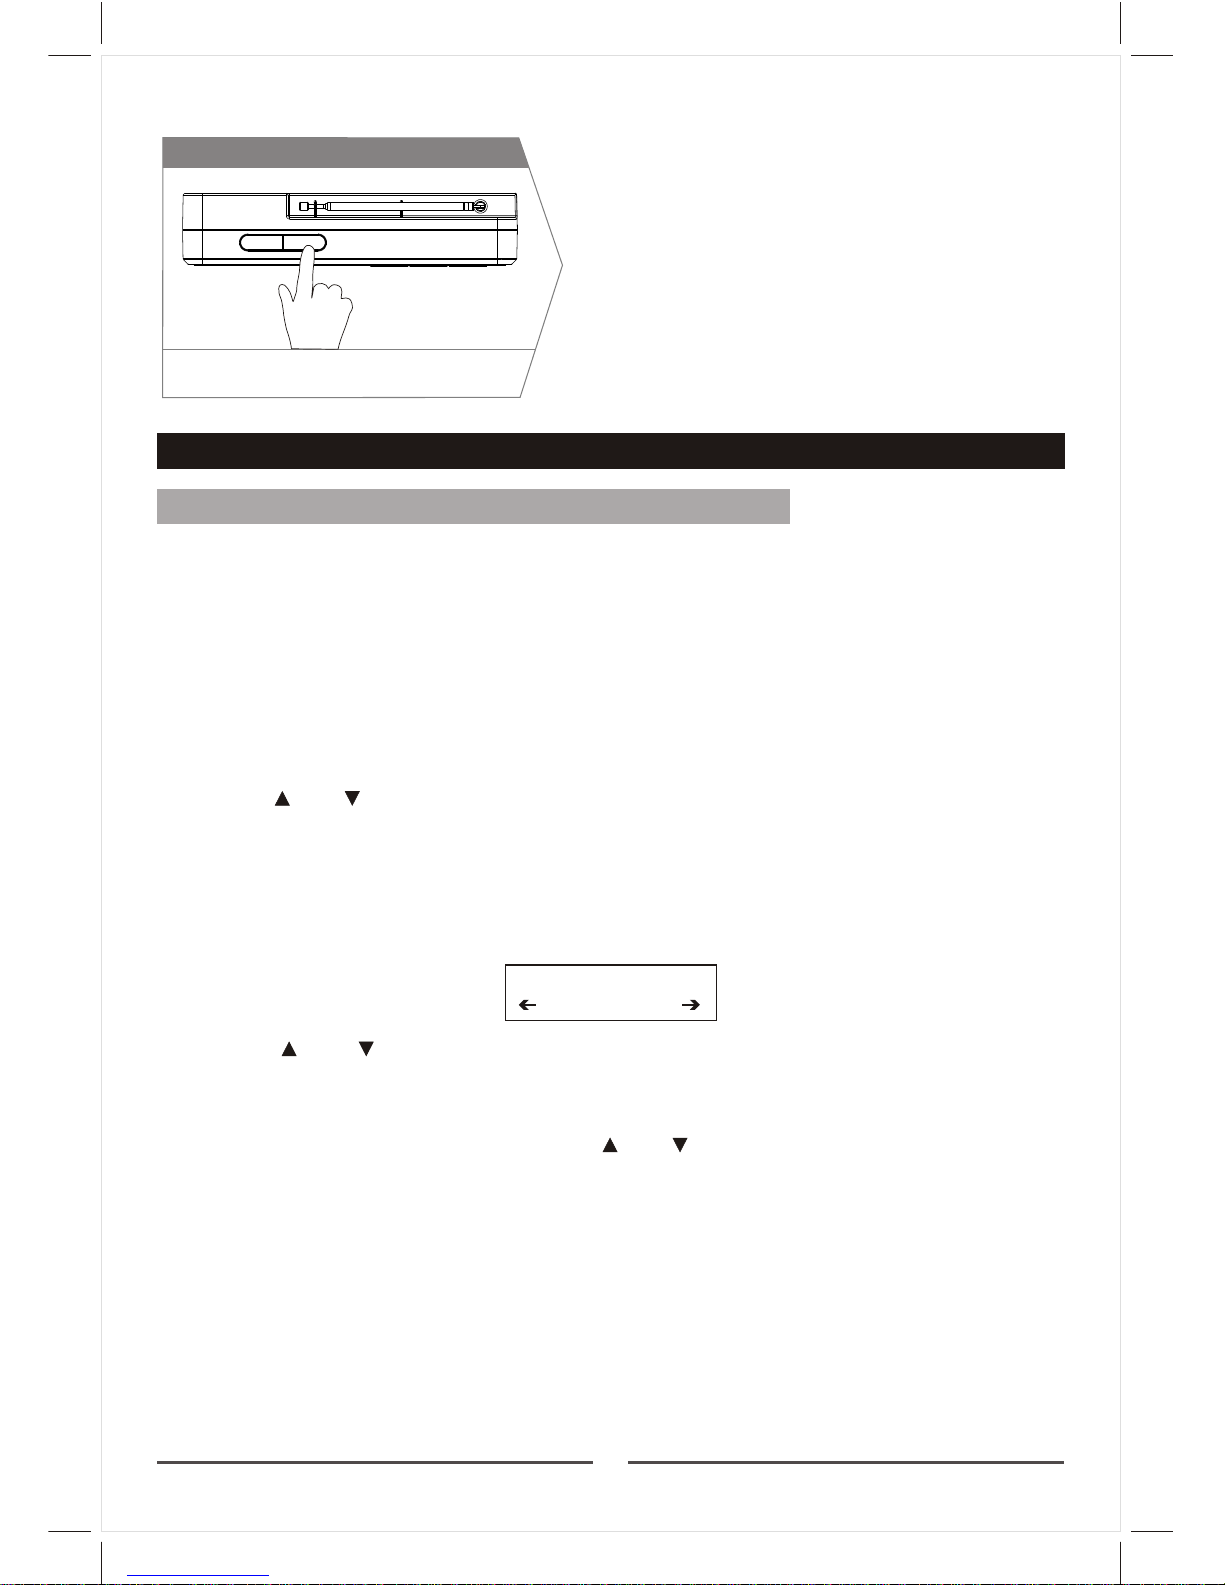
perating instructions
SAFETY AND WARNING
SAFETY AND WARNING
CAUTION
RISK OF ELECTRICAL SHOCK
DO NOT OPEN
CAUTION: TO REDUCE THE RISK OFELECTRIC SHOCK,
DO NOT REMOVE COVER (OR BACK).
NO USER-SERVICABLE PARTSINSIDE.
REFER SERVICING TO QUALIFIED PERSONNEL.
The lightning flash with arrowhead symbol, within an equilateral triangle,
alerts the user to the presence of un-insulated dangerous voltage within
the system enclosure that may be of sufficient magnitude to constitute a
risk of electric shock.
The exclamation point with in an equilateral triangle alerts the user to the
presence of important operating and maintenance instructions in this
owner's guide.
Do not allow children to play with electrical devices when not under supervision.
Children may not be aware of the presence of potential risks!
Install the cables in a safety way! Avoid tripping over them!
Do not expose the device to direct sunlight or place it near sources of heat!
Protect the cables and devices from dust, dirt and abrasive liquids!
The equipment and cables must not be splashed by water. Do not place any containers of liquid
such as vases or beverages, onto or next to the device.
No fire sources (such as candles) should be placed onto or next to the device!
The wall outlet must be within easy reach and next to the place of use. Only use the supplied
power adapter. Do not place heavy objects on the cable or power supply. Position the cable so
that it cannot obstruct or catch anyone. Always make sure there is sufficient ventilation of the
power adapter.
Before stormy weather when there is the danger of lightning, disconnect the device from the
power supply.
Never open the casing of the device, of the power adapter or other accessories: there are no
serviceable parts! If the casing is opened, your life is in danger due to electric shock. Do not
use the device if the casing is damaged. If this happens, it must first be examined by a technical
expert. If you notice any smoke, unusual noise or strange smells, switch off the device immediately
and pull the plug from the power supply. Contact customer service. It is very dangerous to continue
using this device under these conditions. Disconnect the power supply immediately if liquid gets
into the device and seek the help of customer service or a technical expert.
1
For Customer Services & Spare Parts please call 01204 664 084, Opening times: Monday - Friday 9am until 5pm

2
Warning: Do not expose batteries to heat or fire. Do not short-circuit the batteries, disassemble
them or try to recharge them. They may e xplode and cause serious injury. Store
batteries out of children's reach. If batteries are swallowed, there is the danger of
choking or poisoning.
SAFETY AND WARNING
CONFORMITY,DISPOSAL
Conformity
This device has been tested for compliance with the basic and other relevant
requirements of the EMC Directive 2004/108/EC and the low Voltage Directive
2006/95/EC.
CONTROLS AND INDICATIONS
Front View
MENU
PRESET INFO
SCAN
POWER SELECT
DAB FM
1 2 34
5
6
7
8
9
10
11
14 15 16
Vol +
Vol -
Top View
Side View
12
13
DC IN 9V
1 DAB/ FM
2 LCD Display
3 POWER
4 SELECT
5 SCAN
6 BUTTON
7 BUTTON
8 INFO
9 PRESET
10 MENU
11 Speaker
12 DC power input
13 Headphone output
14 Vol -
15 Vol +
16 Antenna
This symbol on the product or in the instructions means that your electrical and
electronic equipment should be disposed at the end of its life separately from your
household waste.There are separate collection systems for recycling in the EU.
For more information,please contact the local authority or your retailer where you
purchased the product.
For Customer Services & Spare Parts please call 01204 664 084, Opening times: Monday - Friday 9am until 5pm

£-
£«
£-
£«
£-
£«
£-
£«
£-
£«
£-
£«
OPEN
CLOSE
6.Install the Batteries
Using earphone(Earphone not included)
5.Plug-in the earphone
POWER SELECT
SCAN
MENU
PRESET INFO
DAB FM
VOL-VOL+
DCIN 9V
The unit will enter into DAB mode, scans the stations, set the
time, and starts playing the first station it found. If there is no
time signal, please follow the instructions in Time Setting.
Autotune
Full Scan
4.Set up the Radio in DAB Mode
Scanning...
2
3.Power On the Radio
MENU
PRESET INFO
SCAN
POWER SELECT
DAB FM
1.Press the Power button to turn on the radio.
2.Press again to enter the Standby mode of the radio.
Extend the telescopic aerial as far as it can go.
2.Extend the Telescopic Aerial
MENUMENU
PRESETPRESET INFOINFO
SCANSCAN
POWERPOWER SELECTSELECT
DABDAB FMFM
3
QUICK START
Box Content
GETTING STARTED
Switching on your radio for the first time
Connect the DC Adapter (supplied in the package) to
the unit
1.Connect the Power Source
POWERPOWER SELECTSELECT
SCANSCAN
MENUMENU
PRESETPRESET INFOINFO
DABDAB FMFM
VOL-
VOL-VOL+VOL+
DCIN 9VDC IN 9V
Fitting 6 X AA batteries withcorrect polarity. Refit the
battery cover(Batteries not included).
DIGITAL RADIO
Instruction Manual
Model Number: GSDAB2001
Please read these instructions carefully and keep for future reference
For Customer Services & Spare Parts please call 01204 664 084
Opening times: Monday Friday 9am until 5pm
For Customer Services & Spare Parts please call 01204 664 084, Opening times: Monday - Friday 9am until 5pm

4
Press the Vol button to adjust the volume.
7.Adjust the Volume
Vol +
Vol -
OPERATING INSTRUCTIONS
DAB OPERATION
Listening to the DAB Radio
2. During the first time use, the DAB radio station list is empty, the radio will perform a Quick
Scan to see what stations are available.
3. When the scan is complete, the DAB Radio will then select the first available station.
Stations are listed in numerical then alphabetic order. The station list is retained in memory
so the next time you switch the radio, the station search does not take place. If there are no
stations found, check that you have adequate DAB coverage in your area.
4. Press SCAN again if you want to check more available stations. Full Scan will be performed.
5. Press and button to select the stations in the station list. The station will be tuned
accordingly.
Storing Preset Station
You can preset up to 10 preset DAB stations for easy access follows:
2. Using and button to choose the preset number 1-10 you wish to use.Then press
the SELECT button once to store the station.
Recalling a Preset Station
1. Press the PRESET button briefly, and use and to select your desired station.
2. Press SELECT button to recall the station.
Display modes
Press the INFO button to view various information about the current station on the second
line of display. Every press of the INFO button changes the information displayed.
This can be better explained in a diagram showing the order of sequence.
NOTE: once you reach the last info setting the next press will return you to the first setting.
EMPTY P1
Service X
< >
1. Tune the station you wish to preset, press and hold PRESET button until the display shows as
below with P1 flashing
1. Press DAB/ FM button to switch DAB and FM mode.
For Customer Services & Spare Parts please call 01204 664 084, Opening times: Monday - Friday 9am until 5pm

5
DLS
Channel Frequency
Programme Type
Transfer Rate
Ensemble Name
Signal Strength
Time and Date
1. DLS (Dynamic Label Segment) - This is the scrolling message that the
broadcaster may include with their transmissions. This message
usually includes information, such as program detail etc.
2. Program Type - This is the type and description of the program
provided by the DAB station
3. Channel Frequency - This displays the channel.
4. Transfer Rate - This shows the signal bit-rate and the signal mode.
5. Ensemble Name - This will show the multiplex that is broadcasting the
program you are listening to.
6. Signal Strength - It shows the signal transmission level by levels.
More level bar displayed means better reception. If you experience
low signal strength, adjust the position of the antenna.
7. Time and Date- This shows the current time and date provided by the
broadcaster.
FM OPERATION
Switching from DAB to FM. Press the DAB/FM button once to switch. The display will show FM Mode.
Automatic Tuning
1. Press SCAN button to search the next available tuning.
2. If the reception is poor, try to use Manual Tuning (see below) to fine tune the station.
Manual Tuning
1. Press and to manual tune through the frequency band.
2. The frequency increases or decreases by 0.05MHz for each step you press.
Storing Preset Station
You can preset up to 10 preset FM stations for easy access follows:
1. Tune the station you wish to preset, press and hold PRESET button until the display shows:
88.00MHz
EMPTY P1
2. P "1" flashes. Using and button to choose the preset number 1-10 you wish to use.
Then press the SELECT button once to store the station.
Display modes
Press the INFO button to view various information about the current station on the second
line of display. Every press of the INFO button changes the information displayed.
This can be better explained in a diagram showing the order of sequence.
NOTE: once you reach the last info setting the next press will return you to the first setting.
Program Type
Signal Strength
Time and Date
Frequency
Audio Mode
Radio Text
1. Program Type - This is the type and description of the program
provided by the FM station.
2. Signal Strength - It shows the signal transmission level by levels.
More level bar displayed means better reception. If you experience
low signal strength, adjust the position of the antenna.
3. Time and Date - Displays the current time.
4. Frequency - Frequency of the station.
5. Audio Mode - This shows the current station is broadcast in stereo
or mono.
6. Radio Text - Displays scrolling text broadcast by the station. (Only
if broadcast ).
For Customer Services & Spare Parts please call 01204 664 084, Opening times: Monday - Friday 9am until 5pm

6
1. Press MENU button to check the model no. of the DAB radio.
2. To perform System Reset of DAB Radio, press and hold DAB/FM button. Press SELECT button
to confirm. Auto Full Scan will be performed.
3. Time and Date will be automatically set when tuned either DAB or FM radio.
OTHER OPERATION
SPECIFICATION
Power consumption 6W
Supply Voltage, Battery 9 V (AA/UM3 x 6)
DAB BAND III 174 -240 MHz
FM 87.5-108 MHz
Sensitivity -95dBm typical
Headphone Output 3.5mm stereo jack
For Customer Services & Spare Parts please call 01204 664 084, Opening times: Monday - Friday 9am until 5pm


Other JMB Radio manuals