Hinton Equipment Flametech Lite User manual

Flametech Lite
Assembly and operating
instructions

Do not attempt to use this equipment unless you are trained in its proper use or are under competent
supervision. For your safety follow the operating procedures described below every time you use the
equipment. Deviating from these procedures may result in fire, explosion, property damage and
operator injury. If at any time the equipment you are using does not perform in its usual manner or if
you have any difficulty in the use of the equipment STOP using it immediately. DO NOT use the
equipment until the problem has been corrected
Always use torch in well ventilated area to avoid possible health hazards from fumes and smoke.
Torches consume oxygen while in use and therefore if working in a confined space oxygen may be
depleted.
Brazing may produce fumes and gases which may be hazardous to your health. Avoid breathing these
fumes and gases. Read and follow the safeguards of the Material Safety Data Sheets (MSDS) for all
brazing materials. Keep combustible material away the heat source. Keep a suitable fire extinguisher
of the proper size in the work area. Eye protection should always be worn when brazing or soldering.
DO NOT store the cylinders in a room used for habitation, in a closed or confined space, near open
flames or in direct sunlight. DO NOT leave a lit torch unattended.
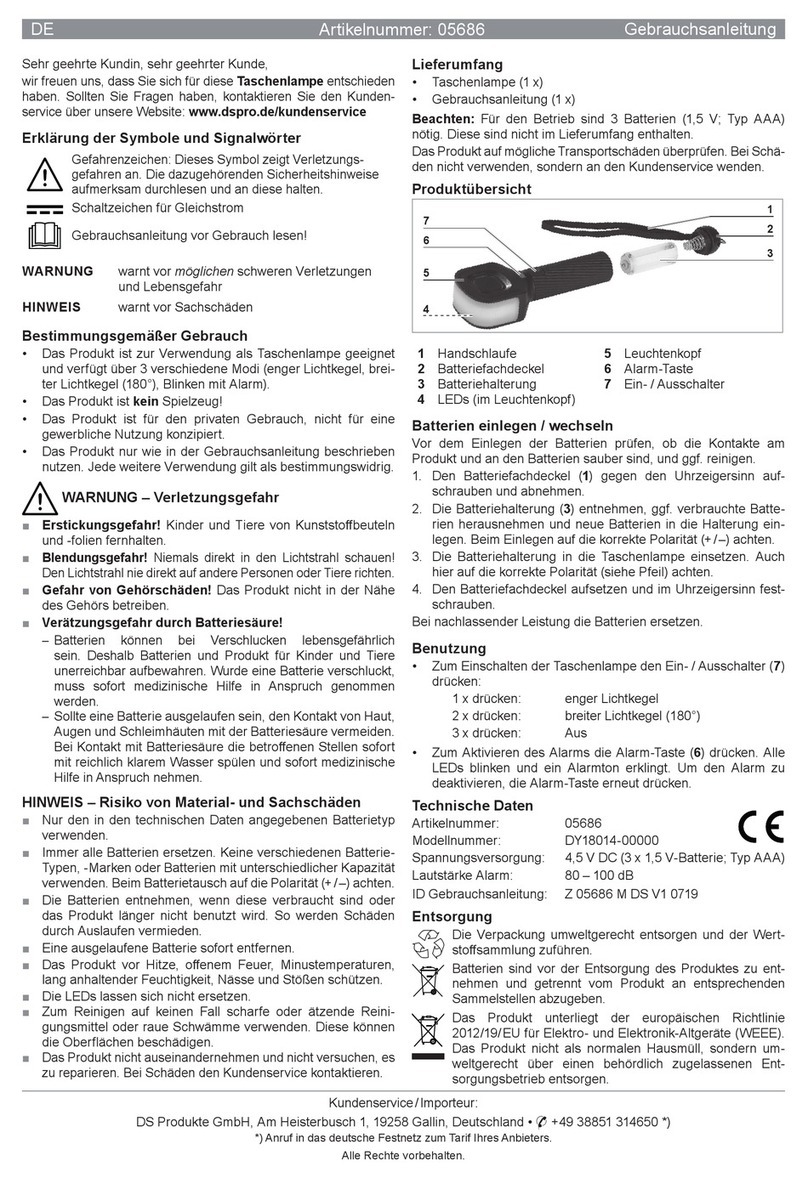
1 x Lightweight Carry Stand
1 x Map Gas Regulator with built in flashback Arrestor
1 x Oxygen Regulator
1 x Oxygen flashback arrestor
1 x 2 Litre Oxygen Cylinder & 1 x Map gas cylinder
3 x Metre Oxygen/Fuel Gas Hose with fitted
non return valves
Contents List
Page 2
Brazing Equipment
Warning
2 x Lightweight Brazing Nozzles
1 x Pepper Pot Nozzle
Triple Spark Lighter

Attaching Regulators
1. Regulators must be used only with the gas or gases and pressure for which they are designed.
2. Check the regulator for any damage. Threads must be in good condition and the seating
connection must be free of contamination.
3. Fit the Oxygen regulator to the cylinder valve ensuring that the front of the regulator is facing
forwards.
4. Using the correct spanner, tighten the regulator nut. Do not use excessive force. NOTE: Fuel gases
have a left-hand thread (tighten anti-clockwise), while oxygen is right-hand thread.
5. Fit the Oxygen flashback arrestor to the oxygen regulator outlet.
6. Screw the Mapp gas regulator on to the cylinder. Do not overtighten.
REGULATOR MAINTENANCE · Always keep the regulators clean and in a safe working condition. ·
Should gauges become faulty or damaged the product needs replacing immediately as the gauges
contain pressurized components, which, if damaged, can be potentially dangerous. Regularly check
the regulators visually for any signs of damage.
Flashback Arrestors
A flashback is a momentary or sustained retrogression of the flame in the torch upstream of the
mixing point at a very high speed. This is a potentially dangerous situation, particularly if the flame
reaches the gas supply hoses. The hose can explode, or in the worst case, the flame can continue
into the regulator and into the cylinder.
A flashback is always a consequence of a backfire in combination with a gas mixture in parts of
equipment upstream from the mixing point. The gas mixture in the hose results from reverse flow,
when gas at higher-pressure flows into a hose with a lower pressure.
This reverse flow is usually the result of:
• Improper shutdown and/or start up procedures;
• Allowing cylinder pressures to become too low; or
• A check valve that is not working properly.
Page 3
Flametech Lite Assembly & Safety Instructions

Where flashback arrestors shall be mounted?
Flashback arrestors can be either:
• Torch-mounted;
• Hose-mounted; or
• Regulator-mounted.
HOSES
Brazing hoses are colour coded blue for oxygen and red for fuel gas. All flametech Lite equipment
have flashback arrestors and non return valves fitted. The Map gas has a built in F/B arrestor and the
oxygen F/B arrestor is fitted at the regulator end. The hoses at the torch end have non return valves
fitted for additional safety.
ATTACHING THE HOSES
1. Attach the blue hose (Oxygen) to the oxygen Flashback arrestor at the regulator. 1/4 BSP nut (right
hand thread) and tighten securely using a suitable spanner. Fit the other end ¼ BSP nut (right hand
thread) to the torch body and secure. Do not overtighten
2. Attach the red fuel gas hose to the Map gas regulator and the other end to the torch body (left hand
thread) and tighten securely.
LIGHTWEIGHT BRAZING TORCH
1. Screw the brazing mixer on to the torch body. Do not overtighten.
2. Select the appropriate nozzle for the diameter of tube to be brazed.
3. Check the nozzle and the torch or mixer seat for damage.
4. Insert the welding nozzle into the mixer. Position the welding nozzle and hand tighten it into the
mixer
GENERAL
Before lighting, a newly assembled oxy-fuel system should be tested to ensure there are no leaks
present.
Page 4
Flametech Lite Assembly & Safety Instructions

LEAK TEST PROCEDURE
1. Ensure that all equipment connections are tightened.
2. Ensure that the pressure-adjusting knobs on both regulators are fully open. (Turn anti-clockwise)
3. Close both the fuel gas and oxygen torch valves.
4. Open the oxygen cylinder valve about half a turn
5. Turn the oxygen regulator pressure-adjusting knob clockwise until a small amount of pressure
registers on the outlet pressure gauge.
6. Close the oxygen cylinder valve.
7. Follow the same procedure for the fuel gas.
8. Using a proprietary leak testing solution or a mixture of 1% Teepol in de-ionised water.
4. After leak testing all testing solution should be cleaned off using a clean, oil and a grease free cloth
PURGING THE SYSTEM
Before lighting the torch, always purge the system to reduce the possibility of a mixed gas condition
in the system. Mixed gases can result in an explosion or flashback in the system. Purging must be
carried out in a well-ventilated area that is free from open flames or other sources of ignition.
1. Ensure that the pressure-adjusting knobs on both regulators are fully open.
2. Close both the fuel gas and oxygen torch valves.
3. Open the oxygen cylinder valve slowly to ensure the regulator is not damaged by the surge of high-
pressure gas.
4. Open the oxygen torch valve one full turn.
5. Turn the oxygen regulator pressure-adjusting knob clockwise until a small amount of pressure
registers on the outlet pressure gauge.
6. Allow the oxygen to pass through the torch for 3 seconds for every 5 meters of hose.
Page 5
Flametech Lite Assembly & Safety Instructions

7. Close the oxygen torch valve.
8. Repeat the same procedure with the fuel gas.
LIGHTING AND SHUT DOWN PROCEDURES
Before lighting the torch always, follow all personal and equipment safety regulations. Wear safety
glasses and filtered protective eyewear to protect the eyes from heat, sparks and hazardous rays of
light produced by the flame. Overalls, safety shoes, leather aprons and gloves may also be required.
LIGHTING PROCEDURE
1. Follow the instructions in this manual pertaining to set up, leak testing and purging practices prior
to lighting the torch.
2. Using the nozzle chart, identify the working oxygen and fuel gas pressure for the nozzle size being
used.
3. Ensure that the pressure-adjusting knobs on both regulators are fully open.
4. Close both the fuel gas and oxygen torch valves.
5. Open the oxygen cylinder valve slowly to ensure the regulator is not damaged by the surge of high-
pressure gas.
6. Open the oxygen torch valve one full turn.
7. Using the oxygen regulator pressure-adjusting knob set the pressure identified from the nozzle
chart.
8. Close the oxygen torch valve.
9. Repeat the procedure on the fuel gas.
10. Open the fuel gas torch valve about one turn, using an approved friction or cup spark lighter to
ignite the fuel gas.
11. Increase the fuel gas flow until the flame is about to leave the end of the nozzle.
12. Slowly open the oxygen torch valve. Continue to open the oxygen valve until the flame of your
choice is achieved.
Page 6
Flametech Lite Assembly & Safety Instructions

EXTINGUISHING THE TORCH FLAME
1. Turn the fuel gas torch valve to the closed position.
2. Turn the oxygen torch valve to the closed position. SHUT DOWN THE SYSTEM FOR A SHORT TIME
Having closed the fuel and oxygen torch valves, the equipment is safe to leave if the operator
remains in the vicinity.
SHUTTING DOWN THE SYSTEM
1. Fully close the oxygen cylinder valve.
2. Open the oxygen torch valve.
3. When the oxygen regulator low pressure gauge indicates “0” close the oxygen torch valve.
4. Fully wind out (anticlockwise) the pressure-adjusting knob on the oxygen regulator
5. Repeat the process for the fuel gas.
NOZZLE GAS PRESSURE CHART
Page 7
Flametech Lite Assembly & Safety Instructions

COMMON BRAZING FAULTS
JOINT FRACTURE
Joint fractures are more commonly found on larger joints and joints manufactured from dissimilar
materials. When metals are heated they expand and when cooling they contract. If the two metals
being brazed are manufactured from different compositions they will have different expansion and
contraction rates. On cooling they will contract at different rates resulting on both metals pulling
against each other which can result in fracture. This can be overcome by ensuring that the joint is
kept out of draughts and allowed to cool slowly.
(wrap joint in asbestos fire blanket or similar material to ensure slow cooling)
HEATING OF JOINT
The flame should be applied to the joint in an even manner by moving the flame around. If one section
of the joint is thicker than the other, more heat should be applied to the thicker section.
BRAZE/SOLDER WILL NOT RUN
If brazing alloy or solder will not run then there are generally two reasons that attribute to this: not
enough heat applied to joint or a fluxing problem. Both of these problems can be overcome quite
easily by increasing the heat input (use larger nozzle if need be) and the flux is suitable for the alloy
being used.
TOO MUCH ALLOY FLOWS AROUND JOINT
It must be appreciated that the alloy will always flow where the most heat is applied to the joint. If too
much heat is applied the alloy will flow all over the joint, similarly if too much flux is applied during
silver brazing the alloy will
always flow towards the flux. Ensure the correct diameter of braze alloy is being used. Too large a
diameter for joint means too much metal being added to joint. (makes for expensive joints)
Page 8
Flametech Lite Assembly & Safety Instructions

Page 9
Flametech Lite Assembly & Safety Instructions
JOINTS CLOSE TO EACH OTHER
When brazing joints that are close to each other you run the risk of when applying heat to the joint
being brazed, the joint adjacent to it re-melts. This can be avoided by using alloys with different
melting temperatures. E.g.: Silweld 40 range 640—7100C and Silweld 55 melting range 630—6600C.
FLAME SETTINGS
Even the most experienced engineer comes across a problem joint from time to time. Whether it be a
fracture in the joint or a braze alloy that does not flow as expected, problems do occur. Most
problems can be overcome by making a few adjustments in brazing technique or set up. There are
basically three types of flame settings that can be set when using an oxygen and acetylene mixture.
Neutral Flame
Equal amounts of oxygen and acetylene burning together in the flame.
Carburising Flame
Excess acetylene. The carburising flame appears to be more softer than the neutral and oxidising
flame. Excess acetylene in the flame assists in removing surface oxides from the copper tube. The
copper will appear bright rather than having dull or blackened surface due to an improper oxidizing
flame.
Oxidising Flame
Excess oxygen. Flame appears to be fierce compared to the other 2 flames. This flame should be
avoided.
First Choice Slightly Carburising Flame
Second Choice Neutral flame Avoid oxidising flame

Page 10
Flametech Lite Assembly & Safety Instructions
Suggested brazing alloys
Below are listed the most common brazing alloys used in the refrigeration and air conditioning
industry. Other alloys are available on request.

Page 11

CWB Wholesale Ltd.
Oak House, Priory Rd, Langstone Business Village, Newport NP18 2LH
Tel: 01291 431373 Email: [email protected] www.cwbwholesale.com
Table of contents


