Hipers DHOE-90 User manual

HIPERS HEATERS
▶Thank you for purchasing the HIPERS Heater.
Please read this user manual carefully before you operate this heater.
▶It is recommended that you put this manual where the user can easily find
it. It is obligatory that the user read "Notice for Safety" carefully before
using, and they should be aware of this notice whenever using this heater.
▶This heater is designed for your country only. If you use it in another coun
try, you have to check the electricity first, and if the electricity condition is
the same, you can use it.
▶A warranty card is enveloped in this manual.
▶The contents (features and specifications) in this manual are subject to
change without notice.

• NOTICE FOR SAFETY
• STRUCTURE & DESCRIPTION
• DAILY CHECK POINTS & ADJUSTMENT
-STRUCTURE & DESCRIPTION
•HOW TO USE
• CLEANING & MAINTENANCE
•WARRANTY CARD
• SPECIFICATION & WIRING DIAGRAM
•TROUBLE SHOOTING
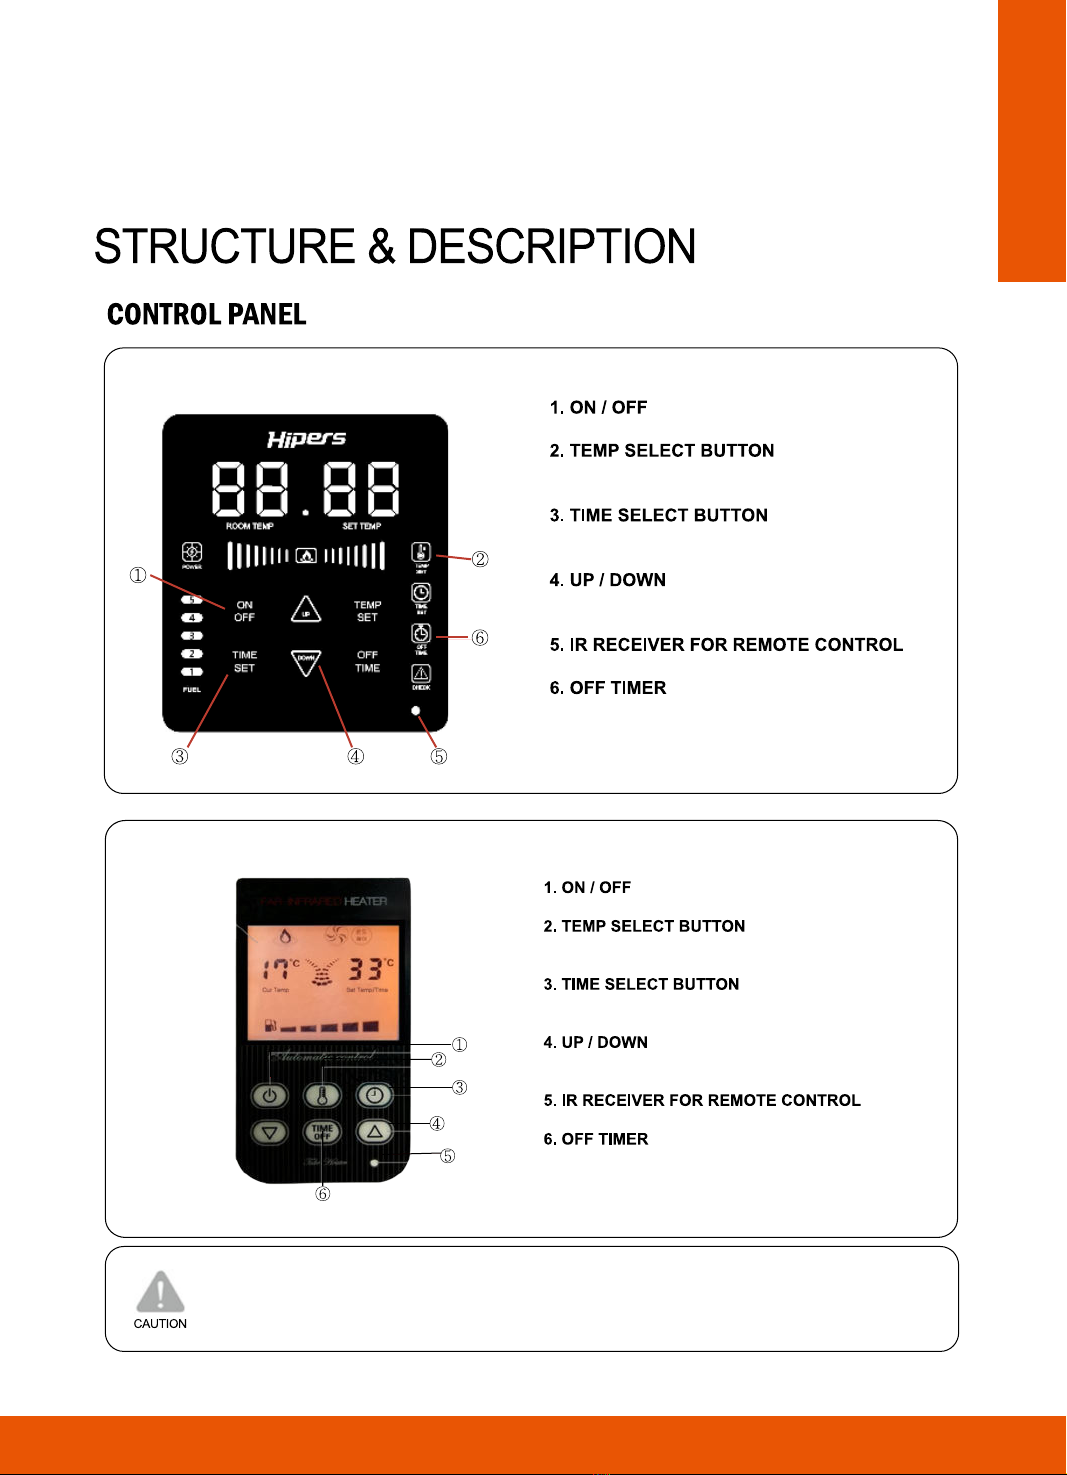
-CONTROL
-REMOTE CONTROLLER
-OPERATION & STOP
-TEMPERATURE CONTROL
-SELF DIAGNOSIS FOR THE SAFETY DEVICE
3
6~7
6
7
8~14
6
-2-
15
16~17
18~19
20
21

Use an AC 220/230V (50 Hz) power supply only.
(Otherwise, it may cause a fire or an electric shock.)
It is dangerous to turn off this heater by
taking out the power plug.
(It may cause a malfunction or electrical shock.)
Do not extend the power cord with connect-
ing another cable in the middle.
(It may cause a fire or an electric shock.)
Do not use a damaged power cord or plug
or a loose outlet.
(It may cause shorts, fire, or a shock.)
Do not take out the plug while holding the
cord or with wet hands.
(It may cause a fire or an electric shock.)
Use the proper fuse.
(Otherwise, it may cause malfunctioning or a fire.)
Do not place or use any inflammable near the
heater, including fuel, gas, thinner, benzene,
spray, solvents, volatile organic compounds,
etc.
(It is exposed to the danger of fire or explosion.)
Do not place any inflammable material near
the heater, including curtains, carpet,
paper, match, clothes, etc.
(It is exposed to the danger of fire or a burn.)
Do not fold the power cord or put heavy
material on it.
(It may be damaged by the covering material, which might
cause a fire or an electric shock.)
Please turn it off using the ON/OFF button.
(Otherwise, it may cause an electric shock or a burn.)
Put a plug into the outlet tightly with Earth (-)
only.
(It may cause an electric shock.)
In the case of cleaning, you must take out the
plug from the outlet and wait until the
furnace is cooled down sufficiently.
(Otherwise, it may cause an electric shock or a burn.)
This is for protecting the user's safety and preventing any property damage. Please
read carefully and follow the instructions in this manual.It is classified as "Warning"
and "Caution" by the contents.
In cases of misuse, it may cause serious wounds or death.
In cases of misuse, it may cause a slight injury or property damage.
Meaning of symbols
Forbidden Obligatory
※ Place this manual noticeably near the heater so that, if necessary, the user can always find it easily.
- 3 -

You must ventilate well while you are using the
heater, and do not use it in a stuffy area where
ventilation is not possible.
(You need to ventilate with fresh air 1~2 times per hour.) (In
cases of incomplete combustion due to a lack of oxygen, carbon
monoxide can be increased to cause an accident from
poisoning.)
It is dangerous to put your hands or anything
else into the grill or furnace or to apply a
considerable shock or force to the heater.
(It is exposed to fire, bum, or electric shock.)
Do not place any electrical items or heavy
materials on top of the heater.
(It may cause malfunctioning or electrical shock, or if the heavy
material falls, the user can be injured by shock or a burn.)
Do not move or transport during the operation.
(It may cause a fire or a burn.) (In case of moving, you must turn
off heaters and take our power plug.)
Do not use this heater for anything other than
heating.
(Do not use this heater for keeping pet animals.)
Do not operate this heater while you are
sleeping. (Due to no ventilation while you are sleeping, the
room easily gets stuffy and lacks oxygen.)
It is dangerous to use this heater for a long
time in a closed room, especially if there
are children, the elderly, or the weak.
(It is recommended that the user open the windows to let
fresh air into the room if the room is stuffy.)
Do not place any inflammable vinyl or plastic
goods on top of the heater or cover the heater
grill with clothes.
(It is exposed to fire or burn.)
Do not touch any of the heated material, such as
the grill, furnace, etc. While the heater is
operating or just after extinguishing, the grill and
furnace are hot, so do not touch any of those
parts. Especially pay more attention to keeping
children away from hot materials.
(they may cause a burn).
It is recommended not to use this heater in highly
elevated areas.
(Do not use this heater in areas where it is higher than 1500m
above sea level.)
You need frequent ventilation in areas 700–1500
m above sea level.
(Due to the lack of oxygen, carbon monoxide can be increased to
cause an accident from poisoning.)
Pay attention to avoiding water entering the
heater during cleaning.
(It may cause a fire or electric shock.)
Do not use this heater in unstable places.
(Do not use this heater on an inclined surface or a shaking
support. This heater may fall down, which may cause a fire or
malfunction.)
※ Place this manual noticeably near the heater so that, if necessary, the user can always find it easily.
- 4 -

When storing this heater, be sure that you store
it in a dry place indoors instead of in a hot and
humid environment.
(Otherwise, it gets rusty or goes into trouble.)
You must take the plug out of the outlet if
there is a flash of lightening or thunder or if
you haven't used it for a long time.
(Otherwise, it is exposed to the danger of electrical shock, a
short circuit, or a fire.)
Do not put an excessive physical shock on
the remote controller, and do not disassem-
ble it arbitrarily.
Call your local after-sales service agent in
case the power cord is damaged.
(Otherwise, it is exposed to the danger of electric shock, a
short circuit, or a fire.)
Do not put this heater on an unstable surface of
the ground, such as an inclined or bumpy
surface.
(The heater may not work.)
Do not shower water on the heater directly, nor
use benzene, thinner, or alcohol for cleaning.
(Otherwise, it is exposed to the danger of electrical shock, a
short circuit, or a fire.)
If the supply cord is damaged, it must be
replaced by the manufacturer, its service agent,
or a similarly qualified person in order to avoid a
hazard.
(Otherwise, it is exposed to the danger of electrical shock, a
short circuit, or a fire.)
Do not operate this heater in a place where it
gets wet from the humidity, such as a bathroom.
(It may cause an electrical short circuit or an electrical shock
accident.)
1. Make sure the safety in the place where you
wish to use this heater ensured.
■ The ground surface and surrounding area should
be plain, non-flammable, and solid.
■You need to have sufficient space surrounding
the heater, at least 15cm from the wall and the left
and right sides, and at least 1 meter from the
ceiling and the front side, without any obstacles.
■ You need to use an exhaust duct when operating
in small spaces.
(Recommended duct specification: 75mm or more
(diameter)
(Be sure there are no raindrops entering the
exhaust duct end.)
(You must ventilate frequently with fresh air by
opening a window or fan.)
■ You must put an extinguisher beside the heater.
■There must not be direct sunlight or excessive
heat near the heater.
■ After you fix the installation, lock the caster to
avoid unexpected movement.
■ Do not use this heater near a fabric, carpet, plastic,
or vinyl curtain that may cover the heater in case of
falling down, but in the wind or by any physical force
that may cause a fire.
■ The heater must not be located immediately below
a socket outlet.
■ Positioned so that the plug is accessible.
2. You must use diesel or kerosene as fuel.
If you use other fuel, it may cause excessive soot or
malfunction.
■ In the case of refueling, make sure the heater is
turned off.
■ To be made by the manufacturer or his service
agent, who should be contacted if there is an oil
leakage.
■Regulations concerning the disposal of oil when
scraping the appliance have to be followed.
3. The proper electricity is 220/230V, 50 Hz. It will be
applied and adjusted as per the customer's request.
You must supply power as per its requirements only
once they are adjusted.
- 5 -
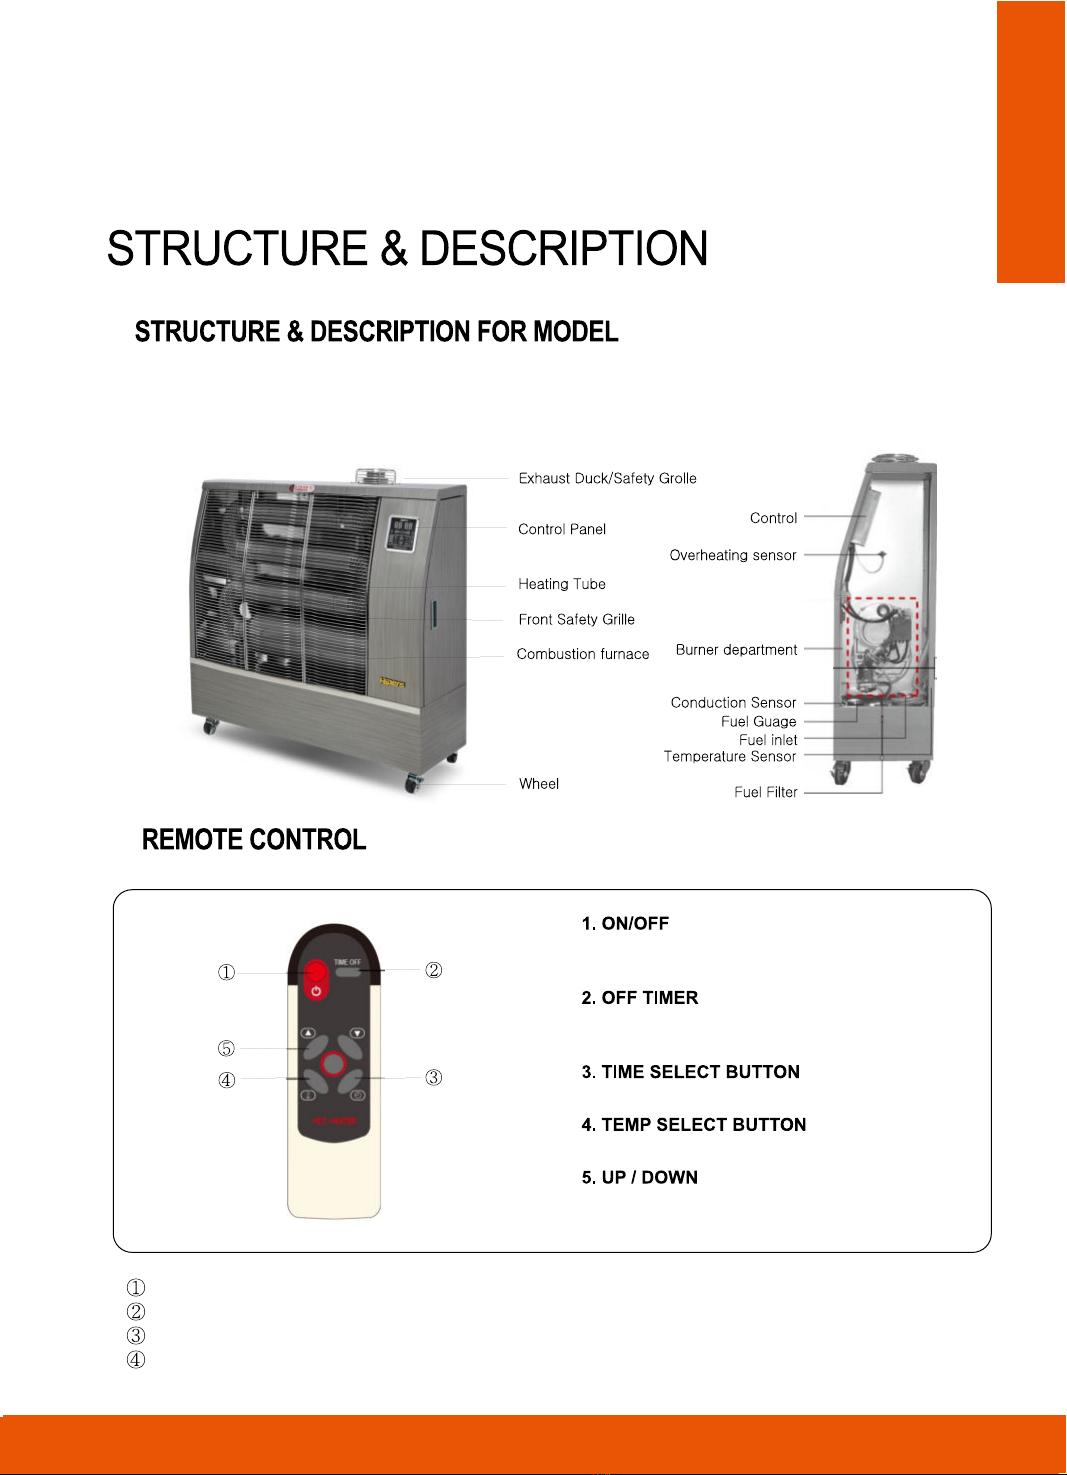
※This design may be changed for improved efficiency.
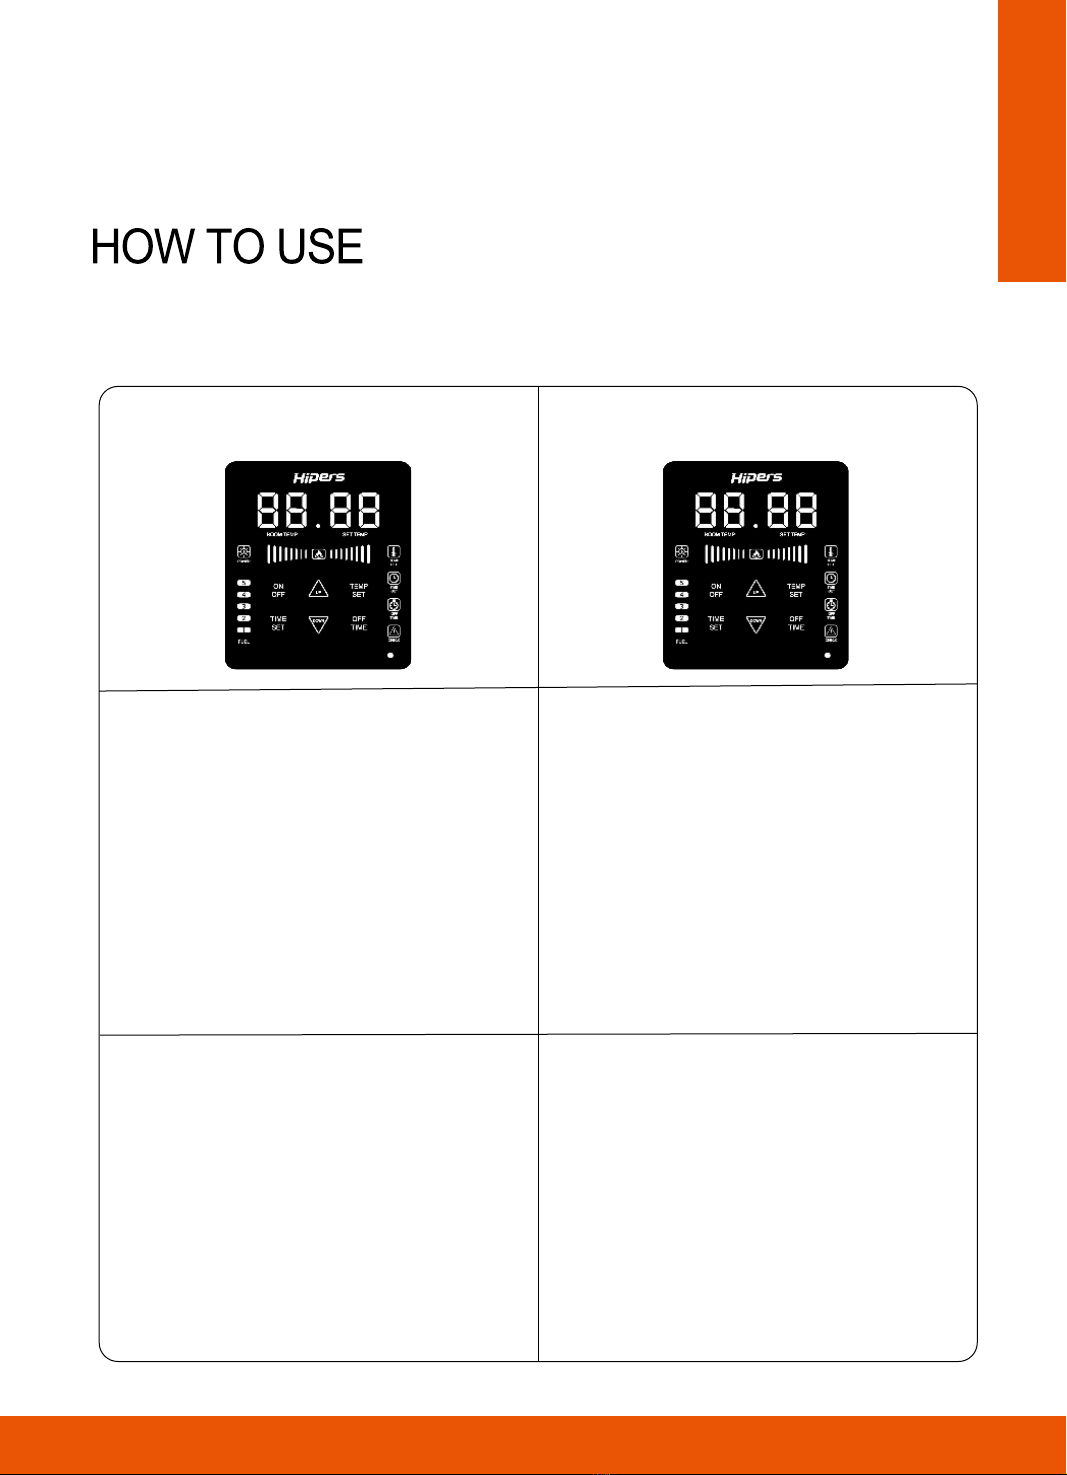
When the heater turns ON or OFF, you can press
this button.
Every time you press this button, the heater
repeats set-up and cancels.
To select the time control mode
To select the temperature control mode.
To set or change the temperature or time
Connect the power cord of the heater to the outlet.
When you connect a power plug, the current temperature is displayed.
When you press the UP/DWON button, the desired temperature is displayed.
You can set the desired temperature between "0~40°C (1°C per press).
- 6 -
DHOE-120~DHOE-350F
DHOE-90
To select the temperature control mode.
To select the time control mode.
To select the time control mode.
To select whether off-timer mode is
operated or not.
To select the temperature control mode.
To select the time control mode.
To select the time control mode.
To select whether off-timer mode is
operated or not.
- When the heater turns off, the motor (to cool the heater) is operated.
- It is dangerous to turn off this heater by taking out the power plug. It may cause a malfunction or
electrical shock. Please stop the heater using the ON/OFF button.
- If the malfunction is caused by a power outage, the customer is responsible for the repair.
- 7 -
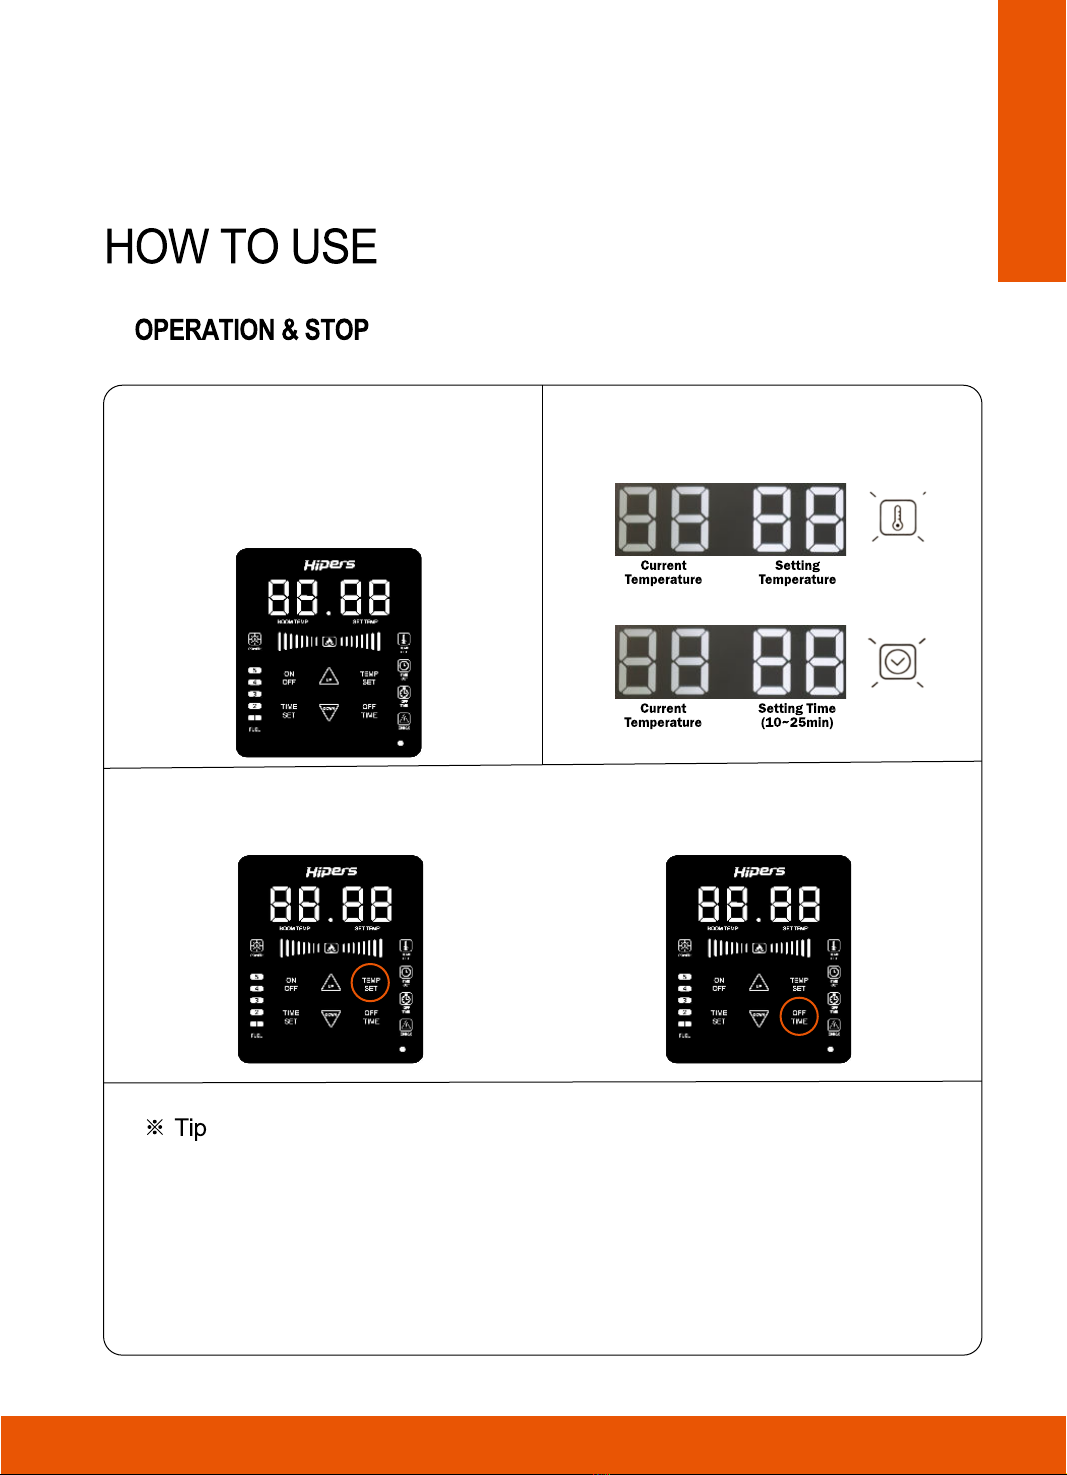
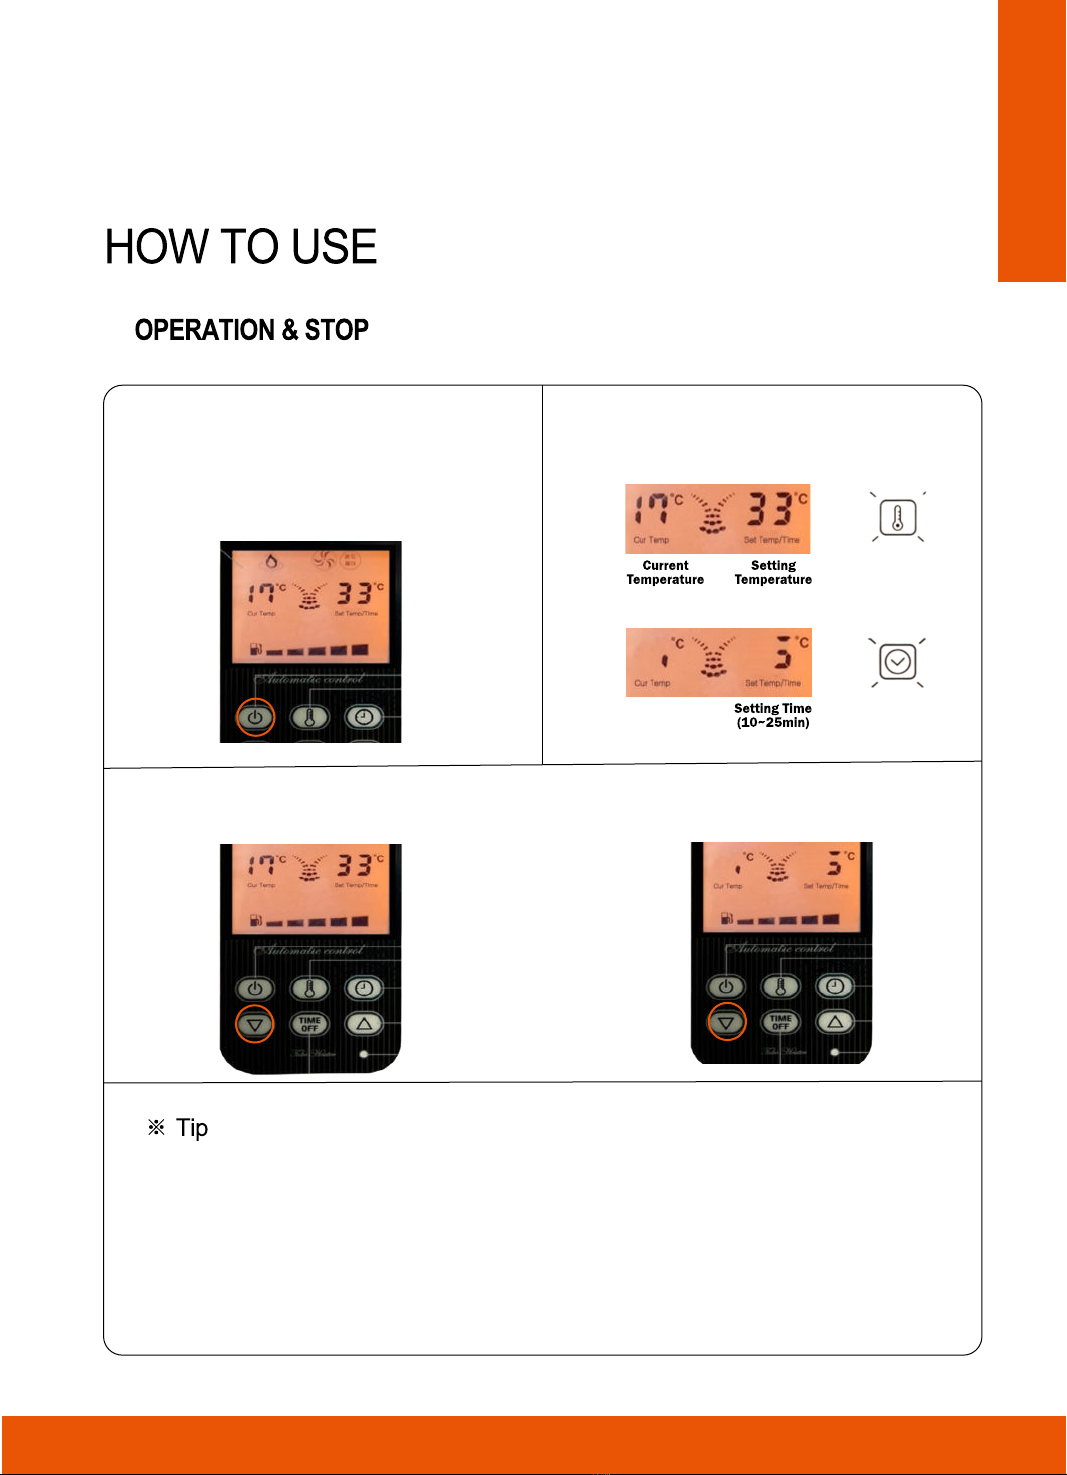
1. Connect the power plug (you can see the current temperature),
then press the on/off button. (Check "SET tem/time," the number
on the right side.)
But if this heater operates in case it is first used from purchase,
turn the air screw left around three times and then start by
pressing the "ON/OFF" switch. The heater will be turned on with a
"beep" sound and automatically operated. Fasten the air screw
after 4 seconds. If the "E1" error is displayed, press the "ON/OFF"
switch more times.2. Select the desired operation type using the "TEMP or TIME"
button.
3. Set the time or temperature by pressing the "Temp select button" or "Time select button."
"Temperature": You can set the desired temperature between "0~40°C."
"Time": Set the desired time limit between "10~25min" (5min per press).
In order to operate, the setting temperature should be higher than the current temperature.
- After power on, the default mode is temperature control mode.
During the operation, if you push the ON/OFF button, the heater will stop and the off-timer function will be cancelled.
Circulation fans operate in a minute after turning on the heater and stop in two minutes after turning off the heater.
(This fan is for circulating heat and a cooling heater.)
The model equipped with a "solenoid valve (by-pass device) makes the remaining oil return to the oil tank. For 10 seconds, from the time the
burner is off, the solenoid valve is in operation, which makes the remaining oil return to the oil tank, and by this device, the smell caused by
unburned gas is remarkable shrunk.
DHOE-120~DHOE-350F
- 8 -
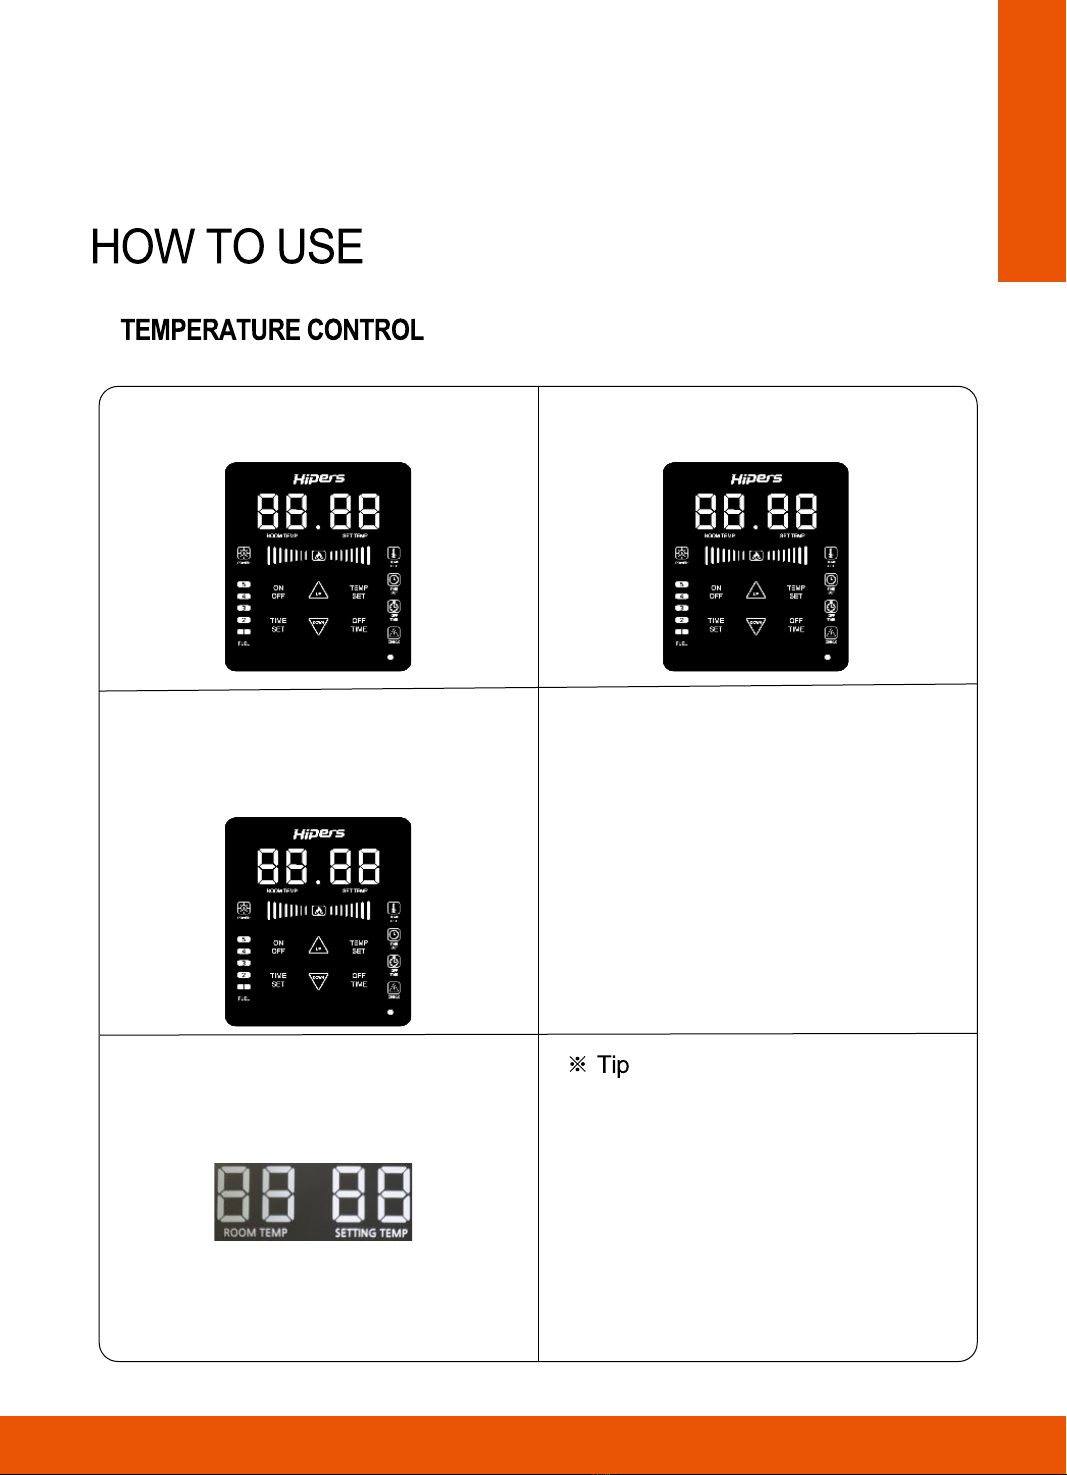
This mode enables the user to set the desired
temperature, and once it is fixed, this heater works
automatically, running and stopping repeatedly to
meet this temperature. (If power is on and the
heater starts operation, the temperature control
mode will be operated by default.)
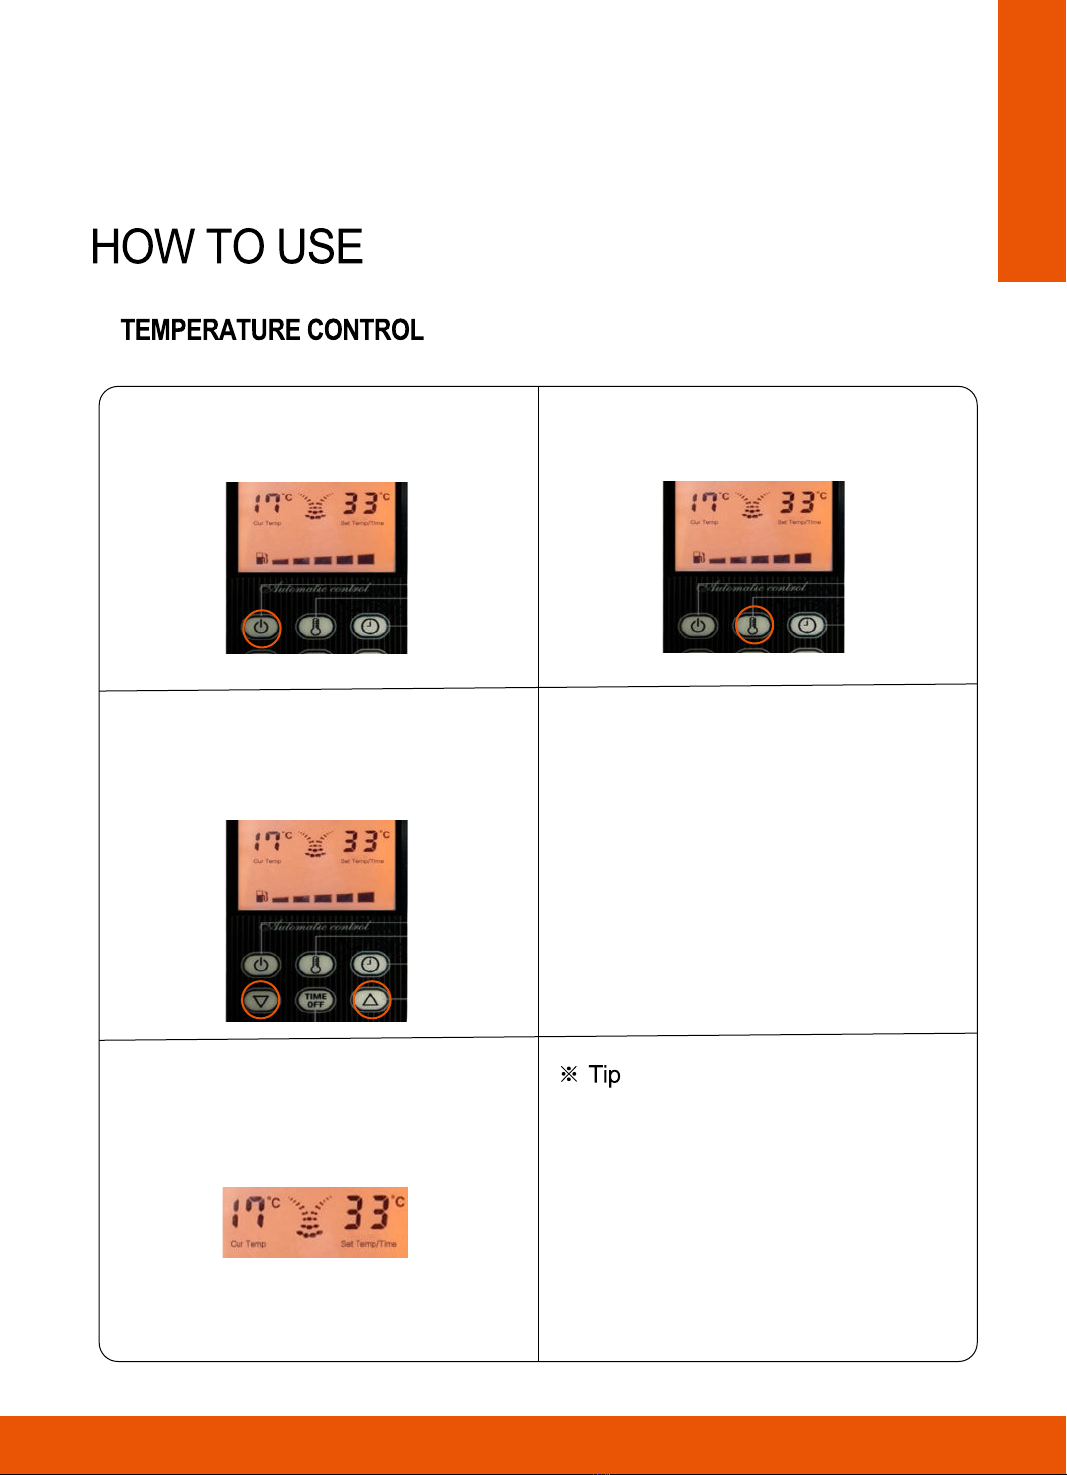
1. Push the ON/OFF button. 2. By pressing the "Set Temp" button, select the
temperature control mode.
At that time, the temperature control lamp will light up.
3. By pushing the "▲" or "▼" buttons, select the
desired temperature.
- The setting range is 0~40°C.
- The default value is 25 °C.
During the time you push "▲", "▼", "setting temperature" is
increased or decreased very fast.
The "room temperature" display range is: -9~50°C.
4. During operation, "room temperature" and "setting
temperature" are displayed, and if you push the
ON/OFF button and make the operation stop, only
"room temperature" is shown.
5. When "setting temp" is higher than 2°C than "room
temp", heaters operate, and when "setting temp" is
less than 1°C than "room temp", the operation stops.
Room temp. < Setting temp. & over 2°C gap :
Operate.
Current temp. > Setting temp. : Stop.
The current temperature is less than -9°C (16°F), the
display of the temperature is 'LO', and more than
50°C (99°F), it is displayed as 'HI' (50°C is not the
same value as 99°F; actually, 37°C is the same value
as 99°F).
The setting temperature is increased or decreased by
1°C by pushing the (▲/▼) button if you push the
button for more than 2 seconds. The value is
increased or decreased by 1°C in 0.2 seconds.
If you push the ▲ and ▼ buttons simultaneously for 5
seconds, the unit is converted from °C to °F (the
default unit is °C).
- 9 -
TIME CONTROL
This mode enables the user to set the desired
time, and once it is fixed, this heater works
automatically, running and stopping repeatedly to
meet this time. (If power is on and the heater starts
operation, the temperature control mode will be
operated by default.)
1. Push the ON/OFF button. 2. By pushing the "Set Time" button, select time
control mode.
At that time, the time control lamp is lit.
3. By pushing the "▲" or "▼" buttons, select the desired
time.
The setting range is 10~25 min.
The default value is 25 °C.
Each time the "▲" and "▼" buttons are pressed, the time
changes by 5 minutes.
ex1) 5 minutes setting: repeat 5 minutes operation + 5 minutes break.
ex2) 25-minute setting: repeat 25-minute operation + 5-minute break.
- 10 -
DHOE-90
- 11 -
1. Connect the power plug (you can see the current temperature),
then press the on/off button. (Check "SET tem/time," the number
on the right side.)But if this heater operates in case it is first used
from purchase, turn the air screw left around three times and then
start by pressing the "ON/OFF" switch. The heater will be turned
on with a "beep" sound and automatically operated. Fasten the
air screw after 4 seconds. If the "E1" error is displayed, press the
"ON/OFF" switch more times.
2. Select the desired operation type using the "TEMP or TIME" button.
3. Set the time or temperature by pressing the "Temp select button" or "Time select button."
"Temperature": You can set the desired temperature between "0~40°C."
"Time": Set the desired time limit between "10~25min" (5min per press).
- In order to operate, the setting temperature should be higher than the current temperature.
- After power on, the default mode is temperature control mode.
- During the operation, if you push the ON/OFF button, the heater will stop and the off-timer function will be cancelled.
Circulation fans operate in a minute after turning on the heater and stop in two minutes after turning off the heater.
(This fan is for circulating heat and a cooling heater.)
The model equipped with a "solenoid valve (by-pass device) makes the remaining oil return to the oil tank. For 10 seconds,
from the time the burner is off, the solenoid valve is in operation, which makes the remaining oil return to the oil tank, and by
this device, the smell caused by unburned gas is remarkable shrunk.
- 12 -
This mode enables the user to set the desired temperature, and once
it is fixed, this heater works automatically, running and stopping repeatedly
to meet this temperature.
(If power is on and the heater starts operation, the temperature control
mode will be operated by default.)
1. Push the ON/OFF button.
3.
By pushing the "▲" or "▼" buttons, select the desired temperature.
- The setting range is 0~40°C.
- The default value is 25 °C.
* During the time you push "▲", "▼", "setting temperature" is
increased or decreased very fast.
- The "room temperature" display range is: -9~50°C.
5. When "setting temp" is higher than 2°C than "room temp",
heaters operate, and when "setting temp" is less than 1°C than
"room temp", the operation stops.
- Room temp. < Setting temp. & over 2°C gap : Operate.
- Current temp. > Setting temp. : Stop.
- The current temperature is less than -9°C (16°F), the display
of the temperature is 'LO', and more than 50°C (99°F), it is
displayed as 'HI' (50°C is not the same value as 99°F; actually,
37°C is the same value as 99°F).
- The setting temperature is increased or decreased by 1°C
by pushing the (▲/▼) button if you push the button for more
than 2 seconds. The value is increased or decreased by 1°C in
0.2 seconds.
- If you push the ▲ and ▼ buttons simultaneously for 5 seconds,
the unit is converted from °C to °F (the default unit is °C).
4. During operation, "room temperature" and "setting temperature"
are displayed, and if you push the ON/OFF button and make the
operation stop, only "room temperature" is shown.
2. By pressing the "Set Temp" button, select the temperature
control mode.
- At that time, the temperature control lamp will light up.

TIME CONTROL
1. Push the ON/OFF button.
3. By pushing the "▲" or "▼" buttons, select the desired time.
- The setting range is 10~25 min.
Each time the "▲" and "▼" buttons are pressed, the time
changes by 5 minutes.
ex1) 5 minutes setting: repeat 5 minutes operation + 5 minutes break.
ex2) 25-minute setting: repeat 25-minute operation + 5-minute break.
2. By pushing the "Set Time" button, select time control mode.
- At that time, the time control lamp is lit.
- 13 -
This mode enables the user to set the desired temperature, and once
it is fixed, this heater works automatically, running and stopping repeatedly
to meet this temperature.
(If power is on and the heater starts operation, the temperature control
mode will be operated by default.)
- 14 -
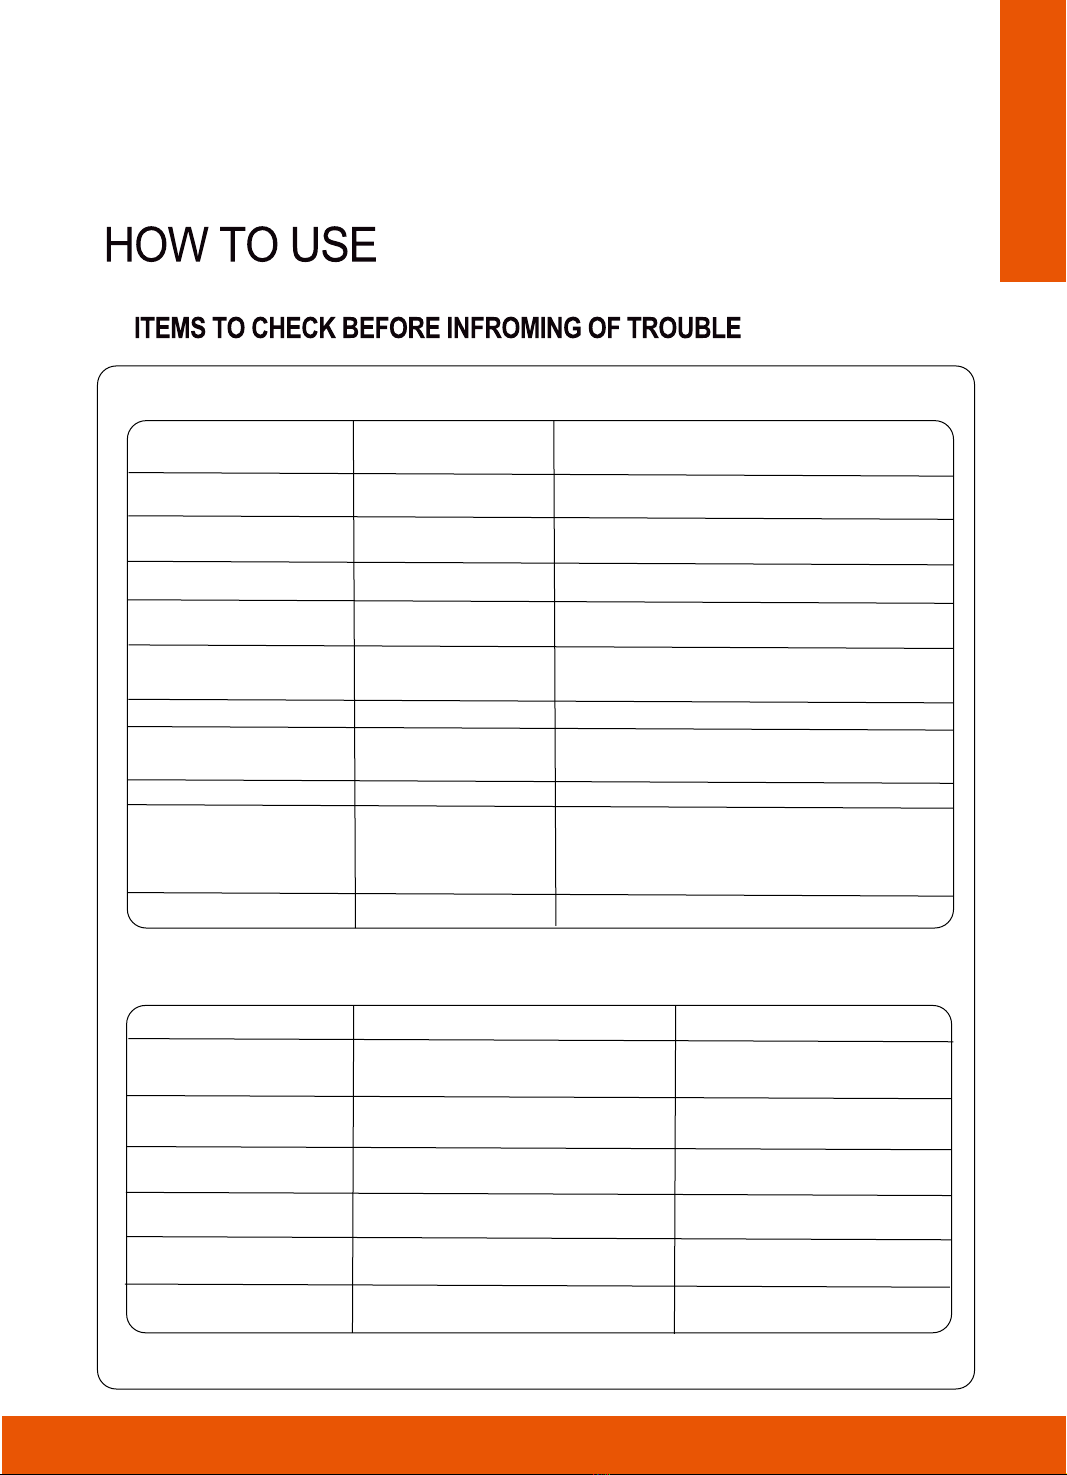
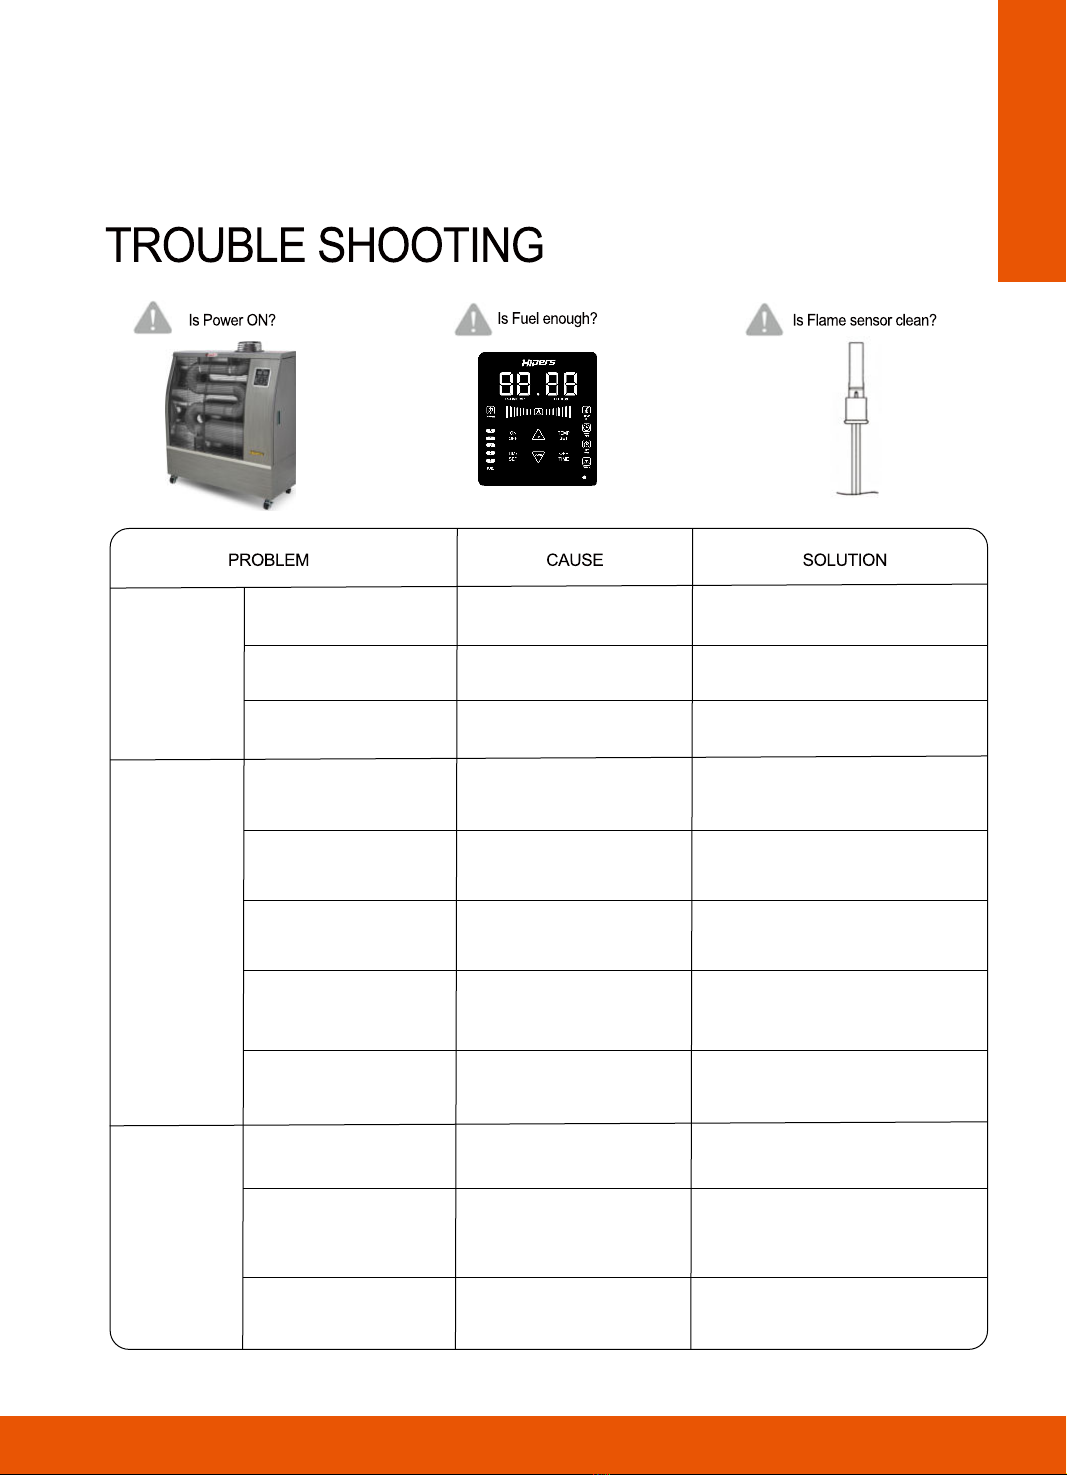
If the following error or trouble signs are displayed on the operation panel
If the troubles E1 ~ E9 occur, check the causes and take the required action.
If you press the power button twice, you may restart the heater.
If the troubles persist even after taking the actions indicated in the below table,
Displayed
messages
Troubles
All lamps on theoperation
panel are turned off.
The lamp is repeatedly
turned off and turned on.
The heater is operated
with no indication of oil.
Something burning smells
during the initial operation.
The fuel smell is unusual.
The room temperature is
higher than the normal one.
- Power failure
- The power plug is unplugged.
- Fuse burns out.
- Select the time (check the lamp).
- Flowmeter wiring is unplugged.
- Foreign substances are burned inside
the gasket.
- There is a smell when the heater is
stopped as soon as it starts.
- On oil supply, spilling fuel
- Check if the location of the temperature sensor
(it may occur if the sensor is installed inside).
- To disappear after 1 or 2 hours
- Fix the sensor at the correct position.
- Operate 15' or more.
- Remove spilled oil.
- Line connection
- Select the temperature.
- Plugning
- Changing Fuse
Items to check Required action
E1. No ignition
E2. Photecell (flame sensor)
E3. Temperature sensor
E4. Overheating sensor
E5. Slope
E6. Lack of fuel
E8.
E9. Poor communication
with the main PCB
HI
E7.
Description
of troubles
The burner is misfiring - The lack of fuel
- There is air in the fuel tube (▶air discharge).
- Photocell pollution (▶cleaning)
- Unpluged Photocell (▶plug), Phototube Trouble (▶exchange)
If the heater is stopped just after ignition, there is residual flame
(no change; ▶Re-operation).
- Check if there are any nump signs inside the burner. (Ask the survivor.)
- Check if the overheat protector wire is disconnected.
(Operate the heater again after connecting the wire.)
- Check if the heater is moved (a tilt may occur if the heater is shaken
or moved). Operate the heater again.
- The inversion switch wire is disconnected. (Operate the heater again
after connecting the wire.)
- Check if the temperature sensor connector is loosening.
(Firmly connect the connector if it is loosened.)
- Refuel and operate.
- Auto-release
- Check that the temperature sensor is installed inside.
(Install the sensor outside.)
Photocell trouble Detrction
of residual flame
Temperature sensor trouble
The product is overheated
Tile of heater
Lack of fuel
Temperature is above 50 °C
Burner fan motor if a data error
occurs more than three times or
the signal is disconnected for more
than one second during
communication with the main
PCB malfunction.
Items to check and required actions

- 15 -
To pull out the front grille, please raise
it a little and pull it out. (Assembly is the opposite way.)
In case you keep the heater for a long time and you want to maintain its clean status, please power off
and cool down the heater, pull out the plug as shown in the above picture, and clean according to the
following instructions.
- Please pull out the frint grille by raising it and pulling it out to the front.
- Please clean the heating reflection, which is on the back side of the heater and burner area.
The combustion tube has a ceramic coating. (Be careful not to damage the coated surface.)
※DO NOT DISASSEMBLE THE BURNING PARTS.
- Please wipe out the front controller area with soft wool.
- After finishing the cleaning, please assemble the front grille for the heater.
To store the heater, cool down the heater and plug out and wrap with plastic cover and keep in the well
air-flowing place. You'd better consume all the oil in the tank.
To keep a heater in an outdoor or humid place is a major cause of problems.

- 16 -
CLEAN OF FLAME SENSOR (Photocell, CDS)
- If the detection part of the photocell is contaminated by soot or other dirt, the
performance can be lowered, which may cause a problem.
-
Please take out the photocell carefully, which is placed in the lower part of the burner.
- Please clean the detection part of the photocell with soft clothes.
Be sure a photocell is fixed correctly. (Mark "A" should be inserted fully.)
CLEAN OF COMPONENTS
- If you need to change components, please contact us.
- In case of a repair or exchange of components, please contact the service center
operated by our distributor's head office.
- Do not try to repair this heater by non-licensed service personnel because it may
cause a worse condition, so please contact the local service center or distributor
that is designated by our company.

- 17 -
DAILY CHECK POINTS & ADJUSTMENT
▶IN CASE OF SUDDEN STOP DURING OPERATION
- Please check if now is operating in the time control operation? If so, the heater can be rest for 5min.
- Please check if now the setting temp, is less than the current temp.
- Please check if the heater is stop by pressing On/Off switch by remote controller or front controller.
- Please check if the heater is stop by sleep timer function.
- Please check if the heater is stop by auto-self-checking.
▶AIR FLOW-OUT
- In case that Electric pump so noisy and burner no ignition, main cause of the problem is air flow into
the electric pump and not distribute oil. If oil is all consumed without remaining in the tank, air can be
flow into inside electric pump.
- The method to flow-out air
- Operate the heater
- When the electric pump operated , turn on the air outflow screw to counter-clockwise. And you
wait till air flow out and oil start to come out.
- When you see oil start to come out, turn off the air outflow screw to clockwise
(In case much air inside, please repeat same way 2~3times.)
▶DETAIL OF BURNER STRUCTURE
When you contact service person with a problem, please refer the below detail structure of the burner.
ADJUSTMENT
Please check the points below before
you think trouble has occurred.
NO
OPERATION
No power supply?
Is the fuse short?
"Lack of Fuel" light on?
Is the misfire lamp on?
Is the overheating lamp on?
Is the fuel filter stuffy?
Is the air suction valve
adjusted excessively
or too small?
The voltage is low.
Can you see "E2"
on the display?
Is the set temperature
lower than the
current temperature?
Lack of fuel
Air in the electric pump.
Under the operation of
overheating prevention
Error on temperature sensor
Filter is contaminated.
In cases of low voltage
Check if the power supply is proper.
(ex. 220/230Vac, 50Hz)
Replace the fuse with a new one.
(250Vac, 3.15A)
Fill it up with kerosene from the diesel.
Do not mix or use these two different
fuels.
Set the temperature to be higher than
the current (room) temperature.
Remove the air from the electric pump.
(Refer to page 13.)
Ventilate with fresh air in the room
and turn off the heater for a while.
Select timer control mode from
temperature control mode.
Clean the filter with compressed air,
or replace it with a new one.
The burner will not work properly, so
use a booster to elevate the voltage.
(A/S)
Call the after-sales service agent.
Plug the power plug into the outlet.
Check that the power
plug is disconnected.
NO FAN
MOTOR
OPERATED
NO IGNITION
ON THE
BURNER
- 18 -

- 19 -
IMMEDIATE
STOP JUST
AFTER
IGNITION
"Lack of Fuel" light ON?
Check if the fuel if
Diesel of kerosene
Water of ant other
impurities on fuel?
Is air suction valve
adjusted excessively
or too small?
Is tube clogged?
Is Fuel filter stuffy?
Noise in fuel pump?
Is flame sensor dirty?
Is flame sensor
located well?
Noise in fuel pump?
Check if the fuel if
Diesel of kerosene
It may cause less
performance & trouble
Error on
Temperature sensor
Smoke may flow backward
Dirty filter with impurities
and contamination
Excessive air in the
pump and nozzle
In different position,
it causes an error
Error because of soot of dirt
Excessive air in the
pump and nozzle.
It may cause less
performance & trouble
Running out of fuel Fill up the fuel.
Drain the existing fuel and fill with
Diesel of kerosene only.
It may cause less
performance & trouble
Drain the existing fuel and fill with
Diesel of kerosene only.
Clean the tube by removing soot inside
of tube, of replace with new one.
Clean or replace with new one
Remove the air in the electric pump.
Replace the fuel with good quality one
Water of ant other
impurities on fuel?
It may cause less
performance & trouble Replace the fuel with good quality one
Call after sales service agent.
Place the sensor in original location.
Call after sales service agent.
Remove the air in the electric pump.
EXCESSIVE
SOOT IS
GENERATED
NOISE IN
BURNER

SPECIFICATION
- 20 -
Other manuals for DHOE-90
1
This manual suits for next models
5
Table of contents
Other Hipers Heater manuals


Popular Heater manuals by other brands

Proheat
Proheat X30 Owner's handbook

Bimar
Bimar S597.EU Instruction booklet

Twin-Star International
Twin-Star International duraflame Infragen 13HM7999-E451 manual

BASETech
BASETech 2268546 operating instructions

Jaga
Jaga STRADA HYBRID MM Installation and operation manual

PFTAS
PFTAS NB series owner's manual


