Hisense XClass User manual

Quick Setup Guide
Help Hisense improve the environment by reducing paper
waste. For detailed instructions and feature descriptions,
access the full user manual online:
www.xclasstv.com/support/documentation/hisense
Before using the TV, please read this guide carefully and keep
it for future reference.
English
ES-Y218721-1

Copyright statement
© 2021 Hisense Company Ltd. and Comcast Corporation (“Comcast”). All Rights
Reserved.
All material in this Quick Setup Guide is the property of Hisense Company Ltd.
and Comcast and their subsidiaries, and is protected under the laws of the US and
international copyright and/ or other intellectual property laws. Reproduction or
transmission of the materials, in whole or in part, in any manner, electronic, print,
or otherwise, without the prior written consent of the Hisense Company Ltd. and
Comcast is a violation of the rights of Hisense Company Ltd. and Comcast under the
aforementioned laws.
No part of this publication may be stored, reproduced, transmitted or distributed, in
whole or in part, in any manner, electronic or otherwise, whether or not for a charge or
for other or no consideration, without the prior written permission of Hisense Company
Ltd. and Comcast. Requests for permission to store, reproduce, transmit or distribute
materials may be made to one of the following addresses:
USA:
Hisense USA Corporation 7310 McGinnis Ferry Road Suwanee, GA 30024
Comcast Corporation, One Comcast Center, 1701 JFK Blvd., Philadelphia, PA 19103
Hisense, and any and all other Hisense product names, logos, slogans or marks are
registered trademarks of Hisense Company Ltd. and its subsidiaries. XClass TV, the
“X” design, and all other Comcast product names, logos, slogans or marks are the
trademarks of Comcast. All other trademarks are the property of their respective
holders.
Disclaimer
Disclaimer: Subscriptions or other payments may be required to access content
through some applications. Some or all of the included or downloaded application
services in this device may not function depending on the Internet connection,
local limitations of included applications or other reasons outside of Hisense’s
and/or Comcast’s control. HISENSE AND COMCAST EXPRESSLY DISCLAIM
RESPONSIBILITY FOR ANY APPLICATION SERVICE FROM FUNCTIONING AT
ANY TIME, FOR CONTENT IN ANY APPLICATION SERVICE, FOR DISRUPTIONS
OF SERVICE, LOCAL OR REGIONAL LIMITATIONS, WARRANTIES OF TITLE,
WARRANTY OF NON-INFRINGEMENT, AND FOR IMPLIED WARRANTIES OF
MERCHANTABILITY OR FITNESS FOR A PARTICULAR PURPOSE. By purchasing
and using this device, you accept such Disclaimer without any claim on Hisense and/or
Comcast at any time.

1
Table of Contents
What's in the box ............................................................................................................3
Getting started................................................................................................................4
Step 1. Attach stand or mount....................................................................................4
Step 2. Connect devices to your TV ..........................................................................6
Step 3. Get your remote ready...................................................................................9
Step 4. Power on the TV..........................................................................................11
Step 5. Set up your TV.............................................................................................11
Step 6. Enjoy your TV! ............................................................................................12
Troubleshooting ...........................................................................................................13
Product specications...................................................................................................14
Certication and compliance ........................................................................................15
This Quick Setup Guide supports the following models:
43A6GX/50A6GX

2
Congratulations on the purchase of your Hisense XClass TV! To learn more about all
things Hisense, contact us using the support info below. To learn more about XClass
TV’s privacy practices, please use the below link to view our privacy policy.
The model and serial number of the TV is located on the back or side of the TV. We
recommend that you record this information if you ever need service.
Disclaimer: This Quick Setup Guide is intended as a general guideline to
help you set up your TV. Images throughout this document are for illustrative
purposes only and may differ from the actual product.
Country Customer
Care Center
Hisense
Support Page
Device
Registration
XClass TV
Privacy
Policy
U.S.A • Phone: 1-888-
935-8880
• Hours of
Operation:
Monday - Friday: 9
AM to 9 PM EST
Saturday -
Sunday: 9 AM to 6
PM EST
• Service Email:
Service@hisense-
usa.com
http://www.
hisense-usa.com/
support/
http://www.
hisense-usa.com/
support/register
http://www.
xclasstv.com/
privacy/policy

3
What's in the box
Your Hisense XClass TV comes with the following items:
● TV ● Quick Setup Guide (this document)
● 1 set of AAA (1.5Vcc) batteries ● 2 base stands
● Remote control ● Important safety information and warranty card
● Power cord
● 4 screws (M4x16 for 43” TVs)
4 screws (M4x12 for 50” TVs)
IMPORTANT:
To prevent accidentally discarding items that came with your TV, be sure to check ALL
of the foam in the box.
You will also need the following items (which are not included) to set up your TV:
● Wireless router for Internet connectivity
● Phillips screwdriver to secure the TV stand
● HDMI and other types of cables to connect external devices to the TV
●
Optional: Wall mount and screws to mount the TV on the wall
· Please check foam for accessories before discarding.
· Veuillez vérifier la mousse pour qu'il n'y ait pas d'accessoires avant de la jeter.
· Antes de desechar la espuma, asegúrese de retirar todos los accesorios.

4
Getting started
Step 1. Attach stand or mount
Before using your TV, attach your TV stand or mount it on the wall.
CAUTION:
• Disconnect the AC power cord before installing a stand or a wall mount bracket.
• The LED display on your TV is fragile. Make sure the TV screen is not scratched or
damaged by hard objects or from pressure.
• After the installation is complete, make sure the TV is steady on a table or firmly
attached to a wall mount before removing all protective film, if any.
Attach the TV stand
To attach the TV stand legs to your TV:
1. Carefully place your TV face down on a clean, soft and at surface.
2. Insert the TV base stands into the bottom slots on your TV.
3. Use the screws provided to secure each leg tightly.
Screws:
M4×16 (43")
M4×12 (50")
Base stand
5
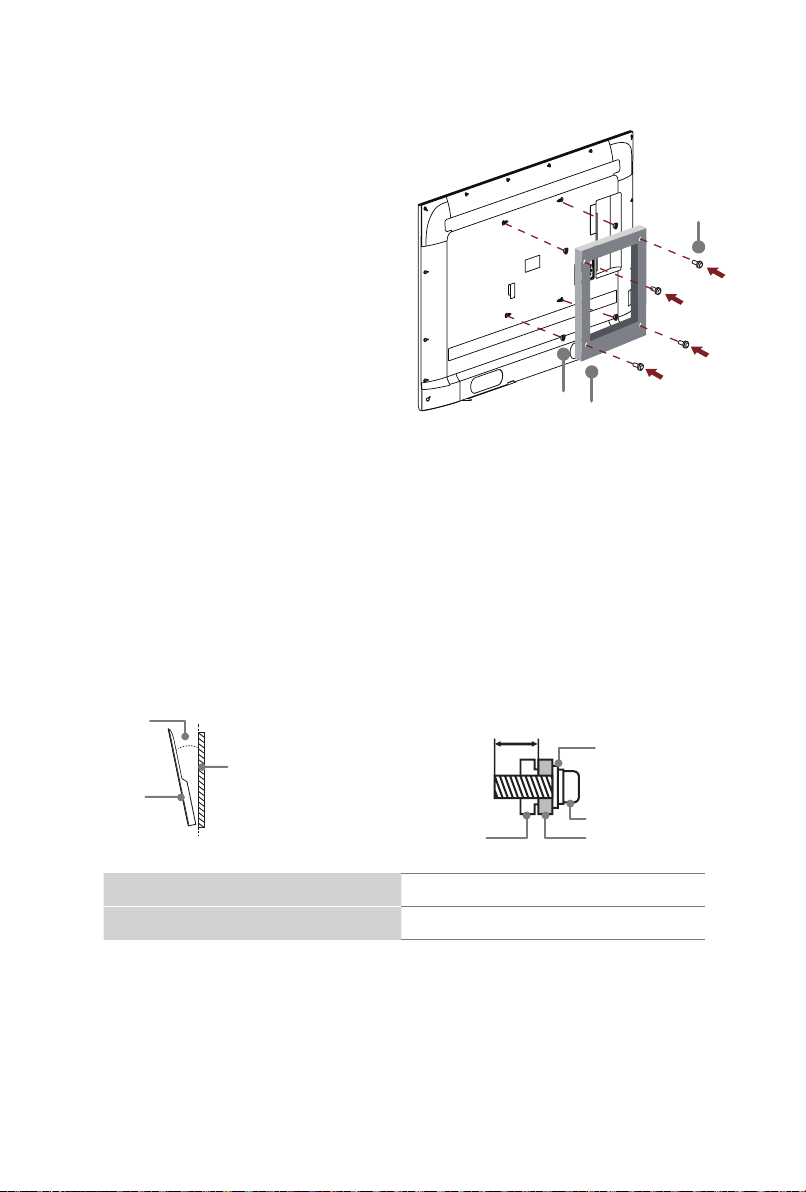
Bracket
(not included)
Screw
(not included)
Spacer
(not included)
Before you begin the third-party manufacturer instructions, be sure to do the following
things:
Attach the wall mount bracket (not included)
CAUTION:
• Follow instructions provided with the wall mount bracket. If it is not correctly mounted,
the TV may fall and cause property damage or personal injury.
• When you attach the mount, be sure to use spacers (provided by the third-party
manufacturer) between the TV and the bracket.
• To prevent internal damage to the TV and to ensure it is mounted securely, be sure to
use fixing screws (not included) that are 8.0 - 10.0 mm in length when measured from
the attaching surface of the rear cover.
• Make sure the tilt angle between the TV screen and the vertical surface is no more
than 15 degrees.
8.0 - 10.0
mm
Wall mount bracket
Screw
Spacer
Rear cover of the TV
≤15°
TV screen
Vertical
surface
1. Place the TV face down on a clean, safe
and cushioned surface.
2. Remove the TV stand if you have already
attached it.
3.
Place spacers (not included) in the
corresponding bracket holes.
Wall mount hole pattern (mm) 200 × 300
Wall mount screw size M6
NOTE:
• If you have additional questions, please contact the wall mount manufacturer or the
retailer from which you purchased the TV.
• The diameter and length of the screws differ depending on the wall mount bracket
model.
6
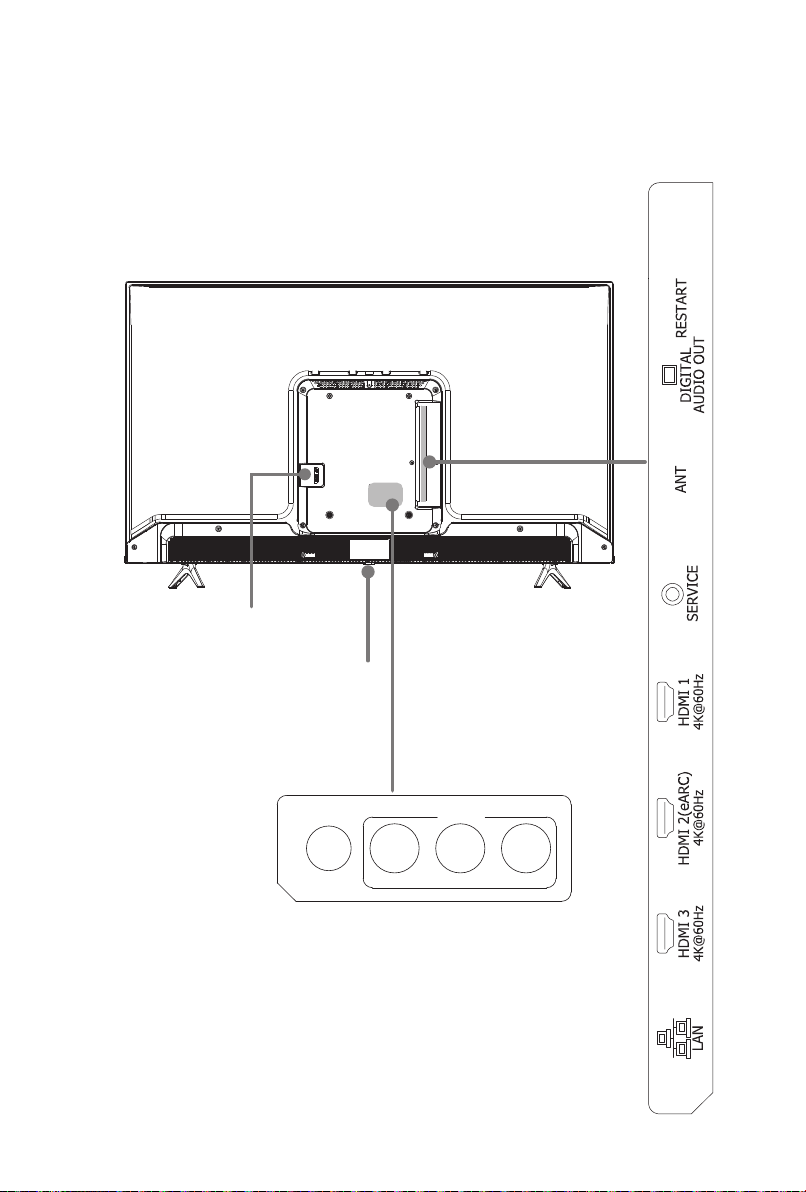
Step 2. Connect devices to your TV
Check to ensure that you have connected right cables for right ports securely. Loose
connections can affect picture image and color.
Back View
Power input
HEADPHONE
AV IN
VIDEOL
R
Power button:
Hold it 30 seconds
for reset

7
TV label Port Cable External Equipment Brief De-
scription
ANT
Antenna
VHF/UHF Antenna
ANT OUT
Connect an
outdoor VHF/
UHF antenna.
HDMI
DVD Player/Recorder
Set-top Box
Satellite Receiver
Satellite
antenna
cable
VCR
Video
Camera
Connect a
High Denition
Multimedia
Interface
(HDMI)
cable from
an external
device.
AV IN
VIDEO
Yellow
Connect a
composite
video cable
and left-right
audio cables
from an
external AV
device.
L
White
RRed
DIGITAL AUDIO
OUT
Connect an
optical cable
from an
external digital
audio system.
HEADPHONE
Connect
headphones
to hear audio
from the TV.
Headphones
with
microphones
are not
supported.
Speaker
Audio Amplier
8
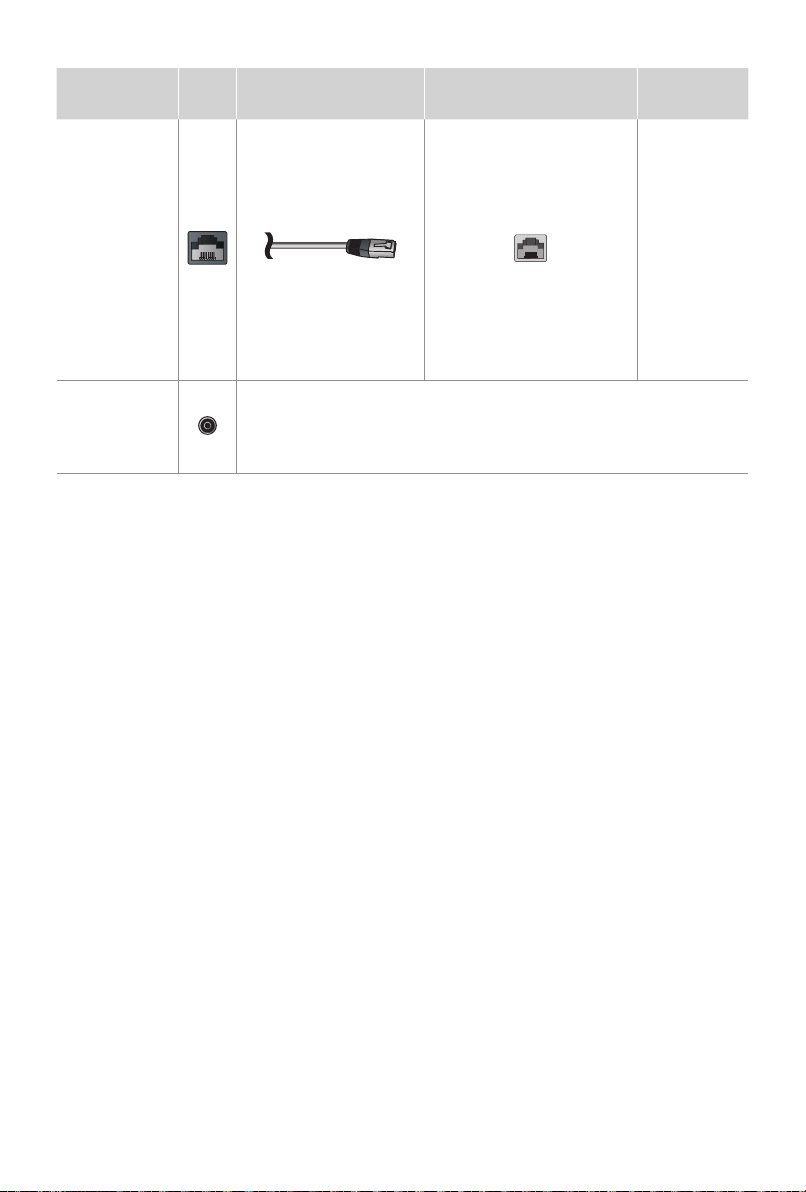
TV label Port Cable External Equipment Brief
Description
LAN
Connect an
Ethernet
cable to
access a
network or
the Internet.
The TV is
also WiFi-
compatible.
SERVICE This port can only be used by factory for testing purposes.
This port may not be available in some models.
Table of contents
Other Hisense TV manuals

Hisense
Hisense 65XT910 User manual

Hisense
Hisense 32H3D+ User manual

Hisense
Hisense 32N2170HW User manual

Hisense
Hisense 50A7G User manual

Hisense
Hisense 55P1 User manual

Hisense
Hisense TC14FS68 User manual

Hisense
Hisense 85R7 User manual

Hisense
Hisense TC24FS2H User manual

Hisense
Hisense 49K3110PW User manual

Hisense
Hisense LCDF0104 User manual

Hisense
Hisense 55A6BG User manual

Hisense
Hisense 85Q8 User manual

Hisense
Hisense 65P9 User manual

Hisense
Hisense A6HAU Series User manual

Hisense
Hisense HL81V68P User manual

Hisense
Hisense MT9618EUEM User manual

Hisense
Hisense HL55XT710PZLN3D 710 series User manual

Hisense
Hisense 50H6D User manual

Hisense
Hisense 48H4CROKU TV User manual

Hisense
Hisense 55U8G User manual


