HIT FITNESS H5 User manual
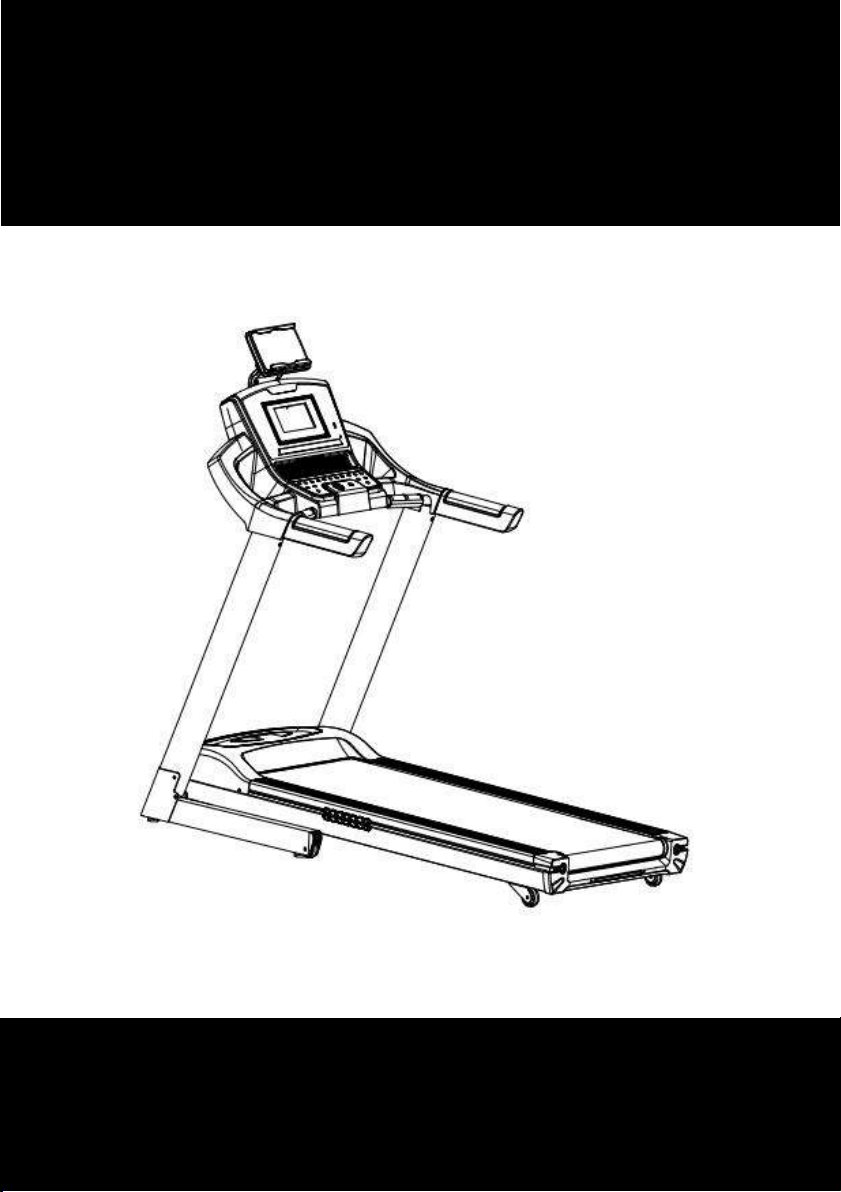
HIT FITNESS H5
HIT00618
1
Retainthisowner’smanualforfuturereference
Readandfollowallinstructionsinthisowner’smanual
VersionA

2
THANK YOU
Thank you for purchasing this product. This product will help you keep fitter and healthier in a simple
way.
User Guide
1. Always connect the power plug to a socket with a grounded circuit and the socket must have a
special circuit to avoid sharing with other electrical equipment.
2. Ensure the treadmill is stable on the ground before use.
3. Ensure it is functioning normally before use.
4. Stand on the two side rails when starting the treadmill.
5. Clip the safety key to your clothes to allow easy ‘stop’ in the event of any emergency.
6. Press the “start” button to get the treadmill started.
7. Follow the running belt with your left leg to do preparation before commencing running. Only when
you feel you can run, you should stand on the treadmill and do it with the right posture. Only one
person should exercise on the treadmill at any time, and excessive exercise can be dangerous and
may cause harm.
8. You can adjust the speed using the control panel if necessary.
9. After running, you can stop the treadmill by pulling out the safety key or pressing the “stop”
button.
10. Remember to turn off the power and pull out the plug when you finish exercising.
Safety precaution:
◆
Place the treadmill indoors to avoid damp conditions.
◆When using the fitness device, wear comfortable clothing and preferably sports or
aerobic shoes.
◆Keep children away from the treadmill to avoid any accidents.
◆Overloading can cause damage to the motor, controller, roller and running belt.
Carry out routine maintenance on the treadmill.
◆Keep the unit free from dust and wipe down after use to avoid interference of the
console and controller.
◆Limit continuous use of the treadmill to less than 2 hours.
◆Keep good air circulation when running.
◆There should be 2000x1000mm safe space at the end of treadmill when running.
◆Stop running if you feel any discomfort and consider consulting a doctor.
◆Keep the silicone bottle out of reach of children to avoid swallowing.
◆Avoid jumping off the treadmill directly after use.
◆Pull out the power plug gently from the socket.
◆Stop the machine if anything goes wrong and cut the power immediately.

3
◆Ask your local distributor to handle any issue or provide service. Please do
not attempt to dismantle the components.
DANGER!
To reduce accidents or harm, please check following rules.
◆Ensure your clothes are zipped up before running.
◆Do not wear clothes that could be easily hooked.
◆Keep power cord away from hot objects.
◆Keep children away from the treadmill.
◆If something goes wrong, hold the handlebars, remove your weight and leave running belt.
◆Do not use the treadmill outdoors.
◆Cut off the power before moving the treadmill.
◆Do not open the motor or roller cover unless skilled professionally.
◆This machine can be used under 10A circuit.
◆Ensure that only one person at a time uses the fitness device.
◆The HRC testing may not be exact as medical devices so use the results for
reference only.
◆Stop exercising immediately should you feel unwell or if you feel pain in your joints or
muscles. Keep an eye on how your body is responding to the exercise program. Dizziness
is a sign that you are exercising too intensively with the device. At the first signs of
dizziness, lay down on the ground until you feel better.
Warning!
Prohibit!
◆
The following patients undergoing treatment for the following should only use this
treadmill after approval from a professional doctor.
(1)
Backache or those who suffer from reoccurring pain in the legs, waist or neck. Those with
numbness of legs, waist, neck and hands (i.e. those with chronic diseases such as inter- vertebral
disc protrusion, spinal slip, cervical vertebra protrusion, etc.)
(2)
Deformational arthritis, rheumatism or gout.
(3)
Osteoporosis.
(4)
Bad circulatory system like heart disease, vascular disorders and vascular hypertension.
(5)
Respiratory disturbance.

4
(6)
Artificial heart rhythm problem.
(7)
Malignant tumors.
(8)
Thrombosis.
(9)
Diabetes caused a perceptual disturbance.
(10)
Skin injury.
(11)
High fever above 38℃.
(12)
Bent back bone.
(13)
Pregnancy or in the (menstrual) period.
(14)
In the process of rehabilitation.
(15)
Abnormal physical features.
- Above cases may cause accident or poor health
◆Stop exercising immediately should you feel unwell like pain in your joints or muscles,
dizziness, numb and abnormal heartbeat, and consult the doctor as soon as possible.
◆Keep children away from this product.
- Children may get hurt if you ignore this.
◆Advise children that the treadmill is not a toy.
- Children may get hurt if you ignore this.
◆when using, taking out, putting back or moving this product, please make sure there is
nobody or pets around.
Beware!
◆Stop using if the cover is cracked (inner parts come out) or welded parts drop off.
-may cause danger or injury.
◆Do not jump up or down from the treadmill when running.
- may fall and get injured.
◆Do not use or keep the treadmill outdoor or near the bathroom to avoid water.
◆Do not use or keep the treadmill in areas exposed to direct sunlight, and avoid high
temperature places like an electric blanket and warmer.
- may cause electric leakage or fire.
◆Do not use if the power line or plug is damaged, or the socket is loose.
- may cause electric shock, short circuit, or fire.
◆Do not damage or twist the power cord, also do not put heavy things on it.
- may cause fire or electric shock.

5
◆Only for one person at a time, tell people near to keep their distance
- may fall down and cause injury.
◆Do not attempt to disassemble or repair without seeking professional assistance.
- may cause mechanical breakdown and injury.
◆Avoid making contact between the main body and operating components with water or drinks.
- may cause electric shock and fire.
Prohibit!
◆Do not exercise too much if you are not used to it.
◆Do not use the treadmill after meals or when feeling tired.
- may cause damage to your health.
◆This product is for home use. It cannot be used in school or gymnasium where are lots of
unspecific users.
- may cause injury.
◆Do not use the product while you are having meals, drinking or doing other activities.
◆Do not use the product under the influence of alcohol.
- may cause accidents or injury.
◆Do not use the product when you have a hard object in your pocket.
- may cause accident or injury.
◆Do not pull out the plug or switch the power to “off” while operating.
- may cause injury.
Do not operate with wet hands!
◆Do not pull out or insert the plug with wet hands.
- may cause electric shock or injury.
Remember to pull out the plug!
◆Remember to pull out the plug when treadmill is not in use.
- Dust and damp can damage insulation and then cause electric leakage and fire.
◆Pull out the plug if performing any maintenance.
- may cause electric shock and injury.
◆Stop using immediately if you notice anything unusual with the machine, pull out the plug
and contact provider’s service department.
- may cause electric shock and injury.
◆pull out the plug if there is sudden power failure.
- may cause accidents and injury when power resumption.
◆You should hold the plug not the wire when pulling out the plug.
- may cause a short circuit, electric shock and fire.

6
Ground connection instruction!
◆the product must have a grounded connection. The grounded connection can provide a
channel with the least resistance for the current when the product is malfunctioning, thus can
reduce the danger of electric shock.
◆The product is equipped with an electric wire for grounding conductor and grounding plug.
The plug must be inserted into a socket that conforms with local regulations.
Danger!
◆Incorrect connection of grounding conductor may cause electric shock. If you are not sure
about the grounding connection, please ask a professional electrician to check. If the plug of the
product does not match your socket, you should ask for an electrician to install the correct socket.
◆The product has a grounding plug. Please confirm that you have the matched socket first. A
socket adapter is not allowed.

7
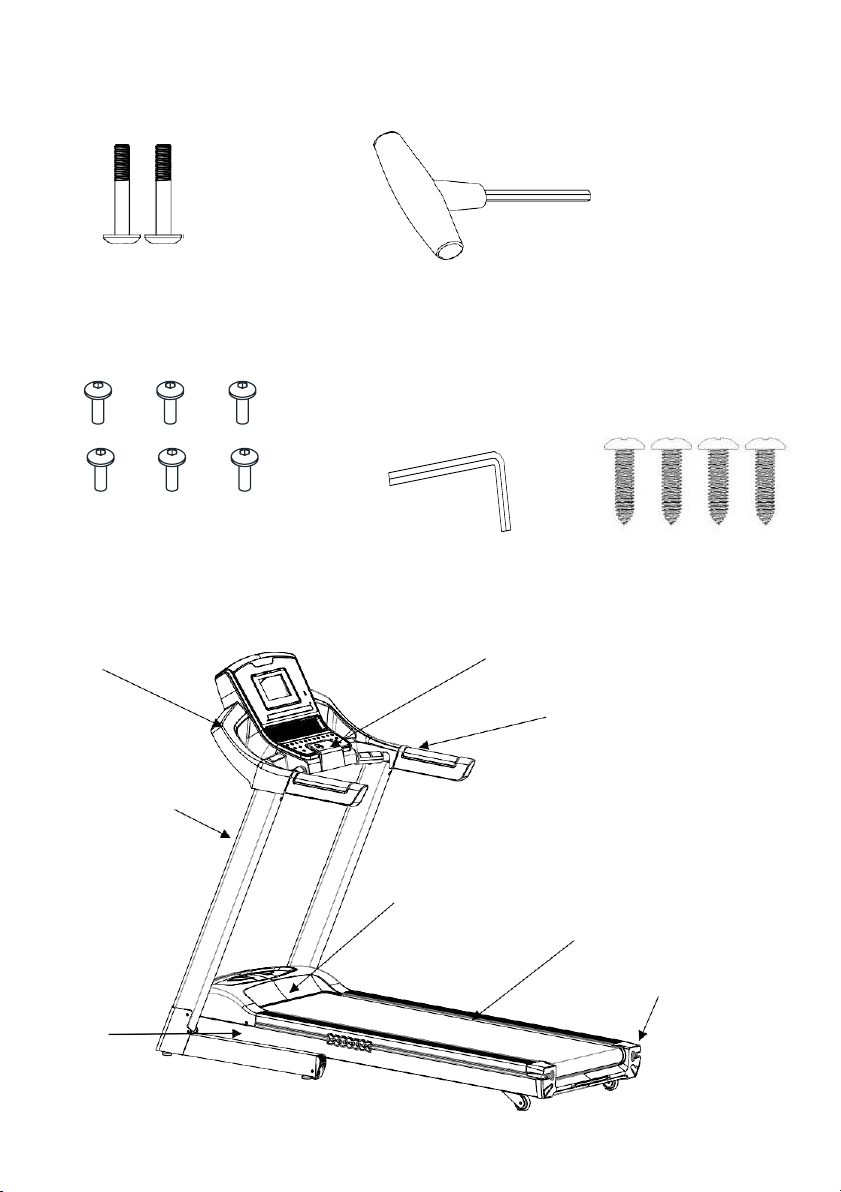
PACKING
LIST
Console
Main frame
Hardware bag Safety key Silicone Oil Manual
Table holder
8
Hardware bag
Allen C.K.S. Self tapping screw×2PCS
(
M8*50*20
)
T shaped wretch * 1PC
Allen C.K.S. Full thread screw×6PCS(M8*15) L Allen wrench S6*1PC
Philips C.K.S. self-tapping screw ST4*16 -4pcs
Treadmill instruction
console
Safety
key
Handle
bar
Upright
post
Motor
cover
Running
belt
Rear cover
Side rail
9
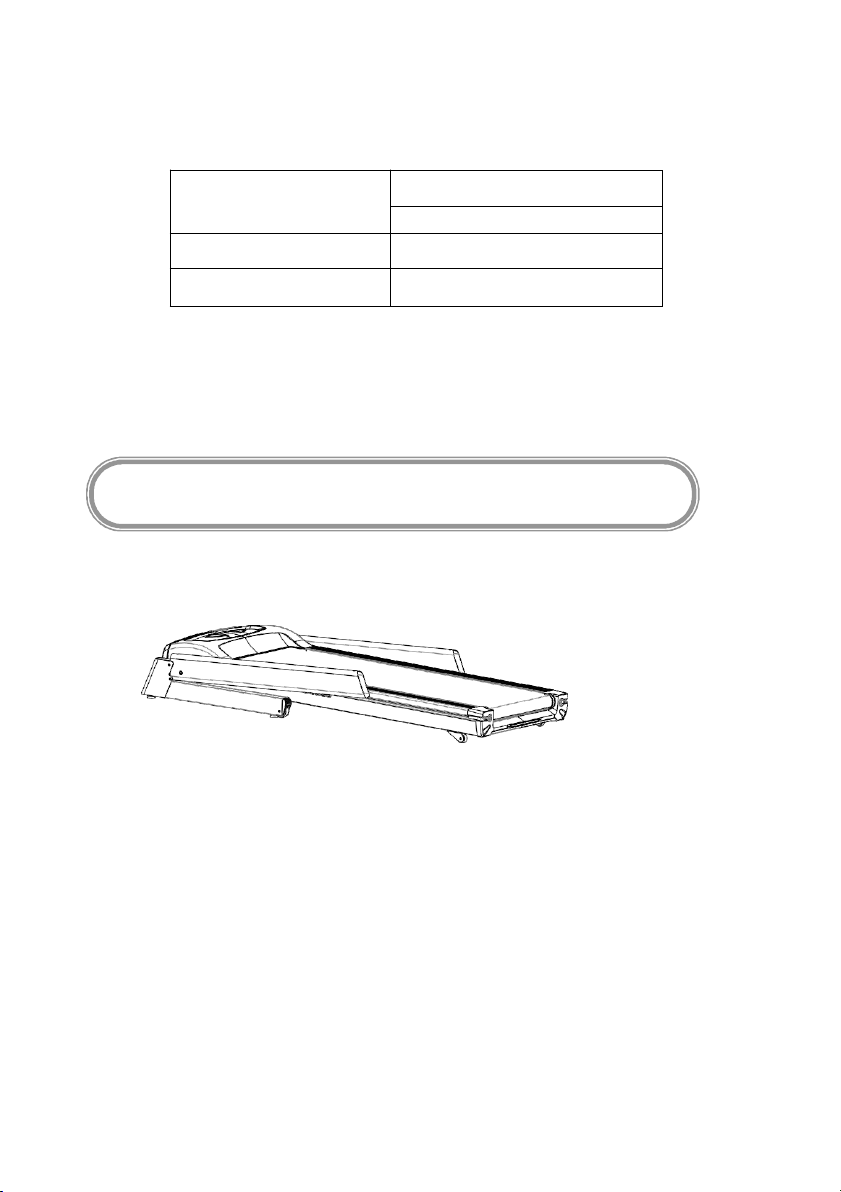
ASSEMBLY INSTRUCTIONS
Technical information
Size
Folding size:1770*790*1450
Open size:1090*790*1560
Running size
1400*500
Space
1-18km/h
*WE RESERVE THE RIGHT TO AMEND THE PRODUCT WITHOUT PRIOR NOTICE.
Step 1:
Take out the machine from box and put it on a flat surface. (As shown)
Step 2:
Insert the upright post into the clamping ring on both sides of the main
frame (please connect the communication wires before you assemble the upright
post). Fix the upright post with 2pcs of Allen C.K.S. half thread screw M8*15 and 2pcs
of M8*50*20 (do not lock tight at this stage).
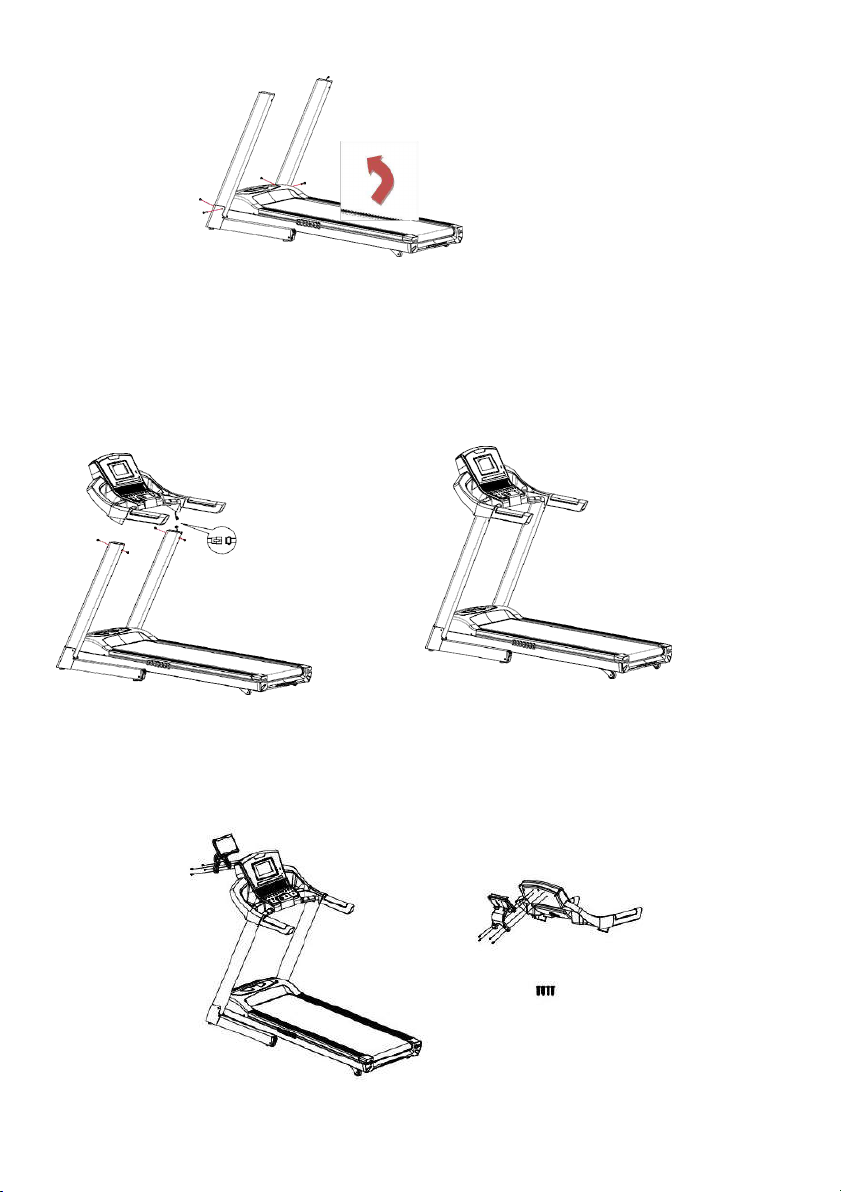
10
Step 3:
Connect the communication wires between the right console frame and
clamp ring (as per the directions in the image below), then connect the console
and upright post with 4 PCS of Allen C.K.S. half thread screw M8*15. (Lock the bolts)
Step 4: Assembly of the table holder:
Mount the table holder on the rear side of the console with four screws.
11
Usage instructions:
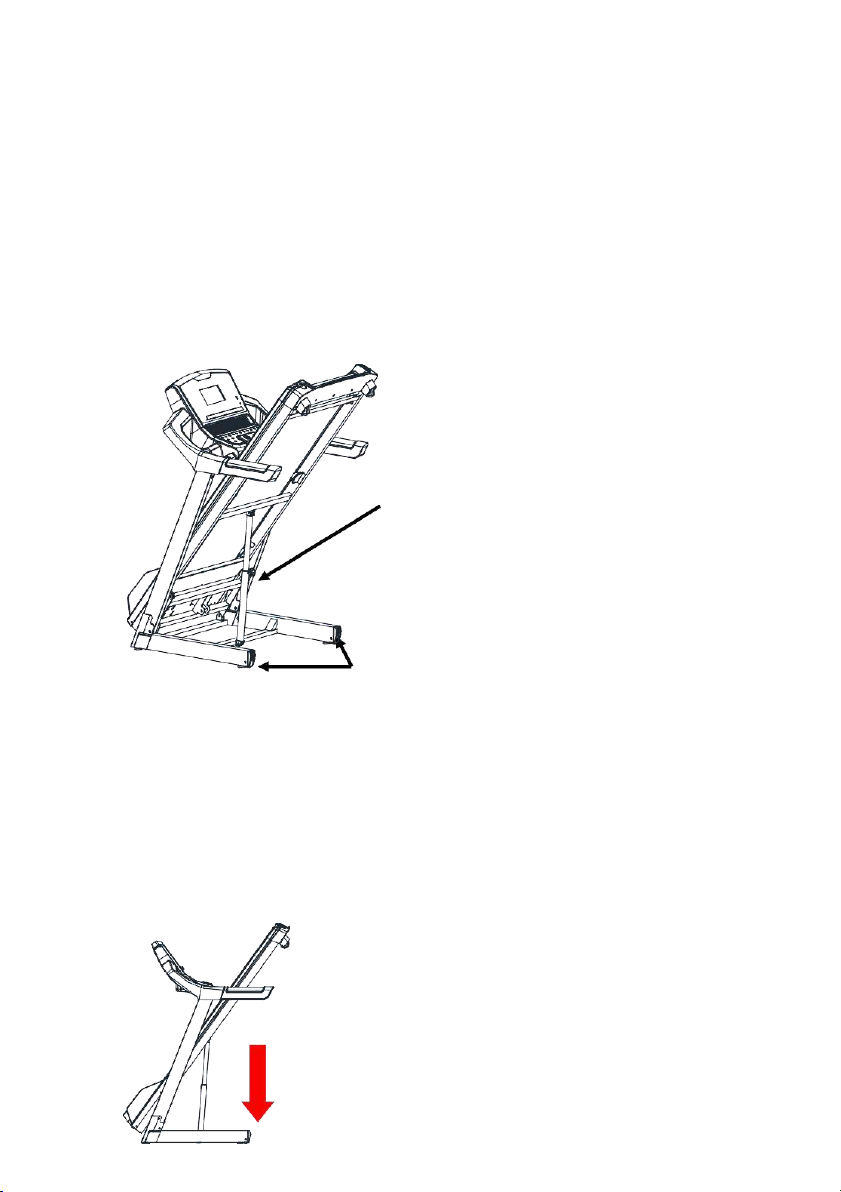
Treadmill folding and moving:
FOLDING
1.
Restore the incline to flat (0) position.
2.
Unplug from power point before folding.
3.
Lift deck until it's parallel to the upright post and cylinder locks into position.
4.
Caution: make sure that the cylinder locking device is engaged.
Cylinder
Wheels
UNFOLDING
1.
Choose a flat place that is 1 meter away from the battery socket.
2.
First hold the running desk with both hand. Then one hand hold the running desk
and the other pull the cylinder quickly. Let the running desk go down to the
horizontal level, and user must keep 1 meter away from the treadmill.
3.
Allow deck to begin slowly dropping before releasing hands.
12
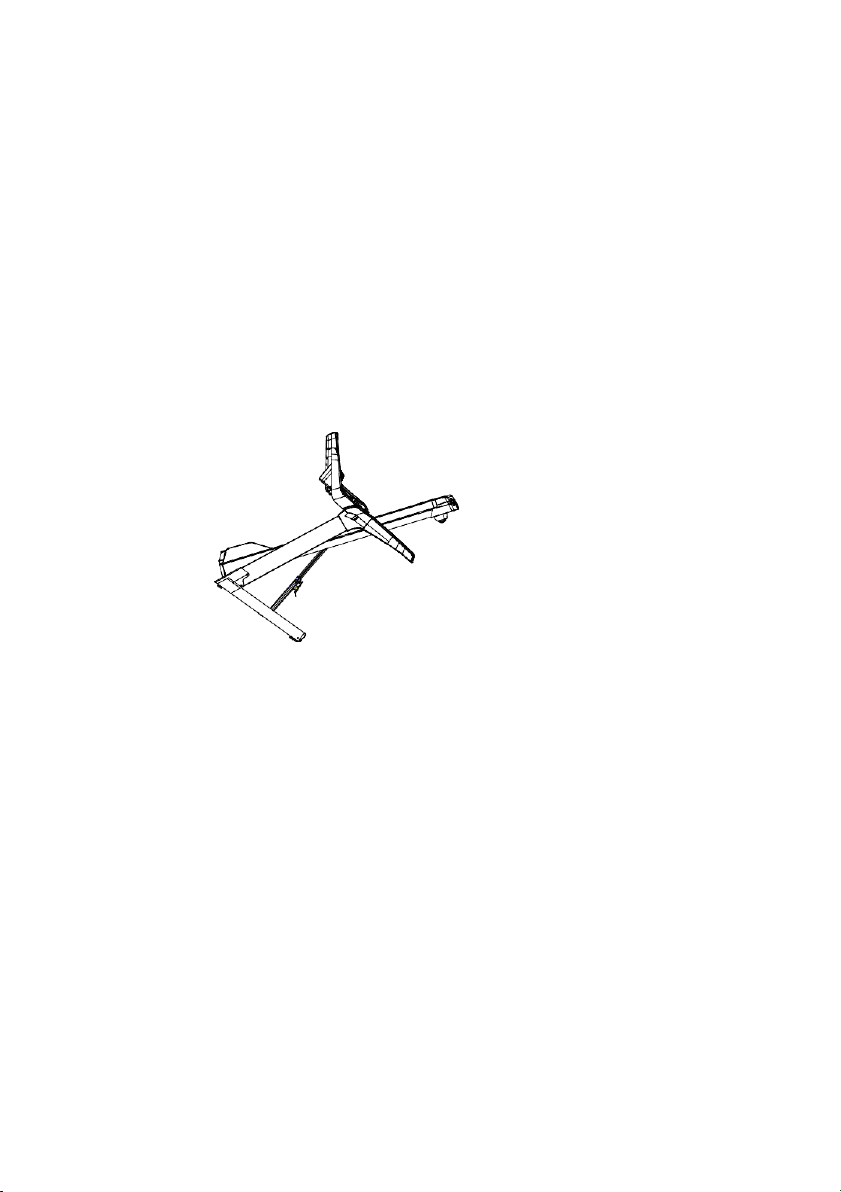
MOVING
1
:
the power is off
2
:
the plug has been pulled out from the socket
3
:
the treadmill has been folded
Then you can catch the end of treadmill with one hand, and catch the handlebar at the
same side with another hand, tilt 40~50° up to chest to move the treadmill slowly, as shown
in picture below:
Grounding Guide:
This product must be grounded. If the treadmill fails or is damaged, the ground wire
can form a minimum resistance circuit, the current into the ground, thereby reducing
the risk of electric shock. This product is equipped with a cable that has a conductor to
ground the unit and a grounding plug. This plug must be plugged into a socket that
complies with local codes and regulations for installation and grounding requirements.
Danger! Improper connection of the equipment grounding conductor may result in an
electric shock hazard. If you do not know if the equipment is properly grounded, consult
a qualified electrician or service person. Do not change the plug that comes with this
product. If the plug does not conform to the socket, allow a qualified electrician to install
a suitable outlet.
This product uses a 220-240 volts line and is equipped with a grounded outlet as
shown in the illustrations below.

13
Note:Ifsafetykeyispulledout,thetreadmillwillstopimmediately.The
consolewillnotwork,thewindowshows“E-07”untilsafetykeyis
reinserted.
Usinginstructionoftreadmill
1.
Poweron,thetreadmillwillstarttothelowestposition,checkthemachineisnormal.
2.
Attachthesafetylockcliptothefabricofsportswearatchestlevel.
3.
Beforerunning,checkthestabilityofthetreadmillanditisfunctioningnormally.Do
notstandontherunbeltatthestart,shouldstandonthesidebar,handlebar,andonceis
workingcorrectlythenstartrunning.Whenpowerison,putonehandtoholdthe
handlebars,pressthe"START"button,treadmilldelaystart5secondsto1.0km/hspeed.
Press the "speed" "+" key, the motor speeds up to 2.5 ~ 3.5km / h (this is a most suitable
runningspeed),usebothhandstograbhandlebars,feethavetostepontherunningbelt,
canrunwiththesamespeed.
4.
Afterafewminutes,youcanspeeduptherunning,pressthe"speed"+""keyor
"speed"-""toincreaseordecreasethespeedasrequired.
5.
Duringtherunningtime,pressthespeedshortcutkeys,youcanquicklyenterthe
runningspeedyouneed.
6.
Press"Stop"keytostopthemotoratanytimeduringrunning.
7.
Preset mode: Press the "Select" button to select one of the automatic operation
modesastherequiredrunningmode.Pressthe"Start"keytostartthetreadmill.The
treadmillstartstorunautomaticallyaccordingtotheselectionmode.Inoperation,youcan
pressthe"speed"+""keyor"speed"-""keytochangethecurrentrunningspeed.Press
"Stop" to stop the motion.
8.
HRC:switchonthetreadmill,thehandsholdstheHRCmetalsensorchip,afew
secondsaftertheheartratedisplaywindowwilldisplaytheuser'sheartratevalue.(Note:
thisvalueisnot100%accurateasmedicaldata,onlyasasportsreference.)

14
LCD Screen
Program
Mode key
Incline shortcut
Speed Shortcut
Incline “+” ”-”
Speed “+” “-”
Safety key
Start
Stop
Key Definition
(1) Display window: 7 inch LCD display
1.1
"DISTANCE" window: displays the distance value;
1.2
"CALORIES" window: displays the calorie value;
1.3
"TIME" window: display the time value;

15
1.4
"INCLINE" window: show the value of the incline;
1.5
"PULSE" window: display the heart rate value;
1.6.
"SPEED" window: displays the speed value;
1.7.
operating buttons: START,STOP,PROGRAM,MODE,SPEED+/-,INCLINE
+/-,QuickSpeedkey6/3
、
9/5
、
12/7
、
15/9,QuickInclinekey6
、
9
、
12
、
15.
(2)
Buttoninstruction
3.1
”PROG”isProgramselectkey:whenthetreadmillisstopped,cycleselectthe
program P01-P36 U01~U03 BMI as you prefer.
3.2
“MODE”iskeyselectkey:InmanualmodeP0normalmode,pressthiskeyto
cycleselect:timecountdownmode,distancecountdownmode,caloriecountdown
mode,normalmode4differentcountdownoperationmodes.
InU1-U3,BMImode,pleaserefertothespecificfunctiondescriptionforthefunctionofthe
modekey.
3.3
“START/PAUSE”key:Whenthetreadmillisstopped,presstheSTARTkeytoturn
onthetreadmill.Press“START/PAUSE”keywhenrunning,itwillpause.
3.4
“STOP” key: When the treadmill is running, press the button to STOP the treadmill.
3.5
"SPEED+" and "SPEED -"KEY: can be used to adjust the setting value when
settingtheparametersofthetreadmill.Oncethetreadmillisstarted,itcanbeusedto
adjustthespeed,step0.1/time,andautomaticallycontinuetoincreaseordecreasewhen
holdingdownformorethan2seconds.
3.6
“QUICKINCLINEKEY”:Itcanbeusedtoadjustthesettingvaluewhensetting
theparametersofthetreadmill.Thetreadmillcanbeusedtoadjusttheascension
afterstarting,step1/time,automaticallyincreaseordecreasewhenheldformore
than2seconds.
3.7
"QUICKSPEED":6KM/H
,
9KM/H
,
12KM/H
,
15KM/HIntherunningstateof
thetreadmill,pressingtheshortcutkeywilldirectlyadjustthemotorSPEEDvalue
markedonthekey.
3.8
Inclineshortcut:"QUICKINCLINE"6%,9%,12%,15%.Intherunningstate
of the treadmill, pressing the shortcut key will adjust the lifting motor to the slope value
markedonthekey.

16
(3)
Program / Start Instruction
A Program Instruction
1. P0 is normal mode: time counting down, distance counting down, calories
countdown mode.
2. 36 setting program: P01,P02,P03,P04,P05, ……,P36;
3. Three user’s program: U01~U03;
4. One body fat function: BMI.
(4)
Manual Mode
1. How to enter manual mode:
A. Switch on, enter normal manual mode.
B. When power off, press MODE key to enter manual mode.
2. 3 countdown modes: time countdown, distance countdown, calories countdown.
When user enter manual mode, press “MODE” key to select mode. After setting, press
“START” key to start the treadmill. The speed and incline are set by user. The default
parameter is 1KM/H and 0% incline.
Normal mode, time countdown, distance countdown, calories countdown. User can
only set one countdown mode, other parameters positive count.
A. When entering manual setting, Time window displays 0:00; time, distance,
calories is in positive counting status and the manual setting is closed. When the
motor is running, press ‘STOP’ key, then the motor starts to slow down to stop, and all
settings return to default state.
B. Under normal manual mode, press ‘MODE’ key to enter time countdown mode,
window displays flashing time. The initial time is 30:00, and press ‘ +’ or ‘-’ to set the speed,
1 min each time. Time setting range is 5:00-99:00.
C. In time countdown mode, press ‘MODE’ to switch to distance countdown mode. The
distance window displays initial distance parameter, 1 kilometer. Press speed key
‘+’‘ or ‘-’ to set the distance. Setting range is 1.0-99 kilometer.0, 0.1 kilometer each time.
D. When in distance countdown mode, press ‘MODE’ to switch to the calories
countdown mode. The calorie window displays default calorie parameter, 50 kcal.
Press speed key ‘+’ and ‘-’ to set the calorie, 10 kcal each time. Setting range is 20-990
kcal.

17
3. Manual program setting instruction
A. Press ‘START’, time countdown for 3 seconds, then the motor start running
and the initial speed is 1KM/H.
B. When the machine is running, press ‘+’ , ‘-’ key or ‘ QUICK SPEED’ to adjust
the treadmill speed.
C. When the machine is running, press“ “/” ” key or “QUICK INCLINE”
key to adjust the treadmill incline.
D. When calories counts down to 0, the speed reduces slowly to stop. Then the
window displays “END” and the buzzer beeps once per second.
E. When distance counts down to 0, the speed reduces slowly to stop. Then the
window displays “END” and the buzzer beeps once per second.
F. When setting time counts down to 0, the speed reduces slowly to stop.
Then the window displays “END” and the buzzer beeps once per second.
(5) Program setting
1.
”P1-P36” are system setting programs, which are only used under time countdown
mode. Under setting status, time window is flashing, press ‘ +’ ‘-’ to adjust the parameter,
press ‘MODE’ to return to the default parameter. The initial time is 30 minutes and the
setting range is 5:00—99:00, press speed ’+’ ‘-’ key to adjust the parameter.
2.
After set the training mode, press ‘START’, time countdown for 3 seconds with 3
warning sound. When count down to 1, the machine starts slowly and speeds up to the
setting speed. Then the machine is running with the setting speed and incline.
3.
When the machine is running, press ‘+’ , ‘-’ key or ‘ QUICK SPEED’ to adjust
the treadmill speed.
4.
When the machine is running, press“ ”/
to adjust the treadmill incline.
” key or “QUICK INCLINE” key
5.
In P1-P36, the speed and slope of each program is divided into 10 segments and
divided equally in each time range. The speed and slope after adjusted are effective in the
current time. There is 3 second warning sound “beeps” with the switch between different
segments. The machine will stop with a long warning sound after running 10 segments.
6.
When the treadmill is running, press “START”, the motor will switch between
pause and restart status. The record remains the same when restarting under the pause
status.
7.
When the motor is running, press the “STOP” button, the motor stops running.
“

18
(6) BMI PROGRAME
BMI is to measure the connection between user’s height and weight. The ideal
BMI rate is between 18-24. Below 18 could be deemed underweight and overweight
between 25- 28, and possible obesity if over 29. (Only for reference)
1. when the treadmill is stopped, press the "PROG" key until select” BMI "and
enter into BMI testing program, press “MODE” key to set the parameter, then press
“+” “-” to set the parameter.
2. The data displayed in the window is the set value, the window displays the
input parameter function.
3. After entering the function of body fat test, the window will first display: F1,
indicating that Sex is entered at this time, the window will display 01, indicating that
the setting is male. Press the speed plus or minus button to select input: 01 (male),
02 (female).
4. Press the MODE key "MODE" and the window displays: F2, indicating that
you enter the Age setting. The window displays 25 years old (the default value).
Press the speed add or subtract key to adjust the Age (the setting range is 10-99
years old).
5. Press the "MODE" button, and the window displays: F3, indicating entering
the Weight setting. The window displays 70kg (154 pounds), and the Weight can be
adjusted by pressing the speed plus or minus button (the setting range is 20-150kg
(44-330 pounds)).
6. Press the "MODE" key, and the window displays F4, indicating that the
Height is set. The window displays 170cm (67inch), and the Height can be adjusted
by pressing the speed plus or minus key (the setting range is 100-199cm (40-
87inch)).
7. Press the MODE button "MODE", the window displays: F5 (BMI), indicating
entering the test body fat function, the window displays --, at this time, please put the
second-hand on the heartbeat sensor on the handrail, the window will display the
subject's body fat value (BMI) within 8 seconds.

19
(7)
Safety key function
In any state, pull-out safety locks, window displays: ”E-07” and sound buzzer
beeps. The machine will stop immediately if it is running. Then reinsert the safety lock,
monitor lights will reactivate for 2 seconds, then go to manual P0 mode (the equivalent of
resetting).
(8)
USER program
USER mode has U1~U3 modes. In USER mode, users can set their own sports
program. Press "PROG" key to adjust to "U1~U3".Then press the "MODE" key or
press the speed "+/-" key to adjust the exercise time (the range is 5-99 minutes), then
press the START key to START the exercise. Press “PROG” key to cycle select the
program U01~U03 and set time by pressing “MODE” or “+” “-” keys. Then press
“START” button to start the treadmill.
Press “MODE” to set 10 segments of specialized speed and incline. When set
the speed, press the speed increase or decrease keys to set the corresponding users
expected speed, which the range is 1KM/H-18KM/H. User can also use the easy quick
buttons to quickly select. When set slope, press“ ”/“ ”set the corresponding
users required slope. The range is 0-15. You can also use the shortcut key of
Ascension to quickly select. Press MODE key to enter the next segment. After the last
paragraph is set, the setting will be saved. Press MODE key to set the time, and the
default is 30:00. Press the increase or decrease keys to adjust the setting time. After
setting, the user can press "START" to start. The user's specialized programs will
be saved. When the user runs the next time, he can enter the corresponding mode.
(9) Handle pulse function
Touch the handle pulse for around 5 seconds, display will show heart rate, range 50
— 200/min, The heart shape flashes during the heartbeat test. This data is for reference
only and should not be regarded as medical data.

20
(10) Parameter range
Initial
Default
Setting
range
Display range
Time(min:
second)
0:00
30:00
5:00-
99:00
0:00-
99:59
Speed(km/h)
0.0
N/A
N/A
1-
18
Incline(%)
00
N/A
N/A
0-
15
Distance(kilometer)
0.0
1.00
1.0
-
99.0
0.0
-
99.9
Calorie(KCal)
0
50
20
-
990
0
-
9990
Under some parameters, press the “+” “-” buttons to adjust and cycle set. For example,
the time setting range is 5:00 to 99:00. When sets to 99:00, press “+” button can return
back to 5:00 to cycle set.
(11) Bluetooth Media play function
Open the Media play devices, search “RUN MUSIC” and match, connection will be ok
after a prompt tone. You can use the device to play music, the volume is controlled by
the device.
(12) Bluetooth APP
Supports Bluetooth connection of three APPs, "Anyrun", "Kinomap" and "Zwift".
1. ANYRUN
Turn on the device's Settings -- Bluetooth. Go to the Oma APP -- click Settings --
Device Management -- Find the device. Click the Bluetooth name that you find, and the
system will connect automatically. After successful connection, the screen of the
console will display the Bluetooth connection symbol.
When using the APP, you need to register a personal account for Oma APP icon -- click
on the Settings in the right corner -- log in.
Users exercise data will save on cloud server.
2. KINOMAP
Register and log in the Kinomap APP, click on the fitness equipment management pages,
click "+" in the upper right corner to add new fitness equipment. Select My Treadmill and
FTMS brand. Click Treadmill on My Treadmill page. Select SW-5925CAI- XXXX from the
fitness equipment and click.
This manual suits for next models
1
Table of contents
Popular Treadmill manuals by other brands


KingSmith
KingSmith WalkingPad Smart Foldable Treadmill Series user manual

NordicTrack
NordicTrack T 7.0 Treadmill Manuel de l'utilisateur

Techness
Techness RUN 800 owner's manual

NordicTrack
NordicTrack T 13.0 Treadmill Gebruikershandleiding

Technogym
Technogym Jog Now Excite+ 700 Technical service guide

NordicTrack
NordicTrack T5.5 NTL60011.1 user manual


