Attacus AT-500 User manual

Please thoroughly read all safety noces in this manual before using this product. Save this manual properly for future reference.
User Manual

ALL
1
Please Save this manual properly for future reference.
When using any electrical products, basic precauons should always be followed. Thoroughly read instruc-
ons in this manual before using the treadmill. It is the responsibility of the owner to ensure that all users
of this treadmill are adequately informed of all warnings and precauons. If you have any quesons aer
reading this manual, please contact your local dealer or the Warranty card for technical support.
This treadmill is for ordinary household use ONLY. The warranty does not cover applicaons in business
place, rental service, school or organizaon or the condion when it is approved that the machine is used
in a non-family locaon.
Do NOT try to modify, disassemble or repair the treadmill on your own. Please contact the dealer or the
Warranty card for technical support if you find any malfuncon. Arbitrary modificaon or disassemble may
cause malfuncon and lead to personnel injury. The warranty does NOT cover malfuncon caused by any
arbitrary modificaon, disassembly or improper repair by the user. Failure to comply will void the warranty.
Important Percauons

AT
2
Contents
Important Precauon ..................................... 1
Table of Contents............................................ 2
Grounding Instrucon .................................... 3
Treadmill Precauons..................................... 4
To Ensure Yours Safety.................................... 5
Assembly Instrucon...................................... 6
Treadmill Design Illustraon........................... 7
Before Assembly / Replacement parts ....... 8~9
Assembly Procedure............................... 10~13
Move / Transport the Treadmill.................... 14
Adjust / Maintain the Belt ............................ 15
Preparaons before Use...........................16~17
Operaon Instrucon..................................... 18
Console display overview...............................19
Operang Panel........................................20~21
Basic Operaon ........................................22~23
Exercise Programs ....................................24~25
Target Heart Rate Zone...................................26
Pairing of Various Devices ..............................27
Troubleshoong .......................................28~29
Roune Maintenance.....................................30
Specificaon ...................................................31
Exploded Parts Diagram ...........................32~35

ALL
3
The power socket of this product contains a grounding conductor. This socket must be inserted into the outlet via the power cord with grounding latch. The plug must
be plugged into an appropriate outlet that is properly installed and grounded in accordance with local codes and ordinances.
This product uses a rated voltage of 220V or 110V and comes with a three-pin power cord as shown in the following illustraon.
If the grounding outlet is not available, please use grounding adapter to connect this plug to the two-pin outlet. Please have qualified electrician install the
grounding outlet correctly before using the adapter. Please connect the grip or similar adapter extension to the ground and fix with the metal screw whenever
the adapter is used. Refer to the following illustraon.
Do determine the power cord is electrically related for 220V or 110V by checking the specificaon label or specificaon in the manual (P.31). Please make sure
the cord is connected to the plug with correct voltage. DO not use the power cord via adapter or extension cord to avoid of any component damage or personnel
injury caused by sudden voltage changes such as voltage surges and spikes.
Power cable
Three-pin outlet
Power cable
Grounding adapter
Metal grounding screw
Two-pin outlet
The above illustraons only show three-pin power code power cord and outlet or two-pin outlet and grounding adapter. The type of
three-prong, two-prong and grounding adapter may vary in different countries. The enclosed power cord will be provided according to local
regulaons of each country..
Make sure the power cord is connected to the outlet with correct voltage. DO NOT connect the power cord to the outlet via voltage adapter
or extension cord to avoid accidental current that may damage component and lead to personnel injury.
•
•
Grounding Instrucon
Grounding
Outlet

ALL
4
• Never use the treadmill before securing the safety key clip to your clothing.
• Stop exercising immediately and consult your physician before connuing, if you experience any kind of pain, including but not limited to chest pains, nausea,
dizziness, or shortness of breath.
• Maintain a pace you feel comfortable during the workout. DO NOT run with extremely high speed.
• Do not wear clothes that might catch on any part of the treadmill.
• Always wear athlec shoes while using this equipment.
• At no me should more than one person be on treadmill while in operaon.
• Do not jump on the treadmill or stand on plasc parts such as Motor safety guard , Upright safety covers or rear cover, to avoid any improper use or acon.
• This treadmill should not be used by persons weighing more than Max. User Weight. Failure to comply instrucons will void the warranty.
• Disconnect all power before maintenance, moving or folding the treadmill.
• Please use a wet cloth to clean the surface for machine maintenance. DO NOT use any detergent.
• The treadmill should never be leunaended when the power is plugged in. Always UNPLUG from outlet when NOT in use.
• DO NOT cover the machine with blanket or fabric. The blanket or fabric may cause overheat and lead to fire, electric shock or other personnel injuries.
• Make sure the machine is connected to the correct outlet. Failure to comply instrucon will void the warranty.
• Please place the machine on a level ground. DO NOT place and use the machine on an uneven ground.
Please abide by following instrucon to avoid burn, fire, electric shock or injury to persons:
• Please turn offthe power and unplug the power cord immediately aer finishing the workout.
• Always turn offthe power and unplug the power cord before cleaning, performing maintenance, move or taking offparts.
Treadmill Precauons

ALL
5
• Keep children under 13 or pets always away from the treadmill at least 3M (10.) at all mes. Children under 13 are not allowed to use this machine.
• The use by children between 13~18, seniors over 65 or disabled people must be under the surveillance of other adults to avoid any danger.
• Please follow instrucons in this manual when using the machine.
• DO NOT use parts other than manufacturer or distributor recommendaon to avoid personnel injury.
• Please stop using the machine immediately and contact maintenance staffif you encounter power cord or plug damage or irregular operaon caused by
accidental drop, impact or soaking in the water.
• Put the power cord away from the surface with high temperature. DO NOT lithe machine with the power cord or use the power cord as a handrail.
• Make sure the vent of the machine is clean before the workout. Remove substances like coon wadding and hair.
• DO NOT put, drop or insert any object in openings as it may result in electric shock. Alatech is not responsible for any damage rising from failure to follow
instrucons.
• The motor controller generate heat. DO NOT use any spray near this area as it may result in combuson.
• Turn offall equipment and power and unplug the power cord when the workout is completed or the connecon is removed.
• Only use this machine in a place with controlled temperature. DO NOT use in the garage, porch, bathroom, kitchen, carport or outdoors. We is not responsible
for any damage rising from failure to follow instrucons.
• This treadmill is for ordinary household use ONLY. The warranty does not cover applicaons in business place, rental service, school or organizaon.
• Specific sole materials of shoes may generate stac electricity. To avoid electric shock, please wear sneakers with gum sole instead of plasc or insulated one.
• Before using the machine, please DO consult your physician and evaluate by physical exam, especially for users are over age 45, users with pre-exisng health
problems from family history such as high pressure or heart disease, users with high cholesterol or obesity, smokers, expectant mother, and users have not done
a workout regularly over one year.
Please abide by following instrucon to avoid burn, fire, electric shock or injury to persons:
This product is for indoor use only. Please pay aenon to room temperature and humidity. If the machine is placed in the environment with
unstable temperature and humidity, it is recommended to warm-up the machine to ambient temperature before the workout. Fail to follow
this instrucon may lead to early damage to electronic components.
To Ensure Your Safety

AT
6
Treadmill Serial Number
Please always make sure that serial number on treadmill is same as warranty card indicated. If not, please do not assemble machine and contact
Alatech’s service center or distributor for further assistance. If maintenance needed, the serial number on machine and warranty card must be
the same, if inconsistent serial number is found, we will not provide warranty.
Ensure your warranty by following noces:
1) The warranty will be invalid if there is no distributor stamp on warranty card or the content is incomplete. However, this warranty does not
cover following condions:
•When customers can provide original invoice or proof of purchase
•When the related proof of purchase can be provided by document
2) Please bring this warranty card when you need maintenance services.
3) Please contact approved distributors or service locaons while your warranty is sll valid.
4) Please keep this warranty card in a secure place.
Assembly Instrucon
Please follow the assembly instrucons and steps in this manual and make sure all parts are securely fastened. Fail to follow the instrucons
may lead to loose parts on the treadmill. Loose parts can result noise or may cause personnel injury. Please thoroughly read the assembly
instrucon to avoid any damage to the treadmill.

500
7
Speaker
Console display overview/operang panel
Rack
Quick key panel
Power switch/power cord
Upright
Upright safety cover
Hydraulic lisystem
Fan
Magazine rack
Handrail quick key
Handrail
Safety key
Heart rate sensor bar
Motor safety guard
Side rail
Belt
Non-skid mat
Belt tension adjusng screw
Caster
Water bole holder

AT
8
1) Please move and transport the treadmill carefully. Put the box on a level surface. Only open the box with its
surface on top. It is recommended to put a protecve mat on the floor.
2) Unpack and assemble the treadmill at the planned locaon to avoid unnecessary transportaon. Pay great
aenon when unfastening cable e that used for packing or fixing to avoid accidental bounce.
3) Please follow assembly procedure to assemble the treadmill aer unfastening cable e. Please fold the machine
to upright and make sure the pin of hydraulic liis securely locked if you need to lior move it. DO NOT try to
crane the machine.
4) DO NOT try to lior move the machine with a single part or stand. (Refer to “Move/transport the treadmill” on
P.14 for informaon related to moving the product.)
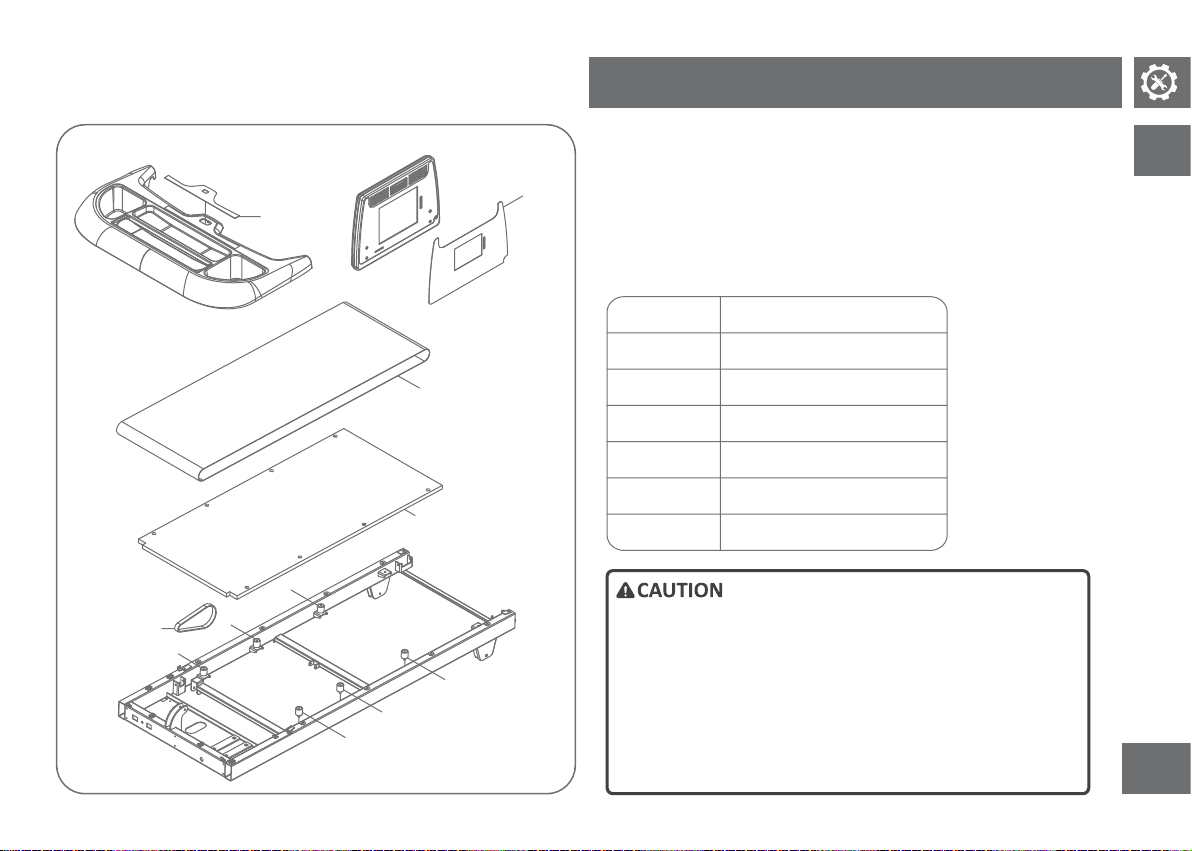
Enclosed tools
Hex wrench
Phillips screwdriver
Noces and safety ps
Assembly parts
Console x 1
Display Console x 1
Upright x 2(L & R)
Upright safety cover x 2(L & R)
Accessory pack
Hardware parts box x 1
Safety key x 1
Power cable x 1
Line-level audio adapter x 1
Silicon oil x 1
When assembling, make sure all nuts, screws and parts are posioned and lightly locked before
proceeding to the next step. Aer the assembly is completed, make sure all screws are securely
locked. DO NOT arbitrarily decrease the quanty of assembling screw.
Several parts are lubricated before delivery to facilitate assembly. DO NOT arbitrarily wipe offthe
lubricant. You can use lubricant to assemble parts when facing any difficulty. It is recommended
to use the lithium base grease for bike.
Several parts are very heavy; DO NOT try to assemble the machine on your own. These heavy
parts may fall and lead to personnal injury. Strongly recommend to have more than 2 persons for
assembly.
•
•
•
Please follow assembly instrucons to lior move the treadmill. DO NOT arbitrarily lior take out
the product from the package.
Fail to following above instrucons may lead to personnal injury and machine damage. Please
pay great aenon to these instrucons.
•
•
Please contact the distribu-
tor or the Warranty card for
technical support if any part
is missing or you have any
queson.
Before Assembly
AT
9
11
10
14
14
13
14
17
14
13
44-24
33-1
Wear condion of replacement parts will vary according to different use
condions such as weight, frequency of use, average speed and incline. Wear
condion of operang panel depends on the frequency of press. Buons that are
frequently used will wear first. Under normal use condions, the lifeme of
replacement parts will be 1~2 years. Wear of supplies may cause irregular
operaon such as noise and slipping belt. Please contact the distributor or the
technician and have them to determine the cause. DO NOT disassemble the
machine by yourself as it may lead to the misjudgment of technician.
10
11
13
Belt
30x30 cushion pad 50A
17
14 30x30 cushion pad 70A
33-1 Film panel(small)
Drive belt
44-24 Film panel(main)
Deck
Refer to the exploded parts diagram (P.32~35) if you noce any
part is missing and inform the distributor or the technician the
corresponding number. The technician will determine if the
user can replace with another part and assemble on his/her
own. Please contact technician if you don’t know how to assem-
ble the missing part. DO NOT disassemble the treadmill to
conduct parts assembly or maintenance as the technician may
misjudge the problem or the machine may not reach complete
fixaon and lead to personnel injury.
Replacement parts

AT
10
Console cable
Hex wrench
A
A
DC
C
A
D
C
C
B
C
B
C
B
C
B
DC
A
D
Console cable
Hex wrench
A
A
DC
C
A
D
C
C
B
C
B
C
B
C
B
DC
A
D
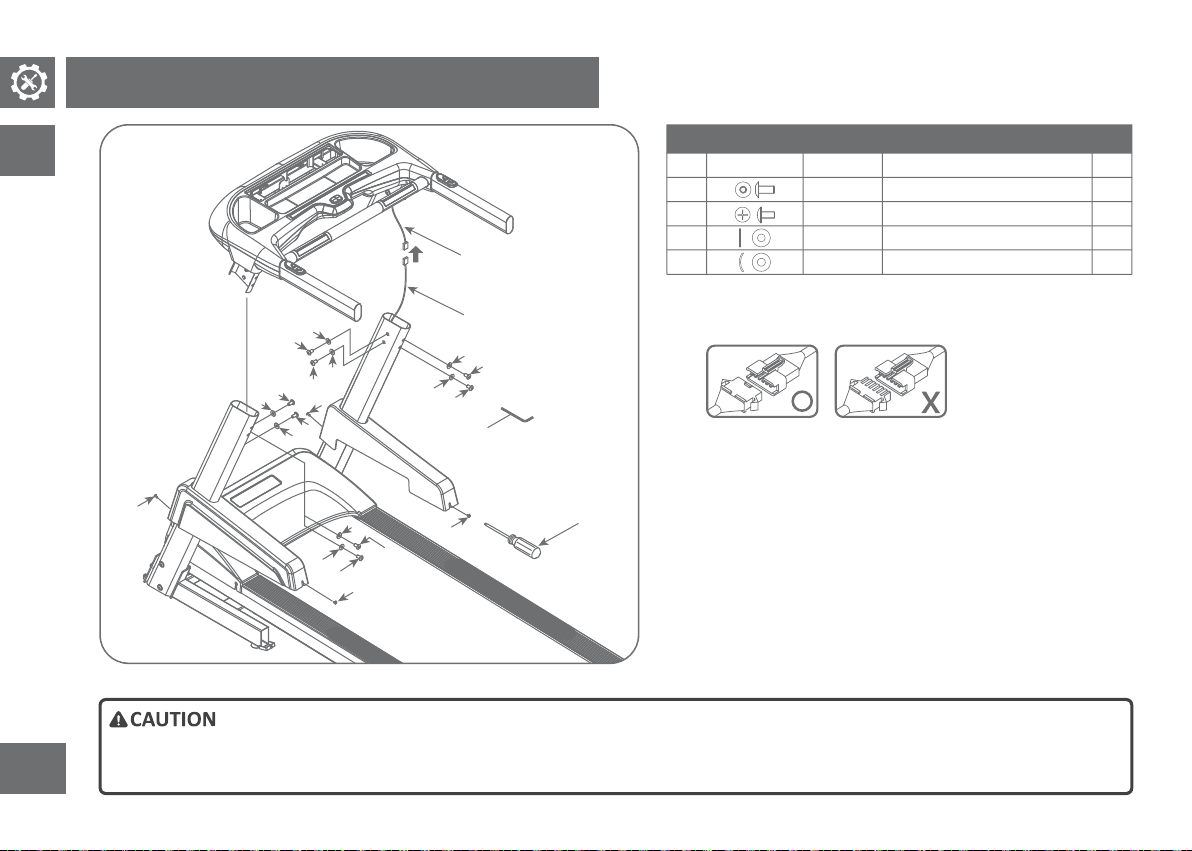
1) Open hardware pack 1.
2) Connect the lead wire to the console cable, pull them through the
right upright of the console, pull out the lead wire from the right upright
and then fix the console cable to the top of upright. Please remove the
lead wire then.
3) Put the right upright on the frame.
4) Use part A, C & D (2 of each) and connect the upright to the frame.
Make sure all screws and washers are well posioned and lock them
lightly.
5) Use part B & C (2 of each) and connect the upright to the frame. Make
sure part B & C are well posioned and lightly locked. Confirm all screws
and washers on the right side are posioned.
6) Repeat step 3~5 to complete the assembly of the leupright.
Hardware pack for step 1
QtyDescriponParts
A
B
C
D
TypeIllustraon
4
6
8
4
Buon Head Socket Bolt (55L)
Buon Head Socket Bolt (20L)
Flat washer (Ø23)
Split washer (Ø18)
Screw
Screw
Washer
Washer
• Put the console strut on the frame with great care to avoid any damage to the console cable.
• DO NOT lock the screw ghtly before you finish step 3.
Step 1 of Assembly Procedure

AT
11
1) Take the leand right upright safety covers.
2) Put the protecve cover through the right upright safety cover carefully.
3) Put the protecve cover through the leupright safety cover carefully.
Step 2 of Assembly Procedure
AT
12
Console cable
Console connecng cable
Hex wrench
Phillips screwdriver
A
A
D
D
D
D
A
A
A
A
A
A
C
C
C
C
B
B
B
B
1) Open hardware pack 3.
2) Connect the console cable to the connecng cable on the console.
3) Put the console on the uprights carefully.
4) Use part A & C (2 of each for leand right side), connect the upright
to the frame. Make sure all screws and washers are well posioned and
lock them lightly.
5) Use part A & D (2 of each for leand right side), connect the upright
to the frame. Make sure all screws and washers are well posioned and
lock them lightly.
6) Lithe uprights safety cover of the upright on both sides and lock all
screws at the lower side of upright ghtly.
7) Use part B (2pcs for leand right side) and lock the uprights safety
cover of the upright safety cover on both sides ghtly.
8) Lock all screws ghtly.
Hardware pack for step 3
QtyDescriponParts
A
C
TypeIllustraon
8
4
Buon Head Socket Bolt (20L)
Screw
Washer
B4
Truss head Phillips screw (10L)Screw
D4
Flat washer (Ø23)
Curved washer (Ø23)Washer
• Please assemble the console with great care. Make sure no wire is pressed or bent to avoid any damage.
• Make sure all screws are well posioned and lightly locked. DO NOT lock the screw ghtly when posioning to ensure a smooth assembly.
Step 3 of Assembly Procedure
AT
13
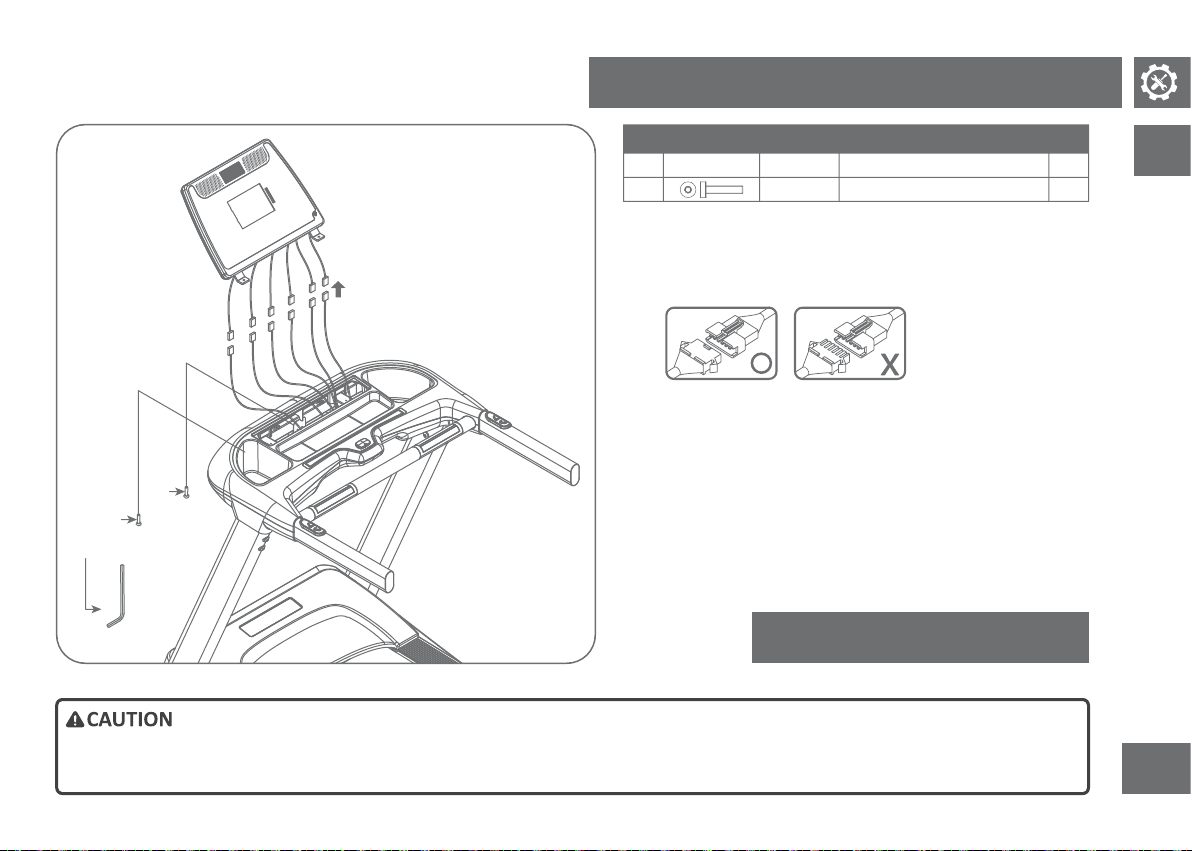
Hex wrench
A
A
1) Open hardware pack 4.
2) Aach the connectors on the display console to the connectors on the
console bridge according to male and female docking terminal line.
3) Put the display console onto the console bridge carefully.
4) Securely ghten all the bolts and nuts of PART A under the display console.
Hardware pack for step 4
QtyDescriponParts
A
TypeIllustraon
2
Socket Head Cap Bolt (30L)Screw
Assembly completed
• Please assemble the display console with great care. Make sure no wire is pressed or bent to avoid any damage.
• Please wire according to male and female docking terminal line and follow the illustraon for correct direcon. DO NOT wire forcibly.
Step 4 of Assembly Procedure

ALL
14
Press
Move
Transport
•
•
There is a safety lock on the hydraulic liunder the machine. If you like to put down the deck, please gently kick the orange pin of hydraulic
liand press deck slightly, then lower the deck carefully on the ground.
The treadmill is very heavy. Please ask another person to move or transport it with you. Before moving or transporng, make sure the deck is
folded and the pin of hydraulic liis fixed. DO NOT try to arbitrarily move or transport the treadmill on your own. Fail to follow above instrucons
may lead to personnel injury and machine damage. Please pay great aenon to these instrucons.
Move / Transport the Treadmil
Please hold the frame at the rear side of machine or under back roller secure-
ly and upright the deck carefully unl the pin of the hydraulic liis locked.
Please put down the deck carefully and make sure it does not fall. To unlock
the fixaon, please hold the frame at the rear side of machine or under back
roller securely and lightly kick the orange pin of hydraulic liand press deck
slightly. Put the deck on the floor carefully.
How to fold
The treadmill comes with two sets of casters. Please fold the treadmill and
make sure the deck is fixed before moving it. Hold the handrails ghtly, make
the machine lean backward and move it. Aempt to move or transport the
treadmill without a folded and fixed deck can result in personnel injury or
machine damage.
How to move
The treadmill comes with two sets of casters. Please fold the treadmill and
make sure the deck is fixed before moving it. Hold the handrails ghtly, make
the machine lean backward and move it. The treadmill is very heavy. DO NOT
arbitrarily move it unless it’s necessary.
How to transport

ALL
15
“LUBE” will be displayed on the digital screen when the accumulated hour reaches 100
hours or distance of 1000km as a reminder of belt maintenance. Please press “STOP” or
remove the safety switch and maintain the belt under standby status. Aer finishing belt
maintenance, please press “START”, “SPEED UP” and “SPEED DOWN” simultaneously to
clear the accumulated hours or kilometers. For belt maintenance, apply the silicon oil
(the whole bole) to the inner side of belt. Aer the oil is fully applied to the belt, please
operate with high speed (10KM) for 10 minutes to make the oil spread evenly on the belt.
The belt slides to the le:
When the belt slides to the le, please fine-tune
the rear lescrew in a clockwise direcon to the
right under high speed operaon (10KM). Repeat
above steps unl the belt moves back to the
center if the belt sll shis offaer 30~60 seconds
under high speed operaon.
The belt slides to the right
When the belt slides to the right, please fine-tune
the rear right screw in a clockwise direcon to the
right under high speed operaon (10KM). Repeat
above steps unl the belt moves back to the
center if the belt sll shis offaer 30~60 seconds
under high speed operaon.
The posion of belt is adjusted before shipment. However, somemes the belt may shioffcenter during transportaon.
To adjust a slipping belt, please use the enclosed hex wrench turn the screws at rear (both sides) of the deck to the right by 90 degrees unl no slippage occurs.
Make sure the belt is not moving while adjusng the screw.
DO NOT adjust the belt when the machine is operang. A ght belt may bring extra load to the frame and electronic components and
therefore should be avoided.
When the belt is adjusted to the center, please test with the speed of 10KM for 30~60 seconds to check if the belt is appropriately
ghtened and if any deviaon occurs. Keep your fingers, hair and clothing away from the belt when tesng.
•
•
Adjust / Maintain the Belt
Belt maintenance
Belt adjustment
The belt stays at the center

ALL
16
200CM
100CM
100CM
30~50CM
Place the machine on a level ground. Clearance requirement: 200cm at the
rear, 100cm at leand right sides and 30~50 cm at the front. DO NOT place
the machine in front of the indoor/outdoor vent, in the garage, in the open
yard, outdoors, or near the water supply.
The treadmill is an equipment for aerobic exercise that can facilitate weight loss, cardiopulmonary funcon enhancement, and muscle tension and basic metabol-
ic rate improvement. Good exercise habits are helpful for achieving these goals. This product can help you to build healthy exercise habit at home.
Please evaluate your physical condion before the exercise and pay aenon to following advice:
1) Do warm-up before you start to run. Warm-up can help stretching your muscles and avoid sports injury.
2) Wear sneakers with a gum sole. This can effecvely relieve the pressure to knees during the workout.
3) Please focus on your workout and please aach the safety clip to your clothing, please also pay highly aenon to your safety to use smart device or any media
player to watch TV/magazine during workout as this may lead to sport injury caused by poor posture.
4) Gradually increase your running speed. Release your grip on the handrails at a comfortable speed.
5) We recommend to limit your exercise to 30~60 minutes. Excessive exercise may result in knee injury or other potenal injuries.
6) Decrease your speed from a fast walk to a slow walk for a gradual recovery when your workout is coming to the end. DO NOT leave the deck immediately aer
the workout to avoid dizziness.
The treadmill is a simple and efficient training equipment and your shortcut to pursue a
healthy lifestyle.
DO NOT start the machine with your feet on the belt. Please stand on foot rails when starng the machine. Start walking on the treadmill only
when the belt starts moving. DO NOT start the machine with the fast run speed. DO NOT try to jump on the machine.
Preparaons before Use
Treadmill locaon

ALL
17
Regulang foot pad
The machine will not start operang unl the safety key is correctly inserted into the port. Always aach the safety key to your clothing during workout. The
safety key is the device to ensure your safety, the emergency stop cung offthe power in case runner accidentally falls down on the treadmill. Please check every
2 weeks to ensure the safety key work funconally.
Start with slow speed and gradually increase the speed to a comfortable level. DO NOT let the machine run by itself. Please pull out the safety switch, turn the
power offand unplug the power cord when not in use. Please start the machine with slow speed. Stand on foot rails first and try to turn your trunk or lean
forward. Please stop using any sport equipments including the treadmill immediately once you feel any dizziness, pain, exhauson or difficult breathing.
Level the machine before use. When the
treadmill locaon is determined, please adjust
the regulang foot pad on the deck and fix it
aer adjusng to the best posion. Make sure
the deck is adjusted to an appropriate height
before use.
Make sure the power cord of treadmill is correctly plugged. The indicator should light up when the power is on. The digital screen will light up aer the beep; 3
seconds aer the machine enters standby status, you can press “Quick Start” twice to proceed to fast exercise or select “PROGRAMS” and the machine will start
to operate at low speed.
DO NOT use the machine without using the safety clip. Please aach the safety clip to your clothing before the workout. Try to pull out
the safety switch and make sure the clip does not fall from clothing.
Damaged power cord or outlet may lead to irregular machine operaon and personnel injury. Please stop the operaon or workout imme-
diately if this occurs.
•
•
Leveling
Turn on the power
Safety key
Correct use

500
18
In this chapter, we’ll introduce the basic operaon including panel operaon and training plan and personal parameter seng. Please make yourself familiar with
the buons and use the machine for workout according to your requirement. It is recommended to read this manual before starng the workout.
When using the machine, we recommend you to pair and connect to smart and wearable devices first when the treadmill is in standby
mode. Confirm if your exercise data has been transmied to the personal device from the treadmill aer workout immediately. Exercise
data will not be saved when the machine is in sleep mode or the power is off. To ensure complete data, it is recommended to confirm right
aer you finish the workout. (Refer to “Connecon of various devices on P.27 for detailed informaon)
Operaon Instucon
Please download treadmill APP before use
• Recommended App: Ala Fitness
• System requirements of APP installation:
• Support iOS 10.0 or later
• Support Android 5.0 or later
• Built-in Bluetooth 4.0 or later
• Scan QR Code or search for Ala Fitness on Apple Store
or Google Play and download.

500
19
1) Time : display in the format of HH: MM: SS. Display your
workout me or connuous workout me.
2) Slope : display in level. Display the slope when you are doing a
fast walk or running on the treadmill.
3) Speed : display in km or mile. Display the slope when you are
doing a fast walk or running on the treadmill.
4) Lap & Program : display the lap or program selecon.
5) KM & Mile : display the distance in digital clock in km or mile.
6) STEP : display the step detected when running in leand right
feet.
7) Pace & Step : can switch the display of your current Pace,
steps(Step1), step frequency(Step2), and current length(Step3).
8) Distance & Slope : can switch the display of total distance or accumulat-
ed slope of your workout.
9) Total calories & Calories per hour : can switch the display current total
calories burned or calories burned per hour.
10) Heart beat & Workout metabolic rate : can switch the display of
current heartbeat or convert the heart rate into metabolic rate to show
workout intensity.
11) Bluetooth connecon : when this indicator is on, the heart beat is the
value detected by Bluetooth on the connected wearable device.
12) ANT+ connecon : when this indicator is on, the heart beat is the value
detected by ANT+ on the connected wearable device.
13) Smart device connecon : when this indicator is on, it means the
smart device is connected to the treadmill via Bluetooth.
14) Bluetooth Speaker connecon : when this indicator is on, it means the
Speaker is connected to the treadmill via Bluetooth.
Other manuals for AT-500
1
This manual suits for next models
1
Table of contents
Other Attacus Treadmill manuals


