manuals.online logo
Brands
  1. Home
  2. •
  3. Brands
  4. •
  5. Hitachi
  6. •
  7. CRT TV
  8. •
  9. Hitachi C28W460N User manual

Hitachi C28W460N User manual

Other Hitachi CRT TV manuals

Hitachi CL2026S User manual

Hitachi

Hitachi CL2026S User manual

Hitachi 32UDX10S, 36UDX10S User manual

Hitachi

Hitachi 32UDX10S, 36UDX10S User manual

Hitachi CG2143S User manual

Hitachi

Hitachi CG2143S User manual

Hitachi CL2554AN User manual

Hitachi

Hitachi CL2554AN User manual

Hitachi 27CX01B User manual

Hitachi

Hitachi 27CX01B User manual

Hitachi 27CX29B User manual

Hitachi

Hitachi 27CX29B User manual

Hitachi C32W460N User manual

Hitachi

Hitachi C32W460N User manual

Hitachi C32W40TN User manual

Hitachi

Hitachi C32W40TN User manual

Hitachi GX Series 32GX01B User manual

Hitachi

Hitachi GX Series 32GX01B User manual

Hitachi C32WF535N User manual

Hitachi

Hitachi C32WF535N User manual

Hitachi 27GX01B User manual

Hitachi

Hitachi 27GX01B User manual

Hitachi 20SA4B, 20SA2B User manual

Hitachi

Hitachi 20SA4B, 20SA2B User manual

Hitachi 27CX4B User manual

Hitachi

Hitachi 27CX4B User manual

Hitachi 31DX22B User manual

Hitachi

Hitachi 31DX22B User manual

Hitachi C28W3XTN User manual

Hitachi

Hitachi C28W3XTN User manual

Hitachi 31DX11B User manual

Hitachi

Hitachi 31DX11B User manual

Hitachi C32WF727N User manual

Hitachi

Hitachi C32WF727N User manual

Hitachi 35TX69K User manual

Hitachi

Hitachi 35TX69K User manual

Hitachi C36WF830N User manual

Hitachi

Hitachi C36WF830N User manual

Hitachi 32UX59B User manual

Hitachi

Hitachi 32UX59B User manual

Hitachi C28WF560N User manual

Hitachi

Hitachi C28WF560N User manual

Hitachi C2566TN User manual

Hitachi

Hitachi C2566TN User manual

Hitachi CL29F60N User manual

Hitachi

Hitachi CL29F60N User manual

Hitachi CL1426T User manual

Hitachi

Hitachi CL1426T User manual

Popular CRT TV manuals by other brands

JVC AV-21QS5SP instructions

JVC

JVC AV-21QS5SP instructions

Philips COLOR TV 25 INCH TABLE TR2517C owner's manual

Philips

Philips COLOR TV 25 INCH TABLE TR2517C owner's manual

LG 30FZ1DC Specification sheet

LG

LG 30FZ1DC Specification sheet

Sony FD TRINITON WEGA KV-24FS120 operating instructions

Sony

Sony FD TRINITON WEGA KV-24FS120 operating instructions

RCA F19442 user guide

RCA

RCA F19442 user guide

Samsung CS761 Owner's instructions

Samsung

Samsung CS761 Owner's instructions

Philips 29PT4973 Instructions for use

Philips

Philips 29PT4973 Instructions for use

Panasonic TC-29P100 Series operating instructions

Panasonic

Panasonic TC-29P100 Series operating instructions

RCA F19422 user guide

RCA

RCA F19422 user guide

Sony WEGA KV 32HS20 operating instructions

Sony

Sony WEGA KV 32HS20 operating instructions

Samsung SlimFit TX R3079WH Owner's instructions

Samsung

Samsung SlimFit TX R3079WH Owner's instructions

Palsonic MODEL 5179G owner's manual

Palsonic

Palsonic MODEL 5179G owner's manual

Toshiba CF13H22 owner's manual

Toshiba

Toshiba CF13H22 owner's manual

Magnavox MS3650C - 36" Smart Ctv Directions for use

Magnavox

Magnavox MS3650C - 36" Smart Ctv Directions for use

Philips 21PT9469 user manual

Philips

Philips 21PT9469 user manual

Mitsubishi CS-35305 owner's guide

Mitsubishi

Mitsubishi CS-35305 owner's guide

Toshiba 14AF41 owner's manual

Toshiba

Toshiba 14AF41 owner's manual

Sony KD-34XBR970 - 34" Hdtv 16x9 Format Specifications

Sony

Sony KD-34XBR970 - 34" Hdtv 16x9 Format Specifications

manuals.online logo
manuals.online logoBrands
  • About & Mission
  • Contact us
  • Privacy Policy
  • Terms and Conditions

Copyright 2025 Manuals.Online. All Rights Reserved.

USERS GUIDE
C28W460NC28W460N
- 1 -
Contents
Other Features ............................................ 18
TV Status............................................................ 18
Double-digit (- -) .................................................. 18
Sound Indicator ................................................... 18
Picture Mode ...................................................... 18
Mute Indicator ..................................................... 18
Volume Bar ......................................................... 18
AV Modes ........................................................... 18
Teletext ......................................................... 19
To o erate Teletext.............................................. 19
To select a age of Teletext ................................ 19
To Select Index Page .......................................... 19
To Reveal concealed Information ....................... 19
To Sto Automatic Page Change ........................ 19
To exit Teletext.................................................... 19
To Dis lay the Time ............................................ 19
Fastext ............................................................... 19
Tips................................................................ 20
Care of the Screen .............................................. 20
Poor Picture........................................................ 20
No Picture .......................................................... 20
Sound ................................................................. 20
Remote Control ................................................... 20
No solution ......................................................... 20
Specifications .............................................. 20
Important Instruction ................................... 21
UK Guarantee .............................................. 22
emote Control ............................................. 2
Control Panel Buttons and ear Panel ....... 3
Aerial Connections ........................................ 4
Connect Peripheral Equipment ................... 5
Via the Euroconnector .......................................... 5
Via Aerial In ut ...................................................... 5
Decoder ................................................................ 5
TV and Video Recorder ......................................... 5
Playback NTSC .................................................... 5
Co y Facility ........................................................ 5
Search for and store the test signal of the video
recorder ................................................................. 5
Camera and Camcorder ........................................ 5
Connect the decoder to the video recorder ............ 5
Connecting Head hones ....................................... 5
Preparation ..................................................... 6
Features ............................................................... 6
Safety Precautions ........................................ 6
Before Switching on your TV ....................... 8
Power connection ................................................. 8
Connections to the RF in ut socket...................... 8
How to connect other devices ............................... 8
Inserting batteries in the remote control handset .. 8
Switching the TV ON/OFF ............................. 8
To switch the TV on .............................................. 8
To switch the TV off............................................... 8
Operating the TV ........................................... 8
A.P.S. (Automatic Programming System) ............. 8
O erating with the buttons on the TV set .............. 9
O erating with Remote Control ............................. 9
Menu System ................................................ 10
Sound Menu ....................................................... 10
Picture Menu ...................................................... 12
Feature Menu ..................................................... 14
Installation Menu................................................. 15
Program Menu .................................................... 16
2853W-1244UK-ENG-ST7P-AK45-PLL-FS-CLED-50051552.p65 13.07.2004, 10:541
- 2 -
Remote Control

= Stand By

0 - 9 = Direct Program

- - = Double Digit

AV = External Source
(EXT-1, RGB, EXT-2, F-AV, SVHS)

I-II = Mono / Stereo - Dual I-II

= Programme U (Cursor U )

= Cursor Right / Volume +

MENU = Menu

TEXT = Teletext

= Info (Program Menu) / = Index Page

= Reveal

= Hold / Picture Mode Change ***

(Blue) = Install Menu

F (Yellow) = Features Menu

(Green) = Picture Menu

(Red) = Sound Menu

= Programme Down (Cursor Down)

= Cursor Left / Volume -

= Mute

TV = TV / Quit Menu

= Time

= Picture Mode Change *** (AUTO, 4:3, 16:9, CINEMA, SUBTITLE, ZOOM, PANORAMIC)










0(18



$979

7(;7
)


2853W-1244UK-ENG-ST7P-AK45-PLL-FS-CLED-50051552.p65 13.07.2004, 10:542
- 3 -
Control Panel Buttons and Rear Panel
S eakers (left + right)
= Power On / Off
- + = Volume -/+
- P/CH + = Program -/+
MENU = Menu
AU IO L = Audio left
AU IO R = Audio right
VI EO = VCR
H-PHONE () = Head hone 3,6 mm Ø
S-VHS
Aerial Input (75 W)
EXT.1 = Scart Socket 1 (with RGB)
EXT.2 = Scart Socket 2 (with RGB)
Power Cable
REAR PANEL
32:( 5
32:(5
3&+
3&+
0(18
0(18
)URQW$9
FRONT PANEL
2853W-1244UK-ENG-ST7P-AK45-PLL-FS-CLED-50051552.p65 13.07.2004, 10:543
- 4 -
Aerial Connections
9+) 8+)

:
5RXQGRKPFRD[LDOFDEOH
5HDURI79
2XWGRRU$HULDO&RQQHFWLRQV
Connect Peripheral Equipment
ECO ER
FOR SATELLITE RECEIVER
VI EO
HEA PHONE
AU IO
CAMERA
2853W-1244UK-ENG-ST7P-AK45-PLL-FS-CLED-50051552.p65 13.07.2004, 10:544
- 5 -
Connect Peripheral Equipment
There is a wide range of audio and video equi ment that
can be connected to your TV.
The connection diagrams on the revious age show
you where the different equi ment should be connected
at the back or the front side of the TV.
Via the Euroconnector
Your TV set has one, two or three Euroconnector sock-
ets. If you want to connect eri herals (e.g. video, de-
coder, etc.) which have Euroconnectors, to your TV, use
o tional EXT.1 or EXT.2 in uts.
If an external device is connected via Euroconnector
sockets TV is switched to AV mode automatically. If
the signal is RGB then the RGB OSD indicator is dis-
layed on the screen.
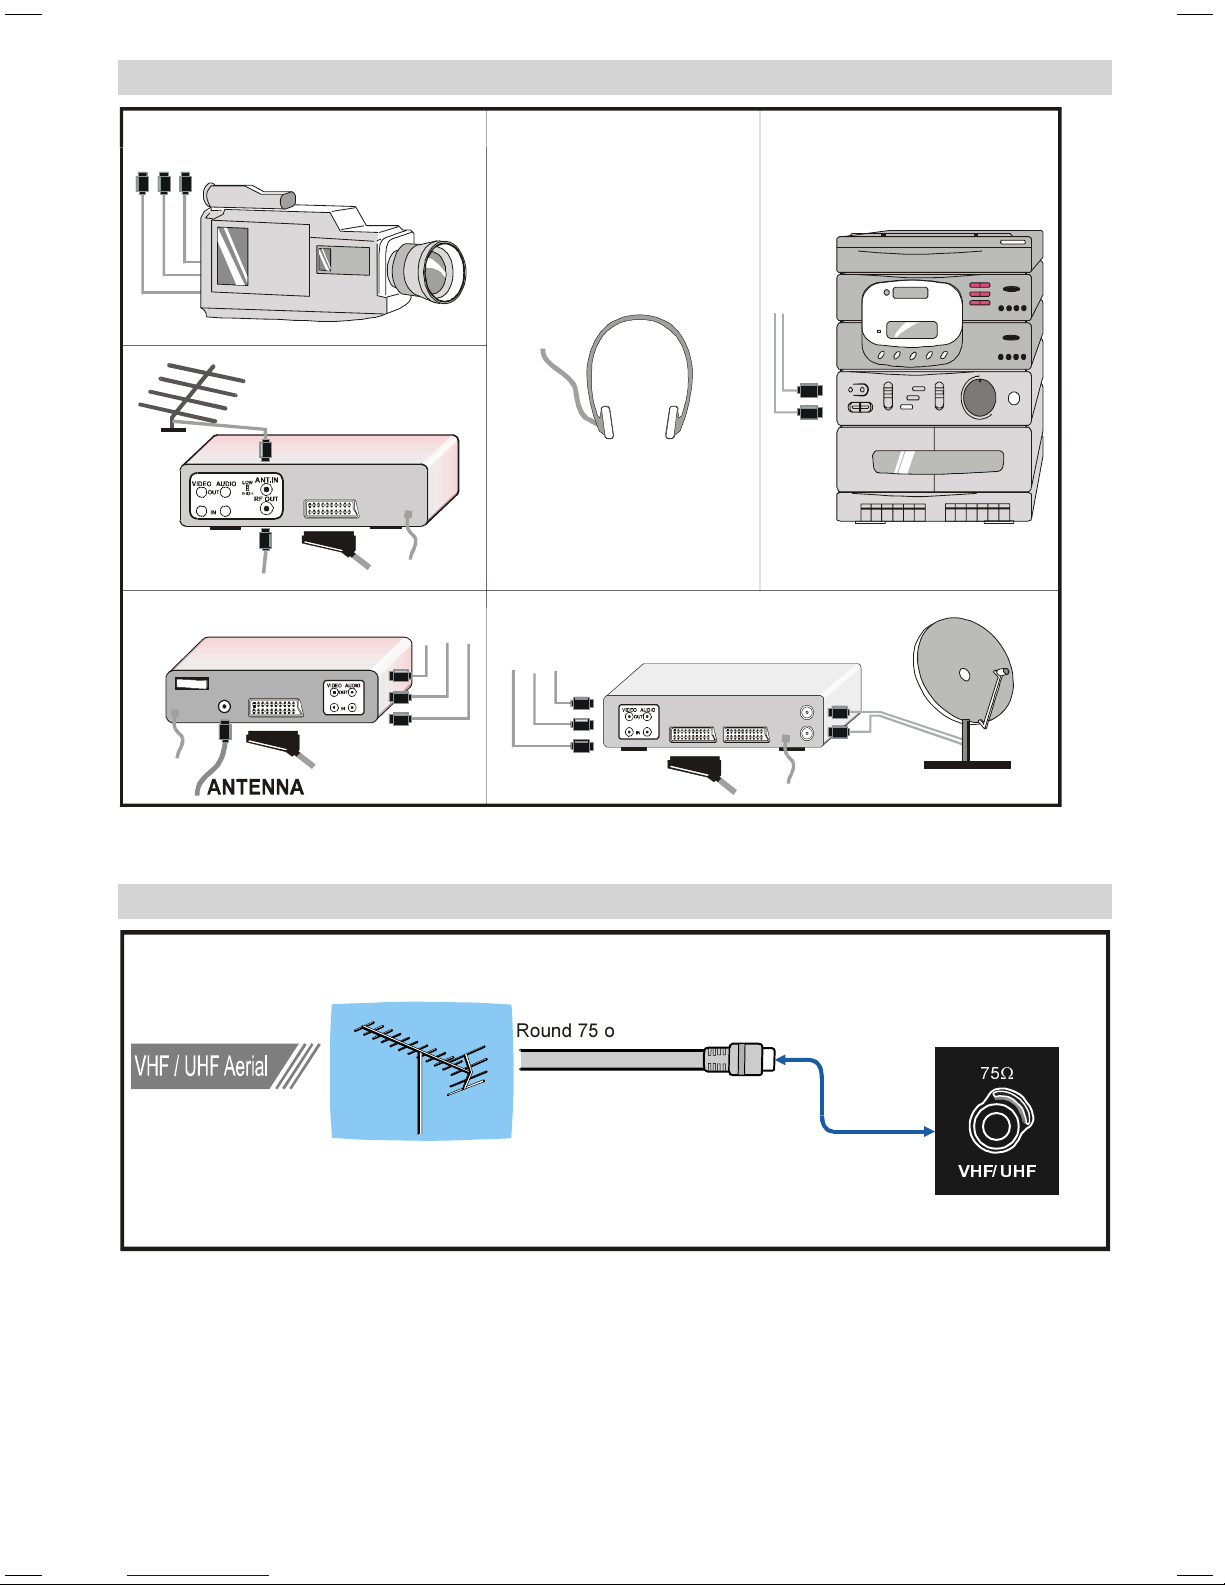
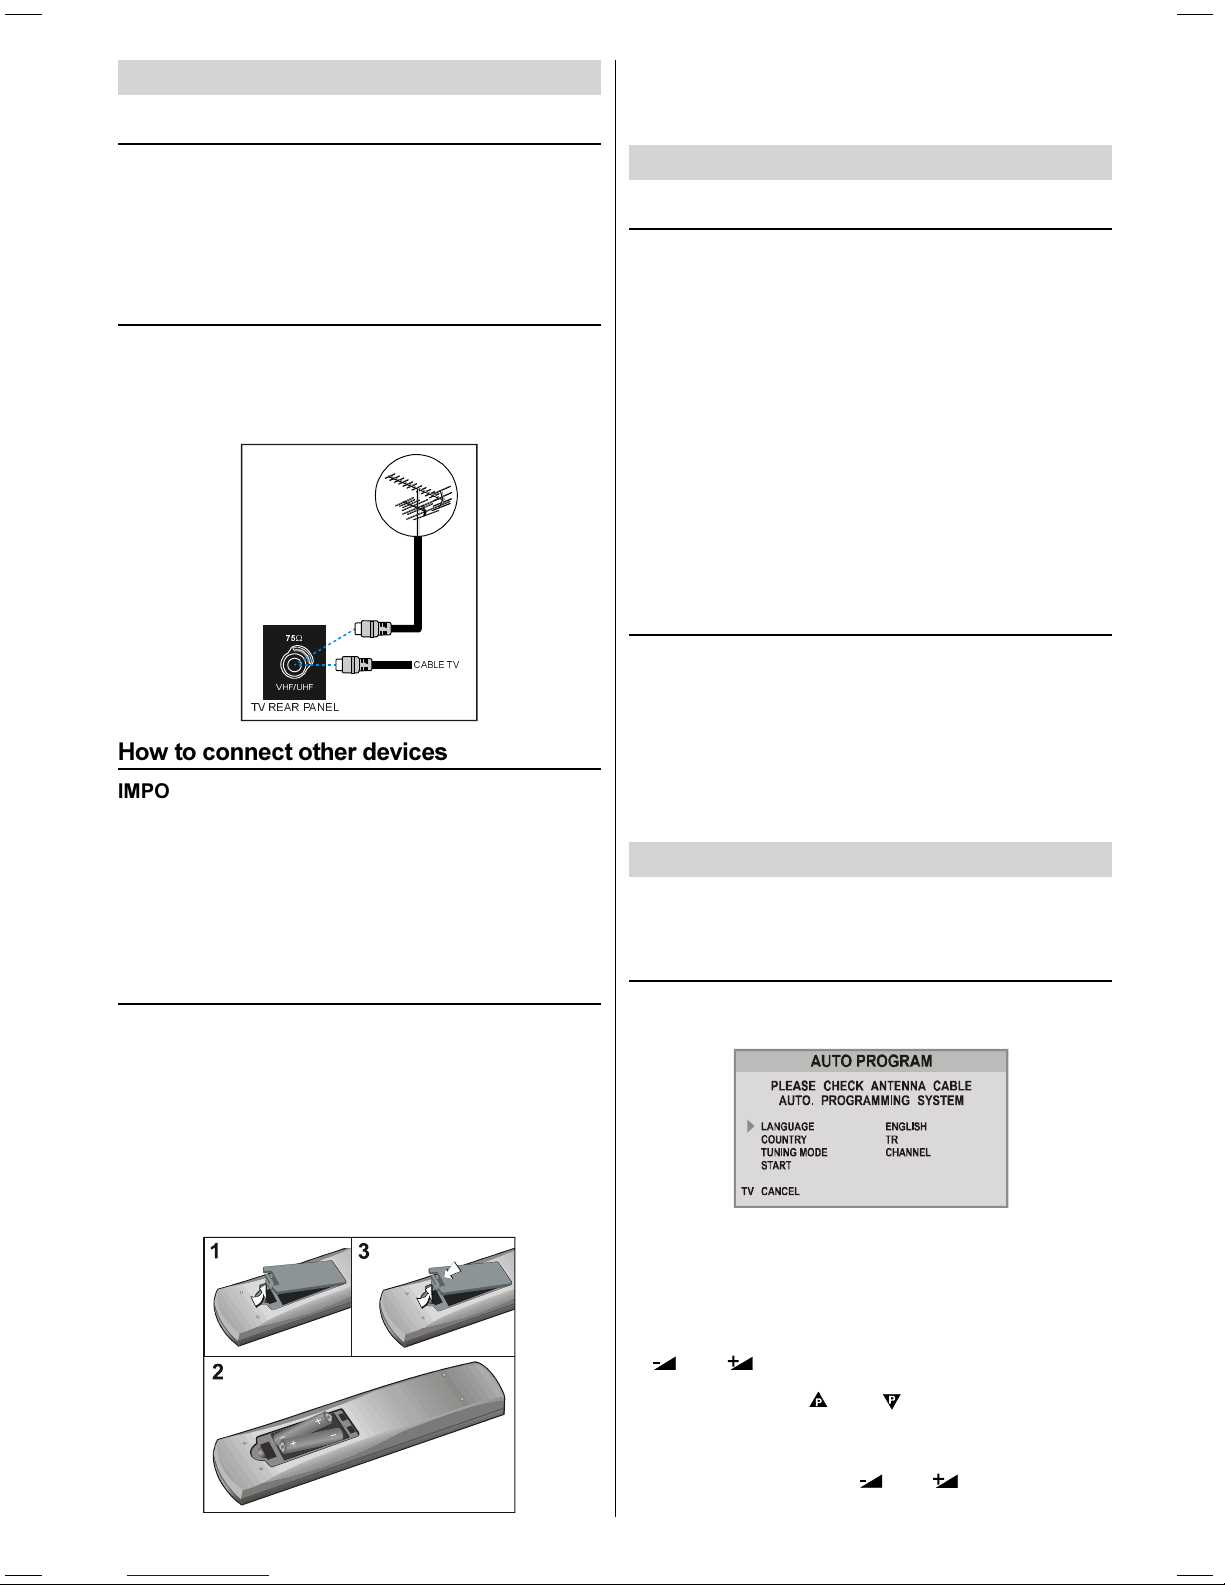
Via Aerial Input
If you want to connect to your TV, eri herals like video
recorders or decoders, but the device you want to con-
nect does not have Euroconnector, you should connect
it to the Aerial in ut of your TV set.
If the VCR is connected via antenna input it is sug-
gested to use the Programme 0.
Decoder
Cable TV offers you a wide choice of rograms. Most of
them are free, others are to be aid for by the viewer.
This means that you will need to subscribe to the broad-
casting organisation whose rogrammes you wish to
receive. This organisation will su ly you a corres ond-
ing decoder unit to allow the rogrammes to be un-
scrambled.
For further information ask your dealer. See also the
booklet su lied with your decoder.
Connect a decoder with an aerial socket to
the TV
 Connect the aerial cable.
Connect a decoder without an aerial socket
to the TV
 Connect the decoder to your TV with a eurocable to
EXT.1 or EXT.2. When your decoder has a
Euroconnector you can obtain better icture quality if
you connect a eurocable to EXTERNAL.
TV and Video Recorder
 Connect the aerial cables.
Better icture quality can be obtained if you also con-
nect a eurocable to EXTERNAL sockets.
Playback NTSC
Connect NTSC VCR layer to Euroconnector at the back
of the TV.
Connect NTSC VCR layer to RCA Jack at the front of
the TV.
Then, ress AV button to select EXT-1, RGB, EXT-2,
F-AV or SVHS.
Copy Facility
Source selection for VCR recording.
 Select Features Menu in the MENU.
 Select EXT-2 OUTPUT source ressing   or  
button.
Search for and store the test si nal of the
video recorder
 Un lug the aerial cable from the aerial socket of your
video recorder.
 Switch on your TV and ut the video recorder on the
test signal. (See the handbook for your video recorder.)
 Enter the Fine Tuning via the Install menu.
 Search for the test signal of your video recorder in the
same way as you searched for and stored the TV sig-
nals. See Tuning, Search and Store TV channels. Store
the test signal under rogramme number 0.
 Re lace the aerial cable in the aerial socket of your
video recorder once you have stored the test signal.
Camera and Camcorder
To connect to Front-AV input (F-AV):
Connect your camera or camcorder at the front side of
your TV.
 Connect your equi ment to the TV via VI EO (yel-
low), AU IO R (red) and AU IO L (white) in uts. You
should connect the jacks to the in ut in the same
colour.
To connect to SVHS input:
Do not use SVHS and F-AV in uts at the same time,
the signals will interfere and it can result a oor ic-
ture.
Connect your camera or camcorder at the front or rear
side of your TV.
 Connect your equi ment to the TV via SVHS in ut
and audio in uts of F-AV in uts by using SVHS cables.
Connect the decoder to the video recorder
Some video recorders have a s ecial euroconnector for
decoder.
 Connect a eurocable to the euroconnector of your de-
coder and to the s ecial euroconnector of your video
recorder. See also the handbook of your video recorder.
 To connect your video recorder to the TV, see TV and
Video Recorder section.
If you want to connect more equi ment to your TV, con-
sult your dealer.
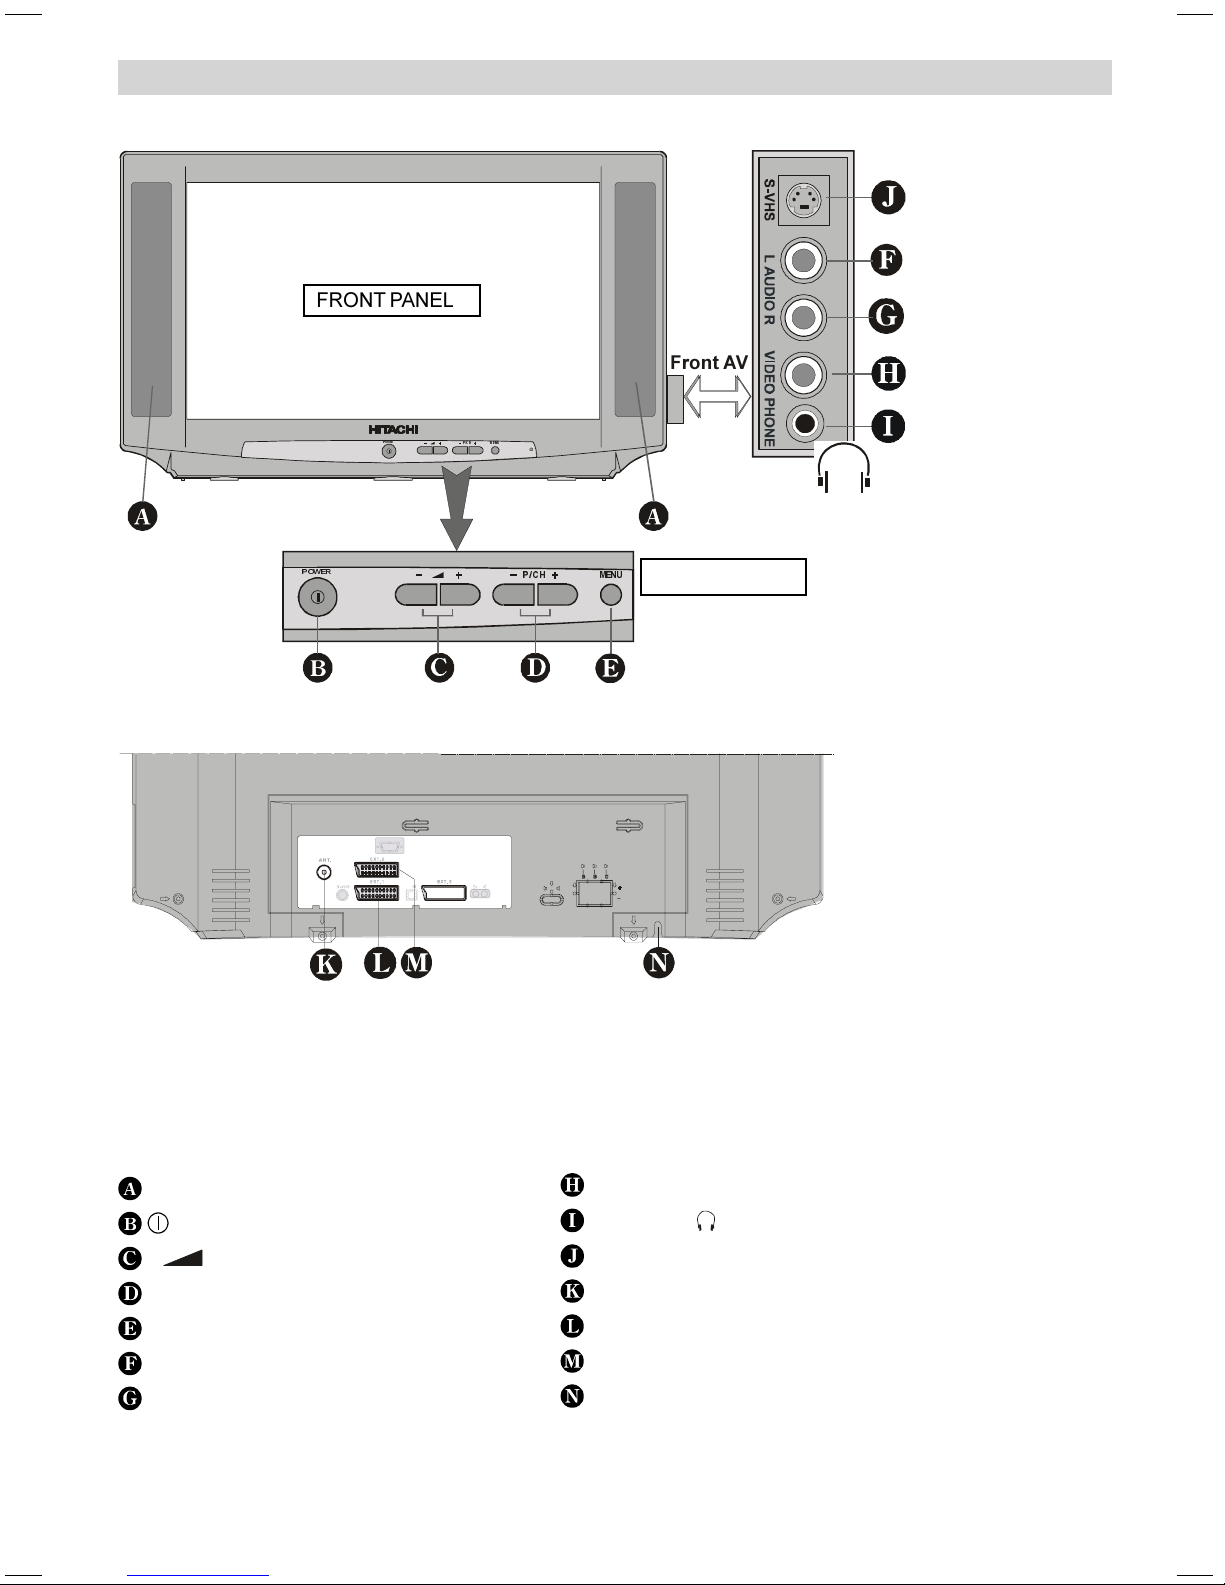
Connectin Headphones
Use the stereo head hone socket on the lower right
side of your TV, to connect head hones.
2853W-1244UK-ENG-ST7P-AK45-PLL-FS-CLED-50051552.p65 13.07.2004, 10:545
- 6 -
Preparation
For ventilation, leave a s ace of at least 10 cm free all
around the set. To revent any fault and unsafe situa-
tions, lease do not lace any objects on to of the set.
Use this a aratus in tro ical and/or moderate climates.
Features
 It is a remote controlled colour television.
 100 rogrammes from VHF, UHF bands or cable chan-
nels can be reset.
 It can tune cable channels.
 Controlling the TV is very easy by its menu driven
system.
 It has two Euroconnector socket for external devices
(such as com uter, video, video games, audio set, etc.)
 Mono or Stereo sound systems are available.
 Teletext (Fastext).
 It is ossible to connect head hone.
 Direct channel access.
 A.P.S. (Automatic Programming System).
 All rogrammes can be named.
 Forward or backward automatic tuning.
 Slee timer.
 Child Lock.
 Automatic sound mute when no transmission.
 When no valid signal is detected, after 5 minutes the
TV switches itself automatically to stand-by mode.
 WSS (Wide Screen Signaling).
 NTSC Playback.
 Front SVHS is available
 Front AV in is available.
Safety Precautions
IMPO TANT SAFETY INFO MATION ON
OPE ATING YOU TV
os and onts
DOs
This Television has been designed and manufactured to
meet international safety standards, but like any elec-
trical equi ment, care must be taken if you are to ob-
tain the best results and safety is to be assured.
O read the o erating instructions before you attem t
to use the equi ment.
O consult your dealer if you are in any doubt about
installation, o eration or safety of your equi ment.
O be careful with glass anels or doors on equi ment.
This TV is su lied with a fitted mains lug. This lug
must not be cut off as it may contain a s ecial radio
interference filter, the removal of which could lead to
im aired erformance. If you wish to extend the lead,
obtain an a ro riate safety a roved extension lead or
consult your dealer.
Observe the manufacturers instructions when connect-
ing extension leads to the TV. Check the fuse rating on
the new lug, this should be fitted with a 5 Am fuse
which conforms to either ASTA or BSI (BS1 362) a -
rovals, these are easily identifiable by either the
or symbols. If you are in any doubt about the in-
stallation of an extension lead, lease consult a com-
etent electrician.
DONTs
ONT continue to o erate the equi ment if you are in
any doubt about it working normally, or if it is damaged
in any way switch off, withdraw the mains lug and con-
sult your dealer.
ONT lace water filled vessels on to of T.V. cabi-
nets.
ONT remove any fixed cover as this may ex ose dan-
gerous voltages.
ONT leave equi ment switched on when it is unat-
tended unless it is s ecifically stated that it is designed
for unattended o eration or has a stand-by mode. Switch
off using the switch on the equi ment and make sure
your family know how to do this. S ecial arrangements
may need to be made for infirm or handica ed eo le.
ONT use equi ment such as ersonal stereos or ra-
dios so that you are distracted from the requirements of
traffic safety. It is illegal to watch television whilst driv-
ing.
ONT obstruct the ventilation of the equi ment, for
exam le with curtains or soft furnishings. Overheating
will cause damage and shorten the life of the equi -
ment.
2853W-1244UK-ENG-ST7P-AK45-PLL-FS-CLED-50051552.p65 13.07.2004, 10:546
- 7 -
The lightning flash with arrowhead symbol, within an equilateral triangle, is intended to
alert the user to the resence of uninsulated "dangerous voltage" within the roduct's
enclosure that may be of sufficient magnitude to constitute a risk of electric shock of
ersons.
The exclamation oint within an equilateral triangle is intended to alert the user to the
resence of im ortant o erating and maintenance (servicing) instructions in the literature
accom anying the a liance.
RISK OF ELECTRIC SHOCK
CAUTION
ONT use makeshift stands and NEVER fix legs or
stands to the TV with any screws other than those ro-
vided - to ensure com lete safety always use the manu-
facturers a roved stand with the fixings rovided.
ONT allow electrical equi ment to be ex osed to rain
or moisture.
ABOVE ALL
 NEVER let anyone especially children push any-
thing into holes slots or any other opening in the
case - this could result in a fatal electric shock.
NEVER guess or take chances with electrical
equipment of any kind - it is better to be safe than
sorry!
1. Power Source
The receiver should be o erated only from a 220-240V
AC, 50 Hz. outlet. Ensure you select the correct volt-
age setting for your convenience.
2. Power Cord
The ower su ly cord should be laced so that it is
not likely to be walked on or inched by items laced
u on them or against it. Pay articular attention to cord
where it enters the lug, ower outlet, and the oint
where it exits from the receiver.
3. Moisture and Water
Do not use this equi ment in a humid and dam lace
(avoid the bathroom, the sink in the kitchen, and near
the washing machine). Do not ex ose this equi ment
to rain or water, as this may be dangerous and do not
lace objects filled with liquids on to . Avoid from dri -
ing or s lashing.
4. Cleanin
Before cleaning, un lug the receiver from the main su -
ly, outlet. Do not use liquid or aerosol cleaners. Use
soft and dry cloth.
5. Ventilation
The slots and o enings on the receiver are intended for
ventilation and to ensure reliable o eration. To revent
overheating, these o enings must not be blocked or
covered in anyway.
6. Li htnin
In case of storm and lightning or when going on holi-
day, disconnect the ower cord from the wall outlet.
7. Replacement Part
When re lacement arts are required, be sure the ser-
vice technician has used re lacement arts which are
s ecified by the manufacturer or have the same s ecifi-
cations as the original one. Unauthorised substitutions
may result in fire, electrical shock, or other hazards.
8. Servicin
Please refer all servicing to qualified ersonnel. Do not
remove cover as this may result in electric shock.
9. X-rays
The x-rays generated in this television are shielded suf-
ficiently.
10. Naked Flame Sources
Do not lace naked flame sources on the a aratus.
Warning!
Any intervention contrary to regulations, in particular,
any modification of high voltage or a replacement of the
picture tube may lead to an increased concentration of
x-rays. Any television modified in this way no longer
complies with license and must not be operated.
Instructions for waste disposal:
 Packaging and ackaging aids are recyclable and
should rinci ally be recycled. Packaging materials,
such as foil bag, must be ke t away from children.
 Batteries, including those which are heavy metal-free,
should not be dis osed of with household waste.
Please dis ose of used batteries in an environmen-
tally sound manner. Find out about the legal regula-
tions which a ly in your area.
 O NOT LEAVE YOUR TV AT STAN -BY OR
OPERATING WHEN YOU LEAVE YOUR HOUSE
2853W-1244UK-ENG-ST7P-AK45-PLL-FS-CLED-50051552.p65 13.07.2004, 10:547
- 8 -
Before S itching on your TV
Power connection
IMPORTANT: The TV set is designed to o erate on 220-
240V AC, 50 Hz.
 After un acking, allow the TV set to reach the ambi-
ent room tem erature before you connect the set to
the mains.
Connections to the RF input socket
 Connect the aerial or cable TV lug to the RF in ut
socket located at the back of the TV and connect the
cable lug coming out from the TV out socket located
at the devices (VCR, DVB etc.) to this socket as well.
9+)8+)

:
795($53$1(/
&$%/(79
How to connect other devices
IMPORTANT: Switch off the TV before connecting any
external device.
Sockets for external connections are at the back and
front of the TV. For connection of other devices via
Euroconnector refer to the manuals of the related de-
vices.
Insertin batteries in the remote control
handset
 Place the batteries in the right directions as seen be-
low.
 Remove the battery cover located on the back of the
handset by gently ulling u wards from the indicated
art.
 Insert two AAA (R03) or equivalent ty e batteries in-
side.
 Re lace the battery cover.
NOTE: Remove batteries from remote control handset
when it is not to be used for a long period. Otherwise it
can be damaged due to any leakage of batteries.
S itching the TV ON/OFF
To switch the TV on
Your TV will switch on in two ste s:
1- Press the ower button located on the front of the
TV. Then the TV switches itself to standby mode and
the RE LE located below the TV turns on.
2- To switch on the TV from stand-by mode either:
Press a digit button on the remote control so that a
rogramme number is selected,
or,
Press Programme U or Down buttons on the front of
the TV or on the remote control, so that last switched
off rogramme is selected.
By either method, TV will switch on and the RE LIGHT
will turn GREEN.
To switch the TV off
 Press the stand-by button on the remote control, so
the TV will switch to stand-by mode and the GREEN
LIGHT will become RE ,
or,
Press the ower button located on the front of the TV,
so the TV will switch off and the GREEN LE will turn
off.
Operating the TV
You can operate your TV both using the remote
control handset and onset buttons.
A.P.S. (Automatic Pro rammin System)
The A.P.S. menu will a ear when you first switch on
your TV for the first time.
A.P.S. automatically rogrammes your TV, according
to the transmission of rogramme systems in your area.
 First come to the Country item and select your coun-
try, according to which the TV will automatically ro-
gram the TV, from the available countries, by ressing
 or   button.
 By ressing the   or   buttons, come to the
Language item and select the language in which the
menus of the TV will a ear. You can see the available
languages by ressing   or   button. As soon
2853W-1244UK-ENG-ST7P-AK45-PLL-FS-CLED-50051552.p65 13.07.2004, 10:548
- 9 -
as you change the language, the menu items will be
dis layed in the selected language.
 By ressing the   or   buttons, come to the
Tuning Mode item and select the mode at which your
TV will run the A.P.S.. If you select Channel Tuning
Mode, A.P.S. will run according to Channel Tuning
Mode and will auto-search according to the Channel
numbers of the stations in your area. If you select Fre-
quency Tuning Mode, A.P.S. will run according to
Frequency Tuning Mode and will auto-search accord-
ing to the frequencies of the stations in your area.
 After selecting the Tuning Mode if you want to start
A.P.S., by ressing the u and down buttons, come to
the Start item and by ressing   or   button
start the A.P.S..
 If you do not want to start A.P.S., you can cancel it by
ressing the TV button on your remote control.
 When you start A.P.S. the below menu will a ear on
the screen.
$36 ,6 5811,1*
3/($6( :$,7
&$1&(/
Operatin with the buttons on the TV set
Volume setting and rogramme selection can be made
using the buttons on the front of the TV.
Volume Setting
 Press - button to decrease volume or  +
button to increase volume, so a volume level scale
(slider) will be dis layed in the lower middle side of the
screen.
Programme Selecting
 Press P/CH+ button to select the next rogramme
or -P/CH button to select the revious rogramme.
Entering MENU
 Press MENU button to enter the MENU. In the MENU
select sub-menu using -P/CH or P/CH+ button and
enter the sub-menu using - or  + button. To
learn the usage of the menus, refer to the Menu Sys-
tem section.
Operatin with Remote Control
The remote control handset of your TV is designed to
control all the functions of the model you selected. The
functions will be described in accordance with the menu
system of your TV.
Functions of the menu system are described in Menu
System section.
Volume Setting
Press   button to increase volume. Press   but-
ton to decrease volume. A volume level scale (slider)
will be dis layed at the middle of the bottom on the
screen.
Programme Selecting (Previous or next
programme)
 Press   button to select the revious rogramme.
 Press   button to select the next rogramme.
Programme Selecting (direct access)
Press digit buttons on the remote control handset to
select rogrammes between 0 and 9. TV will switch to
the selected rogramme. To select rogrammes between
10 - 99, you must use the double digit button
- -.
this OSD is dis layed at the left hand u er on
this screen.
Press the digit buttons consecutively for the channel
you wish to watch (e.g for channel 27, first ress 2 then
7). If you do not ress the second digit within 3 sec-
onds of ressing the first, the dis lay will disa ear.
2853W-1244UK-ENG-ST7P-AK45-PLL-FS-CLED-50051552.p65 13.07.2004, 10:549