manuals.online logo
Brands
  1. Home
  2. •
  3. Brands
  4. •
  5. Hitachi
  6. •
  7. LCD TV
  8. •
  9. Hitachi 17LD4220U User manual

Hitachi 17LD4220U User manual

Other Hitachi LCD TV manuals

Hitachi 26LD8000TA User manual

Hitachi

Hitachi 26LD8000TA User manual

Hitachi 22LD4550U User manual

Hitachi

Hitachi 22LD4550U User manual

Hitachi 37LD8700UA User manual

Hitachi

Hitachi 37LD8700UA User manual

Hitachi 32LD8700CA User manual

Hitachi

Hitachi 32LD8700CA User manual

Hitachi L22VG07U User manual

Hitachi

Hitachi L22VG07U User manual

Hitachi 32LD4550U User manual

Hitachi

Hitachi 32LD4550U User manual

Hitachi L26A01 User manual

Hitachi

Hitachi L26A01 User manual

Hitachi 50HK5100 User manual

Hitachi

Hitachi 50HK5100 User manual

Hitachi 26HDL52 - LCD Direct View TV User manual

Hitachi

Hitachi 26HDL52 - LCD Direct View TV User manual

Hitachi LE55W806 User manual

Hitachi

Hitachi LE55W806 User manual

Hitachi 26LD8000TA2 User manual

Hitachi

Hitachi 26LD8000TA2 User manual

Hitachi 26LD4550U User manual

Hitachi

Hitachi 26LD4550U User manual

Hitachi C15-LC800SNT User manual

Hitachi

Hitachi C15-LC800SNT User manual

Hitachi LE42EC05AUS User manual

Hitachi

Hitachi LE42EC05AUS User manual

Hitachi L32HP03U User manual

Hitachi

Hitachi L32HP03U User manual

Hitachi L47VP01E User manual

Hitachi

Hitachi L47VP01E User manual

Hitachi Director's UT32X812 User manual

Hitachi

Hitachi Director's UT32X812 User manual

Hitachi 20LD3200 User manual

Hitachi

Hitachi 20LD3200 User manual

Hitachi ALPHA L32A404 User manual

Hitachi

Hitachi ALPHA L32A404 User manual

Hitachi Alpha L40A105 Quick start guide

Hitachi

Hitachi Alpha L40A105 Quick start guide

Hitachi L26A01A User manual

Hitachi

Hitachi L26A01A User manual

Hitachi 32LD380TA User manual

Hitachi

Hitachi 32LD380TA User manual

Hitachi 32LD8700UA User manual

Hitachi

Hitachi 32LD8700UA User manual

Hitachi L42X01AU User manual

Hitachi

Hitachi L42X01AU User manual

Popular LCD TV manuals by other brands

Samsung LA32E420 E-manual

Samsung

Samsung LA32E420 E-manual

ViewSonic VS12119-1M user guide

ViewSonic

ViewSonic VS12119-1M user guide

iLO CIWL3706 owner's manual

iLO

iLO CIWL3706 owner's manual

LG 32LT560C Quick reference guide

LG

LG 32LT560C Quick reference guide

Sony WEGA KLV-27HR3 operating instructions

Sony

Sony WEGA KLV-27HR3 operating instructions

Zenith Z32LC2D Specifications

Zenith

Zenith Z32LC2D Specifications

Sony KDL-32S3000R - 32" Class Bravia S-series Digital Lcd... Specifications

Sony

Sony KDL-32S3000R - 32" Class Bravia S-series Digital Lcd... Specifications

Medion MEDION LIFE X14330 quick start guide

Medion

Medion MEDION LIFE X14330 quick start guide

Vizio HDTV30A VW32L Service manual

Vizio

Vizio HDTV30A VW32L Service manual

Sharp LC-24DV250K Operation manual

Sharp

Sharp LC-24DV250K Operation manual

SOYO Dymond DYLT032A user manual

SOYO

SOYO Dymond DYLT032A user manual

Kalley K-LED40FHDST2 Service manual

Kalley

Kalley K-LED40FHDST2 Service manual

Dynex DX-L40-10A Guide de l'utilisateur

Dynex

Dynex DX-L40-10A Guide de l'utilisateur

Hisense M3300 user manual

Hisense

Hisense M3300 user manual

Toshiba 42XV600A owner's manual

Toshiba

Toshiba 42XV600A owner's manual

Panasonic TX-26LX1A operating instructions

Panasonic

Panasonic TX-26LX1A operating instructions

HP LT3200 Illustrated parts & service map

HP

HP LT3200 Illustrated parts & service map

Sharp LC-32GA8 Service manual

Sharp

Sharp LC-32GA8 Service manual

manuals.online logo
manuals.online logoBrands
  • About & Mission
  • Contact us
  • Privacy Policy
  • Terms and Conditions

Copyright 2025 Manuals.Online. All Rights Reserved.

NL
GB
DK
D
Gebruiksaanwijzing
Instructions for use
Instruktionsbog
Bedienungsanleitung
17LD4220U
- 1 -
Contents
Remote Control Buttons ......................... 2
Control Panel Buttons ............................ 3
Preparation ............................................. 4
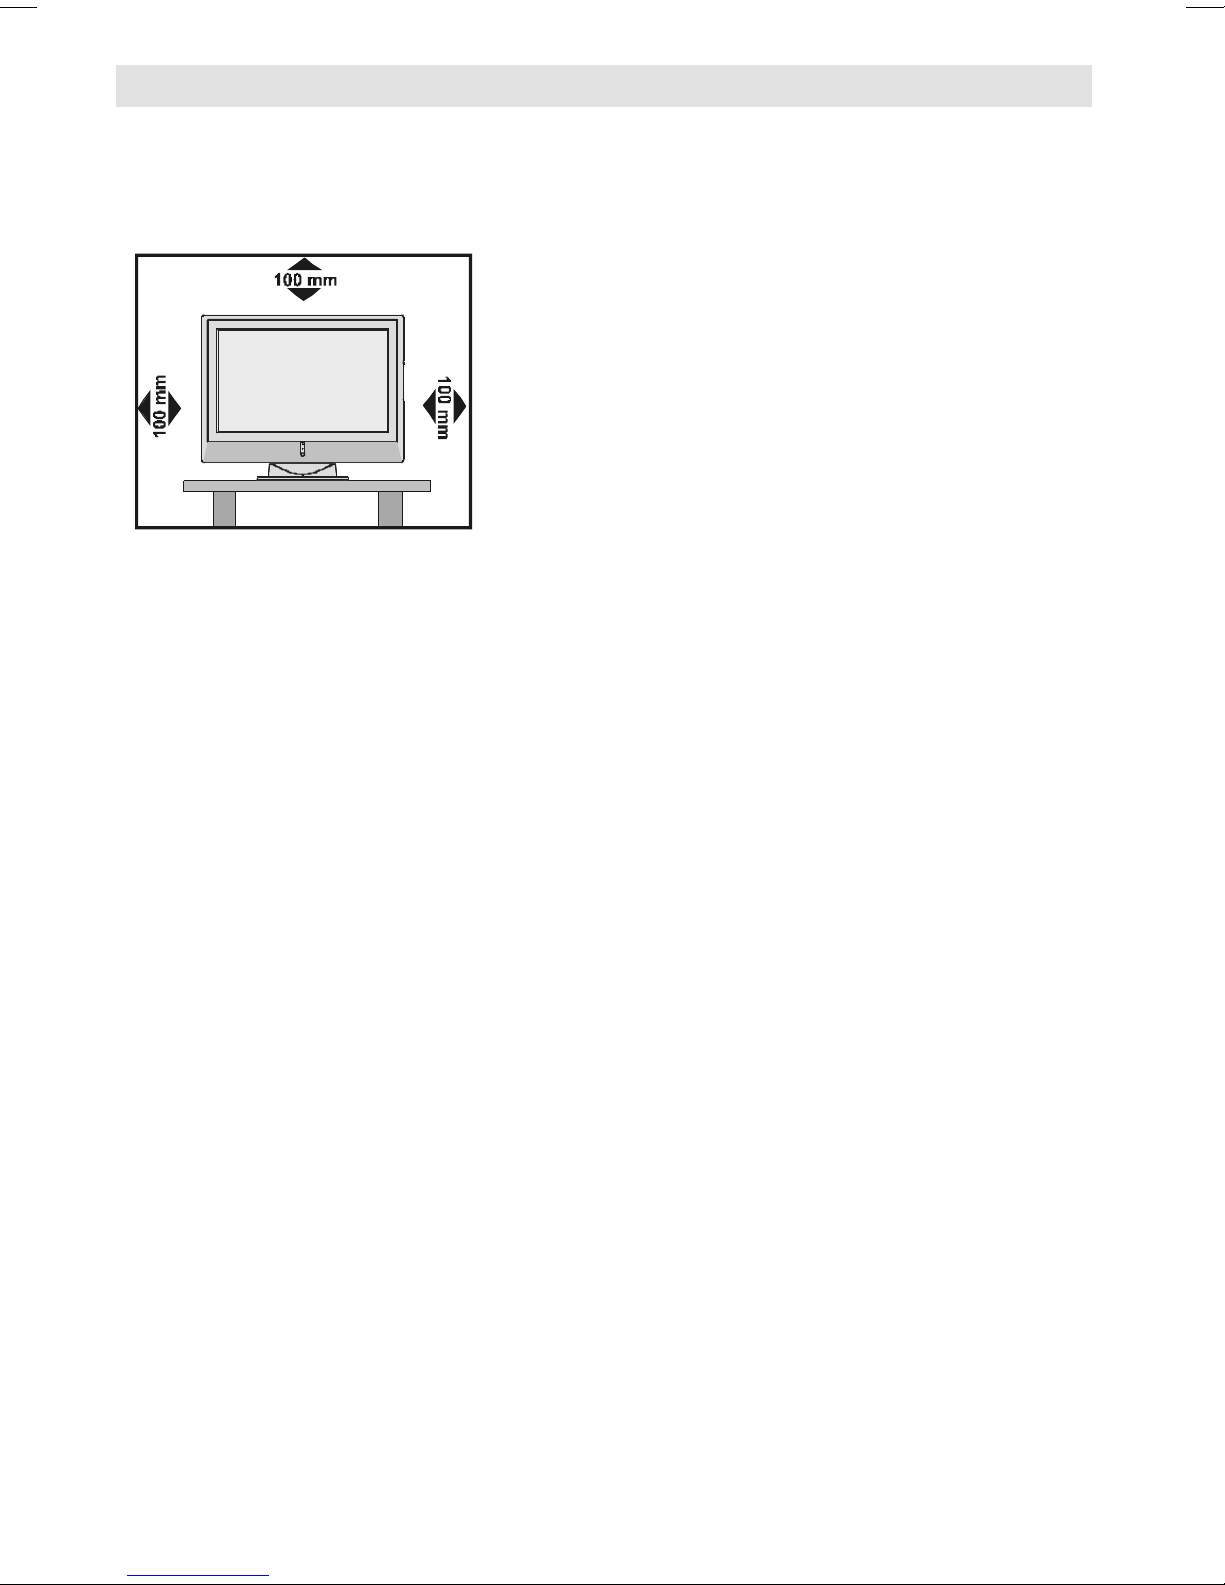
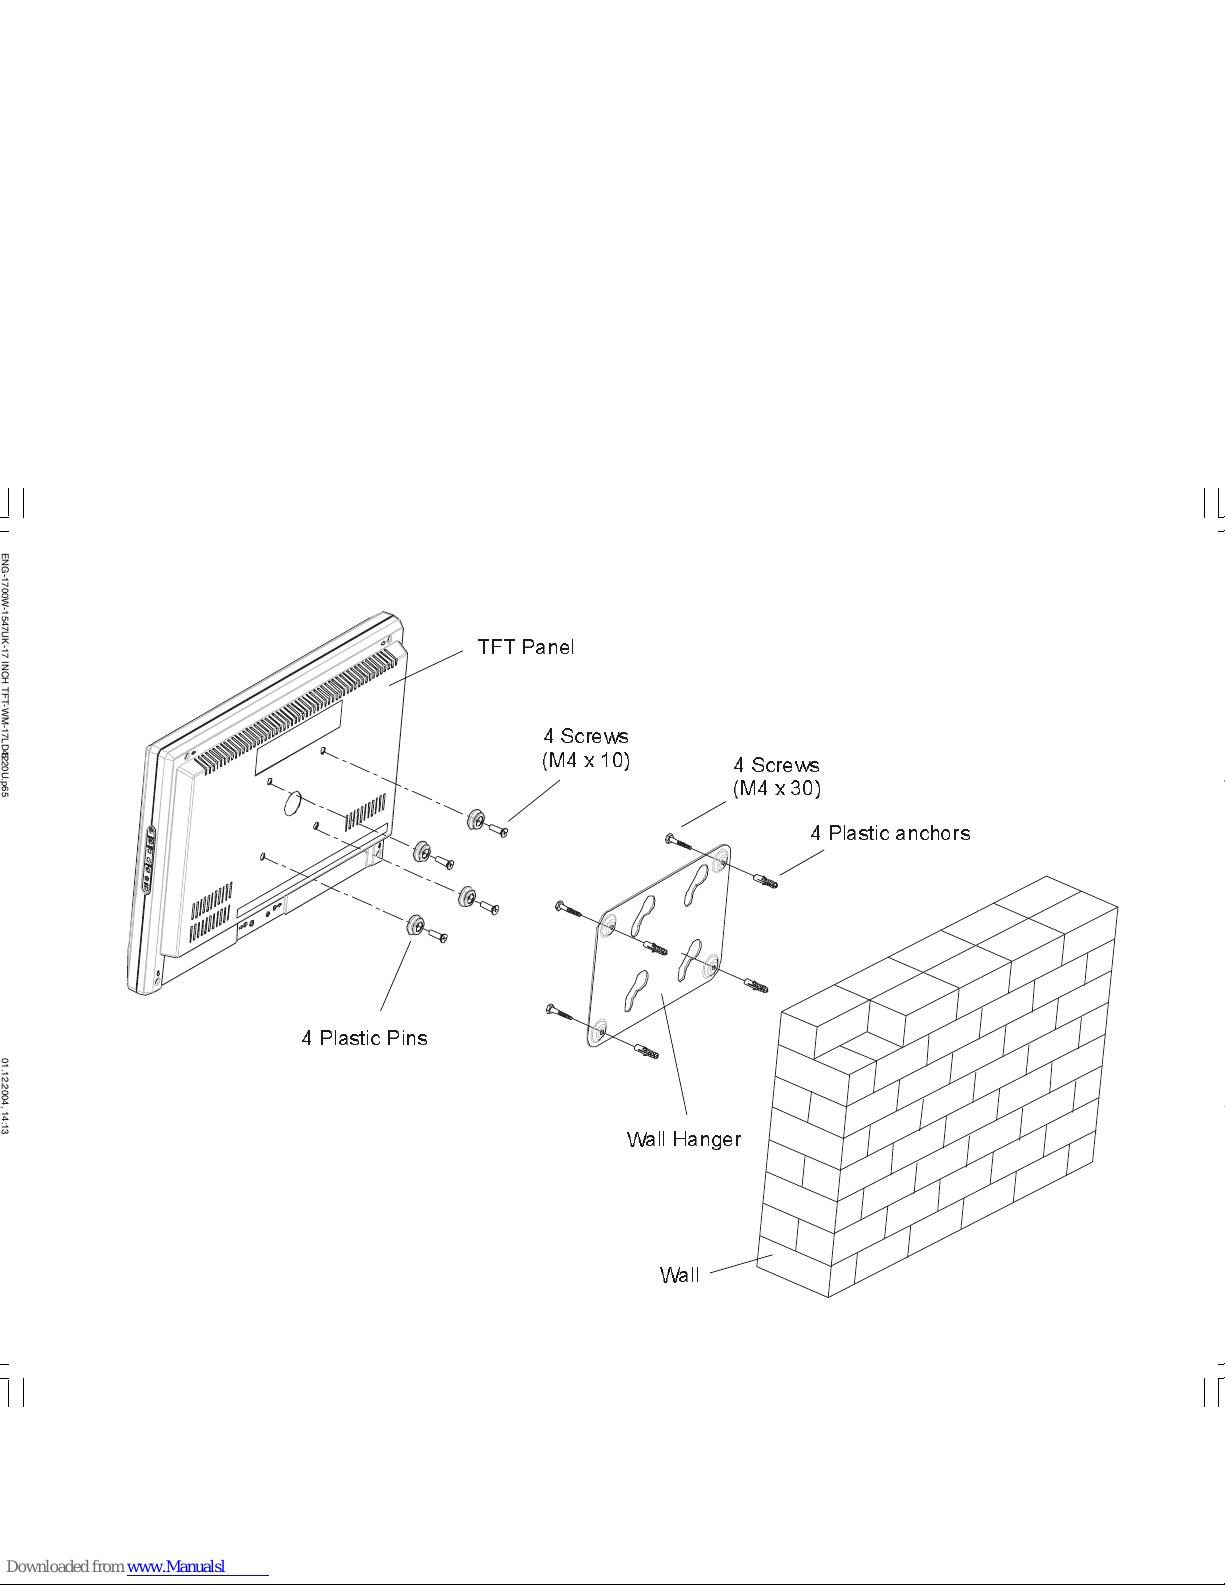
Installation Of The TFT TV To The Wall 4
Features ............................................... 6
Panel Features .................................... 6
Safety Precautions ................................. 6
Before Switching on your TV .................
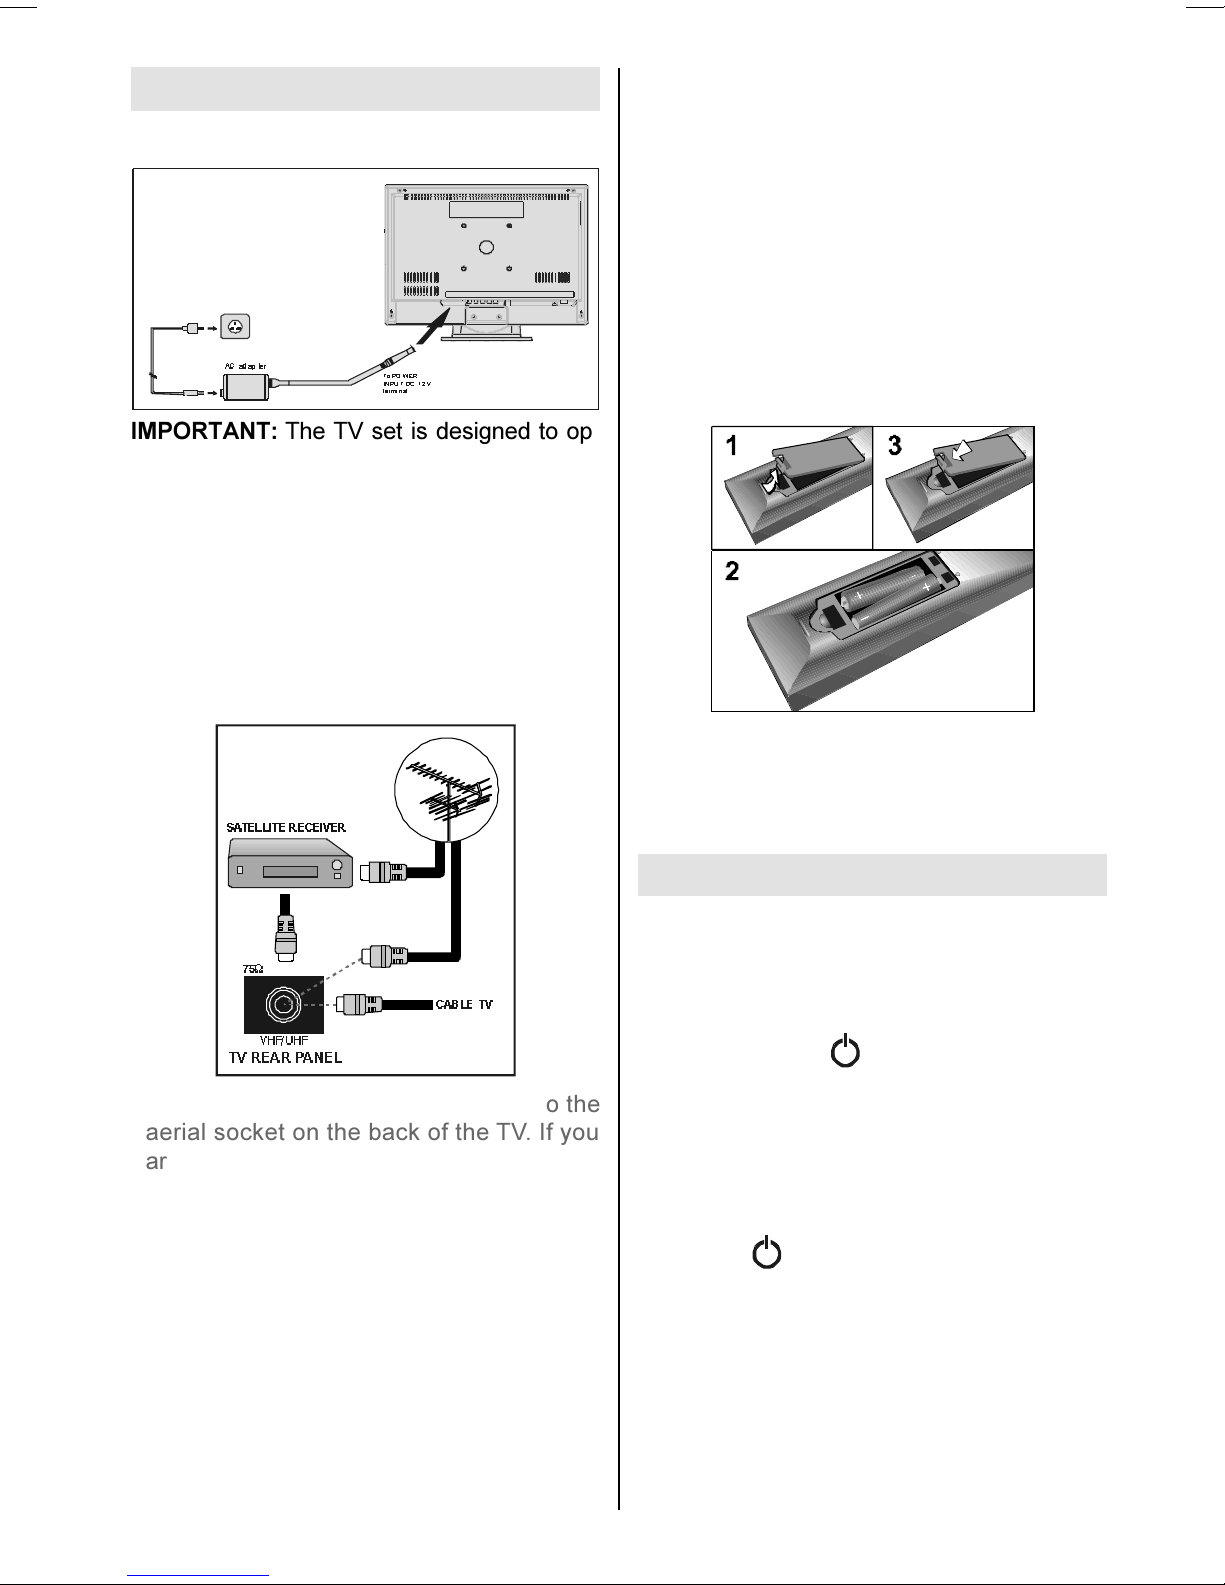
Power connection ................................ 9
Connections to the Aerial socket ......... 9
ow to connect other devices .............. 9
Inserting batteries in the remote control
handset ................................................ 9
Switching the TV ON/OFF .......................
To switch the TV on .............................. 9
To switch the TV off ............................ 10
Operating the TV ................................... 10
A.P.S. (Automatic Programming
System) .............................................. 10
Operating with the buttons on the TV
set ....................................................... 10
Operating with Remote Control ......... 10
Menu System ........................................ 11
Sound Menu ....................................... 12
Picture Menu ...................................... 14
Feature Menu ..................................... 16
Installation Menu ................................ 17
Programme Menu .............................. 18
Source Menu ...................................... 20
Other Features ...................................... 20
TV Status ............................................ 20
Programme Swap (P<P) ................... 20
Double-digit (- / - -) ............................. 21
Personal Preferences (PP) ................ 21
Sound Indicator .................................. 21
Picture Mode ...................................... 21
Sleep Timer Indicator ......................... 21
Mute Indicator ..................................... 21
No-Signal Detection (TV) ................... 22
No-Signal Detection (PC) .................. 22
Volume Bar ......................................... 22
AV Modes ............................................ 22
Signal Out Of Range .......................... 22
PC MODE ............................................... 22
Installation.......................................... 22
Switching from TV to PC .................... 22
Main Menu in PC mode: ..................... 22
Sound Menu ....................................... 23
Picture Menu ...................................... 23
PIP Picture .......................................... 23
Feature Menu: .................................... 23
Geometry Menu: ................................. 24
Source Menu: ..................................... 24
PIP Source Menu: ............................... 24
Teletext .................................................. 24
To operate Teletext ............................. 24
To select a page of Teletext ................ 25
To Select Index Page ......................... 25
To Select Double eight Text ............. 25
To Reveal concealed Information .... 25
To Stop Automatic Page Change ....... 25
To Select a Subpage .......................... 25
Fastext ................................................ 26
To exit Teletext .................................... 26
To Display the Time ........................... 26
Peripheral Equipment Connections .... 26
PC Sound Connection ....................... 26
Via the Euroconnector ........................ 26
Via Aerial Input .................................... 26
Peripheral Equipment Connections .... 27
AERIAL Connections ............................. 28
Peripheral Equipment Connections .... 28
Decoder.............................................. 29
TV and Video Recorder ...................... 29
Playback NTSC .................................. 29
Search for and store the test signal of the
video recorder .................................... 29
Camera and Camcorder ................... 29
Connect the decoder to the video
recorder .............................................. 29
Connecting eadphones .................. 29
Connecting the PC ............................. 29
PC INPUT TYPICAL DISPLAY MODES ... 30
Tips ........................................................ 31
Specifications ....................................... 32
Important Instruction ........................... 33
UK Guarantee ........................................ 34
ENG-1700W-1547UK-17 INCH TFT-WM-17LD4220U.p65 01.12.2004, 14:131
- 2 -
Remote Control Buttons
= Stand By
= Cursor Up
= Cursor Right
OK = Store
= Info (Program Menu)
0 - = Direct Program
-/-- = Double Digit
=Previous Programme
P/CH + = Programme Up
+ = Volume +
= TV / Quit Menu
= External Source
(AV-1, AV-2, AV-3, S-VIDEO, PC)
Yellow (FEATURE) = Feature Menu
Blue (INSTALL) = Installation Menu
= old
= Update
= Index Page
= Reveal, PC = Switch from TV to PC
= Expand, = Aspect ratio
= PIP on / PIP off
= Teletext
= Time
Red (SOUND) = Sound Menu
Green (PICTURE) = Picture Menu
= Mute
I-II = Mono/Stereo - Dual I-II
- = Volume -
- P/CH = Programme Down
= Personal Preference
M = Menu

= Cursor Down

= Cursor Left
02.



































ENG-1700W-1547UK-17 INCH TFT-WM-17LD4220U.p65 01.12.2004, 14:132
- 3 -
Control Panel Buttons
)227723&29(5
92/80(
0(18
67$1'%<
/('
,1)5$5('5(&(,9(5
63($.(5 63($.(5
79$9
3&K
ENG-1700W-1547UK-17 INCH TFT-WM-17LD4220U.p65 01.12.2004, 14:133
- 4 -
Preparation
Install Display on solid horizontal surface such as a table or desk.
For ventilation, leave a space of at least 10 cm free all around the set. To prevent any fault
and unsafe situations, please do not place any objects on top of the set.
This apparatus can be used in tropical and/or moderate climates.
Installation Of The TFT TV To The Wall
1- To install the TFT TV on the wall, first of all, foot assembly should be removed. Unscrew
the 2 screws that attach the foot top cover and the 4 screws that attach the foot to the TFT
panel and remove the foot assembly from the TFT panel.
2- Place the 4 hangers to the circular screw holes at the rear of the TFT and screw them to
the TFT panel with 4 (M4 x 10) screws.
3- Decide the place on the wall where the TFT panel would be placed. Level and mark with a
pencil the 4 mounting points on the wall hanger. Drill pilot holes for the plastic anchors and
then fix the wall hanger with 4 screws (M4 x 30).
4- Raise the TFT panel and hang it to the holes on the wall bracket from the 4 hanging
screws at the rear of the TFT panel.
ENG-1700W-1547UK-17 INCH TFT-WM-17LD4220U.p65 01.12.2004, 14:134
- 5 -
3ODVWLFDQFKRUV
7)73DQHO
6FUHZV
0[
6FUHZV
0[
3ODVWLF3LQV
:DOO+DQJHU
:DOO
ENG-1700W-1547UK-17 INCH TFT-WM-17LD4220U.p65 01.12.2004, 14:135
- 6 -
Panel Features
 igh resolution (1280 x 768), 17-inch TFT
LCD display.
 igh contrast ratio (400:1 Typical)
 Brightness: 450 cd/m2.
 igh-speed response time < 25 msec.
 Wide viewing angle (typical) 140° (horizontal)
and 11 0° (vertical).
 8-bit colour depth, display 16.2 M colours.
Safety Precautions
IMPORTANT SAFETY
INFORMATION ON OPERATING
YOUR TV
Dos and Donts
DOs
This Television has been designed and
manufactured to meet international safety
standards, but like any electrical equipment,
care must be taken if you are to obtain the
best results and safety is to be assured.
DO read the operating instructions before
you attempt to use the equipment.
DO consult your dealer if you are in any
doubt about installation, operation or safety
of your equipment.
DO be careful with glass panels or doors on
equipment.
This TV is supplied with a fitted mains plug.
This plug must not be cut off as it may con-
tain a special radio interference filter, the re-
moval of which could lead to impaired per-
formance. If you wish to extend the lead, ob-
tain an appropriate safety approved exten-
sion lead or consult your dealer.
Observe the manufacturers instructions
when connecting extension leads to the TV.
Check the fuse rating on the new plug, this
should be fitted with a 5 Amp fuse which
conforms to either ASTA or BSI (BS1 362)
approvals, these are easily identifiable by ei-
ther the or symbols. If you are in
Features
 It is a remote controlled colour television
and PC monitor.
 100 programmes from V F, U F bands or
cable channels can be preset.
 It can tune cable channels.
 Controlling the TV is very easy by its menu
driven system.
 It has 2 pieces of Euroconnector socket for
external devices (such as video, video
games, audio set, etc.)
 To use as a monitor, 15 Pin Mini D-Sub con-
nector for computer.
 A2 German stereo and Nicam stereo sys-
tems.
 Multilanguage OSD.
 Teletext (Fastext (7 pages), Toptext).
 It is possible to connect headphone.
 A.P.S. (Automatic programming system)
 All programmes can be named.
 Programme swapping between last two
programmes watched
 Forward or backward automatic tuning.
 Sleep timer.
 Child lock
 Auto, 4:3, 16:9, Cinema, Subtitle, Zoom and
Panorama modes.
 Automatic sound mute when no transmis-
sion.
 When no valid signal is detected, after 5
minutes the TV switches itself automatically
to stand-by mode.
 NTSC Playback.
 Universal power supply range is a standard
feature on this model.
 TV Picture in PC (if PC input available).
 PLL (Channel Search)
 PC input (Support Up to 1280 x 768)
ENG-1700W-1547UK-17 INCH TFT-WM-17LD4220U.p65 01.12.2004, 14:136
- 7 -
1. Power Source
The TV set is designed to operate on 12 V
DC. The adaptor should be operated from a
220-240V AC, 50 Hz. outlet. Ensure you se-
lect the correct voltage setting for your conve-
nience.
2. Power Cord
The power supply cord should be placed so
that it is not likely to be walked on or pinched
by items placed upon them or against it. Pay
particular attention to cord where it enters
the plug, power outlet, and the point where it
exits from the receiver.
3. Moisture and Water
Do not use this equipment in a humid and
damp place (avoid the bathroom, the sink in
the kitchen, and near the washing machine).
Do not expose this equipment to rain or wa-
ter, as this may be dangerous and do not
place objects filled with liquids on top. Avoid
from dripping or splashing.
4. Cleaning
Before cleaning, unplug the adaptor from the
main supply, outlet. Do not use liquid or
aerosol cleaners. Use soft and dry cloth.
5. Ventilation
The slots and openings on the receiver are
intended for ventilation and to ensure reli-
able operation. To prevent overheating,
these openings must not be blocked or cov-
ered in anyway.
6. Lightning
In case of storm and lightning or when go-
ing on holiday, disconnect the power cord
from the wall outlet.
7. Replacement Part
When replacement parts are required, be
sure the service technician has used re-
placement parts which are specified by the
manufacturer or have the same specifica-
tions as the original one. Unauthorised sub-
stitutions may result in fire, electrical shock,
or other hazards.
any doubt about the installation of an exten-
sion lead, please consult a competent elec-
trician.
DONTs
DONT continue to operate the equipment if
you are in any doubt about it working nor-
mally, or if it is damaged in any way switch
off, withdraw the mains plug and consult
your dealer.
DONT place water filled vessels on top of
T.V. cabinets.
DONT remove any fixed cover as this may
expose dangerous voltages.
DONT leave equipment switched on when it
is unattended unless it is specifically stated
that it is designed for unattended operation
or has a stand-by mode. Switch off using
the switch on the equipment and make sure
your family know how to do this. Special ar-
rangements may need to be made for infirm
or handicapped people.
DONT use equipment such as personal
stereos or radios so that you are distracted
from the requirements of traffic safety. It is
illegal to watch television whilst driving.
DONT obstruct the ventilation of the equip-
ment, for example with curtains or soft fur-
nishings. Overheating will cause damage
and shorten the life of the equipment.
DONT use makeshift stands and NEVER fix
legs or stands to the TV with any screws
other than those provided - to ensure com-
plete safety always use the manufacturers
approved stand with the fixings provided.
DONT allow electrical equipment to be ex-
posed to rain or moisture.
ABOVE ALL
 NEVER let anyone, especially children
push anything into holes, slots or any
other opening in the case - this could re-
sult in a fatal electric shock.
NEVER guess or take chances with
electrical equipment of any kind - it is bet-
ter to be safe than sorry
ENG-1700W-1547UK-17 INCH TFT-WM-17LD4220U.p65 01.12.2004, 14:137
- 8 -
8. Servicing
Please refer all servicing to qualified per-
sonnel. Do not remove cover as this may re-
sult in electric shock.
. Naked Flame Sources
Do not place naked flame sources on the
apparatus.
WARNING: When the device is not in use
for a long time, disconnect from power.
Instructions for waste disposal:
 Packaging and packaging aids are recy-
clable and should principally be recycled.
Packaging materials, such as foil bag, must
be kept away from children.
 Battery, including those which is heavy
metal-free, should not be disposed of with
household waste. Please dispose of used
battery in an environmentally sound man-
ner. Find out about the legal regulations
which apply in your area.
 old cathode fluoresant lamp in L D PANEL
contains a small amount of mercury, please
follow local ordinates or regulations for dis-
posal.
DO NOT LEAVE YOUR TV AT STAND-BY
OR OPERATING WHEN YOU LEAVE YOUR
HOUSE
"The LCD panel is very high technology
product with about a million thin film tran-
sistors, giving you fine picture details. Oc-
casionally, a few non-active pixels may ap-
pear on the screen as a fixed point of blue,
green or red. Please note that this does
not affect the performance of your prod-
uct."
" The mains plug of the power supply is
used as disconnect device and therefore
shall remain readily operable. "
DO use the power cord given/supplied by
the manufacturer for the AC adaptor of the
product.
ENG-1700W-1547UK-17 INCH TFT-WM-17LD4220U.p65 01.12.2004, 14:138
- 9 -
Before Switching on your TV
Po er connection
$&DGDSWHU
7R 32 :(5
,1 38 7'&  9
WH UPL Q DO
IMPORTANT: The TV set is designed to op-
erate on 12 V DC. For this, an adaptor is
used which gives 12V DC voltage. Connect
this adaptor to a system that supplies 220-
240V AC, 50 Hz.
 After unpacking, allow the TV set to reach the
ambient room temperature before you con-
nect the set to the mains.
Connections to the Aerial socket
9+)8+)

:
795($53$1(/
&$% /( 79
6$7(//,7(5(&(,9(5
 Connect the aerial or cable TV plug to the
aerial socket on the back of the TV. If you
are also connecting a video recorder or sat-
ellite receiver you should connect the aerial
or cable plug to this device first and then
connect the RF out socket on the device to
the aerial socket on the TV.
Ho to connect other devices
IMPORTANT: Switch off the TV before con-
necting any external device.
Sockets for external connections are at the
back of the TV. For connection of other de-
vices via Euroconnector refer to the manuals
of the related devices.
Inserting batteries in the remote
control handset
 Remove the battery cover located on the
back of the handset by gently pulling up-
wards from the indicated part.
 Insert two AAA (R03) or equivalent type of
batteries inside.
 Replace the battery cover.
NOTE: Remove the batteries from remote
control handset when it is not to be used for
a long period.Otherwise it can be damaged
due to any leakage of battery.
Switching the TV ON/OFF
To s itch the TV on
Your TV will switch on in two steps:
1- Connect the power supply cord to the sys-
tem. Press the   button on the right side
of the TV. Then the TV switches itself to
stand-by mode and the led, located on the
front of the TV, becomes red.
2- To switch on the TV from stand-by mode
either:
Press the   button on the remote control,
or,
Press a digit button on the remote control so
that a programme number is selected,
or,
Press P/Ch button on the right side of the
TV or press -P/CH or P/CH+ buttons on
the remote control, so that last switched off
programme is selected.
ENG-1700W-1547UK-17 INCH TFT-WM-17LD4220U.p65 01.12.2004, 14:139