manuals.online logo
Brands
  1. Home
  2. •
  3. Brands
  4. •
  5. HiVi
  6. •
  7. Speakers
  8. •
  9. HiVi DIY2.2-A User manual

HiVi DIY2.2-A User manual

HiVi DIY2.2-A Speaker Kit Manual
Designed by HiVi Acoustics, Inc.
1
Thanks for purchasing this DIY kit! We hope you have a lot of fun building and
listening.
Please read the manuals carefully first. If you ever have any problems, feel free
to email us at support@hivi.com. There is also a great community of DIY
builders at www.reddit.com/r/diyaudio/.
If you’re ever looking for completely built speakers please check out our
website at www.swanspeakers.com.
You can also find many of our products on Amazon.com, including our award
winning M200MKIII audiophile bookshelf speakers, and our warm sounding
M50W full wood 2.1 surround sound system.
Happy Listening! HiVi Acoustics & Swan Speakers.
Preface
2
Warning: Keep safe when making this kit! Wear protective eye wear when
soldering and clipping component legs.
Suggested tools:
1) Wood clamps 5) Scissors 9) Cross point screwdriver
2) Wood glue 6) Solder 10) Brush
3) Diagonal pliers 7) Soldering iron 11) Sandpaper
4) Hammer 8) Allen wrench
Note: Crossover components may be substituted with parts of equal of higher
quality depending on stock.
Components:
I、Package contents
7) HiVi LB-D6.8-IIB woofer
8) HiVi LB-Q1R tweeter
9) Vent tube and paper tube
1 2 3 45 6
1) 1.5Ohm resistor (R2)
2) 6.8Ohm resistor (R1)
3) 8uF capacitor (C2)
4) 6.8uF capacitor (C1)
5) 1.5mH air inductor (L2)
6) 0.35mH air inductor (L1)
798
11) Grill and frame
12) Cushions for drivers
10) Cabinet front (x2), Back (x2) Bottom (x2), Side (x4), Division (x2)
Enclosure
Top Division
Side
Back
Side
Front
Bottom
3
13) Screws
A. Screws for woofer/ tweeter/ terminal box 32 PCS
B. Screws for crossover 8 PCS
C. Retainers 8 PCS
A B CD E F
D. Male threads 8PCS
E. Female threads 8PCS
F. Holding pegs 8PCS
14) PCB(Printed Circuit Board)
15) Veneer surface
16) Terminal box
17) Cotton acoustic stuffing
18) Speaker wire
19) Rubber feet 8 PCS
20) Swan tape
21) Double sided foam tape 4 PCS
22) Swan logo and label
4
5
1. Arrange the components as illustrated in the figure below. With a soldering
iron, apply solder to the connections between the components and the board.
Remove the excess components legs and secure the inductors with cable ties.
Note: Remove the coating on either end of the inductors to ensure good
contact. And apply glue to all the contact surfaces between the components and
PCB to ensure steadiness.
2. Cut 3 lengths of 2-conductor speaker wire, slightly longer than the distance
from the crossover to the corresponding speaker openings. Solder them
respectively at the outputs of the crossover. Cut one length of 2-conductor
speaker wire and weld it at the imput of the crossover. Make sure the polarity is
correct. Generally, the red wire is positive. Paste the double sided foam tape at
the back side of the crossover to support the crossover.
R1
R2
C2
C1
WOOF ER OUTP UT TWEE TE R OUT
IN PUT
L1
L2
II、Crossover Assembly
6
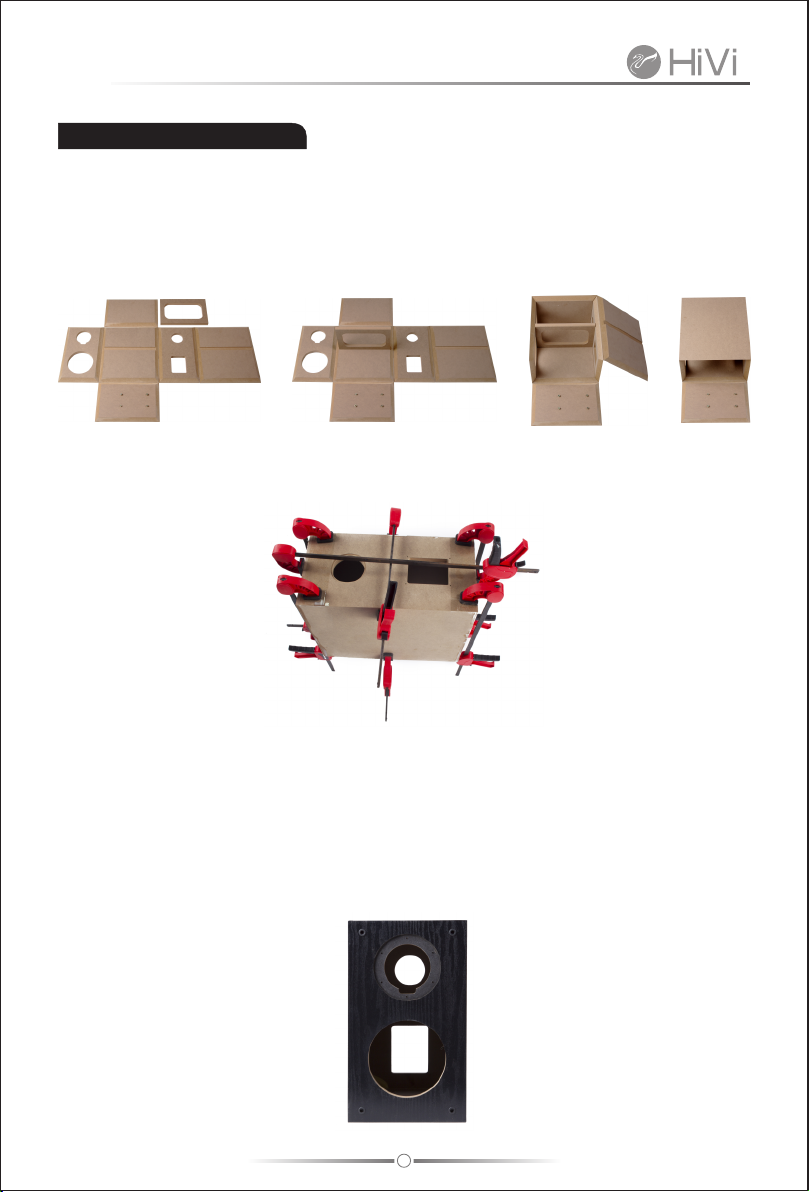
1. Set the enclosure parts out on a flat level surface. Apply some wood glue to
the locating groove in the side panel and install the division panel into the
groove. Then apply glue to all the contact surfaces between the panels. And
place all the other panels in place. Install the 4 retainers into the holes in the
bottom panel.
2. Apply clamps to the enclosure. Wipe away any glue squeeze-out on the
outside of the enclosure. Allow to dry according to the glue manufacturer’s
recommendation.
3. Once the glue is dry, remove the clamps. Sandpaper the panels smooth
before you finish them. Apply a thin layer of glue to wood veneer and paste it on
the enclosure. Press hard and evenly to make sure the veneer is flat and
smooth. A piece of wrung hot wet cloth is recommended here to help make the
veneer soft enough to be pasted evenly.
Note: In case you don't like the finish provided, you can finish enclosure to your
liking. Finishing is not only used to beatify your speaker but also keep it from
damping and prolong its life.
I、Enclosure AssemblyII
5. Insert crossover through woofer hole and install it onto the holding pegs on
the bottom panel. Have the wires outside through the corresponding speaker
openings to avoid confusion and make it easier for driver connection. Add some
cotton acoustic stuffing into the enclosure and press it hard against the side
panels.
6. Insert the vent tube into the paper tube and apply some glue to it. Then install
it into the tube hole.
7
4. Turn the 4 holding pegs onto the retainers or just knock the nails into the them.
Then install 4 female threads into the holes on front panel which will be later used
to hold the grill.
8. Weld the tweeter wires to the its terminals and set the tweeter with its cushion
in place. Press them into opening and secure them with screws. Weld the
woofer wires to its terminals and set the woofer with its cushion in place. Press
them into opening and secure them with screws. Make sure the polarity is
correct. Bigger terminals on the drivers are positive.
7. There are two sets of lugs on one side of the terminal box and two sets of
connected terminals on the other. Weld the input wire on crossover to either set
of lugs through the terminal box hole. Again the polarity must be correct. (red =
positive) Make sure that there is no short circuit or false welding. Screw the
terminal box and its cushion on the cabinet with terminals upward.
8
9
10. Paste the rubber feet to the bottom panel and the label to the blank place
between the tube and terminal box.
11. You are now ready to enjoy your speakers.
9. Apply a layer of glue to the frame of the grill and tuck the grill fabric into the
groove in the frame cut the excess fabric. Knock the 4 male threads into the
holes in the frame. If you wish, attach the logo on the bottom edge in the circle
slot.
HiVi USA
87 N. Raymond Ave, Suite 917, Pasadena, CA 91103, U.S.A.
E-mail: sales@swanspeaker.com https://swanspeakers.com
HiVi China Zhuhai HiVi Technology co., Ltd.
NO.1, South Dongcheng Road, Liangang Industrial Zone, Zhuhai, Guangdong, P.R.China
HiVi Acoustics, Inc.
Due to the reasons in the change of design or others, product information contained here may
not be in conformity with product itself. We reserve the right of no prior notice before change.

Other HiVi Speakers manuals

HiVi CX Series User manual

HiVi

HiVi CX Series User manual

HiVi DIY3.1-A User manual

HiVi

HiVi DIY3.1-A User manual

HiVi M200MKII User manual

HiVi

HiVi M200MKII User manual

HiVi M Series User manual

HiVi

HiVi M Series User manual

HiVi M200MKIII+ User manual

HiVi

HiVi M200MKIII+ User manual

HiVi EX Series User manual

HiVi

HiVi EX Series User manual

HiVi H5MKII User manual

HiVi

HiVi H5MKII User manual

HiVi M300 User manual

HiVi

HiVi M300 User manual

Popular Speakers manuals by other brands

Harman JBL 4312MII owner's manual

Harman

Harman JBL 4312MII owner's manual

Reverie ELATION owner's manual

Reverie

Reverie ELATION owner's manual

Electro-Voice EVX-180B datasheet

Electro-Voice

Electro-Voice EVX-180B datasheet

Dynaudio Focus 60 XD owner's manual

Dynaudio

Dynaudio Focus 60 XD owner's manual

Acoustic Arc BS1130E instruction manual

Acoustic Arc

Acoustic Arc BS1130E instruction manual

Genesis 450XS Owners manual and set-up guide

Genesis

Genesis 450XS Owners manual and set-up guide

RCS AUDIO-SYSTEMS SRC-512 EN-1 operating instructions

RCS AUDIO-SYSTEMS

RCS AUDIO-SYSTEMS SRC-512 EN-1 operating instructions

Next W3 user manual

Next

Next W3 user manual

Revox Re:sound H190 Specification sheet

Revox

Revox Re:sound H190 Specification sheet

HK Audio LINEAR 5 LTS A manual

HK Audio

HK Audio LINEAR 5 LTS A manual

Pioneer S-DV390T Service manual

Pioneer

Pioneer S-DV390T Service manual

Saxx AS 30 User instructions

Saxx

Saxx AS 30 User instructions

Millenium BS-2222 user manual

Millenium

Millenium BS-2222 user manual

NEC MultiSync Soundbar 90 manual

NEC

NEC MultiSync Soundbar 90 manual

Amperes CS210 installation guide

Amperes

Amperes CS210 installation guide

König Electronic CMP-SPSW21 manual

König Electronic

König Electronic CMP-SPSW21 manual

Yamaha MS150 operating manual

Yamaha

Yamaha MS150 operating manual

Apogee 109-2151 Installation instructions manual

Apogee

Apogee 109-2151 Installation instructions manual

manuals.online logo
manuals.online logoBrands
  • About & Mission
  • Contact us
  • Privacy Policy
  • Terms and Conditions

Copyright 2025 Manuals.Online. All Rights Reserved.