HJ Toys Flanker W606-5 User manual

Please read the instrucon manual before go for flight.
Recording and sharing in HD, During each flight, you can record
an HD video that's sent directly to your iOS/android devices
Acrobac maneuvers connuous flips
Fast LiPo baery charger with US/JP, UK, EU, ANZ plugs
Headless Mode for beginners and taking a video
A View from Above See exactly what your camera sees with a
live HD video feed right on your mobile device
5.8Ghz HD Video FPV
14+
R
W606-5
Auto Take off & Landing HD
FPV Acrobac maneuvers drone
Instrucon Manual
FLANKER

Required 6*1.5VAA"Baery
Aerobac maneuver Key
LCD screen power
Altude hold mode
Camera buon
IOC (Headless mode)
Aileron/Roll Trim
Elevator/Pitch Trim
Elevator/Aileron
A key return
Press up light control /
press dwon for speed
Rudder Trim
Auto takeoff & Landing
Automac propeller
shutdown
Power Indicateor
Throle/Rudder
On/Off swch
GET TO KNOW YOUR TRANSMITTER
6*AA baery (Not including)
7.4 V 2500 MAH Li-po baery inside
Standard charger
9-10 minutes
180 minutes
200-300 meters
560 gram
L: 420MM × W: 320MM × H:150MM
Transmier Baery
Baery
Adapter for FLANKER
Flying me
Charging me
Flying distance
FLANKER weight
FLANKER Size
NO. Flanker main technical contents
5.8GHz FPV FLANKER Aircra:
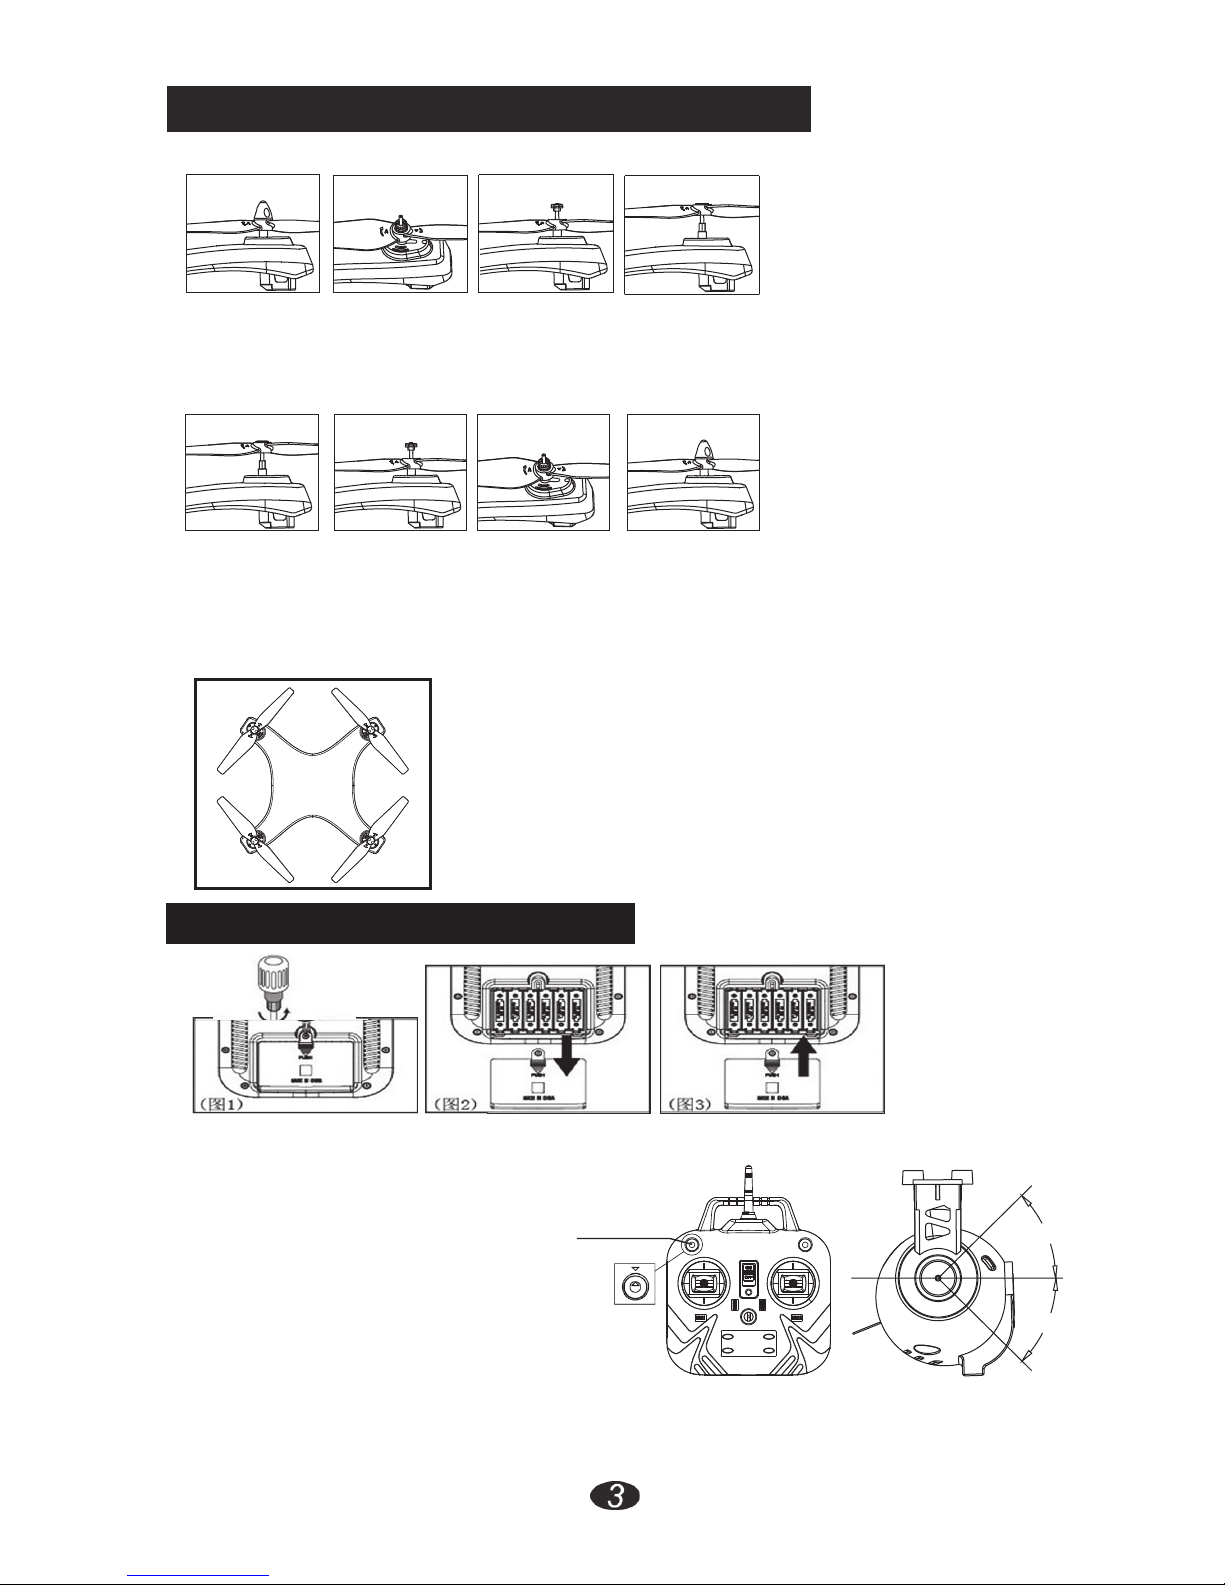
Installation of propeller /Dismounting Steps
1
4
Dismounting Steps:
2
3
3
2
4
1
Installation Procedure:
Details of replacement blades:
1.Replace the corresponding
blades as
above picture shows
(reference mark in
blades must
be in the same as the UFO),
arrows in the picture is motor
direction.
1. Rotate cover of blades counterclockwise & take it out (as picture 1).
2. Rotate collar bush counterclockwise and get tube out (as picture 2).
3. Pull collar bush up as picture 3.
1.
Take fan blades plug in gear wheel through the main shaft (as picture 1).
2. Fix the collar bush plug in main shaft tube (as picture 2).
3.
Arrange tube plug into the hole of main shaft tube, and then tighten the
cover by turning it clockwise (as picture 3).
4.Tighten fan blades by turning it clockwise (as picture 4).
Remote control installation instructions
Install the battaries regarding above given instruction
Blade A
Blade A
Blade B
Blade B
Front
Back
Radio control Camera funcon details:
Calibrate your aircraft first, and here you
go with radio control Camera, just
move the Actuator button left and right
camera will move up and down.
1. Move actuator button clockwise rotation,
camera move up to 45 degree direction.
2. Move actuator button counterclockwise
rotation,camera rotates downside direction. Figure 1
Camera(actuator system) Angle
adjustment (optional accessories):
Actuator Buon
Pitch Angle
-45°
0°
45°

Auto Take off & Landing:
AUTO TAKEOFF: Before go for this unique feature auto
takeoff & landing please collaborate your aircra first.
Aer that find the auto takeoff & landing buon (Image 3)
on the lower le side on the transmier buon for
over 3-6 seconds aircra will takeoff. Please press the
fast/slow buon )Image 2) to fly up and loose altude.
LANDING: Please press the same auto takeoff &
landing buon (Ref Image 03) for landing
Ascending & Desending:
under this funon your throle will Neutral (You can’t fly up/down by throle),
side fly/trun le/turn right work normally, press the same buon (Reg Image 3)
to exit from auto takeoff & landing funcon and start fly manually.
Key 5: In state of auto takeoff & landing “KEY 5”
work as throle (fly up/asending and desending) of aircra.
KEY 2: In state of auto takeoff & landing key 2 will not work as fast and slow speed funcon. When
you are flying in normal mode, it will work fast and slow speed, press downward with 1 beep means
normal speed and press again, with two beep sound it means fast speed.
KEY 1: Push upward to off/on LED lights of the aircra.
KEY 4: Under Auto takeoff & landing state this funcon (Embergency exit) work only
Just press the key when you want to stop the drone by force
when you feel it hit some obstacle, drone will shutdown.
How Does Headless Mode Work:
Altude Hold Mode:
The funconing of headless mode is prey simple. The only
pre-requisite is that before taking off, you’re required to posion
the drone in such a way that its front is your front. Since yaw
(the le sck) anyway doesn’t have anything to do with
orientaon (le is le and right is right all the me,
regardless of where your drone is poinng at), it is how the drone
reacts to rudder (the right sck) that changes. In other words, even
when you turn your drone 90 degrees to the le, it’ll sll go forward when
you push the rudder forward (on a non-headless mode drone, this would make the drone go le).
One key return is the funcon which help to save your drone to lost or crash when you fly far away
from you, like you are flying the drone 100 meters away from you, and it's going to out of control, just
push down the key on upper right side, drone will come to you.
In altude hold mode, aircra maintains a consistent altude while allowing roll, pitch, and yaw to be
controlled normally.
When altude hold mode is selected, the throle is automacally controlled to maintain the current
altude. Roll, Pitch and yaw operate the same as in Stabilize mode meaning that the pilot directly
controls the roll and pitch lean angles and the heading.
Noted: Before acvate the altude hold mode assure the aircra get enough altude(recommended
altude at least 2 meters from the surface)
Light Control
One Key Return:
NORTH
1
2
4
5Fly up/down
Fast/Slow Buon
3 Auto Takeoff & landing
Emergency Exit Buon

Flying operation introduction
Turn le/right fine-tuning
Fine-tuning operation
Forward/Backward fine-tuning
When the quadcopter keeps
flying forward / backward, you
can correct it by pressing fine-
tuning buon down / up.
When the quadcopter keeps
flying sideward, you can
correct it by pressing fine-
tuning buon le/right.
When the quadcopter keeps
rolling/head move le/right, fix
it by pressing fine-tuning buon
le to right/right to le.
Sideward fly fine-tuning
Pull the direcon lever le or right, the
quadcopter flies to le side or right side.
Pull the throle le or right, the
quadcopter turns to le or right.
Sideward fly Turn Le and Right
If the drone hovering but not stable means going front/back or side fly/rolling
Please go through the trimming opon to make the aircra stable, Or just
switch off the transmier and keep press the camera buon & switch on
again transmiser will trimming it automacally
Push the throle up or down, the
quadcopter flies upward or downward.
Hover up and down
Push the direcon lever up or down, the
quadcopter flies forward or backward.
Forward and backward
First Step:Push the throle up and down twice for connecng the drone.
!

黑线
红线 红线
黑线
OFF ON
(Image 01)7.4V 2500 MAH Li-po baery (figure2)
Baery
baery cover
power switch
plug cord
Baery charging using instrucons
Remove the baery from aircra before charge, place the adopter and baery socket in right way
(Image 01). when charge will have Red light on adopter, aer 180 minutes when the charge complete it
will turn green, which means full charge.
Distance of 3M
Distance of 2.5M
Distance of 3M
Distance of 2M
Distance of 3M
Environment for flight
Please have good practice before go to ight
*When charging, please put the drone on a dried oarea and keep it far away from heat source or explosive product.
*Aer flying, please do not charge the baery if the surface temperature is sllnot cool. Otherwise it may cause
a swollen baery or even a fire hazard.
*Please make sure that you use the original adopter provided with the drone and When the baery has been
used for a long me, or appears to be swollen, please replace them.
*IF not in use for a long me will lose its charge automacally Charging or discharging too oen may reduce its ife
Warning on Li-poly baery:
Spare parts
B
A
Part-01 Part-02 Part-03
Upper/Down Body 2.4G Remote Controller Battery cover
Part-05 Part-06 Part-07
7.4V 2500 MAH Li-po battery Main Blade A Main Blade B
Part-09 Part-10 Part-11
Charger Landing Gear PCB Board
Part-04
Motor kit holder
Part-08
5.8Ghz FPV LCD Screen
Part-12 Part-13 Part-14
Normal Camera RC Camera Main Motor
6
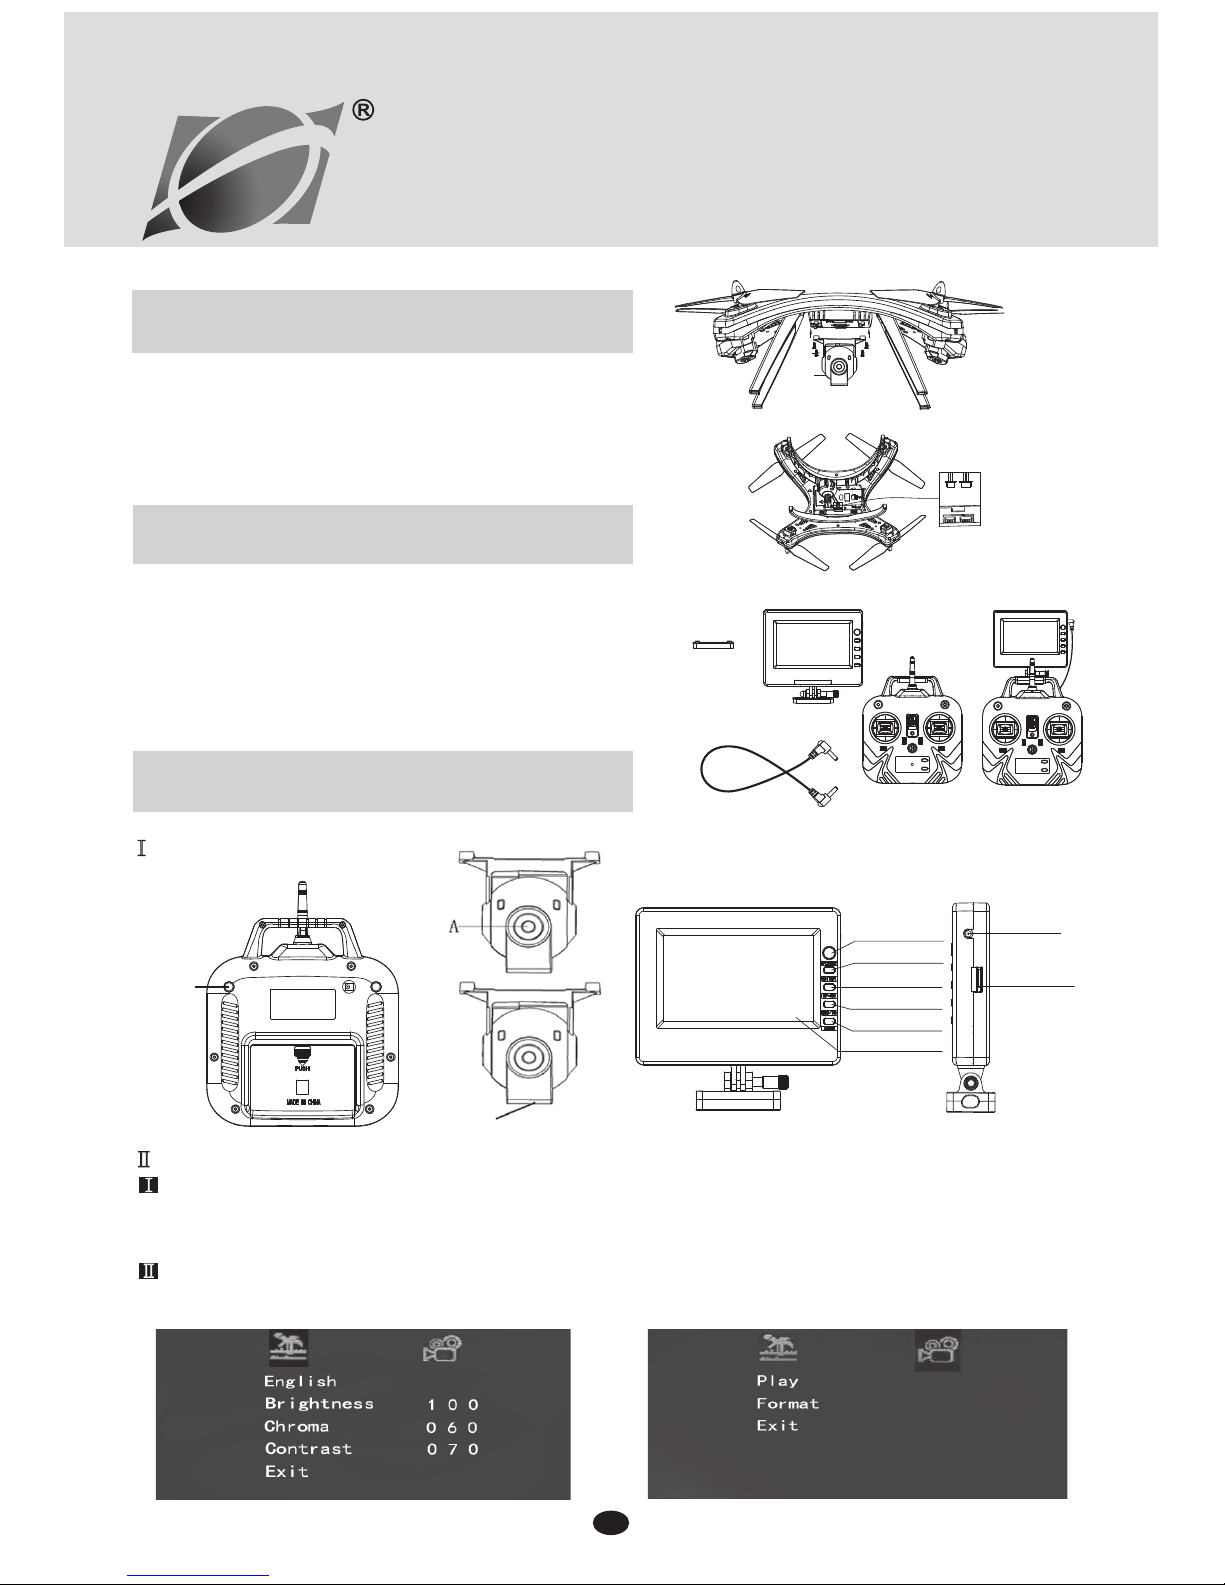
5.8G Real-Time Transmission Transmitter
Component Installation Instructions
Real-Time Transmission Display Screen
Installation Instructions
The four pillars (Image 1) 5.8G real-time transmission transmitter
component corresponding to (Image 2) (A) are installed , screw
them . Then connect the plug (Image 2) (C) to 2 pin socket.
The fixed handle under cover (Image A) to the handle (ImageD),
(Image B) display screen . Directly fixed buckle to the handle
(Image D ). (Image E ) is installed . And then fixed by screw ,
Connect the wire (Image C), power DC socket connect to the
display screen ,connect another DC socket behind the remote
controller.
Ⅰ . Turn on/Turn off
Turn on: Connect the power, long press 5.8G screen "power switch" button for 3~5 seconds. The display screen light will
display the Huajun Aeromodelling Logo.(Image F);
Turn off: Turn off after using , press 5.8G screen "power switch" button for 3~5 seconds, the display screen out .
Ⅱ.Menu Introduction:
The menu consists of two small menu, as shown in the following image.
(Menu 1 & Menu 2)
Menu 1
Menu 2
5.8G Real-Time Transmission Display
Operating Instructions:
Ⅰ.Brief Introduction :
Ⅱ.Function Description:
1
5.8Ghz FPV Device
INSTALLATION AND OPERATION
Image A
Image B
Image C Image D Image E
Image 1
Image 2
Socket
SD Card
Reader Slot
ON/OFF
OK
UP/Video
DOWN
Menu
Screen
camera
screw
2
TF Card
Slot
1

1.Real-Time Transmission Display Interface
: Signal Strength Display Icon
: Recording Status Display Icon
(No recording states red dots
disappear)
: Photo Shooting Status Display
Icon (Red dots on screen will
flash once when taking photo)
: Card Display Icon When Card
Inserted
: Power Display Icon
Video: Enter to review and play TF card
Photo: Enter to review photo
Camera: Enter the display of "real-time
transmission "
Setting: Enter the display parameters
In the "Main Menu" interface, using the "Fast-Forward
Button" or "Fast-Rewind Button"to select the function
icon. Press the enter button to get in.
Ⅳ. DISPLAY SCREEN ICON INSTRUCTION
Reader 1PCS 、4GB TF Card 1PCS
Ⅴ. ACCESSORY
1.Transmission Distance: 100-150M. If beyond the effective distance does not affect take photo and video
function.
2.During the recording process, please stop recording function first. Then take out the card. Otherwise it will
affect the normal playback of video files.
REMARKS
2
2.Main Menu Interface
Video Photo Camera Setting
Video
Photo
Camera
Setting
5.8Ghz FPV LCD
INSTALLATION AND OPERATION
2

Camera Installation
Figure1
Figure2
Figure4
Video/
Camera
1.
Install the SD card, power on, green light on. If not
install the SD card, green light on, red light flash.
2.
Start taking video, press the video / photo button
(Figure 1). The indicator light behind the camera
display status:green light on,red light flash one time.
Repeat the above steps, take pictures.
3.When taking video,just press the video/Photo button
(Figure 1) for 3 seconds. Lights behind the camera
display status: Green light on, red light on.If you want
to exit the video, only need to press long video/Photo
button (Figure 1) for 3 seconds. The lights behind the
camera display status: Red light extinguish, green light
on.
4.
When the camera SD card is full,the red light by the long
on, becomes automatic off, green light on. If you want
to keep your photography needs to remove the SD
card. Then put the content of the SD card input to
computer.Input empty then continue photography.
(Note: 5MP camera status lights are green /Blue)
5.
MicroSD Card can now be used as a Flash Drive.
6.
Go to "NO NAME"drive, go into the DCIM Folder,
Go into the 100DSCIM Folder, AVI files can be played
on several media players such as "Quicktime."
7.HAVE FUN!!!
■
If you have trouble playing the files with Quicktime
try your other media players. You can also look online
for recommended free downloadable AVI players.
■
Video camera does not record sound.But can record
video and take photos.
■Micro SD Card should be placed with the little
copper connections facing as show in.(image 4)
■No compression video files can be moved or deleted.
Fittings
CARD READER SD CARD
USING THE ON-BOARD VIDEO CAMERA
Camera
lens
SD
Card
Slot
camera
Screw
Table of contents


