HJC SMART 10A Instructions for use

PREMIUM MOTORCYCLE
ACTION CAMERA
FOR HJC HELMETS
APPLICATION MANUAL
ENGLISH

SMART HJC 10A 2
Contents
1. Precautions for use
Precautions for use - General 3
Precautions for use - Battery 4
Precautions for use - SD card 5
Precautions for use - GPS 6
Precautions for use - Waterproof 7
2. Product description
Product components 8
Components and descriptions 9
How to assemble - General 12
How to assemble - F70 13
How to assemble - i90 & RPHA 90,
RPHA 90S, RPHA 90S CARBON 15
How to assemble - Precautions (standard) 17
How to operate (Firmware upgrade) 18
3. Application / PC Viewer
Installing the SMART HJC 10A app 19
Connecting SMART HJC 10A to a smartphone 20
Before connecting SMART HJC 10A to the app 21
Application - Settings (Android) 22
Application - Settings (iOS) 23
After connecting SMART HJC 10A to the app 24
Application - Camera settings 25
Application - Live view 29
Application - Gallery 30
Application - SNS streaming 31
SMART HJC 10A PC Viewer 38
4. Others
Voice list 41
Sound effects 43
Points to check before requesting for warranty service and FAQ 44
Product specifications 46

SMART HJC 10A 3
Precautions for use - General
1. This device features home-use (class B) electromagnetic compatibility
and is suitable for use in any location, including homes.
2. Using third-party components with the authentic parts enclosed in the
product may lead to faults or accidents. Damages caused by such
components will invalidate the free warranty service, and the manufacturer
will not take any responsibility for the damages.
3. Do not arbitrarily dismantle, repair, or modify the product as it may lead
to electric shocks, product damages, or loss of recorded videos and data.
If any anomalies are found, please contact our customer center before
taking action.
4. After purchasing the product, ensure that it operates and records
videos properly.
5. Please maintain the camera lens’ condition by regularly cleaning it with a
soft cloth. Contamination of the lens with foreign objects may lead to degraded
image-recording quality.
6. The product utilizes a camera. Abrupt changes in brightness (e.g., when
passing through tunnels, when the backlight is strong, or if no light source is
available at night) may lead to degraded image-recording quality.
7. Please check recorded images regularly to ensure the product’s normal
operation and the SD card’s good condition. If any anomaly occurs, stop using
the product and contact our customer center.

3. Use this product outdoors only when riding a motorcycle.
Keep it indoors when not in use.
SMART HJC 10A 4
Precautions for use - General Precautions for use - Battery
1. Using the product while driving may lead to accidents; stop the vehicle
at a safe place before use.
2. For the stable use of the product, ensure that it is operated at the
following temperature.
- SMART HJC 10A operating temperature : -10℃ – 50℃
- Battery charging temperature : 0℃ – 45℃
1. The battery is a consumable and has a six-month warranty period.
2. Using a third-party battery may lead to explosions or fire, make sure to use
an authentic battery.
3. Plugging or unplugging the charging cable with wet hands may lead to fire
or electric shock accidents; make sure to do so with dry hands.

SMART HJC 10A 5
Precautions for use - SD Card
1. Please regularly maintain the SD card as it is consumable*, and its
service life will be shortened with continued recording. However, using the
card with regular formatting may extend its service life. Before formatting,
make sure to back up important image files. If the SD card is not
recognized, please replace (purchase) it with a new one.
(*consumable : The SD card has a six-month warranty provided by the
manufacturer.)
2. In replacing (purchasing) an SD card, ensure its authenticity
(class 10 or higher).
3. Before removing the SD card, ensure that the product is turned off.
Removal of SD card with the power on may lead to the loss of data or damages
to the product.
4. If the SD card needs to be stored in a separate place, ensure that it is not
exposed to moisture, dust, or high heat as these may lead to a deformed or
malfunctioning SD card.
5. Please back up and store important data in a separate storage medium
(HDD, CD, etc.) if it is needed to be stored for a long time.

SMART HJC 10A 6
Precautions for use - GPS
1. The GPS system is affected by weather, satellite conditions, and the
surrounding geography. Because the GPS functions through the
communicationof the product’sreceiving antenna and dedicated artificial
satellites, various weather conditions (cloudy/rainy/snowy weather, etc.) or
changes in the surrounding geography (around tall buildings, under land
bridges, in tunnels/underpasses/parkinglots, or around other
interferences) may make thereception unstable.
2. TheGPS signal reception does not affect video recording. When the GPS
signal is lost, only the location coordinates and the driving speed will not be
recorded.
3. GPS connection may be slow on the first use after purchase or a long
period of no use, taking 5 to 30 min at most to check the satellite location
andreceive GPS signals.
4. In the hot summer or cold winter, GPS reception may become unstable or
takea longer time.
* What is GPS?
GPS is astate-of-the-art satellite navigation system that measures accurate
time and distance through three or more dedicated satellites above the earth.
Moreover, the current location is calculated through triangulation. Through GPS
technology, the product records vehicle location and driving speed at the time of
video recording and provides additional situational information on the recorded
videos.In addition, it also hasa function that enables theviewingof the driving
route on an Internet map service interface with the stored locational information.
SMART HJC 10A 7
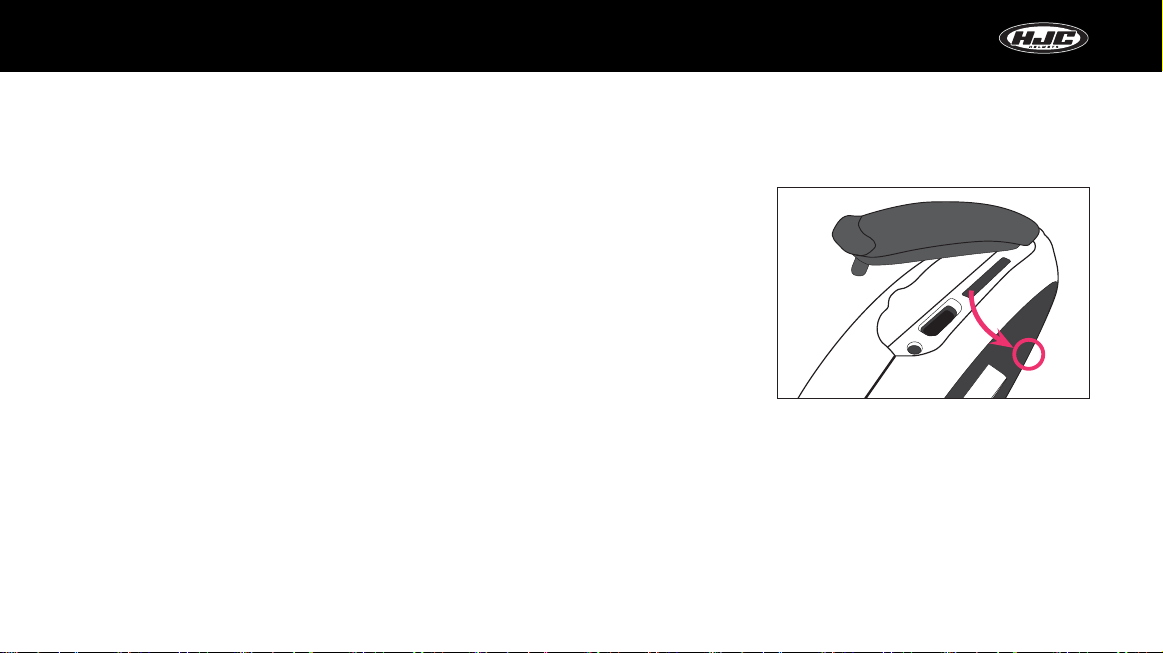
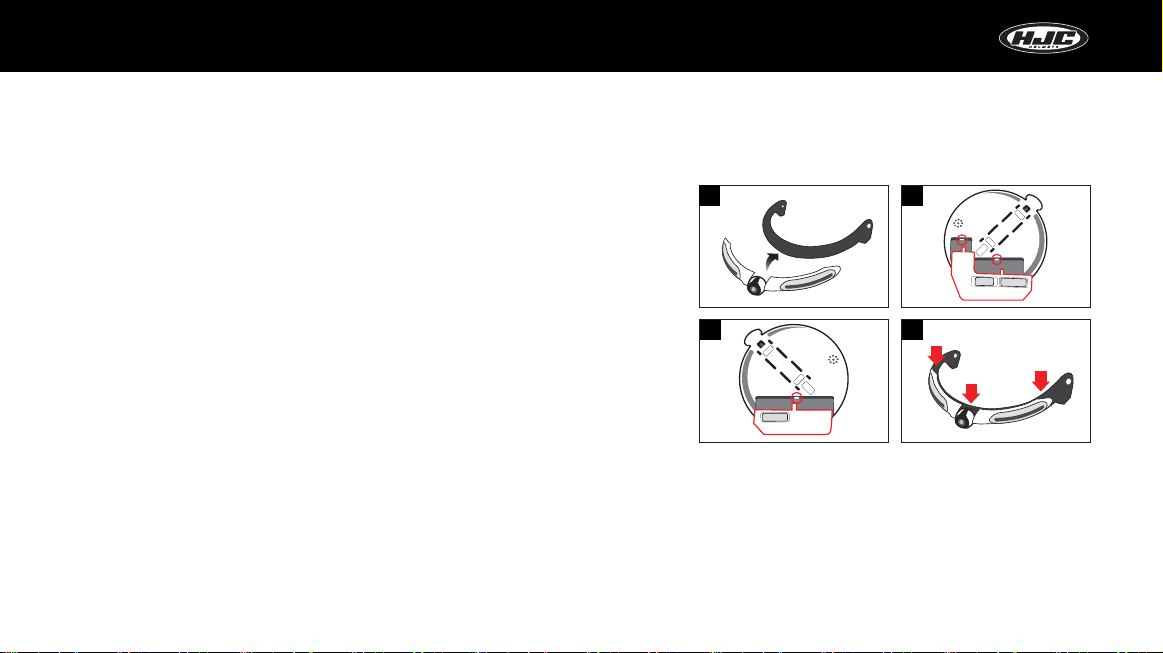
Precautions for use - Waterproof
1. Precautions for mounting the rubber cap to the body
As shown in the figure, insert the protruding part of the rubber cap tightly into the body’s hole,
and press down the rubber cap to ensure that there is no gap between the cap and body.
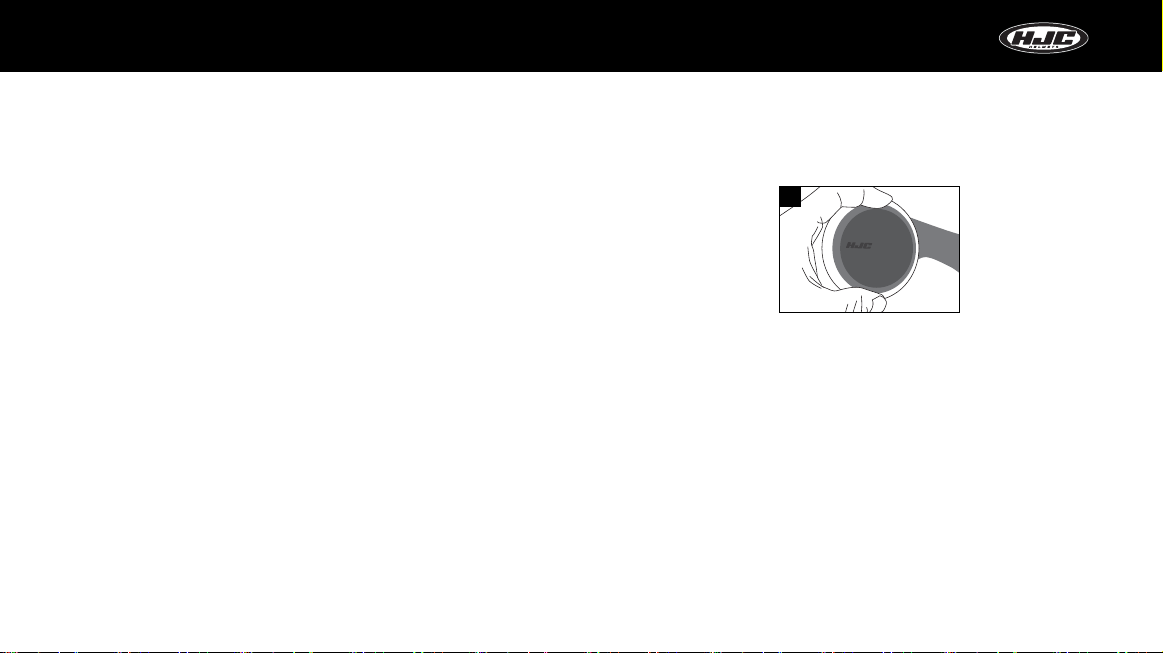
2. Precautions for opening/closing the battery-holder cover
If the battery-holder cover is not tightly closed, rainwater may seep into it. Therefore, after closing,
check if the cover isclosed tomatch the point indicated on the corresponding part.
3. Precautions for mounting/demounting the battery holder to/from the body
The battery holder can be mounted/demounted to/from the body. Mount/demount the battery
holder in a placefree from rainwater. If the vehicle was exposed to rain, mount/demount the battery holder after
the rainwater is fully dried.
Micro SD Card
Removal Tool
SMART HJC 10A 8
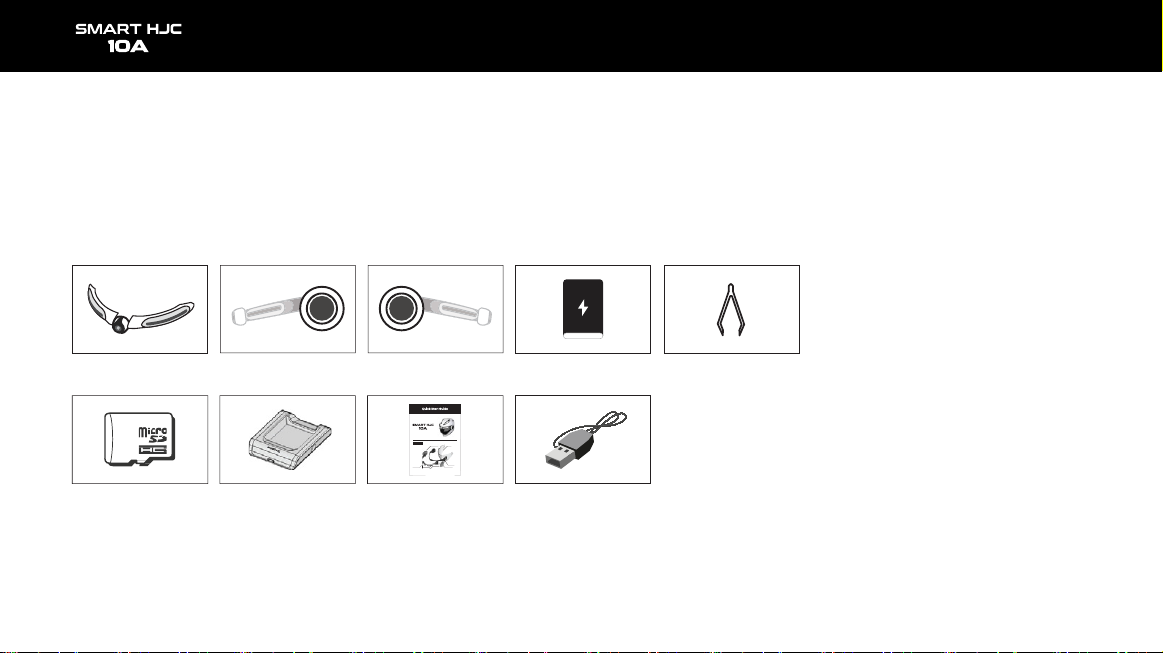
Product components
The components of the product are subject to changes without notice to improve product performance.
Besides the basic components, additional accessories are sold separately.
Camera Body Battery holder Battery
USB cable for
charging
Micro SD card
(32GB)
Charging cradle Quick start guide
카메라부
이미지센서
카메라렌즈
*
별매품
본체부
SD카드소켓/USB소켓
멀티버튼
LED
램프
방전표시LED
캠홀더
*
별매품
쉴드
배터리장착부
배터리
충전표시LED

SMART HJC 10A 9
Components and descriptions
1. SMART HJC 10A components
SMART HJC 10A 10
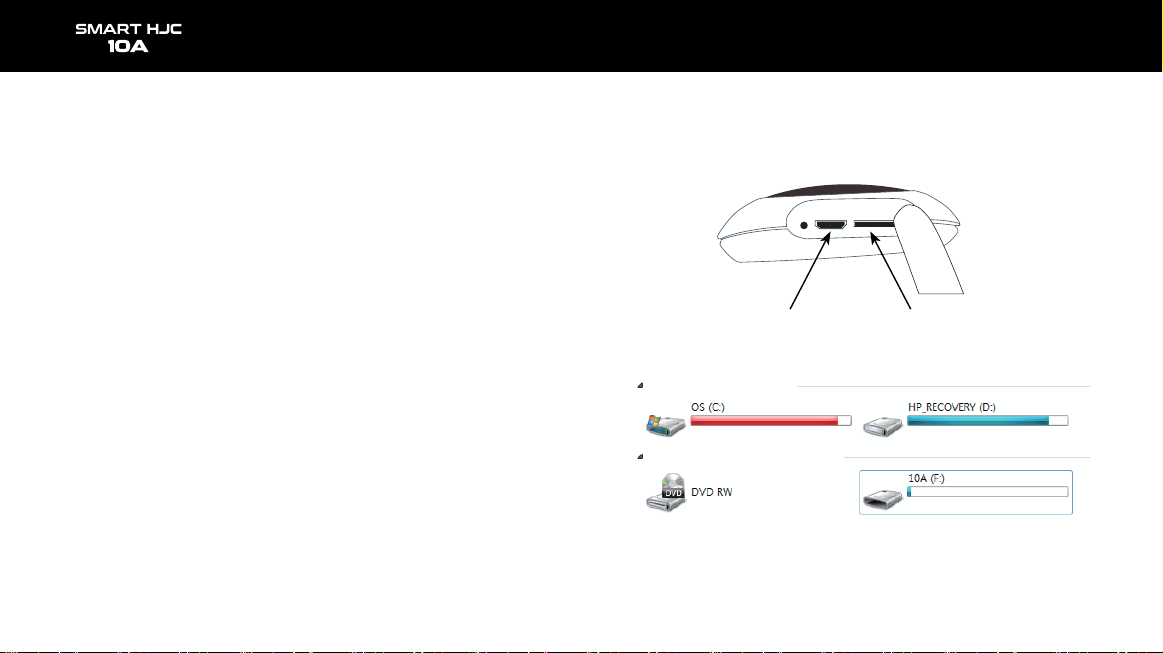
2. Micro SD card slot and micro USB port
- Micro SD card slot : Insert the included (or purchased) SD card into the slot.
Please use an SD card that supports SD High Capacity (SDHC), Class 10, or higher.
- Micro USB port : For battery charging
· If a PC USB port is connected to the product’s USB port through a USB cable,
the SD card of the product will be recognized as external storage.
Component names and description
Micro USB port Micro SD card slot
Hard disk drive (2)
Portable media device (2)

SMART HJC 10A 11
Components and descriptions
3. Battery
- Lithium polymer 2000 mA battery
- Charging time : It takes 2.5 hr from total discharge to full charge.
- Duration of use : The fully charged battery can be used for approximately 2.5 hr
(in continued video shooting).
- Charging method : Use the dedicated charging cradle (see Figure 1 in the right).
4. Battery charging cradle
- Charge the battery by mounting it on the charging cradle, as shown in the following figure.
The battery should be mounted so that its back faces upward.
- LED : · Charging = RED
· Full charge or empty cradle = GREEN
12
Use the micro USB port of the product (see Figure 2 on the right).

SMART HJC 10A 12
1. Insert the included micro SD card into the body.
- Insert the micro SD card with the printed surface facing upward.
2. Insert the battery into the battery holder.
- To open the cover, turn it counterclockwise.
- Insert the battery with the SMART HJC facing upward.
- Insert the battery, and place the cover, as shown in Figure 2.
Then, close the cover by turning it to match the marking, as shown in Figure 3.
* Connect the battery holder to the camera holder to open or close
the battery cover more easily.
How to assemble the product - General
3
21

SMART HJC 10A 13
How to assemble the product - F70
3. Connect the camera, with the three connection grooves of the cam holder
(sold separately), as shown in the Figure 1.
- To fix the camera part to the cam holder, connect the two guide pins of the camera
part first, as shown in Figure 2, and fix the other guide pin by pushing it into the groove,
as shown in Figure 3.
4. Firmly connect the camera holder (sold separately) and the camera by fastening
the five enclosed bolts with a screwdriver, as shown in Figure 4 on the right.
1 2
3 4
SMART HJC 10A 14
5. Mount the components jointed in 4 to the shield and
the helmet.
- Connect the camera part to the shield by inserting the cam
holder’s guide spurs (at two points) to the shield’s holes
(see Figure 7), as shown in Figure 6.
- Mount the fixed product to the shield and helmet with the
washers and bolts provided, and make sure to insert a washer
before fastening a bolt.
6. Insert the body unit and the battery holder into the lever
grooves of the camera holder, and mount them onto the
helmet.Connect the body and the battery holder until a clicking
sound is heard.
How to assemble the product - F70
119 10
6 8
5
7
Helmet Shield Washer Bolt
Bolting
Cam
holder
Assembling sequence
SMART HJC 10A 15
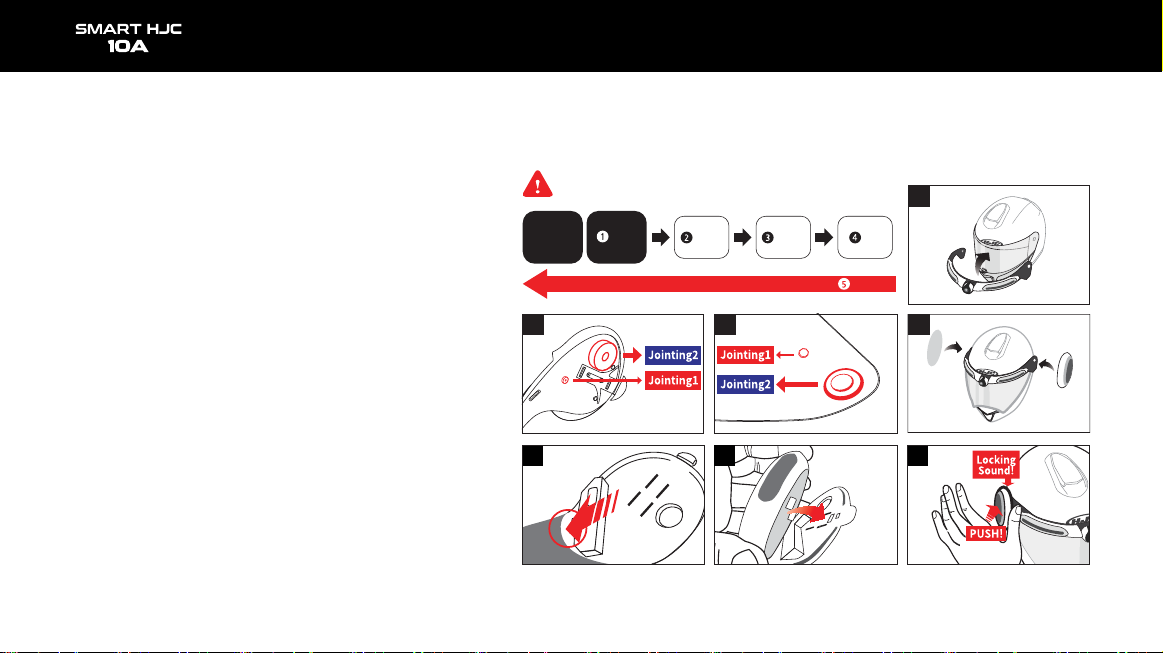
How to assemble the product - i90 & RPHA 90, RPHA 90S, RPHA 90S CARBON
3. Connect the camera, with the three connection grooves of the cam holder
(sold separately), as shown in the Figure 1.
- To fix the camera part to the cam holder, connect the two guide pins of the camera
part first, as shown in Figure 2, and fix the other guide pin by pushing it into the groove,
as shown in Figure 3.
4. Firmly connect the camera holder (sold separately) and the camera by fastening
the five enclosed bolts with a screwdriver, as shown in Figure 4 on the right.
1 2
3 4

Assembling sequence
6. Insert the body unit and the battery holder into the lever
grooves of the camera holder, and mount them onto the
helmet.Connect the body and the battery holder until a clicking
sound is heard.
SMART HJC 10A 16
5. Mount the components jointed in 4 to the shield and
the helmet.
- Connect the camera part to the shield by inserting the cam
holder’s guide spurs (at two points) to the shield’s holes
(see Figure 7), as shown in Figure 6.
- Joint the cam holder to the shield with the washers and
bolts provided, and mount the shield jointed by the cam holder
to the helmet.
How to assemble the product - i90 & RPHA 90, RPHA 90S, RPHA 90S CARBON
Jointing
8
910
Cam
holder
Helmet Bolt
Bolting
Washer Shield
11
Jointing2
Jointing1
Jointing2
Jointing1
Locking
Sound!
SMART HJC 10A 17
In mounting the body/battery holder to the lever groove, firmly push down the body/battery holder,
as shown in the following figure, until a clicking sound is heard.
* Firmly push down the red part of the body/battery holder (Figure 1).
* After completely mounting the product, check if the product works properly before using it.
If it doesn’t, remove the body and battery parts, and remount them according to the instructions
written in the manual. Then, check if the problem is fixed.
How to assemble the product - Precautions (standard)
1
Normal operation
Click the “multi” button. ▶ The “Hello” audio is heard. ▶ The camera part’s LED turns on successively. ▶
The LED on the body- and battery-mounted parts light up consecutively. ▶ A sound effect is heard twice.

SMART HJC 10A 18
How to operate SMART HJC 10A
1. Multifunction button
① One short click : ▶ (while power is off) Power on
▶ (while power is on) Photo is taken
② Two short clicks : Video recording on/off
③ Long click : ▶ 3–5 sec : Power off
▶ 10 sec or longer : Reset to factory settings
2. LED
① Camera RED LED (on the camera) :
▶ Off : Battery level above 15%
▶ On : Battery level 5–15%
▶ Blinking : Battery level below 5% (GPS, Wi-Fi power off)
② Battery RED LED (on the battery holder) : ▶ Off : Charging complete
▶ On : Charging
③ WHITE LED : ▶ Upon power ON / OFF, all the LED will turn on in sequence,
and then turned off.
▶ The LED can be set in the app settings menu.
④ BLUE LED : The LED will turn on when the product is on.
3. Product boot confirmation
① After pressing the power button, a voice saying “hello” will be heard, and the
white LED will turn on in a sequence.
②Then, the LED will turn off, and a sound effect will be heard, indicating that the
product functions can be used normally.
4. Firmware upgrade (You can download the firmware from www.smarthjc.com)
① Copy the latest firmware to the 10A SD card. Insert the SD card into the 10A,
and turn it on.
②A voice saying “firmware upgrade will start” will be heard, and the upgrade will
proceed automatically.
③A voice saying ”firmwareupgrade is completed” will be heard, and the system
will reboot automatically.
④The system may reboot two or more times, which is normal. After rebooting,
the product can be used normally.

SMART HJC 10A 19
SMART HJC 10A - App installation
1. Android phones : In the Google Play Store, search and install the SMART HJC 10A app.
2. iPhones: In the App Store, search and installthe SMART HJC 10A app.
3. Supported versions
- Android phones : Android6.0 or later (may vary for different devices)
- iPhones: iOS 12.0 or later
4. Installation completed icon :

SMART HJC 10A 20
SMART HJC 10A - Smartphone connection (Wi-Fi)
In the Wi-Fi settings menu of the smartphone, select the network ID (SSID) of SMART HJC 10A,
and enter the password (PW) to connect SMART HJC 10A to the smartphone through Wi-Fi.
<Default network ID (SSID), password (PW)>
- Network ID (SSID) : SMART HJC 10A
- Password (PW) : 12345678
※ If other users’ smartphones are connected to the default network ID (SSID) through Wi-Fi,
they may decrease the performance of the Live View and Preview functions. Therefore, make
sure to change the default SSID to a unique one for personal use after purchasing the product.
Table of contents


