HKBN S-Box7580P User manual

HDTV Higher-tier Receiver
Wi-Fi Setup Guide
Model No.: S-Box7 80P

Table of Contents
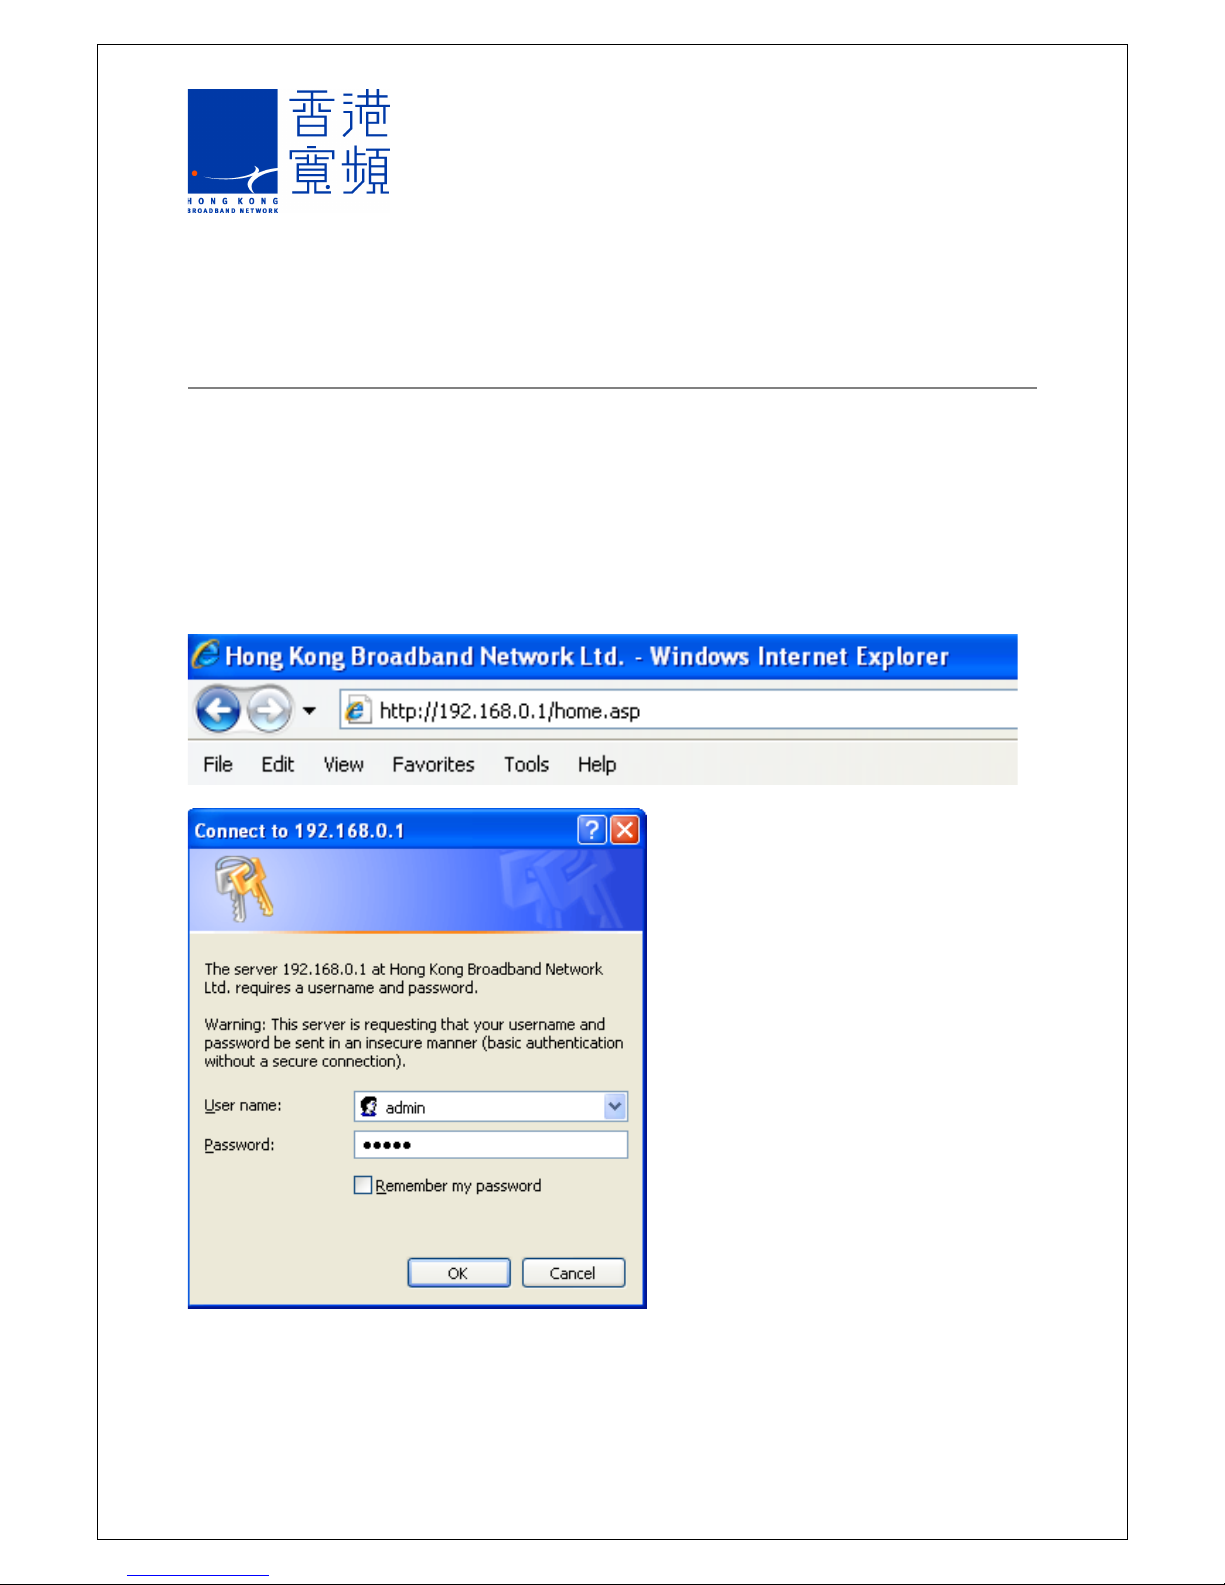
1 Wi-Fi Router Login ......................................................................................................... 1
2 Language Selection ....................................................................................................... 2
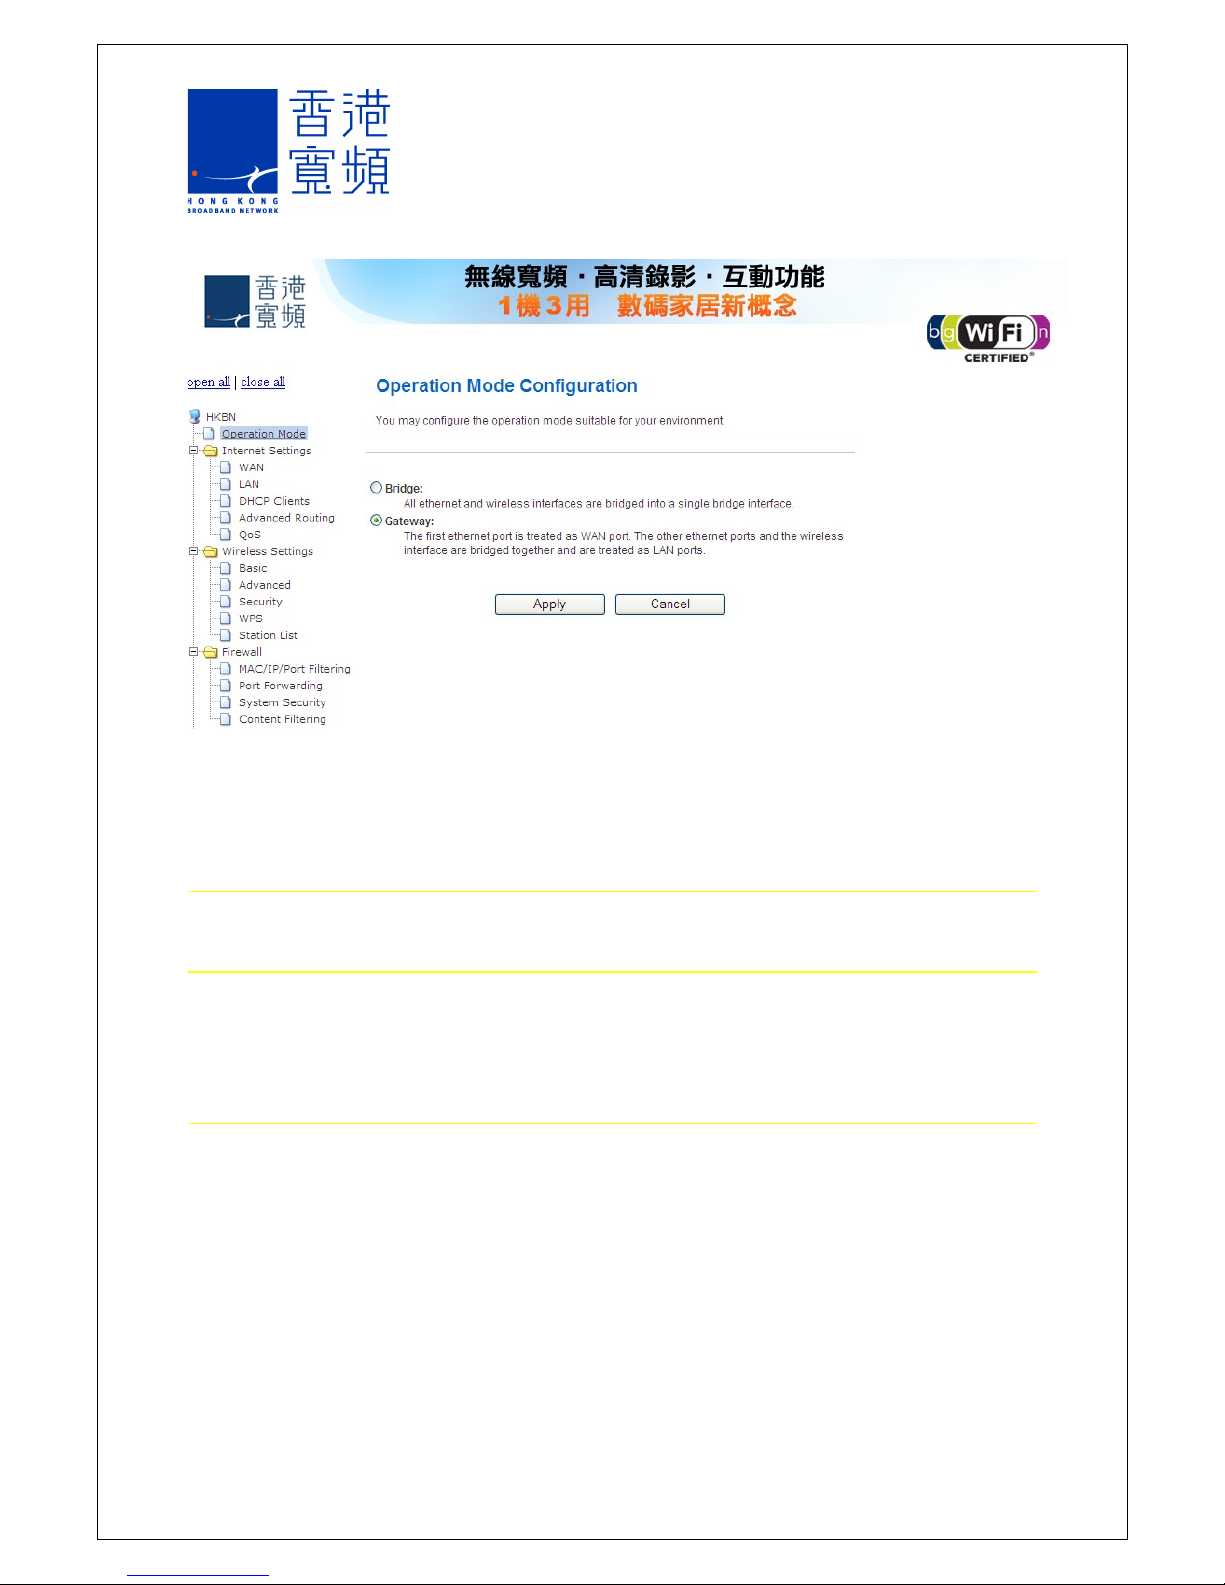
2.1 Operation Mode ...................................................................................................... 2
2.1.1 Bridge Mode ..................................................................................................... 2
2.1.2 Gateway Mode ................................................................................................. 2
3 Networ Setup ............................................................................................................... 3
3.1 WAN ....................................................................................................................... 3
3.1.1 Static (Fixed IP) ................................................................................................ 3
3.1.2 DHCP (Dynamic IP) .......................................................................................... 4
3.1.3 PPPoE (ADSL) ................................................................................................. 4
3.1.4 L2TP ................................................................................................................. 5
3.1.5 PPTP ................................................................................................................ 6
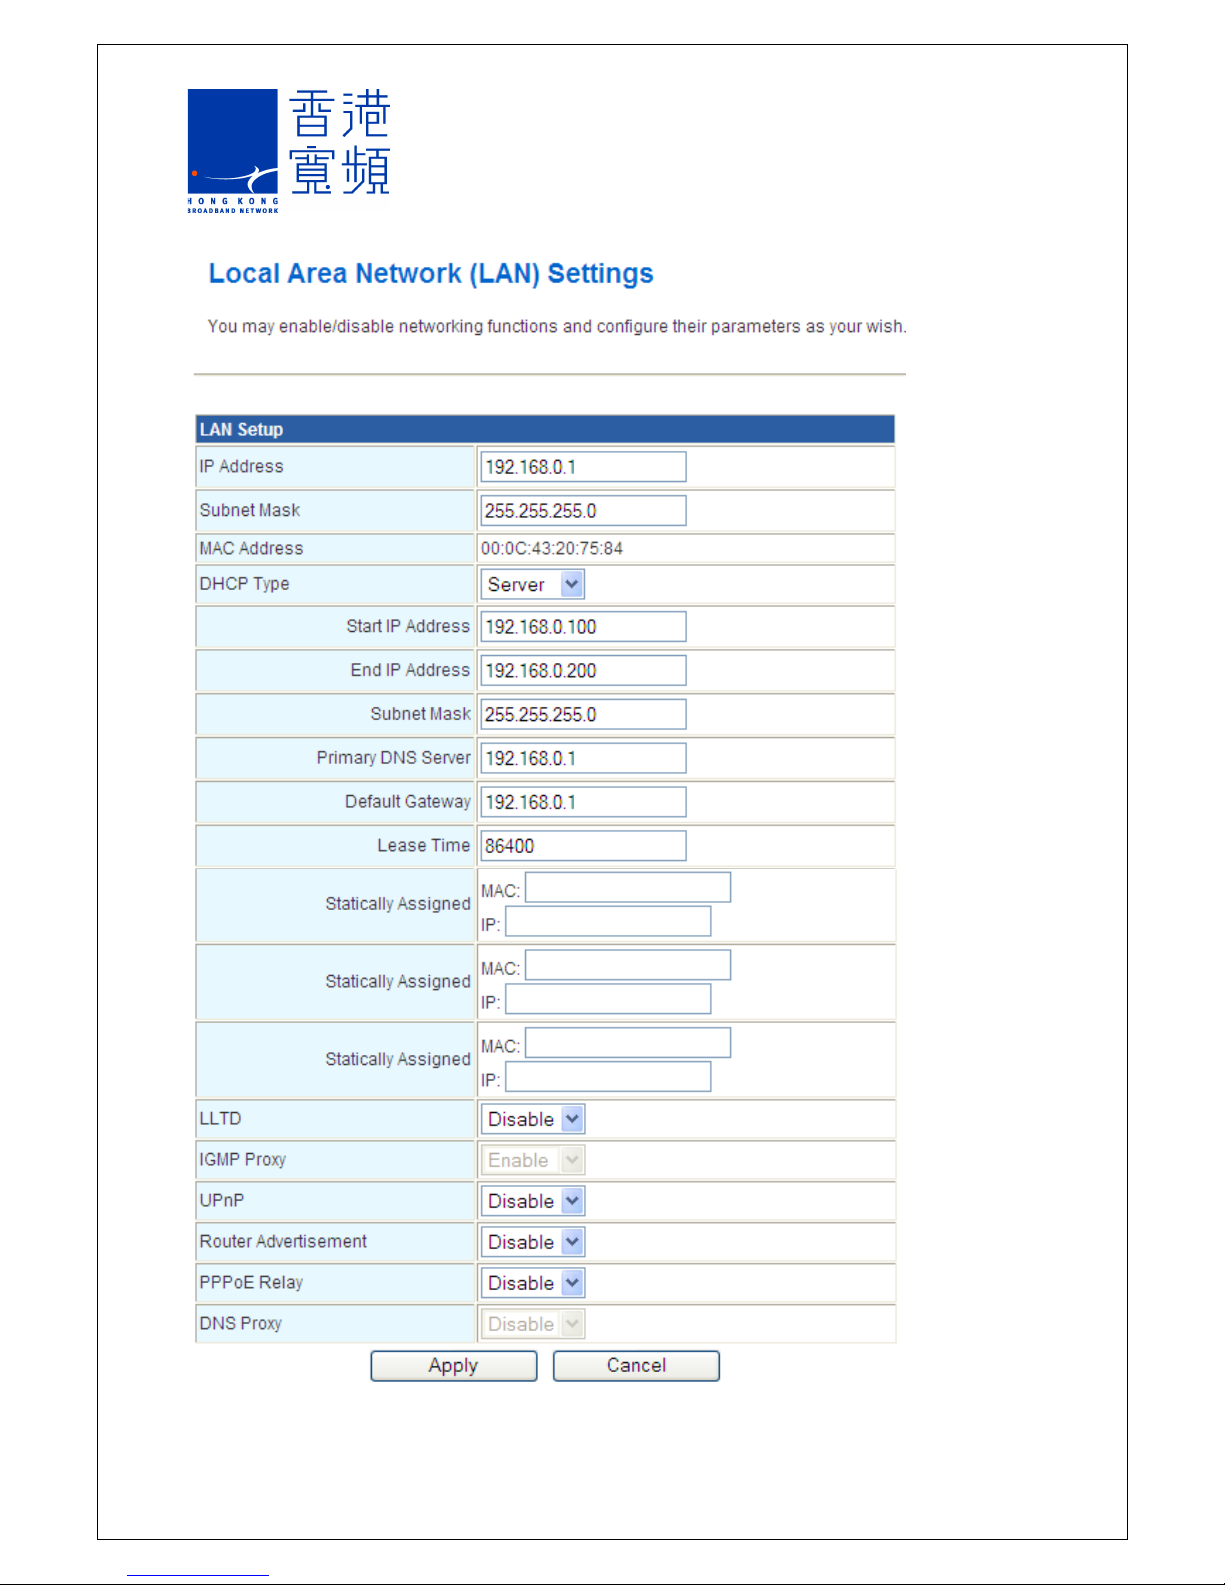
3.2 Local Area Networ (LAN) ...................................................................................... 7
3.3 DHCP Client List ..................................................................................................... 9
3.4 Advanced Routing ................................................................................................... 9
3.5 Quality of Service Settings .................................................................................... 10
4 Wireless Networ Setup .............................................................................................. 11
4.1 Basic Wireless Settings ......................................................................................... 11
4.2 Advanced Wireless Settings .................................................................................. 12
4.3 Wireless Security Settings ..................................................................................... 14
4.4 WPS ...................................................................................................................... 16
4.5 Station List ............................................................................................................ 17
5 Firewall ........................................................................................................................ 18
5.1 MAC/IP/Port Filtering ............................................................................................. 18
5.2 Port Forwarding ..................................................................................................... 19
5.3 System Security .................................................................................................... 20
5.4 Content Filtering .................................................................................................... 21
6 Administration ............................................................................................................. 22
6.1 System Management ............................................................................................ 22
6.2 Settings Management ........................................................................................... 23
6.3 Status .................................................................................................................... 24

1Wi-Fi Router Login
In order to access the router setup program, computer IP setup needs to be in the same IP
subnet of the HDTV Higher-tier Receiver (e.g. 192.168.0.50)
1. Connecting to the Wi-Fi networ of the Receiver, input the Receiver’s IP address on the
internet browsing software (192.168.0.1)
2. If users wish to login to the system with a computer Ethernet cable and connect it to the
LAN soc et of the Receiver, please change the operation mode to Gateway Mode (see
details in 2.1.2) through Wi-Fi connection at once.
Input the user name and password “admin” (The default user name and password
is “admin”)
Page 1

2Language Selection
Select “HKBN” from the function list on the left and the “Select Language” option is displayed
on the right hand side of the web page. This Wi-Fi setup supports “Traditional Chinese” and
“English” interfaces.
2.1 Operation Mode
Select “Operation Mode” from the left hand side and operation mode can be selected on the
right hand side of the page. The Receiver supports both “Bridge” mode and “Gateway”
mode.
2.1.1 Bridge Mode
This mode connects the WAN port and LAN port in serial to the same connection interface
and is treated as a wide area networ . The Wi-Fi networ is treated as a local area networ .
2.1.2 Gateway Mode
This mode connects the LAN port and Wi-Fi port in serial to the same connection interface
and is treated as a local area networ . WAN is the wide area networ .
Page 2

3Network Setup
3.1 WAN
Select “WAN” from the list on the left and the wide area networ connection setup can be
configured on the right hand side of the web page. The Receiver supports Static, DHCP,
PPPoE, L2TP and PPTP connection modes.
3.1.1 Static (Fixed IP
In case all the IP information is provided by the ISP, please select Static (Fixed IP) address.
It is required to input the IP address, subnet mas , default gateway address and DNS
address. The IP address must be in the correct format (x.x.x.x) with “.” to separate four 8-
bits numbers. The Receiver does not accept IP address in other formats.
IP Address : input the IP address provided by the ISP
Subnet Mask : input the subnet mas provided by the ISP
Default Gateway : input the gateway address provided by the ISP
Primary DNS Server : input the primary DNS address provided by the ISP
Secondary DNS Server : input the secondary DNS address provided by the ISP
Page 3

3.1.2 DHCP (Dynamic IP
In case your ISP does not provide the exact IP address, please select “DHCP (Dynamic IP)”
option to get IP related information from your ISP automatically.
Hostname : networ name is optional and depends on the ISP requirements
3.1.3 PPPoE (ADSL
Select “PPPoE” option in case ISP uses PPPoE (ADSL) for internet connection based on the
point-to-point communication protocol. This option is used in common DSL connection. The
Page 4

username and password are provided by your IP for login purpose and you do not need to
login from the PPPoE software in your computer again.
User Name : input your PPPoE user name
Password : input your PPPoE password
Verify Password : input your PPPoE password again
Operation Mode : select “Keep Alive”, “On Demand” or “Manual” mode
3.1.4 L2TP
Select “L2TP” option if ISP uses L2TP (Layer 2 Tunnel Protocol) for internet connection. The
user name and password are provided by your ISP. This option is suitable for common DSL
connection.
Server IP : input the server IP provided by the ISP (optional)
User Name : input the L2TP user name
Password : input the L2TP password
Address Mode : select “Static” if your ISP provides IP address, subnet mas , default
gateway and DNS IP address. Otherwise, please select “Dynamic” option.
IP address : input the L2TP IP address provided by the ISP (“Static” option only)
Subnet Mask : input the subnet mas provided by the ISP (“Static” option only)
Default Gateway : input the default gateway IP address provided by the ISP (“Static” option
only)
Operation Mode : select “Keep Alive”, “On Demand” or “Manual” mode
Page 5

3.1.5 PPTP
Select “PPTP” option if ISP uses PPTP (Point-to-Point Tunneling Protocol) for internet
connection based on point-to-point protocol. This option can be used in common DSL
connection. The user name and password are provided by the ISP.
Server IP : input the server IP provided by the ISP (optional)
User Name : input the PPTP user name
Password : input the PPTP password
Address Mode : select “Static” if your ISP provides IP address, subnet mas , default
gateway and DNS IP address. Otherwise, please select “Dynamic” option.
IP address : input the L2TP IP address provided by the ISP (“Static” option only)
Subnet Mask : input the subnet mas provided by the ISP (“Static” option only)
Default Gateway : input the default gateway IP address provided by the ISP (“Static” option
only)
Operation Mode : select “Keep Alive”, “On Demand” or “Manual” mode
Page 6

3.2 Local Area Network (LAN
Select “LAN” from the list on the left and the local area networ connection setup can be
configured on the right hand side of the web page.
IP Address : input the IP Address of the the Receiver. The default IP address is
192.168.0.1.
Subnet Mask : input the subnet mas of the Receiver. The default subnet mas is
255.255.255.0.
DHCP Type : indicate the DHCP server control mode (select “Server” or “Disable”)
DHCP IP address range : input DHCP server start and end IP addresses for address
assignment to computer and other IP devices connected to the the Receiver. The assigned
IP address is within the DHCP IP address range.
Subnet Mask : input the subnet mas of the Receiver
Default Gateway : input the gateway address of the Receiver
Primary DNS Server : input the primary DNS address of the Receiver
Secondary DNS Server : input the secondary DNS address of the Receiver
Lease Time : input the time duration for IP address renewal
Page 7

Page 8

3.3 DHCP Client List
Select “DHCP Clients” from the list on the left. All DHCP clients are listed on the right hand
side of the web page.
3.4 Advanced Routing
Select “Advanced Routing” from the list on the left, and routing rules can be added or
deleted for static routing or activate dynamic routing, i.e. RIP (Routing Information Protocol).
Destination : input the destinated IP address of the routing rule
Range : select either “Host” or “Net”. “Net” defines a subnet and “Host” defines a specific IP
address
Gateway : input gateway address for any IP pac ets to the defined destination
Interface : select the networ interface card for the routing rule
Comment : provide related information for the routing rule
Page 9

Display the present routing settings.
RIP : enable or disable the dynamic routing, i.e. RIP
3.5 Quality of Service Settings
Quality of service (QoS) rules can be added or deleted to provide different upload and
download throughput and priority.
Page 10

4 Wireless Network Setup
4.1 Basic Wireless Settings
Select “Basic” from the list on the left to configure basic wireless setup, for example, networ
name (SSID, Service Set identifier) and channel. Basic configuration can be done for simple
router settings.
Radio On/Off : Select this button to enable the Wi-Fi function. Press the button again to
disable the Wi-Fi function.
Network Mode : Select the 802.11b/g/n and mixed mode
Network Name (SSID) : SSID is the Wi-Fi networ name and it can support up to 32
characters. (Note: SSID is case sensitive)
Broadcast Network Name (SSID) : Select “enable” and “disable” mode. If “disable” is
selected, the SSID will not broadcast through the Receiver and scanned by clients’ Wi-Fi
devices. Therefore, the user must now the correct SSID of the Receiver’s Wi-Fi networ in
order to access it.
BSSID : BSSID (Basic service set identifier) shows the MAC address of the Receiver
Frequency (Channel) : Support both auto-select and manual channel select options
Page 11

4.2 Advanced Wireless Settings
Advanced wireless settings can be used to perform detailed Wi-Fi setup (including advanced
parameters setup), for example, beacon interval, transmission power and data beacon rate
(DTM), etc.
Page 12

The default setting of WMM (Wi-Fi Multimedia) is “Disable”.
WMM can be enabled manually and more options will pop up with additional parameters:
WMM Capable : select “enable” or “disable” the WMM
APSD Capable : select “enable” or “disable”, alternatively, you can also choose power
management method - Automatic Power Save Delivery
Page 13

DLS Capable : select “enable” or “disable” direct station-to-station frame transfer – Direct
Lin Setup
4.3 Wireless Security Settings
Select “Security” from the list on the left to setup the Wi-Fi networ security and encryption to
prevent unauthorized access of the Wi-Fi networ and data snoop.
SSID Option : Service Set Identifier (SSID) is the wireless networ name. It consists of a
maximum of 32 case-sensitive characters.
Security Mode : select the Wi-Fi networ security/encryption algorithm. The default security
algorithm is WPA-PSK (Wi-Fi Protected Access – Pre-shared Key).
WPA Algorithms : select TKIP (Temporal Key Integrity Protocol), AES (Advanced
Encryption Standard) or TKIPAES security/encryption protocol.
Pass Phrase : display and generate ey for Wi-Fi networ
Key Renewal Interval : configure the ey renewal time interval. The Wi-Fi router
determines whether the security ey needs to be renewed based on this interval setting.
Policy : allow or restrict the access from the configured MAC address to the Wi-Fi router by
selecting “allow” or “reject”
Page 14

Page 15

4.4 WPS
Select “WPS” from the list on the left to establish a secured Wi-Fi connection. Simply input a
PIN or press button (PBC) to execute Wi-Fi security by using an easier security connection
setup procedure. Wi-Fi Protected Setup (WPS) is a standard for easy and secure
establishment of a wireless home networ created by the Wi-Fi Alliance (WFA), in which it
enables the Wi-Fi devices from different manufacturers to certify this function. WPS can
enable the protection of Wi-Fi networ security for both initial setup and new device pairing
through simpler procedures, as it only requires the press of the button or PIN input. The
setup procedure for highly secured WPA2 security mode is greatly simplified by WPS and it
enables users to establish a secured Wi-Fi connection quic ly.
New WPS PIN can be generated by pressing “Generate” button. The other Wi-Fi devices
can establish connections with the Wi-Fi router by inputting PIN to the registrar through the
AP user interface.
The secured Wi-Fi connection can also be established by pressing the button (PBC) in AP
and Wi-Fi devices.
Page 16

4.5 Station List
Select “Station List” from the list on the left, and the list of Wi-Fi devices connected to the Wi-
Fi networ will be displayed on the web page.
Page 17

5Firewall
Firewall protects your networ from external networ s through isolation. Rules can be setup
in the firewall to protect your networ from malicious attac s, spoof and snoop from Internet,
virus and worms.
5.1 MAC/IP/Port Filtering
MAC/IP/Port Filtering function can enable users to define the filtering policies for pac ets
based on MAC address, IP address and port.
MAC/IP/Port filtering : select “enable” or “disable” mode
Default Policy : select “accepted” or “dropped” any pac ets that do not fulfill the rules
Page 18
Other manuals for S-Box7580P
1
Table of contents