Hobby People Aerocraft CamQuad User manual

1
AerocrAft cAm quAd user’s Guide
user’s Guide
The Aerocraft CamQuad Quad-Copter is not a toy! If misused, it can cause serious
bodily harm and/or injury. This product is not intended for those under 14 years of
age, unless closely supervised by an adult! Please read and understand the safety warnings
included prior to operation.

2
AerocrAft cAm quAd user’s Guide
tAble of contents
If you should have trouble with any of the steps listed in this User's Guide, or if you find a
missing or a damaged part, or require additional information, please contact our Customer
Service Center at the address below:
Global Services
18480 Bandilier Circle
Fountain Valley, CA 92708
Phone: (714) 963-0329
Fax: (714) 964-6236
Email: [email protected]
service And support
Hobby People guarantees this product to be free from defects in both material and workmanship
for a period of 90 days from the date of purchase. During this 90 day warranty period, Global
Services/Hobby People will repair or replace at our discretion, equipment determined to be
defective, otherwise, the user is responsible for any charges for the repair or replacement of the
equipment in question. This warranty does not cover cosmetic damage, nor does it cover damage
caused by misuse, modification, negligence, abuse, improper connections, acts of God or damage
caused by alterations by unauthorized persons. This warranty only applies to the original purchaser
and requires proof of purchase to redeem. This warranty does not cover components purchased
by the user that were not part of this original kit (e.g., add-ons or optional parts, if applicable).
Hobby People shall not be liable for any damage resulting from the use of this product. As Hobby
People has no control over the use, setup, modification or misuse of this product, no liability shall
be assumed nor accepted for any resulting damage or injury. By the act of using this product,
the user accepts all resulting liability.
In no case shall Hobby People’s liability exceed the original cost of the purchased product.
Some states do not allow the exclusion or limitation of incidental or consequential damages, or
allow limitations on how long an implied warranty lasts, so the above limitations may not apply
to you. This warranty gives you specific legal rights, and you may have other rights which vary
from state to state.
Crash damage will not be covered under warranty.
If you have a warranty claim, please contact our Customer Service Center below for more
information.
liAbility And wArrAnty informAtion
Liability and Warranty Information ..................................................................................................................Page 2
Service and Support ..............................................................................................................................................Page 2
Features and Specifications ..............................................................................................................................Page 3
Kit Contents and Items Required .....................................................................................................................Page 3
Safety Warnings and Important Information .............................................................................................Page 4
Layout and Functions Overview ......................................................................................................................Page 6
Preparing to Fly the Aerocraft CamQuad Quad-Copter .......................................................................Page 7
Control Operation ....................................................................................................................................................Page 9
Flying the Aerocraft CamQuad Quad-Copter .........................................................................................Page 10
Taking Photos and Recording Video ..........................................................................................................Page 14
Maintenance ...........................................................................................................................................................Page 15
Troubleshooting Guide ......................................................................................................................................Page 16
Replacement Parts ..............................................................................................................................................Page 17
Notes ...........................................................................................................................................................................Page 18

3
AerocrAft cAm quAd user’s Guide
The Aerocraft CamQuad is a high performance rotor-drone with built-in still and video camera
that’s ready to fly anywhere for any pilot at any skill level. This palm-sized quad-copter may be
small, but it has the performance to take great web-ready stills and video while flying and flipping
indoors or out. And yet, with it’s three speed settings and computerized on-board six-axis
stabilizer, you can tame the beast, so that even new pilots can fly with confidence. The three
speed settings also allow you to slow the response of this HP-Heli’s quad so you can fly smoothly
and precisely in tight spaces.
Once you’ve mastered basic flight, you’ll be ready to turn the speed up and go outdoors and fly
fast in wind, and perform flips with the easy-to-use aerobatic flip button, all while controlling
the camera directly from the transmitter, on-the-fly!
feAtures And specificAtions
• Diagonal Span: ......................................................................................................................5.0 Inches (127mm)
• Length and Width: .................................................................................................................3.9 Inches (100mm)
• Propeller Blade Diameter: ................................................................................................2.25 Inches (57mm)
• Flying Weight: ...............................................................................................Approximately 2.1 Ounces (60g)
• Flying Time: ................................................................................................................... Approximately 7 Minutes
• Charge Time: .........................................................................................Approximately 45 Minutes to 1 Hour
specificAtions
• Four-Motor Control with LiPo Power
• Fly Indoors or Outdoors
• Refined Six-Axis Stabilization
• Easy and Fun to Fly
• 4-Channel 2.4GHz Transmitter
• Bright LEDs Allow You to Fly at Night
• Built-In Camera for Stills and Video
feAtures
• 2GB Memory Card and USB Card Reader
• Aerobatic Flips on Command
• Three Speed Settings
• Great for Beginners and Experts Alike
• Spare Set of Propeller Blades
• USB Automatic LiPo Charger
• Replacement Parts Available
kit contents And items required
The Aerocraft CamQuad Quad-Copter includes everything required for flight, except 4 'AA'
alkaline batteries for the transmitter. Before beginning, make sure that your kit contains the
parts shown below.
kit contents
Aerocraft CamQuad Quad-Copter
4-Channel 2.4GHz Transmitter
1S 3.7V 380mAh 20C LiPo Battery
USB Automatic LiPo Charger
Memory Card and USB Card Reader
Spare Propeller Blades Set
Printed User’s Guide (Not Pictured)
A
B
C
D
• 4 'AA' Alkaline Batteries
items required
E
F
G
A
B
C
D
E
F

4
AerocrAft cAm quAd user’s Guide
• Just because the Quad-Copter is small and is powered by electric motors doesn’t mean
that you shouldn’t exercise caution when flying and operating it. The Quad-Copter can be
dangerous if you do not fly it in a safe manner or do not pay close attention while flying it.
You alone are responsible its actions during flight.
• We strongly suggest that when you first begin flying the Quad-Copter that you perform only
basic maneuvers, such as hovering, until you are more familiar with its flight characteristics.
• The Quad-Copter has a safety feature that will prevent the propeller blades from spinning
without first cycling the left control stick (throttle) from low to high and back to low. This
prevents the possibility of the propeller blades accidentally spinning and harming you when
you turn the Quad-Copter ON.
• Always fly the Quad-Copter in a suitably large area free of obstructions. When using the Flip
function, we recommend flying in an area no smaller than 10 feet square and 10 feet high.
• The Quad-Copter can be flown indoors or outdoors in light winds. Do not fly in winds greater
than 10 MPH or in gusty winds. Make sure any spectators are behind you.
• Always be conscious of the spinning propeller blades. Do not put your fingers in the spinning
propeller blades.
• Always unplug the LiPo battery and remove it from the Quad-Copter after use.
• Do not use any solvents to clean the Quad-Copter. Solvents will damage the plastic parts.
Rubbing alcohol is safe to remove stubborn stains.
GenerAl wArninGs
• The radio system operates on the 2.4GHz frequency band. The 2.4GHz connection is
determined by the transmitter and receiver pair. Unlike ordinary crystal-based systems, the
Quad-Copter can be flown without frequency control. This allows you to fly the Quad-Copter
with others at the same time.
• To prevent any chance of unwanted RF interference, always turn the transmitter ON before
turning the Quad-Copter ON and always turn the Quad-Copter OFF before turning the
transmitter OFF.
• Never touch the transmitter antenna during use. Doing so can interfere with the RF signal,
resulting in loss of control of the Quad-Copter.
• During flight, try not follow the Quad-Copter with the transmitter antenna, as this can result
in a weakened RF signal. Try to keep the transmitter in the same position regardless of the
location of the Quad-Copter.
rAdio system wArninGs
Before flying your Aerocraft CamQuad Quad-Copter, please read and understand the
safety warnings and other important information in this section. Failure to do so could
lead to personal injury and/or property damage.
The Hobby People Aerocraft CamQuad Quad-Copter is NOT intended for persons under 14
years of age, unless closely supervised by an adult.
sAfety wArninGs And importAnt informAtion
The Aerocraft CamQuad Quad-Copter is not intended for commercial use. It must be used in a
safe and legal manner only. By operating your Quad-Copter, the user accepts full responsibility
for its safe and legal use. Follow all privacy laws and property laws when operating your Aerocraft
CamQuad Quad-Copter, and especially when using the camera. The camera is to be used for
hobbyists and/or amateur video or photography only.
For Safe Operation Guidelines, please contact the Academy of Model Aeronautics (AMA) at
www.modelaircraft.org.
sAfe And leGAl use of your quAd-copter

5
AerocrAft cAm quAd user’s Guide
lipo bAttery wArninGs
sAfety wArninGs And importAnt informAtion
The Aerocraft CamQuad Quad-Copter is powered using a LiPo battery. To ensure your safety,
please read and carefully follow the guidelines in this section.
It’s important that you follow these warnings closely. LiPo batteries are significantly more
volatile than Alkaline or Ni-Cd and Ni-MH batteries. While there are precautions that must
be taken and dangers that must be considered, LiPo batteries today are very safe and very
easy to use.
• Use only the included USB Automatic LiPo Charger to charge the LiPo battery. Do not attempt
to charge the LiPo battery using any other type of charger.
• Always charge the LiPo battery on a fire-resistant surface and never charge the LiPo battery
near any flammable material. We suggest placing the LiPo battery inside a LiPo battery safety
charging bag (available separately at most hobby stores) during the charging process.
• Do not leave the LiPo battery unattended during the charging process.
• The average charge time is 45 minutes to 1 hour. After the charging process completes,
unplug the LiPo battery from the charger, then unplug the charger from its power source.
• Do not use or charge the LiPo battery if it is hot to the touch. Always let the LiPo battery cool
between uses and before recharging it.
• Do not leave the LiPo battery in direct sunlight or in a hot car or storage area.
• Do not allow the LiPo battery or charger to be exposed to moisture.
• Do not short-circuit the LiPo battery or plug it in with reverse polarity.
• Always unplug and remove the LiPo battery from the Quad-Copter when not in use. When
not in use, the LiPo battery should be stored in a fire-proof container.
• Do not poke, bend or otherwise damage the LiPo battery and never allow the LiPo battery to
ever exceed 160ºF (71ºC) for any reason.
• If you don’t fly the Quad-Copter for an extended period time, the LiPo battery should be
charged, then stored in a fire-proof container. Never store the LiPo battery in a discharged
state for any period of time!
• If the LiPo battery appears damaged (swollen, cracked or punctured) it should be discarded
immediately. Carefully remove the insulation from around the battery, then submerge the
battery in a bowl of saltwater for 24 to 36 hours. This will completely discharge the battery.
After soaking, cut off the wires, place the battery in a bag, then discard it in the trash.
• The maximum operational range of the Quad-Copter is approximately 165 feet (54 yards),
but may vary depending on a number of variables. Always try to keep the Quad-Copter
within this distance, otherwise you might experience loss of control.
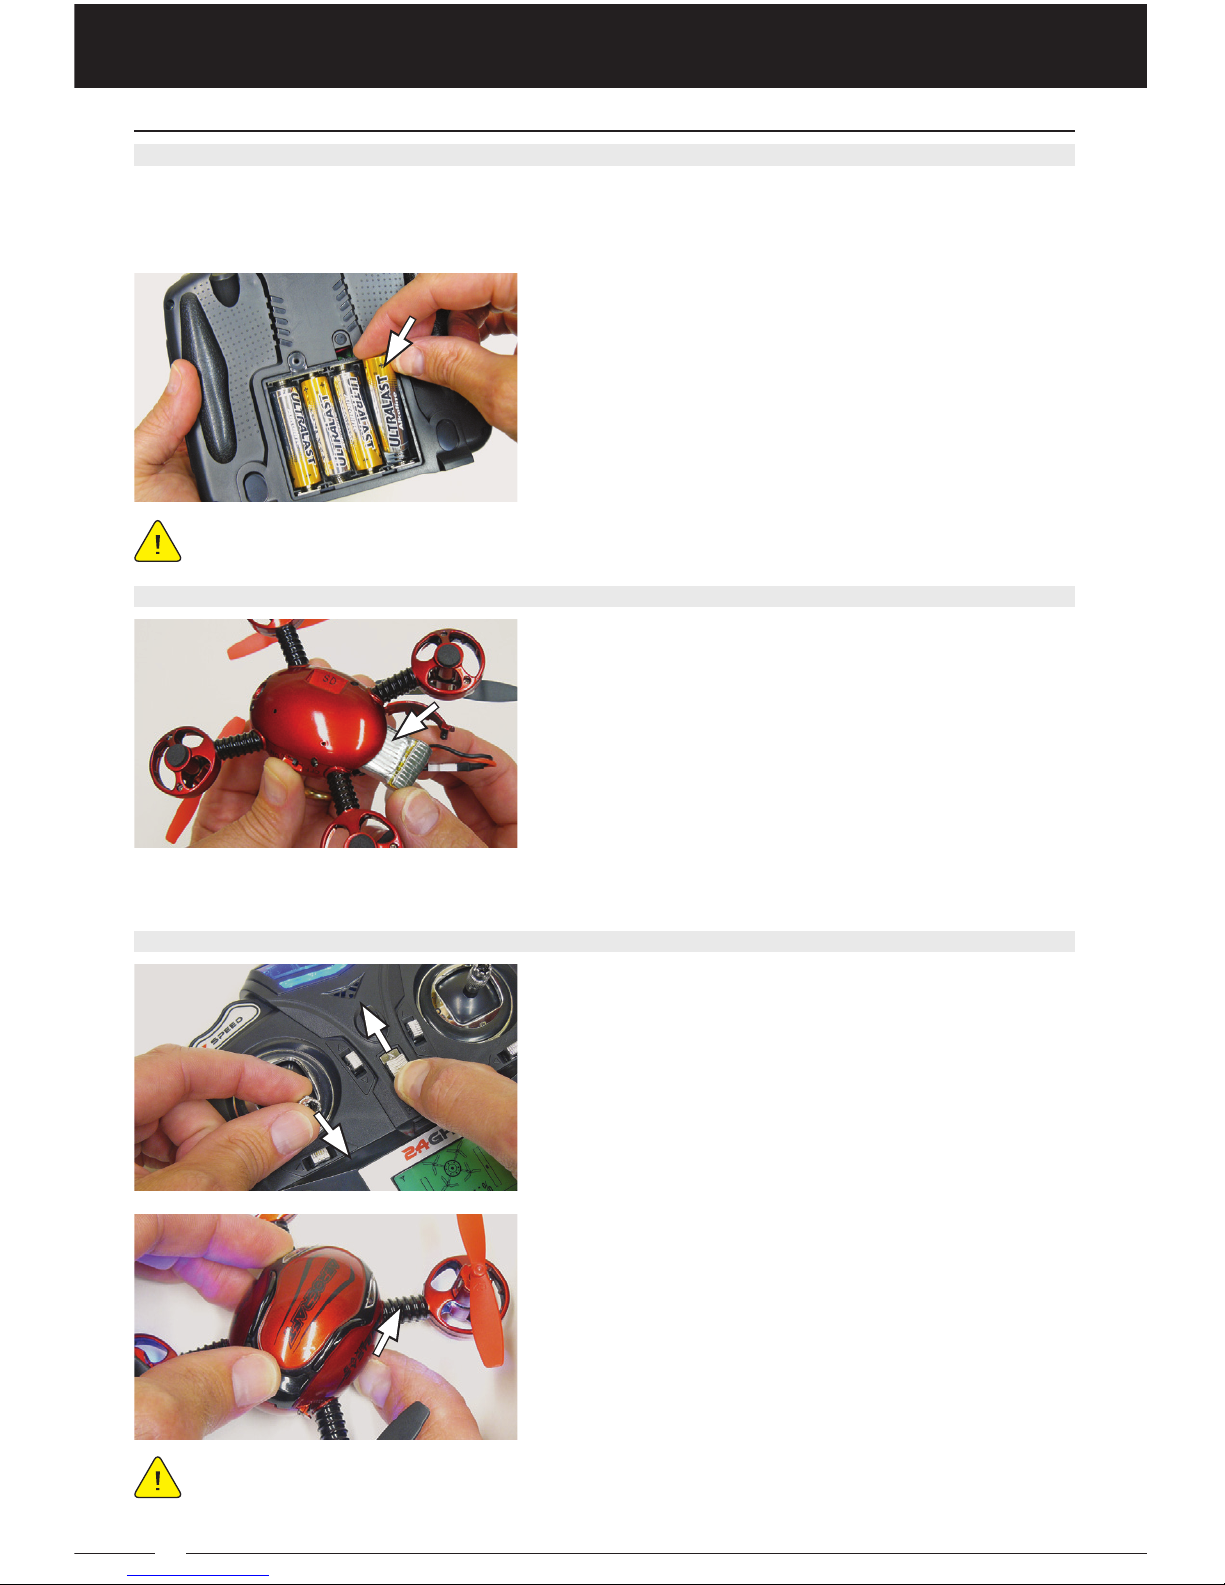
• Because the Quad-Copter is operated by radio control, it’s important to make sure you are
always using fresh transmitter batteries. Never allow the transmitter batteries to run low or
you might experience loss of control. The operational range of the radio system will deteriorate
as the voltage of the batteries gets lower.
• Do not expose the transmitter or the Quad-Copter to excessive heat or moisture, or electrical
damage may occur. The transmitter and Quad-Copter are not waterproof!
• Never attempt to disassemble or modify any of the radio system components.
• If the transmitter becomes dirty, it can be cleaned with a soft dry cloth. If the outer case
becomes soiled, it can be cleaned with a damp cloth and liquid detergent. Do not use any
solvents to clean the outer case. Solvents will damage the finish.
rAdio system wArninGs, continued....

6
AerocrAft cAm quAd user’s Guide
Binding: The transmitter binds automatically to the
Quad-Copter each time it’s turned ON. Binding is not
required, even if you replace the transmitter with a
new one.
lAyout And functions overview
Use the information in this section to become familiar with the layout and functions of both the
Aerocraft CamQuad Quad-Copter and the included 4-channel 2.4GHz transmitter.
trAnsmitter functions overview
5
4
3
2
1
9
13
15
1 - Antenna
2 - Flip Button
3 - Right Control Stick
4 - Forward/Backward Trim Switch
5 - Bank Right/Left Trim Switch
6 - LED Lights On/Off Button
7 - Take Photo Button
8 - Record Video Button
9 - LCD Screen
10 - On/Off Switch
11 - Spin Right/Left Trim Switch
12 - Throttle Up/Down Trim Switch
13 - Left Control Stick
14 - Power Indicator
15 - Speed (Flight Mode) Button
Transmitter Power Indicator Conditions:
• Flashing Fast - Ready for Arming
• Solid - Armed (Ready for Flight)
6
7
8
10
12
11
14
1 - RF Signal Strength Indicator
2 - Graphical Power Indicator
3 - Transmitter Battery Voltage Indicator
4 - Forward/Backward Trim Indicator
5 - Take Photo Indicator
6 - Record Video Indicator
7 - Bank Right/Left Trim Indicator
8 - Control Travel and Speed Indicator
9 - Spin Right/Left Trim Indicator
10 - LED Lights On/Off Indicator
11 - Throttle Up/Down Trim Indicator
lcd screen overview
Trim Switches: Each time a trim switch is pressed, a short audible tone will sound. A longer
audible tone will sound to indicate when the trim is centered. The trim position is also shown
on the LCD screen.
Low-Voltage Alarm: The transmitter features a low-voltage alarm that will sound when the
voltage of the transmitter batteries gets too low. When the low-voltage alarm sounds, land
as soon as is safely possible, then replace the transmitter batteries. Continuing to fly with the
low-voltage alarm sounding can result in loss of control.
1 2 3
6
5
4
7
8
10
9
11

7
AerocrAft cAm quAd user’s Guide
prepArinG to fly the AerocrAft cAmquAd quAd-copter
Prior to charging the LiPo battery, please read and understand the LiPo Battery Warnings
section on page 5.
1) Plug the charger into a free USB port in your PC or Laptop.
2) Plug the connector from the charger into the
matching connector on the LiPo battery. The
charge indicator will turn red, indicating the LiPo
battery is charging.
On some PCs and Laptops, you may need to
turn the device ON to power the USB port.
3) Allow the LiPo battery to charge. When the LiPo battery is fully charged, the charge indicator
will turn OFF. At this time, unplug the LiPo battery from the charger, then unplug the charger
from its power source.
Follow the steps in this section to get the Aerocraft CamQuad Quad-Copter ready for its first
flight. This includes charging the LiPo battery, installing the transmitter batteries, installing the
LiPo battery, calibrating the gyro and arming the ESC.
chArGinG the lipo bAttery
On average, the LiPo battery will take approximately 45 minutes to 1 hour to fully charge. To
prevent any chance of over-charging, unplug the LiPo battery from the charger immediately
after the charging process completes.
AerocrAft cAmquAd quAd-copter lAyout overview
2
1
5
4
3
FRONT
1 - Propeller (Red ‘A1’)
2 - Propeller (Red ‘B2’)
3 - Propeller (Black ‘B2’)
4 - Propeller (Black ‘A1’)
Quad-Copter Power Indicator Conditions:
• Flashing Rapid - Gyro Initializing / After Arming, Indicates Low LiPo Battery Voltage*
• Flashing Slow - Ready for Arming / After Arming, Indicates Photo Taken or Video Started or Stopped*
• Solid - Armed (Ready for Flight)
*LED lights also flash in addition to the Power Indicators.
5 - Power Indicators
6 - On/Off Switch
7 - Still/Video Camera
lAyout And functions overview
7
8
69
10
8 - Memory Card LED Indicator
9 - Memory Card Slot
10 - Battery Cover

8
AerocrAft cAm quAd user’s Guide
prepArinG to fly the AerocrAft cAmquAd quAd-copter
1) Verify that the transmitter On/Off switch is in the OFF position.
2) Using a small Phillips head screwdriver, remove the screw that secures the battery cover
on the back of the transmitter, then remove the battery cover by lifting up on the small tab.
3) Install four new ‘AA’ alkaline batteries into the battery
holder, double-checking to make sure that the
polarity (+/-) is correct. Reinstall the battery cover.
Use only new batteries. Do not mix new and used batteries and do not mix battery types.
instAllinG the trAnsmitter bAtteries
instAllinG the lipo bAttery
1) Verify that the Quad-Copter On/Off switch is in the
OFF position.
2) Pull open the battery cover on the back of the
Quad-Copter.
3) Plug the LiPo battery into the matching connector in
the Quad-Copter, then carefully slide the LiPo battery
all the way inside the body.
4) Push the excess battery wires into the body, then close the battery cover, making sure that it
snaps closed. Be careful not to pinch or otherwise damage the battery wires.
cAlibrAtinG the Gyro And ArminG the esc
1) Make sure that the left control stick (throttle) is pulled
all the way back.
2) Turn the transmitter ON. The transmitter will make an
audible tone and the Power Indicator will flash.
To ensure that the gyro calibrates correctly, the Quad-Copter must be sitting on a flat, level
surface when you turn it ON. Do not move the Quad-Copter until after the calibration
process is complete. If the calibration process fails, turn the Quad-Copter OFF, then repeat step 3.
3) Set the Quad-Copter on a flat, level surface, then turn
the Quad-Copter ON. The two Power Indicators and
the LED lights will flash rapidly for approximately 5
seconds, indicating the gyro is calibrating, then they
will begin to flash slowly, indicating the calibration
process is complete and the Quad-Copter is ready
to be armed.

9
AerocrAft cAm quAd user’s Guide
prepArinG to fly the AerocrAft cAmquAd quAd-copter
fliGht controls
Each diagram in this section displays what the Quad-Copter will do when a control stick is
moved either up or down, or right or left.
cAlibrAtinG the Gyro And ArminG the esc, continued....
4) Push the left control stick all the way forward, then
pull it all the way back. The transmitter will make an
audible tone and the Power Indicators on both the
transmitter and the Quad-Copter, along with the LED
lights, will turn solid, indicating the ESC is armed and
the Quad-Copter is ready to fly.
Once the ESC is armed, moving the left control stick forward will cause the propeller blades
to spin. Be very careful not to accidentally move the left control stick forward or you could
be injured by the spinning propeller blades!
2
1
control operAtion
Use the information in this section to become familiar with how to control the Aerocraft
CamQuad Quad-Copter and use the Speed (Flight Mode) function.
orientAtion
The Quad-Copter has a front and back, and right and
left, so you should familiarize yourself with this first,
before attempting to fly. To easily remember this, the
two red propeller blades are on the front and the
two black propeller blades are on the back.
When you power up the Quad-Copter, the propeller blades should spin in the directions described
below, otherwise your Quad-Copter won’t fly correctly.
• ‘A1’ Rotors Turn Clockwise
• ‘B2’ Rotors Turn Counter-Clockwise
Left Control Stick: Move the left control stick left and right to spin the Quad-Copter left and right.
Spin Left Spin Right
TOP VIEW

10
AerocrAft cAm quAd user’s Guide
flyinG the AerocrAft cAmquAd quAd-copter
If at any time during flight you begin to lose control of the Quad-Copter, pull the left control
stick (throttle) all the way back to shut the Quad-Copter down and allow it to crash land
on its own. The Quad-Copter is small and light, so damage, if any, should be minimal.
Always fly the Quad-Copter in a suitably large area free of obstructions. When performing
flips or flying aggressively, we recommend flying in an area no smaller than 10 feet square
and 10 feet high.
The Quad-Copter can be flown indoors or outdoors in light winds. Do not fly in winds greater
than 10 MPH or in gusty winds. Make sure any spectators are behind you.
Right Control Stick: Move the right control stick forward and backward to move the
Quad-Copter forward and backward.
Right Control Stick: Move the right control stick left and right to move the Quad-Copter left
and right.
Move Forward Move Backward
SIDE VIEW
Move Left Move Right
BACK VIEW
fliGht controls, continued....
control operAtion
Left Control Stick: Move the left control stick forward and backward to move the Quad-Copter
up and down (increase and decrease throttle).
Move Up
Move Down
BACK VIEW

11
AerocrAft cAm quAd user’s Guide
chAnGinG the speed settinG (fliGht mode)
The Speed Button changes the sensitivity of the Quad-Copter’s controls. Press the Speed Button
to cycle between the three available Flight Modes. Each time you press the Speed Button, an
audible tone will sound, indicating which Flight Mode you’re in. In addition, the Speed Indicator
on the LCD screen will show the current Response Mode percentage (e.g. CH0 : 30%)
• Flight Mode 1 (One Audible Tone / CH0 : 30%) - The
Quad-Copter will be more docile and easier to fly. This
Flight Mode is recommended for beginners.
• Flight Mode 2 (Two Audible Tones / CH0 : 60%) - The
Quad-Copter will be more responsive, making it more
agile. This Flight Mode is recommended for intermediate
and experienced pilots.
• Flight Mode 3 (Three Audible Tones / CH0 : 100%) - The
Quad-Copter will be very sensitive to control inputs, making it very responsive. This Flight
Mode is ideal for aggressive flying. This Flight Mode is recommended for experienced pilots only.
We recommend using Flight Mode 1 until you’re familiar with the Quad-Copter’s flight
characteristics, regardless of your flying experience. If you’re flying outdoors or you want
to fly more aggressively, we recommend using Flight Mode 2 or Flight Mode 3, depending on
your skill level and desired control response. Each time the transmitter is turned ON, the Flight
Mode will reset to Flight Mode 1.
flyinG the AerocrAft cAmquAd quAd-copter
By its nature, the Quad-Copter is stable and easy to fly, however, to make the Quad-Copter as
easy as possible to fly, it should first be trimmed for flight. Complete this procedure prior to flying
your Quad-Copter for the first time or at any time your Quad-Copter seems out of trim.
fliGht trimminG
1) Push the left control stick (throttle) forward to take off and place the Quad-Copter in a stable
hover, about 2 to 3 feet off the ground, then release both control sticks for a couple of seconds.
Watch how the Quad-Copter reacts, then trim the Quad-Copter as described:
We suggest flight trimming the Quad-Copter while hovering no less than 1 foot off the
ground. Flight trimming while flying any lower will make it more difficult due to ‘ground effect’.
• If the Quad-Copter spins left,
press the Spin Right/Left Trim
Switch RIGHT several times
until the Quad-Copter stops
spinning.
• If the Quad-Copter spins right,
press the Spin Right/Left Trim
Switch LEFT several times
until the Quad-Copter stops
spinning.
• If the Quad-Copter moves
left, press the Bank Right/Left
Trim Switch RIGHT several
times until the Quad-Copter
stops moving left.

12
AerocrAft cAm quAd user’s Guide
When trimmed properly, the Quad-Copter should stay in the same general position and
not be spinning right or left around its axis while hovering with the control sticks centered.
flyinG the AerocrAft cAmquAd quAd-copter
fliGht trimminG, continued....
• If the Quad-Copter moves
right, press the Bank Right/
Left Trim Switch LEFT several
times until the Quad-Copter
stops moving right.
• If the Quad-Copter moves
forward, press the Forward/
Backward Trim Switch
BACKWARD several times
until the Quad-Copter stops
moving forward.
• If the Quad-Copter moves
backward, press the Forward/
Backward Trim Switch
FORWARD several times
until the Quad-Copter stops
moving backward.
• If the Quad-Copter motors turn ON
with the left control stick pulled all
the way back, press the Throttle Up/
Down Trim Switch DOWN several
times until the motors turn OFF.
fliGht bAsics
1) With the front of the Quad-Copter facing away from you, slowly push the left control stick
(throttle) forward until the propeller blades begin to spin, then continue to push the left control
stick farther forward to increase the speed of the propeller blades and take off.
2) Move the right control stick as required in very small increments to keep the Quad-Copter
hovering in the same general area about 2 to 3 feet off the ground.
3) Slowly move the right control stick to the right and left and see how the Quad-Copter banks
and moves to the right and left, then slowly move the right control stick forward and backward
and see how the Quad-Copter banks and moves forward and backward.
4) Slowly move the left control stick to the right and left and see how the Quad-Copter spins
around its center axis right and left.
To be successful when learning, make small control inputs. Over-controlling is a mistake all
new pilots make. Never move the control sticks more than halfway (except the throttle, and
only when necessary) and try to make all movements very small.
When learning to fly, we suggest always trying to keep the Quad-Copter about 2 to 3 feet off
the ground and in a relatively small flying area. If at any time you feel as if the Quad-Copter is
getting out of control, pull the left control stick back to reduce power. The Quad-Copter will
quickly descend. In some cases, if you’re flying too high or too fast, this can result in slight
damage to the Quad-Copter, but that’s better than crashing into someone or something.

13
AerocrAft cAm quAd user’s Guide
5) Repeat moving the right and left control sticks slowly to the left and right, and forward and
backward to get used to how the Quad-Copter moves, all while at the same time making
small adjustments to the throttle to try and keep the Quad-Copter hovering about 2 to 3 feet
off the ground.
The LED lights will begin to flash during flight to indicate the LiPo battery voltage is getting
low. When the LED lights flash, land as soon as is safely possible, then recharge the battery.
flyinG the AerocrAft cAmquAd quAd-copter
fliGht bAsics, continued....
Press the Lights On/Off Button to turn the Quad-Copter’s LED lights
ON and OFF. Flying with the LED lights ON allows you to see the
Quad-Copter while flying in the dark (be careful!) or for flying during
the day for extra fun.
turninG the led liGhts on And off
First, practice hovering in a small space, using small control inputs to keep the Quad-Copter in
place (Fig. 1). Next, practice flying a square or rectangular pattern (Fig. 2), then practice flying
in a figure-8 pattern (Fig. 3). After getting better at flying these patterns, practice flying different
patterns, spinning the Quad-Copter 360º and changing the position at which you stand relative
to the front of the Quad-Copter (Fig. 4).
After mastering the basics of flight, use the Flip Button to make the Quad-Copter do 360º flips in
flight. The Quad-Copter is capable of doing 360º flips in any direction, regardless of Flight Mode
and even with minimal power.
4-wAy flip
1) With the throttle above idle (the motors must be turning), press and HOLD the Flip Button,
then move the right control stick in the direction you want the Quad-Copter to flip and
release it. The Quad-Copter will flip 360º in that direction. You can do this while hovering
or during directional flight. The Quad-Copter will flip in the direction you hold and then
release the right control stick as long as the Flip Button is pressed.
Flip performance will degrade as the LiPo battery is drained. We don’t recommend doing
flips with low battery power.
Make sure that you have adequate room to perform flips. Flipping from a hover requires
about 2 to 3 feet of space. Flipping while flying in a specific direction will require more space,
depending on the speed of flight.
2
1
Flip Backward
Flip Forward
Flip Left
Flip Right
Fig. 1 Fig. 2 Fig. 3 Fig. 4
Practice Patterns:
Once you become familiar with the basics, start practicing the different patterns described below.

14
AerocrAft cAm quAd user’s Guide
tAkinG photos And recordinG video
The Aerocraft CamQuad Quad-Copter features a 640x480 resolution color camera that is able
to take still photos and record video during flight - and it’s all controlled directly from the
transmitter. Images and video are stored on the included 2GB memory card and can be
downloaded to your PC or Laptop after flight, using the included USB Card Reader.
instAllinG the memory cArd
1) Push the memory card into the memory card slot on
the bottom of the Quad-Copter. It will click into place.
If you need to remove the memory card, simply press
it in and release and it will pop out.
The memory card can be inserted only one way.
Do not force it.
1) To take a photo during flight, press the Take Photo Button. The transmitter will make a short
audible tone and the four LED lights on the Quad-Copter will flash momentarily, indicating a
photo is being taken. To take multiple photos, simply continue to press the Take Photo Button.
2) To record video during flight, press the Record Video Button. The transmitter will make a long
audible tone and the four LED lights on the Quad-Copter will flash momentarily, indicating a
video recording has started.
3) When you want to stop recording video, press the Record Video
Button a second time. The transmitter will make a long audible tone
and the four LED lights on the Quad-Copter will flash momentarily,
indicating video recording has stopped. Multiple individual video
recordings can be made by starting and stopping the video recorder.
When video is being recorded, the Record Video Indicator will be displayed on the LCD
screen.
After flying, photos you’ve taken and video that you’ve recorded can be downloaded to your PC
or Laptop for viewing.
1) Press the memory card in with your finger and release.
The memory card will pop out.
2) Slide the memory card into the USB Card Reader,
then plug the USB Card Reader into a free USB port
in your PC or Laptop.
The memory card can be inserted only one way.
Do not force it.
3) When you plug the USB Card Reader into your PC or Laptop, the memory card will be
recognized by Windows as a Removable Disk. This allows you to view, copy or delete files
directly through Windows Explorer. Pictures are saved as JPEG files and videos are saved
as AVI files in their own separate folders.
tAkinG photos And recordinG video
viewinG photos And video on your pc or lAptop
A Memory Card LED Indicator is located on the bottom of Quad-Copter that displays
the current condition of the camera system when the Quad-Copter is turned ON: (Solid
Blue - Memory Card Installed), (Solid Blue and Flashing Red - No Memory Card Installed)
and (Solid Blue & Solid Red - Photo Taken or Video Being Recorded).

15
AerocrAft cAm quAd user’s Guide
mAintenAnce
In general, your Quad-Copter doesn’t require any maintenance or adjustments, however, there
may come a time when you need to replace the propeller blades or replace one or more of the
motors or LED lights. This section covers the most common maintenance requirements you
might encounter.
replAcinG the propeller blAdes
Make sure to install the replacement propeller blades in the correct configuration, or the
Quad-Copter won’t fly correctly. For more information, see the diagram in the Propeller,
Motor and LED Configuration section below.
1) While holding the outrigger arm to support it, gently
pull the propeller blade up and off the motor shaft.
2) Press the replacement propeller blade onto the
motor shaft until it bottoms out.
propeller, motor And led confiGurAtion
Use the diagram below to install the propellers, motors and LED lights in the correct configurations.
If you don’t configure the Quad-Copter as shown, the Quad-Copter won’t fly correctly.
*Clockwise motors feature red and blue wires and counter-clockwise motors feature white and black wires.
LED Yellow
LED White
MOTOR Black
MOTOR White
MOTOR Blue
MOTOR Red
1
2
3
4
5
6
FRONT
Black ‘B2’
(Counter-Clockwise)
Black ‘A1’
(Clockwise)
Red ‘B2’
(Counter-Clockwise)
Red ‘A1’
(Clockwise)
A
B
C
D
E
CAMERA White
CAMERA Black
CAMERA Red
SWITCH Black
SWITCH Yellow
A
B
C
DE
resettinG the trAnsmitter trims
If desired, all four transmitter trims can be reset to their
neutral positions in one step, instead of resetting them
manually.
1) Press and HOLD the Speed button, then turn the
transmitter ON. The transmitter will make a short
series of audible tones, indicating the transmitter
trims have been reset.

16
AerocrAft cAm quAd user’s Guide
troubleshootinG Guide
This Troubleshooting Guide has been provided to help you diagnose and solve most problems
that you might encounter with the Aerocraft CamQuad Quad-Copter. If you cannot solve a
problem using this Troubleshooting Guide, please contact our Customer Service Center using
the information in the Service and Support section on page 2.
Transmitter Does Not Turn ON:
• Transmitter batteries not installed correctly - Reinstall transmitter batteries (Page 8)
• Transmitter batteries depleted - Install new transmitter batteries (Page 8)
• Transmitter is damaged - Contact Customer Service Center (Page 2)
Quad-Copter Does Not Power Up:
• LiPo battery depleted - Charge LiPo battery (Page 7)
• LiPo battery is damaged - Replace LiPo battery (Page 17)
• ESC not armed - Arm ESC (Page 8)
• Damaged electronic component - Contact Customer Service Center (Page 2)
Quad-Copter is Difficult to Control:
• You are flying in too much wind - Fly indoors or fly outdoors, but only in little to no wind
• Flight Mode 2 or Flight Mode 3 is selected - Select Flight Mode 1 (Page 11)
• You are hovering too low in the ground effect - Hover no less than 2 to 3 feet off the ground
• You are over-controlling - Use smaller, gentler control inputs
• Quad-Copter is out of trim - Trim Quad-Copter using Trim buttons (Page 11)
Quad-Copter Seems Under-Powered or Won’t Take Off:
• LiPo battery depleted - Charge LiPo battery (Page 7)
• Motor speed is too slow - Push left control stick (throttle) further forward
• Propeller blades and/or motors installed incorrectly - Check and reinstall (Page 15)
• Damaged propeller blade and/or motor - Replace damaged component (Page 15)
2) With the left control stick pulled all the way back,
press and HOLD the Flip button, then move both
control sticks to the lower left corners and HOLD
them there for approximately 3 to 4 seconds, or
until the Power Indicators and LED lights on the
Quad-Copter begin to flash rapidly.
3) Release the Flip button and the control sticks. When the Power Indicators and LED lights stop
flashing, the calibration process is complete.
mAintenAnce
cAlibrAtinG trAnsmitter controls
Over time it’s possible that the transmitter controls may drift, resulting in erratic performance. If
this occurs, the transmitter controls can be calibrated to return to normal operation.
1) Follow steps 1 through 4 in the Calibrating the Gyro and Arming the ESC section on pages 8
and 9 to arm the Quad-Copter for flight.

17
AerocrAft cAm quAd user’s Guide
replAcement pArts
Replacement parts can be purchased directly through your local Hobby People retail store.
If you don’t have a Hobby People retail store near you, replacement parts can be ordered
online through our website at www.hobbypeople.net or by calling our Mail Order Department
at 1-800-854-8471.
165941
Upper Body Shell
165942
Lower Body Shell
165943
Propeller Blade Set
165944
Motor Set - Forward
165945
Motor Set - Reverse
165946
Battery Door Assembly
165947
Switch & LED Light Set
165948
1S 3.7V 380mAh LiPo
Clockwise
Counter-Clockwise
165951
Memory Card & Reader
165952
USB Charge Cord
165953
Transmitter
troubleshootinG Guide
Quad-Copter is Unresponsive:
• LiPo battery depleted - Charge LiPo battery (Page 7)
• Quad-Copter is out of control range - Move closer to Quad-Copter
• Transmitter batteries depleted - Install new transmitter batteries (Page 8)
• Damaged electronic component - Contact Customer Service Center (Page 2)
Quad-Copter Will Not Take Photos or Shoot Video:
• Memory card not installed in Quad-Copter - Install memory card into Quad-Copter (Page 14)
• Quad-Copter not turned ON and armed - Quad-Copter must be turned ON and the ESC armed
for the camera system to operate (Page 8)
• Damaged electronic component - Contact Customer Service Center (Page 2)
Transmitter Beeps Continuously:
• Low Voltage Alarm is sounding - Install new transmitter batteries (Page 6)
Transmitter LCD Screen Backlight is OFF:
• Transmitter LCD screen blue backlight turned OFF - This is normal. The LCD screen backlight
will turn OFF automatically if the left control stick (throttle) is pulled all the way back and there
is no control input after approximately 30 seconds. Moving the left control stick up will turn the
LCD screen backlight on again.

18
AerocrAft cAm quAd user’s Guide
notes
_____________________________________________________________________________________
_____________________________________________________________________________________
_____________________________________________________________________________________
_____________________________________________________________________________________
_____________________________________________________________________________________
_____________________________________________________________________________________
_____________________________________________________________________________________
_____________________________________________________________________________________
_____________________________________________________________________________________
_____________________________________________________________________________________
_____________________________________________________________________________________
_____________________________________________________________________________________
_____________________________________________________________________________________
_____________________________________________________________________________________
_____________________________________________________________________________________
_____________________________________________________________________________________
_____________________________________________________________________________________
_____________________________________________________________________________________
_____________________________________________________________________________________
_____________________________________________________________________________________
_____________________________________________________________________________________
_____________________________________________________________________________________
_____________________________________________________________________________________
_____________________________________________________________________________________
_____________________________________________________________________________________
_____________________________________________________________________________________
_____________________________________________________________________________________
_____________________________________________________________________________________
_____________________________________________________________________________________
_____________________________________________________________________________________
_____________________________________________________________________________________
_____________________________________________________________________________________
_____________________________________________________________________________________
_____________________________________________________________________________________
_____________________________________________________________________________________
_____________________________________________________________________________________
_____________________________________________________________________________________
_____________________________________________________________________________________
_____________________________________________________________________________________
_____________________________________________________________________________________
_____________________________________________________________________________________
_____________________________________________________________________________________
_____________________________________________________________________________________
_____________________________________________________________________________________
_____________________________________________________________________________________
___________________________________________________________________________________
__
___________________________________________________________________________________

19
AerocrAft cAm quAd user’s Guide
notes
_____________________________________________________________________________________
_____________________________________________________________________________________
_____________________________________________________________________________________
_____________________________________________________________________________________
_____________________________________________________________________________________
_____________________________________________________________________________________
_____________________________________________________________________________________
_____________________________________________________________________________________
_____________________________________________________________________________________
_____________________________________________________________________________________
_____________________________________________________________________________________
_____________________________________________________________________________________
_____________________________________________________________________________________
_____________________________________________________________________________________
_____________________________________________________________________________________
_____________________________________________________________________________________
_____________________________________________________________________________________
_____________________________________________________________________________________
_____________________________________________________________________________________
_____________________________________________________________________________________
_____________________________________________________________________________________
_____________________________________________________________________________________
_____________________________________________________________________________________
_____________________________________________________________________________________
_____________________________________________________________________________________
_____________________________________________________________________________________
_____________________________________________________________________________________
_____________________________________________________________________________________
_____________________________________________________________________________________
_____________________________________________________________________________________
_____________________________________________________________________________________
_____________________________________________________________________________________
_____________________________________________________________________________________
_____________________________________________________________________________________
_____________________________________________________________________________________
_____________________________________________________________________________________
_____________________________________________________________________________________
_____________________________________________________________________________________
_____________________________________________________________________________________
_____________________________________________________________________________________
_____________________________________________________________________________________
_____________________________________________________________________________________
_____________________________________________________________________________________
_____________________________________________________________________________________
_____________________________________________________________________________________
___________________________________________________________________________________
__
___________________________________________________________________________________

20
AerocrAft cAm quAd user’s Guide
Hobby People
18480 Bandilier Circle
Fountain Valley, CA 92708
Features, Specifications and Contents are Subject to Change Without Notice.
All Rights Reserved. © 2014 Hobby People • Revision 1 08.25.2014 • Made in China
Table of contents
Other Hobby People Quadcopter manuals