HOMCOM 800-102V70 Installation guide

ASSEMBLY & INSTRUCTION MANUAL
IMPORTANT, RETAIN FOR FUTURE REFERENCE: READ CAREFULLY
INcsb053_UK
INcsb053_UK_800-102V70

1
Important Safeguards
When using electrical appliances, in order to reduce the risk of fire, electric
shock, and/or injury to persons, basic safety precautions should be always
followed, including:
For Your Safety
Read all instructions carefully, even if you feel you are quite familiar with
the appliance.
• Unplug from power outlet when not in use and before cleaning.
• This appliance is not intended for use by persons (including children) with
reduced physical, sensor y and mental capabilities, or lack of experience
and knowledge, unless they have been given supervision or instruction
concerning use of the appliance by a person responsible for their safety.
• Children should be super vised to ensure that they do not play with the
appliance.
• To protect against fire, electric shock or injury, do not immerse power cord,
plug or unit in water or other liquid.
• Do not allow the power cord hang over the edge of a table or bench, touch
hot surfaces or become knotted.
• Do not place this appliance on or near a gas burner or electric element, or
where it could touch a heated oven.
• Do not operate any appliance with a damaged power cord or plug, if the
appliance malfunctions, or if it has been damaged in any manner.
• Avoid contact with moving parts. A rubber scraper may be used but only
when the unit is not operating.
• This appliance is recommended for household use only. Do not use this
appliance for other than its intended use.Do not use outdoors.
• Allow to cool before cleaning.
• Do not attempt to repair or disassemble the appliance. There are no user-
serviceable parts.
• Do not connect the appliance to an electrical socket until all parts have
been assembled according to the instructions.
• Operate on a dry level surface. Operating on sinks, drainboards or uneven
surfaces should be avoided.
• Do not blend hard ingredients or fruit kernels.
• Only use the original beaters and dough hooks attached with the Hand
Mixer. Never use different attachments(beater and dough hooks) at the
same time.
• Always ensure the beaters or dough hooks are firmly positioned before
operating.
• Handle your Hand Mixer and attachments with care. Never place your
fingers inside a mixing bowl or near beaters or dough hooks during use.
• Do not open the appliance and never attempt to insert metal objects inside.
• Keep hands, hair, clothing, as well as spatulas and other utensils away from
moving beaters during operation.
• Never immerse the appliance in water or any other liquid.
• Always remove the attachments from the mixer before cleaning.
2
Features of Your Hand Mixer
A B C D
E F G
‚
ƒ
• Never fold the mains lead or wind it round the appliance, as this could
cause the cable to break.
• Always switch the appliance off and then switch off at the power outlet after use
and before attempting to move the appliance, before putting on or taking off parts
and before cleaning.
• Do not use the appliance if you are on a damp surface, or if your hands or the
appliance are wet.
• Do not leave the appliance unattended when in use.
• Never operate the appliance when the mixing bowl is empty, as the motor may
over heat.
Warning
If t he s upply pow er cor d is damag ed, the po wer co rd m ust be rep laced by t he
manufacturer,its service agent or similarly qualified persons in order to avoid a
hazard.
This product has not been designed for any uses other than those specified in this
booklet.
Only use OEM accessories. Using non - OEM accessories results in an increased
risk of accidents. There is no liability for any accidents or damages resulting from
th e us e of non - O EM a cce s s o rie s . Th e us e of non - o r igi n a l a c c ess o r i e s a n d
resulting damage to the appliance invalidates any warranty claims.
Save These Instructions

3
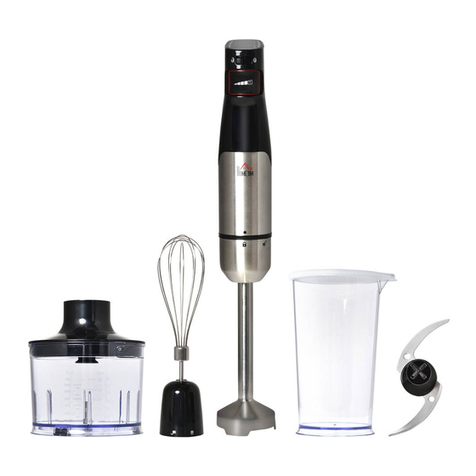
A) Mixer unit (①Eject button ②pulse button ③Speed selector)
B) Dough hook
C) Beater(wire)
D) Whisk
E) Bar blender
F) Beaker with lid (for bar blender)
G) Chopper (①Chopper lid ②Chopper blade ③Chopper bowl)
Getting to Know Your Hand Mixer
Congratulations on the purchase of your new Hand Mixer.
Before using your new Hand Mixer, it is important that you read and follow
the instructions in this booklet even if you feel you are familiar with this type
of appliance. Find a place to keep this booklet handy for future reference.
Attention is particularly drawn to the section dealing with “IMPORTANT
SAFEGUARDS”.
This appliance has been designed to operate from a standard domestic
power outlet. It is not intended for industrial or commercial use.
Before First Use
• Remove and safely discard any packaging material and promotional labels
before using the appliance for the first time.
• Before using your Hand Mixer for the first time, wash the beaters, dough
hooks, whisk, bar blender, beaker, chopper in warm soapy water with a soft
cloth. Rinse and dry thoroughly.
• When first using your hand mixer, you may notice an odour from the motor.
This is normal and will dissipate as the motor is run in.
WARNING: Do not plug the power cord into an electrical outlet until the
accessories such as beaters, dough hooks, whisk , bar blender, chopper
have been securely attached.Make sure the Speed Selector is set to the
“0”(Off ) position.
Control Buttons
• Eject button - to release beaters, dough hooks, whisk.
• 1-5 Speed Selector - for beaters, dough hooks, whisk light, medium and
heavy mixing; M speed selector - for bar blender and chopper function.
• pulse button- Speed Selector on 1-4, Hi-speed, for heavy mixing; Speed
Selector on M, press to start the bar blender and chopper function, release
to stop the bar blender and chopper function.
Installing The Attachments
• Ensure the appliance is unplugged from the power socket.
• Ensure that the speed selector is set to the “ 0” (Off ) position.
• The beater stem ends are shaped to fit the corresponding apertures in the
mixer .

4
Beater(wire)and dough
hook with a collar
the hole with the
larger opening
• Each pair of beaters(wire), dough hooks has one attachment fitted with a
collar with a large diameter on the stem and the other fitted without it on
the stem.
• When inserting the beaters, dough hooks, whisk, make sure that the beaters(wire)
and dough hooks with the larger disc-shaped collar is placed into the hole with
the larger opening. (Fig 1)
• While installing,Align stems and push down Insert the attachments into the holes
until they click into place (you may have to rotate them slightly). Check they are in
securely and correctly
• The bar blender are shaped to fit the corresponding apertures in the mixer .
• Before inser ting the bar blender to the mixer door, firstly you use bar
blender head to lever the mixer door, then push it down, finally rotate it
anticlockwise until they click into place( if you can not hear they click into
place, you may have to push it down and rotate it anticlockwise until the
he ad re a l l y te ac h t he b o tto m p la c e ) . C he ck th e y a re i n s e c u re l y a nd
correctly. (Fig 2)
• Then you can put it to the beaker with food. (Fig 3)
Fig.2 Fig.3

5
• The mixer ends are shaped to fit the corresponding apertures in the
chopper .
• Before you putting the food into the chopper bowl, you must insert
chopper blade into chopper bowl. (Fig 4)
WARNING: The chopper blade is very sharp, please be careful.
• Before inserting the chopper lid to the mixer door, firstly you use chopper
lid head to lever the mixer door, then push it down, finally rotate it
anticlockwise until they click into place( if you can not hear they click into
place, you may have to push it down and rotate it anticlockwise until the
head really reach the bottom place). Check they are in securely and correctly.
(Fig 5)
• Putting mixer with chopper lid to the chopper bowl, then rotating mixer
clockwise until they click into place.(Fig 6) Check they are in securely and
correctly. If you find it is difficult to put chopper lid to the chopper bowl,
please rotate the drive connector on the chopper lid some angel. (Fig 7).
Selecting The Speed
Speed recommendations:
Speed
setting Action Description
1 Combine/blend
Lowest speed for blending larger quantities and dry foodstuffs, such as
flour, sugar.For combining 2 ingred, such as stirring beaten egg white into
a mixture.
2 Slow whisk Perfect speed for adding liquids or mixing salad dressings.
3 Combine/whisk For pastry or cake mixture.
4 Mix/fast whisk
For whipping cream. For mixing butter and sugar, whisking cold puddings,
custard, etc.
5 Whip For whisking eggs,meringue, potato puree, whipping cream, mayonnaise,etc.
M Bar blender Make kinds of fruits and vegetables juice
Chopper Food process, meat or vegetables.

6
Using the Hand Mixer(for beaters/dough hooks/whisk)
• Ensure beaters/dough hooks/whisk are inserted into slots and clicked into
place securely.
• Plug into a standard domestic electrical outlet.
• Place the ingredients into a bowl suitable for mixing purposes, grip the
mixer handle, and position the beaters/dough hooks/whisk in the centre of
the food to be mixed.
• To avoid the ingredients splashing out and the risk of injur y when you
switch on the appliance, make sure the beaters/dough hooks/whisk are
immersed in the food to be processed before you switch it on. Always begin
m i x i n g o n a l o w e r s p e e d s e t t i n g“1” t o p r e v e n t s p l a t t e r i n g . S l o w
increasing to the desired speed for the mixing task (setting1 for lowest
speed, 5 for highest speed). The speed setting can be adjusted during use
by turning the speed selector to front or back.
• You can use the pulse button at any time on any setting (except “0”).Press
t h e p u l s e b u t t o n t o i n c r e a s e t h e a p p l i a n c e’s p o w e r a n d s p e e d t o
maximum(as speed setting “5”). The pulse button is the equivalent of
setting “5”, so when you are on setting “5”, pressing the pulse button
will not add any extra power.
• Move the mixer in a slight circular motion dur i ng m ixing to allow the
beaters/dough hooks/whisk to mix the ingredients efficiently. Stop the
mixer now and then, using a plastic spatula, scrape down the sides of the
mixing bowl, then continue mixing.
CAUTION:Avoid allowing the beaters or dough hooks to hit against the side
of the mixing bowl while the mixer is in use as this will result in damage to
the beaters/dough hooks/whisk.
CAUTION: To prevent the Mixer from overheating, do not operate it for more
th a n 1 0 m in ute s at a t im e. A ll ow t he a pp li a nc e to c oo l dow n to roo m
temperature before using it again.
Using the Hand Mixer(for bar blender)
• Ensure bar b l e n der is i n s er ted into mixer d o o r and clicke d into place
securely.
• Plug into a standard domestic electrical outlet.
• Pl a ce t h e fr u i t / v e ge t ab l es a n d wa te r ’s in g red i e n t s i n to be a ke r fo r
blending purposes, grip the mixer handle, and position the bar blender’s
edge against the inner surface of beaker.
• To avoid the ingredients splashing out and the risk of injur y when you
switch on the appliance, make sure use one hand to hold the beaker. Then
s p e e d s e l e c t o r s e t t i n g o n“M”. P re s s t h e p u l s e b u t to n t o s t a r t t h e
appliance.
• In order to blending better, you may moving the mixer up and down the
beaker inner surface slightly .

7
CAUTION: To prevent the Mixer from overheating, do not operate it for more
t h a n 1 m i n u t e a t a t i m e . A l l o w t h e a p p l i a n c e to c o o l d o w n t o r o o m
temperature before using it again.
Using the Hand Mixer(for chopper)
• Ensure chopper is inserted into mixer door and clicked into place securely.
• Ensure place the meat/vegetables ingre d i e nts into chop p e r bowl f o r
process purposes.
• Plug into a standard domestic electrical outlet.
• Place the meat/vegetables ingredients into chopper bowl for process
purposes. Grip the mixer handle.
• S p e e d s e l e c t o r s e t t i n g o n“M”. P re s s t h e p u l s e bu t t o n t o s t a r t t h e
appliance.
• In order to blending better, you may press a nd ho l d the pulse button
slightly every several seconds .
CAUTION: To prevent the Mixer from overheating, do not operate it for more
t h a n 1 m i n u t e a t a t i m e . A l l o w t h e a p p l i a n c e to c o o l d o w n t o r o o m
temperature before using it again.
Remove The Beaters or Dough hooks/whisk/bar blender/chopper
• Set the speed selector to “0” position(Off ).
• Switch appliance off at the power point.
• Unplug the appliance.
• For doug h hooks/beater s /whisk - Press the Eje c t button, remove the
beaters/dough hooks/whisk from the mixer.
• For bar blender - Rotate the bar blender clockwise until end, pull it out of
the mixer door.
• For chopper - Rotate the mixer unit anticlockwise until end, pull it out of
the chopper.
Note: Never attempt to release the beaters/dough hooks/whisk or
rotate the bar blender/chopper while operating the hand mixer. Only
t a k e t h e a t t a c h m e n t s ( b e a t e r s / d o u g h h o o k s / w h i s k / b a r
blender/chopper) out of the bowl /beaker when all parts have come to a
complete stop.
Note: Always set the speed selector to “0”(Off ) while press the Eject
button to remove the attachments.

8
Task
Type load
Attachment
capacity
Operating Time
Chopper Raw beef Chopper bowl 350g 5s
Blender Carrots and
water
30 oz beaker 320g carrot,480g
water
5S
Food
mixer
Dough
Dough hook Flour:500g
Water:360g
3min
Cake bater Beater 5min
Water Whisk 5min
Recipe
Troubleshooting
Defect: Cause: Remedy:
The appliance does not
function.
The mains plug is not connected to
the electrical socket.
Connect the mains plug to the electrical
socket.
The appliance is not switched on.
Use the 6-step switch to turn on the
appliance.
The attachments cannot be
removed. The eject button was not pressed.
Press the eject button to remove the
attachments from the unit.
The unit is not mixing.
The attachments were not fully
clicked in.
Make sure you push the attachments into
the holesuntil you hear and feel them
click into place.
Bar blender or chopper is
not work
The speed selector on1-5 Haven’t
press pulse button Setting speed selector on M Press the
pulse
Care and Cleaning
• DO NOT immerse the appliance in water or any other liquid.
• Always ensure that the speed selector is in the “0” (Off ) position and that
the power is turned off at the power outlet. Then remove the plug from the
power outlet.
• Fo r dough hooks/ beaters/whisk - Press the Eject button, remove the
beaters/dough hooks/whisk from the mixer.
• For bar blender - Rotate the bar blender clockwise until end, pull it out of
the mixer door.
• For chopper - Rotate the mixer unit anticlockwise until end, pull it out of
the chopper.
• Use a rubber spatula to c l ean the b e ater s/dough hooks / w h i sk/bar
blender / chopper blade/ c h opper bowl/cho p per l i d. The n wash the
beaters/
dough hooks/whisk/bar blender/chopper blade/chopper bowl/chopper
lid inner surface in warm soapy water with a soft cloth.. Rinse and dr y
thoroughly.

9
• F o r the bar ble n der c l ean ing - use a be ake r w i th cl e an wate r, t h en
blending the clean water can also wash the bar blender.
• Cleaning the attachments in a dishwasher is not recommended.
• Wipe the mixer body and chopper lid out surface with a soft damp cloth and dry.
• Wipe any excess food particles from the power cord.
• Never use sharp or abrasive cleaning products or sharp-edged objects for
cleaning.
• Place the appliance and attachments in a dry,cool place.
WARNING: The chopper blade is very sharp, please be careful of cleaning it.
Specifications
Power Supply.................220-240V ~ 50-60Hz
Power Consumption............500W
Protection class............ II
Rating Label (L50*W30mm)
220-240V~ 50-60Hz 500W
The product packaging is made of recyclable materials. The
packaging material can be taken to public recycling
collection points.
Old appliances do not belong in household waste! To comply
with current legislation, old appliances, having reached the
end of their useful lives, should be taken to a disposal facility
where they can be sorted. In this way, any valuable material
contained in the old appliances can be recycled and the
environment protected. Responsible local authorities or
their waste disposal operators.
Note: As a result of continual improvements, the design and specifications of
th e p r o d u c t w i th in m a y di ff er s l ig ht ly t o t h e u n i t i ll u s t r a t ed f ro m t h e
packaging.

10
Table of contents
Other HOMCOM Kitchen Appliance manuals

HOMCOM
HOMCOM 853-020V90 Installation guide

HOMCOM
HOMCOM 800-018 Installation guide

HOMCOM
HOMCOM 853-018 Installation guide

HOMCOM
HOMCOM 800-020 Installation guide

HOMCOM
HOMCOM 800-112V80 Installation guide

HOMCOM
HOMCOM 800-112V90 Installation guide

HOMCOM
HOMCOM 800-016 User manual

HOMCOM
HOMCOM 800-112V90 Installation guide

HOMCOM
HOMCOM 03-0026 Quick start guide

HOMCOM
HOMCOM 800-162V70 User manual