HomComfort 3224OFP User manual

MODEL: 3224OFP
Wood Burning APPLIANCE
United States Stove Company
227 Industrial Park Road • South Pittsburg, TN 37380
www.usstove.com • (800) 750-2723
SAFETY NOTICE:
If this appliance is not properly installed, a house re
may result. For your safety, follow the installation
instructions. Never use make-shift compromises
during the installation of this appliance. Contact
local building or re ofcials about permits,
restrictions and installation requirements in your area.
CAUTION!
Please read this entire manual before you install
or use your new room appliance. Failure to follow
instructions may result in property damage, bodily
injury, or even death.
Improper Installation Could Void Your Warranty!
Contact your local building or re
ofcials about obtaining permits,
restrictions and installation inspection
requirements in your area.
Save these instructions.
U.S. Environmental Protection Agency
This unit is not a certied residential
wood heater.
This is not a UL listed Appliance
852978-2605G
*Unit is shown with optional brick kit

SAFETY NOTICE
• If this appliance is not properly installed, a house re may result. To reduce the risk of re, follow the
installation instructions.
• Consult your municipal building department or re ofcials about permits, restrictions and installations
requirements in your area.
• Never use gasoline, gasoline-type lantern fuel, kerosene, charcoal lighter uid, or similar liquids to start or
“freshen up” a re in this appliance. Keep all such liquids well away from the appliance while it is in use.
• In the event of a chimney re, keep the air control full closed to deprive the re of oxygen. Call the re
department.
INSTALLATION CLEARANCES
The clearances given are minimum dimensions by the NFPA. Installation of this appliance must comply with the
latest edition of NFPA 211 and / or your local building code rulings. Use whichever is largest.
Your appliance must be installed in residential applications in accordance with the clearances given below. For
safety reasons, please adhere to the installation clearances and restrictions. Check with your municipal building
department or re ofcials for methods to reduce clearances.
IMPROPER INSTALLATION: The manufacturer will not be held responsible for damage caused by the
malfunction of an appliance due to improper venting or installation. Call (800) 750-2723 and/or consult a
professional installer if you have any questions.
This unit is only intended to be used In conjunction with masonry block and/or pavers to make an outdoor
replace
Appliance Installation
Note: Register your product on line at www.usstove.com. See “Limited Warranty” section for specic warranty
information for your new purchase. Save your receipt with your records for any claims.
Congratulations!
You’ve purchased an appliance from North America’s oldest manufacturer of wood burning products.
By cooking with wood you’re helping to CONSERVE ENERGY!
Wood is our only Renewable Energy Resource. Please do your part to preserve our wood supply. Plant at least
one tree each year. Future generations will thank you.
The instructions pertaining to the installation of your wood burring appliance comply with NFPA 211.
CAUTIONS:
• Hot while in operation. Keep children, clothing and furniture away. Contact may cause skin burns
• Do not use chemicals or uids to ignite the re
• Do not leave the appliance unattended
• Do not burn garbage, ammable uid such as gasoline, naphtha or motor oil
Combustible: Wood
Flue Pipe Diameter: 10”
Flue Pipe Type: (Standard Single Wall or Double Wall): Black or Blued Steel 2100°F (650°C)
Minimum Chimney Height: 60”

Dimensions
28.00
26.00
25.00
2
6.00
28.
00
30.86
36”36”
36”
36”
Clearance To Combustibles

Your appliance was designed to
burn wood only; no other materials
should be burned. Waste and other
ammable materials should not be
burned in your appliance. Any type of
wood may be used in your appliance,
but specic varieties have better
energy yields than others. Please
consult the following table in order to
make the best possible choice.
It is EXTREMELY IMPORTANT that you
use DRY WOOD only in your wood
appliance. The wood should have
dried for 9 to 15 months, such that the
humidity content (in weight) is reduced
below 20% of the weight of the log. It
is very important to keep in mind that
even if the wood has been cut for one, two, or even more years, it is not necessarily dry if it has been stored in
poor conditions. Under extreme conditions it may rot, instead of drying. This point cannot be over stressed; the
vast majority of the problems related to the operation of a wood appliance is caused by the fact that the wood
used was too damp or has dried in poor conditions. These problems can be:
- Ignition problems
- Creosote build-up causing chimney res
- Low energy yield
- Blackened windows
- Incomplete log combustion
Smaller pieces of wood will dry faster. All logs exceeding 6” in diameter should be split. The wood should not be
stored directly on the ground. Air should circulate through the cord. A 24” to 48” air space should be left between
each row of logs, which should be placed in the sunniest location possible. The upper layer of wood should be
protected from the elements but not the sides.
FLOOR PROTECTION
This appliance must only be installed on the required brick kit.
CHIMNEY CONNECTOR (STOVE PIPE)
Your chimney connector and chimney must have the same
diameter as the appliance outlet (10”). If this is not the case, we
recommend you contact your dealer in order to insure there will be
no problem with the draft.
The stove pipe must be made of aluminized or cold roll steel with a
minimum thickness of 0.021” or 0.53 mm. It is strictly forbidden to use
galvanized steel.
Your smoke pipe should be assembled in such a way that the male
section (crimped end) of the pipe faces down. Attach each of the
sections to one another with three equidistant metal screws. Seal
with furnace cement.
The pipe must be short and straight.
To insure a good draft, the total length of the coupling pipe should never exceed 8’ to 10’ (2.4m to 3.04 m).
Installation of a “barometric draft stabilizer” (replace register) on a smoke exhaust system is prohibited.
Furthermore, installation of a draft damper is not recommended. Indeed, with a controlled combustion wood
appliance, the draft is regulated upon intake of the combustion air in the appliance and not at the exhaust.
Ventilation
Appliance Utilization
TYPE WEIGHT
(LBS. CU. FT.,
DRY)
PER CORD EFFICIENCY
RANKING
SPLITS MILLIONS
BTU’s/CORD
Hickory 63 4500 1.0 Well 31.5
White Oak 48 4100 .9 Fair 28.6
Red Oak 46 3900 .8 Fair 27.4
Beech 45 3800 .7 Hard 26.8
Sugar Maple 44 3700 .6 Fair 26.2
Black Oak 43 3700 .6 Fair 25.6
Ash 42 3600 .5 Well 25.0
Yellow Birch 40 3400 .4 Hard 23.8
Red Maple 38 3200 .3 Fair 22.6
Paper Birch 37 3100 .3 Easy 22.1
Elm/Sycamore 34 2900 .2 Very Difcult 20.1
Red Spruce 29 1800 .1 Easy 16.1

TESTING YOUR WOOD
When the appliance is thoroughly warmed, place one piece of split wood (about ve inches in diameter)
perpendicular to the door on the bed of red embers.
Keep the air control full open by sliding it right and close the door. If ignition of the piece is accomplished within
90 seconds from the time if was placed in the appliance, your wood is correctly dried. If ignition takes longer,
your wood is damp.
If your wood hisses and water or vapor escapes at the ends of the piece, your wood is soaked or freshly cut. Do
not use this wood in your appliance. Large amounts of creosote could be deposited in your chimney, creating
potential conditions for a chimney re.
THE FIRST FIRES
The fresh paint on your appliance needs to be cured to preserve its quality. Once the fuel charge is properly
ignited, only burn small res in your appliance for the rst four hours of operation. Never open the air control more
than necessary to achieve a medium burn rate.
Make sure that there’s enough air circulation while curing the appliance. The odors may be smelled during the
rst 3 or 4 res. During curing people and animals with lung problems should take caution.
IGNITION
Place several crumpled sheets of paper in the center of the combustion chamber. Place 8 to 10 pieces of small
dry kindling wood over the paper in the form of a tent. No chemical product should be used to light the re.
Before igniting the paper and kindling wood, it is recommended that you warm up the chimney. Twist together
a few sheets of newspaper into a torch. Light up this paper torch and hold it as close as possible to the back of
the combustion chamber to warm up the chimney. Once the updraft movement is initiated, you are ready to
ignite the appliance by lighting the paper and kindling wood inside the combustion chamber.
RELOADING
Once you have obtained a good bed of embers, you should reload the unit. Bring the red embers to the front
of the appliance and reload the unit. For optimal operation of your wood appliance, we recommend you to
operate it with a wood load approximately equivalent to the height of re bricks. Creosote - Formation and
Need for Removal - When wood is burned slowly, it produces tar and other organic vapors, which combine with
expelled moisture to form creosote. The creosote vapors condense in the relatively cool chimney ue of a slow-
burning re. As a result, creosote residue accumulates on the ue lining. When ignited, this creosote makes an
extremely hot re. The chimney connector and chimney should be inspected at least once every two months
during the season to determine if a creosote build-up has occurred. If creosote has accumulated (3mm or more),
it should be removed to reduce the risk of a chimney re.
TO PREVENT CREOSOTE BUILD UP
• Always burn dry wood. This allows clean burns and higher chimney temperatures, therefore, less creosote
deposit.
• Always check for creosote deposit once every two months and have your chimney cleaned at least once a
year.
If a chimney or creosote re occurs, close all dampers immediately. Wait for the re to go out and the appliance
to cool. Then, inspect the chimney for damage. If no damage results, perform a chimney cleaning to ensure
there is no more creosote deposits remaining in the chimney.
ASH DISPOSAL
Ashes should be removed from the appliance every few days or when ashes get to 2 to 3 inches deep. Always
empty the appliance when it is cold, such as in the morning. Ashes should be placed in a metal container with
a tight tting lid. The closed container of ashes should be placed on a non combustible oor or on the ground,
well away from all combustible materials, pending nal disposal. If the ashes are disposed of by burial in soil or
otherwise locally dispersed, they should be retained in the closed container until all cinders have thoroughly
cooled. Other waste shall not be placed in this container.
Warnings: Never overre your appliance. If any part of the appliance starts to glow red, over ring is happening.
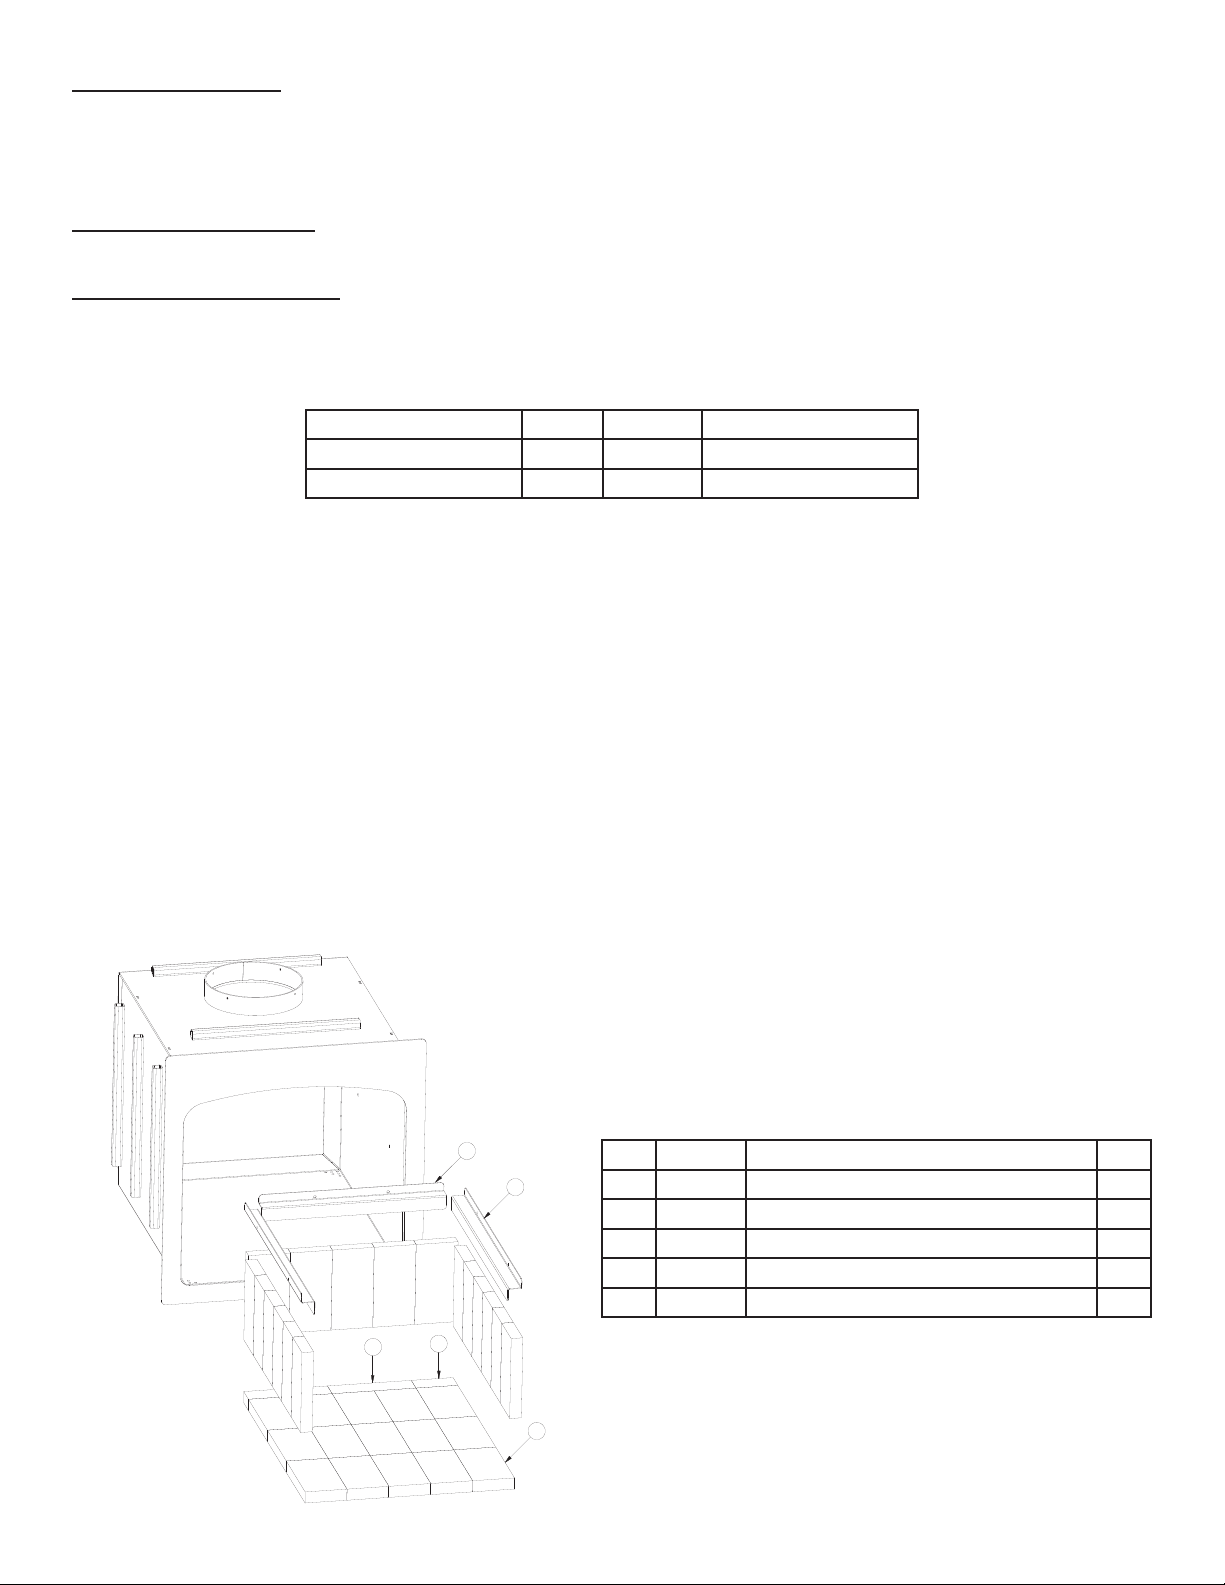
Readjust the air intake control at a lower setting. The installation of a log cradle or grates is not recommended
in your wood appliance. Build re directly on rebrick. Never put wood above the rebrick lining of the rebox.
CAUTIONS:
• Ashes could contain hot embers even after two days without operating the appliance.
• The ash pan can become very hot. Wear gloves to prevent injury.
Table of contents
Popular Wood Stove manuals by other brands

RAIS
RAIS attika NEXO 100 GAS installation guide

WoodPro
WoodPro WS-TS-1500 owner's manual

Contura
Contura C 586W installation instructions

Palazzetti
Palazzetti EVA GENERAL INFORMATION - WARNINGS - INSTALLATION - MAINTENANCE

Lopi
Lopi 1250 Republic owner's manual

Panadero
Panadero CAPRI 3V Usage and maintenance instructions