Rev:10/2015 6277HA-M01A6 11-62-0000-0000 V1-JUL21
USER GUIDE
Home Aide Diagnostics, Inc.
1072 S. Powerline Road,
1 (800) 915 - 0116
www.homeaide.us
Deereld Beach, FL 33442
Contents
1. Introduction to the System
3. Safety Information
Please use this device only for the intended use described in this user guide.
Before using this system to test your blood glucose, please read instructions thoroughly and
practice the test when you first use this system. Do a quality check on the system following
the controls solution test instructions and consult with your healthcare professionals for
questions or problems.
Be aware of the safety of young children or handicapped persons near you when you
conduct a glucose test using this system.
The Easy Talk glucose monitor can only be used with the Easy Talk/Plus II Glucose
Test Strips and control solution.
Please keep the test strip vial away from children. The test strips and vial cap can present a
choking hazard.
Never share a lancet or a lancing device with anyone.
Always use a new, sterile lancet-lancets are for single use only.
Please be cautious when removing the lancet. Take the lancet out carefully. Always place
the protective cap back on the exposed tip or (if using a twist lancet) place the cap on a hard
surface and push the exposed tip into the protective cap and discard of properly.
Always test your blood glucose using the meter and the test strips using either Easy Talk
or Easy Plus II meter, strips and control solutions. Any other brand will give invalid
6. Settings (Language/Date /Time/Alarm/
Measuring Unit/Memory Deletion/Voice Volume)
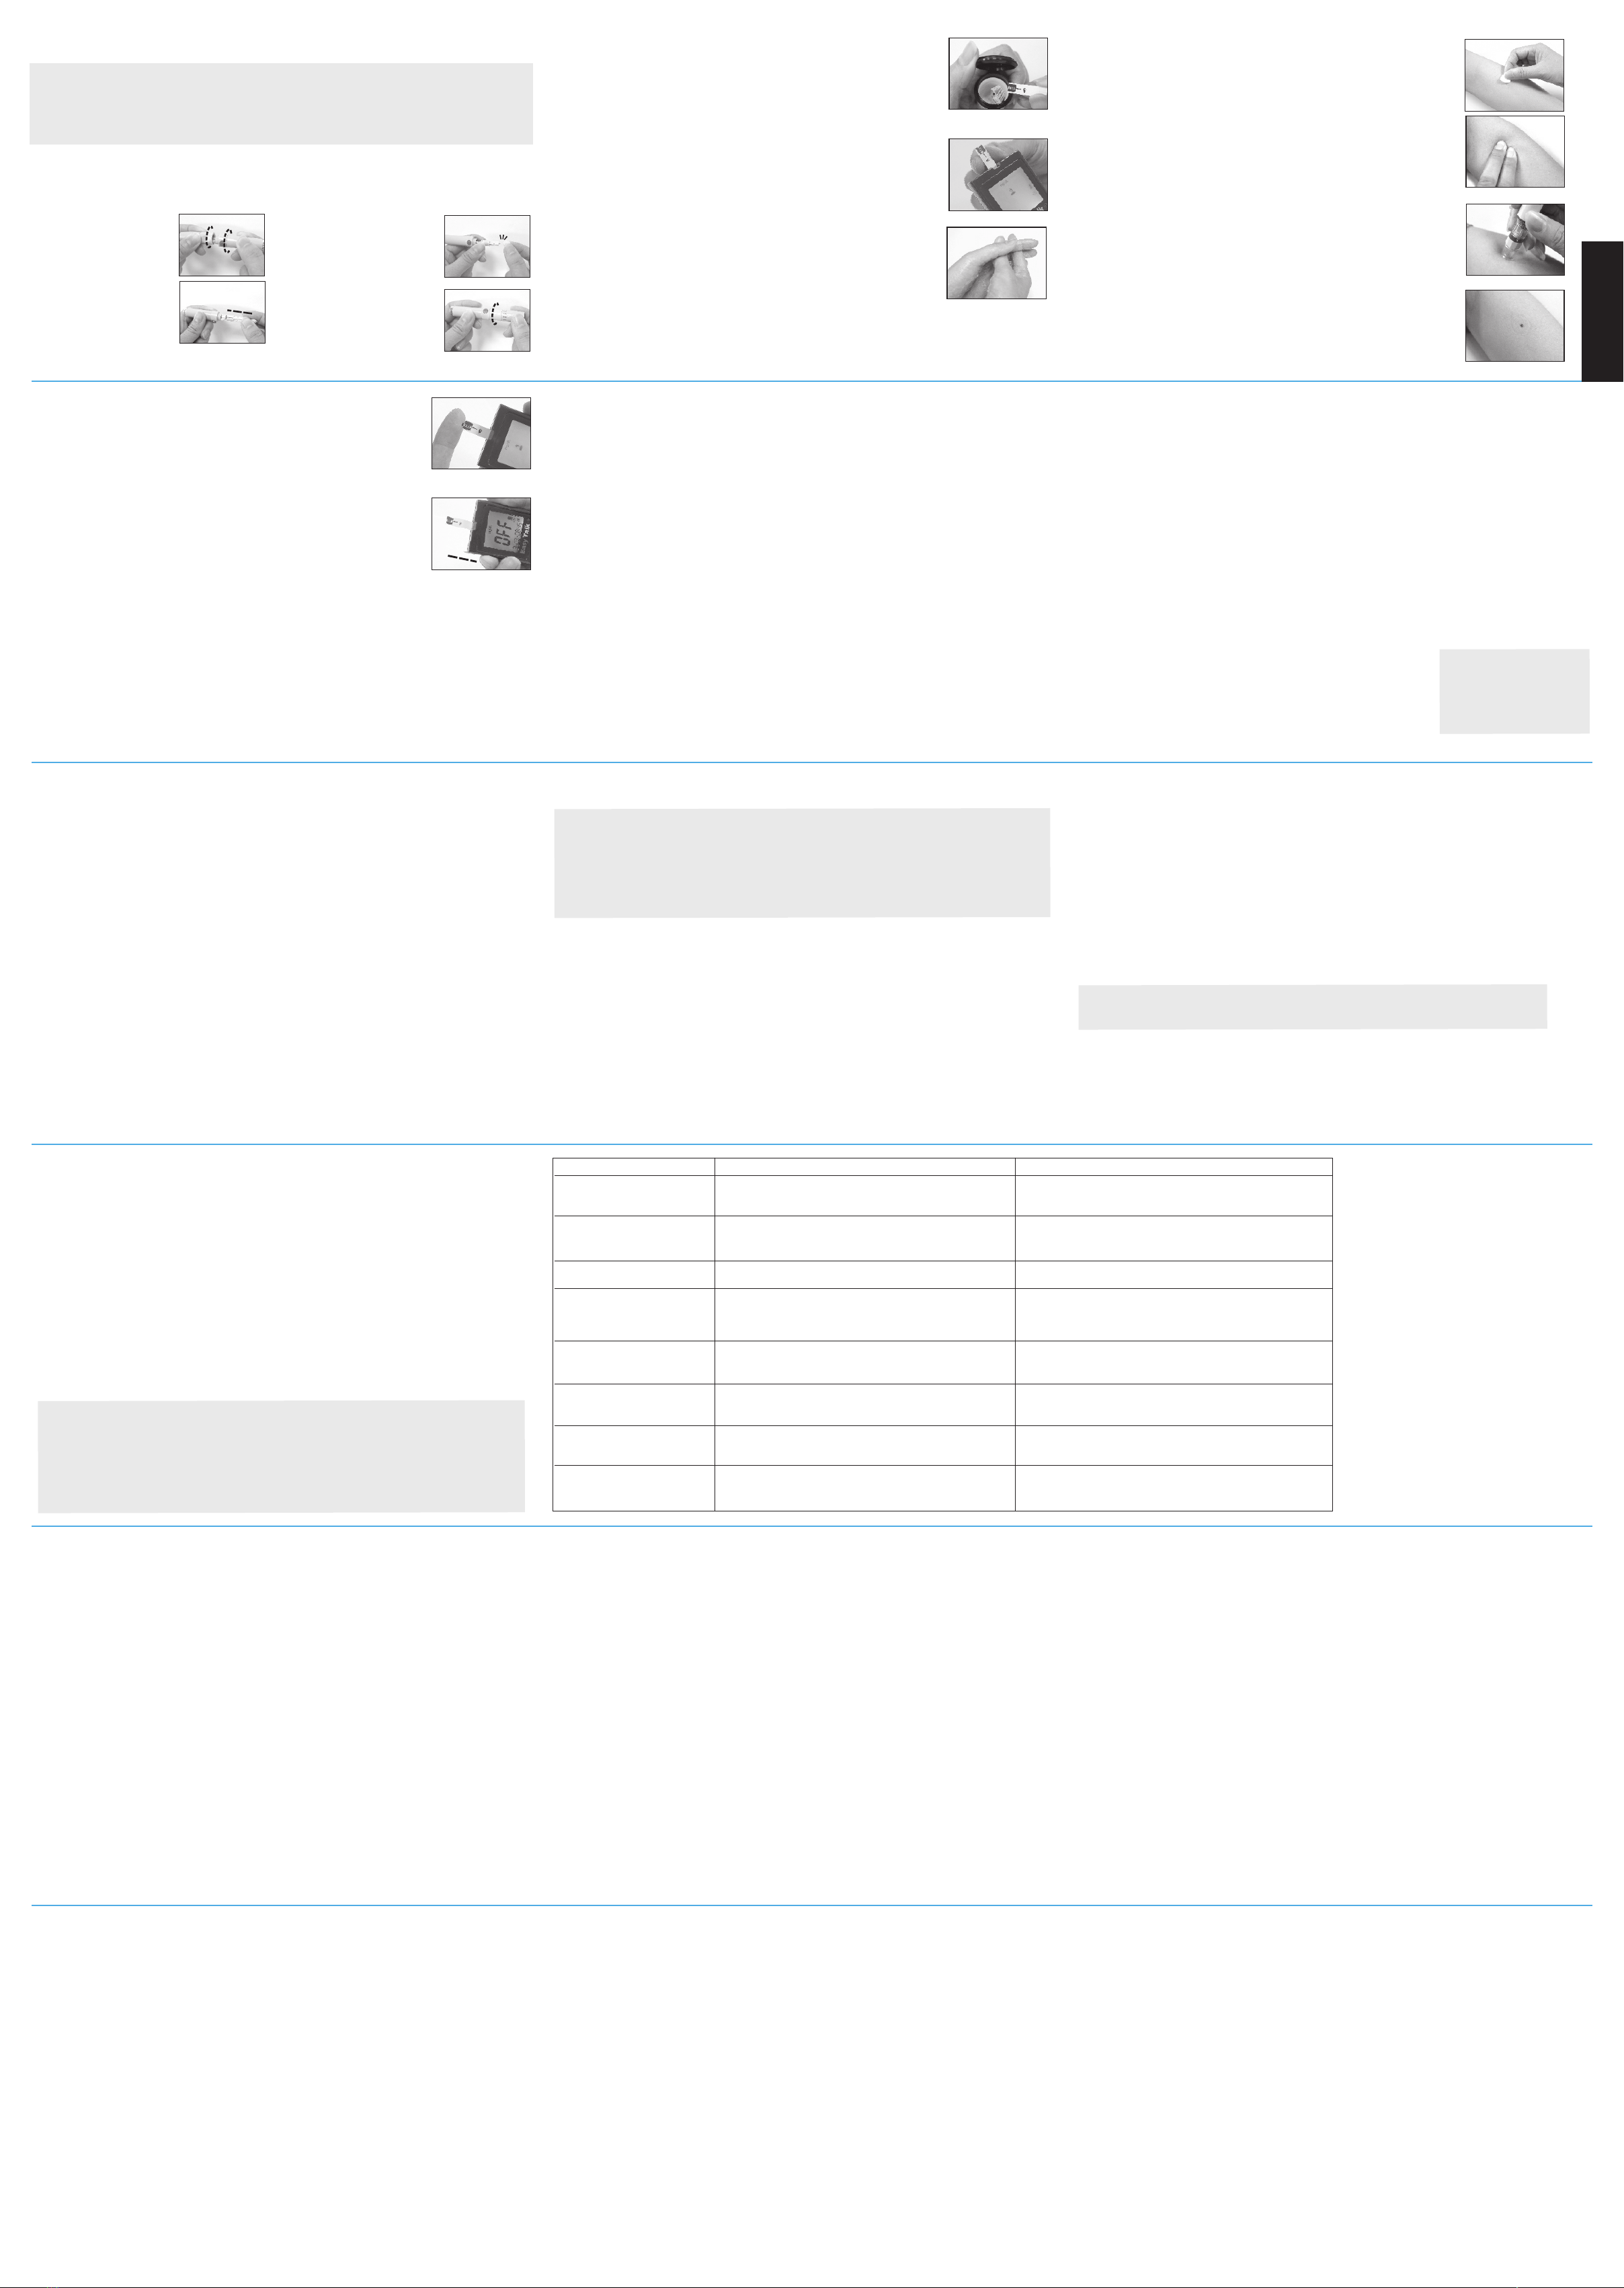
7. Running a Control Solution Test
IMPORTANT:Always make sure you press C key for Control Solution test,
otherwise in the control solution test result will be stored in the memory, and
affect your “AVG” results.
1. Insert a strip into the meter, you will hear: “Hello, the meter is ready.” A
full LCD screen will be displayed briefly and then a blood drop icon
appears. You will hear: “Apply blood now.”
2. Press the C key, and the meter will display a letter “C” on the upper right
corner of screen, indicating the control test mode. You will hear: “Apply
control solution now.” The test result will not be stored in the memory.
3. Squeeze a small amount of Control Solution on a flat surface and apply to
the front edge of the test strip, and you will hear: “Testing in process.”
4. Wait for 6 seconds, and the meter will display the result. You will hear:
“The glucose level is number/unit.”
5. Remove the used strip by hand or by pushing the ejector and the meter
will power off with a display of “OFF” on the screen. You will hear:
“Goodbye.”
8. Blood Glucose Testing
Alternate Site Testing (AST)
What is AST?
Sampling from anatomical sites (parts of the body) other than the fingertip ( i.e. forearm, upper arm,
thigh, calf, palm) to check the blood glucose levels. This system allows you to test on the forearm
with the equivalent results to fingertip testing.
There are important limitations to AST. Please consult your healthcare professional before you use
AST.
What is the advantage?
It is more painful feeling when taking blood sample from fingertips because fingertips have many
nerve endings. Other body sites do not have as many nerve endings, so you will not feel as much
pain as at the fingertip.
When to use AST?
Medication, stress, illness, food and exercise can affect blood glucose levels. Capillary whole blood at
the fingertip can reflect test changes faster than capillary blood at other sites of body. If you test your
blood glucose level during or immediately after a meal, physical exercise or stressful events, take the
blood sample from your fingertip instead of from other sites.
Use AST only:
1. 2 hours or more after taking insulin;
2. 2 hours or more after a meal;
3. 2 hours or more after exercise.
Do not use AST if you are pregnant, or if you are aware that your glucose level is not as stable as usual,
or if you think you have hypoglycemia (low blood sugar) or hyperglycemia (high blood sugar).
Do not use AST if you think your blood glucose is low and your AST results do not match the way
you feel.
1
2
3
4
(1)Measurement Units
(6)Battery Symbol
(3)Setting
(2)Memory
(10)Month
(11)Day (12)Hour
(13)Minute
The LCD screen will show as below:
(4)Test flag
(5)Blood drop icon
(7)Voice Symbol
(8)Day Average
(9)Alarm
Reminder
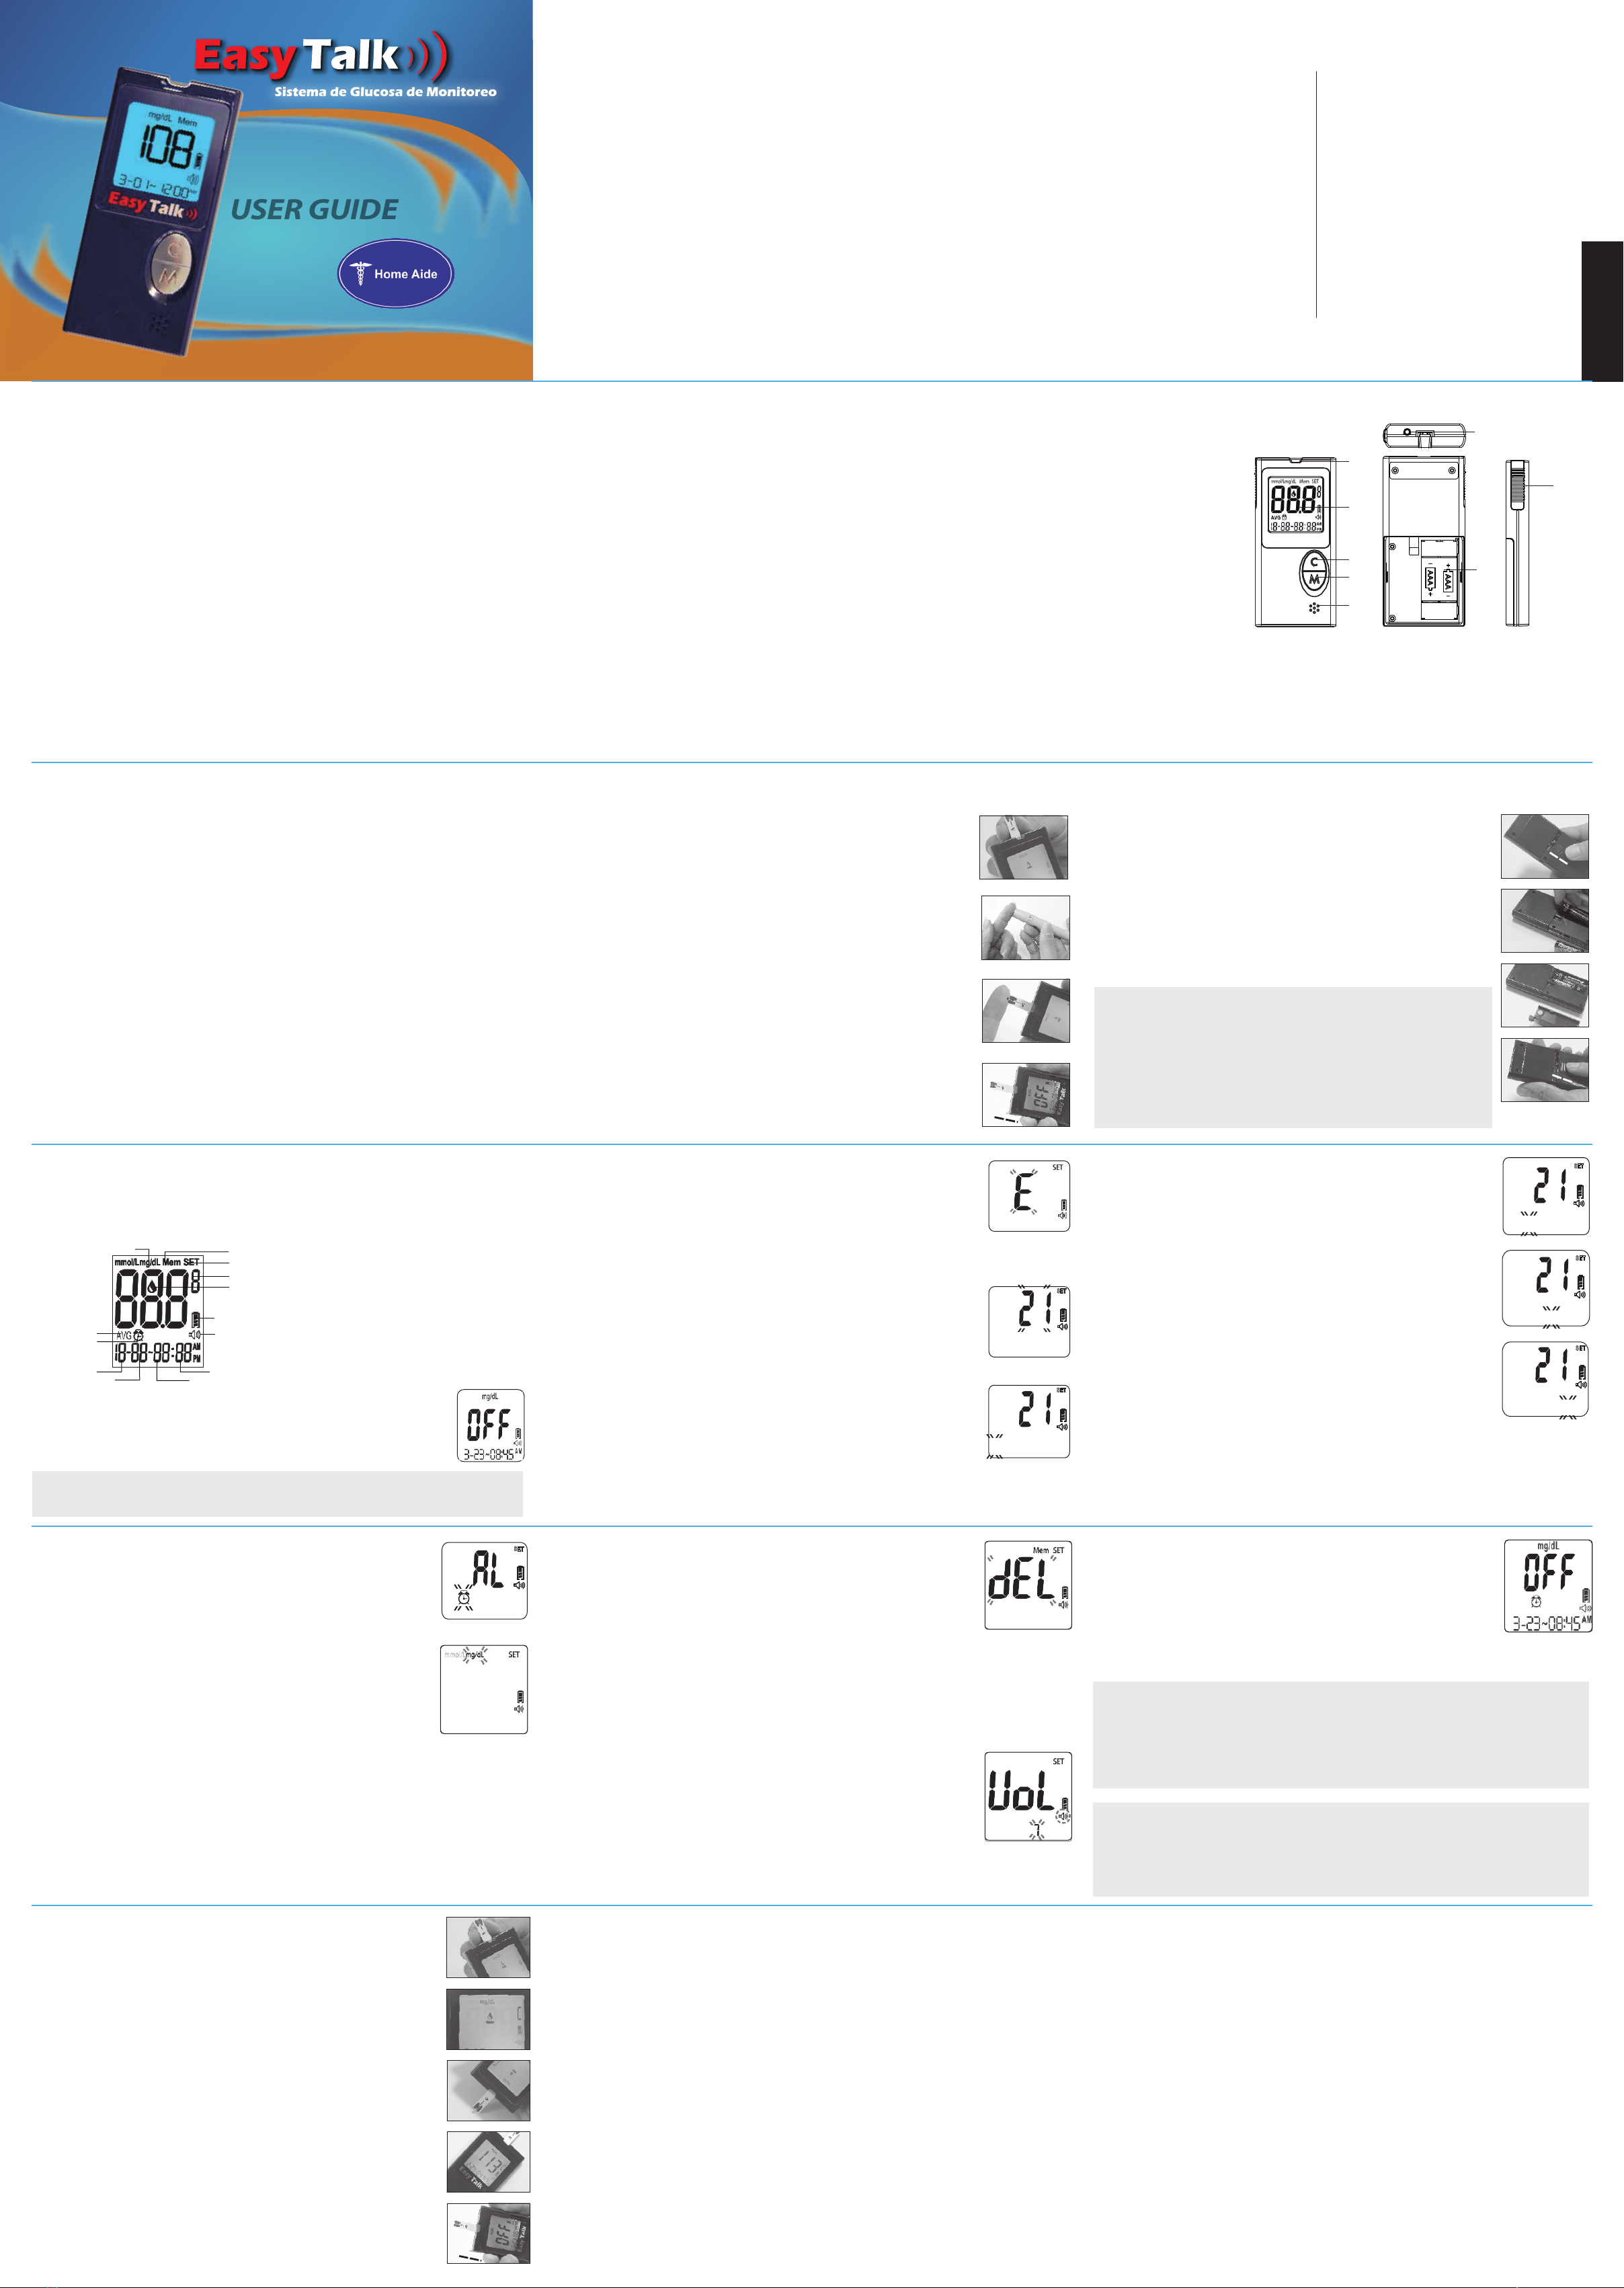
1. Setting the language for voice – With meter off, by pressing the M key and
hold for 2 seconds, you will enter the setting mode viewing an “S” for Spanish
language or an “E” for English language. The “S” or “E” will be flashing on
the screen depending on your last language setting. A small “SET” will be
displayed at the upper right corner of the LCD display. (Please see Figure
6-1.) The meter is now in the setting mode. You will hear: “You are now in
setting mode.” S indicates Spanish and E indicates English. Pressing C Key
will toggle between “S” and “E” and to set the language selection, please press
M key to select the language. You will then view the last two digits of current
year is displayed in the center of screen. The C key is used to change the
individual settings. Press M key to confirm each setting.
2. Set the Year – Press C key to adjust the year until the desired year is displayed
and then press the M key to confirm the year setting. After the year setting is
confirmed, you will see the month segment flashing on the screen. Each time
you press the C key to adjust the year, you will hear: “The year is 20xx.” (If
year 21 is selected, you will hear: “The year is 2021.”)(Please see Figure
6-2.)
3. Set the Month – Press C key to adjust the month until the desired month is
displayed and then press M key to confirm the month setting. You will then
see the day segment is flashing on the screen. Each time you press the C key
to adjust the month, you will hear: “The month is xxx.” (If December is
selected, you will hear: “The month is December.”)(Please see Figure 6-3.)
8. Set the measurement unit – Press C key to toggle between mg/dL and mmol/L
measurement units. Press M key to confirm the setting. You will see a “dEL”
displayed in the center of the screen. (Please see Figure 6-9.) If mg/dL is
selected, you will hear: “Measurement unit in milligrams per deciliter.” If
mmol/L is selected, you will hear: “Measurement unit in millimole per
liter.” The unit of measurement – mg/dL- is the standard unit of measurement
in the U.S. If the meter is to be sold in the U.S., the units of measure will be
set to mg/dL by default.
9. Delete Memory – Press C key to toggle between a flashing “dEL” for
memory deletion or a non-flashing “dEL”. If you want to delete all memory,
press M key while the “dEL” is flashing. If you do not want to delete all
memory, press M key when the “dEL” is not flashing. Once the M key is
pressed, the LCD display will move to the setting of voice volume setting
mode. You will see the display of “VoL” in the center of screen. When the
“dEL” is flashing on the screen, you will hear: “Ready to delete memory
records.” (Please see Figure 6-9.)
10. Set the Voice Volume – Press C key to toggle between the selection of
speaking mode and non-speaking mode. If you want to turn off the speaker,
press M key when the screen does not show the small speaker icon. You will
hear: “Voice Off.” If you see a small speaker icon appears below the battery
icon on the right side of LCD screen, you can press M key to turn on the
speaker. Then you will see the existing voice volume level at the lower right
corner of the screen. (Please see Figure 6-10.) There are 7 levels of voice
volume. You can press C key to adjust the voice level and then press the M
key to confirm the setting. (There will be a “beep” sound to indicate the
level of voice volume adjusted.) The meter will turn off automatically
after 2 seconds with a display of “OFF”, and you will hear: “Goodbye.”
11. Power off Screen – When the meter is off, the time, date, measurement
unit, and battery icon will be still on the screen as Figure 6-11. If the
alarm reminder has bee set or the voice has been turned on, then the
alarm or the speaker icon will appear on the power off screen as well.
The LCD screen will display “OFF”.
4. Set the Day – Press C key to adjust the day until the desired day appears
and then press the M key to confirm the day setting. You will then see
the hour segment is flashing on the LCD screen. Each time you press the
C key to adjust the day, you will hear: “The day is xxx.” (If 18th is
selected, you will hear: “The day is the eighteenth.”) (Please see the
Figure 6-4.)
5. Set the Hour – Press C Key to adjust the hour until the desired hour
appears on the screen and then press the M key to confirm the setting.
You will then see the minute segment is flashing on the screen. Each
time you press the C key to adjust the hour, you will hear: “The hour is
xxx.” (If 11 PM is selected, you will hear: “The hour is eleven PM.”)
(Please see Figure 6-5.)
6. Set the Minute – Press C Key to adjust the minute until the desired
minute appears on the screen and then press the M key to confirm the
setting. You will then see an “AL” displayed on the screen center. Each
time you press the C key to adjust the minute, you will hear: “The
minute is xxx.” (If 25 minute is selected, you will hear: “The minute is
twenty five.”)(Please see Figure 6-6.)
6-5
PM
SET
6-6
PM
SET
NOTE: For information about the name of the manufacturer of the lancing device and
he lancets, please contact your pharmacy.
Intended Use/Indications for Use
The Easy Talk Blood Glucose Monitoring System is intended for use in the quantitative
measurement of glucose in fresh capillary whole blood from the finger and the forearm. It is
intended for use by healthcare professionals and people with diabetes mellitus at home and
as an aid in monitoring the effectiveness of a diabetes control program.
The Easy Talk Blood Glucose Monitoring System is not intended for the diagnosis of or
screening for diabetes mellitus, nor for use with neonates.
The alternative site testing (forearm) in this system can only be used during steady-state
blood glucose conditions.
This system contains a speaking function that provides an audible message of test results for
users with impaired vision..
This User Guide has been prepared to describe the proper use of the Easy Talk Blood
Glucose Monitoring System.
Please read this User Guide and the package insert that comes with the Easy Talk/Plus II
Glucose Test Strips before testing. Keep this user guide for future reference. The Easy Talk
Glucose Meter can be used with the Easy Talk/Plus II Glucose Test Strips and/or control
solutions..
IMPORTANT!!!
1. If the meter, test strips and control solutions are moved from one temperature to another, allow thirty (30)
minutes for them to adjust to the new temperature before performing a control solution test.
2. You must push the C key to distinguish the control solution test from the blood glucose test. Do not perform
the blood test in Control Solution mode. (If you perform the blood test in Control Solution mode, the test
result will not be stored.)
3. Use Easy Talk or Easy Plus II Control Solutions with Easy Talk Glucose Meter.
4. Control Solutions are used to check that the meter and the test strips are working together as a system and
that you are performing the test correctly.
5. Control Solution contains a known amount of glucose that reacts with test strips. The Low and High level
Control Solutions are intended to check the monitoring system in different measurement ranges.
6. Shake the vial, discard the first drop of control solution, and wipe off the dispenser tip to ensure a good
sample and an accurate result.
7. Use only for 3 months after fist opening. Record the open date on the Control Solution vial. Discard after
3 months.
8. Compare your Control Solution test results with the expected range printed on the test strips vial label. If
your glucose control results fall outside the expected range; repeat the test. Results that repeatedly fall
outside the expected range may indicate:
(1) You may not be doing the test correctly; repeat the test, by shaking the control solution vial well and
carefully following instructions. Please make sure the test is done within the temperature range.
(2) The Control Solution is expired or contaminated.
(3) The test strips are damaged or outdated.
(4) You may have applied the Control Solution before the blood drop appears on the screen. This will cause
incorrect glucose measurement.
(5) Meter malfunction.
2. Appearance and Key functions
of the meter
(8)
(1)
(2)
(3)
(4)
(5)
(6)
(7)
1. Test strip slot – When the strip is inserted into the slot, the meter will automatically turn on.
2. LCD Display – Guide you through the test using symbols and simple messages.
3. M Key – Power ON/OFF, also for memory recalling mode, please refer to manual for detailed
function description.
4. C Key – Setting mode, please refer to manual for detailed function description.
5. Speaker – Where voice comes out.
6. RS232 port – Cable connection and data transmitting.
7. Battery Compartment – Where batteries are located.
8. Ejector – Remove used strip.
4. Quick Testing Instructions
1. With the meter off, insert a new test strip with the contacts facing up in the
test strip slot. The meter will turn on. You will see a full screen display
briefly, and then a blinking blood drop icon will appear on the screen. You
will hear: “Hello, the meter is ready.” And “Apply blood now.”
2. Lance the finger or AST and let a blood drop from.
3. Apply your blood to the front edge (the tip) of the test strip while the blood
drop icon is still blinking, and the meter will start counting down for 6
seconds then display the test results on the screen. You will hear: “Testing
in process.” and “The glucose level"
4. Remove the used strips by hand or by pushing the ejector and the meter will
power off, with “OFF” appearing on the screen. You will hear: “Goodbye.”
5. Installing the battery
1. Slide down the battery cover on the back of the meter by pushing the
cover in the direction of the arrow and put the cover aside.
2. Remove the two used batteries.
3. Insert 2 new batteries with correct +/- direction.
(Battery : AAA 1.5V 2 Alkaline 24A LR03)
4. Put the battery cover back in place by pushing the cover in the oppo-
site direction of the arrow to close the cover into position.
Note:
1. It is suggested that batteries need to be replaced when the battery icon appears
empty. If keep using the meter, the battery icon will start flashing and an error
message E_3 will appear on the screen.
2. Note that replacing the battery will not reset the stored testing results.
3. You need to reset the time and date after the batteries are replaced.
4. If there is any unexpected symbol on the display, please follow the above procedure
to replace the batteries again.
5. Please dispose of batteries according to your local ordinances.
2
3
1
4
1. Appears with the test result either in
mg/dL or in mmol/L.
2. Appears when you recall the memory.
3. Appears when you are in setting mode.
4. Appears for control solution test flag (c).
5. Indicates the meter is ready to take the
blood sample when it flashes.
6. Indicates the battery status.
7. Indicates if audio function is on or off.
8. Indicates current displayed result is an
average.
9. Appears when alarm is on.
10. Month
11. Day
12. Hour
13. Minute
The LCD screen for Power Off – When the meter is off, the date, time, measurement unit, battery
icon and “OFF” will be still on the screen. If the voice is on or the alarm reminder is on, the speak-
er icon and the alarm will be displayed as well.
1
2
3
4
5
The principle of the method
When glucose reacts with the reagents on the test strips, an electrical current is produced,
which is proportional to the glucose concentration in the blood sample.
The glucose concentration is calculated by the meter and based on the current measured.
* Your meter has the back light feature, it will turn on with in every operation to increase
the legibility in operation, helping the user to operate the meter more smoothly.
7. Set the Alarm Reminder – Press C key to toggle between the alarm
reminder setting or no-setting mode. If setting alarm is selected, you
will hear: “Ready to set alarm reminder.” If you see the LCD display a
small flashing icon of alarm clock in the lower left corner with a time
segment display, it means that you are in the alarm setting mode.
(Please see Figure 6-7.) If you see only AL without the icon of the small
alarm clock, it means that you are not in the alarm setting mode. Press
M key to confirm the alarm setting mode. If you select the alarm setting
mode, alarm clock icon will stop flashing and the hour of the time
segment will start flashing. You will hear: “Ready to set alarm remind-
er.” Press C key until the desired alarm hour appears and then press M
key to confirm the hour setting. (If 8 AM is selected, you will hear:
“The hour is eight AM.”) Then the minute segment will start flashing.
Press C key until the desired minute appears on the screen and then
press M key to confirm the minute setting. (If 25 minute is selected, you
will hear: “The minute is twenty five.”) You will see the measuring
unit flashing on the upper left corner of the LCD display. (Please see
Figure 6-8.) Each time you press C key to adjust the hour, you will hear:
“The hour is xxx.” Each time you press the C key to adjust the minute,
you will hear: “The minute is xxx.” At the end of this process, you will
hear: “Alarm reminder set.”
6-7
AM
SET
08:00
6-1
6-2
6-3
AM
SET
AM
SET
12-01~01:01
6-4
AM
SET
6-9
6-10
6-11
6-8
Note: Your meter can show results either in “mg/dL” or “mmol/L” units. Mg/dL is the unit used in the U.S.,
please contact the manufacturer if your meter does not display mg/dL when you turn it on. The factory set
default for the meter is mg/dL, in the event that the meter loses power or the batteries are changed, the factory
set default is mg/dL. It is very important to use the correct unit of measurement to properly manage your
diabetes. If you live in the USA you should use mg/dL; your results will never have a decimal point. If you live
in Canada and some European countries you should use mmol/L; your results will always have a decimal point.
The mg/dL display is on by default.
Note:
1. When you change the date and time backward, you will not change the test results in the meter memory.
2. You need to move through the language, year, month, day, hour, minutes, alarm, unit dEL and VoL to save
the meter settings and turn off the meter .
3. The average readings in the meter memory are calculated from the results obtained during the 7, 14, 28, 60,
and 90 calendar days preceding the current date and time settings.
1. Introduction to the System
2. Appearance and Key functions
3. Safety Information
4. Quick Testing Instructions
5. Installing the battery
6. Settings(Language/Date
/Time/Alarm/Measuring
Unit/Memory Deletion/Voice
Volume)
7. Running a Control Solution Test
8. Blood Glucose Testing
9. Runnig A Blood Glucose Test
10. Recalling the Memory and Viewing
the Average
11. Expected Values Reference
12. Transmitting Results
13. Maintenance of your system
14. Troubleshooting
15. Customer Service
16. Limitations
17. Specifications
18. Warranty Information
1-01~01:01
12-18~01:01
12-18~11:01
12-01~01:25
11-62-0110-0003
V2-SEP21