HOMEAIDE Easy Trak II User manual

Easy Trak II
Blood Glucose Monitoring System
Easy Trak II
User’s Manual
Home Aide

i
Introduction
About the Product
Aboutthe Easy Trak II Meter
About the Easy Trak II TestStrips
Aboutthe Easy Trak II TestStrip VialLabel
Installing/ReplacingtheBattery
Section 1 - The Easy Trak II Blood Glucose Monitoring System
Section2-Setting up theMeter
Setting up theMeter
Settingupthedate,time
Start a test
Control Solution Test
Section 3 - Testing yourBloodGlucose Levels
Testingyour Blood GlucoseLevel
Obtain a bloodsample
Applyingbloodsample to the Easy Trak II TestStrip
1
5
5
7
8
9
1
10
10
10
11
14
19
19
22
23
Easy Trak II
Blood Glucose Monitoring System
User’s manual for Easy Trak II

ii
Section4-MemoryFeature
MemoryStorageand Recalling Results
ExitingtheMemoryMode
Section5-Care and Storage for your System
Section6-Display Messages
Section8-Specifications
Section9-Limitations of the Procedures
Section10-Service and Warranty
27
30
31
32
Section7-Trouble Shooting
43
44
45
46
27
Easy Trak II
Blood Glucose Monitoring System
User’s manual for Easy Trak II

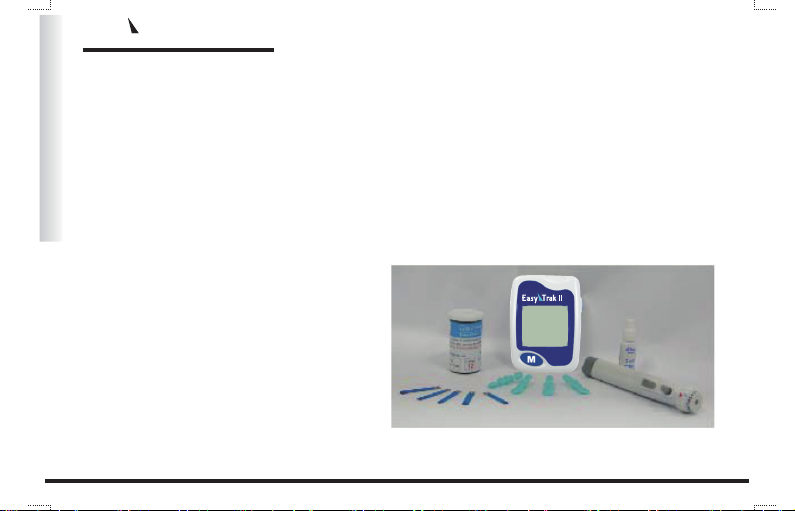
The Easy Trak II BloodGlucose MonitoringSystem is made up of the Easy Trak II meter,
The Easy Trak II BloodGlucoseMonitoringSystem is designedforeaseofuseandtoprovide
accurateresultswhentestingyourownbloodglucoselevelanytime,anywhere.The
Trak II BloodGlucose MonitoringSystem is specificallydesignedfordiabeteshealthcare
professionals,hospitals,andmostimportantly, people withdiabetes.Studiesshowthatkeeping
yourbloodglucoselevelsincontrolmaydecreasethechance of developingmoreserious
diabeticrelatedsymptomssuchaskidneydiseaseandloss of eyesight.
Easy
The Easy Trak II BloodGlucose
Monitoring System processisbased on
bio-electrodesensortechnology. This
uniquedesignallowsyou to useasmall
amount of blood o produce results in
only a shortamount of time.
t
Teststripandcodeinthemeter. The Easy Trak II normalcontrolsolution is partofthetesting
materialstoensurequalitycontrol.Lowandhighcontrolsarealsoavailable.
1
Easy Trak II
Blood Glucose Monitoring System
User’s manual for Easy Trak II

2
Howitworks
Whatitis
As youalreadyknow, thebloodglucosetestingisanimportant factormanagingyour
diabetes.Thetestresultsyougathercanhelpyoudeterminethe effectsofexercise,food
and diabetesmedications.
Designedtobeusedanywhereandanytimeandchosenforitseaseofuseanditsability to
provideaccurateresultsutilizingonlyasmallvolume of bloodwithinasmallamount of
time (5 seconds), the Easy Trak II BloodGlucose MonitoringSystem isaconvenient and
safemonitoringsystem. Withitsuniquedesign,small sizeanditsuseofbio-electrode
sensortechnologythe Easy Trak II systemisthechoiceformanyhealthprofessionals,
hospitalsandpeoplelikeyouwithdiabetes.
The Blood Glucose Monitoring System consists of one Meter, one Lancing Device, One
check strip,Users Manual. Glucose pilot test strips, lancets and control solution can be
included upon request.
Easy Trak II
Blood Glucose Monitoring System
User’s manual for Easy Trak II

IMPORTANT:
To ensure that you get the bestpossible results from your Easy Trak II BloodGlucose
MonitoringSystem,pleasereadtheentiremanualbeforeyoubegintotest and remember
thefollowing:
1. Check both of the codes of the test strips and meter.
The number on the Meter must always match the number on the vial of the Test Strip that
you are using for your test.
2. Use only Easy Trak II Test Strips with the Easy Trak II Meter.
3. Re-checkanyunusual or inconsistentresults.
4. WorkwithyourDoctor or Healthcare Professionalbeforemakinganyadjustment in
medication,diet or exercise(activity)routine.
5. UseonlyCapillaryWholeBloodwhentesting withyour Easy Trak II Meter.
3
Easy Trak II
Blood Glucose Monitoring System
User’s manual for Easy Trak II

4
√ One Easy Trak II
√ One Lancing Device
√ One Carrying Case
Your Easy Trak Blood Glucose Monitoring System contains:
User’s manual for Easy Trak II
Easy Trak II
Blood Glucose Monitoring System

5
Display
Yourtestresultsare
displayedhere.The
large,easy to read
screenguides you
through the test by
using numbersand
symbols.
MButton
S Button
Test well
This is whereyou
insertthe TestStrip
intothe Meter.
Easy Trak II Meter
The M (mode) button is
used to turn the Meter on
and off and select the
memory record
The S (select/set button) is
used to turn the meter on
and off as well as to
switch between mode
and function and set the
test strip code number.
M
Easy Trak II
Blood Glucose Monitoring System
User’s manual for Easy Trak II

6
Code
KETONE
CTL
mg/dL
mmol/L
DAY
AVG
AM
PM
M
Month Day Hour Minutes
Code
Appears withthecode
number of the teststrips
currentlyinuse
KETONE
Appears when a blood
glucosetestresults is
above240mg/dL
Batteries
Appears whenthebattery
is low or must be
replaced
Strip
Appears whenthemeter
is readyforinseringtest
strip
Thermal
Appears whenoperation
temperature is low or
high
CTL
Indicateacontrol
solution test result
Memory
Indicateatest
resultstored in
memory
Blood drop symbol
Thissymboltellsyou
when to applythe
sample
Units of Measurement
Dependinguponhow
the meter is set,either
mg/dL or mmol/Lwill
appearwithtestresult
Error Message
Appears when
error show
Easy Trak II meter display segments
User’s manual for Easy Trak II
Easy Trak II
Blood Glucose Monitoring System

7
The Easy Trak II TestStripsaredesigned to workonlyinconjunction withthe Easy
Trak II Meter. Eachstripcan be usedonlyonce.The Easy Trak II TestStripconsists of
the following parts:
Target Well Area
Located on thefrontofthetest strip,this
well is where you must apply your whole
bloodorglucosecontrolsample.
Confirmation Window
Thisiswhereyoucanconfirm
thatenoughbloodhas been
applied to thetargetarea.
Contactbars
Thisend of the Easy Trak II TestStrip is
insertedintothe TestPort to activatethe
Easy Trak II Meter(fllow the arrow
to indicate the direction).
Easy Trak II Test Strip
User’s manual for Easy Trak II
Easy Trak II
Blood Glucose Monitoring System

Eachvialof Easy Trak II system TestStripshasalabelthatisprintedwiththe
following:
8
User’s manual for Easy Trak II
Easy Trak II
Blood Glucose Monitoring System
Home Aide Diagnostics, Inc.
Control Solution Range
mg/dL mmol/L
70~120 4.0~7.0
DI (01) : 00850632007379
LOT (10) : 0217720
MFG (11) : 200229
EXP (17) : 220228
For testing glucose in whole blood
using the Easy Trak II meter.
Discard 3 months after opening.
Keep closed. Replace cap
immediately after removing strip.
Do not refrigerate.
Store strips in vial only.
Use within 90 days of opening
Control Solution Range

WhentoreplacetheBatteries
Whenthebatteriesarelow, the Meterwillflasha" " warningsignal.Whenthis
displayappears, it is timetoreplacethebatteries.Whenthelow powerwarningsignal
beginstoflash,the Easy Trak II Meterwill need to replace the batteries immediately.
How to Replace the Batteries
1. Fromthe backofthe Meter, gentlyslide
and removethebatterycover.
2.Insert two AAAsize batteries.
3.Slidebatterycoverbackintoplace.
9
0001023
+
ret
eMesoculGdo
olB
Pilot Munual-03 (0402)
User’s manual for Easy Trak II
Easy Trak II
Blood Glucose Monitoring System
Easy Trak II

Setting up the date, time andunit measurement
1.Start with the Meter off. Press S button for 2 seconds.The Meter is now in the setting mode.
2.The Yearsetting willbethe first to appear. Pressand releasethe S buttonuntilthe
correctyearappears. Withthecorrectyear on thedisplay, presstheMbuttonandthe
month setting willappear.
3.Pressand releasetheSbuttonuntilthecorrectmonthappears. Withthecorrectmonth
on thedisplay, pressandreleasethe M buttontobring up thedatesetting.
5.Set the Time. Press and release the S button until the correct hour appears. With the
correct hour on the display, press and release the M button and the minute display
will appear.Press and release the S button until the correct minute appears.
6.Set unit, when finishing setting the minute, press and release the S button to choose
the correct unit of mg/dL or mmol/L. When the correct unit on the display, press the
M button there will be a "ok" showed on the display, then the meter will shut
offautomatically.
4.Pressandreleasethe S buttonuntilthecorrectdateappears. Withthecorrectdate on
thedisplay, pressandreleasetheMbutton to bring up thetimedisplay.
10
User’s manual for Easy Trak II
Easy Trak II
Blood Glucose Monitoring System

11
Start a test
1. Insert a Easy Trak II Test Strip, blue side
of the Test Strip facing up, contact bar
end first, into the test port. Push the test
strip into the test port until it stops.The
Easy Trak II meter will automatically turn
on.
2. The test strip icon " " and "CH" will appear for a
few seconds indicating that the Easy Trak II meter is
functioning properly. Then the code number will display
for 3 seconds.
M
M
Easy Trak II
Blood Glucose Monitoring System
User’s manual for Easy Trak II

12
3. Match the code number on the Easy Trak II Meter
display with the code number on the Easy Trak II
Test Strip vial label. If the codes match, you may
begin testing.
M
CodeCode
User’s manual for Easy Trak II
Easy Trak II
Blood Glucose Monitoring System

13
4. Wait a few seconds until a flashing““ symbol will appear,
M
mg/dL
User’s manual for Easy Trak II
Easy Trak II
Blood Glucose Monitoring System
indicating that the system is ready for testing.

14
The Control Solution is used to check and ensure that the Easy Trak II Meter and Easy
Trak II Test Strip are working together properly and that you are performing the test correctly.
For an accurate reading, check the system with the Easy Trak II Control Solution on a
routine basis.
After coding the Easy Trak II Meter and the display show "mg/dL" or “mmol/L”, press "S"
button to select control solution test mode "CTL", then you can perform the control solution
test. If you decide not to perform a control solution test, press "S" button before the “ “show
up, the "CTL" sign will disappear and meter will go back to blood glucose test mode.
Caution:
Make sure that you have set the Easy Trak II Meter in the Control Solution test mode
"CTL", so the result will not be stored into the memory and incorporated into the 14-
day or 30-day average.
User’s manual for Easy Trak II
Easy Trak II
Blood Glucose Monitoring System

15
Control Solution Test
1. Insert a Easy Trak II Test Strip, blue side face
up, contact bar end first, into the test port.
Easy Trak II Meter will automatically turn on.
2. The test strip icon “ ” and "CH" will appear for a few
seconds indicating that the Easy Trak II Meter is
functioning properly. Then the code number will display for 3
seconds.
The
M
M
User’s manual for Easy Trak II
Easy Trak II
Blood Glucose Monitoring System

16
3. After the symbol "mg/dL" (or “mmol/L”) appears, press and hold the S button until the
Caution: To ensure accurate results, the confirmation window of the Test Strip must be
completely filled with the Control Solution.
M
Code
M
CTL
mg/dL
User’s manual for Easy Trak II
Easy Trak II
Blood Glucose Monitoring System
"CTL" symbol appears. The "CTL" symbol indicates that the Easy Trak II Meter will mark
your current test as a Control Solution test. Now you are ready to apply the Control Solution to
the test strip.

17
4. Insert the Test Strip into the test port then apply a
small drop of Control Solution on to your
fingertip. After, place the drop of Control Solution
onto the target well area.
5. As soon as enough solution has entered the
Confirmation Window, the Easy Trak II Meter
will begin counting down from "5" to "1" and the
Control Solution test result will appear.
Caution:
Please remember that in order to prevent contamination, follow the above instructions for
performing the Control Solution test.
User’s manual for Easy Trak II
Easy Trak II
Blood Glucose Monitoring System
Table of contents
Other HOMEAIDE Blood Glucose Meter manuals