Horizon International EF-354 User manual

IUM203023-05
051213/EF354/05E/HS
Important Information
- This manual is designed to help you to install, operate and maintain the EF-354 Paper
Folder. Please read and understand this manual and keep it in a safe and convenient place.
- Do not operate the EF-354 until you have read and understand the instructions in this
manual.
- Horizon International Inc. shall not be liable for incidental consequential damages result-
ing from: improper or inadequate maintenance by customer, unauthorized modification or
misuse, or operation outside of the environmental specifications for the product.
- Horizon International Inc. pursues a policy of continuing improvement in design and
performance of the product. Therefore, the product design and specifications are subject to
change without prior notice and without our legal obligation.
- All rights are reserved. No part of this manual may be photocopied, reproduced or trans-
lated to another language without the prior written consent of Horizon International Inc.
EF-354
PAPER FOLDER

II
Safety Precautions
- The term WARNING indicates a potentially hazardous situation which, if not avoided,
could result in death or serious injury.
- The term CAUTION indicates a potentially hazardous situation which, if not avoided,
may result in damage to the machine. It may also be used to alert against unsafe practices.
- Please read and understand all safety instructions which include the terms WARNING
and CAUTION. If these safety instructions are ignored, personal injury may result.
- Horizon International Inc. cannot anticipate every possible situation that might involve
a potential hazard. Therefore, the instructions in this manual and the warning labels on the
machine are not all-inclusive.
- All equipment shall be locked out or tagged out to protect against accidental or inad-
vertent operation when such operation could cause injury to personnel. Do not attempt to
operate any switch, valve, or other energy isolating device which has been locked or
tagged out.
- Do not operate the machine when any covers are removed.
- Some of the drawings in this manual show the machine uncovered to assist in explain-
ing the details inside the machine. Never operate the machine with the covers removed.
Warnings for machine operation
- The manual handle rotates during the folding operation. Keep your hands and fingers
away from the rotating manual handle.
- Turn off the power switch before turning the manual handle by hand. If the power is
left on, the manual handle may move without warning, causing severe personal injury.

III
CONTENTS
Important Information ............................................................................................ I
Safety Precautions .................................................................................................... II
1. Before You Begin ..................................................................... 1
1-1 Machine Features ............................................................................................... 1
1-2 Machine Descriptions ........................................................................................ 2
1-2-1 Main Part of Machine ..................................................................................... 2
1-2-2 Fold Section.................................................................................................... 3
1-2-3 Feed Section ................................................................................................... 4
1-2-4 Delivery Section .............................................................................................5
1-2-5 Blower / Vacuum Pump ................................................................................. 7
1-2-6 Control Panel .................................................................................................. 8
2. Operating Procedures ............................................................. 11
2-1 Setup Procedure ................................................................................................. 11
2-2 Check the Fold Pattern ..................................................................................... 12
2-3 Setup Details ....................................................................................................... 14
2-4 Adjusting the Feeding Operation .....................................................................20
2-5 Setting the Control Panel .................................................................................. 22
2-6 Setting the Operation Mode .............................................................................. 23
2-7 Start the Folding Operation .............................................................................. 25
2-8 Optional ED-354 Standing Delivery ................................................................. 26
2-9 Check the Fold Pattern (KTU-35 Cross Folder) ............................................. 27
2-10 Setting the KTU-35 Cross Folder ................................................................... 28
2-11 When Not Using the KTU-35 Cross Folder ...................................................37
3. Trouble Shooting .................................................................... 39
3-1 Problems During Folding .................................................................................. 39
3-2 Problems With Fold Quality ............................................................................. 42
3-3 Problems Using Standing Delivery ................................................................... 44

IV
5. Installation................................................................................ 59
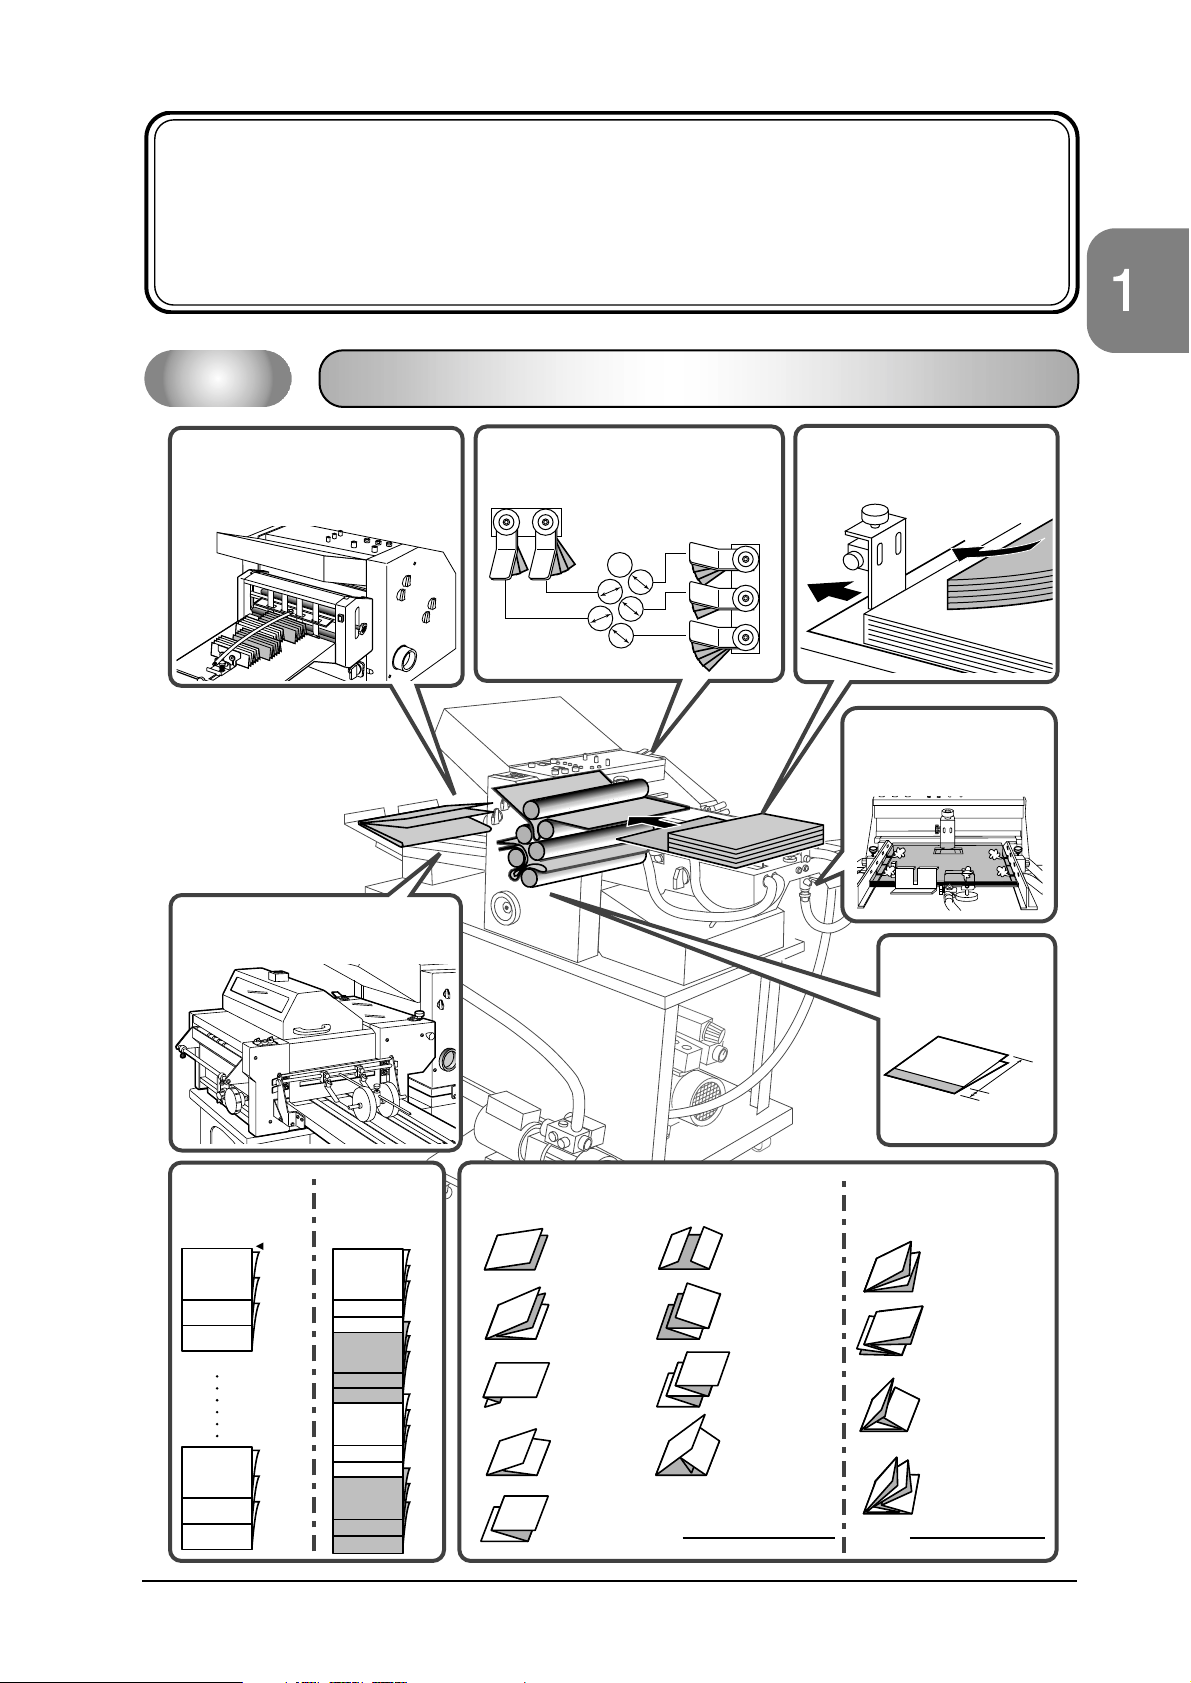
5-1 Installation Overview for the EF-354 ..............................................................59
5-2 Installing the Blower and Vacuum Pump .......................................................60
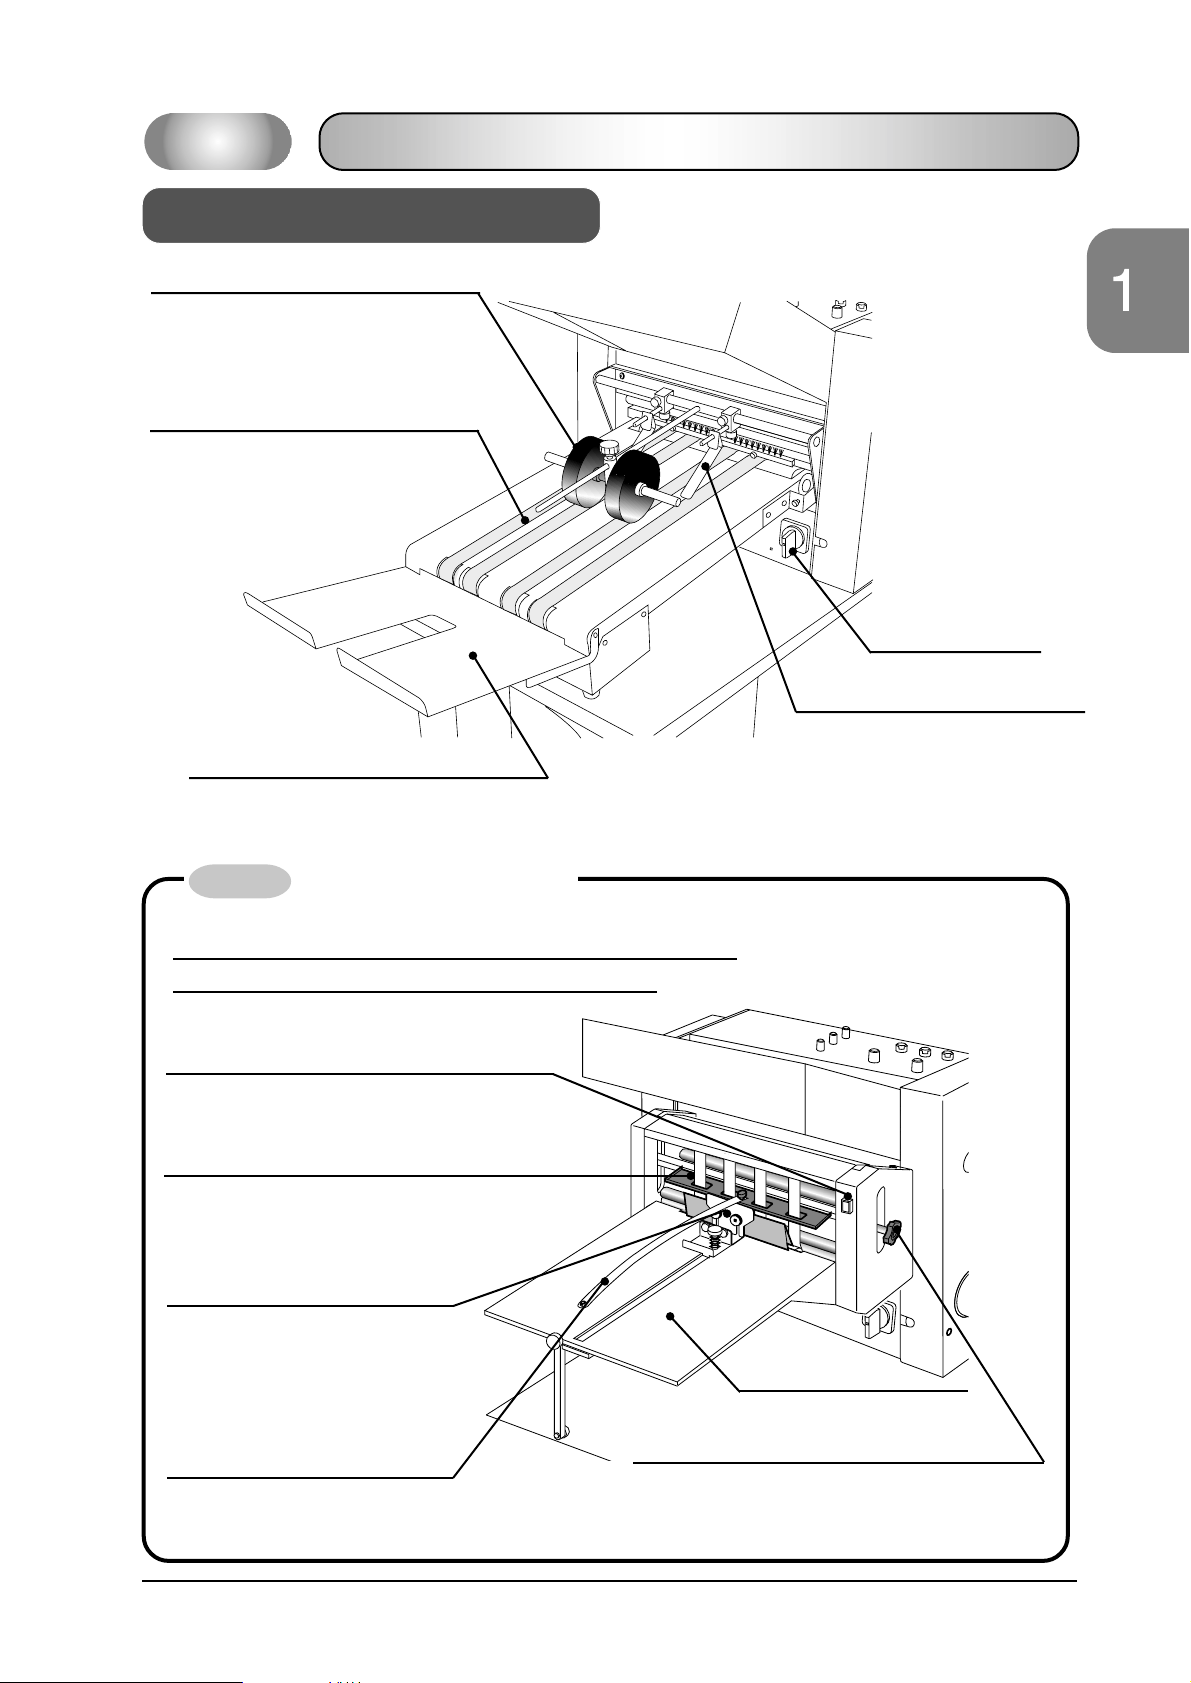
5-3 Installing the Delivery Section ..........................................................................61
5-4 Installing the Feed Section ................................................................................63
5-5 Installing the Buckle Plates ............................................................................... 64
5-6 Checking the Pump Rotation Direction........................................................... 65
5-7 Installing the Optional Standing Delivery ....................................................... 67
5-8 Installing the Optional Cross Folder................................................................69
6. Additional Information ........................................................... 73
6-1 Specifications ......................................................................................................73
6-2 Accessories ..........................................................................................................74
6-3 Accessories for Optional ED-354 Standing Delivery ......................................77
6-4 Accessories for Optional KTU-35 Cross Folder .............................................78
6-5 Index....................................................................................................................80
4. Maintenance ............................................................................. 55
4-1 Cleaning the Counter Sensor ............................................................................55
4-2 Cleaning the Vacuum Pump Filter ..................................................................56
4-3 Cleaning the Sheet Sensor on the Optional KTU-35 ......................................57
4-4 Replacing the Battery ........................................................................................58
3-4 Problems During Folding When Using Cross Folder..................................... 45
3-5 Problems With Fold Quality When Using Cross Folder ................................46
3-6 Other Problem ...................................................................................................46
3-7 Adjusting a Clearance between Buckle and Fold Roller ...............................48
3-8 Removing a Sheet Jam ......................................................................................49
3-9 Resetting the Circuit Breakers ......................................................................... 50
3-10 Opening the Soundproof Buckle Cover (If Installed) ..................................51
3-11 Removing a Sheet Jam When Using the KTU-35 ......................................... 52
3-12 Resetting the Motor When Using the KTU-35 ..............................................53

1
Before You Begin
1. Before You Begin
Machine Features
1-1 Machine Features
This chapter explains the futures of this machine, and lists the parts descriptions
and functions.
4 2
1 3 5
48
49
50
3
1
2
2
3
1
2
3
1
2
1
2
3
3
1
2
Max.330 mm
(12.9")
Min.20mm
(0.8")
Stop
Folding
Single Fold Gate Fold 8-Page,
Right Angle
12-Page ,
Letter Fold,
Accordion
12-Page ,
Letter Fold,
Heads Out
(Direct Mail Fold)
16-Page Folder,
Heads Out
Double Parallel
Fold
Zig-Zag Fold
(four panels)
Short Fold Zig-Zag Fold
(five panels)
Letter Fold
Roll Fold
(three times)
Accordion Fold
And other parallel folds And other cross folds
Small folded sheets can be stacked
vertically by the optional standing
delivery. The stack can also be offset.
Cross folding can be done by using
the optional KTU-35 Cross Folder.
The folding
operation can be
stopped after a
predetermined
number.
A stack offset can
be performed after
a pre-determined
number.
The folder has four buckle plate, so various kinds
of parallel folding can be performed.
With the optional KTU-
35 Cross Folder, cross
folding is available.
The gaps between the fold rollers can be
adjusted easily.
The sheets are fed from the
bottom. More sheets can be loaded
while the machine is folding.
The vacuum feed
mechanism allows the unit
to feed coated stock.
The minimum folding
length is 20 mm
(0.8").

2
Blower/ Vacuum Pump
The 115 V unit uses a combined blower/
pump. The 230 V unit has a separate
blower and pump.
(Page 7)
Fold Section 1
The first and third buckle plates are mounted inside this
section. Each buckle plate has an adjustable folding
mechanism.
Control Panel
The control switches, buttons, adjusting knobs
and counters are mounted on this panel.
(Page 8 and 9)
Feed Section
The bottom sheet of the stack is fed
into the fold sections.
Delivery Section
The ejected sheets are
conveyed and stacked on the
receiving tray.
(When using the optional
standing stacking delivery
unit, replace this section with
the optional conveyor.
Casters
Casters with stoppers are provided
on the operator’s side of the machine.
Power Switch
Fold Section 2
The second and fourth buckle
plates are mounted here.
1-2 Machine Descriptions
1-2-1 Main Part of Machine

3
Before You Begin
Soundproof Buckle Cover
This cover reduces the noise while the
machine is running.
Stopper 1 Angle Adjust Locking Knob
Stopper 1 Fine Adjusting Knob
This screw can be used to make a fine
adjustment on the stopper 1.
Buckle Locking Knob
These knobs are used to lock the buckles.
For each buckle, these are locking knobs on
the front and rear of the machine.
Stopper 1 Angle Adjusting Knob
First Buckle Plate
This buckle has a stopper which sets the folding
position for the first fold. If this will not be used,
set the deflector.
Stopper 1
This stopper sets the position of the
first fold.
Second Buckle Plate
Stopper 2
Manual Knob
The fold rollers can be rotated using
this knob. This knob can also be used
to remove jammed sheets.
WARNING
Turn off the power switch before
turning the manual knob. If the ma-
chine starts without warning, the knob
can cause severe personal injury.
Stopper 2 Fine Adjusting Knob
Stopper 2 Angle Adjusting Knob
Stopper 2 Angle Adjust Locking Knob
Stopper 1 Locking Screw
This screw can be used to make
a rough setting for stopper 1.
Fourth Buckle Plate
Third Buckle Plate
Stopper 2 Locking Screw
First Buckle Plate (Upper)/ Third Buckle Plate (Lower)
Gap Adjusting Levers
These levers are used to
adjust the gaps between the
folding rollers. For each
roller, there are levers on
both the front and rear of
the machine.
Front Cover
Second Buckle Plate (Upper)/
Fourth Buckle Plate (Lower)
Machine Descriptions (Fold Section)
1-2 Machine Descriptions
1-2-2 Fold Section
Rear Cover

4
Feed Guide
These guides are used to
help move the sheets into
the fold sections.
Feed Table
The sheets are stacked
on this table.
Side Blower Air Slits
These slits are used to separate the
sheets and make the feeding operation
easier.
Rear Blower Air Nozzle
This nozzle is used to blow air
from the back of the stack. Use
this when the side blower air
slits do not provide enough air.
Back Stop
Set this stop at the back of the
stack of sheets to prevent the sheets
from shifting to the rear.
Side Blower Air Valves
These are used to adjust the amount of
side blower air.
Rear Blower Air Valve
This is used to adjust the amount
of rear blower air.
Gate Plate Positioning Knob
This knob is used to adjust the gate
plate position to match the sheet weight.
Gate Plate
This is a register guide used to position
the sheets on the feed table. It also
prevents double feeding.
Feed Rotor
This rotor provides vacuum to
the bottom sheet in the stack
and feeds it into the fold
sections.
Feed Guide Locking Knob
These knobs are used to lock
the feed guides.
Feed Guide Angle Adjusting Plate Locking Knob
This is used to lock the feed guide angle
adjust plate.
Vacuum Angle Adjusting Lever
This lever is used to adjust the vacuum angle of
the feed rotor to match the sheet weight. The
locking knob is located underneath the lever.
Gate Plate Up/Down Adjusting Knob
This knob is used to adjust the gap between
the gate plate and feed rotor to match the
sheet thickness.
1-2 Machine Descriptions
1-2-3 Feed Section

5
Before You Begin
Standing Delivery Shift Button
This button is used to move this unit to the side.
Holding Guide
This guide is used to stabilize the
stack of folded sheets.
Sliding Back Stop
This stop is used to hold up the
folded sheets.
As the number of folded sheets
increases, this stop moves backward.
Top Guide
This guide is used to hold up the ejected
sheets. Set it to the height of the folded
sheets.
Delivery Guides
These guides are set according to
the sheet weight and folding
pattern to eject the sheets
smoothly.
Delivery Rollers
These rollers are set to match the folded
sheet. Change the set position according
to the fold type and sheet size.
Conveyor Belts
These belts drive the delivery rollers
and transport the ejected sheets to the
receiving tray. (The belt speed can be
adjusted.)
Receiving Tray
The ejected sheets are stacked on this tray.
Power Switch
1-2 Machine Descriptions
1-2-4 Delivery Section
Locking Knobs
These knobs are used to lock the position of the top
guide. Knobs are provided on both the front and rear
sides of the machine.
Delivery Tray
The folded sheets are
stacked here.
Machine Descriptions (Delivery Section)
Option ED-354 Standing Delivery
The ED-354 Standing Delivery unit can be used with sheets
with a finished size of 0.8” - 4.1” (20 mm -104 mm).

6
6 5 4 3 2 1 0 1 2 3 4 5 6
01
Top and Bottom Guides
These guides are positioned
above and below the sheets
to help them to move
smoothly.
Option KTU-35 Cross Folder
1-2 Machine Descriptions
Buckle
The sheet makes the second cross fold.
Gap Adjusting Levers
These levers adjust the gap between
the scoring rollers.
Conveyor
The cross folded sheets are
delivered to this conveyor.
Manual Knob
The fold rollers can be rotated
using this knob. This knob can
also be used to remove any
jammed sheets.
KTU Positioning Knob
The position of the KTU
unit (for the first cross fold)
can be changed using this
knob. The inner knob is used
to lock the positioning knob.
Stoppers
These stoppers stop and hold
the sheets during cross folding.
Fold Knife
This knife presses the sheet
downward and transports it
to the fold roller.
Scoring Blades
These blades make the scoring lines on
the sheet if the sheet is difficult to fold.
Sheet Guides
These guides are used to guide the
sheets into the fold section.
Knife Delay Switch
After the sensor detects
a sheet, the delay before
the knife operation is
set here.
The KTU-35 Cross Folder can be used to cross-fold sheets which already have parallel folds
made by the EF-354. After this unit has been installed, the EF-354 can only do parallel folding.
Gap Adjusting Lever
These levers adjust the gap between
the fold rollers.
Knife Job Button
Knife ON/OFF Switch
Turn the sensor ON/OFF using this
knob.
Locking Knob
This knob locks the
scoring shaft lever.
Scoring Shaft Lever

7
Before You Begin
1-2 Machine Descriptions
1-2-5 Blower / Vacuum Pump
PRESSURE
Vacuum Gauge
About 30 KPa
Vacuum Hose
Vacuum Regulator
This regulator is used to
adjust the vacuum.
Pressure Gauge
Compressed Air Hose
Blower Air Hose
Vacuum Hose
Combined unit used for 115 V
Separate units used for 230 V
Vacuum Pump Blower
Pressure Regulator
This regulator is used to adjust the
air pressure.
Machine Descriptions (Blower / Vacuum Pump)

8
PAPER FOLDER
EF-354
1
SL
5
24
1
06
2
3
4
5
1
SL
5
24
1
SL
5
24
1
2
3
4
5
6
7
8
9
10
11
12
13
14
15
16
17
18
19
20
21
22
23
24
25
26
27
28
29
30
31
32
33
34
35
36
123
123
C
1
06
2
3
4
5
1-2 Machine Descriptions
1-2-6 Control Panel 1
Test Feed Button
When this button is pressed while the motor is
running, one sheet will be fed.
Roller/ Feed Start Button
This button is used to start feeding the sheets.
Press this button once to start the motor, the
roller, delivery conveyor, and the pump. Press
this button again to start the feeding opera-
tion.
Roller/Feed Stop Button
When this button is pressed once, the machine
stops feeding the sheets. Press this button
again to stop the motor, the roller, delivery
conveyor and the pump.
Total Counter Clear Button
The total counter can be reset using this button.
Preset Number Save Button
This button is used to save the preset number. The
preset number can be viewed again by pressing this
button even if the machine has stopped during the
folding operation because it reached the preset stop
number.
Total Counter
This indicates the total number of folded sheets.
Preset /Number Set Button
These button are used to set the preset number.
The buttons set the units, tens, hundreds, and
thousands digit from the right respectively.
Each number can be changed by pressing the
correct button.
Preset Counter
This indicates the number of sheets to be folded in
preset stop mode or preset pause mode.
Mode Lamp
The LED for the selected mode is lighted. When the
continuous folding mode is selected, both the preset
stop and preset pause LEDs go out.
Mode Select Button
This button is used to change the mode for continu-
ous folding, preset stop, and the preset pause
counter.
Scale
Pump Switch
When this switch is turned on
while the feed rotor is turning, the
blower provides air to the feed
table.

9
Before You Begin
1-2 Machine Descriptions
1-2-6 Control Panel 2
PAPER FOLDER
EF-354
1
SL
5
24
1
06
2
3
4
5
1
SL
5
24
1
SL
5
24
1
2
3
4
5
6
7
8
9
10
11
12
13
14
15
16
17
18
19
20
21
22
23
24
25
26
27
28
29
30
31
32
33
34
35
36
123
123
C
1
06
2
3
4
5
Feed Sensor LED
This LED lights each time a sheet passes through
the feed section.
Pause Time Knob
This knob is used to adjust the pause time
between one batch of sheets and the next
batch when the preset pause mode is selected.
Vacuum Time Knob
This knob is used to adjust the vacuum time
for the feed rotor. When the knob is turned all
of the way to the right, the LED blinks and the
feed rotor provides vacuum continuously.
Feed Interval Knob
This knob is used to adjust the feed interval.
Feed Rotor Vacuum LED
This LED lights while the feed rotor is
providing vacuum to sheet, and blinks
when the continuous folding mode is
selected.
Pause LED
This LED lights while the machine is
paused, and also after a preset stop.
Fold Speed Knob
This knob is used to adjust the rotating speed of the fold rollers.
Conveyor Speed Adjusting Knob
This knob is used to adjust the conveyor belt speed.
Conveyor Switch
This switch is used to change the operating mode of the conveyor.
When is selected, the conveyor operates continuously.
When is selected, the conveyor operates only after a sheet
has passed through the feed sensor, and the machine has counted
through the pause delay.
Machine Descriptions (Control Panel 2)

10
This page intentionally left blank.

11
Operating Procedures
1. Check the fold pattern (p.12)
Set each part
2. Setting the buckle plate (p.14)
3. Setting the gap adjusting levers (p.15)
4. Setting the gate plate (p.16)
5. Setting the feed table (p.16)
10. Start the folding operation (p.25)
*Offset the sheets using the ED-354 standing
delivery (P.26)
*Cross folding with the KTU-35 cross folder
(P.27)
9. Selecting the operation mode (p.23)
Setup Procedure
2. Operating Procedures
This chapter explains how to set and adjust each part before operation,
and lists the operation procedures. Refer to this chapter when changing
the sheets, fold pattern, or the operation mode.
WARNING
- There are rotating rollers inside this
unit. Be careful not to catch your
hair or clothing. Otherwise, the
machine can cause severe personal
injury.
- Keep your hands and fingers away
from moving parts of the machine.
Otherwise, the machine can cause
severe personal injury.
2-1 Setup Procedure
6. Setting the delivery section (p.18)
7. Adjusting the feeding operation (p.20)
8. Setting the control panel (p.22)
10
2
6
9
4
7
5
3
8
(4)
Number of sheet to pinch
(1) Fold Type 1
1
1/2
of the sheet
2
21/2
11/2
21/4
11/2
31/4
345
11222
12222
12
244
14
244
(2) Buckle Plate
Number
(3) Stopper Position
way
Single Fold
Double Parallel Fold
11/3
31/3
12/3
21/3
13/4
21/4
41/4
11314
12133
11333
Letter Fold
Roll Fold (three times)
1
Two ways to fold ( and )
12
1
2
2
2
2
1
1
11/3
21/3
12/3
31/3
11
233
13
133
Accordion Fold
1
Two ways to fold ( and )
12
Two ways to fold ( and )
12
Two ways to fold ( and )
12
One way to fold ( )
1
1
Power Switch

12
2-2 Check the Fold Pattern
Check the settings by referring to the table.
(1) Determine the fold pattern.
- The EF-354 can do parallel folding.
- The EF-354 can create various folding patterns by setting the buckle plate and gap adjusting levers in
various ways, although the table below shows only the general folding patterns.
(2) Determine which buckle plate to use.
(3) Check the position of the stopper on each buckle plate.
- The table shows the stopper position in relation to the sheet length.
(4) Check the number of the sheets to set in the gap adjusting levers.
- After checking the setup table, go to the sections on “Setting the Buckle Plates” and “Setting the Gap
Adjusting Levers,” and perform the setup operations.
The following table indicates the setting of buckle plate and gap adjusting lever according
to the fold pattern. Check this table before setting the buckle plates and gap adjusting
levers. See section 2-3, “Setup Details.”
- The position of each fold depends on the position of the stopper.
- The fold pattern depends on the buckle plates being used.
- The gap between any pair of fold rollers can be adjusted using
the gap adjusting levers.
(4) Number of sheets
(1) Fold Pattern 1
1
1/2
of the sheet
2
2 1/2
1 1/2
21/4
1 1/2
3 1/4
345
11222
12222
12
244
14
244
(2)
Buckle
Plate
Number
(3) Stopper Position
Orien-
tation
Single Fold
Double Parallel Fold
1 1/3
3 1/3
1 2/3
2 1/3
1 3/4
2 1/4
4 1/4
11314
12133
11333
Letter Fold
Roll Fold (three times)
1
Two ways to fold ( or )
12
1
2
2
2
2
1
1
1 1/3
2 1/3
1 2/3
3 1/3
11
233
13
133
Accordion Fold
1
Two ways to fold ( or )
12
Two ways to fold ( or )
12
Two ways to fold ( or )
12
One way to fold ( )
1

13
Operating Procedures
2-2 Check the Fold Pattern
Check the Fold Pattern
11/5
2 1/5
3 1/5
4 1/5
11
115
Zig-Zag Fold (five panels)
Short Fold 1 1/4
2 1/4
1 3/4
3 1/4
1 1/4
3 1/2
2 1/4
4 1/2
113
33
1233
1
Gate Fold 112 22
11222
1
1
2
1
2
12345
1
2 1/4
31/4
11144
Zig-Zag Fold (four panels)
1
1
1 2
12
1
Two ways to fold ( or )
(2)
(3) Stopper Position
(1) Fold Pattern
1/4
of the sheet
One way to fold ( )
One way to fold ( )
(4) Number of sheets
Buckle
Plate
Number
Orien-
tation

14
5) Set the stopper for each buckle plate which is
used for the folding operation.
- Set the stopper at the position calculated in step
2.
- Move the stopper after loosening the stopper
locking screw. The stopper can be micro-
adjusted using the stopper fine adjusting knob.
- There is a scale on the buckle plate. Use the
scale when positioning the buckle stopper.
2-3 Setup Details
Stopper Locking
Screw
1
SL
2
3
4
5
PAPER FOLDER
EF-354
EF-354
1
SL
2
3
4
5
1
2
3
4
5
6
7
8
9
10
11
12
13
14
15
16
17
18
19
20
21
22
23
24
25
26
27
28
29
30
31
32
1
SL
5
24
1
SL
5
24
1
SL
5
24
123
C
Scale First Buckle Plate
Third Buckle Plate
First and Third Second and Fourth
Scale
Stopper Fine
Adjusting
Knob
Second Buckle Plate
Fourth Buckle Plate
Setting the buckle plates
See the table in section 2-2 to determine
which buckle plates to use, and where to set
the stoppers.
Set each buckle stopper.
1) Measure the sheet length.
- Use the scale next to the panel.
2) Calculate the stopper position.
- See the tables on pages 12 and 13 to calcu-
late the stopper position.
3) Open the soundproof buckle plate covers.
In order to remove the fourth buckle plate, remove the
second buckle plate first.
4) Pull out the buckle plate.
- Each buckle plate can be pulled out by
loosening the locking knobs on the front and
rear covers.
Soundproof
Buckle Plate
Covers
When the optional standing delivery unit is installed, this
may prevent the cover from opening and closing. Move
the standing delivery unit to the operator’s side of the
machine. Refer to page 51.

15
Operating Procedures
2-3 Setup Details
Gap Adjusting Levers
Front Cover
Rear Cover
Sheet
Deflector
Knob
Allen Wrench
Setup Details
Setting the gap adjusting levers
Pinch the correct number of sheets under
each gap adjust lever. See column 4 in the
table on pages 12 and 13.
Set the gap adjusting levers.
1) Pinch the sheets using the gap adjusting
levers, referring to the tables on pages 12 and
13.
- Use a sheet which is identical with the sheet
being folded.
- Each roller has gap adjusting levers on the
front and rear covers.
Insert the sheets completely to the end of each gap
adjusting lever.
- There is a hexagonal hole on the stopper locking
screw. Tighten this using an Allen wrench to set the
stopper.
- If the stopper is in a position which makes it difficult
to move, remove the buckle plate from the main
body and adjust the stopper position.
Stopper Locking Screw
6) Attach a deflector onto any buckle plate
which is not used for the folding operation.
- Install the deflector on the end of the buckle
plate.
- Tighten the knob to lock the deflector.
Install the buckle plate in the machine.
- Attach the buckle plate by tightening the
locking knobs on the front and rear covers.
- The first and second buckle plate can be exchanged.
The third and fourth buckle plates can also be
exchanged.
- Install the fourth buckle plate before installing the
second buckle plate.

16
2-3 Setup Details
Up
Down
Feed Rotor
Gate Plate
Side Locking Screw
[Side View- Cross Section]
Up/Down Adjusting Knob
Two Sheets
Feed Rotor
Gate Plate
[Side View- Cross Section]
Feed Guides
Locking Knob
Setting the gate plate
The gate plate allows the machine to feed
only one sheet at a time. In order to prevent
double feeding or misfeeding, adjust the gate
plate properly.
Set the gate plate.
1) Adjust the gate plate.
- Loosen the slide locking screw and move the
gate plate to the left for thin sheets, or to the
right for thick sheets.
- Set the gate plate to the left side of the center
of the feed rotor. (See the drawing below.)
Do not move the gate plate too much to the left. Other-
wise, the sheet might be creased by the edge of the gate
plate.
2) Adjust the height of the gate plate.
- Insert two sheets between the gate plate and
the feed rotor.
- Turn the up/down adjusting knob to set the
gate plate so that two sheets can be pulled
out tightly, but a single sheet can be pulled
smoothly.
Extension Table
Setting the feed table
Load the sheets on the feed table.
Load the sheets on the feed table and set
the feed guides to the edges of the
sheets.
- Put the sheets in the center of the table using
the scale.
- Set the feed guides so that the feed rotor comes
to the center of the sheets. Loosen the locking
knob to move the feed guide.
- Set each feed guide so that the gap between the
feed guide and the sheets is 1 mm (0.04”) or
less. Check that the sheets have no play and
move smoothly in the directions shown by the
arrows in the figure below.
If you are using sheets which are longer than the feed
table, attach the extension table.
Table of contents
Other Horizon International Folding Machine manuals