Horst Welding HLA SNOW SINGLESHOT HS100 User manual

OPERATOR’S MANUAL
Manual #HS100112 230920
CAUTION
!
Operational Hazard
Personal Protection Equipment
(PPE) is required when operating
or maintaining this machine.
SNL00001
!
Do not attempt to operate the equipment without thoroughly
reviewing this manual for safe and proper operation.
Keep this manual with the machine at all times
HORST WELDING
8082 Rd 129
Listowel, ON N4W 3G8
Canada
519-291-4162
1-866-567-4162
Fax 1-519-291-5388
www.horstwelding.com

Notes.
Page 2

Horst Welding Page 3
Record your product information for future reference:
Model Number: ______________
Serial Number: ______________
In Service Date: _____________
Sold By: ___________________
Contents
NOTES ................................................................................................................ 2
INTRODUCTION .................................................................................................. 4
REFERANCES ....................................................................................................... 5
GENERAL SAFETY PRECAUTIONS ....................................................................... 5
PRODUCT CONFIGURATION............................................................................... 7
OPERATION AND TRANSPORTATION ON PUBLIC ROADS AND AREAS .............. 11
MOUNTING ........................................................................................................ 11
SETUP INSTRUCTIONS ........................................................................................ 12
MATERIAL DISTRIBUTION................................................................................... 14
USING THE BROADCAST SPREADER ................................................................... 16
OPERATION ........................................................................................................ 16
MAINTENANCE ................................................................................................... 17
STORAGE ............................................................................................................ 17
PARTS ................................................................................................................. 17
WARRANTY ........................................................................................................ 18

Horst Welding Page 4
INTRODUCTION
Thank you for choosing a HLA Broadcast Spreader.
We feel confident that this equipment will meet your expectations in workmanship,
reliability and performance when used as designed. Thismanual isto assist you with
the safe operation of the HLA HS Series Broadcast Spreader.
Any person who will be assembling, attaching,operating, maintaining, or operating this
product and the prime mover to which it isattached, isrequired to read and completely
understand the information and instructions contained in this manual and that of the
prime mover.
Always obtain further assistance by contacting the dealer from which this product was
purchased or by contacting HLA at the telephone number or address below.
Keep this manual available for reference whenever this product isbeing handled or
used and we recommend that itis reviewed periodically and before seasonal use.
Provide this manual to any new owners and/or operators and ensure they fully
understand the safe operation of this equipment before it isplaced in service.
Replacement copies of this manual are available for downloading at:
www.horstwelding.com
“Having only one ATTACHMENT islike having only one DRILL BIT”
HLA Attachments
8082 Rd. 129
Listowel,ON, N4W 3G9
Canada
1-866-567-4162
www.horstwelding.com
The illustrations and information contained within this manual were current at the
time of publication. Under our policy of continuous improvement, we reserve the
right to change specifications and designs without prior notice. The illustrations do
not necessarily show the standard version of product offered by HLA.

Horst Welding Page 6
GENERAL SAFETY PRECAUTIONS
Careful operation is the best assurance against accidents. Itisthe owner’s responsibility
to make surethat alloperators read and understand this manual and follow the
recommendations, cautions and warnings before connecting to a prime mover and
operating the equipment.
Familiarize yourself with all controls and know how to quickly stop the equipment and all
rotating parts in the case of an emergency.
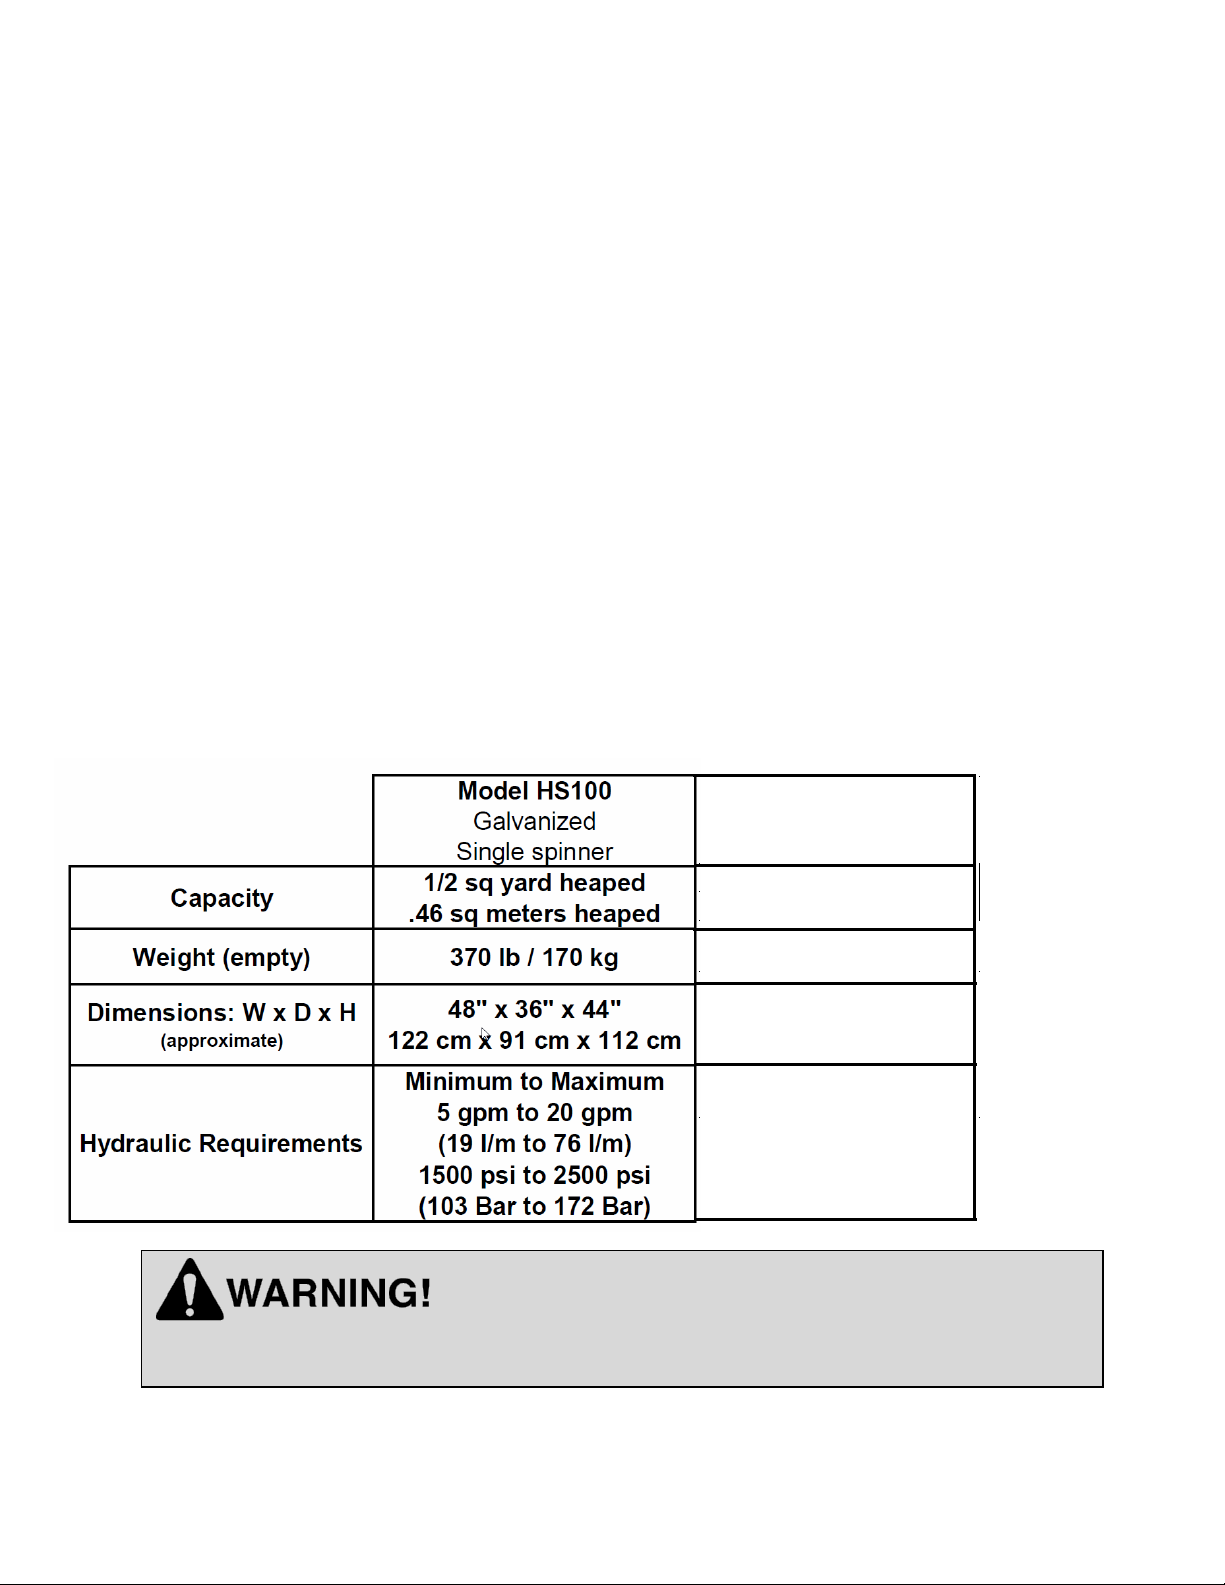
Depending upon the material used,the casting range of the HS100 is 3 ft. to 40 ft., (1 m
to 18 m) and the HS200 is 6 ft. to 60 ft., (2 m to 18 m) from the spreader. The limitations
or restrictions that govern the spreading radius may be dictated by either the material to
be dispersed and / or the surroundings. Keep a minimum of 75 ft (23 m) away from
bystanders while dispensing product.
Never let a child or an untrained person operate equipment.
DO NOT MODIFY THE BROADCAST SPREADER OR PRIME MOVER
Modifications may weaken the integrity of the Broadcast Spreader and may impair
the operation, safety, and performance of the product. When making repairs, only
qualified technicians using the manufacturer’s genuine parts, following authorized
instructions shall attempt the repair. Never modify any ROPS (Roll Over Protection
Structure) or FOPS (Falling Object Protective Structure) equipment or other safety
device or remove guarding. Any modifications must be sanctioned in writing by an
authorized representative of the manufacturer.
The following references are used throughout this Operator’s and Parts Manual:
Front or Rear
Mounted
Orientation that is determined in relation to the operator of the
equipment when seated in the normal operating position of the
prime mover
Prime Mover The engine-driven machine to which this product is attached
Right, Left, Front,
Rear
Orientation that is determined in relation to the operator of the
equipment when seated in the normal operating position. Unless
otherwise noted
Attachment,
Implement
Refers to the Broadcast Spreader whether attached or separate
from the prime mover
Equipment Refers to the Implement and / or prime mover whether separate or
connected
WARNING,
CAUTION,
IMPORTANT
A notice that relates to the safe and efficient operation of the
Broadcast Spreader or prime mover. Read and understand the
reference before attaching or operating the Broadcast Spreader or
the prime mover
REFERANCES
Page 5

Horst Welding Page 6
Never use your hands to clear a clogged agitator. Never allow anyone to
reach into the hopper, force objects (i.e. bars, poles, etc.) into the
agitator or spinner, or otherwise come in contact with an agitator or
spinner or with a non-rotating agitator or spinner. Rotating parts can
crush and/or dismember. Keep everyone clear of the spreader until the
prime mover engine is off and the hydraulic pressure has been relieved.
MAINTAIN AND REPAIR EQUIPMENT SAFELY
•Do not wear loose clothing, or any accessories that can catch in moving parts
•If you have long hair, cover or secure it so that it does not become entangled in
the equipment
•Work on a level surface in a well-lit area.
•Always lower raised equipment to the ground or securely support it to prevent
unintentional movement
•Remove and retain the prime mover’s ignition key
•Use the correct tool for the job at hand. Make sure they are in good condition
for the task required
•Wear the protective equipment specified by the tool manufacturer
•Use care when working on hydraulic systems and understand how to check for
and release trapped hydraulic pressure
WELDING GALVANIZED MATERIAL
•Only qualified welders should attempt a weld repair on a galvanized component
•Always ensure proper ventilation, avoid direct contact with zinc oxide smoke,
and proper pre-welding preparation work is required
STAY CLEAR OF ROTATING OBJECTS
Keep hands, feet and clothing away from power driven rotating parts.

Horst Welding Page 7
PRODUCT CONFIGURATION
FEATURES
HLA HS100 durable all-season broadcast spreader is ideal for grass seed, fertilizer,
sand & salt and has a½ sq. yd. hopper capacity.
Depending upon the material, the HS100 casting range is 3 ft. to 40 ft., (1 mto 9m)
DQGWKH+6LVIWWRIWPWRP and has spinner speed control allowing
the operator to control distribution for maximum effectiveness.
The application rates are controlled through a manual adjustment flow control gate,
while the standard in-hopper agitator ensures even material flow to the spinner.
The galvanized ½yd HS100 model spreader has an optionally available 36” (91,4 cm)
wide drop shield to focus distribution to where it isneeded most, expanding the
seasonal use and making it ideal for winter sidewalk maintenance.
In addition, for the HS100 there is an optional hydraulic shut-off gate available. The
shut off engages when the spinner is turned off, useful for containing free flowing fine
material that continues to flow through the gate when the spinner is shut off.
When mounted to a loader, its innovative design allows ittobe self-loaded,saving time
and money. To match to existing equipment, the spreader is available with a 3 Point
Hitch and can also be equipped with the optional hydraulic self-load feature.
Exceeding the recommended specifications can result in damage to the equipment and
will void all HLA warranties.
Model HS200
Galvanized
Twin spinners
1-1/2 sq yard heaped
1.2 sq meters heaped
1300 lb / 590 kgs
86" w x 42" d x 60" h
218 cm x 107 cm x 152 cm
Minimum to Maximum
5 gpm to20 gpm
(19l/m to76 l/m)
1500 psi to 2500 psi
(103 Bar to 172 Bar)

SPINNER SPEED CONTROL
Speed of the spinner rotation is controlled by the
variable flow control.
The operator can adjust the feeding speed
appropriate for the operating conditions.
A scale on the face of the valve is numbered
from 0 to 10 (0 to 100%).
To adjust the feed:
•Loosen the thumb screw
•Move the control lever to the desired position.
•Tighten the thumb screw
Note: Adjust the control lever in small increments
as a small adjustment on the control lever can
result in a large change to spinner rotation speed.
FLOW CONTROL GATE
The HS100 & 200 feature a manually
adjustable material flow gate.
Flow rate of material is controlled by sliding
the gate in or out which decreases or
increases the hopper opening.
Graduations are notched into the side of the
sliding gate, making it easier to set the gate.
The third notch in is approximately 50% open.
To set the gate:
•loosen the hand wheel knob
•pull the gate out to the desired position
•tighten the hand wheel knob.
Page 8
Wheel knob
Third notch
50% open
Flow gate

Horst Welding Page 9
SIDEWALK DEFLECTOR / TARP COVER
The galvanized ½ yd. HS100 model spreader has an optionally available 36” (91.4cm)
wide sidewalk deflector to focus distribution to where it isneeded most, expanding the
seasonal use and making it ideal for winter sidewalk maintenance.
The sidewalk deflector can easily be removed and installed.
•Simply hook the mounting slot of the deflector onto the mounting peg on the
spreader
•Swing the latch to lock the deflector in place.
When using the deflector, use a slow spinner speed. Adjust the flow control to the
spinner to achieve the desired application rate.
The optional tarp cover is easily slipped over the hopper and held securely with a
drawstring.
Mounting peg
Tarp cover
P/N HS100VHC
Sidewalk deflector
P/N HS100DSS
Mounting Slot

A
HYDRAULIC SHUTOFF GATE - Optional
The galvanized ½ yd. HS100 model spreader has an optionally available hydraulic
shutoff gate. This isfor granular products that without the gate would keep flowing
when spinner isstopped.
The gate automatically opens when the spinner isstarted.
To close the gate, move the hydraulic lever on the prime mover to reverse position.
No extra hydraulic outlet isrequired for this option.
Hydraulic Shut-off Gate
P/N HS100HSO
Page 10
OPERATION AND TRANSPORTATION ON PUBLIC ROADS
AND AREAS
Always adhere to the local laws and regulations concerning traveling or operating on
public roadways and areas.
Clean alllights, reflectors and mirrors ensuring that all lighting is in working order before
moving.
Know the area that the discharged material is to be placed is free from hazards and that
the discharged material will not create a hazard for vehicular traffic or pedestrians.
Always be alert while transporting or operating the equipment.
Select a safe ground speed when transporting from one area to another.
When traveling on roadways, transport in such a way that faster moving vehicles may
passyou safely.
Do not fill the hopper (especially with fertilizer) and transport over long distances, as it
may result in packing, causing poor or erratic discharge.

Horst Welding Page 11
MOUNTING
HS100
Several different methods of mounting are
available, depending apon the machine
and the type of mounting system:
•Universal Skid Steer mount,
•CAT 1, three point hitch mount for a
tractor,
•Assortment of loader quick attach plates
•CAT 1, three point hitch hydraulic loader
frame.
They fasten to the spreader by means of ten
bolts (5 per side) to allow you to move the
spreader between different types of prime
movers.
On the HS spreader, there are 7 mounting
holes on each side. When mounting the
three point hitch, use the top five holes to
allow for more clearance for the PTO.
The remaining mounting types may be
mounted on the bottom five holes. These
may be adjusted as required depending on
your machine.
HYD DRIVE/SELF LOADING
3PH CAT 1
UNIVERSAL
SKIDSTEER QTACH
HYD 3PH CAT1,
NON SELF LOADING
Top five holes used
for three point hitch
adapter

Universal Skid
Steer
3PH Hydraulic CATII
CATII 3PH ALO
MOUNTING
HS200
Many different methods of mounting are available, including universal Skid Steer, ALO
loader mount, Category 2 or 3,three point hitch mount for a tractor,and a 3PH
hydraulic loader frame.They fasten to the spreader by means ofeight bolts toallow you
to move the spreader between different types ofprime movers.
Horst Welding Page 12

Horst Welding Page 13
SETUP INSTRUCTIONS
Improper installation, operation, or maintenance of this equipment could result in
serious injury or death. FOLLOW ALL SAFETY INSTRUCTIONS IN THIS MANUAL
AND THE PRIME MOVER'S MANUAL(S)
•Refer to the Operator’s Manual(s) for your prime mover and follow the mounting
instructions contained therein
•Connect the hydraulic lines to the prime mover’s hydraulic system
•Ensure that the hose ends and fittings are free of dirt and contamination
•Once attached, and it issafe to do so, carefully raise the Broadcast Spreader
and cycle eitherthe loader arms or the 3 Point Hitch to check clearances and to
verify that all mounting procedures have been successfully completed
•Refer to the prime mover starting and operating instructions
•Only engage the prime mover’s hydraulic system when it is safe to do so
•Verify that the spinner direction is in a clockwise direction when viewed from
above the spreader regardless ifmounted to the front or rear of the prime mover
oIf the spinner turns in the wrong direction, the hydraulic connections need
to be reversed by a qualified technician

• Material or product being spread
• The travel speed of the prime mover
• The spinner speed (has the greatest impact upon area covered per pass)
• The product / flow regulator opening size (manually set by the operator)
• The height of the spreader from the ground
For best spreading results, experiment with different settings to better understand
the affects of each of these distribution factors.
Consult the product packaging or information sheet if available, to determine the
recommended amount of coverage and adjust distribution rate factors accordingly.
If spreading material over a large area, have a plan to avoid missed areas or high
concentrations. To ensure full coverage, set spreader to disperse product at half
the required rate and go over the area twice with the 2nd pass perpendicular to
the first.
Drier material will flow faster than courser or damp material:
Free Flowing Material: Material that is very dry.
Examples:
• Dry Fine Bulk Salt
• Dry Bagged Salt
• Dry Salt with Calcium Chloride Flakes
• Fertilizer
• Grass Seed
Slower Flowing: Materials that are coarse or not completely dry.
Examples:
• Coarse Bulk Salt
•Damp Fine Bulk Salt
• Sand / Salt Mix
• Sand
Knowing the capabilities and features of your HS Scatter Shot and prime mover, coupled
with your experience is the best way to safely and efficiently tackle any spreading operation.
MATERIAL DISTRIBUTION
CAUTION:
•Always read and comply with all safe handling and application instructions and
precautions of the product being used as found on the package label
•Always wear protective clothing including safety glasses and a properly fitted
breathing mask when filling the hopper to prevent injury to the body and/or
inhalation of product. Refer to product manufacturers’ labels for specific
protective requirements.
MATERIAL
Once the HS series spreader is mounted and tested it is ready for spreading operations.
The HS series is an all-season broadcast spreader ideal for grass seed, screened top soil,
fertilizer, sand & salt.
Product distribution factors:
Page 14

Horst Welding Page 15
FILLING HOPPER
Ensure the loading area is on a hard, level surface, uncluttered and free of
debris. Bagged material should be on a skid for easy access and handled to
avoid unnecessary strain on back and arms.
1. Move the prime mover as close as possible to the bagged material.
2. Engage park brake, lower the spreader to the ground.
3. Shut engine off and remove and retain the ignition key.
4. Release residual hydraulic pressure before dismounting from prime mover.
5. Check agitator to make sure it moves freely.
6. Check spinner vanes for wear.
7. Check the flow control gateto make sure it opensand closesproperly.
8. Fully close flow control gate.
9. Carefully fill hopper with product ensuring that the product isfree flowing and
does not contain stones or hard lumps.
10. Do not over fill or carry bags of additional product on top of the spreader.
SELF-LOADING FEATURE
When mounted to the loader arms of a prime mover that are capable of rolling the
spreader forward, the hopper of the HLA spreader can be filled bycarefully driving into
a pile of product - such as sand or de-icing salt using an action similar to that of a front
end loader.
•Always make sure the pile consists of loose material and is not frozen or
compacted. Break up or discard any small chunks.
•Tip bucket forward to allow cutting edge to touch ground and drive forward to
pile of material to fill bucket.
•Always ease into a pile, never hita pile at a high rate of speed, damage to the
equipment or personal injury may result.
•Using the prime mover’s tilt function, slowly raise the spreader as you move into
the pile to aid filling.
SPREADER MAY TIP WHEN LOADING
Load hopper with product only after the spreader has been properly attached to a
prime mover capable of handling a fully loaded broadcast spreader.

Horst Welding Page 16
USING THE BROADCAST SPREADER
•Do not operate an engine in confined or non-ventilated area
•Do not perform adjustments or repairs with the engine running
•Always lower raised equipment to the ground or securely support it to prevent
unintentional movement
•Do not operate on excessive inclines or side slopes – know the limitations of the
prime mover – be careful when turning on slopes as a rollover condition may
exist
•Never carry passengers
•Keep bystanders away from the machine when in operation
•Know how to quickly stop the equipment and all rotating parts in the case of an
emergency. Refer to the prime mover’s Operator’s Manual
•Stop the prime mover, lower implements and turn off the engine before
dismounting
READ OPERATOR’S MANUAL BEFORE OPERATING
Do not operate equipment until you are completely trained by a qualified operator in
how to use the controls, understand the machine’s capabilities, dimensions, and all
safety requirements. Refer to your equipment's manual for these instructions.
OPERATION
•With the flow control gate closed, start up the engine.
•Run the prime mover engine at idle to engage the hydraulic motor that drive’s the
spinner.
•Make sure the motor is turning spinner in correct direction, and set the spinner speed
control.
•Move the machine to the start of the spreading work area
•Open the flow control gate to the desired position.
•When seated in the cab, Increase engine rpm to operating speed.
•Raise the attachment to achieve desired spread width.
•Move forward at appropriate speed that allows for desired coverage.
•Reduce rpm to idle before disengaging hydraulic spinner motor.

Horst Welding Page 17
MAINTENANCE
Refer to the General Safety Precautions, in this manual before performing any
maintenance.
1. Always ensure the Broadcast Spreader is properly installed, the prime mover is
positioned on a level surface with the park brake set
2. Shut-off the engine and remove and retain the ignition key
3. Chock the wheels to prevent movement and release residual hydraulic pressure
4. At the beginning of each season, ensure that all fasteners are properly torqued,
all safety guards are in place and that Operator’s Manual is reviewed and
understood
5. At the end of season, perform all maintenance and storage activities, always
check for missing or damaged parts and that all gates function properly; repair
as required
STORAGE
1. Empty allproduct from hopper prior to removing it fromthe prime mover
2. Wash thoroughly before putting into storage
3. Inspect for loose, damaged or worn parts. Make needed adjustments, tighten
loose parts and replace damaged and worn parts
4. Store in dry ventilated area properly supported to prevent tipping
5. Store with all hydraulic cylinder piston rod in a retracted position to prevent
corrosion (for units with hydraulic shut off installed)
6. Oiling the Broadcast Spreader before storage will ensure years oftrouble free
use
PARTS
Note: For complete and current detailed parts breakdown
please go to hlasnow.com and click on 'Parts'

Warranty is active at the time of customer delivery and any claims require the product
model and serial number.
All claims must be discussed with a representative of Horst Welding prior to any repairs /
replacement or warranty will be void.
200917
Warranty
One Year Limited Consumer Warranty
Two Year Limited Commercial Warranty on
HLA Snow 3000 to 6000 series blades
Horst Welding 8082 Rd 129 Listowel Ontario, Canada N4W 3G8 Email : [email protected] Fax : (519)-291-5388 Tel : (519)-291-4162
This new and unused product is warranted by Horst Welding, to be free from defects in material and workmanship under normal
use and regular service as described in the owner’s manual, for a period of 1 year from the date of delivery, and a commercial
period of 2 years for HLA Snow 3000, 4000, 5000 and 6000 series blades from the date of delivery. Warranty is limited to the repair
of the product and / or replacement of parts.
Customer: If issues develop within the warranty period with the product, contact the local dealer from which you purchased the
unit. Only Horst authorized dealers may make repairs to the product or aect the replacement of defective parts, unless otherwise
approved by Horst.
Distributor / Dealer: must notify Horst Welding of the defect before repair / replacement is made. Recommended repairs / re-
placement and cost are to be discussed with, and agreed on, by an authorized Horst Welding representative. All claims must be
accompanied by a photograph of the defective product.
Defective products may be required to be returned to Horst Welding in Listowel, Ontario at the request of Horst Welding. Repairs
/ Replacement will be done at no charge to the customer within a reasonable time after the receipt of the product.
This warranty does not cover the following items:
1. Normal replacement of service items.
2. Normal maintenance or adjustments.
3. Machines or parts lost or damaged during shipment,
4. Accessory items / parts not supplied by Horst Welding
5. Damages resulting from:
misuse, negligence, accident, theft or re
use of improper or insucient fuel, uids or lubricants
use of after market parts or accessories, unless approved by Horst Welding
modications, alteration, tampering or improper repair
any device or accessories installed other than an authorized dealer.
using incorrect supplies or supplies not specied in the owners manual.
Horst shall not, in any event, be liable for any losses, damages or costs; to include prots, travel, transportation, pick up, delivery,
towing cost, tow vehicle, loss of use, whether special, incidental, consequential or otherwise, in any way. Unit or parts are returned
at the customer’s expense.
There are no warranties, expressed or implied, other than those specied herein. No agent, employee or other person has any
authority to vary any of the foregoing provisions.
All claims must be discussed with a representative of Horst Welding prior to any repairs

Notes.
This manual suits for next models
1
Table of contents
Popular Spreader manuals by other brands

Tatu Marchesan
Tatu Marchesan DCA2 MC 2500 Operator's manual

Ferris
Ferris Voyager FS5250 Series Operator's manual

Craftsman
Craftsman 486.243234 owner's manual

Western
Western LOW-PRO 300G Owner's manual and installation instructions

Fisher
Fisher QUICK-CASTER 300W Owner's manual and installation instructions

Kellfri
Kellfri 33-JMATV manual