Hoshizaki HW-600A User manual

DISHWASHER
FOR END USER
INSTRUCTION MANUAL
L1J030103 (060421)
No. 15 Qingqiu Street, Suzhou Industrial Park, Suzhou 215126 China
HW-600A
HW-600A-1

i
WARNING
Only qualified service technicians should install, service and maintain the
product. No installation, service or maintenance should be undertaken until
the technician has thoroughly read this Instruction Manual. Likewise, the
owner/manager should not proceed to operate the product until the installer
has instructed them on its proper operation. Failure to install, operate, and
maintain the equipment in accordance with this manual may adversely aect
safety, performance, component life, and warranty coverage.
IMPORTANT
This manual should be read carefully before the product is installed and
operated. Only qualified service technicians should install, service, and
maintain the product. Read the warnings contained in this booklet carefully as
they give important information regarding safety. Please retain this booklet for
any further reference that may be necessary. This manual is not applicable
to persons (including children) with reduced physical, sensory or mental
capabilities, or lack of experience and knowledge.
CONTENTS PAGE
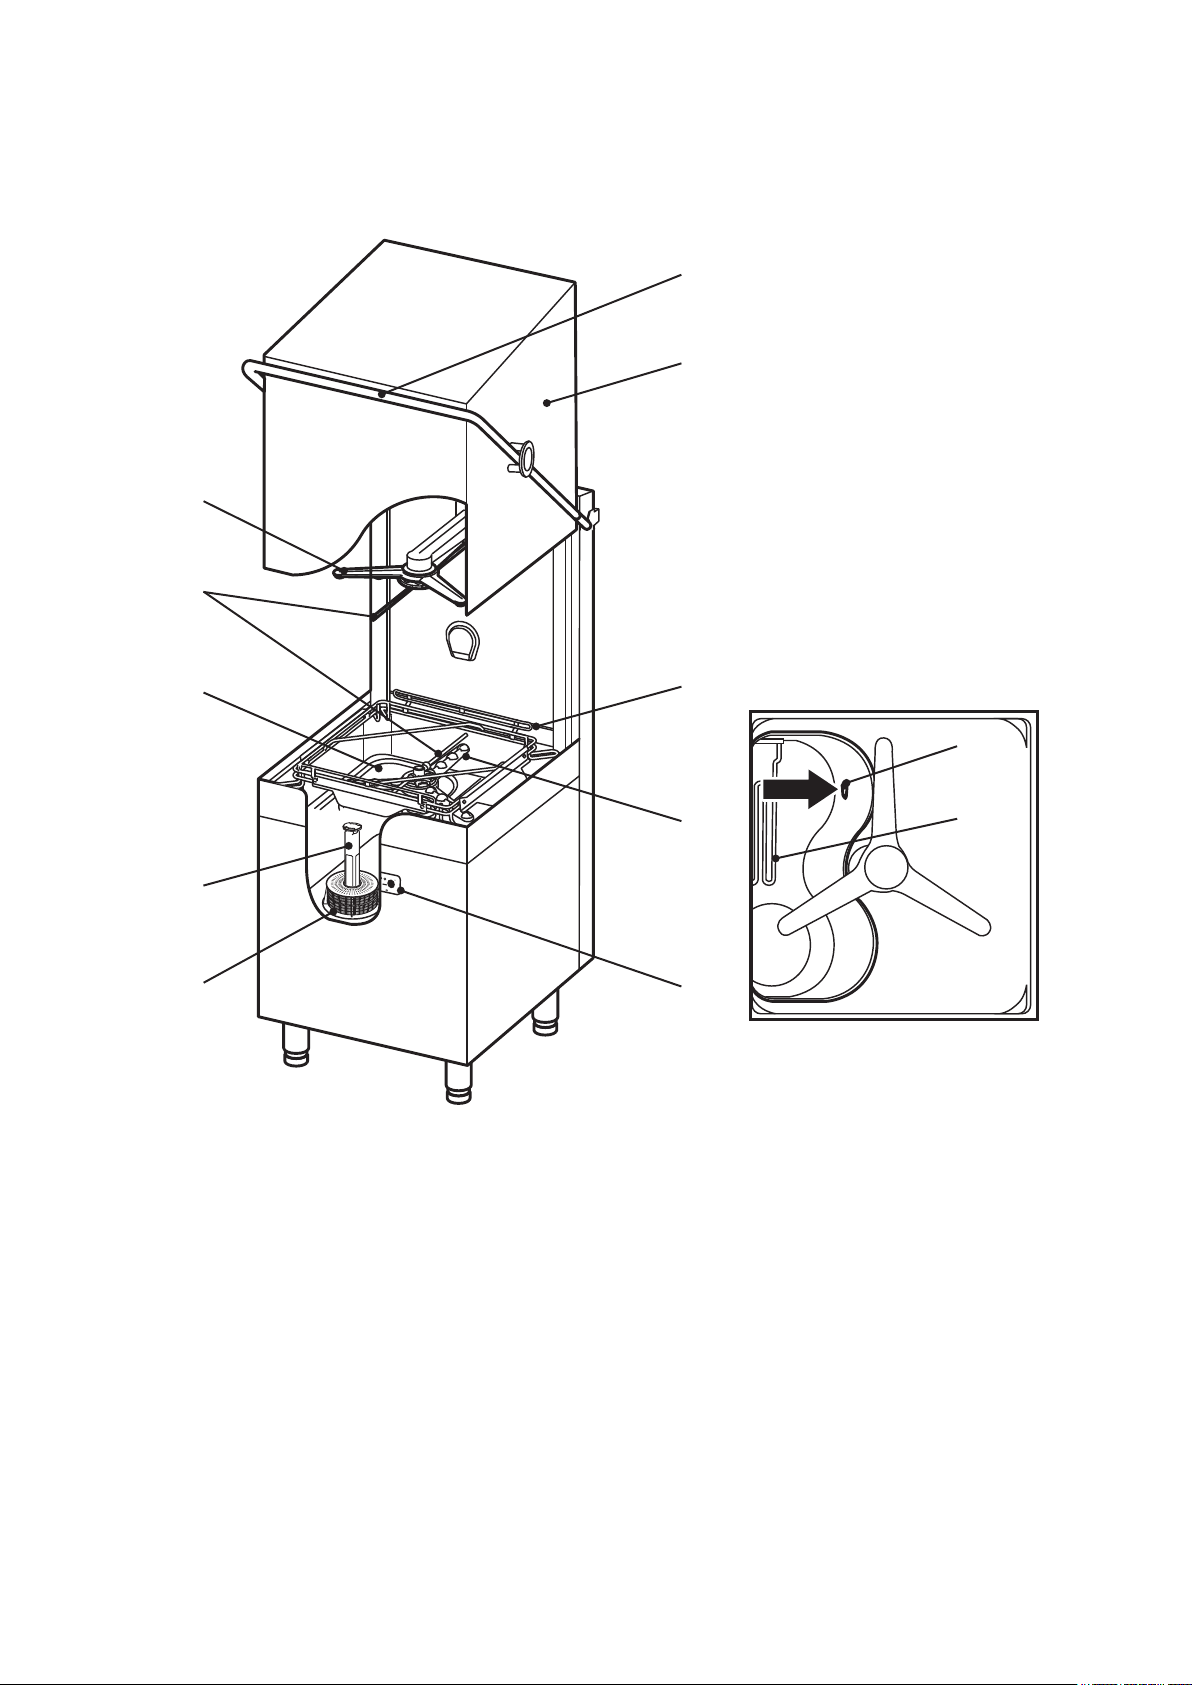
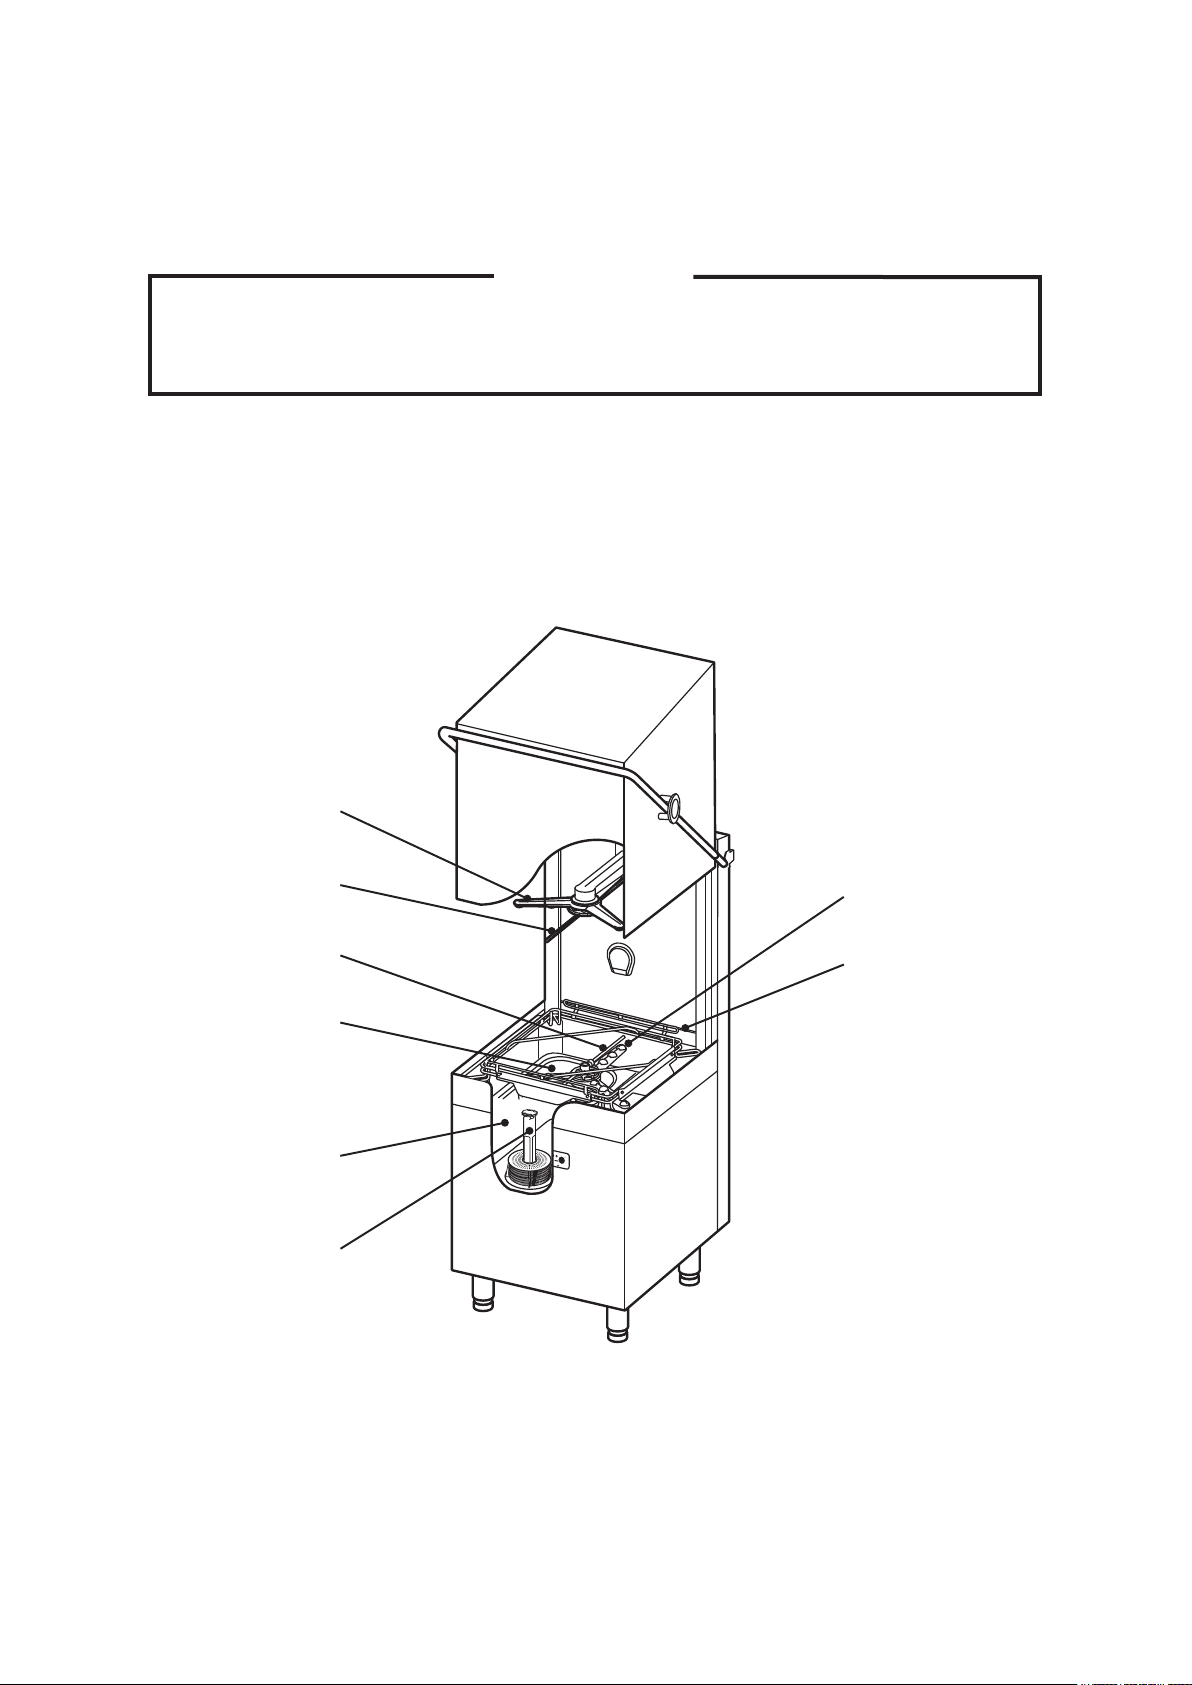
1. CONSTRUCTION -------------------------------------------------------------------------------------- 1
[a] GENERAL -------------------------------------------------------------------------------------------- 1
[b] OPERATION PANEL------------------------------------------------------------------------------- 2
[c] ACCESSORIES ------------------------------------------------------------------------------------- 3
[d] OPTIONS--------------------------------------------------------------------------------------------- 3
2. CHECKS BEFORE OPERATION------------------------------------------------------------------- 4
[a] CHECKS AFTER INSTALLATION-------------------------------------------------------------- 4
[b] WATER REQUIREMENTS----------------------------------------------------------------------- 4
[c] CHECKS BEFORE OPERATION--------------------------------------------------------------- 5
3. CHECKING DETERGENT TANK AND RINSE AID TANK------------------------------------ 6
4. PREPARING THE WASH COMPARTMENT----------------------------------------------------- 6
[a] AUTO FILL ------------------------------------------------------------------------------------------- 7
5. LOADING ------------------------------------------------------------------------------------------------- 8
[a] PREWASH ------------------------------------------------------------------------------------------- 8
[b] LOADING DISHES--------------------------------------------------------------------------------- 8
[c] LOADING RACK------------------------------------------------------------------------------------ 9
6. WASH AND RINSE------------------------------------------------------------------------------------- 9
[a] OPERATING TEMPERATURES---------------------------------------------------------------- 9
[b] MODE SETTING ----------------------------------------------------------------------------------- 9

ii
7. UNLOADING------------------------------------------------------------------------------------------- 10
8. INSUFFICIENT WASHING RESULTS------------------------------------------------------------11
9. SHUTDOWN ------------------------------------------------------------------------------------------- 12
10. INTERRUPTION -------------------------------------------------------------------------------------- 13
11. STANDBY/CLEANING BUTTON ----------------------------------------------------------------- 14
12. INTERNAL BOOSTER TANK ENERGY SAVING CONTROL----------------------------- 14
13. ALERT FUNCTION----------------------------------------------------------------------------------- 14
14. LOW TEMPERATURE LOCK FUNCTION ----------------------------------------------------- 14
15. DAILY MAINTENANCE ----------------------------------------------------------------------------- 15
16. SELF-CLEANING------------------------------------------------------------------------------------- 17
17. WEEKLY MAINTENANCE-------------------------------------------------------------------------- 18
[a] HEATER -------------------------------------------------------------------------------------------- 18
[b] EXTERIOR ----------------------------------------------------------------------------------------- 18
[c] WASH COMPARTMENT------------------------------------------------------------------------ 18
18. MONTHLY INSPECTION --------------------------------------------------------------------------- 18
[a] WATER SUPPLY LINE -------------------------------------------------------------------------- 18
[b] DRAIN HOSE (WASH TANK) ----------------------------------------------------------------- 19
[c] POWER SUPPLY CORD ----------------------------------------------------------------------- 19
19. TROUBLESHOOTING ------------------------------------------------------------------------------ 19
[a] TROUBLES REQUIRING IMMEDIATE SERVICE CALL-------------------------------- 19
[b] TROUBLES REQUIRING CHECK BY USER---------------------------------------------- 19
[c] TROUBLES WITHOUT ERROR CODE INDICATION ----------------------------------- 20
20. LONG STORAGE, RELOCATION, DISPOSAL, TRANSFER ----------------------------- 21
21. WARRANTY ------------------------------------------------------------------------------------------- 22
22. SPECIFICATIONS------------------------------------------------------------------------------------ 23

iii
Important Safety Information
Throughout this manual, notices appear to bring your attention to situations which could
result in death, serious injury, or damage to the unit.
WARNING Indicates a hazardous situation which could result in death or
serious injury.
NOTICE Indicates a situation which could result in damage to the unit.
IMPORTANT Indicates important information about the use and care of the
unit.
WARNING
This product should be destined only to the use for which it has been
expressly conceived. Any other use should be considered improper and
therefore dangerous. The manufacturer cannot be held responsible for injury
or damage resulting from improper, incorrect, and unreasonable use.
To reduce the risk of death, electric shock, serious injury, or re, follow
basic precautions including the following:
• Electrical connection must be hard-wired and must meet national and local
electrical code requirements. Failure to meet these code requirements
could result in death, electric shock, serious injury, re, or severe damage to
equipment.
• This unit requires independent power supplies for the dishwasher and for the
booster tank. See the nameplate for proper voltage and breaker/fuse sizes.
Failure to use proper breakers or fuses can result in tripped breakers, blown
fuses, or damage to existing wiring. This could lead to heat generation or
re.
• It is recommended to install a proper breaker or fuse in this unit.
• THIS UNIT MUST BE EARTHED. Failure to properly earth this unit could
result in death or serious injury.
• This unit should be disassembled or repaired only by qualified service
personnel to reduce the risk of electric shock, injury, or re.
• Do not make any alterations to the unit. Alterations could result in electric
shock, injury, re, or damage to the unit.

1
1. CONSTRUCTION
[a] GENERAL
[1] Upper Rinse Spray Arm, Lower Rinse Spray Arm
Rotatesandspraysrinsewaterontodishestorinseodetergent.
[2] Upper Wash Spray Arm, Lower Wash Spray Arm
Rotatesandsprayswashwaterontodishestoremovestains.
[3] Heater
Keepswashwateratapropertemperature.
[4]WaterLevelPressureSwitchSensingHole
[4]
[2]
[5]
[6]
[3]
[7]
[9]
[10]
[11]
Front
[1]
[2]
[8]

2
[5] Handle
[6] Door
[7] Operation Panel
See“[b]OPERATIONPANEL”.
[8] Rack Support Frame
[9] Drain Pipe
Pullouttodrain.
[10] Strainer
Separateswashwaterandscraps.
[11] Filter
Preventsscrapsfrombeingdrawnintothepump.
[b] OPERATION PANEL
[1] “READY” Lamp
Lightsupwhentheautollcyclecompletesandthedishwasherisreadytowash.
[2] “AUTO FILL” Lamp
Flashesduringtheautollcycle,andgoesoattheendofthecycle.
[3] Mode Lamps
Lightuptoindicatetheselectedoperationmode,andashduringoperation.
[9] [3] [2] [1] [8]
[7] [6] [5] [4]

3
[4] Standby Lamp
Lightsupwhen thedishwasher is inthe standbymode.Theunitwill notstarteven
whenthedoorisclosedwiththislampon.See“11.STANDBY/CLEANINGBUTTON”.
[5]UpButton,DownButton
Indicatesthetotalnumberofoperationinsixdigitsbytwodigitseachtime.
Example: 123,456 times are indicated by
Press to indicate rinse water temperature instead of wash water temperature while
thedishwasherisonstandby.
Servicepersonnelalsousethesebuttonstochangethecontrollersettings.
[6] Display
Indicates wash water temperature in wash cycle, rinse water temperature in rinse
cycle,anderrorcodesincaseoftrouble.See“19.TROUBLESHOOTING”.
[7]“MODE”Button
Presstochangetheselectedoperationmode.See“6.WASHANDRINSE”.
[8]“STANDBY/CLEANING”Button
Press to make the dishwasher inoperable even when the door is closed. See “11.
STANDBY/CLEANINGBUTTON”.
Press and hold to start self-cleaning with the “ON/OFF” button o. See “16. SELF-
CLEANING”.
[9]“ON/OFF”Button
Turnson/othepowerforoperation.
[c] ACCESSORIES
Instruction manual x 1 Installation manual x 1
Maintenancesheetx1 Glassrackx1
Open rack x 1 Plate rack x 1
*Theracksmaynotbeprovidedasaccessoriesdependingondestinations.
[d] OPTIONS
Detergentinletx1 Inlethosex1
Remote kit x 1

4
2. CHECKS BEFORE OPERATION
WARNING
1.To prevent possiblewaterleak,electricshockorre,theinstallationmustbe
carriedoutbyqualiedpersonnel.
2.To use a gas water heater, thoroughly read its instruction manual. Ensure
adequate air intake and exhaust systems and exhaust hoods in accordance
with applicable laws for the type and capacity of the heater to prevent
dangerousconditionsduetolackofoxygenandtoxicgasgeneration.
[a] CHECKS AFTER INSTALLATION
*Inthepresenceoftheinstaller,checkforproperinstallationaccordingtotheinstallation
manualprovided.
*Receivetheinstallationmanualfromtheinstaller,andkeepitforlaterreference.
[b] WATER REQUIREMENTS
*Properwater qualitycanimprovewarewashingperformanceby reducingspotting,
lowering chemical supply costs, improving productivity and extending equipment life.
Localwaterconditionsvary.Therecommendedproperwatertreatmentforeectiveand
ecientuseofthisequipmentwillalsovarydependingonthelocalwaterconditions.Ask
yourmunicipalwatersupplierfordetailsaboutlocalwaterspecicspriortoinstallation.
*Recommendedwaterhardnessis not morethan100mg/L. Water hardnessabove
100 mg/L should be treated by a water softener or in-line treatment. Water treatment
has been shown to reduce costs associated with machine cleaning, reduce the need
for deliming the dishwasher, reduce detergent usage and reduce corrosion of metallic
surfacesintheinternalboostertankanddishwasher.Failuresresultedfromuseofwater
outsidetherequiredwaterconditionsarenotcoveredbywarranty.
* Sediment, silica, chlorides or other dissolved solids may lead to a recommendation for
particulateltrationorreverseosmosistreatment.
* If an inspection of the dishwasher or internal booster tank reveals lime build-up after
the equipment has been in service, in-line water treatment should be considered, and,
ifrecommended, shouldbe installedand usedas directed.Contact anauthorized
Hoshizakiservicecompanyforspecicrecommendations.

5
[c] CHECKS BEFORE OPERATION
*Ambient temperature should be within 5 to 35°C. Operation of the unit for extended
periodsoutsideofthisnormaltemperaturerangemayaectperformance.
WARNING
To avoid the risk of corrosion, clogging and health problems, be sure to use
potablewater.
*Topreventwaterleaksresultingindamagetothesurroundingproperty,keepthewater
supply temperature, pressure and ow rate within the values listed below. If the water
pressureistoohigh,apressurereducingvalvemustbeinstalledaccordingtothewater
heater’sinstructionmanual.
Water Supply Temperature Max 50°C
Minimum Flow Pressure 100kPa
Maximum Inlet Pressure 600kPa
Water Supply Flow Rate Min4L/min
*Thepowersupplyvoltageandcapacitymustbeasspeciedbelow.
ProductCode
(See"22.SPECIFICATIONS")
J030-D002
J030-D003
J030-D004
J030-D012
J030-D013
J030-D014
J030-D006
J030-D007
J030-D009
J030-D016
J030-D017
J030-D019
Power Supply 3 phase 4-wire
PowerSupplyVoltage 380V 380V 400V 415V
VoltageVariation 358 - 403V 358 - 403V 376 - 424V 390 - 432V
MaximumBreaker/FuseSize 40A 30A
MinimumCircuitAmpacity 40A 30A
*The wash compartment has been cleaned before shipping. But clean it again before
starting up the unit, and checkforproperinstallationofeach part.See “15.DAILY
MAINTENANCE”.
*Check the electrical, water, and drain connections before startingup the unit. See “18.
MONTHLYINSPECTION”.
*Alwaysuseadishwasherdetergentinsteadofaneutraldetergentforkitchenuse.
(Somedishwasherdetergentsarenotsuitable.ContactanauthorizedHoshizakiservice
companyforfurtherdetails.)

6
3. CHECKING DETERGENT TANK AND RINSE AID TANK
*Follow the instructions of the detergent and rinse aid suppliers to check the detergent
tankandrinseaidtanksafely.
IMPORTANT
Besuretoreadthewarningandcautionlabelsattachedtothedetergenttank
andrinseaidtank.
4. PREPARING THE WASH COMPARTMENT
*Check that the wash compartment has been cleaned with all the parts in place. If not,
cleanthe washcompartment according to “15. DAILYMAINTENANCE”,and install the
partsfollowingtheinstructionsbelow.
Upper Wash Spray Arm
Upper Rinse Spray Arm Lower Wash Spray Arm
Lower Rinse Spray Arm
Strainer
Drain Pipe
WashCompartment
Rack Support Frame

7
1)Checkthatthestrainer,lteranddrainpipe
areinplace.
IMPORTANT
Make sure that the drain pipe is securely
insertedinthedrainoutlet.
2)Openthewatersupplylineshut-ovalve.
3)Turnonthemainpowersupply.
4)Press the “ON/OFF” button.The display lights up. (If the door is closed, the auto ll
cyclebegins.)
[a] AUTO FILL
The auto ll cycle refers to automatically repeated starts and stops of the unit to ll the
washtankwith enough hotwaterfor washing.Theunit starts andstopsabout 12 times.
Then, thedishwasher is readyfor washing.The autofill cyclestartswhenthe water
temperatureintheinternalboostertankreaches60°C.
1)Closethedoor.The“AUTOFILL”lampashes,andtheautollcyclestarts.
2)Aftertheautollcyclecompletes,theunitstops,the“READY”lamplightsup(“AUTO
FILL”lampgoeso),andthebuzzersounds.
IMPORTANT
If the dishwasher has been drained
outtopreventfreezing,closethe
drain valve before opening the water
supplylineshut-offvalve.Withthe
drain valve left open, hot water will be
wasted.
Water Supply Line
Shut-oValve
Water
Water Supply Valve
Drain Valve
Dishwasher
Strainer
Drain Pipe
Filter

8
5. LOADING
[a] PREWASH
1)Removeanyleftovers(e.g.meat,fish,vegetables),chopsticks,toothpicks,straws,
paperproductsandplasticsfromthedishes.Neverusesteelwoolonwaretobeloaded
intothedishwasher.
NOTICE
Do not put these scraps in the dishwasher, as this may cause reduction in wash
performanceorfailure.
2)Toremoveheavysoilssuchasbakedgratinandsteamedeggorrice,soakthedishesin
hotwaterbeforeloadingtheminthedishwasher.
IMPORTANT
1.Donotallowalargeamountofneutraldetergentinthedishwasher.
2.Useasuitablerackfordishes.
[b] LOADING DISHES
1)Placetherackonthedishtable.
2)Keep the dishes within the rack, otherwise they
maybedamaged.
3)Donotstackthedishes,otherwisetheycannotbe
washedproperly.
4)Loadglassesupsidedownintotheglassware
rack, otherwise they cannot be washed properly
and rinsedthoroughlyortheymaytoucheach
otherandbedamaged.
Dishes or cups with a deep bottom rim cannot be
rinsed thoroughly with wash water left inside the
rim.Loadthemasshownbelow.
Iftheaboveloadingisnotpractical,therinsecycle
time must beextended.Contactan authorized
Hoshizakiservicecompanyforfurtherdetails.
水がたまると洗いが悪い
正しい入れ方 汚れ残りの原因
Correct Incorrect
StackedStickingout
Facingup
Correct Incorrect
Correct Incorrect
Water remains
Water remains

9
5)Thedooropeningisabout445mmhigh.Keeptheloadedracklowerthanthisheight.
Donotforcelargeitemsintothedishwasher,otherwisetheymaybedamagedorblock
thesprayarms.
[c] LOADING RACK
1)Slowlyopenthedoor.
2)Push the rack into the center of the dishwasher until it touches the rack guide at the
back.Otherwise,therackanddishesmaygetcaughtonthebackofthedoor,resulting
indamagingthewashandrinsesprayarmsanddishes.
NOTICE
Do not stack racks. Otherwise, this will cause reduction in
washperformanceorfailure.
6. WASH AND RINSE
[a] OPERATING TEMPERATURES
Therecommendedoperatingtemperaturesareasfollows:
Wash Temperature Rinse Temperature
Minimum Maximum Minimum Maximum
50°C 60°C 75°C 85°C
[b] MODE SETTING
Mode CycleTime WashingCapacity
(230mmDIAdishes)
Standard mode: Normal soils About 60 seconds 60racks(1080dishes/hour)
Longmode: Heavy soils About 122 seconds 30racks(540dishes/hour)
Rinse mode: Rinse only About 6 seconds

10
1)Pressthe“MODE”buttonuntilthedesiredmodeisselectedanditslamplightsup.
2)Slowlyclosethedoor.Theselectedmodelampashes(“READY”lampgoeso),and
washingoperation(washandrinse)starts.
3)Whenthewashingoperationcompletes,the“READY”lamplightsup(modelampgoes
o),andthebuzzersounds.
IMPORTANT
1.Tochange theduration ofeach mode,contact anauthorizedHoshizaki
servicecompany.
2.Ifthedisplay haschangedfrom temperatureindication to
circlingindication,thedishwasheriswaitingforwatersupply.
In a wash cycle, the unit will automatically extend the wash
cycleandstartarinsecycleaftercompletionofwatersupply.
In the rinse mode, the unit will wait for the water supply cycle
tocompleteandstartarinsecycle.
3.In case washing operation is interrupted by power failure or other reasons,
restartthewashingoperationfromthebeginningorselecttherinsemodeto
rinseoanydetergentremainingonthedishes.
7. UNLOADING
1)Slowlyopenthedoor.
2)Slidetherackontothedishtable.
WARNING
1.Topreventtherisk of burns, do not touch the hotwater(60to80°C)inside
thewashtankdirectly.
2.When opening the door, be careful not to burn yourself with dripping hot
water.
3.Topreventpossibleburns,handletherack,dishes,andinteriorparts(around
80°C)withcareafterwashing.
IMPORTANT
Whencarryingaloadedrack,usebothhandstokeepitlevel.

11
8. INSUFFICIENT WASHING RESULTS
Ifwashingresultsseeminsucient,checkforthefollowingpossiblecauses:
* Small items such as chopsticks and spoons or part of the dishes stick out of the rack to
blockthesprayarms.Removetheprojectingitems.
*Thedishesarepackedandstackedintherack.Reloadthedishes.See“5.[b]LOADING
DISHES”.
*The strainer orfilteris clogged. Cleanthem.See “15.
DAILYMAINTENANCE”.
*Thesprayarmnozzlesareclogged.Cleanthem.See“15.
DAILYMAINTENANCE”.
*Theupperandlower headers(sprayarmshafts)are
cloggedwithsmallobjectssuchastoothpicks.Clean
them.
*The detergent tankisoutof detergent.Replaceitwith a
newtank.See“3.CHECKINGDETERGENTTANKAND
RINSEAIDTANK”.
*Washwaterisnotclean.Pressthe“ON/OFF”button,checkthatthedisplaygoeso,and
pulloutthedrainpipetodrainthewashwater.Reinsertthedrainpipe,thenpressthe“ON/
OFF”buttontosupplyfreshwashwater.
*Thewashorrinsewatertemperaturebecomestoolowinsomeconditions.Waituntilthe
propertemperatureisreached.
*Thedishesareheavilysoiled.Precleanbeforeloadingthedishes.
*Ironortannincontentinwashwaterturnsthedishesyellowishorfaintlyblack.Soakthe
dishesinaplasticbucketcontaininghotwaterandcommercialbleach.
*Whitespotsleftonclearglasswarecanbecausedbydierentreasons.Consultwithan
authorizedHoshizakiservicecompanyorthedetergentsupplier.
*Adjustments of the wash and rinse cycle times, hot water temperature, and detergent
concentrationmayberequireddependingonthewaterquality,dishtypesandmaterials,
andsoilconditions.
Header

12
9. SHUTDOWN
NOTICE
If there is a possibility that the ambient
temperature may fall below 0°C and
freeze the unit, be sure to drain the
unit.The water supply line could be
damaged and leak water, resulting in
damagetothesurroundingproperty.
1)Press the “ON/OFF” button on the operation panel.
Thedisplayandlampsgoo.
2)Turnothemainpowersupply.
3)Closethewatersupplylineshut-ovalve.
4)Openthedoorandremovetheracksupportframe.
5)Turnandloosenthelowersprayarmnutinthedirection
ofthearrow.Liftupthelowerrinsesprayarmand
removethelowerwashsprayarm.
6)Removethestrainer.
Lower Wash
Spray Arm
Lower Rinse
Spray Arm
Water Supply Line
Shut-oValve
Water
Water Supply Valve
Drain Valve
Dishwasher
Rack Support Frame
Strainer

13
7)Pulloutthedrainpipetodrainwaterfrom thewash
tank.
WARNING
Whenpullingoutthedrainpipe,becarefulnottotouchthewashwater.Itmay
causeburnsorskinirritation.Turnthedrainpipeifitishardtopullout.
IMPORTANT
For the drain pump model, when the power supply (display) is on, press and
hold the “ON/OFF” button for 3 seconds after pulling out the drain pipe.The
drain pump starts to fully drain the wash tank.The display shows as follows
duringthefulldrainushcycle.Theoperationpanelgoesoattheendofthe
cycle.Then,turnothemainpowersupply.
8)Removethelter.
Drain Pipe
Filter
10. INTERRUPTION
WARNING
Topreventhot water fromsplashingandcausingburns, do notopenthedoor
while the unit is running. Wait until the buzzer sounds 1 second after the unit
stops.

14
To interrupt washing operation, press the “ON/OFF” button on the operation panel. The
displayandlampsgoo,andtheunitstops.
Toresumeoperation,pressthe“ON/OFF”button.
11. STANDBY/CLEANING BUTTON
Tokeepwashwaterhotwhilethedishwasherisleftidle,pressthe“STANDBY/CLEANING”
buttonandclosethedoor.Washwaterwillcoolmorequicklyifthedoorisleftopen.
1)Press the “STANDBY/CLEANING” button on the operation panel.The standby lamp
lightsup(“READY”lampgoeso).Theunitwillnotstartevenwhenthedoorisopened
orclosed.
2)Toresumeoperation,pressthe“STANDBY/CLEANING”buttonontheoperationpanel.
The“READY”lamplightsup(standbylampgoeso).Nowthedishwasherisreadyto
wash.
IMPORTANT
The “STANDBY/CLEANING” button function is not available during washing
operation.Pressitwhilethe“READY”lampison.
12. INTERNAL BOOSTER TANK ENERGY SAVING CONTROL
When the dishwasher is left idle for a while, the internal booster tank water temperature
canbetemporarilysetlowertosaveenergy.Forfurtherdetails,consultwithanauthorized
Hoshizakiservicecompany.
13. ALERT FUNCTION
Tokeepwaterinthewashtankclean,thisunitisprovidedwithfunctionstobeepandash
“Ch”(=Change)inthedisplaywhenwashwatershouldbechangedandtocontinuethis
alertuntilthewashwatertankisrelled(factorydefault:OFF).Forfurtherdetails,consult
withanauthorizedHoshizakiservicecompany.
14. LOW TEMPERATURE LOCK FUNCTION
Continuouswashingoperationmaylowerthewashandrinsewatertemperatures,resulting
inpoorwashingperformance.Topreventperformancereduction,theunitcanbesettolock
thewashandrinsecyclesatlowtemperatures(factorydefault:OFF).Forfurtherdetails,
consultwithanauthorizedHoshizakiservicecompany.

15
15. DAILY MAINTENANCE
IMPORTANT
Be sure to clean the dishwasher after closing time every day. It is dicult to
removeheavy soils left overnight. Inhigh temperature conditions, food scraps
willrotandaectsanitaryoperation.
1)Takeoutscrapsfromtheremovedstrainer,lteranddrainpipe,andwashthemclean
withascourer.
IMPORTANT
To prevent damage, do not hitthe strainer, lterand drain pipe on the sink to
dropscrapsortoemptytheseparts.
2)Turnandloosentheuppersprayarmnutinthe
directionofthearrow.Supporttheupperrinse
sprayarm,andremoveittogetherwiththe
upperwashsprayarm.
3)Ifthewashsprayarmandrinsesprayarmnozzlesareclogged,
useawireorbrushtounclogandwashthemclean.Cleanthe
lower wash spray arm and lower rinse spray arm removed for
draining.
4)Checkthe water levelpressureswitch hole. Ifitisclogged,
cleantopreventpossiblemalfunction.
Front
Water Level
Pressure
Switch
SensingHole
Upper Wash Spray Arm
Upper Rinse Spray Arm
Wire

16
5)Replacethelterinitscorrectposition.
6)Insertthedrainpipesecurelyintothedrainoutlet.
7)Replacethestrainerinitscorrectposition.
8)Useonehandtoholdtheupperwashsprayarm
on the upper spray arm shaft, and use the other
hand to tighten the upper spray arm nut in the
directionofthearrow.
9)Place the lower wash spray arm on the lower header,
andtightenthelowersprayarmnutinthedirectionof
thearrow.
10)Checkthatthewashsprayarmsandrinsesprayarms
canbeturnedeasilybyhand.
Upper Wash Spray Arm
Upper Rinse Spray Arm
Filter
Strainer
Lower Wash
Spray Arm
Lower Rinse
Spray Arm
This manual suits for next models
1
Table of contents
Other Hoshizaki Dishwasher manuals

Hoshizaki
Hoshizaki JWE-620UA-6B User manual

Hoshizaki
Hoshizaki JWE-620UA-6B User manual

Hoshizaki
Hoshizaki HW-600B3 RT User manual

Hoshizaki
Hoshizaki JWE-2400CUA-L-25B User manual

Hoshizaki
Hoshizaki JWE-2400CUA-L-25B User manual

Hoshizaki
Hoshizaki HW 600B User manual

Hoshizaki
Hoshizaki JWE-2400CUA-L-25B User manual

Hoshizaki
Hoshizaki JWE-620UA-6B User manual

Hoshizaki
Hoshizaki JWE-620UA-6B User manual