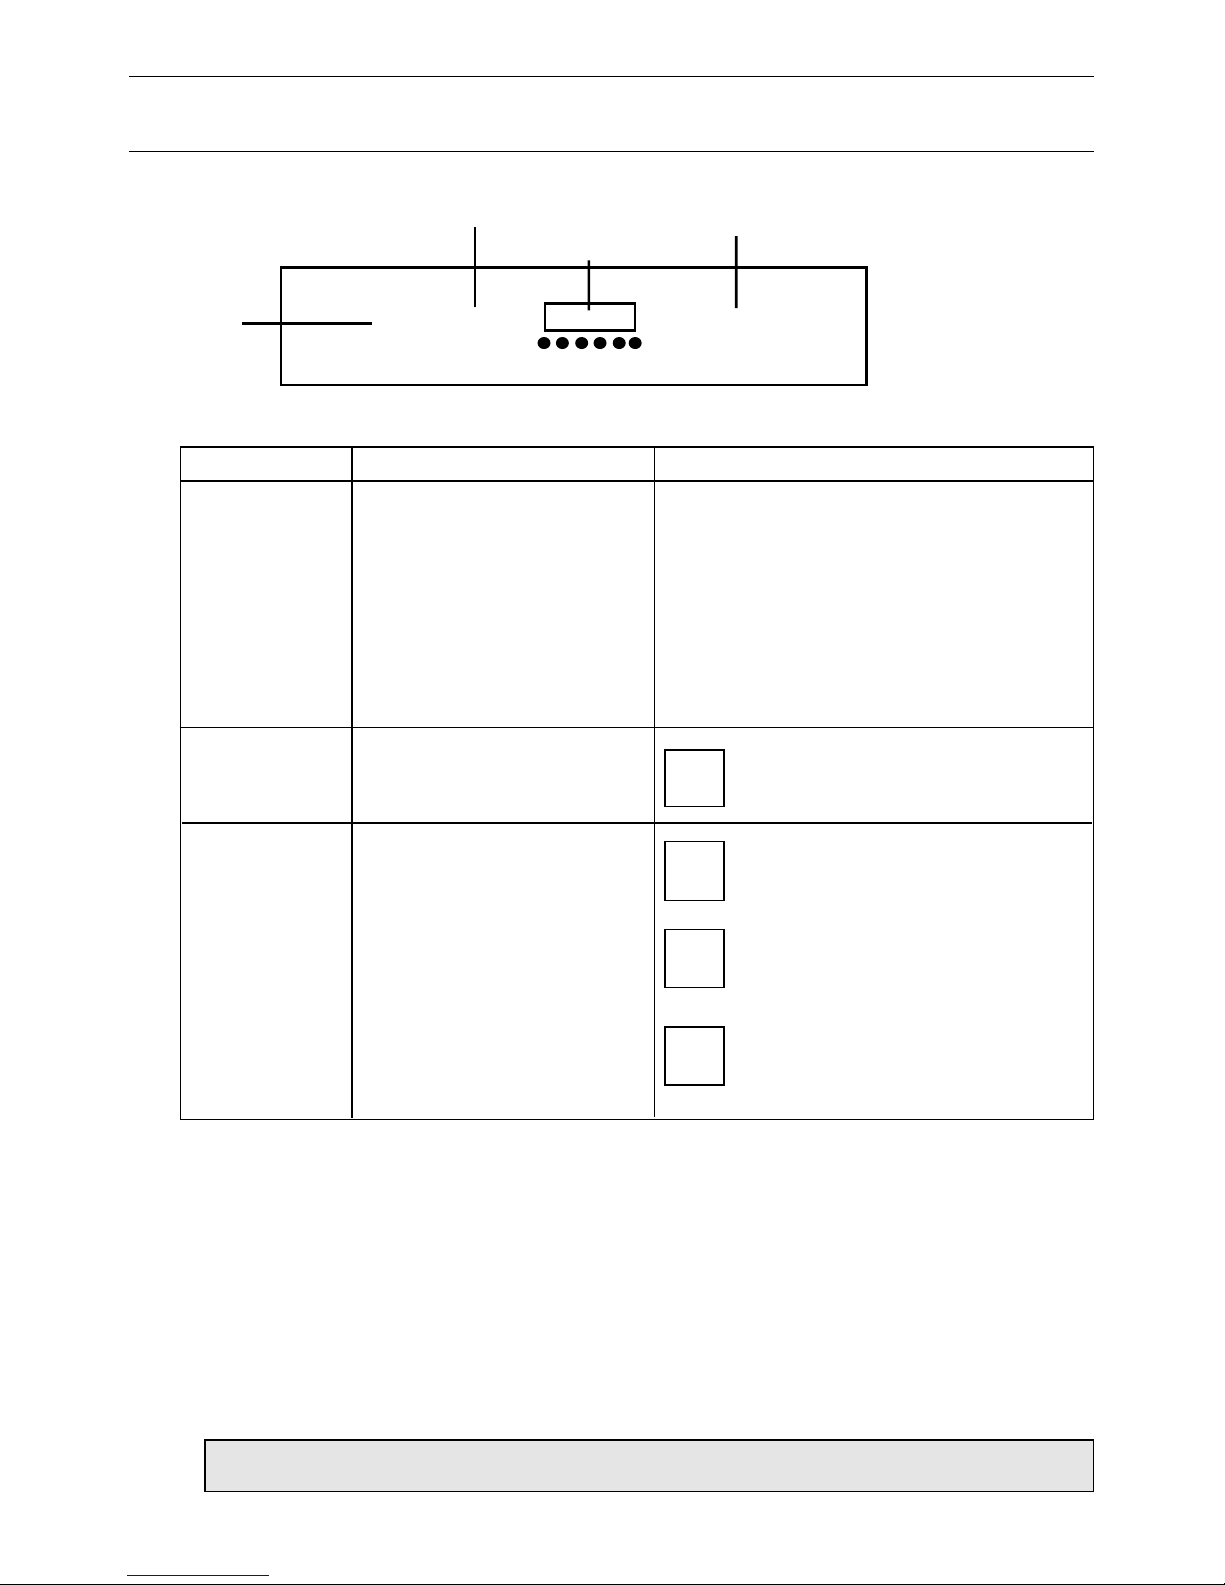
manuals.online logo
Brands
  1. Home
  2. •
  3. Brands
  4. •
  5. Hotpoint
  6. •
  7. Oven
  8. •
  9. Hotpoint S130E Mk2 User manual

Hotpoint S130E Mk2 User manual

Other Hotpoint Oven manuals

Hotpoint MH 99.1/HA User manual

Hotpoint

Hotpoint MH 99.1/HA User manual

Hotpoint SBS 636 X S User manual

Hotpoint

Hotpoint SBS 636 X S User manual

Hotpoint SY23 User manual

Hotpoint

Hotpoint SY23 User manual

Hotpoint SH51X S User manual

Hotpoint

Hotpoint SH51X S User manual

Hotpoint SY36B/1 User manual

Hotpoint

Hotpoint SY36B/1 User manual

Hotpoint 6171 Instruction Manual

Hotpoint

Hotpoint 6171 Instruction Manual

Hotpoint SX 1049Q CX User manual

Hotpoint

Hotpoint SX 1049Q CX User manual

Hotpoint SY10 User manual

Hotpoint

Hotpoint SY10 User manual

Hotpoint SH83 CX S User manual

Hotpoint

Hotpoint SH83 CX S User manual

Hotpoint FK 89 E P.20 X/HA S User manual

Hotpoint

Hotpoint FK 89 E P.20 X/HA S User manual

Hotpoint HDM67V8D2CX/UK User manual

Hotpoint

Hotpoint HDM67V8D2CX/UK User manual

Hotpoint FZ 99 P.1 IX /HA User manual

Hotpoint

Hotpoint FZ 99 P.1 IX /HA User manual

Hotpoint SD97 User manual

Hotpoint

Hotpoint SD97 User manual

Hotpoint BS43W/1 User manual

Hotpoint

Hotpoint BS43W/1 User manual

Hotpoint SE861X/1 User manual

Hotpoint

Hotpoint SE861X/1 User manual

Hotpoint S230G DY230G User manual

Hotpoint

Hotpoint S230G DY230G User manual

Hotpoint FK 1037 EN P.20 /HA S User manual

Hotpoint

Hotpoint FK 1037 EN P.20 /HA S User manual

Hotpoint UX 892 CX User manual

Hotpoint

Hotpoint UX 892 CX User manual

Hotpoint SC 87EX User manual

Hotpoint

Hotpoint SC 87EX User manual

Hotpoint BU82SS User manual

Hotpoint

Hotpoint BU82SS User manual

Hotpoint CD67V9H2CX/U User manual

Hotpoint

Hotpoint CD67V9H2CX/U User manual

Hotpoint EG600X User manual

Hotpoint

Hotpoint EG600X User manual

Hotpoint SE102PX User manual

Hotpoint

Hotpoint SE102PX User manual

Hotpoint SA4 544 C IX User manual

Hotpoint

Hotpoint SA4 544 C IX User manual

Popular Oven manuals by other brands

Brandt FC 222 user manual

Brandt

Brandt FC 222 user manual

aumate TOA20M04N-1E instruction manual

aumate

aumate TOA20M04N-1E instruction manual

Maytag CWE4100AC - 24" Single Electric Wall Oven Dimension Guide

Maytag

Maytag CWE4100AC - 24" Single Electric Wall Oven Dimension Guide

Kernau KBO 1076 S PT B instruction manual

Kernau

Kernau KBO 1076 S PT B instruction manual

Bosch HB 37 N Series User manual and installation instructions

Bosch

Bosch HB 37 N Series User manual and installation instructions

Electrolux EOD5420AA user manual

Electrolux

Electrolux EOD5420AA user manual

Mx Onda MX-HC2183 instruction manual

Mx Onda

Mx Onda MX-HC2183 instruction manual

Daewoo F6EV19SM2 Service manual

Daewoo

Daewoo F6EV19SM2 Service manual

Blodgett MT3870 Specifications

Blodgett

Blodgett MT3870 Specifications

GE ZET2F owner's manual

GE

GE ZET2F owner's manual

GE JK3000DF3WW owner's manual

GE

GE JK3000DF3WW owner's manual

eka EKF 523 NT Operating and instruction manual

eka

eka EKF 523 NT Operating and instruction manual

AEG Electrolux E3191-5 user manual

AEG Electrolux

AEG Electrolux E3191-5 user manual

Pratica Rocket Express quick start guide

Pratica

Pratica Rocket Express quick start guide

Viking Professional VGSO260T user guide

Viking

Viking Professional VGSO260T user guide

FM RX203 instruction manual

FM

FM RX203 instruction manual

Bosch HBN331 9B Series instruction manual

Bosch

Bosch HBN331 9B Series instruction manual

NEFF B95M42N0MK Instructions for use

NEFF

NEFF B95M42N0MK Instructions for use

manuals.online logo
manuals.online logoBrands
  • About & Mission
  • Contact us
  • Privacy Policy
  • Terms and Conditions

Copyright 2025 Manuals.Online. All Rights Reserved.

Instructions for Installation and Use
Build-in Electric double oven
S130E Mk2
To the Installer:
Before installation, fill in the product details on the back cover of this book.
The information can be found on the rating plate.
To the User:
You must read the instructions prior to installing and using the appliance and
then retain them for future reference.
2
PL AS R AD THIS BOOKL T CAR FULLY.
Contents Page
Introduction 3
Safety Infor ation - Always 4
Never 5
Features 6
Controls 7
Oven Ti er Operation 8-13
Grill Pan and Handle 14
Using the Top Oven for Grilling 15
Operation when Using the Top Oven for Grilling 16
Using the Top Oven as a Convection Oven 17
Operation when using the Top Oven as a Convection Oven 18
Using the Main Oven for Fan Cooking 19
Using the Main Oven for other functions 20-21
Te perature Conversion Chart 22
Oven Te perature Charts 23-24
Cooking Results Not Satisfactory? 25
Care and Cleaning 26-28
Installation 29-32
So ething Wrong? 33-34
Hotpoint Service Cover 35
Key Contacts Back Cover
Retention of this Instruction Book
This Instruction Book ust be kept handy for reference as it contains i portant
details on the safe and proper use of the appliance.
If you sell or pass the appliance to so eone else, or ove house and leave it behind,
ake sure this Book is also provided so the new owner can beco e fa iliar with
the appliance and safety warnings.
Introduction
3
Your new appliance is guaranteed* and will give lasting service. This guarantee is only
applicable if the appliance has been installed in accordance with the installation instructions
detailed in this booklet.
To help ake best use of your cooking equip ent, please read this booklet carefully.
The cooker is designed specifically for do estic use and responsibility will not be accepted
for use in any other installation.
When first using the cooker ensure that the roo is well ventilated (e.g. open a window
or use an extractor fan) and that persons who ay be sensitive to the odour avoid any
fu es. It is suggested that any pets be re oved fro the roo until the s ell has
ceased. This odour is due to te porary finish on oven liners and ele ents and also any
oisture absorbed by the insulation.
* The guarantee is subject to the provisions that the appliance:
(a) Has been used solely in accordance with the Users Instruction Book.
(b) Has been properly connected to a suitable supply voltage as stated on the
rating plate attached to this equipment.
(c) Has not been subjected to misuse or accident or been modified or repaired by
any person other than the authorised employee or agent.
(d) Has been correctly installed.
When the cooker is first used an odour may be emitted,
this will cease after a short period of use.
This appliance confor s to the following EEC Directives:
Low Voltage Equip ent
73/23/EEC
93/68/EEC
Electro agnetic Co patibility
89/336/EEC
92/31/EEC
93/68/EEC
Always
●Always ake sure you re ove all packaging and literature fro inside the
oven and grill co part ents before switching on for the first ti e.
●Always ake sure you understand the controls prior to using the appliance.
●Always keep children away fro the appliance when in use as the surfaces
will get extre ely hot during and after cooking.
●Always ake sure all controls are turned off when you have finished cooking
and when not in use.
●Always stand back when opening an oven door to allow any build up of
stea or heat to disperse.
●Always use dry, good quality oven gloves when re oving ite s fro the
oven/grill.
●Always take care to avoid heat/stea burns when operating the controls.
●Always turn off the electricity supply at the wall switch before cleaning and
allow the appliance to cool.
●Always ake sure the shelves are in the correct position before switching
on the oven.
●Always keep the oven and grill doors closed when the appliance is not in use.
●Always take care when re oving utensils fro the top oven when the ain
oven is in use as the contents ay be hot.
●Always keep the appliance clean as a build up of grease or fat fro cooking
can cause a fire.
●Always follow the basic principles of food handling and hygiene to prevent
the possibility of bacterial growth.
●Always keep ventilation slots clear of obstructions.
●Always refer servicing to a qualified appliance service engineer.
●During use the oven beco es hot. Care should be taken to avoid touching
heating ele ents inside the oven,
SAF TY ADVIC
IN TH V NT OF A CHIP PAN OR ANY OTH R PAN FIR :
1. TURN OFF THE COOKER APPLIANCE AT THE WALL SWITCH.
2. COVER THE PAN WITH A FIRE BLANKET OR DAMP CLOTH, this will s other
the fla es and extinguish the fire.
3. LEAVE THE PAN TO COOL FOR AT LEAST 60 MINUTES BEFORE MOVING IT.
Injuries are often caused by picking up a hot pan and rushing outside with it.
NEVER USE A FIRE EXTINGUISHER TO PUT OUT A PAN FIRE as the force of
the extinguisher is likely to tip the pan over. Never use water to extinguish
oil or fat fires.
4
Safety Information
When used properly your appliance is completely safe but as with any electrical
product there are certain precautions that must be observed.
PL AS R AD TH PR CAUTIONS B LOW B FOR USING YOUR APPLIANC .
Never
●Never leave children unsupervised where a cooking appliance is installed as all
cooking surfaces will be hot during and after use.
●Never allow anyone to sit or stand on any part of the appliance.
●Never store ite s above the appliance that children ay atte pt to reach.
●Never re ove the oven shelves whilst the oven is hot.
●Never heat up unopened food containers as pressure can build up causing
the container to burst.
●Never store che icals, food stuffs or pressurised containers in or on the
appliance, or in cabinets i ediately above or next to the appliance.
●Never operate the grill with the door closed as this will cause the appliance
to overheat.
●Never use the appliance as a roo heater.
●Never use the grill to war plates.
●Never dry any ite s on the oven doors.
●Never install the appliance next to curtains or other soft furnishings.
●Never allow children to play with the appliance controls.
●Never use ‘stea cleaners’.
5
Safety Information
Features
6
TOP OVEN
TEMPERATURE CONTROL
MAIN OVEN
TEMPERATURE
SELECTOR
TIMER
OVEN LIGHT
GRILL PAN,
FOOD SUPPORT
TOP OVEN
DOOR
OVEN LIGHT
OVEN SHELF
MODEL & SERIAL NUMBERS
GRILL
CONTROL
GRILL
ELEMENT
OVEN FAN
STAY CLEAN
LINER
STAY CLEAN
LINER
INNER DOOR
GLASS
INNER DOOR
GLASS
MAIN OVEN
DOOR
❍❍❍
TOP OVEN
TEMPERATURE CONTROL
MAIN OVEN
TEMPERATURE
SELECTOR
TIMER
GRILL
CONTROL ❍❍❍
Cooling Fan: A gentle flow of air will be blown below the control panel when the grill
control is used and after a short period of ti e when the ovens are
used.
Note: Whenever the appliance has been used, the cooling fan ay run
on or restart itself after all the controls have been turned off.
This indicates that the appliance is still war .
Oven Interior The oven lights are operated when their respective oven control is
Lights used. (N.B. Not all odels have a top oven interior light).
The ain oven has a light only position.
Slow Cooking ‘S’ The ain oven has a “Slow Cook Setting”, ‘S’, this can be used for slow
cooking, keeping food war and war ing plates for a short period.
Controls
Control Markings
Note: It is advisable to check that all oven controls have been switched off when you have
finished using the appliance.
7
Control Knob Description
Grill Setting Control
Top Oven Temperature
Control
Main Oven Temperature &
Function Control
A
ACB
B
C
Function
Selects either twin grill ele ents (FULL GRILL)
or single left hand grill ele ent (HALF GRILL)
and the heat at which the grill will cook the food.
1 – 4 Grill Settings Control: 1 = Low, 4 = High
Selects the cooking te perature
(Degrees Centigrade) when using the
top oven as a conventional oven.
- turn Grill Control clockwise for FULL
GRILL, using twin grill ele ents.
- turn Grill Control anti-clockwise for
HALF GRILL, using left hand ele ent.
Fan Only Setting
- This is used to decrease the a ount
of ti e required to defrost food ite s.
Oven Light Only
- Switches on the Main Oven Interior
Light Only.
Main Oven Temperature Scale (In
Degrees Centigrade).
- When cooking select the required
cooking te perature.
100 -
220
Fan
Only
Oven
Light
FULL
GRILL
HALF
GRILL
80 -
230
Oven Timer Operation
8
The oven ti er offers you the following features:
1. Ti e of Day
2. Auto atic Cooking
3. Minute Minder
The Main Oven (only) can be controlled by the auto atic ti er.
Never operate the grill or top oven when the ain oven is set to cook
auto atically because the oven cavity can beco e war and this ay
cause bacterial growth in food.
1. Select foods which will take the sa e ti e to cook and require
approxi ately the sa e te perature.
2. Set the oven ti er so that the food has just finished or about
to finish cooking on your return to the oven. This will ensure the
food has not cooled down and does not require reheating
before serving.
3. Food should be as cold as possible when it goes into the oven,
ideally straight fro the refrigerator. Frozen eat and poultry
should be thawed thoroughly before it is put in the oven.
4. We advise that war food should never be placed in the oven if
there is to be a delay period. Stews prepared by frying the eat
and vegetables should be cooked as soon as possible.
5. We advise dishes containing left-over cooked poultry or eat,
for exa ple Shepherds Pie, should not be cooked auto atically
if there is to be a delay period.
6. Stews and joints should be cooked by the long slow ethod, so
that the delay period is kept to a ini u .
7. On war days, to prevent har ful bacterial growth in certain
foods (ie poultry, joints, etc) the delayed start should be kept to
a ini u .
8. Wine or beer ay fer ent and crea ay curdle during the
delay period, so it is best to add these ingredients just before
serving.
9. Foods which discolour should be protected by coating in fat or
tossing in water to which le on juice has been added, prior to
placing food in the oven.
10. Dishes containing liquid should not be filled too full to prevent
boiling over.
11. Food should be well sealed (but not airtight) in a container to
prevent the loss of liquid during cooking. Alu iniu foil gives a
good seal.
12. Ensure food is cooked thoroughly before serving.
1. Make sure all oven controls are turned Off.
2. Check that the electricity supply to the oven is turned On.
3. Check that the oven clock is at the right ti e of day.
Automatic Cooking
Hints on
Automatic
Cooking
Timer
Operation
9
Know Your Timer
CLOCKFAC
The ti er incorporates a 24 hour clock.
nsure the correct time of day is always set, before using your cooker.
SYMBOLS
A ‘bell’ sy bol will light up when you select a Minute Minder Period and will
re ain lit for the period set.
At the end of the Minute Minder Period, the ti er will e it an audible tone
and the ‘bell’ sy bol will disappear.
The ‘cookpot’ sy bol will light up either:–
– When the ti er is in anual ode, or
– During the actual Cook Period.
‘AUTO’ will light up:–
– When the ti er is first turned on it will flash. It will go out when a ti e
of day is set or when the ti er is set to anual.
The ‘AUTO’ sy bol will flash at the end of an Auto Cooking progra e to
indicate that the progra e has finished.
(When the ‘AUTO’ symbol is flashing, to return the oven to Manual operation,
turn the oven controls off, ensure that the correct time of day is set, and
press the “Manual” button – The ‘AUTO’ symbol will go out).
Here you can set a ti e period of up to 23 hours 59 inutes, that will count
down. When it reaches zero, the ti er will e it an audible tone.
For xample: If you set 20 inutes, the audible tone will occur 20 inutes later.
Cook Period is the actual length of ti e for which, the ti er will switch the
oven(s) on as part of an “Auto Cooking” progra e.
(e.g. If you set 2 hours, the food will be cooked for 2 hours).
The ti e of day at which you want an “Auto Cooking” progra e to end.
For xample: If you set a “Cook Period” for 2 hours, and “End Ti e” of 11:00.
The ti er will switch the oven(s) on at 9:00 and turn the oven(s) off at 11:00.
You will hear a audible tone at 11:00, to indicate that the Auto Cooking
Progra e has finished.
Notes:
- When setting an Auto Cooking progra e you will need to set the oven
control(s) to the required te perature(s) when you set the ti er.
- If an Auto Cooking progra e has been set the oven(s) will only operate
during the pre-progra ed ti e.
Needs to be pressed to cancel an Auto Cooking progra e and return the
oven(s) to Manual operation.
Used to adjust the various ti er function settings.
Minute Minder
Button
Cook Period
Button
nd Time Button
Manual Button
“+” and “–”
Buttons
TIM R FUNCTION BUTTONS
AUTO COOKING PROGRAMM
lectronic Clock and Automatic Oven Timer Operation
10
S TTING TH TIM OF DAY
Step 1 Make sure all oven controls are turned Off.
Step 2 Check the electricity supply to the cooker is turned on.
Step 3 When switched on the display will show 0.00 and the Auto sy bol,
flashing inter ittently.
Step 4 Press & hold in both the Cook Period & End Ti e buttons together.
Step 5 With the Cook Period & End Ti e buttons still held in, press either
the “+” or “–” buttons to set the correct ti e of day.
Step 6 Release all the buttons si ultaneously.
TH TIM OF DAY IS NOW S T.
To change the time of day repeat Steps 4, 5 & 6 above.
Note: You cannot adjust the time of day if the timer has been set for an
Auto Cooking Programme.
S TTING TH MINUT MIND R
Step 1 Ensure the ti e of day is set correctly.
Step 2 Press and hold the Minute Minder button.
Step 3 With the Minute Minder button held in, set the required Minute
Minder period using the “+” and “–” buttons. A ‘bell’ sy bol will light
up.
Release all buttons and the ti er display will revert back to the ti e of day.
The ‘bell’ sy bol will re ain lit to signify that a Minute Minder period has
been set.
At the end of the set ti e an audible tone will be heard, and the ‘bell’
sy bol will disappear.
Step 4 To cancel the audible tone press the Minute Minder button.
Note 1 When the Minute Minder has been set, the time remaining can be checked at any
time by simply pressing the Minute Minder button.
Note 2 If necessary the Minute Minder can be cancelled before the tone sounds by
pressing and holding the Minute Minder button and then at the same time
pressing the “–” button until 0.00 appears in the display window.