manuals.online logo
Brands
  1. Home
  2. •
  3. Brands
  4. •
  5. Hotpoint
  6. •
  7. Refrigerator
  8. •
  9. Hotpoint CTF14 Installation instructions

Hotpoint CTF14 Installation instructions

Other manuals for CTF14

5

This manual suits for next models

1

Other Hotpoint Refrigerator manuals

Hotpoint FUFY User manual

Hotpoint

Hotpoint FUFY User manual

Hotpoint 16 Operating instructions

Hotpoint

Hotpoint 16 Operating instructions

Hotpoint FFUQ 20 Series Original instructions

Hotpoint

Hotpoint FFUQ 20 Series Original instructions

Hotpoint FFFL Series User manual

Hotpoint

Hotpoint FFFL Series User manual

Hotpoint HT303 User manual

Hotpoint

Hotpoint HT303 User manual

Hotpoint 22 Series Original instructions

Hotpoint

Hotpoint 22 Series Original instructions

Hotpoint HTS17BCSL Manual

Hotpoint

Hotpoint HTS17BCSL Manual

Hotpoint CTF14 Installation instructions

Hotpoint

Hotpoint CTF14 Installation instructions

Hotpoint HM311i User manual

Hotpoint

Hotpoint HM311i User manual

Hotpoint HL161AI User manual

Hotpoint

Hotpoint HL161AI User manual

Hotpoint NCD 191 I User manual

Hotpoint

Hotpoint NCD 191 I User manual

Hotpoint HSH25IFTACC and Operating instructions

Hotpoint

Hotpoint HSH25IFTACC and Operating instructions

Hotpoint HME40N User manual

Hotpoint

Hotpoint HME40N User manual

Hotpoint CTFM15 Installation instructions

Hotpoint

Hotpoint CTFM15 Installation instructions

Hotpoint HDR190I User manual

Hotpoint

Hotpoint HDR190I User manual

Hotpoint FFA52xx User manual

Hotpoint

Hotpoint FFA52xx User manual

Hotpoint FFA90 User manual

Hotpoint

Hotpoint FFA90 User manual

Hotpoint FFA46W User manual

Hotpoint

Hotpoint FFA46W User manual

Hotpoint CTA12 Specification sheet

Hotpoint

Hotpoint CTA12 Specification sheet

Hotpoint HTH16BBSL User manual

Hotpoint

Hotpoint HTH16BBSL User manual

Hotpoint HTS16BBS Assembly instructions

Hotpoint

Hotpoint HTS16BBS Assembly instructions

Hotpoint SXBHAE 924 WD User manual

Hotpoint

Hotpoint SXBHAE 924 WD User manual

Hotpoint FFU4D X User manual

Hotpoint

Hotpoint FFU4D X User manual

Hotpoint Larger Fridge RLM54 User manual

Hotpoint

Hotpoint Larger Fridge RLM54 User manual

Popular Refrigerator manuals by other brands

Frigidaire FRS26TS7DW2 Use & care manual

Frigidaire

Frigidaire FRS26TS7DW2 Use & care manual

Fisher Scientific 10ECEEFSA manual

Fisher Scientific

Fisher Scientific 10ECEEFSA manual

Summit FF22BDRSS user manual

Summit

Summit FF22BDRSS user manual

Frigidaire FFRU17B2QWE use & care

Frigidaire

Frigidaire FFRU17B2QWE use & care

Hitachi R-SG28KPH instruction manual

Hitachi

Hitachi R-SG28KPH instruction manual

Dometic RMH 7390 L operating instructions

Dometic

Dometic RMH 7390 L operating instructions

AEG S71700TSW0 user manual

AEG

AEG S71700TSW0 user manual

Electrolux ENB3669 Instruction book

Electrolux

Electrolux ENB3669 Instruction book

Electrolux ERN 2930 Instruction book

Electrolux

Electrolux ERN 2930 Instruction book

Beko GNE 60520 X user manual

Beko

Beko GNE 60520 X user manual

Jenn-Air JUR248LBES00 Use & care guide

Jenn-Air

Jenn-Air JUR248LBES00 Use & care guide

Dometic RGE 4000 Installation and operating manual

Dometic

Dometic RGE 4000 Installation and operating manual

Dometic L-0191B Brochure & specs

Dometic

Dometic L-0191B Brochure & specs

LG LRBP1031W - 10 Cu. Ft. Cabinet Depth Bottom Freezer... owner's guide

LG

LG LRBP1031W - 10 Cu. Ft. Cabinet Depth Bottom Freezer... owner's guide

Daewoo RN-33 Series user manual

Daewoo

Daewoo RN-33 Series user manual

Haier RF-8888-174 Service manual

Haier

Haier RF-8888-174 Service manual

Blaupunkt 5CK2 Series user manual

Blaupunkt

Blaupunkt 5CK2 Series user manual

Beko B5RCNE366HG user manual

Beko

Beko B5RCNE366HG user manual

manuals.online logo
manuals.online logoBrands
  • About & Mission
  • Contact us
  • Privacy Policy
  • Terms and Conditions

Copyright 2025 Manuals.Online. All Rights Reserved.

Uand Careof
NO-ROWModels
CITM
CTmi
Energy-saving
tips pi?
HowtheEnergy Saver
switchworks
Howlongshouldy’m
storefoods? Ip45
.—.
..—___..---
.—..--—.
-....e.-..a..e—
‘.-a, .. ,—-.
_:_~y=%&a.. ----
—,
.....+..** ...e G-
-—-- --7=-- —=.’.‘>
c===
..—.-z ----------
——- .._.- ~.!.. &——
.——..—-. .-m-..L. e-
.—.—__..+ssss..—
-__—.-—.——
,. . . .. _-+.>— --
.——.-..-.;.: a.-..--~
:Ql_ ::. ~
. . . .- .. —=-,- .
..— .~’
.-—----s-.. *—----
—-——,-,, —
.———=-
——
.
}
I
Readthisbookcarefully. writei$ownthemodelamjl
serialmmbmk’
Misintendedto helpyouoperate
and maintainyournewrefrigerator
properly. You’llseethemon alabelatthe
bottom,just insidethefreshfood
compartmentdoor.
Keepithandyfor answersto your
questions. Thesenumbersare alsoon the
ConsumerProductOwnership
RegistrationCardthatcame with
yourrefrigerator.
Howto AdjustLev4ng,Legs. J. .4
Howto SetTemperature .-
controls . . . . . ..-.. 6. . . . . ...5
.,
Howto Use ,-
Energy SaverSwitch-.. . . . . . . ~5
If youdon’tunderstandsomething
or needmore help,write (include
yourphonenumber): Beforesendingin the registration
card, pleasewritethesenumbers
here:
ConsumerAffairs
Hotpoint
AppliancePark
Louisville,KY40225
FoodStorageSuggestions ......6
SheHPosition$ ...............7 Model Number
StorageDrawers ............7.8 Serial Number
.IceService ...............9. lO
Accessories.’. . . . . . . . . . . ... ..l OUsethese numbersin any
correspondenceor service calls
concerningyourrefrigerator.
User Maintenance
Instructions.. .............ll Hyoureceivedadamaged
refrigerator,immediatelycc ‘tact
the dealer (or builder)that soldyou
the refrigerator.
The Problem Solver. . . . . ...12-14
If YouNeed Service ..........15 Savetime andmoney.
Beforeyou requestservice, check
the Problem Solveron pages 12
through 14.It listsminor causes of
operatingproblemsthat you can
correct yourself.
Warranty .....;. . . . .Back Cover
@Besurethedoorsareclosed.
tightly.~efore leavingthe house
or retiring for the night, checkto
be sure the doors haven’tbeenM
Open,Wcidentdly’.
sLocation ofyour refrigerator is
important. Avoidkmatingitnext
toyourrange,aheatingventorwhere
th; sun will shine directly on it.
sKeepfoodscovered@reduce
moisturelmikiupinside the
refrigerator.
ewpemoisturefrombottlesand
cartonsbeforeputtingthem.inthe
refrigerator.
**KeepEnergy SaverSwitchinthe
NORMALpositionLmkxsrmistlm
iiwm013ik cmisideofthe
r<
iiigmw?r-. cool.
.-.-—.-——-.—.- ..——.-————.
—.———.-— —..-—.....—.-——.... ...7=-.-.-r-
folklting:
eWe this applianceonlyforits
intendedpurposeasdes~bed in
thisUse and Care Book.
eThisrefrigeratormustbeproper~y
installedin ac&mkmcewi@the
hstallation lnstmctio~ beforeitis.
used.Seegroundinginstructions
belowandon page4.
eNeverunplugyourrefrigeratorby
pullingon the powercord. Always
Ii?@plugfi~y and pullstraight
out fromthe o’titlet.
sRepairorreplaceimmediate~y
au ekctric servicecordsthathave
become frayedor otherwisedam-
aged. Do not use acord thatshows
cracksor abrasiondarnagealong
itslength or at either the plug or
connector end.
*l%%e~moving your refrigerator
awayfromthe M@ be carefd not
ImpotiahtSafqt~”IDitfGCti60$-,‘.s~.,. ,‘-..’.. ~.-iii-
..----.
,., ,
,- L.
Read4hstructiombdim’im$mg‘thisQppliance. ‘~~“,‘“. ‘-~E%g..--
,, —“.—...
..
..r’K—
,)-’
,’ ””.
e+,... ,**.ql!*.s. .
wiw!illwOYn*.x Ytin-’.amm~- ~, ..
. . A-4i-.-w —A&%mzw%-.m.ww?mn-m-+,s-a -. .%-..x& -_
,. —?4wmnwI+m. .“wf&3m4=w?.m~ ~f.nm
., !—, ,.,.
,., .~drs--- .-
W_NG-~en usingthis @~YP~retierator ‘W *‘:]s~v!m‘*ch ‘~~b?ti‘at~ng ‘“???; -
.*
appliance,alwaysexercise&isic aW&@itkicanakerqdo not place quidltyas you’cml. ‘~, ‘,r.ti@---_
afety precautions,includingthe fin&!kson”handson tk?awtmmtk ..‘
icem@g mechanismwhilethe $3M$@”&bldretig6~iQr.is mm r‘‘ -‘:;FL;
re~geiatdr ~phnggedin. Thiswill ~”
amiid thehmE@B@~bt~‘M-iw39.b .-’- ‘---- --
.- . ..-.
Wt’m
preventcontactwiththemoving sureto r6WhJethe dooisgTl$sJwill ~.
,--
m.-y--
reducethepqwibflity”Of&m&erto ~, ~~ii
parts dthe ejectormechtim, ‘~,~Mdren ,,- !
or withthe heatingelementthat ●-
,’
,,. —..—
releasesthe cubes. ~?i___
6Unplugytiurrefrige~ktmv’,-”’ ,..~.
%%F&.L-
,: .m.@-
~‘Don9t retieez~frozenfoodswhic~ ~,A. 13.eforemaking any ;epairsg ,” , . . ;: ~_..-.
have thawed Ci$mphdy.
The United States Departme& of ‘~@e: We stronglyrecommend ~‘:..
Agriculture in Home and Garden that any servicingbe performed
~by.a qualified individual .-
Bulletin No. 69saws: .-—...
--—=.—--
--
to Edover or damagethe power
cord.
slifter your refrigeratorisin
Oprstion, do nottouch dle cold
surfaces,p@@cdwiywhen hands
are dampor wet. Skinmayadhere
to theseextremelycoldsurfaces.
.
‘t..Youmaysafelyrefreezefrozen RBeforecle,tingg
foodsthat havethawedif theystill GBeforereplacingaburned-out
containicecrystalsor iftheyare lightbulb,the refrigeratorshould
stillcold—below4001?. .beimplujggedin order’to avoid
‘~..Thawedgroundmeats,poultry, ~contact.witha~vewirefilament.,
or fishthat haveanyoff-odoror (Aburned-outhghtbulbmay
off-colorshouldnotberefrozenand ,breakwhenbeingreplabe$) ~“
shouldnot be eaten.Thawedice Note:T-g controlto OFF -
creamshouldbe discarded.If the ~~
odor or colorof anyfoodispoor positiondoesnot removepower
to-thelightcircuit.
or questionable,getrid of it.The
foodmaybe dangerousto eat. .
eDo not operateyourretigerator
“Evenpartialthawingand refreez- in the presence o! exphmhwfumes.
ingreducethe eatingqualityof
foods,particularlyfruits,vegeta-
bles,andpreparedfoods.Theeating
qualityofred meatsis affected1- p~K‘-P
than that of manvother foods.Use 22A %1ALT:H!EIE’!J-W
A- ,*.AM.4A
Where astandard two-prong wall
outlet isencountered, it isyour per-
sonal responsibility and obligation
to have it replaced with aproperly
grounded three-prong wall outlet.
.7qINSUREPROPER
GROUNDEXISTS
BEFOREUSE Do NOT, wRRmcRcm”
Fia. 1ST’CES. CUTORWIWOW
I-=- “/ IiiwT- (GRoum)PRONG
Have the wall outlet and circuit mo~TmPmwm. como
checked by aqualified electrician
to make sure the outlet is properly
grotmded. (continuednextpzge)
Part No. 467736P05
3
useOfadapterplug
13ecauseof potential safety
hazards under certain conditions,
we stronglyrecommend againstuse
ofan adapter plug. However,ifyou
stillelect to usean adapter, where
localcodespermit, aTEMPORARY
CONNECTION may be made to a
properly.grounded two-prongwall
outlet by useof aULlisted adapter
(Fig.2) available at most local
hardware stores.
TEMPORARYMETHO~ ~,
vdr-’l
(ADAPTER PLUGS NOT
PERMITTED IN CANADA)
ALIGN LARGE m
‘RONGs’sLOTs= I‘~-~= e--- ~
---e 0’ t
.,> INSURE PROPER GROUND
Fig. 2‘i= #~o\l~~s!:NNEcTION
The larger slot in the adapter
must be aligned with the larger slot
in the wall outlet to provide proper
polarity in the connection of the
power cord.
CA?JT1ON:Attaching adapter
ground terminal to wall outlet
cover screw does not ground the
appliance unless cover screw is
metal, and not insulated, and wall
outlet isgrounded through house
wiring.You should have the circuit
checked byaqualified electrician
to make sure the outlet isproperly
gr~unded.
Vi&endisconnecting thepower
cordfromthe Aptq alwayshold
the adapter with one hand. if this
is not done, the adapter ground
terminal isvery likely to break with
repeated use.
should the adapter ground tmmimd
break,m Nor WE theappliance
WM aproper
ground has again km
estalllislled.
T:! eq
..,, ~c-.,..:,’”/.,&,f,.,<>.=,-?.-+~fl,.++.=;,~-
.-::y-p-&~;,
,, ... 2-..Jf: %:%l:~dit
~v~Y14~i.i,;
Because of potential safety
hwwds unchx certain conditions.
we strongly recommend against the
use of an extension cord. I-Iowtwer,
ifyou still elect to use an extension
Lwrd,it is absolutely necessary tha[
ii he ;]UL listed 3-wi~egrounding
~‘wa}pliance extension cord hav-
Lj[ [
ingagroundingtypeplugandoutlet
and that the electrical ratingof the
cord be 15amperes (minimum)and
120volts.Suchextensioncords
are obtainable through your local
service organization.
The refrigerator should
always lbepluggecl MO its owrn
indivihd e~ectrical outlet —
(115volt, 60 Hertz, or 100volt,
50Hertz, singlephase AC). This is
recommended forbestperformance
and to prevent overloadinghouse
wiringcircuits, which could cause
apossiblefire hazard from over-
heating wires.
Refrigerator Installation
Location
Do not install refrigeratorwhere
temperatureWWgo be~ow(W°F.
because itwillnot run often enough
to maintain proper temperatures.
Do install it on afloor strong
enough to supportafullyloaded
refrigerator.
Also see Energy-SavingTips
regarding location.
cleaK%MMX?s
A11owthe followingclearances for
ease of installationand proper air
circulation.
Sides . . . . . . . . . . . . . ..3/4°
Top ..................l”
Back . . . . . . . . . . . . . . . ..l”
Vvaf:er si~pp!:y te Icemalier
J
(4H2nlmiek so equipped)
You wiHneed to connect your
icemaker to acold water line. A
water supply kitcontaining copper
tubiilg, shut-off valve, fittings and
instructions is available at extra
cost from your dealer. There
should be sufficient tubing for
the icemaker from the cold water
supply to allow you to move the
refrigerator out from the wall
several feet (approximately 3coils
of l/4-inch copper tubing that
measure at least 10inches in
diameter). 4
rollersthat enable yotito move
the refrigerator awayfrom the wall
for cleanirw; other models have
adjustablekveling legs. Rollers
or legs, located behind the base
grill,should be set so the refriger-
ator is firmly positioned on the
floor and the front is raised just
enough that the doors close easily
when opened about halfway.
To adjust roliers or leveling legs,
remove base grille by grasping it
at bottom and pulling it out.
IROLLER I
FLEVELINGLEG I
1-.1_!23iH wI
Turn roller adjustingscrewsor
levelinglegs clockwiseto raise
refrigerator,counterclockwiseto
lowerit. Use adjustablewrench
(3/8”hex head bolt)or pliers.
When adjustingfront rollers or
levelinglegsforproperdoorclosure,
it is recommended that the bottom
front edge ofthe cabinet be
approximately3/4”from the floor.
Towpke base fyilkq align prongs
on back of grille with clamps in
cabinet and push forward until
grille snaps into place.
—-...——...-—
.%
FREEZER
cINITIAL SETTiNG
EIS COLDEST
WIHHUHI(
Agc DE
A4
ALLOW 24 HOURS
BETWEEN ADJUSTMENTS
Yourrefrigeratorhas twocontrols
thatletyouregulatethetemperature
inthe fresh foodand freezer
compartments.
INITIALLY, set the FRESH
FOOD control at 5and the
FREEZER control at C.
Forcolderor warmertemperatures,
adjustthe desired compartment
controloneletteror numberatatime.
mPoRTANT
When initially setting the controls
a
or when adjustingthem, allow24
hoursfor the temperatures to
stabilize,or even out.
ote: Turning the fresh food
ontrol to the IOFFjpoWon stops
coolingin BOTH cornpartrnents—
fresh kod AND f’reez~r-but
does not shut off power to the
refrigerator.
Usethe milk test for the fresh food
compartnlent. Place acontainerof
milkon the topshelfin the fresh
foodcompartment. Check it aday
later.If the milk is too warm or too
cold,adjustthetemperaturecontrols.
Usethe iee cream test for the
freezer compartment. Place a
confaincr of ice cream in the center
0[ the freezer compartment. Check
itafter aday.If it’stoo hard or too
soft,adjust thetemperature con~rols.
FRESH FOOD
5INITIAL SETTING
9IS COLDEST
oIS OFF
mlllullnlw
7654s
A
TEMPERATURE
CONTROLS
thtwmxi-atkh’6W’F. atE-@@
...youmay wanttoturnthelettered
controlonestepcolder,asfrom “C”
to “DVCooler temperaturesinthe
housemaycausethecompressorto
operatelessfrequently,thusallowing
the freezercompartmentto warm
somewhat.Toprotectyourfrozen
foodsupply,leaveyourlettered
settingat this colder settingfor the
entirewinteror forwhateverperiod
oftimeyouare turning downyour
thermostat. This isespecially
importantwhen thethermostatis
turneddownfor anextendedperiod.
This changeshouldhaveno effect
on yourfresh foodcompartment.
However,if freezing occurs, turn
the numbered controlone step
warmer, as from “5” to “4V
Whenyou stop turning the
thermostatdown, turn temperature
controlsbacktotheirregularsettings.
The Energy SaverSwitch is located
on the upper leftsideof the fresh
foodcompartment.
lb nxke the amou~lt of
electricity reqk~iredto operate
your refrigerator,pushswitch
to the NORMAL position. This
turns offheaters in your refrigerator
that prevent moisture from forming
on the outside.
5
UseoftheEnergySaverSwitchcan
saveyoumoney.Estimatedyearly
savings,dependingcmyourlocal
electricrates, are asfollows:
EstimatedYearlySavings Energy
Model ElectricRate(PerKwh) Savings
$.05 $,08 $.11 @pproxJ
CTF14 $8.00 $13.00 $18.00 14%
CTF16 $8.00 $14.00 $19.00 14%
Withthe heatersturned off, there
isachancethat moisturemayform
onthe outsideofyourrefrigerator,
especiallywhen theweatheris
humid. The humidityis mostlikely
tobe highin the summer,in the
early morninghours,and in homes
whichare not air conditioned.
Overan extendedperiodoftime,
moisturethat formson theoutside
maycausedeteriorationofthepaint
finish.It willbeimportanttoproteet
thefinishbyusingappliancepolish
waxas describedon page11.
When the EnergySaverSwitch
ispwshedto theright9electricity
flowsthroughthelowwattage
heaterswhichwarmthe outside
ofthecabinetand, undermost
conditions,preventtheforming
ofmoistureor waterdroplets.
It isnotneeessarytodefrostthe
freezeror freshfoodcompartments.
Yourrefrigeratorisdesignedand
equippedto defrostitself
automatically.
Part No. 4677’WW5
.—-..—— —— ....-——”—.—-.—.—— —.— .—.— . . .— —m.- .....-. .—--”—-—-. -—=.-. . . -,. . . . . . .
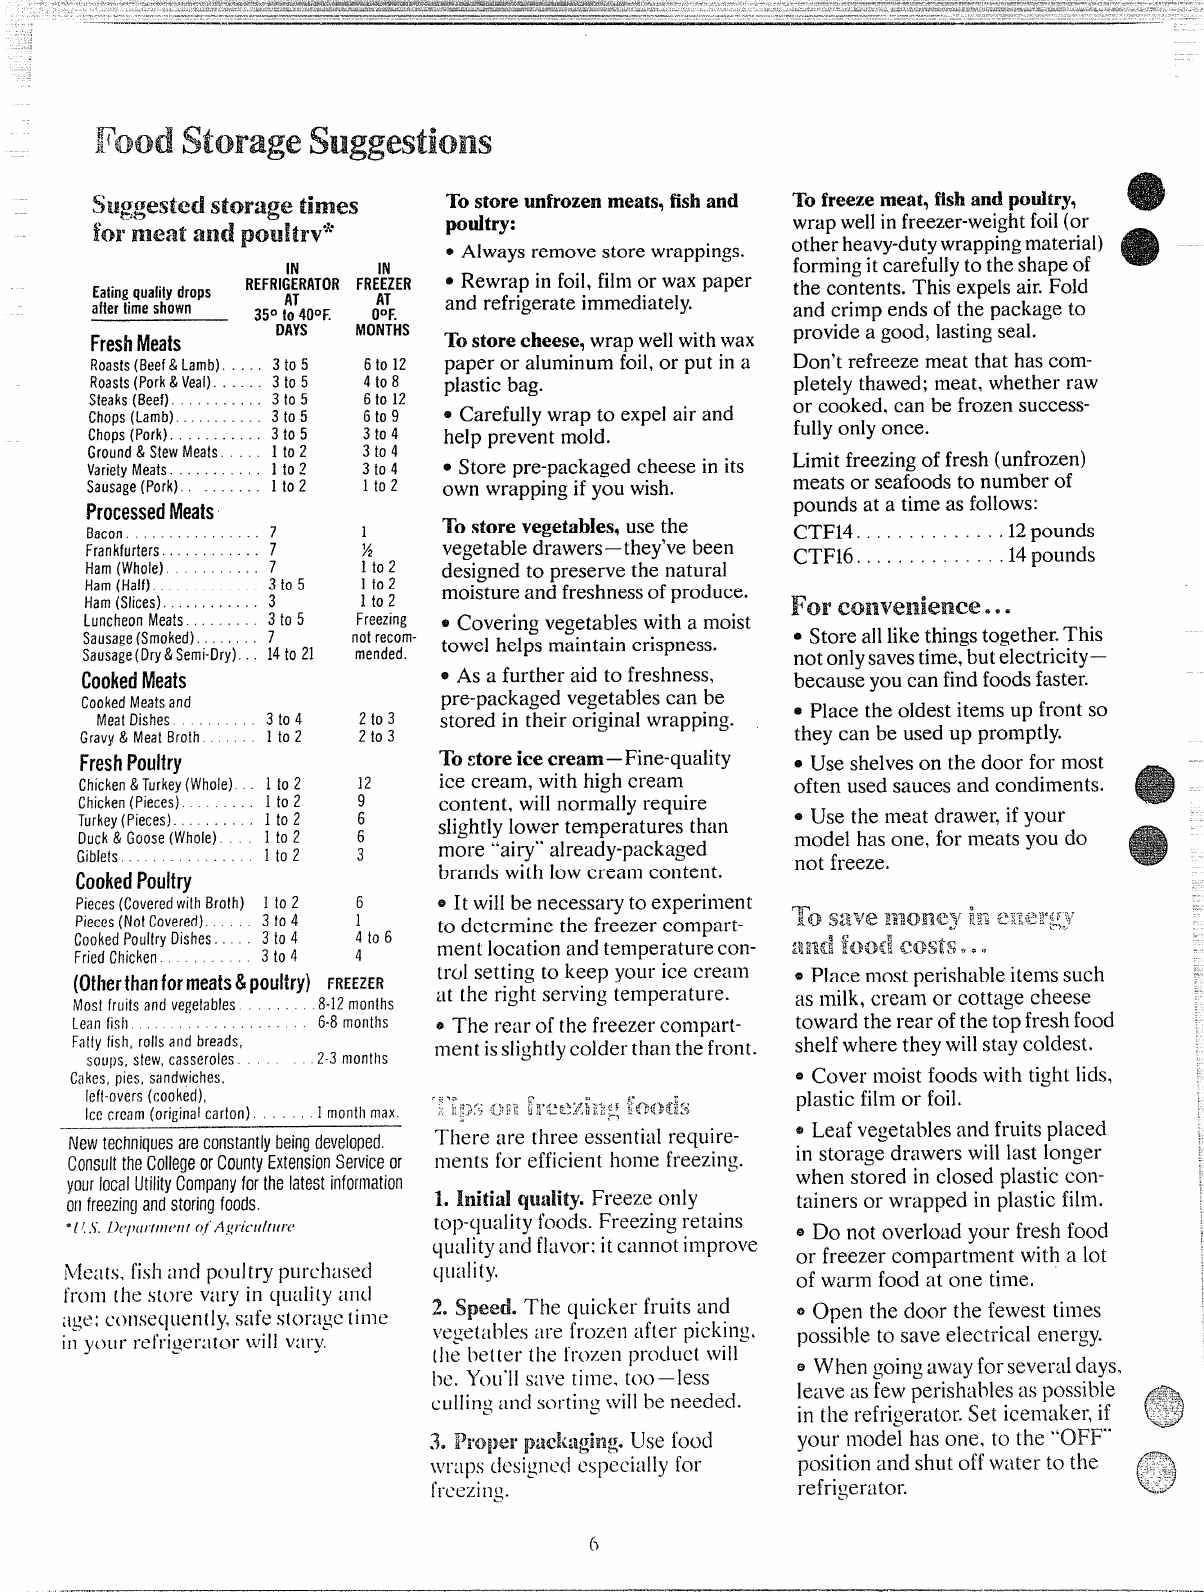
Eatingqualitydrops REFRIGERATOR FR;\ZER
after timeshown 35° :T400F. 00F.
MONTHS
FreshMeats DAYS
Roasts(Beef &Lamb). . . . . 3to 5
Roasts(Pork &Veal). . . . . . 3to 5
Steaks(Beef) . . . . . . . . . . . 3t05
Chops (Lamb) . . . . . . . . . . . 3t05
Chops (Pork) . . . . . . . . . . . 3t05
Ground &Stew Meats. 1to 2
VarietyMeats........... lto2
Sausage(Pork).. . . . . lto2
ProcessedMeats
Bacon................7
Frankfurters ............ 7
Ham(Whole). ......... 7
Ham(Half) ............. 3{05
Ham(Slices) . . . .. . . . . . . . 3
Luncheon Meats......... 3t05
Sausage(Smoked). . . . . . . . 7
Sausage(Dry& Semi-Dry). 14to 21
CookedMeats
Cooked Meatsand
Meat Dishes 3t04
Gravy &Meat Broth”.”.::. 1to 2
FreshPoultry
Chicken&Turkey(Whole) 1to 2
Chicken (Pieces). 1to 2
Turkey(Pieces!. . . . . 1to 2
Duck&Goose(Whole) 1to 2
Giblets, . . . . . . lto2
CookedPoultry
Pieces(Coveredwith Broth) 1to 2
Pieces (Not Covered). 3to 4
Cooked Poullry Dishes. . . . . 3to 4
Fried Chicken ........ 3t04
6to 12
4t08
6to 12
6t09
3t04
3t04
3t04
lto2
1
x
lto2
lto2
lto2
Freezing
not recom-
mended.
2t03
2t03
12
9
6
!
6
1
4!06
4
(Otherthanformeats&poultry) FREEZER
Most fruits and vegetables 8-12 months
Lean fish 6-8 months
Falty fish, rolls and breads,
soups, stew, casseroles. .2-3 months
Cakes,pies, sandwiches,
Iefl-overs (cooked),
Icc cream (original carton). . . ...1 month max.
Newtechniques areconstantly beingdeveloped.
CcmsulttheColle~eorCountyExtensionServiceor
yourlocalUtilityCompanyfor thelatest information
OHfreezing and storing foods.
*[ ! ,S.lkp(II(I\I(vII ()/”AgriC[(lIUri>
NIc:IIs. fish ;Irici poultry purchwxd
from [he store vary in quality am.i
;i~~e:consequently, sate storaSc time
in your refrigerator will vary.
To store unfrozen nreats9fishand
pouitry:
oAlways remove store wrappings.
@Rewrap in foil, fib-nor wax paper
and refrigerate immediately.
To store cheesel wrap wellwithwax
paper or aluminum foil,or put in a
plastic bag.
eCarefully wrap to expel air and
help prevent mold.
oStore pre-packaged cheese in its
own wrapping if you wish.
To store vegetables, use the
vegetable drawers—they’vebeen
designed to preserve the natural
moisture and freshness of produce.
~Covering vegetables with amoist
towel helps maintain crispness.
~As afurther aid to freshness,
pre-packaged vegetables can be
stored in their original wrapping.
To store ice cream–Fine-quality
ice cream, with high cream
content, willnormally require
slightly lower temperatures than
more “-airy”already-packaged
brands with low cream content.
~It willbe necessary to experiment
to determine the freezer compart-
ment location and temperature con-
trol setting to keep your ice cream
at the right serving temperature.
~The rear of the freezer compart-
ment isslightlycolder than the front.
.:,,9 ..<. ?s
:G>,<*.F...JY.;:-.},$
:!,?“i,“.~‘7~:,--~,.~---~,~,,/*,:.::fj~:~jf:e
:.......$!b,..- ,.
There are three ess~ntial require-
ments for efficient home freezing.
1. Initial quaiity. Freeze only
top-quality foods. Freezing retains
quality and flavor: it cannot improve
quality.
2. Speed. The quicker fruits and
~ege~:l[~]es:H-efrozen af[er picking,
the better the frozen product will
[m. YoLI”ll satre time. too-less
culling and soi-tingJvillbe needed.
3. PrQ~l@l’]l~3~~~ag!13g.USe fOOd
f~rr:lps(iesignc(i especially for
freezing.
6
—
To freeze meat, fishand poultry,
wrap wellinfreezer-weightfoil(or
other heavy-dutywrappingmaterial)
formingit carefully to the shape of
the contents. This expels air.Fold
and crimp ends of the package to
provide agood, lastingseal.
Don’t refreeze meat that has com-
pletely thawed; meat, whether raw
or cooked, can be frozen success-
fullyonly once.
Limit freezing of fresh (unfrozen)
meats or seafoods to number of
pounds at atime as follows:
CTF14. . . . . . . . . . . . ..12 pounds
cTF16 . . . . . . . . . ..- ..14 pounds
For coBM%31ieEMXe=e
oStore al1like thingstogether.This
not onlysavestime, but electricity—
because you can find foodsfaster.
@Place the oldest items up front so
they can be used up promptly.
eUse shelveson the door for most
often used sauces and condiments.
~Use the meat drawer, if your
model has one, for meats you do
not freeze.
T~h’%[;t: $>?-:..?,.1..Tlr
50 S21Vt~ M12ClK1.pLj .JA b!i!.”- L~J.,J
:~~~gg f~}{}g] &g+;’ts. <, . .
~Place most perishable iternssuch
as milk, cream or cottage cheese
toward the rear of the top fresh food
shelf where they willstay coldest.
~Cover moist foods with tight lids,
plastic film or foil.
~Leaf vegetables and fruits placed
in storage drawers will last longer
when stored in closed plastic con-
tainers or wrapped in plastic film.
~Do not overload your fresh food
or freezer compartment with alot
of warm food at one time.
~Open the door the fewest times
possible to save electrical energy.
~When going away for several days.
leave as few perishables as possible ~:~
(J
.:3&+
,,,<.,.-
in the refrigerator. set iccmakr, if _%.-
~-...-
your model has one, to the “OFF’”
~
position and shut off water to the ;~
refrigerator. .- ---
.
Somemodelshaveadjustableshelves
inthefresh foodcompartment,
enablingyoutorearmngetheshelves
to fityour family’sfoodstorage
needs.
To remove shelves: Tiltshelfup
at front, then liftitup and outof
trackson rear wallof refrigerator.
ill
❑Engage I~L
top lug- ;;>
❑Lower to
‘k
I
lock into place I
lTlil
,/
,..
/
~~--
To replace shelves: Selectdesireci
shelf height. Withshelf front raised
slighdy,engagetop lugsin tracks at
rear ofcabinet. Then lower frontof
shc]f until itlocks intoposition.
Dmwcrs at !hc bottomofthe
fresh foodcompartment havebeen
speciallydesigned topreserve the
naturalmoisture and freshnessof
prodUcc.
,Thisrefrigerateddrawerisdesigned
tokeepunwrapped foods freshby
retainingthenaturalmoisture
contentoffoodssuchas:
@AfliChOkes@
Cherries oPlums
~Asparagus CICorn @Radishes
oBeets,topped ~Currants @Rhubarb
eBlueberries oGreens,leafy @Spinach
oCarrots ~Lettuce oTomatoes,
oCelery ~Parsley ripe
oPeas,green
Asinanyrefrigeratedstoragearea,
itisrecommended that odorous
foodsbe stored wrapped—foods
suchas:
*Broccoli eCabbage eParsnips
*Brussels eCauliflower ~Turnips
Sprouts CJGreenOnions
Storagetimewilldependuponthe
typeoffoodand itsconditionwhen
placedinthedrawer.
Excessw~terwhichmayaccumulate
inthebottomoftheSealed&Fresh
Drawershouldbepouredoutand
thedrawerwipeddry.
The Sealed&Fresh Drawer is
partiallysealed bygasketsattached
tothecoverat thefrontandback
edges.Alwaysreplacethedrawer in
thiscoverandpush Ihedm~iwral[
[he}tu>’
in.
Drawers at the bottomof the
fresh foodcompartment will stop
bckx-ccoming all the wayout of the
refrigerator to help preventcontents
from spillingonto floor. Drawers
can easily be removed by tilting up
slightlyand pulling past the “stop”
location.
-. -.
.-.-
‘I?oremove drawers when the fres$l “‘
=A...
—-..—_
foodcompartment door cannot be ___
H%&@’’
openedlMy, followthe procedure ww-
~.. =
belowthat applies to your mode]. W+W
-w
Haif”wTidthDrawer%
((m mowssoequipped)
1. Removefoodfromdrawersand
drawercoversandshelfabovethem,
andtakeshelfout.
2. Grip drawerandcoverfarthest
fromthe door simultaneouslywith
bothhands, liftthem offthefront
supports, andpullthemout.
3. Grip remainingdrawer and
coversimultaneouslywith both
hands, lift them offthe front
supports, and pull forwardjust
enoughto detachfrom rear supports.
\
4. Tilt drawer and cover sideways.
(colltitule(inevlpage)
I
PartNo.46?736P05 (,
.’
\
!5.Turndrawer andcover andtake
themout.
1%replace: reverseprocedure,
makingsurecoversengagesupports
at rear and rest onsupports at front
ofrefrigerator.Sealed&Fresh
drawerand itscovermust be
returnedto the leftposition,
1. Removefoodfromdrawer cover
and shelvesaboveitand takeout
sheives.
2, Grip drawer and cover
siwldtaneously with both hands
211L1pull forwardjust enough 10
dc:Uchcover from rear support
br:ickets$
\
3. Up-end drawerand coverwith
front-sidedown.
4. Turn drawer and coverto left
and removefrom refrigerator.(With
left-handdoor, turn drawer and
coverto right.)
To replace: reverse procedure,
making sure cover engages support
bi-;]c~ets at rear and rests on support
brackets ai frontof refrigerator.
g
Theslide-outmeatdrawercanbe
removedand takentothe sinkor
foodpreparationarea. Youmayalso
relocateitwithinthefreshfood
compartmentto suityourstorage
needs.
On fulLwidtb sheM’models,just
slidedrawerout, removedrawer
coverfromshelfabove,relocate
coverinthepositionyoudesireit
andslidedrawerbackintoplace.
On half-width shelfmodels, the
drawerandthe shelfto whichit
attachescan be relocatedatany
level.
——
Rx)service
ouricemakerwillproduceeight
bespercycle–approximately
100cubes in a24-hourperiod,
depending on freezer compartment
temperature, room temperature,
number of door openingsand other
use conditions.
It your refrigerator is operated
before water connection ismade
to the icemakerqkeep the icemaker
feeler arm in”the OFF (up)position
as shown below.
Feeler Arm in
OFF position
Icemaker 1
Ice Storage Bin
When refrigerator has been
connected to water Supplyymove
the feeler arm to the ON (down)
position.
Feeler Ar[m in
ON position
Ice cube mold willautomatically
fillwith water after cooling to
freezing temperature, and first
cubes normally freeze after several
hours. When cubes are solidly
frozen, they willbe ejected from
the mold into the icestorage bin by
means of asweeper arm.Icemaking
willcontinue until the fee~erarm
sensesasufficientaccumulation of
ice cubes in the storage bin and
halts the operation temporarily.
For maximum ice storage, level
the stored cubes with your hand
occasionally.Be sure nothing
interferes with the swingof the
feeler arm.
The icemaker ejects cubes in
groups of eight and it isnormal
for several cubes to be joined
together.
Once your icernaker isin oper-
ation, throw away the first few
batches of ice cubes. This will
flush away any impurities in the
water line. Do the same thing
after vacations or extended
periods when ice isn’tused.
Under certain rare circum-
stances, ice cubes may be
ciiscolored, usually appearing
with agreen-bluish hue. The
cause of thisunusual discolor-
ation is apparently due to a
combination of factors such as
certain characteristics of locai
waters, household plumbing
and the accumulation of copper
salts in an inactive water supply
line which feeds the icemaker.
Continued consumption of such
discolored ice cubes may be
injurious to health. If such dis-
coloration is observed, discard
the ice cubes and contact your
General Electric Factory Service
(knt:r or an authorized Customer
(kc’”’ servicer.
Move kemaker fee~erarm to
OFF (up)position when:
~home water supply is to be offfor
several hours.
~ice storage bin is to be renioved
for aperiod of time.
@going away on vacation, at which
time you should also turn off the
valve in the water supply line to
your refrigerator.
Ifice isusedinfrequently,old cubes
willbecome cloudy and taste stale.
Empty ice storage bin periodically
and wash it in lukewarm water.
When alargesupplyof ice WW
be needed, make an extra supply
ahead of time. Empty bin,put cubes
in plastic bags or containers and
store in the freezer compartment
until the bin refills.
If this is your first icemaker$you’ll
hear occasional sounds that may be
unfamiliar. They are normal ice-
rnaking sounds and are not cause
for concern.
Part No.467736FW ‘~
I:.
..--.-—-.
To releaseice cubes, invert tray,
hold it over storage bucket {on
models so equipped) or bowl, and
twisttray at both ends. \\
For only one or two ice cubes,
leave t~e tray right-side up, twist
both ends slightly and remove
desired number of cubes. .
Wash trays and storage bucket in
lukewarm water only. Do not put
[hem in an automatic dishwasher.
&lKEtQma$ielka--mktw
C4N3xssoryK&
(Opwd at extraCc?si)
The optional automatic icernaker
willreplace the ice you use. ..auto-
matically.It can keep you supplied
with abinful of cubes—ice for
everything, everybody—without
fussor muss.
If your refrigerator did not come
already equipped with an auto-
matic icemaker, you may add one—
contact your local FIotpointdealer:
specify UK-KIT-1or UK-KIT-2.A
water supply kit containing copper
tubing, shut-off valve, fittingsand
instructions needed to connect the
icemaker to your cold water line
is also available at extra cost.
iiptbwiat extracost)
Your ice cubes can only
be as fresh-tastingas the
water that produces them.
That’swhy it’sagood idea
to purify your water with
aQuadra Kleen Water
Filter.
Its activated charcoal
removes musty,staleodors
and unpleasant medicinal,
metallic tastes. Aporous
fiber cartridge catches
dirt, rust particles, sand
and siltwhile special
crystals reduce deposits F
u
of hard scale. /-’
The water filter isavailable from
your Hotpoint dealer. Specify
WIW7X214.It hascomplete instal-
lation instructions and installsin
minutes on 1/4”O.D. copper
water line.
—. . . ..—.s--——. -T-------