Hotspot RE User manual

Owner’s Manual
Owner’s Manual

Owner’s Manual
T
his Owner’s Manual will acquaint you with your new spa’s operation and general maintenance. We
suggest that you take some time to carefully review all six sections. Please keep this manual available for
reference.
If you have any questions about any aspect of your spa’s set-up, operation or maintenance, contact your
authorized Hot Spot Spa dealership. They are trained professionals who are familiar with the product as well
as new spa ownership concerns. Their expertise will facilitate the enjoyment of your new Hot Spot Spa.
The Serial Number/Identification label is located within the equipment compartment of your Hot Spot Spa.
The serial number should also be documented on the delivery receipt from your dealer.
IMPORTANT: Watkins Manufacturing Corporation reserves the right to change specifications or design
without notification and without incurring any obligation.
DATE PURCHASED: ________________________________________
DATE INSTALLED: ____________________________________________
DEALER: ____________________________________________________
ADDRESS: __________________________________________________
TELEPHONE: ________________________________________________
SPA MODEL/SERIAL NUMBER:________________________________
COVER SERIAL NUMBER: ____________________________________
I
n most cities and counties, permits will be required for the installation of electrical circuits or the construction of exterior surfaces
(decks and gazebos). In addition, some communities have adopted residential barrier codes which may require fencing and/or
self-closing gates on the property to prevent unsupervised access to a pool (or spa) by children under 5 years of age. Your Hot Spot
Spa is equipped with a locking cover that meets the ASTM F1346-91 Standard for Safety Covers and as a result, is usually exempt
from most barrier requirements. As a general practice, your local Building Department will inform you of any applicable barrier
requirements at the time a permit is obtained for the installation of an electrical circuit. Your Hot Spot Spa Dealer can provide
information on which permits may be required.
Congratulations on your decision to enjoy the finest spa available...
Welcome to the growing family of Hot Spot
®
Spa owners.
Watkins Manufacturing Corporation

Page 1
I. SAFETY INFORMATION
............................................................................................................................................2
II. INSTALLATION INSTRUCTIONS
Site Preparation ......................................................................................................................................................................................5
Outdoor Installation ................................................................................................................................................................................5
Deck Installation ....................................................................................................................................................................................5
Indoor Installation ..................................................................................................................................................................................5
Spa Leveling Instructions ......................................................................................................................................................................6
Electrical Requirements ........................................................................................................................................................................7
Spa Specifications................................................................................................................................................................................10
III. OPERATING INSTRUCTIONS
Start-up and Refill Procedures ............................................................................................................................................................14
Heating and Hydromassage Systems ................................................................................................................................................15
Safety Equipment ................................................................................................................................................................................16
Comfort Control®System ....................................................................................................................................................................16
Spa Control Panel ................................................................................................................................................................................17
IV. SPA CARE AND MAINTENANCE
Draining the Water................................................................................................................................................................................17
Filter Maintenance ................................................................................................................................................................................18
Care of the Exterior Finish....................................................................................................................................................................18
Vacation Care Instructions ..................................................................................................................................................................20
Prevention of Freezing..........................................................................................................................................................................20
V. WATER QUALITY AND MAINTENANCE
General Information..............................................................................................................................................................................21
Methods for Testing the Spa Water ....................................................................................................................................................21
Hot Spot
®
Spa Water Maintenance Program ....................................................................................................................................22
FreshWater Ag+
®
Silver Ion System ......................................................................................................................................................24
EverFresh
®
Water Care System ..........................................................................................................................................................25
Hot Spot Water Treatment Guide ........................................................................................................................................................25
FreshWater Ag+ Silver Ion Purifier Replacement..................................................................................................................................26
Chlorine (Sodium Dichlor) ....................................................................................................................................................................27
Common Water Chemistry Questions ................................................................................................................................................29
Water Terminology................................................................................................................................................................................30
VI. SERVICE INFORMATION
General Information..............................................................................................................................................................................31
GFCI and High Limit Thermostat ........................................................................................................................................................31
FreshWater
®
III Ozone System ............................................................................................................................................................31
Miscellaneous Service Information......................................................................................................................................................32
Acts Invalidating Warranty ..................................................................................................................................................................32
Disclaimers ..........................................................................................................................................................................................32
Watkins Customer Service ..................................................................................................................................................................32
Troubleshooting....................................................................................................................................................................................33
Table of Contents
Table of Contents

Safety Information Page 2
I. SAFETY INFORMATION
IMPORTANT SAFETY INSTRUCTIONS
READ AND FOLLOW ALL INSTRUCTIONS
AVOIDING THE RISK TO CHILDREN
WARNING:
• RISK OF CHILD DROWNING. Extreme caution must be exercised to prevent unauthorized access by children. To avoid
accidents, ensure that children cannot use a spa unless they are supervised at all times.
• To reduce the risk of injury, do not permit children to use this product unless they are closely supervised at all times.
• To reduce the risk of injury, lower water temperatures are recommended for young children. Children are especially sensitive
to hot water.
DO:
• Make sure you always lock the child resistant locks after using the spa for your children’s safety. Every Hot Spot®Spa is
equipped with a locking cover that meets the ASTM F1346-91 Standard for Safety Covers.
• Test the water temperature with your hand before allowing your child to enter the spa to be sure that it’s comfortable.
Children are especially sensitive to hot water.
• Remind children that wet surfaces can be very slippery. Make sure that the children are careful when entering or exiting
the spa.
DON’T:
• Allow children to climb onto the spa cover.
• Allow children to have unsupervised access to the spa.
AVOIDING THE RISK OF ELECTROCUTION
Risk of electrocution
• Connect only to a grounded source.
• Do not bury the power cord. A buried power cord may result in death or serious personal injury due to electrocution if direct
burial-type cable is not used, or if improper digging occurs.
• A ground terminal (pressure wire connector) is provided on the control box inside the unit to permit connection of a
minimum No. 10 AWG (6mm2) solid copper bonding conductor between this point and any metal equipment, metal water
pipe, metal enclosures of electrical equipment, or conduit within five feet (1.5 m) of the unit as needed to comply with local
requirements.
WARNING:
• To reduce the risk of electrical shock, replace a damaged cord immediately. Failure to do so may result in death or serious
personal injury due to electrocution.
• Your spa is provided with a Ground Fault Circuit Interrupter for user and equipment protection. To ensure proper operation
of this important safety device, test according to the following instructions per electrical configuration.
Cord-Connected 115 Volt, 15 or 20 Amp Models: The GFCI is located at the end of the power cord. Before each use,
with the unit operating, push the TEST button. The unit should stop operating. Push the RESET button. The spa should now
return to normal operation. If the interrupter does not perform in this manner, there may be an electrical malfunction and
with it, the possibility of an electric shock. Disconnect the power until the problem has been corrected.
Hard-Wired 115 Volt, 30 Amp Models: The GFCI breaker, located inside the subpanel, supplies all of the power to the spa.
Before each use, open the subpanel and press the TEST button located on the subpanel GFCI breaker. The breaker should
snap into the “tripped” position and the spa should stop operating. Reset the subpanel GFCI breaker by completely flipping
the breaker switch down, into the off position. Then, flip the breaker switch up, into the on position. Power should be
restored and the spa should resume operation. If the breaker does not perform in this manner, there may be an electrical
malfunction and with it, the possibility of an electric shock. Disconnect the power until the problem has been corrected.
DANGER: RISK OF ELECTRICAL SHOCK
• Install at least 5 feet (1.5 m) from all metal surfaces. A spa may be installed within 5 feet of a metal surface if each metal
surface is permanently connected by a minimum No. 10 AWG (6mm2) solid copper conductor attached to the wire ground
connector on the terminal box that is provided for this purpose if in accordance with National Electrical Code
ANSI/NMFPA70-1993.

Page 3 Safety Information
• Do not permit any electrical appliances, such as a light, telephone, radio, or television within 5 feet (1.5 m) of a spa.
Failure to maintain a safe distance may result in death or serious personal injury due to electrocution if the appliance
should fall into the spa.
DO:
• Be sure your spa is connected to the power supply correctly - use a licensed contractor.
• Disconnect the spa from the power supply before draining the spa or servicing the electrical components.
• Test the Ground Fault Circuit Interrupter(s) before each use.
DON’T:
• Use the spa with the equipment compartment door removed.
• Place electrical appliances within 5 feet (1.5m) of the spa.
• Use an extension cord to connect the spa to its power source. The cord may not be properly grounded and the
connection is a shock hazard. An extension cord may cause a voltage drop, which will cause overheating of the jet
pump motor and motor damage.
• Attempt to open the electrical control box. There are no user serviceable parts inside.
RISKS TO AVOID
DANGER: RISK OF INJURY
• To reduce the risk of injury to persons, DO NOT remove suction fittings (filter standpipes) located in the filter
compartment.
• The suction fittings in the spa are sized to match the specific water flow created by the pump. Should the need arise
to replace the suction fittings, or the pump, be sure that the flow rates are compatible.
• There is a danger of slipping and falling. Remember that wet surfaces can be very slippery. Take care when entering
or exiting the spa.
Increased side effects of medication
• The use of drugs, alcohol, or medication before or during spa use may lead to unconsciousness with the possibility of
drowning.
• Persons using medications should consult a physician before using a spa; some medication may cause a user to
become drowsy, while other medication may affect heart rate, blood pressure, and circulation.
• Persons taking medications that induce drowsiness, such as tranquilizers, antihistamines, or anticoagulants should
not use the spa.
Health problems affected by spa use
• Pregnant women should consult a physician before using spa.
• Persons suffering from obesity or with a medical history of heart disease, low or high blood pressure, circulatory
system problems, or diabetes should consult a physician before using spa.
Unclean water
• Keep the water clean and sanitized with correct chemical care. The recommended levels for your Hot Spot®Spa are:
Free Available Chlorine (FAC): 3.0-5.0 ppm
Water pH: 7.4-7.6
Total Alkalinity: 125-150 ppm
Calcium Hardness: 150-200 ppm
(Refer to Water Quality and Maintenance section for complete instructions.)
IMPORTANT: Turn on the jet pump for a least ten minutes after adding ANY spa water chemicals into the filter
compartment.
• Clean the filter cartridge monthly to remove debris and mineral buildup which may affect the performance of the
hydromassage jets, limit the flow, or trip the high limit thermostat which will turn off the entire spa.
AVOIDING THE RISK OF HYPERTHERMIA
Prolonged immersion in hot water can result in HYPERTHERMIA, a dangerous condition which occurs when the internal
temperature of the body reaches a level above normal (98.6°F). The symptoms of hyperthermia include unawareness of
impending hazard, failure to perceive heat, failure to recognize the need to exit the spa, physical inability to exit the spa, fetal
damage in pregnant women, and unconsciousness resulting in a danger of drowning.

x Page xSafety Information Page 4
WARNING:
The use of alcohol, drugs, or medication can greatly increase the risk of fatal hyperthermia in hot tubs and spas.
TO REDUCE THE RISK OF INJURY:
• The water in the spa should never exceed 104°F. Water temperatures between 100°F and 104°F are considered
safe for a healthy adult. Lower water temperatures are recommended for extended use (exceeding ten minutes)
and for young children. Extended use can cause hyperthermia.
• Pregnant or possibly pregnant women should limit spa water temperatures to 100°F. Failure to do so may result in
permanent injury to your baby.
AVOIDING THE RISK OF SKIN BURNS:
WARNING:
• To reduce the risk of injury, before entering a spa the user should measure the water temperature with an accurate
thermometer, since the tolerance of temperature-regulating devices may vary by as much as ±5°F.
• Test the water with your hand before entering the spa to be sure it’s comfortable.
SAFETY SIGN
Each Hot Spot®Spa is shipped with a SAFETY SIGN in the owner’s package. The sign, which is required as a condition of
Product Listing, should be permanently installed where it is visible to the users of the spa. To obtain additional SAFETY
SIGNS, contact your Hot Spot Spa Dealer and request Part #70798.
IMPORTANT SPA INSTRUCTIONS
The following contains important spa information, and we strongly encourage you to read and apply them.
DO:
• Use and lock the cover when the spa is not in use, whether it is empty or full.
• Follow the Spa Care and Maintenance recommendations stated in this manual.
• Use only approved accessories and recommended spa chemicals and cleaners.
DON’T:
• Leave the Hot Spot Spa exposed to the sun without water or the cover in place. Exposure to direct sunlight can
cause solar distress of the shell material.
• Roll or slide the spa on its side. This will damage the siding.
• Lift or drag the vinyl cover by using the cover lock straps; always lift or carry the cover by using the handles.
• Attempt to open the electrical control box. There are no user serviceable parts inside. Opening of the control box
by the spa owner will void the warranty. If you have an operational problem, carefully go through the steps outlined
in the Troubleshooting section. If you are not able to resolve the problem, contact your authorized Hot Spot Spa
Dealer. Many problems can easily be diagnosed over the telephone by an Authorized Service Technician.
SAVE THESE INSTRUCTIONS

Page x xPage 5 Installation Instructions
II. INSTALLATION INSTRUCTIONS
SITE PREPARATION
Y
ou probably have a spot picked out for your new spa, whether it’s indoors or outdoors, on a patio or on a deck. Just make
sure you check the following:
• Always put your spa on a structurally sound, level surface. A filled spa can weigh a great deal. Make certain that the
location you choose can support the weight of your filled spa.
• Don’t forget to level your spa before filling it. (See the Spa Leveling section of this manual)
• Locate your equipment compartment, which houses all of the electrical components, in a place where water will drain
away from it. Allowing water into the equipment compartment can damage the electronics, or may result in tripping
your house’s circuit breaker.
• Leave yourself easy access to the Ground Fault Circuit Interrupter (GFCI) for testing. The GFCI is located at the end of
the power cord, or at the subpanel of a hard-wired (optional) 30 amp spa.
• Never let water get into the subpanel (optional 30 amp models) or into the electrical outlet that your spa is plugged
into. Your spa’s subpanel is rain-tight when installed correctly with the door closed. Consult your local code authority
to determine if an electrical outlet with a cover is required for your installation. If it is, and your spa is a 15 amp RE,
RLX, or an SLX model, a suitable outlet may be purchased from your Authorized Hot Spot®Dealer. Ask for Part
#71591. An outlet will be provided for the 20 amp SLXtra.
• Leave access to the equipment compartment for periodic spa care and maintenance.
OUTDOOR AND PATIO INSTALLATION
N
o matter where you install your new spa, it’s important that you have a solid foundation to support it. Structural damage to
the spa, resulting from incorrect installation or placement on an inadequate foundation, is not covered under the spa’s
limited warranty.
If you install the spa outdoors, we recommend a reinforced concrete pad at least four inches thick. The reinforcing rod or
mesh in the pad should be attached to a bond wire.
If you place the spa on the ground, even temporarily, place stepping stones under the leveling areas (see Spa Leveling
Instructions). The stones should be at least two inches thick and twelve inches square. Even with stones in place, the spa will
inevitably settle and become unlevel. Plus, a spa surrounded by dirt or grass will soon be filled with dirt or grass from users’
feet; therefore, it is important to get it onto a solid foundation as soon as possible.
DECK INSTALLATION
T
o be certain your deck can support your spa, you must know the deck’s maximum load capacity. Consult a qualified
building contractor or structural engineer. To find the weight of your spa, its contents and occupants, refer to the Spa
Specifications for your model. This weight per square foot must not exceed the structure’s rated capacity, or serious structural
damage could result.
INDOOR/BASEMENT INSTALLATION
B
e aware of some special requirements if you place your spa indoors. Water will accumulate around the spa, so flooring
materials must provide a good grip when wet. Proper drainage is essential to prevent a build-up of water around the spa.
When building a new room for the spa it is recommended that a floor drain be installed. The humidity will naturally increase
with the spa installed. Water may get into woodwork and produce dry rot, mildew, or other problems. Check for airborne
moisture’s effects on exposed wood, paper, etc. in the room. To minimize these effects, it is best to provide plenty of
ventilation to the spa area. An architect can help to determine if more ventilation must be installed.
Your Hot Spot Spa Dealer can help you with local information such as zoning regulations and building codes.
HOW TO UNPACKAGE AND MOVE THE
HOT SPOT SPA
The Hot Spot Spa has been designed to be easy to move and install. For ease of handling, the spa should be moved as close
as possible to the installation site before unpackaging.
CAUTION: Do not slide or roll the spa on its side. This will damage the siding.

x Page x
IMPORTANT REMINDERS:
• The Hot Spot®RE and RLX weigh 264 and 300 pounds respectively, and the Hot Spot SLX and SLXtra weigh 382 and
442 pounds respectively when in the factory packaging. At least two people are required to safely move and set down
the spa.
• Do not leave the spa exposed to the sun without water or the vinyl cover in place. Exposure to direct sunlight can cause
solar distress of the shell material.
INSTALLATION NOTES:
1. If you are an owner of a condominium, town home/patio home or are a member of a homeowner’s association, contact
your representatives regarding their requirements. If you have any questions regarding zoning requirements or building
codes, contact your local city government office.
2. IMPORTANT: The spa is designed for installation on a relatively flat and level surface. Installing the spa on an unlevel
surface will result in unlevel water and an aesthetically unbalanced spa, and may affect its performance. The spa may be
shimmed according to the following Spa Leveling Instructions; however, shimming of the spa may place additional stress
on the spa’s support system. Damage to the spa caused by the incorrect installation of the spa is not covered by the
warranty.
Spa Leveling Instructions
Approved Shim Material (1/4” to 1/2” thick, cut into 2” x 4” rectangles)
• Cedar Shingles
• Redwood
• Exterior Rated Plywood
• Exterior Rated Lumber
Suggested Leveling Procedure:
1. Using a six-foot carpenter’s level (or a short level and a straight piece of wood about eight feet long), check the spa to
identify the lowest and highest corners.
2. With one end of the carpenter’s level resting on the highest corner of the spa, and the opposite end resting on the lowest
corner, gently raise the lower end of the level with shims placed on the corner of the spa shell, until a level reading is
achieved.
3. Carefully lift and pivot the carpenter’s level (so as not to knock over your stack of shims) to each of the remaining corners.
Place the required number of shims under the end of the level at each corner until a level reading is achieved. These are
now your preselected shims.
4. Carefully remove the carpenter’s level and the sets of shims. With one or more persons lifting the lowest side of the spa,
place a 4” x 4” block under the spa base, in the center of the side lifted.
5. The Hot Spot Spa may be shimmed only along the wooden base supports shown as shaded areas in the bottom view of
each spa shown below. Set the preselected shim sets under the wooden base support at their designated leveling point for
each corner. Lift the spa, remove the support block, and set the spa on the shims. Repeat this procedure for the opposite
side of the spa, if necessary.
6. Use the carpenter’s level to recheck the level of the spa.
7. Identify the locations of the remaining approved shimming points using the illustrations below, and carefully
slide helper shims under the spa beneath each location. These helper shims should create a snug fit
between the foundation and base support system. If it is necessary to lift the spa to place the helper shims,
use care not to kick out the original corner shims.
Installation Instructions Page 6
78"
(1.98m) 78"
(1.98m) 71"
(1.8m)
78" (1.98m) 71" (1.8m)
Warning!
Warning!
Watkins Manufacturing
Corporation recommends that
the Hot Spot Spa be installed
above ground. Lowering the
top of the spa to ground level,
or employing decking which
raises standing level toward
the top of the spa
substantially increases the
hazard of accidental entry.
Consult a licensed building
contractor to design or
evaluate your custom decking
requirements.

Page x x
Electrical Requirements and
Precautions
GENERAL INFORMATION
Y
our Hot Spot®Spa has been carefully designed to give you maximum safety against electrical shock. Connecting the spa
to an improperly wired circuit will negate many of the spa’s safety features. Please read and follow the electrical
installation requirements and instructions for your specific spa model completely!
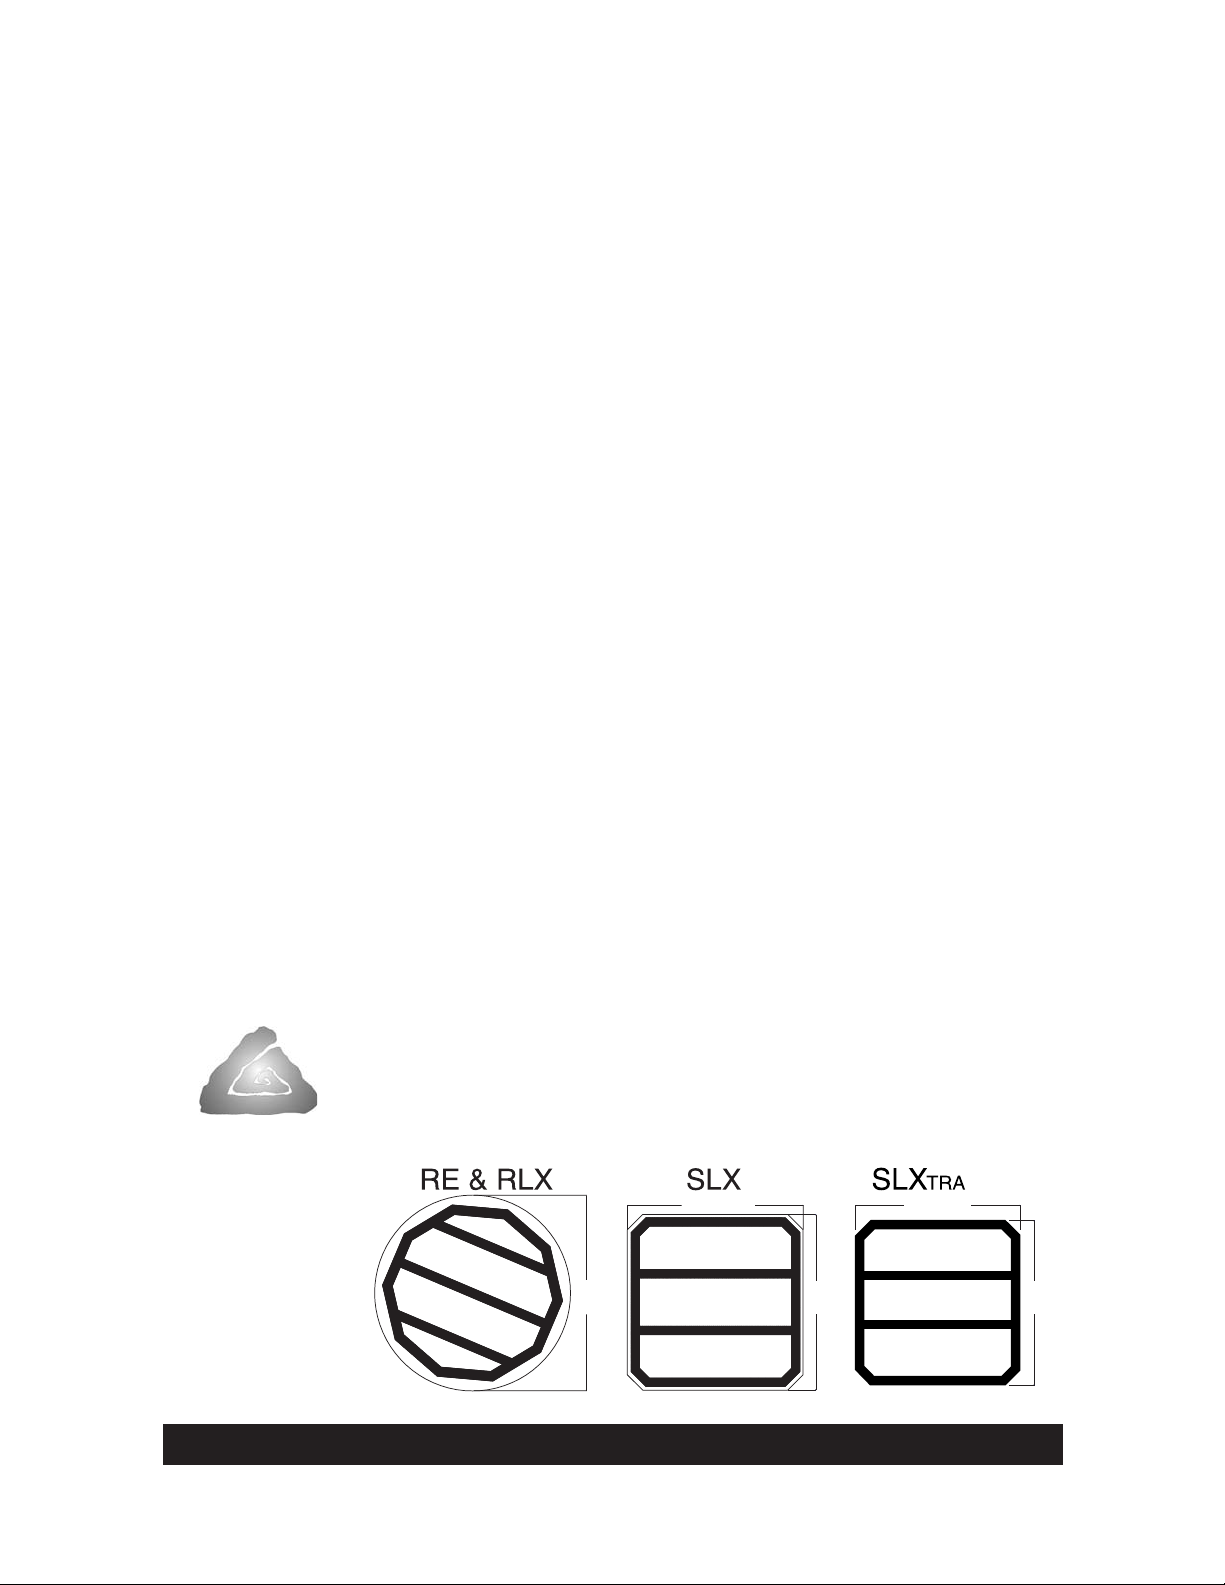
There are three electrical configurations associated with Hot Spot Spas. Each spa comes standard as a 115 volt 15 amp or
20 amp (SLXtra), cord-connected electrical configuration, which is designated as an “either/or” hydromassage system. This
means that the heater will not activate simultaneously with the high speed mode of the jet pump. If you use your spa for
extremely long periods of time with the high speed jet pump operating, you may experience a slight drop in water
temperature. This happens because the heater will not heat while the pump is running on high. To allow the heater to
operate at the same time as the high speed jet pump, the spa may be converted (by an authorized technician) to a 115 volt
30 amp hard-wired configuration. The 30 amp configuration provides enough electrical current to allow the heater and the
high speed jet pump to operate simultaneously. Conversion requires electrical modification within the control box (contact
an authorized Hot Spot Service Technician) and the installation of an electrical subpanel (available from your Hot Spot
Dealer). A licensed electrician must install the subpanel.
ELECTRICAL REQUIREMENTS
The spa must be connected to a 115 volt, 15 or 20 amp (30 amp for converted models) grounded circuit. The equipment
pack requires a MINIMUM of 104 volts under load. A dedicated circuit is required; the term “dedicated” means the electrical
circuit is not being used for any other high-load electrical items (patio lights, appliances, garage circuits, etc.). If the spa is
connected to a non-dedicated circuit, overloading will result in “nuisance tripping” of the internal fuses or of the breaker
switch at the house electrical breaker panel.
The circuit must be properly wired; that is, it must have the following:
•Standard (cord-connected) 115 volt 15 amp – A minimum 15 amp GFCI circuit breaker in the house breaker
panel, #14 AWG or larger wire (including the ground wire) and the correct polarity throughout the circuit.
•Standard (cord-connected) 115 volt 20 amp (SLXtra Spa only) - A minimum 20 amp GFCI circuit breaker in the
house panel, #12 AWG or larger wire (including the ground wire) and the correct polarity throughout the circuit.
•Converted (hard-wired) 115 volt 30 amp – A minimum 30 amp circuit breaker in the house breaker panel,
#10 AWG or larger wire (including the ground wire), a subpanel with an appropriate GFCI breaker, and the correct
polarity throughout the circuit.
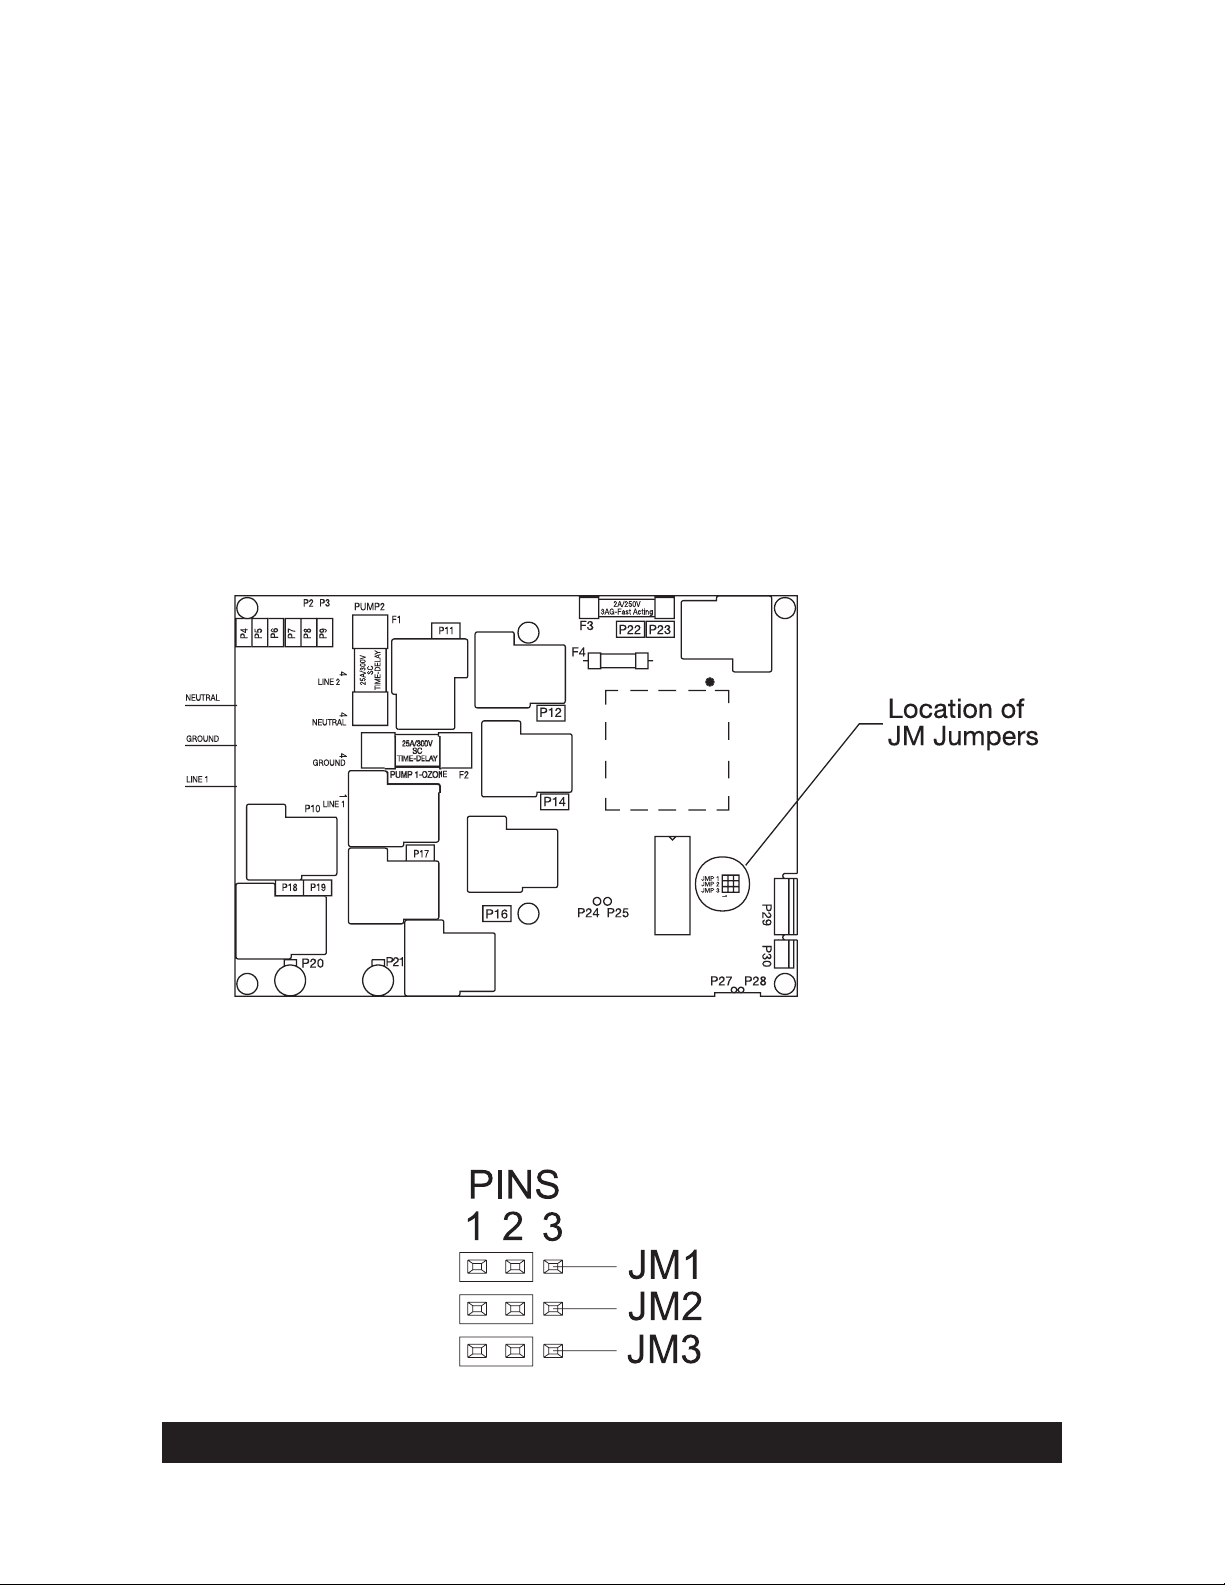
A pressure wire connector is provided on the exterior surface of the spa’s electrical control box, located inside the
equipment compartment. This is to permit the connection of a bonding ground wire between this point and any metal
equipment, enclosures, pipe or conduit within five feet of the spa (if needed to comply with local building code
requirements). The bonding wire must be at least a #8 AWG solid copper wire.
NEVER CONNECT THE SPA TO AN EXTENSION CORD!
SPA INSTALLATION INSTRUCTIONS
Each Hot Spot Spa comes equipped with approximately 15 feet of usable power cord (this is the maximum length allowed
by regulatory standards and the National Electric Code). The power cord is stored for shipping inside the equipment
compartment. To remove the power cord, open the equipment compartment and locate the cord. Carefully pull the cord out
of the equipment compartment to the desired length.
If you choose to convert your spa to 115 volt 30 amp operation (contact an authorized Hot Spot Spa Service Technician to
perform the conversion), a licensed electrician must install the subpanel (available from your Hot Spot Spa Dealer). Refer to
the 30 amp wiring instructions at the end of this section for electrical connections and specifications.
STANDARD, CORD-CONNECTED 115 VOLT 15 OR 20 AMP
CONFIGURATION
For your safety, if you are having an electrician install an electric outlet for the spa outdoors, it should be no closer than ten
(10) feet and no further than fifteen (15) feet from the spa. If the spa is being installed indoors, it should be no closer than five
(5) feet and no further than ten (10) feet from the spa. [Reference National Electrical Code 680 - 6a(1) and 680 - 41a.]
One GFCI is used in the cord-connected 15 or 20 amp configuration. The GFCI module is located at the end of the power
cord. To test the GFCI, simply press the TEST button. The GFCI should trip to the OFF position, disconnecting power to the
spa. To reset the GFCI, press the RESET button. The GFCI should reset, and power should be restored to the spa. If the
GFCI does not function in this way, unplug the cord and contact an authorized Hot Spot Spa Service Technician.
Page 7 Electrical Requirements

x Page xElectrical Requirements Page 8
NOTE: Consult your local code authority to determine if an electrical outlet with a cover is required for your installation. If it
is, a suitable outlet cover may be purchased from your Authorized Hot Spot®Dealer. Ask for Part #71591.
CONVERTED 115 VOLT 30 AMP CONFIGURATION
Conversion Instructions
NOTE: An Authorized Hot Spot Spa Technician must perform the conversion.
1. Disconnect power to the spa and access the control box.
2. Locate the program jumpers (JM1, JM2 and JM3) at the bottom right of the control box (see Figure 1).
3. Using a pair of needle nose pliers, carefully move the JM1 jumper from pins 2 and 3 to pins 1 and 2 (see Figure 2).
A licensed electrician must install the subpanel (available from your Hot Spot Spa Dealer) to supply
power to the spa. The subpanel must be placed in sight of the spa, at a minimum distance of 5 feet away.
Figure 1
Figure 2:
Converted 115 Volt
30 amp jumper configuration
(See Figure 2
for jumper
configuration.)

Page x x
30 Amp Subpanel Wiring Instructions
NOTE: The subpanel must be placed within 100 feet of the main electrical service panel, and between 5 and 50 feet away
from the spa.
Refer to the wiring diagram below.
1. Connect the #10 AWG, WHITE [NEUTRAL] wire from the main electrical service panel to the subpanel NEUTRAL bar.
2. Connect the #10 AWG, GREEN [GROUND] wire from the main electrical service panel to the subpanel GROUND bar.
3. Connect the #10 AWG, BLACK [L1] wire from the main electrical service panel to the subpanel [terminal L1].
4. Check the connections internal to the subpanel and be sure that a pigtail wire exists between the neutral bar and the 30
amp breaker. NEVER remove the pigtail wires!
5. Inside the control panel, locate the terminal block (TB-1).
6. Remove existing power cord.
7. Connect the #10 AWG, BLACK wire from the subpanel 30 amp breaker [terminal L1] to TB-1 terminal L1.
8. Connect the #10 AWG, WHITE wire from the subpanel 30 amp breaker [terminal N, load neutral] to TB-1 terminal N.
9. Connect the #10 AWG, GREEN wire from the subpanel GROUND bar to TB-1 terminal GROUND.
The GFCI breaker inside the subpanel supplies all of the power to the spa. Before each use, open the subpanel and press the
TEST button located on the subpanel GFCI breaker. The breaker should snap into the “tripped” position and the spa should
stop operating. Reset the subpanel GFCI breaker by completely pressing the breaker switch down, into the OFF position.
Then, flip the breaker switch up, into the ON position. Power should be restored and the spa should resume operation.
If the GFCI breaker fails to operate in this manner, it is an indication of an electrical malfunction and the possibility of an
electric shock. Disconnect the power until the fault has been identified and corrected.
IMPORTANT: Should you ever find the need to move or relocate your Hot Spot®Spa, it is essential that you understand and
apply these installation requirements. Your Hot Spot Spa has been carefully engineered to provide maximum safety against
electric shock. Remember, connecting the spa to an improperly wired circuit will negate many of its safety features.
Page 9 Electrical Requirements

Spa Specifications Page 10
HOT SPOT®RE MODEL
SPA SPECIFICATIONS & ILLUSTRATION
HORIZONTAL DIMENSIONS: 78” (198 cm.) diameter round
HEIGHT (without cover): 29” (74 cm.)
EFFECTIVE FILTER AREA: 30 sq. ft. (2.79 sq. meters)
HEATER: 1000 watts (1.0 kW)
WATER (capacity): 230 gallons (871 liters)
WEIGHT: 264 lbs. dry (120 kg.), 2834 lbs. filled (1285 kg.)
(Includes weight of water and 4 adults @ 175 lbs. each.)
DEAD WEIGHT (filled): 100 lbs. per sq. ft., 480 kg. per sq. meter
ELECTRICAL REQUIREMENTS: 115 volt 15 amp grounded circuit (standard)
115 volt 30 amp grounded circuit (optional – requires 30 amp
subpanel)
NOTE: 30 amp wiring must be performed by a licensed electrician.
CERTIFICATIONS: ETL Listed, CE Listed
OVERHEAD VIEW
A. Hydromassage Jets
B. Control Panel
C. Hydromassage Jet Comfort Control®Lever
D. Jet Pump Anti-Suction Grill
E. Light Lens
F. Filter Compartment Cover
EQUIPMENT COMPARTMENT
1. 1.0 kW Heater
2. Spa Drain Valve
3. Electrical Control Box
4. Compression Unions
5. Jet Pump
(WaveMaster®3000)

Page x xPage 11 Spa Specifications
HOT SPOT®RLX MODEL
SPA SPECIFICATIONS & ILLUSTRATION
HORIZONTAL DIMENSIONS: 78” (198 cm.) diameter round
HEIGHT (without cover): 33” (83.8 cm.)
EFFECTIVE FILTER AREA: 30 sq. ft. (2.79 sq. meters)
HEATER: 1000 watts (1.0 kW)
WATER (capacity): 245 gallons (927 liters)
WEIGHT: 300 lbs. dry (136 kg.), 2992 lbs. filled (1357 kg.)
(Includes weight of water and 4 adults @ 175 lbs. each.)
DEAD WEIGHT (filled): 105 lbs. per sq. ft., 510 kg. per sq. meter
ELECTRICAL REQUIREMENTS: 115 volt 15 amp grounded circuit (standard)
115 volt 30 amp grounded circuit (optional – requires 30 amp subpanel)
NOTE: 30 amp wiring must be performed by a licensed electrician.
CERTIFICATIONS: ETL Listed, CE Listed
OVERHEAD VIEW
A. Hydromassage Jets
B. Control Panel
C. Hydromassage Jet Comfort Control®Lever
D. Jet Pump Anti-Suction Grill
E. Light Lens
F. Filter Compartment Cover
G. 6 Precision®Jets
H. Adjustable Rotary Hydromassage Jet
I. Floor Drain
EQUIPMENT COMPARTMENT
1. 1.0 kW Heater
2. Spa Drain Valve
3. Electrical Control Box
4. Compression Unions
5. Jet Pump
(WaveMaster®4000)

Spa Specifications Page 12
HOT SPOT®SLX MODEL
SPA SPECIFICATIONS & ILLUSTRATION
HORIZONTAL DIMENSIONS: 78” (198 cm.) square
HEIGHT (without cover): 33” (83.8 cm.)
EFFECTIVE FILTER AREA: 30 sq. ft. (2.79 sq. meters)
HEATER: 1000 watts (1.0 kW)
WATER (capacity): 285 gallons (1078 liters)
WEIGHT: 382 lbs. dry (173 kg.), 3574 lbs. filled (1621 kg.)
(Includes weight of water and 5 adults @ 175 lbs. each.)
DEAD WEIGHT (filled): 100 lbs. per sq. ft., 480 kg. per sq. meter
ELECTRICAL REQUIREMENTS: 115 volt 15 amp grounded circuit (standard)
115 volt 30 amp grounded circuit (optional – requires 30 amp subpanel)
NOTE: 30 amp wiring must be performed by a licensed electrician.
CERTIFICATIONS: ETL Listed, CE Listed
OVERHEAD VIEW
A. Hydromassage Jets
B. Control Panel
C. Hydromassage Jet Comfort Control®Lever
D. Jet Pump Anti-Suction Grill
E. Light Lens
F. Filter Compartment Cover
G. Precision®Jets
H. Adjustable Rotary Hydromassage Jet
I. Floor Drain
EQUIPMENT COMPARTMENT
1. 1.0 kW Heater
2. Spa Drain Valve
3. Electrical Control Box
4. Compression Unions
5. Jet Pump
(WaveMaster®4000)

HOT SPOT®SLXTRA MODEL
SPA SPECIFICATIONS & ILLUSTRATION
HORIZONTAL DIMENSIONS: 71” (180 cm.) square
HEIGHT (without cover): 33” (83.8 cm.)
EFFECTIVE FILTER AREA: 30 sq. ft. (2.79 sq. meters)
HEATER: 1000 watts (1.0 kW)
WATER (capacity): 285 gallons (1078 liters)
WEIGHT: 442 lbs. dry (200 kg.), 3634 lbs. filled (1648 kg.)
(Includes weight of water and 5 adults @ 175 lbs. each.)
DEAD WEIGHT (filled): 105 lbs. per sq. ft., 510 kg. per sq. meter
ELECTRICAL REQUIREMENTS: 115 volt 20 amp grounded circuit (dedicated)
115 volt 30 amp grounded circuit (optional – requires 30 amp subpanel)
NOTE: 20 and 30 amp wiring must be performed by a licensed electrician.
CERTIFICATIONS: ETL Listed, CE Listed
OVERHEAD VIEW
A. Hydromassage Jets
B. Control Panel
C. Hydromassage Jet Comfort Control®Lever
D. Jet Pump Anti-Suction Grill
E. Light Lens
F. Filter Compartment Cover
G. Precision®Jets
H. Adjustable Rotary Hydromassage Jet
I. Floor Drain
EQUIPMENT COMPARTMENT
1. 1.0 kW Heater
2. Spa Drain Valve
3. Electrical Control Box
4. Compression Unions
5. Jet Pump
(WaveMaster®6000)
6. Ozone Injector
(optional accessory)
Page 13 Spa Specifications
14 4
3
3
2
5
6

Operating Instructions Page 14
III. OPERATING INSTRUCTIONS
START-UP AND REFILL PROCEDURES
Your Hot Spot®Spa has been thoroughly tested during the manufacturing process to ensure reliability and long-term
customer satisfaction. A small amount of water may have remained in the plumbing after testing and, as a result, may have
spotted the spa shell or the spa siding prior to delivery. Before filling the spa, wipe the spa shell clean with a soft rag.
The following instructions must be read and followed exactly to ensure a successful start-up or refill.
CAUTIONS
• Do not fill the spa with hot water, as tripping of the high-limit thermostat may result.
• Do not connect power to an empty spa. Power to the spa automatically activates critical components
within the spa, such as controls, the heater, and other systems. If power is supplied to these components
prior to the spa being filled, the components will be damaged, and this may result in a non-warranty
component failure.
• Do not use your spa after filling until all of the steps listed below are completed.
• Do not add chlorine if treating your spa with polyhexamethylene biguanide (Biguanide, PHMB, eg.
BaquaSpa™) sanitizer (please consult your BaquaSpa manual for instructions on the use of this product).
• Do not use the FreshStart®10,000 pre-filter if treating your spa with a polyhexamethylene biguanide (Biguanide,
PHMB, i.e. BaquaSpa) sanitizer.
1. Close the drain and fill the spa with water through the filter compartment. The water level of your Hot Spot Spa should
be maintained at six (6) inches below the bar top (top of the spa).
RECOMMENDED: Use the FreshStart10,000 pre-filter to remove unwanted contaminants from the tap water.
IMPORTANT: Watkins Manufacturing Corporation does not recommend that the spa be filled with “softened” water, as
this may damage the spa’s equipment.
2. AFTER the spa has been filled with water and the equipment compartment door is secured, power must be applied to
the spa.
• Cord connected 115 volt 15 or 20 amp models – Connect the plug to the dedicated outlet and push the RESET
button on the GFCI.
• Converted 115 volt 30 amp models – Open the door of the electrical subpanel and reset the GFCI breaker. Close
and secure the subpanel door.
3. The jet pump, heating system and all internal plumbing will achieve a partial prime as the spa is filled. To check the
operation of the jet system and remove any remaining air from the heating system, push the JETS button twice to make
the jet pump run on high speed for one minute. Once the jet system is fully operational (as indicated by strong, non-
surging jets), priming of the spa is complete.
IMPORTANT: The air control which is located on the top of the spa shell and labeled “Comfort Control®” should be set
to the MAX position when checking jet operation. Always turn the air control to the MIN position anytime the spa is not
being used. This will help to make the spa operate more quietly and heat more efficiently when the cover is in place.
4. Adjust Total Alkalinity (TA) to 125 ppm, Calcium Hardness (CH) to 150 ppm, then spa water pH to between 7.2 and 7.4.
These procedures are listed in the “Water Quality and Maintenance” section.
IMPORTANT: Add spa water chemicals directly into the filter compartment with the jet pump on high speed for at least
ten minutes.
OPERATION NOTE: Adjusting the Total Alkalinity as the first step is important, as out-of balance TA will affect your
ability to adjust the pH correctly and will prevent the sanitizer from operating effectively.
5. Superchlorinate the spa water by adding 1-1/2 teaspoons of chlorine (sodium dichlor) per 250 gallons of spa water.
Run the jet pump (push the JETS button twice to make the pump run on high speed) for ten minutes.
6. Set the temperature control to the desired temperature (between 100°F and 104°F), then place the vinyl cover on the
spa and allow the water temperature to stabilize (approximately 24 hours). Make sure you secure the cover in place
using the cover locks. Periodically check the spa water temperature. When the water temperature climbs above 90°F,
proceed to the next step.
7. Turn on the jets (push the JETS button twice to make the pump run on high speed) for ten minutes to circulate the spa
water. After the cycle is complete, test the spa water for Free Available Chlorine (FAC) residual. If the residual is
between 3 and 5 ppm on the test strips (found in the test kit) go on to the next step. If the residual is less than 3 ppm,
superchlorinate the spa water by adding 1-1/2 teaspoons of chlorine (sodium dichlor) per 250 gallons of spa water. Run
the jet pump (push the JETS button twice to make the pump run on high speed) for ten minutes.

8.
Recheck the Total Alkalinity (TA) at 125 ppm, Calcium Hardness (CH) at 150 ppm, then spa water pH at between 7.2 and 7.4.
Operational Note: Make sure you adjust your Total Alkalinity first, as an out-of-balance condition will affect your ability to
adjust the pH correctly, and will prevent the sanitizer from operating effectively. The spa is ready for use when the
chlorine level remains between 3 ppm and 5 ppm.
9. The spa temperature is pre-programmed to reach 102°F, and will normally do so within 18 to 24 hours; thereafter, the water
will remain within 3°F of the set temperature.
OPERATION NOTES:
1. The Hot Spot®Spa is equipped with a ten-minute timer delay on the heating/maintenance mode. Whenever the jet pump
has been turned off (and a three-degree temperature drop has occurred) or the temperature control has been turned up, it
will take ten minutes before the low speed of the jet pump and heater become activated. Always push the JETS button to
turn off the jet pump when exiting the spa. In the standard 115 volt 15 or 20 amp electrical configuration, the heating
system does not operate simultaneously with the high speed pump. On the other hand, in the optional 115 volt 30 amp
system, the heating system does operate simultaneously with the high speed pump.
2. The spa controller has an automatic two-hour “time-out” feature should the high speed jet mode be left on inadvertently.
After two hours of continuous operation, the controller will automatically return to the maintenance/heating mode.
3. The spa controller also has a six-hour “time-out” feature should the light be left on inadvertently. After six hours of
continuous operation, the controller will automatically turn the light off.
HEATING AND HYDROMASSAGE SYSTEMS
The Hot Spot Spa uses a two-speed jet pump to operate its hydromassage jets and to circulate the spa water through the
heating system. The low speed mode of the pump, which is activated automatically by the control thermostat, will cause the
spa water to be drawn slowly in through the filter, the heater, and into the pump. The pump, in turn, will push the water back
into the spa through the jets. When the JETS button is pushed one time, the spa user can activate the low speed of the jet
pump. (The heater may or may not be on, depending on whether the control thermostat has indicated a demand for heat.)
When the JETS button is pushed a second time, the high speed of the jet pump will be activated. (This will automatically
deactivate the heater if it is operating in a standard 15 or 20 amp system.)
In the optional 115 volt 30 amp electrical system, if a drop in the water temperature has occurred, the spa heater will operate
simultaneously when the jet pump is operating on high speed. On the other hand, in a standard 115 volt 15 amp electrical
system, the spa heater will not operate simultaneously when the jet pump is operating on high speed, even if a drop in the water
temperature has occurred. In either electrical configuration, when the high speed mode of the jet pump is turned off, the spa will
enter a ten-minute “tranquil mode.” During this time the heating system (and simultaneous operation of the jet pump at low
speed) will not operate (unless the JETS button is pushed), even if the water temperature has dropped below the control setting.
Once the ten-minute period has expired, the spa controller will switch to the maintenance mode and the heating system will be
automatically activated.
The Hot Spot Spa is equipped with a state-of-the-art heating system. The system uses an exclusive “flow through” No-Fault®
1000 stainless steel, high watt density heater.
IMPORTANT: The 115 volt electrical system of the Hot Spot Spa is not convertible to a 230 volt system. Any modification to the
original equipment will void the spa’s ETL Listing, resulting in an unsafe spa and voiding the spa’s warranty!
CIRCULATION CYCLE
The circulation cycle must be activated if your spa is equipped with a FreshWater®III high output ozone system (SLXtra Spas
only), in order to ensure adequate ozone circulation time. On RE, RLX and SLX models the circulation is primarily used when the
ambient temperature remains high for extended periods of time. In this scenario, the heater may not cycle on because the spa
water temperature does not cool. If the heater does not cycle on, the low speed jet pump will not automatically engage. This is
very critical when using the FreshWaterAg+®silver ion purifier, which relies on circulation to disperse silver ions throughout the
spa. When engaged, the circulation switch will activate the low speed jet pump for a four-hour circulation cycle. If, during the
circulation cycle, a user enters the spa and turns on the high speed jet pump, the circulation cycle will not pause. When the high
speed pump is shut off, the circulation cycle will continue to completion.
The circulation cycle begins when the circulation timer is activated. Thereafter, the circulation cycle will repeat for the same time
every day until the timer is deactivated. The only exception occurs in the event of a power failure. If power is disconnected from
the spa when the circulation timer is activated, the circulation cycle will reset and engage when power is reapplied. Therefore, if
you have activated the timer at 8 am, the low speed jet pump will be activated from 8 am to noon. The cycle will repeat the next
day (at 8 am) as long as the timer remains activated. However, if a power failure occurs at 10 am, and power is reapplied at
10:30 am, the cycle will reset and the low speed jet pump will activate from 10:30 am to 2:30 pm.
To activate the circulation timer:
1. Determine the time of day that you would like the pump to activate the circulation cycle. It is best to choose the cooler
hours of the day, such as morning or evening.
Page 15 Operating Instructions

Operating Instructions Page 16
2. Locate the Light button, the Temp Plus (+) and the Temp Minus (-) buttons on the control panel.
3. To turn the circulation cycle on, press and hold the Light button for three seconds. The display will then read “OFF.” Press the Temp Plus (+)
button within three seconds. The display will read “ON” and the circulation cycle LED will illuminate. Finally, press the Light button again within
three seconds to confirm activation of the circulation cycle.
4. To turn the circulation cycle off, press and hold the Light button for three seconds. The display will then read “ON.” Press the Temp Minus (-)
button within three seconds. The display will read “OFF” and the circulation cycle LED will go dark. Finally, press the Light button again within
three seconds to confirm deactivation of the circulation cycle.
NOTE: The circulation switch should remain off except in conditions where the ambient temperature remains very high for extended periods of time.
HYDROMASSAGE JETS
A. On the Hot Spot®RE model, the hydromassage jet nozzles are directional. The intensity of these jets is determined by the volume of air which
is introduced into the jet chambers, where it mixes with the water stream. The air control valve is used to change the intensity of all five jets
simultaneously. The intensity of individual hydromassage jets cannot be adjusted separately.
ACCESSORY NOTE: Ask your Hot Spot Spa Dealer about Micro’ssage rotating jet kits, which can be installed easily in your spa in place of
directional nozzles to vary the effect of the jets.
B. On the Hot Spot RLX, SLX and SLXtra models, the Comfort Control®lever is used to change the intensity of all jets simultaneously. Each jet is
also individually adjustable; simply turn the faceplate clockwise to decrease the jet pressure or counterclockwise to increase the jet pressure.
Three of the four hydromassage jets contain directional nozzles, while the remaining one contains a dual-port rotary nozzle. The directional nozzles
and dual-port rotary nozzle can be placed in any jet location desired. The nozzles can be removed by grasping the nozzle and gently pulling away
from the jet faceplate. To install a new nozzle, align the four prongs on the rear of the nozzle with the four holes in the interior of the jet faceplate
and press the nozzle into place. The nozzle will snap into place.
ACCESSORY NOTE: Additional rotary jet kits are available from your Hot Spot Spa Dealer.
PRECISION®JETS
Precision jets are small (available in the RLX, SLX and SLXtra models only). They are designed to perform a soft, soothing massage on your back
and shoulders. Adjust their pressure using the Comfort Control lever.
SAFETY EQUIPMENT
A. GFCI: The Ground Fault Circuit Interrupter, located on the end of the power cord, is a safety device that is designed to sense as little as 5
milliamps of electrical current leakage to ground. It is very important to protect a GFCI from rain and other moisture. Watkins Manufacturing
Corporation recommends that the GFCI be tested before each use to ensure it is functioning correctly.
To test the GFCI:
Before each use, with the spa operating, push the TEST button (located on the front of the GFCI). The GFCI breaker should trip to the “off”
position, disconnecting power to the spa. Reset the GFCI by pushing the RESET button. The spa will now operate normally. If the interrupter
does not perform in this manner, it is an indication of an electrical malfunction and the possibility of an electric shock. Unplug the spa until the
fault has been identified and corrected.
B. HEATER HIGH-LIMIT SWITCH: The heater high-limit thermostat is located on the heater assembly. If for any reason the internal temperature
of the heater exceeds 120°F, the high-limit circuit will trip and turn off the spa. This is indicated on the control panel display by the code
“◆◆◆” The heater high-limit may be reset when the water temperature within the heater has cooled to approximately 110°F. Reset the heater
high-limit by simply disconnecting power to the spa for thirty seconds. The cause of the overheating must be located to prevent a recurrence.
The most common cause of limit-tripping is inadequate water flow through the heating system. This may be caused by an obstruction within
the pump water lines (filter, pump intakes or internal plumbing), the non-function of the low speed mode of the jet pump, or the malfunction of
the control thermostat. Once the cause has been identified and corrected, and the sensor has cooled, reset the switch.
C. PRESSURE SWITCH: The pressure switch is located on the heater, and is designed to prevent heater operation during a no or low flow
condition. If for any reason flow through the heater is reduced or stopped, the pressure switch will trip. This is indicated on the control panel
display by the code “◆◆◆” The most common causes of inadequate heater flow are a dirty or clogged filter, obstruction in the plumbing
lines, and non-operation of the low speed heat pump.
Additionally, the control panel display will display the code “◆◆◆” if the pressure switch senses flow through the heater when the jet pump is
not activated. Contact your Authorized Service Technician.
COMFORT CONTROL SYSTEM
COMFORT CONTROL AIR VALVE: Turning the Comfort Control lever to MAX allows for the same volume of air to flow to all individual jets and
Precision jets simultaneously. On the Hot Spot RLX, SLX and SLXtra models, the jet faceplate is then used to control the intensity of each
hydromassage jet.
NOTE: Always turn the Comfort Control lever to the MIN position anytime the spa is not being used. This will help make the spa operate more
quietly and heat more efficiently when the vinyl cover is in place.

SPA CONTROL PANEL
A. JET BUTTON: Use the JET button to activate the
jet pump. Pushing the JET button once will
activate the jet pump on low speed. Pushing it a
second time will activate the high speed mode of
the jet pump. A third push will deactivate the jet
pump.
The jet LED on the control panel will illuminate
whenever the jet pump is activated (either high or
low speed) using the JET button. The LED does
not illuminate when the jet pump comes on
automatically to heat the water.
B. LIGHT BUTTON: The Hot Spot®Spa is equipped
with a low-voltage spa light. Push the LIGHT
button to turn it on. Push it a second time to turn it
off. For your spa enjoyment, a blue and a red lens
cover have been included with the spa’s owner’s
package. The original clear lens is not removable –
a colored lens can be snapped over the clear lens
to achieve the desired color.
When the light is activated, the light LED on the control panel will illuminate.
C. TEMPERATURE CONTROLS: The set temperature range is from 50°F to 104°F (10°C to 40°C).
The factory-set temperature of the spa water is 102°F (39°C). Whenever power is disconnected and then
reconnected to the spa, the water temperature will automatically seek this temperature, unless you set it otherwise
using the temperature controls.
Pressing the Temp Plus (+) button displays the spa’s set temperature. To increase the set temperature, press the
Temp Plus (+) button again, once for each degree of increased temperature desired. If you hold the button down,
the set temperature will increase by one degree every half-second.
To decrease the set temperature, press the Temp Minus (-) button, once for each degree of decreased temperature
desired. If you hold the button down, the set temperature will decrease by one degree every half-second.
D. CIRCULATION CYCLE LED: The circulation cycle LED will illuminate when the circulation cycle is activated. See the
Circulation Cycle Switch section of this manual for instructions on activating the circulation cycle.
IV. SPA CARE AND MAINTENANCE
GENERAL INFORMATION
Y
our Hot Spot Spa is manufactured from the highest quality, most durable materials available. Even so, the spa care
and maintenance program you develop will ultimately determine how long your spa and its individual components
will last. Regular maintenance and following the advice in this section will help you to protect your investment.
DRAINING THE WATER
Detergent residues from bathing suits and soap film from your body may gradually accumulate in your spa’s water.
Normally, in about four months the water will become sudsy and should be replaced. Showering without using soap
prior to entering the spa or using only the rinse cycle when laundering your bathing suit will help to reduce detergent
residue in the spa water. Important: Remember to change your water every three to four months.
TO DRAIN YOUR SPA:
1. Disconnect the spa from the power supply by the appropriate method:
Standard 115 volt 15 or 20 amp models - Disconnect the power cord from the house receptacle.
Converted 115 volt 30 amp models - Trip the GFCI breaker located in the subpanel.
2. Remove the screws from the equipment access door and remove the door completely. Locate the main drain valve
for the spa and remove the drain cap. Attach the inlet of a garden hose to the drain valve (to avoid flooding of the
foundation surrounding the spa) and route the outlet of the hose to an appropriate draining area.
NOTE: Spa water with a high sanitizer level may harm plants and grass.
Page 17 Spa Care and Maintenance
Set Temperature
Display Jet LED Light LED Circulation
Cycle LED
Jet
Button Light
Button Temperature
Minus
Temperature
Plus

Spa Care and Maintenance Page 18
3. Open the valve by turning the knob counterclockwise. The spa will drain almost completely by gravitational flow. Any remaining water should
be removed by bailing with a soft plastic cup.
IMPORTANT: All Hot Spot®Spa models will drain almost completely through the main drain valve. Use a soft plastic cup to bail any remaining
water. Equipment such as the jet pump and heating system will drain. Any water remaining within the plumbing after draining will only need to
be removed if the spa is being winterized.
4. When empty, inspect the spa shell and clean as required. (Follow the Care of the Exterior Finish instructions.)
5. Remove the filter cartridge and clean as required (see the Filter Maintenance section).
6. Replace the filter cartridge.
7. Close the drain valve and reinstall the drain cap.
8. Replace or close the equipment access door and replace the screws.
9. Refill the spa through the filter compartment BEFORE restoring power.
IMPORTANT: Always clean the filter cartridge each time the spa is drained for cleaning. Always sanitize and chemically balance the spa water
after cleaning and refilling the spa.
FILTER MAINTENANCE
As with any water filtering system, the filter cartridge may become clogged, resulting in reduced water flow. In your Hot Spot Spa, it is important to
maintain a clean, unobstructed filtering system to ensure maximum performance from the jets. Watkins Manufacturing Corporation recommends
the filter cartridge be cleaned with a filter cleaner at least once every month.
WARNING: The frequency and duration of use, and the number of occupants all contribute to determining the appropriate time between filter
cleanings. More use means that more frequent filter cleanings are required. Failure to maintain the filter cartridge in a clean, unobstructed condition
will result in reduced water flow through the heater assembly that may cause the High Limit Thermostat or Pressure Switch to trip. If this high limit
or pressure switch trip occurs during sub-freezing temperatures and goes unnoticed, the spa water may freeze. Any damage to the spa (due to
freezing) caused as a result of poor maintenance (stated under misuse or abuse in the Hot Spot Spa Limited Warranty), will not be covered by your
spa warranty.
DANGER: To reduce the risk of injury to persons using the spa, DO NOT use the spa with the filter cartridge or filter standpipe removed!
FILTER CARTRIDGE REMOVAL AND CLEANING
1. Disconnect power to the spa.
2. Remove and carefully set aside the filter compartment cover.
3. Remove any floating items from within the filter compartment.
4. Turn the filter retainer handle (located on the top of the filter cartridge) counterclockwise until the retainer can be removed from the filter
standpipe.
5. Remove the filter retainer and cartridge.
SERVICE NOTE: Never remove the filter standpipe. Debris may find its way into the internal plumbing which may result in blockage. NEVER
REMOVE SUCTION FITTINGS.
6. Always clean the filter using a filter degreaser such as Hot Spring®FreshWater®Filter Cleaner to remove mineral and oil buildup. Simply soak
the filter in the degreaser (according to the package directions), then place the filter on a clean surface and spray until clean using a garden
hose. It may be necessary to rotate the filter while spraying to remove any debris lodged between the filter pleats.
7. To reinstall the filter cartridge, reverse the order of steps in which it was removed. Do not overtighten!
CARE OF THE EXTERIOR FINISH
SPA SHELL
The Hot Spot RE model has a high quality Endurol®shell. The Hot Spot RLX, SLX and SLXtra models have a high quality granite-like shell. Stains
and dirt generally will not adhere to your spa’s surface. Most household chemicals are harmful to your spa’s shell. The only products which
have passed the manufacturer’s tests are Soft Scrub®and Windex.®Sodium bicarbonate (baking soda) can also be used for minor surface
cleaning. A soft rag or a nylon scrubber should easily remove most dirt. Always thoroughly rinse off any spa shell cleaning agent with fresh water.
Cleaning of the surface at the waterline to remove any body oil or “bathtub ring” can be done easily with baking soda and a soft sponge. When
your spa has been drained for cleaning, the use of a spa/tub surface cleaner is recommended to clean the spa shell. The use of a soft rag, soft
sponge or nylon scrubber should easily remove most dirt build-ups. Always thoroughly rinse off any spa shell cleaning agent with fresh water. The
use of a spa polish, such as Hot Spring FreshWater Spa Shine, is recommended after the spa shell has been dried, to polish the surface.
SERVICE NOTES:
1. Iron and copper in the water can stain the spa shell if allowed to go unchecked. Ask your Hot Spot Spa Dealer about a Stain and Scale
Inhibitor, such as Hot Spring FreshWater Stain and Scale Defense, to use if your spa water has a high concentration of dissolved minerals.
Table of contents
Popular Water Pump manuals by other brands

IMP PUMPS
IMP PUMPS NMT Mini Series Installation and operating manual

Central Pneumatic
Central Pneumatic 67697 Set up and operating instructions

Gema
Gema OptiSpray AP01.1 operating instructions

MTH PUMPS
MTH PUMPS T31 Series Repair instructions

HeatPumps4Pools
HeatPumps4Pools iFlo Junior instruction manual

red lion
red lion RL160U owner's manual