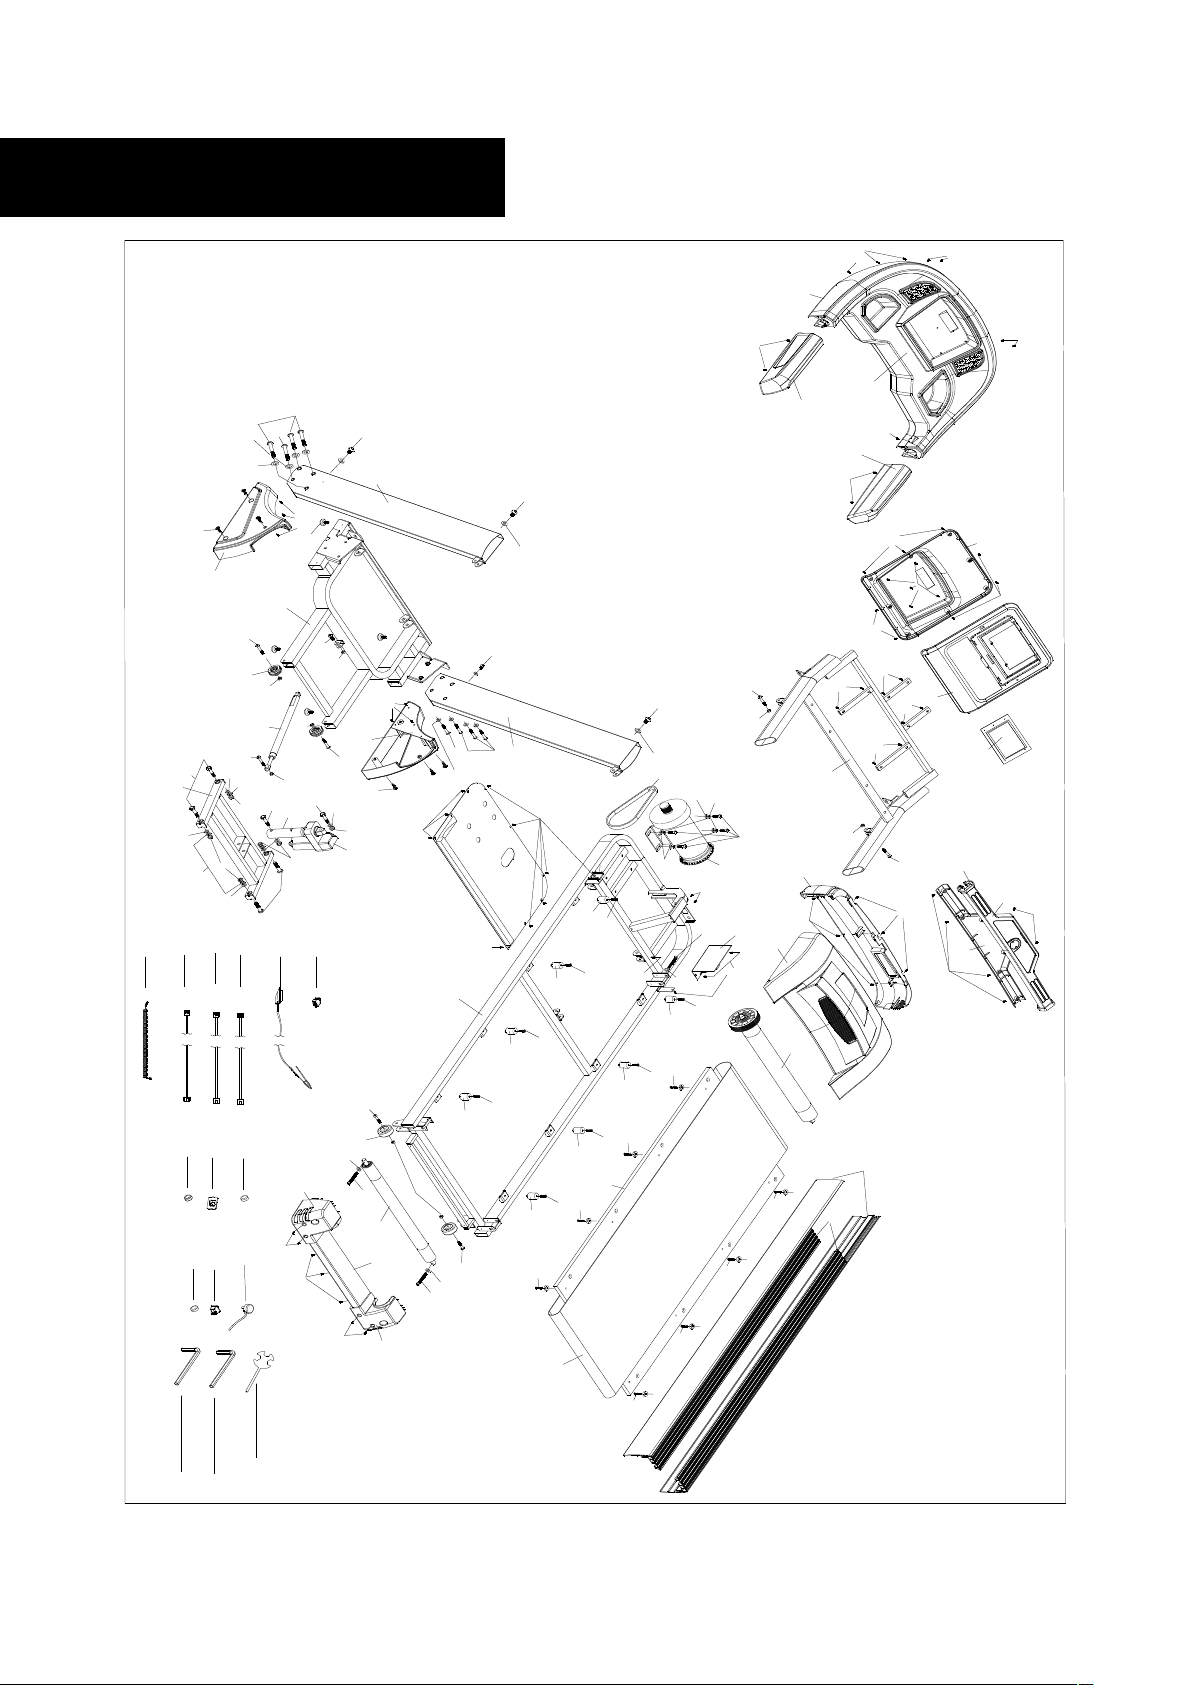
HouseFit HT-9111E User manual

Stay Healthy﹐Stay Fit

1
Before starting to exercise, read the manual carefully and also always keep this manual with you.
The equipment has been tested and certified by En957 under class H.C. for home use only.
Maximum weight of user: 130KGS/286lbs
Make sure that you have gathered all the necessary tools you may require to assemble the unit
properly. Having all your equipment at hand will save time and make the assembly quickly.
Make sure that you have cleared away a large enough space to properly assemble the unit.
Make sure space is free from anything that may cause injury during assembly.
Keep the treadmill indoors, away from moisture and dust . Do not put the treadmill in a garage or
covered patio, outdoors or near water.
Keep pets and small children away from the treadmill at all time.
Keep at least 2500mm (L)* 1500mm (W) safety area behind the treadmill.
Assemble and operate the treadmill on a level, solid surface.
Keep the plug and power cord away from heated surface.
Do not operate where aerosol (spray) products are being used or where oxygen is being
administered.
Assembly size (mm) 1910*800*1400 Voltage DC 220-240V
Fold size (mm) 1210*800*1520 Motor power 2.5HP
Running area (mm) 460*1360 Output current 6A
Net weight 75 KG Speed range 1.0-18 km/h
Max.user weight 130 KG
Display readout Speed,Time.Distance,Elevation,Calories,Pluse,Program,Body fat
Specification
PRECAUTIONS
BEFORE BEGINNING ASSEMBLY

2
Please check all the bolts and nuts and the tools in the tool bag.
You must follow the assembly instructions carefully.
When assemble the handle, you must note not to let it press any wire.
To make the assembly easier, at first you should not tighten all parts completely, but tighten all after
finishing the assembly.
When finishing assembly, please make the tool in save keeping for future use.
Always keep all electric components, such as the motor, cord and switch away from water.
Before plugging in, check the voltage label near the power switch.
Don’t plug in the power cable, until the assembly has been completed.
NOTE:
If the supply cord is damaged, it must be replaced by the manufacturer, its service agent or similarly
qualified persons in order to avoid a hazard.
Before beginning any exercise program you should consult your doctor first to determine if you have
any medical or physical conditions that could put your health and safety at risk or any damage. Your
doctor’s advise is essential especially if you are taking medicine that affects your heart rate, blood
BEGIN TO ASSEMBLE
BEFORE YOUR WORKOUT

3
pressure or cholesterol level. We do not suggest you to use the machine unless you have your
doctor’s advice.
Be aware of your body’s signals. Incorrect or excessive exercise can damage your health. If you feel
dizziness, nausea, chest pain, back pain or other health symptoms stop the workout at once and
consult your doctor before continuing.
Do warm-up exercises.
Never insert any objects into any opening on the treadmill.
Wear appropriate workout clothing while exercising. Do not wear robes or other clothing that could
become caught in the machine. Running or aerobic shoes are also required while using the
machine.
Never turn on the treadmill while somebody is standing on the running surface.
Before using the machine, please check the nuts and bolts are securely tightened.
Proceed with caution when getting on or off the treadmill. Use the handrails whenever possible. Do
not step off the treadmill while the belt is running at high speed.
Keep all loose clothing and towels away from the running surface.
To get on running surface, straddle the running surface by standing on the right and left foot rails on
each side of the belt before starting the belt.
The treadmill is capable of high speed. To avoid sudden jumps in speed, adjust the speed in small
increments.
Keep hand away from all moving parts.
Always insert the safety key and attach the clip to your clothes at your waist before beginning your
workout. If you encounter problems and need to stop the motor quickly, simply pull the safety key
from the computer.
Never leave the treadmill unattended while it is running.
Never attempt to turn around while of the treadmill with the belt running. Keep your head and body
facing forward at all times.
Do not overexert yourself during your workout. If you feel any pain or discomfort, stop your workout
immediately and consult your physician.
Always use the equipment as mentioned. If any defective components while assembling or
checking the equipment has been found, or you hear any unusual noises from the equipment during
use, stop immediately. Do not use the equipment until the problem has been rectified.
DURING YOUR WORKOUT

4
Decrease the speed gradually, then press the button “ STOP” on the computer.
To get off the running surface, straddle the running surface by standing on the right and left foot rails
on each side of the belt after the belt has stopped.
Remove the safety key and store it away in a safe place when the treadmill is not in use. Keep the
safety key away from children.
Do warm-down exercises at the end of your workout.
When you finish your workout, follow page 17 to fold up the treadmill for storage.
Regularly inspect and tighten all parts of the treadmill.
Always unplug the power cord before performing the maintenance and adjustment procedures
described in this manual. Do not remove the motor cover unless instructed to do so by an authorized
service representative. Servicing other than the procedures in this manual should be performed by
any authorized service representative only.
To disconnect, turn the power switch to the OFF position before removing the power plug from the
wall outlet.
Keep all electrical components, such as the motor, power cord and ON/OFF switch away from water
or other liquids to prevent shock. Do not set anything on the handrail, computer console or belt.
Never place liquids on any part of the unit.
Do not modify or attempt any service on the treadmill yourself other than the assembly and
maintenance described in this manual.
AFTER YOUR WORKOUT

5
EXPLODE VIEW 1
20
20
49
49
49
49
49
49
49
47
26
26
26
16
26
26
26
25
25
25
25
24
24
13
13
24
24
24
28
23
23
23
22
22
22
22
22
22
22
21
20
20
20
20
20
20
20
20
20
19
19
18
18
18
18
18
18
18
18
17
17
17
17
17
17
17
16
15
14
13
10
10
10 10
B
9
9
A8
8
8
58
62
61
53
56
57
71
63
67
68
70
69
66
65
64
60
59
55
54
52
51
50
49
48
47
46
44
45
43
42
41
40
39
38
37 36
35
34
33
32
31
30
29
28
27
25
24
23
22
21
19
17
16
14
14
12
11 7
6
5
4
3
2
24
13
1
D
B
D
A
BD
BD
C
C
E
F
G

6
PARTS LIST
1 Base 1 40 Rear end cap left 1
2 Incline frame 1 41 Rear end cap right 1
3 Main frame 1 42 Base cover(left&right) 2
4 Left upright 1 43 Base cover board 2
5 Right upright 1 44 Side rail cover 2
6 Handrail rack 1 45 Side rail 2
7 Bolt M10*55 1 46 End cap support board 1
8 Bolt M10*45 5 47 Handrail foam 2
9 Bolt M8*55 2 48 Motor belt 210J-6 1
10 Screw¢4*20 8 49 Cushion¢25*33*M8 8
11 Bolt M8*25 1 50 Base foot 4
12 Bolt M8*30 4 51 Base moving wheel 2
13 Bolt M8*35 4 52 Frame moving wheel 2
14 Bolt M8*40 3 53 Magnet ring foam 1
15 Screw ¢4*12 2 54 Running board1220*605*T15 1
16 Bolt M8*65 3 55 Running belt460*2870*T1.6 1
17 Bolt M8*20 8 56 U socket 1
18 Bolt M5*28 8 57 Cable grommet¢24*¢15*6 1
19 Screw¢4*15 7 58 Power cord 1
20 Screw¢4*12 30 59 DC Motor 1
21 Screw¢3*10 4 60 Incline motor 1
22 Screw¢4*12 22 61 Power switch 1
23 Nut M10 6 62 Magnetic ring¢28*¢16*13 1
24 Nut M8 11 63 Circuit breaker 1
25 Washer ¢11*¢22*2.0 6 64 Air cyclinder 1
26 Washer ¢9*¢16*T1.6 12 65 Upper controller 1
27 Spring washer M8 4 66 Controller 1
28 Spring washer M10 4 67 Safety key 1
29 Front roller dia 1 68 Upper cables 1
30 Rear roller dia 1 69 Middle cables 1
31 Console upper box 1 70 Under cables 1
32 Console under box 1 71 Audil cables 1
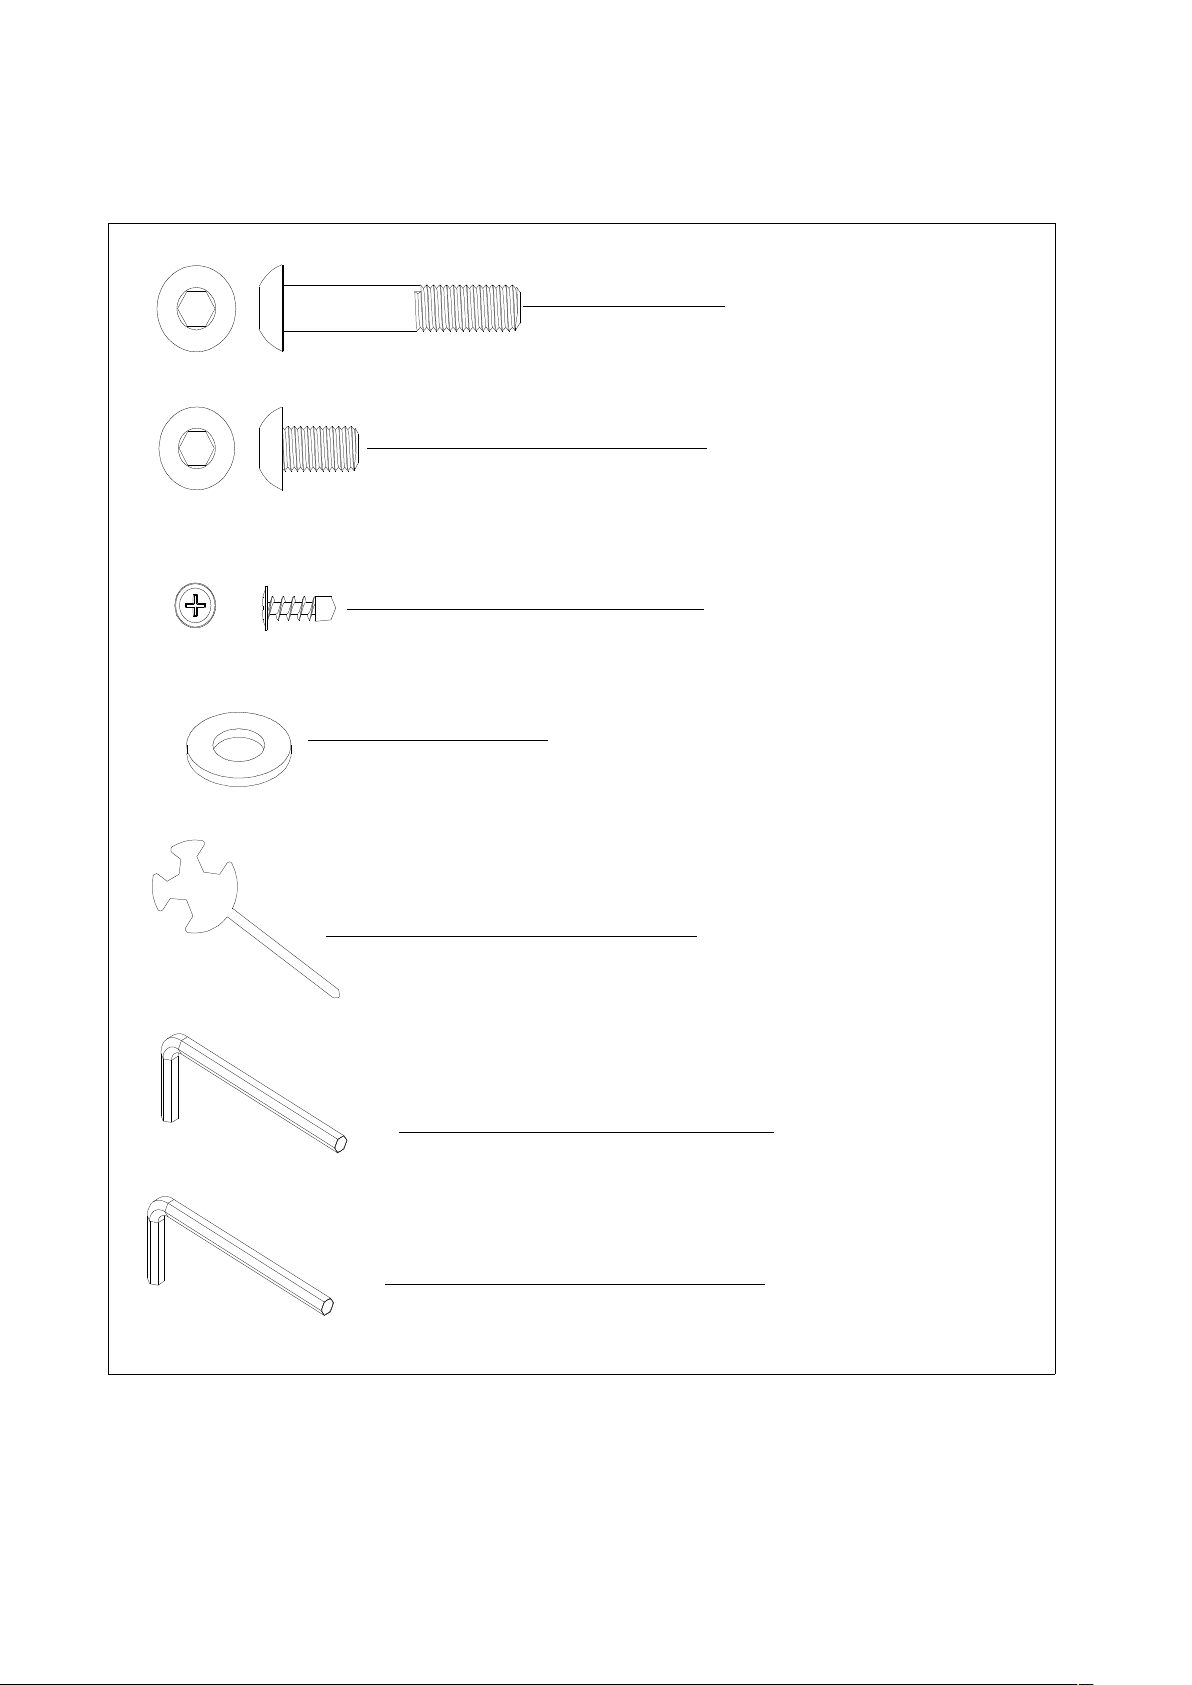
33 Console PCB upper cover 1 A Bolt M8*55 6
34 Console PCB under cover 1 B Bolt M8*15 4
35 Front handrail bar upper cover 1 C Screw¢4*15 6
36 Front handrail bar under cover 1 D Washer¢9*¢16*T1.6 10
37 Handrail cap 2 E Wrench S13.15 1
38 Front motor cover 1 F WrenchS5 1
39 Motor cover 1 G WrenchS6 1
吸塑包纸板

7
A
B
D
B
B
BA
D
D
D
4
5
6
EXPLODE VIEW 2

8
NOTICE
● Read this manual before assembly
● Recognize the spare parts first
● Check the hardware
● Ensure that you have the right tool
● Prepare an area to assemble
● Follow the instruction accordingly
● Never force the joints
● Periodically tighten the joints
● Keep this manual with you

9
PART LIST OF ASSEMBLY
#A M8*55 6PCS
#B M8*15 4PCS
#C ST4*15 6PCS
#D ID9*OD16*1.6T 10PCS
#E S13.15 1PCS
#F S5 1PCS
#G S6 1PCS

10
Information: The following parts listed on the drawing is based on the ratio 1:1 , just
find them from the bolt set and follow the illustration to finish the assembly
ASSEMBLY STEPS:
STEP 1:
4
B
A
D
#B M8*15 1PCS
#A M8*55 3PCS
#D ID9*OD16*1.6T 4PCS
S5 1PCS

11
STEP 2:
S5 1PCS
#D ID9*OD16*1.6T 4PCS
#A M8*55 3PCS
#B M8*15 1PCS
5
A
D

12
STEP 3:
S5 1PCS
D
B
D
B
33
#D ID9*OD16*1.6T 2PCS
#B M8*15 2PCS

13
STEP 4:
C
S13.15 1PCS
#C ST4*15 6PCS
C
67
71

14
STEP 5:

15
WARNING 1: Before folding up or down, do not stand on the deck
WARNING 2: Make sure the treadmill has been disconnected with the
electricity. You can switch off the treadmill by pressing the main power
switch as below.

16
INSTRUCTION OF FOLDING AND GRADIENT ADJUSTMENT
HOW TO FOLD UP THE TREADMILL
1. FOLD UP:
To fold the deck you first need to bring
the treadmill to the lowest incline level.
Hold the rear cap position (on main
Frame) firmly, raise the rear side of Main
frame to fold the treadmill up,
Then after hearing “kick” sound, the
machine has been folded up.
HOW TO FOLD DOWN THE TREADMILL
2. FOLD DOWN:
A. Step on the damper(as shown by the arrow on bottom middle).Both hands hold on to the top end
covers(as shown by the arrow on top left) and pull down the treadmill slowly.

17
Use a warm damp cloth with mild detergent to keep your treadmill clean.
Do not clean between the mat and running board---The silicone lubricant is needed for smooth
movement of the mat.
Check parts for wear before use.
If in doubt do not use the treadmill and contact our help line.
Pay particular attention to the fixing knob and make sure they are tight.
You may feel after a period of time (depending on how often you use the machine) that the mat is
sticky. We recommend you apply a light covering of Silicone between the mat and the running board
as below
To reduce the friction ( sticking) of the running belt and minimize wear, a silicone lubricant or
WD-40, may be applied directly to the wooden board and under the running belt.
NOTE: The lubricant may be applied whenever sticking occurs. To apply simply lift up one side of the
running belt and spray the lubricant onto the board and underside of running belt, See the figure as below.
CARE AND MAINTENANCE
IF THE BELT IS STICKY (DOES NOT RUN SMOOTHLY)
LUBRICATE

18
Turn the right belt tension bolt clockwise. 1/4 at a time, with a test to follow, If the belt continues to
walk to the right, simply adjust the left belt tension bolt by turning 1/4 counterclockwise , with a test to
follow.
Turn the left belt tension bolt clockwise 1/4 at a time. If the belt continues to walk to the left, simply
adjust the right belt tension bolt by turning 1/4 counterclockwise.
Simply tighten both right and left belt tension Both right and left belt tension bolts evenly 1/4 turn
clockwise.
Simply loosen both bolts evenly 1/4 turn counterclockwise.
BELT ADJUSTMENT
NOTE:
For most people, one of your legs is stronger than the other, the treadmill mat
may tend to track to that side because of the extra pressure exerted by your stronger
leg. If this occurs then either dismount treadmill and allow mat to track back to
middle, or exert pressure to side of mat with other leg to track mat back to middle.
IF THE BELT TENDS TO WALK ON THE RIGHT SIDE:
IF THE BELT TENDS TO THE LEFT SIDE:
IF THE BELT APPEARS TO BE LOOSE
IF THE BELT APPEARS TO BE TIGHT.

19
Operation instructions of computer
I. Display function
1:LCD Display readout:
1、“SPEED”:(Referred to as: window 1 )
1.1 display speed
2、“INCLINE/ DIS/CAL” :(Referred to as: window 2)
2.1 When“INCLINE”flashes, display the accumulated total workout incline
2.2 When“DIS”flashes, display the accumulated total workout distance in kilometers
2.3 When“CAL”flashes, display the accumulated calories burn during workout
2.4 When you enter into program sports, it will display program number
3、“TIME/PULSE”:(Referred to as: window 3)
3.1 When“TIME”flashes, display the accumulated total workout time in minute
Table of contents
Other HouseFit Treadmill manuals