manuals.online logo
Brands
  1. Home
  2. •
  3. Brands
  4. •
  5. HP
  6. •
  7. Digital Camera
  8. •
  9. HP PhotoSmart 618 User manual

HP PhotoSmart 618 User manual

Other manuals for PhotoSmart 618

1

This manual suits for next models

1

Other HP Digital Camera manuals

HP Photosmart M425 User manual

HP

HP Photosmart M425 User manual

HP PhotoSmart 315 User manual

HP

HP PhotoSmart 315 User manual

HP R725 User manual

HP

HP R725 User manual

HP SB360 - 12 MP, 3IN LCD User manual

HP

HP SB360 - 12 MP, 3IN LCD User manual

HP d3000 User manual

HP

HP d3000 User manual

HP Photosmart 720 Series User manual

HP

HP Photosmart 720 Series User manual

HP Photosmart Mz60 Series User manual

HP

HP Photosmart Mz60 Series User manual

HP R725 User manual

HP

HP R725 User manual

HP Photosmart 215 User manual

HP

HP Photosmart 215 User manual

HP Photosmart E330 Series User manual

HP

HP Photosmart E330 Series User manual

HP Photosmart 318 User manual

HP

HP Photosmart 318 User manual

HP d3500 User manual

HP

HP d3500 User manual

HP Photosmart M417 User manual

HP

HP Photosmart M417 User manual

HP Photosmart M440 Series User manual

HP

HP Photosmart M440 Series User manual

HP Photosmart 215 User manual

HP

HP Photosmart 215 User manual

HP Compaq presario,presario 730 User manual

HP

HP Compaq presario,presario 730 User manual

HP Photosmart Mz60 Series User manual

HP

HP Photosmart Mz60 Series User manual

HP PhotoSmart 945 User manual

HP

HP PhotoSmart 945 User manual

HP PhotoSmart C500 User manual

HP

HP PhotoSmart C500 User manual

HP SNPRB-0603 Owner's manual

HP

HP SNPRB-0603 Owner's manual

HP d3500 User manual

HP

HP d3500 User manual

HP Photosmart R830 series User manual

HP

HP Photosmart R830 series User manual

HP s300 User manual

HP

HP s300 User manual

HP 320 Series User manual

HP

HP 320 Series User manual

Popular Digital Camera manuals by other brands

Canon WP-DC35 user guide

Canon

Canon WP-DC35 user guide

Xiaomi 70mai Dash Cam Lite user manual

Xiaomi

Xiaomi 70mai Dash Cam Lite user manual

Samsung PL70 Quick start manual

Samsung

Samsung PL70 Quick start manual

GE E1680W user manual

GE

GE E1680W user manual

Canon EOS 1200D instruction manual

Canon

Canon EOS 1200D instruction manual

Tevion MD 86497 user guide

Tevion

Tevion MD 86497 user guide

Exakta VX Features

Exakta

Exakta VX Features

Kodak Digital Science DC120 user guide

Kodak

Kodak Digital Science DC120 user guide

Nikon FM3A Specifications

Nikon

Nikon FM3A Specifications

Vectra Fitness H1 Quick reference guide

Vectra Fitness

Vectra Fitness H1 Quick reference guide

Nikon COOLPIX 775 quick start guide

Nikon

Nikon COOLPIX 775 quick start guide

Olympus IR 500 - 4MP Digital Solutions Camera Manuel de Référence

Olympus

Olympus IR 500 - 4MP Digital Solutions Camera Manuel de Référence

Samsung EC-L100ZBBA brochure

Samsung

Samsung EC-L100ZBBA brochure

FujiFilm FINEPIX BL01124-201 owner's manual

FujiFilm

FujiFilm FINEPIX BL01124-201 owner's manual

Panasonic DMC-L10KPP Service manual

Panasonic

Panasonic DMC-L10KPP Service manual

Hyundai Electric HYU-CC-CHBF12001 Quick installation guide

Hyundai Electric

Hyundai Electric HYU-CC-CHBF12001 Quick installation guide

Sony DSC-WX80 specification

Sony

Sony DSC-WX80 specification

Nikon Nuvis S - Point & Shoot instruction manual

Nikon

Nikon Nuvis S - Point & Shoot instruction manual

manuals.online logo
manuals.online logoBrands
  • About & Mission
  • Contact us
  • Privacy Policy
  • Terms and Conditions

Copyright 2025 Manuals.Online. All Rights Reserved.

HP 618 Digital Camera
User’s Guide
HP Imaging Technology
HP 618 Digital Camera User’s Guide 2 Legal otices
Legal otices
 Copyright 2000 Hewlett-Packard Company. ALL RIGHT RE ERVED.
The information contained in this document is subject to change without notice.
Hewlett-Packard Company shall not be liable for errors contained herein or for
consequential damages in connection with the furnishing, performance, or use of this
material. No part of this document may be photocopied, reproduced, or translated to
another language without the prior written consent of Hewlett-Packard Company.
HP, the HP logo, Jet end, the Jet end logo, Photo mart, and the Photo mart logo are
property of Hewlett-Packard Company.
PENTAX is a trademark of Asahi Optical Co., Ltd.
The Digita camera operating system is  copyright 2000 FlashPoint Technology, Inc.
ALL RIGHT RE ERVED.
Digita and the Digita logo are trademarks of FlashPoint Technology, Inc.
anDisk and CompactFlash are trademarks of anDisk Corporation.
Adobe and Acrobat are registered trademarks of Adobe ystems Incorporated.
Microsoft and Windows are registered trademarks of Microsoft Corporation.
Apple, Macintosh, and Mac are trademarks of Apple Computer, Inc., registered in the U. .
and other countries.
HP 618 Digital Camera User’s Guide 3 Table of Contents
Table of Contents
Chapter 1: Introduction ............................................................................................................................................................. 5
Product Overview ...................................................................................................................................................... 5
What’s in this Guide ..................................................................................................................................................6
How to Use this Guide ..............................................................................................................................................7
Related Information ..................................................................................................................................................7
Chapter 2: Preparing to Take Pictures .............................................................................................................................. 8
Accessing the Capture Mode and Powering on the Camera ............................................................... 8
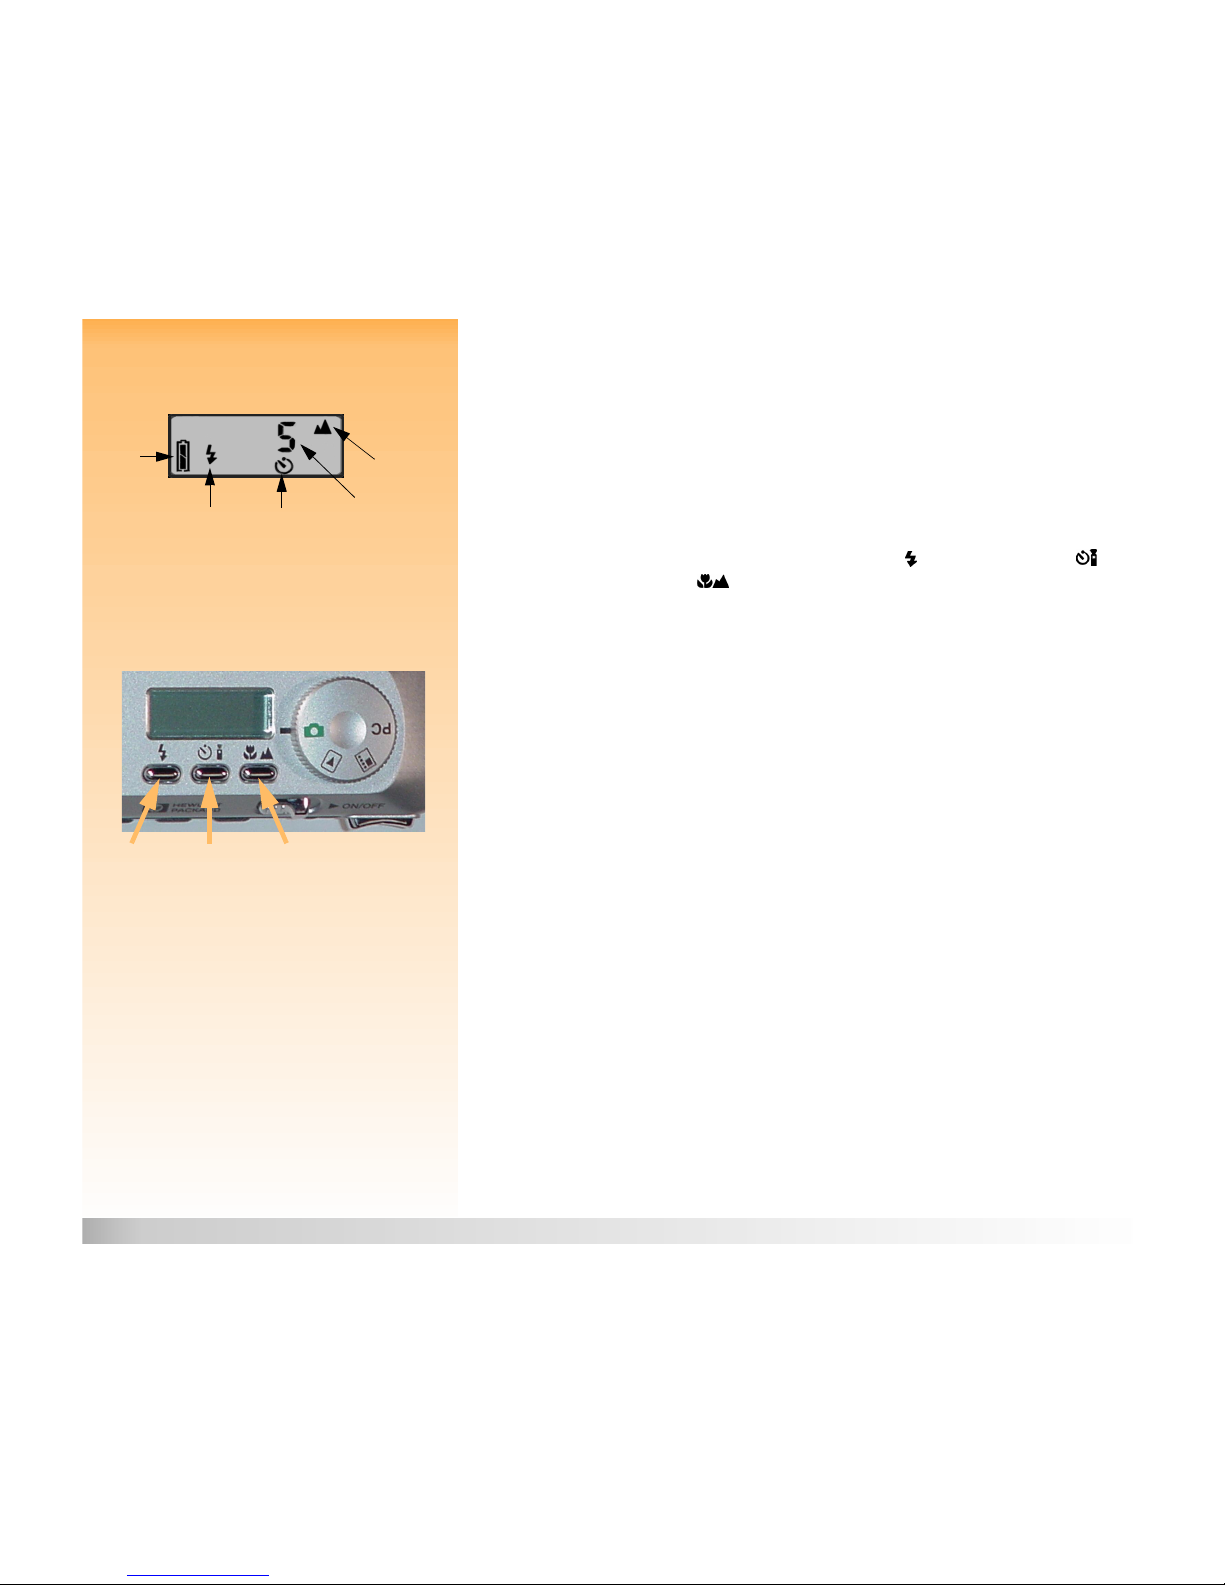
Using the tatus LCD ..............................................................................................................................................9
Using the Image LCD .............................................................................................................................................12
Chapter 3: Taking Pictures .................................................................................................................................................... 16
Taking imple Point-and- hoot Pictures .................................................................................................... 16
Taking More Advanced Pictures .......................................................................................................................17
Using the Zoom Lever ...........................................................................................................................................22
Using the Diopter Control ..................................................................................................................................22
Understanding the LEDs on the Camera .....................................................................................................23
Using Instant Review ..............................................................................................................................................25
Recording ound .................................................................................................................................................... 26
Chapter 4: Viewing and Reviewing Images ..................................................................................................................27
Using Playback Mode ...........................................................................................................................................27
Using Review Mode ............................................................................................................................................... 30
Chapter 5: haring Images ...................................................................................................................................................38
Transferring Images to Your Computer .......................................................................................................38
Using a Digital Print Order Format (DPOF) File ......................................................................................44
Jet ending Images to a Printer .......................................................................................................................46
Transmitting Images Between Two Cameras ............................................................................................48
Connecting the Camera to Your Television ..............................................................................................50
Chapter 6: Menu and oft Key Reference ....................................................................................................................52
Capture Mode Menus and oft Keys ............................................................................................................52
Playback Mode Menu and oft Keys ............................................................................................................74
Review Mode Menus and oft Keys ...............................................................................................................78
HP 618 Digital Camera User’s Guide 4 Table of Contents
Chapter 7: Troubleshooting ................................................................................................................................................ 88
Troubleshooting Common Problems .......................................................................................................... 88
Contacting HP Customer Care .........................................................................................................................93
Appendix A: Using the Preferences Menu ...................................................................................................................94
Accessing the Preferences Menu ....................................................................................................................94
etting the Display ................................................................................................................................................ 95
Controlling Camera ounds .............................................................................................................................97
Formatting the Memory Card .......................................................................................................................... 98
electing the PC Connect Mode ..................................................................................................................... 98
etting the Date and Time ................................................................................................................................. 99
etting the Image Counter ..............................................................................................................................100
Naming Your Camera ......................................................................................................................................... 101
electing a Language ........................................................................................................................................ 102
Resetting Camera ettings .............................................................................................................................. 102
Appendix B: Camera and Accessories Information ...............................................................................................103
Camera pecifications ........................................................................................................................................103
Battery Life .............................................................................................................................................................. 106
HP Accessories for Powering the Camera .................................................................................................107
torage Capacities of Memory Cards ........................................................................................................ 109
Appendix C: Product Warranties ..................................................................................................................................... 110
Limited Product Warranty ................................................................................................................................. 110
Hewlett-Packard Year 2000 Warranty ........................................................................................................112
Appendix D: Product afety and Regulatory Information ................................................................................. 113
afety Information ................................................................................................................................................ 113
Regulatory Notices ................................................................................................................................................114
Glossary .......................................................................................................................................................................................115
Index .............................................................................................................................................................................................. 125
Chapter 1: Introduction 5 Product Overview
Chapter 1: Introduction
Welcome to the HP 618 Digital Camera User’s Guide. This guide will help you take high-quality
pictures quickly and easily with your HP 618 digital camera.
Product Overview
The HP 618 is a versatile, point-and-shoot digital camera. It provides these key features:
HP Imaging Technology
3x optical /2x digital zoom
Three image type settings − One hot, Continuous, and Timelapse
Two focus modes − Auto and Manual
Three auto focus range settings − Normal, Macro, and Infinity
ix exposure settings − Auto, Landscape Program, Portrait Program, Action Program,
Aperture Priority, and hutter Priority
Built-in flash with seven flash modes − Auto, Auto with Red-Eye Reduction, Forced On,
Forced On with Red-Eye Reduction, Forced Off, Night, and Night with Red-Eye Reduction
Note: For more detailed information about the
camera’s features, see “Camera pecifications”
on page 103.
Three timer modes − Off, 10- econd Timer, and 3- econd Remote
Your camera comes equipped with four operating modes (see Table 1). To set the mode, turn the
camera mode dial on top of the camera to the mode you want to use.
Note: Capture, Playback, and Review modes
have menus and related soft keys you can use
to change your camera’s settings and to edit
and organize images. (PC Connect mode does
not have menus or soft keys.)
Table 1: Camera Modes
Mode Use this Mode to...
Capture
CaptureCapture
Capture Take pictures (or “capture images”).
Playback
Playback Playback
Playback View the captured images in a variety of ways. You can
view images full screen, play back timelapse and grouped
image sequences, and create slideshows of images.
Review
ReviewReview
Review ort and edit the captured images in a variety of ways. For
example, you can group, categorize, delete, and search for
captured images.
PC Connect
PC ConnectPC Connect
PC Connect Transfer images from the camera to a computer.
Chapter 1: Introduction 6 What’s in this Guide
What’s in this Guide
This User’s Guide provides all the “how to” and reference information you need to use your
camera successfully.
Part of Manual What is Covered
“Chapter 2: Preparing to Take Pictures” How to adjust settings in the status LCD, image LCD, and Capture mode
menus to prepare your camera to take pictures.
“Chapter 3: Taking Pictures” How to take simple point-and-shoot pictures, as well as more advanced
pictures. Also how to use the zoom, Instant Review, and the sound
recording features.
“Chapter 4: Viewing and Reviewing
Images”
How to view images full screen, play back timelapse and grouped image
sequences, and create slideshows of images in Playback mode. Also how
to edit, organize, delete, and search for images in Review mode.
“Chapter 5: haring Images” How to share images by transferring them to your computer, Jet ending
them to a printer, transmitting them to other cameras and printers, and
viewing them on a television.
“Chapter 6: Menu and oft Key Reference” What each of your camera’s menus and related soft keys do.
“Chapter 7: Troubleshooting” How to fix common problems when using the camera, and how to contact
HP Customer Care for help, if needed.
“Appendix A: Using the Preferences Menu” How to use the Preferences menu to change a variety of your camera’s
general settings.
“Appendix B: Camera and Accessories
Information”
pecifications for the camera, as well as information about some of the
accessories that the camera supports.
“Appendix C: Product Warranties” Limited product warranty and the HP Year 2000 warranty for the camera.
“Appendix D: Product afety and
Regulatory Information”
afety information and regulatory notices regarding the camera and
some of its accessories.
“Glossary” Definitions of the terms related to your camera that are used throughout
this guide and in the camera’s Quick Start Guide.
“Index” Where to find particular topics about your camera throughout this guide.
Chapter 1: Introduction 7 How to Use this Guide
How to Use this Guide
You can use this guide online, or you can print it out. The main advantage of using it online is that
you can use its built-in searching and linking capabilities on your computer to quickly find the
information you need. Of course, an advantage of having a print-out is that you can take it anywhere
you want to use your camera. You may also prefer to read information about your camera from a
printed version, rather than on a computer screen.
Note: If you choose to print this guide, be aware
that printing it in color may take a long time.
Therefore, you may want to print this guide in
black and white, instead.
This online guide is provided in Adobe® Acrobat® version 4.0 (.pdf) format. To learn how to use
Acrobat’s searching and linking features, see the online Help for the Acrobat software.
To print this guide, select Print
Print Print
Print from Acrobat’s File menu. In the Print dialog box, either click the OK
OKOK
OK
button to print the entire guide, or specify the Print Range
Print RangePrint Range
Print Range of pages you want and then click OK
OKOK
OK.
Related Information
For a complete listing and description of your camera’s features, including diagrams showing the
locations of all the buttons, dials, displays, and so on, see the printed HP 618 Digital Camera Quick
Start Guide that was included with your camera. Along with helping you use your camera for the first
time to capture and view images, the Quick Start Guide also explains how to transfer images from the
camera to your computer.
Note: It is assumed that you have already used
the HP 618 Digital Camera Quick Start Guide to
install the batteries and the memory card in
your camera.
To learn how to use the software that came with your camera, see the software’s online Help. All the
documentation for the software is provided in the form of online Help within the software itself.
Finally, you can get project ideas, troubleshooting assistance, and up-to-date information about
your camera and the HP Photo Imaging oftware from the HP website at: www.hp.com/photosmart
www.hp.com/photosmartwww.hp.com/photosmart
www.hp.com/photosmart.
Updates for your camera’s firmware are also posted to this website from time-to-time. You can
install these updates on your camera so that you can always have the most current functionality
running on it.
Chapter 2: Preparing to Take Pictures 8 Accessing the Capture Mode and Powering on the Camera
Chapter 2: Preparing to Take Pictures
Overview
You can use your camera’s default settings to take pictures in a point-and-shoot fashion, or you can
use more advanced features that you set via the camera’s status LCD and image LCD. This chapter
explains how to prepare your camera to take pictures by adjusting various settings on it.
This chapter covers the following topics:
“Accessing the Capture Mode and Powering on the Camera” on page 8
“Using the tatus LCD” on page 9
“ etting the Flash Mode” on page 10
“ etting the Timer Mode” on page 11
“ etting the Auto Focus Range” on page 11
“Using the Image LCD” on page 12
“ etting the Image Type” on page 13
“Understanding the Text Message Area” on page 12
“Viewing the Camera tatus” on page 14
“Using the Overlay oft Key” on page 14
“Using the Capture Mode Menus” on page 15
“Using the 4-Way Controller” on page 15
Accessing the Capture Mode and Powering on the Camera
Figure 1: etting the Camera to Capture Mode To prepare your camera to take pictures, you must first set your camera to Capture mode and power
on the camera:
1Turn the camera mode dial on the top of the camera to (see Figure 1).
2Power on the camera by sliding the ON/OFF power switch on the back of the camera to the
right and releasing it. The status LCD on the top of the camera turns on and displays the status
of the camera.
Chapter 2: Preparing to Take Pictures 9 Using the Status LCD
Using the Status LCD
Figure 2: tatus LCD Indicators The status LCD conveys important information about the camera’s status. The status LCD shows you
the status of the camera’s batteries, the settings for the flash mode, timer mode, and auto focus
range, as well as the number of pictures remaining on the memory card (see Figure 2).
The status LCD turns on every time you power on the camera. You can use the status LCD to assess
the current status of the camera, and to change the flash mode, timer mode, and auto focus range
settings when preparing to take pictures.
The buttons beneath the status LCD −the flash mode button , the timer mode button , and
the auto focus range button − toggle the associated camera settings on and off within the
status LCD (see Figure 3). To change one of these settings, press the associated button until you see
the desired icon or set of icons displayed in the status LCD for the setting you want.
Figure 3: tatus LCD Buttons The next three subsections explain the possible settings for the flash mode, timer mode, and auto
focus range on the camera.
Note: If you see 000 flashing in the status
LCD, this means that either there is no memory
card in the camera, or the memory card is full.
Flash
Battery
status
Timer
Pictures
remaining
focus
range
mode mode
Auto
Auto focus rangeTimer modeFlash mode
Chapter 2: Preparing to Take Pictures 10 Using the Status LCD
Setting the Flash Mode
Your camera has seven flash modes. The default flash mode is Auto (no icons displayed). Each mode
is displayed on the status LCD with the icon(s) shown in Table 2. To set the flash mode, press the flash
mode button beneath the status LCD to toggle through the icons on the status LCD until you see
the flash mode setting you want (see Table 2).
Note: The flash mode setting remains set
between shots, but will return to Auto after you
cycle the power on the camera (power it off and
then on again).
If the batteries’ charge is low, the camera will
not take a picture if the flash mode is set to
Forced On or Night, and it will disable the flash
if set to Auto.
Also note that flash pictures may be over-
exposed when using the Macro auto focus
range (see “ etting the Auto Focus Range” on
page 11). Thus, you may want to turn off the
flash (set the flash mode to Forced Off) when
taking pictures with the Macro auto focus
range setting.
Table 2: Flash Mode Settings
Flash Mode Icon Displayed When to Use
Auto (default) No Icon To allow the camera to determine the need for flash
based on the lighting conditions.
Auto with Red-Eye
Reduction
To allow the camera to determine the need for flash
based on the lighting conditions. When flash is used,
red-eye reduction minimizes the occurrence of red-
eye in pictures of people or animals by flashing twice.
Forced On To use the flash, regardless of the lighting conditions.
Forced On with Red-Eye
Reduction To use the flash, regardless of the lighting conditions.
Red-eye reduction minimizes the occurrence of red-
eye in pictures of people or animals by flashing twice.
Forced Off To take pictures without flash, regardless of the
lighting conditions.
Night To use a slow sync mode of the flash in which the
camera collects the image background with the
available light and flashes to illuminate the
foreground of the image.
Night with Red-Eye
Reduction To use a slow sync mode of the flash in which the
camera collects the image background with the
available light and flashes to illuminate the
foreground of the image. Red-eye reduction
minimizes the occurrence of red-eye in pictures of
people or animals by flashing twice.