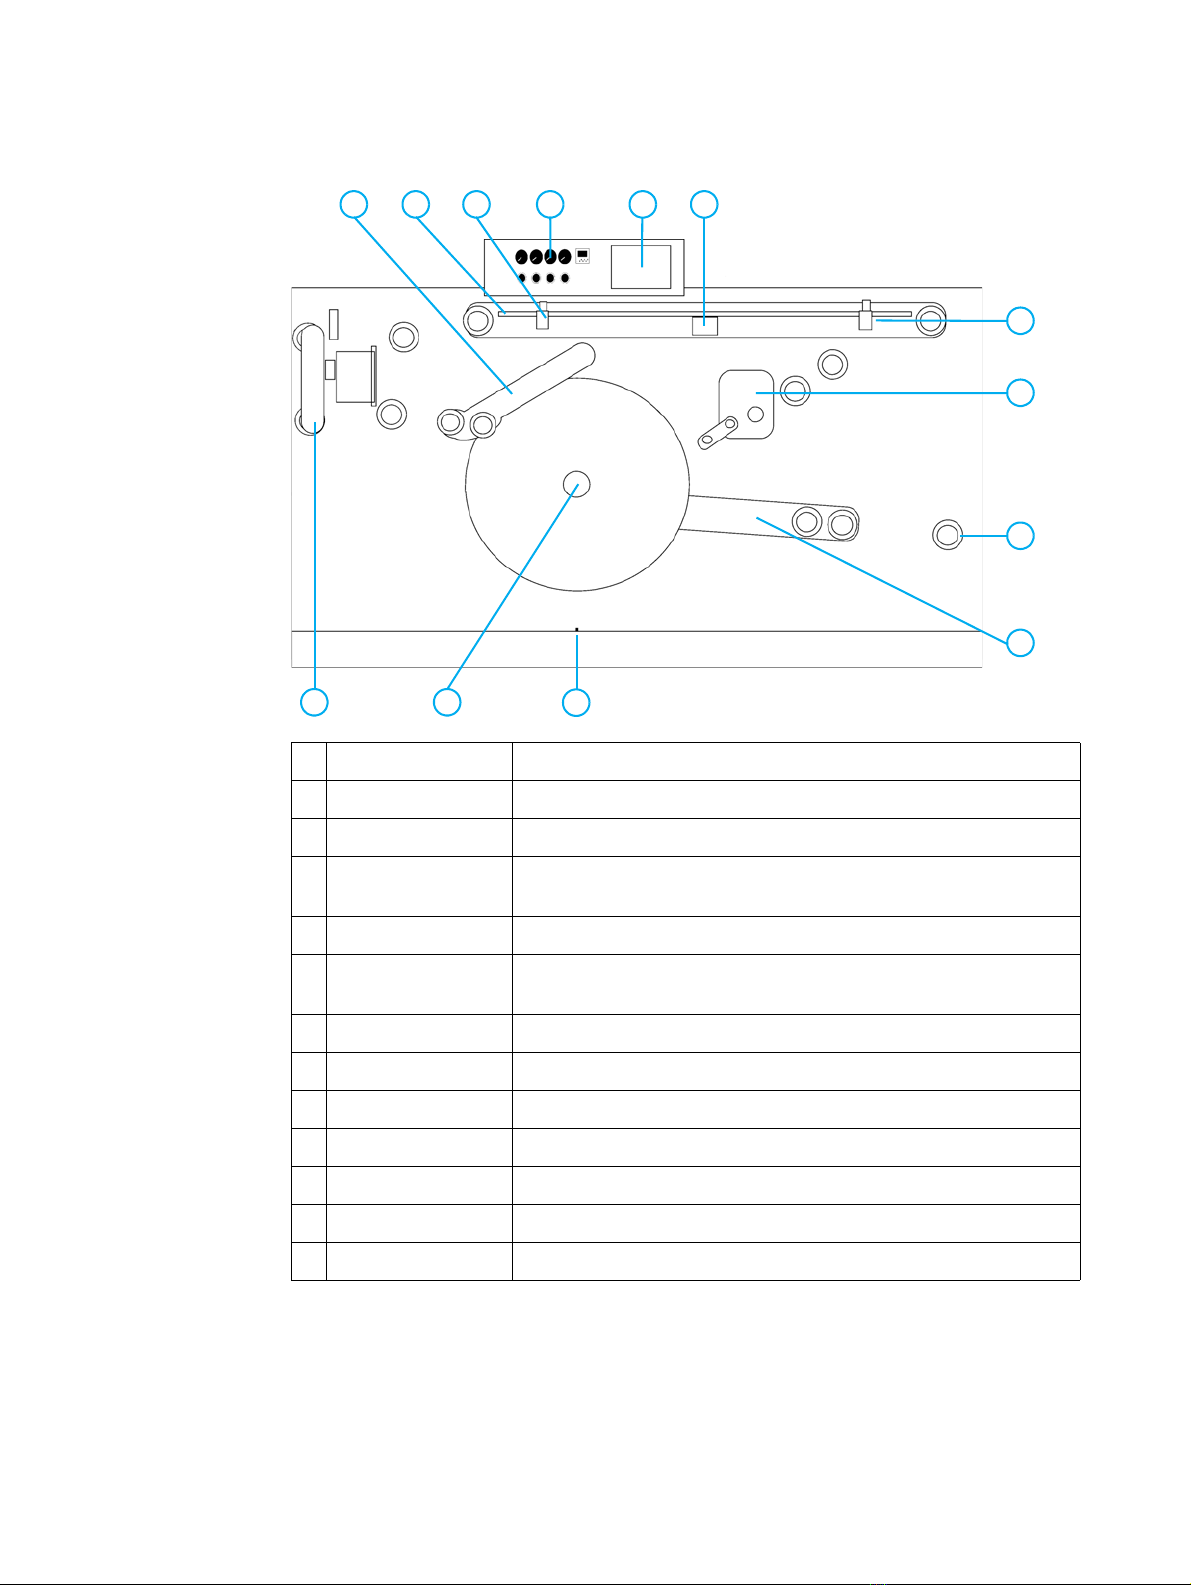
HP Indigo Series User manual

User Guide
HP Indigo Flexible Packaging Rewinder
For HP Indigo press ws4050 and HP Indigo press ws4500


HP Indigo Flexible Packaging Rewinder
for HP Indigo press ws4050
and HP Indigo press ws4500
User Guide

Printed in Israel.
© 2007 Copyright
Hewlett-Packard
Development Company,
L.P.
Reproduction, adaptation,
or translation without prior
written permission is
prohibited, except as
allowed under the
copyright laws.
The information contained
herein is subject to change
without notice.
The only warranties for HP
products and services are
set forth in the express
warranty statements
accompanying such
products and services.
Nothing herein should be
construed as constituting
an additional warranty. HP
shall not be liable for
technical or editorial errors
or omissions contained
herein.
HP, HP Indigo Press,
HP Indigo Press RIP, and
HP ElectroInk are
trademarks or registered
trademarks of HP.
Adobe® PostScript® is a
trademark of Adobe
Systems Incorporated.
MS Windows® and
Windows® are U.S.
registered trademarks of
Microsoft Corp.
All other products or name
brands are trademarks of
their respective holders.
The HP Indigo press
counter feature records the
number of impressions you
make using your press.
The counter does not
reflect any previous use of
the press or its age.
The HP Indigo press is a
Class 1 Laser Product
containing high voltage
power supplies and laser
light sources. There is no
danger to persons or
equipment when the
system is operated in
accordance with the
directions provided by HP
in this and other
publications. All high
voltage power supplies and
laser sources are located
behind protective covers.
Warning labels are
attached to each protective
cover. Do not remove
covers.
Part Number:
CA294-05790
First Edition:
December 2007

EN i
Contents
1 Using the flexible packaging rewinder
Overview . . . . . . . . . . . . . . . . . . . . . . . . . . . . . . . . . . . . . . . . . . . . . . . . . . . . . . . . 2
Turning on the rewinder . . . . . . . . . . . . . . . . . . . . . . . . . . . . . . . . . . . . . . . . . . . . 4
Using the touch screen . . . . . . . . . . . . . . . . . . . . . . . . . . . . . . . . . . . . . . . . . . . . . 5
Changing the touch screen language. . . . . . . . . . . . . . . . . . . . . . . . . . . . . . . 5
Operating the rewinder . . . . . . . . . . . . . . . . . . . . . . . . . . . . . . . . . . . . . . . . . . 5
Viewing the alarms and messages. . . . . . . . . . . . . . . . . . . . . . . . . . . . . . . . . 7
Adjusting the substrate tension. . . . . . . . . . . . . . . . . . . . . . . . . . . . . . . . . . . . . . . 8
Using the tension control panel . . . . . . . . . . . . . . . . . . . . . . . . . . . . . . . . . . . 8
Using the meter counter . . . . . . . . . . . . . . . . . . . . . . . . . . . . . . . . . . . . . . . . . 9
Threading the web . . . . . . . . . . . . . . . . . . . . . . . . . . . . . . . . . . . . . . . . . . . . . . . 10
Turning off the rewinder . . . . . . . . . . . . . . . . . . . . . . . . . . . . . . . . . . . . . . . . . . . 10
A Obtaining service

ii EN

2 Overview EN
Overview
The flexible packaging rewinder is used to rewind the web.
The rewinder:
zSupports a wide variety of flexible packaging substrates and thin films that are less
than 50 µm thick
zPrevents wrinkles, telescoping, and ink back transferring
zCan rotate clockwise or counterclockwise
zEnables you to rewind the web with the print facing the inside or outside of the roll
zIs controlled from the touch screen
zConnects to the printing engine through an interface cable
zIncludes a web guide with a lateral rewinding accuracy of 0.3 mm
zIncludes a meter counter
Table 1-1 shows the rewinder specifications.
Table 1-1. Specifications
Parameter Specification
Power supply 230 VAC / 8 A / 1p+1n+GND
or
110 VAC / 15 A / 1p+1n+GND
Power consumption 1,650 W
Air supply 6 - 10 bar (maximum:10 liter/min)
Maximum web width 330 mm (13 in)
Maximum web roll diameter
(if you use a heavy substrate, the maximum web
roll weight may cause this value to decrease)
600 mm (26 in)
Maximum web roll weight
(when the rewinder is attached to the floor)
100 kg (220 lb)
Maximum web roll weight
(when the rewinder is not attached to the floor)
75 kg (165 lb)
Standard web core diameter 76 mm (3 in)
Rewinder height 1,280 mm (50 in)
Rewinder length 1,905 mm (75 in)
Rewinder width 960 mm (38 in)
Rewinder weight (including packaging) 500 kg (1,102 lb)

EN Overview 3
Figure 1-1 shows the main components of the rewinder.
Figure 1-1. Rewinder components
1 Riding roller Prevents wrinkles and electrostatic build-up in the final roll.
2 Splicing table Used for splicing the web.
3 Left clamp Holds the substrate in place for splicing.
4 Tension control panel Controls the tension in the rewinder (see "Using the tension control
panel" on page 8).
5 Touch screen Operates the rewinder (see "Using the touch screen" on page 5).
6 Anti-vacuum roller Prevents vacuum build-up between the moving web and the splicing
table.
7 Right clamp Holds the substrate in place for splicing.
8 Nip cassette Creates tension in the web before it is rolled on the rewinder spindle.
9 Alignment roller Used for aligning the printing engine and the rewinder.
10 Dancer arm Keeps the web taut between the printing engine and the rewinder.
11 Ultrasonic sensor Stops the rewinder when the final roll reaches the maximum size.
12 Rewinder spindle Removes substrate.
13 Web guide Compensates for lateral web movement.
12
1 2 3 5 6
13 11
7
8
9
10
4

4 Turning on the rewinder EN
Follow these safety guidelines:
zThe rewinder must be operated only by properly trained personnel thoroughly familiar
with all its safety and maintenance procedures.
zDo not attempt to service or repair the rewinder yourself. Call an authorized customer
engineer for service and repair of the rewinder.
zFor more safety guidelines, see the "Safety" chapter in CA294-04110 - HP Indigo
Press ws4500 User Guide.
Turning on the rewinder
1Turn the main switch.
The Start screen appears.
Figure 1-2. Main switch
Figure 1-3. Start screen

EN Using the touch screen 5
Using the touch screen
Changing the touch screen language
1From the Start screen, touch . The Setup menu screen appears.
2Touch Language. The Language screen appears.
3Select a language.
4Touch . The touch screen language changes.
5Touch .
Operating the rewinder
1From the Start screen, touch . The first Operator screen appears.
Figure 1-4. Setup menu screen
Figure 1-5. Language screen
Figure 1-6. First Operator screen

6 Using the touch screen EN
2To switch between standby and ready modes, touch either Standby On/Off or
Ready On/Off.
3When the rewinder is in standby mode, you can do the following tasks from the first
Operator screen:
• To raise the right clamp and close the nip cassette, touch the right Up Clamp
button.
• To lower the right clamp and open the nip cassette, touch the right Down Clamp
button.
• To raise the left clamp, touch the left Up Clamp button.
• To lower the left clamp, touch the left Down Clamp button.
• To deflate the rewinder spindle, touch Air off Spindle.
• To inflate the rewinder spindle, touch Air on Spindle.
• To change the rewinder direction, touch .
• To slowly turn the rewinder spindle, touch and hold . To stop turning the rewinder
spindle, release .
4Touch . The second Operator screen appears.
5When the rewinder is in standby mode, you can do the following tasks from the
second Operator screen:
• To enable dancer arm tension, touch High Tension.
• To disable dancer arm tension, touch Low Tension.
6When the rewinder is in ready mode, you can do the following tasks from the second
Operator screen:
• To start printing, touch PE Print two times. Ensure that the press and the web
handling system are both in the ready mode.
• To stop printing, touch PE Stop.
• To feed the web, touch PE Feed two times. Hold PE Feed until the correct amount
of substrate is fed. Ensure that the web handling system is in the ready mode.
Figure 1-7. Second Operator screen

EN Using the touch screen 7
Viewing the alarms and messages
Alarms and messages can appear at the bottom of the Operator screen. Follow the
instructions in table 1-2.
Table 1-2. Alarms and messages
Alarm / message Instructions
Factory default values set. Please calibrate
dancer
Calibrate the dancer.
Local emergency stop activated Release the rewinder emergency stop button.
Motor failure Turn off the rewinder. Wait two minutes. Turn on
the rewinder. If the problem continues, contact
technical support.
PE cover open Close the cover.
Picking up web. Please wait Wait until the rewinder finishes picking up the
web.
Press “PE Print” / “PE Feed” to activate
print/feed cycle
Tou ch PE Print or PE Feed.
Printing engine is not ready Put the printing engine into ready mode.
Remote emergency stop activated Release the emergency stop button.
Rewinder can’t start when clamps are down.
Release clamps
Touch the right and left Up Clamp buttons.
Rewinder is not ready Touch Standby On/Off.
Roll has reached maximum size Remove the roll. Insert a new core.
Touch panel communication trouble Turn off the rewinder. Wait two minutes. Turn on
the rewinder. If the problem continues, contact
technical support.
Web break Fix the broken web or raise the dancer arm from
the lowest position.

8 Adjusting the substrate tension EN
Adjusting the substrate tension
You can optimize the rewinder performance by adjusting the substrate tension.
Using the tension control panel
From the tension control panel, you can do the following:
zTo control the tension of the finished roll, adjust the web tension controller. The default
setting is 0.5 bar for thin substrates and 2.5 bar for thick substrates. Set the web
tension controller according to the properties of the substrate (see tables 1-3
and 1-4).
zTo reduce the amount of wrinkles in the finished roll, adjust the riding arm controller.
The default setting is 2 bar.
zTo control the nip pressure, adjust the nip controller. The default setting is 4 bar. For
smooth or glossy substrates, increase the nip pressure.
zTo control the pulling force of the rewinder, adjust the dancer arm controller. The
default setting is 0 bar.For thick substrates, increase the dancer arm controller.
zTo use the counter, see "Using the meter counter" on page 9.
Figure 1-8. Tension control panel
1 Controller displays
2 Meter counter
3 Touch screen
4 Dancer arm controller
5 Nip controller
6 Riding arm controller
7 Web tension controller
1
7 6 5 4
2
3

EN Adjusting the substrate tension 9
Using the meter counter
The counter enables you to measure the amount of substrate that has been rewound. The
counter displays all values in meters.
From the counter, you can do the following:
zTo set the preset value, press the UP button for the digit that you want to increase.
zTo reset the counter value, press RESET.
zTo enable and disable the counter keypad, press LOCK.
Table 1-3. Web tension controller settings
Substrate thickness Web tension controller setting
12 - 50 µm 1 - 2 kg/cm
2
(0.5 bar)
50 - 150 µm 2 - 5 kg/cm
2
(1.0 - 2.5 bar)
150 - 250 µm 4 - 7 kg/cm
2
(2.0 - 3.5 bar)
Table 1-4. Pressure-tension conversions
Pressure Tension
0 bar 0.5 kg/cm
2
1 bar 2.2 kg/cm
2
2 bar 4.1 kg/cm
2
3 bar 6.1 kg/cm
2
4 bar 8.0 kg/cm
2
5 bar 10.0 kg/cm
2
6 bar 11.9 kg/cm
2
Figure 1-9. Counter
1 Counter value
2Presetvalue
3 UP buttons for the six digits of
the preset value
1
2
3

10 Threading the web EN
Threading the web
1From the exit of the printing engine, ensure that you have enough web.
2Thread the web as shown in figure 1-10.
3When the web reaches the nip cassette, touch the right Clamp Down button. The nip
cassette opens.
4Thread the web through the nip cassette.
5Touch the right Clamp Up button. The nip cassette closes.
6When the web reaches the core, tape the web to the core.
7Use either the spindle ruler or the core stop ring to align the core with the middle of
the rewinder spindle.
8Touch Air on Spindle. The core inflates.
9Touch Standby On/Off. The web is rewound.
Turning off the rewinder
1Release all tension in the rewinder (see "Adjusting the substrate tension" on page 8).
2Turn the main switch (see figure 1-2).
Figure 1-10. Threading the web
1 Nip cassette
2 Start of web
2
1

EN 11
AObtaining service
To obtain service, contact the HP Indigo customer care center in your country/region:
Europe
zAustria: +43 (0) 820220310
zBelgium: +32 (0) 26264803
zFrance: +33 (0) 149932498
zGermany: +49 (0) 6995307080
zItaly: +39 (0) 238591081
zIreland: +353 (0) 1 605 8409
zLuxembourg: +352 (0) 2730 2067
zNetherlands +31 (0) 205476870
zUK: +44 (0) 2072950038
Distribution Channels (DC): +31 (0) 20 6545543
North America: 1-800-204-6344
Israel: +972 8 938 1818
North America
Hewlett-Packard Company
Indigo Division
165 Dascomb Road
Andover, MA 01810-5897
USA
International
Hewlett-Packard Company
Indigo Division
Limburglaan 5
6221 SH Maastricht
The Netherlands
Israel
Hewlett-Packard Company
Indigo Division
Kiryat Weizmann
P. O . B o x 1 5 0
Rehovot 76101
Israel

12 EN


reorder: P/N CA294-05790
Copyright © 2007 Hewlett-Packard Company
This is an HP Indigo digital print. Printed in Israel.
www.hp.com/go/indigo
This manual suits for next models
2
Table of contents
Other HP Industrial Equipment manuals
Popular Industrial Equipment manuals by other brands

Nordson
Nordson Rhino SD3 instruction sheet

Parker
Parker Racor Absolute Series Owner Manual With Instructions

Bungard
Bungard RDC 30 Translation of the original instructions

Temptronic
Temptronic ThermoStream TP04300 Series Interface & Applications manual

Aimco
Aimco US-LT Series Operation instructions

SEM
SEM SSD1-HS Operation and maintenance manual