HP ExpressCard User manual

Hardware Setup
HP ExpressCard Digital/Analog TV Tuner
Document Part Number: 438624-001
December 2006
This guide provides information to help you set up your
HP ExpressCard Hybrid Digital/Analog TV Tuner to use with
your computer and the Windows Vista™ operating system.

© Copyright 2006 Hewlett-Packard Development Company, L.P.
Windows Vista is either a trademark or registered trademark of Microsoft
Corporation in the United States and/or other countries.
The information contained herein is subject to change without notice. The
only warranties for HP products and services are set forth in the express
warranty statements accompanying such products and services. Nothing
herein should be construed as constituting an additional warranty. HP shall
not be liable for technical or editorial errors or omissions contained herein.
Hardware Setup
HP ExpressCard Digital/Analog TV Tuner
First Edition: December 2006
Document Part Number: 438624-001

Hardware Setup iii
Contents
1Introduction
Before you begin . . . . . . . . . . . . . . . . . . . . . . . . . . . . . . . 1–2
Getting help . . . . . . . . . . . . . . . . . . . . . . . . . . . . . . . . . . . 1–3
Getting help for Windows Media Center . . . . . . . . . 1–3
Getting help for QuickPlay . . . . . . . . . . . . . . . . . . . . 1–3
2 Identifying the hardware
Setup components . . . . . . . . . . . . . . . . . . . . . . . . . . . . . . 2–1
3 TV tuner setup
Step 1: Set up your computer. . . . . . . . . . . . . . . . . . . . . . 3–1
Step 2: Set up your audio/video connection. . . . . . . . . . . 3–1
Step 3: Connect the remote sensor . . . . . . . . . . . . . . . . . . 3–8
Step 4: Complete the setup. . . . . . . . . . . . . . . . . . . . . . . 3–11
Running the Setup Wizard. . . . . . . . . . . . . . . . . . . . 3–12
4 Advanced connections
TV tuner cable components . . . . . . . . . . . . . . . . . . . . . . . 4–2
Using composite video or S-Video (set-top box
connections only) . . . . . . . . . . . . . . . . . . . . . . . . . . . . . . . 4–3
Composite video . . . . . . . . . . . . . . . . . . . . . . . . . . . . 4–4
S-Video . . . . . . . . . . . . . . . . . . . . . . . . . . . . . . . . . . . 4–5
Adding a TV to your connection . . . . . . . . . . . . . . . . . . . 4–6
Configuring the TV display. . . . . . . . . . . . . . . . . . . . 4–9
Adding an audio receiver to your connection . . . . . . . . 4–10

iv Hardware Setup
Contents
5 Remote control
Remote control buttons . . . . . . . . . . . . . . . . . . . . . . . . . . 5–2
Using the remote control . . . . . . . . . . . . . . . . . . . . . . . . . 5–6
Replacing the remote control batteries. . . . . . . . . . . . . . . 5–9
A Troubleshooting
B Glossary
Index

Hardware Setup 1–1
1
Introduction
This guide provides instructions for connecting the
HP ExpressCard Digital/Analog TV Tuner to your computer
using your existing cable/satellite setup or the antenna included.
When connected, the TV tuner lets you use your computer like a
standard TV and video recorder, allowing you to watch and
record TV programs, and schedule TV recordings. This guide
describes the most common connections.
✎The TV tuner is designed to be used with the Windows Vista™
operating system and Windows Media Center or QuickPlay.
Other third-party software applications may work with the TV
tuner, but are not supported by HP.
ÄCAUTION: In certain areas, digitally broadcast ATSC signals may not
be available. Under these circumstances, you will not be able to set up
the TV tuner with the antenna. Instead, set up the TV using your regular
TV or cable TV wall jack.

1–2 Hardware Setup
Introduction
Before you begin
Review this guide carefully to determine the most appropriate
connection for your equipment. Refer to Chapter 3, “TV tuner
setup,” for information on the most common connections.
Additional connections, such as adding a TV to your setup, are
described in Chapter 4, “Advanced connections.”
Consider the following factors when setting up your connection:
■How often you plan to use the TV tuner
■Whether you plan to use a cable/satellite signal source or a
digitally broadcast ATSC signal
■The proximity of a cable/satellite signal source to your
computer
■Existing home entertainment equipment you want to include
in your setup
■Whether you want to view TV content on your computer
or on your TV
■Which media software you want to use—QuickPlay or
Windows Media Center
✎QuickPlay is preinstalled on your computer and may be used
with any version of the Windows Vista operating system.
Windows Media Center is included in only the Premium and
Ultimate editions of Windows Vista. If you have the Basic or
Business edition of Windows Vista, you must use QuickPlay.
Refer to the next section, “Getting help,” for more information.
To fully utilize TV tuner features, your computer should have
Internet access so you can download and view TV guide listings
for your broadcast area or cable/satellite service provider.
Without Internet access, you will only be able to view live TV
and will not be able to schedule recordings. For more information
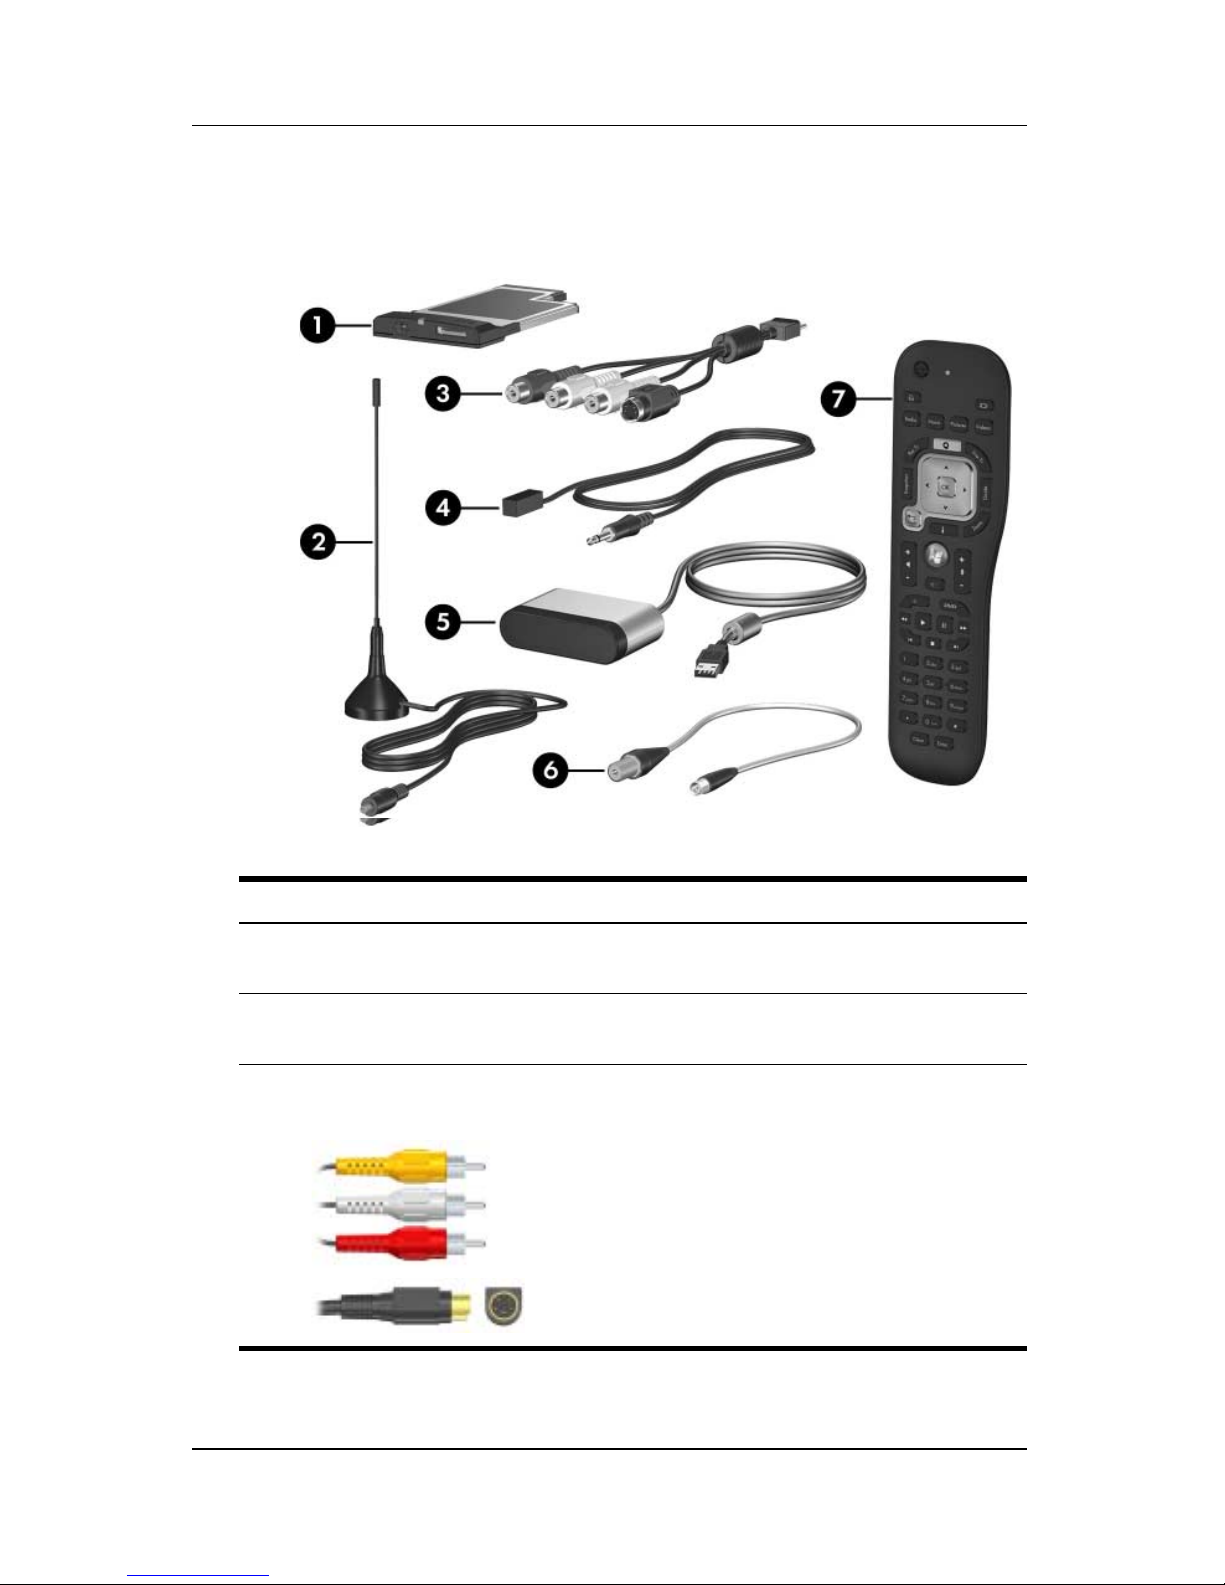
on required and optional equipment, refer to Chapter 2,
“Identifying the hardware.”

Introduction
Hardware Setup 1–3
Getting help
If you have any difficulty with the setup process, refer to
Appendix A, “Troubleshooting,” for help. For help with your
software, refer to one of the following sections.
Getting help for Windows Media Center
If you are having trouble with Windows Media Center, refer to
Windows Help and Support:
From your Windows desktop, select Start > Help and Support.
Getting help for QuickPlay
If you are having trouble with QuickPlay, refer to the QuickPlay
Help menu:
1. Open QuickPlay:
❏Press the QuickPlay button on your remote.
– or –
❏From your Windows desktop, select Start > All
Programs > QuickPlay.
2. Select the TV icon on the menu bar at the bottom of the
screen.
3. Select the question mark icon on the menu bar on the left side
of the screen.
✎You can also access QuickPlay Help by selecting the home,
music, or camera icons.

Hardware Setup 2–1
2
Identifying the hardware
Setup components
Unpack your TV tuner. In addition to the items provided with the
TV Tuner, you will also need the following items (purchased
separately):
■Computer with a Windows Vista operating system and
required computer equipment (such as an AC adapter).
■A working Internet connection (required for features such as
scheduling recordings and accessing the Program Guide).
■A working TV signal source (either a digitally broadcast
ATSC signal or a cable/satellite signal). Your TV source may
also require a cable or satellite set-top box.
■An RF coaxial cable (purchased separately) for a wall
connection.
■A television (optional).
■S-Video and audio-out Y cables or optional media cable
(compatible with select models only) if connecting a
television.
■Additional cables (composite video or S-Video) for some
advanced connections or to facilitate your cable length
requirements.

2–2 Hardware Setup
Identifying the hardware
The following components are included with your TV tuner.
Depending on your connection, not all components are required.
Component Description
1HP ExpressCard
Digital/Analog TV Tuner
Provides input and output jacks for
the antenna or media cables.
2TV tuner antenna Receives standard and high
definition digital broadcast signals.
3Composite audio/video and
S-Video cable
Connects a cable or satellite set-top
box to the TV tuner for higher
audio/video quality over RF coaxial
(optional).
✎For information comparing
RF coaxial, S-Video, and
composite video, refer to
Chapter 4, “Advanced
connections.”
(Continued)

Identifying the hardware
Hardware Setup 2–3
4Infrared (IR) emitter cable Connects the TV tuner to your cable
or satellite set-top box. When
connected, you can change
channels on the set-top box using
the HP MediaBuddy Remote Control.
5Remote sensor Connects to the USB port on the
computer. When it is connected, you
can change channels using the HP
MediaBuddy Remote Control.
6RF coaxial cable adapter Connects an RF coaxial cable to the
TV tuner.
7HP MediaBuddy Remote
Control
Used to change channels and
navigate.
✎For more information on composite video, RF coaxial, S-Video, and
other terms, refer to Appendix B, “Glossary.”
Component Description

Hardware Setup 3–1
3
TV tuner setup
Step 1: Set up your computer
If you have not already set up your computer, refer to the printed
Setup Instructions poster, included with your computer, for
details.
Step 2: Set up your audio/video
connection
Three common connections are detailed in the following sections.
The connection you use depends on what you want to do with
your audio/video setup and on the type of TV input you use.
Consider the following factors when setting up your connection
■How often you plan to use the TV tuner
■Whether you plan to use a cable/satellite signal source or a
digitally broadcast ATSC signal
■The proximity of a cable/satellite signal source to your
computer
■Existing home entertainment equipment you want to include
in your setup
■Whether you want to view TV content on your computer
or on your TV
■Which media software you want to use—QuickPlay or
Windows Media Center

3–2 Hardware Setup
TV tuner setup
✎QuickPlay is preinstalled on your computer and may be used
with any version of the Windows Vista operating system.
Windows Media Center is included in only the Premium and
Ultimate editions of Windows Vista. If you have the Basic or
Business edition of Windows Vista, you must use QuickPlay.
Connecting the TV tuner allows you to perform the following
actions:
■Watch and/or record a live TV program on your computer.
– or –
■Record one live TV program while watching a previously
recorded TV program.
Some advanced setup instructions are also provided. Refer to
Chapter 4, “Advanced connections,” for instructions on the
following tasks:
■Using composite video or S-Video with your cable or
satellite set-top box.
■Adding a TV or stereo to your configuration.
✎Depending on how you set up your TV tuner, you may not use all
of the cables.

TV tuner setup
Hardware Setup 3–3
The type of connection you use will depend on your existing TV
source and the availability of a digital broadcast. Refer to the
following table for more information.
✎ATSC digital TV may be broadcast in either standard
definition, approximately 640x480 (480i), or high definition,
approximately 1920x1080 (1080i).
Your TV Source Refer to Section
Digitally broadcast
ATSC TV signal
“Connection 1: Connecting with an antenna”
Regular TV without
set-top box
“Connection 2: Connecting with regular TV or
cable TV without a set-top box”
Cable TV without
set-top box
“Connection 2: Connecting with regular TV or
cable TV without a set-top box”
Cable TV with
set-top box
“Connection 3: Connecting with satellite TV or
cable TV with a set-top box”
Satellite TV with
set-top box
“Connection 3: Connecting with satellite TV or
cable TV with a set-top box”

3–4 Hardware Setup
TV tuner setup
Connection 1: Connecting with an antenna
✎The antenna cable length is not shown to scale.
To install the TV tuner and connect it to the TV tuner antenna:
1. Insert the TV tuner 1into the ExpressCard slot on the
computer.
✎The location of the ExpressCard slot varies by computer
model. Refer to the user guide for your computer.
2. Connect the TV tuner antenna cable 2to the TV tuner.
3. Connect the remote sensor to a USB port on the computer.
Refer to “Step 3: Connect the remote sensor,” for details.
4. Complete the setup of your TV tuner. Refer to “Step 4:
Complete the setup,” later in this chapter.
✎For additional connection steps, such as adding a television,
refer to Chapter 4, “Advanced connections.”

TV tuner setup
Hardware Setup 3–5
Connection 2: Connecting with regular TV or
cable TV without a set-top box
✎
Computer features may vary. Cable lengths are not shown to scale.
To connect the TV tuner to your regular TV or cable TV source
without a set-top box:
1. Insert the TV tuner 1into the ExpressCard slot on the
computer.
2. Connect the RF coaxial cable adapter 2to the TV tuner.
3. Connect an RF coaxial cable from the RF coaxial cable
adapter on the TV tuner 3to your regular TV or cable TV
wall jack 4.
4. Connect the remote sensor to a USB port on the computer.
Refer to “Step 3: Connect the remote sensor,” for details.
5. Complete the setup of your TV tuner. Refer to “Step 4:
Complete the setup,” later in this chapter.
✎For additional connection steps, such as adding a television, refer
to Chapter 4, “Advanced connections.”

3–6 Hardware Setup
TV tuner setup
Connection 3: Connecting with satellite TV or
cable TV with a set-top box
✎Refer to your cable or satellite set-top box user guide for the exact
location and labeling of components.
✎
Computer features may vary. Cable lengths are not shown to scale.
To connect the TV tuner to your existing satellite TV or cable TV
source with a set-top box:
1. Connect an RF coaxial cable from your cable or satellite TV
wall jack 1to the TV-In jack on your cable or satellite set-top
box 2.
2. Connect an RF coaxial cable from the TV-Out jack 3on your
cable or satellite set-top box to the RF coaxial cable
adapter 4.
✎For improved video quality you can connect your set-top
box to the TV tuner using a composite video or S-Video
cable instead of an RF coaxial cable. Refer to Chapter 4,
“Advanced connections,” for instructions.
3. Connect the RF coaxial cable adapter 5to the TV tuner.
4. Insert the TV tuner 6into the ExpressCard slot on the
computer.

TV tuner setup
Hardware Setup 3–7
5. Connect the remote sensor to a USB port on the computer.
Refer to “Step 3: Connect the remote sensor,” for details.
6. Complete the setup of your TV tuner. Refer to “Step 4:
Complete the setup,” later in this chapter.
✎For additional connection steps, such as adding a television, refer
to Chapter 4, “Advanced connections.”

3–8 Hardware Setup
TV tuner setup
Step 3: Connect the remote sensor
To change channels using the HP MediaBuddy Remote Control,
the remote sensor must be connected to your computer:
1. Connect the remote sensor to a USB port on the computer.
✎You can connect the remote sensor to any USB port on your
computer.

TV tuner setup
Hardware Setup 3–9
2. Connect the infrared (IR) emitter cable from the IR receiver
to the set-top box.
If you did not include a set-top box in your setup, proceed to
“Step 4: Complete the setup,” later in this chapter.
a. Connect the IR emitter cable plug to the connector on the
remote sensor 1.
✎Be sure that you connect the IR emitter cable plug to the
connector marked with a “1” on the remote sensor.
b. Remove the backing paper from the IR emitter to expose
the adhesive tape 2.
c. Press the adhesive side of the IR emitter onto the infrared
(IR) lens on the front of the set-top box 3.
✎To help locate the IR lens, shine a flashlight on the front
of the set-top box. The IR lens is usually a small, dark
red window.
✎If you cannot place the emitter directly over the IR lens,
place it as close to the IR lens as possible.

3–10 Hardware Setup
TV tuner setup
After the IR emitter is connected to the set-top box, you can
use the HP MediaBuddy Remote Control to change the
channels.
3. Complete the setup of your TV tuner. Refer to “Step 4:
Complete the setup,” later in this chapter.
✎For additional connection steps, such as adding a television, refer
to Chapter 4, “Advanced connections.”
Table of contents
Other HP TV Tuner manuals