HPC Sport Pit Installation instructions

SPORT PIT
Portable Fire Pit
Series
Installation&OperationInstructions
950-SPORT PIT
C US
SPORTPIT20-BLK

1
This is a Safety Alert Symbol
Whenyouseethis symbolonthefirepitinsert, or in thismanual,
look for oneofthefollowingsignalword panelsalertingyouto
thepotentialfor personalinjury,deathormajorpropertydamage.
WARNING
Do not store or use gasoline or other flammable vapors
and liquids in vicinity
of this or any other appliance.
An LP-cylinder not connected for use shall not be stored
in the vicinity of this
or any other appliance.
DANGER
FIRE OR EXPLOSION HAZARD
If you smell gas:
•Shut off gas to the appliance.
•Extinguish an open flame.
•If odor continues, leave the area immediately.
•After leaving the area the fire department.
Failure to follow these instructions could result in fire or
explosion, which could cause property damage, personal
injury, or death.
DANGER
CARBON MONOXIDE HAZARD
This appliance can produce carbon monoxide
which has no odor.
Using it in an enclosed space can kill you.
Never use this appliance in an enclosed
space
such as a camper, tent, car or home.
INSTALLER: Leave this manual with the appliance.
CONSUMER: Retain this manual for future reference.

Table of Contents
2

Table of Contents
3
1 ImportantSafetyInformation
.......................................................................................................
4
Technical Support.....................................................................................................................4
Symbol Legend......................................................................................................................... 4
Important Safety Information for Installers ...............................................................................5
Important Safety Information for End-Users.............................................................................5
2 ProductFeaturesandPartsList
...................................................................................................
6
3 SelectingtheFirePitLocation
.....................................................................................................
7
4 OverheadStructuresandSidewallClearanceRequirements
...................................................8
5 RemoteLPTankSystemEnclosureRequirements-IfApplicable
.........................................
9
6 Installing the Fire Pit
...................................................................................................................
14
7
Adding Approved Media
...................................................................................................................
15
8 OperatingtheFirePit
..................................................................................................................
16
9 Maintaining the Fire Pit
.............................................................................................................
18
10
Troubleshooting
................................................................................................................................
19
11
Compatible Accessories
.................................................................................................................
20
12
Replacement Parts
...........................................................................................................................
20
13
Warranty
.............................................................................................................................................
21

1 Important Safety Information
4
SELECT MODELS
Certified to
ANSI Z21.97-2017
CSA 2.41-2017
C
US
IMPORTANT
•
Toqualifyforwarranty,allinstructionsmustbestrictlyfollowed.Otherwise,
warrantymaybevoid. Neveralterproductorconfigurationinanyway.
•
Annualservicing should behandled byprofessionalscertified in theUSby the
NationalFireplaceInstitute(NFI)asNFIGasSpecialistsorinCanadabyWETT
(Wood Energy Technical Training).
•
Itistheend-user’s responsibilitytoensureasafeinstallationandeducate
regardingthefeatures,safetyrecommendationsandproperoperation
of this
product.
•
Pleasereferencepage1forallwarnings.
Symbol Legend
This is a Safety Alert Symbol
Whenyousee this symbolonthe firepitinsert,or inthis manual,lookfor
one
ofthefollowingsignalwordpanelsalertingyoutothepotentialfor
personal
injury,deathormajorpropertydamage.
Necessary instructions
Technical Support
Forinformationand supportcontactyourHearthProductsControlsdealer.

1 Important Safety Information
5
Please reference page 1 for all warnings.
Important Safety Information for Installers
Manualneedstobewith the end-user andtoretain it for future
reference.Instructions
andproductupdatesarealsoavailableatwww.hpcfire.com under the Support
tab.
End-usersmustcarefullyfollowtheinstructionsinthismanualtopreventpersonal
injuryorpropertyloss.Theseinstructionscontaininformationcriticaltothesafe
installationandoperationoftheportablefirepit.
•
Instructionsareupdatedasneeded.It istheresponsibilityoftheend-userto check
for product updates and installation manual updates at www.hpcfire.com/
support.htmlpriortoinstallation.
•
Itis theresponsibilityoftheinstallertofollow:
-
TheNationalFuelGasCode,ANSIZ223.1/NFPA54orInternationalFuel
GasCode.
-
Natural Gas and Propane Installation Code CSA B149.1 or CSA B149.2.
-
TheNationalElectricalCode,ANSI/NFPA70. In Canada, Canadian Electrical Code CSA22.1.
-
Localcodes
•
Only use gas/fuel type specified for this portable firepit asnoted on the
portable firepit controlslabel.NEVERuseanalternativefueltoincludebiofuel,
ethanol,lighterfluid
oranyotherfuel.
•
For use with an LP tank –A 20lb tank can be used.
•
Gaspressureand type shouldbecheckedpriortoinstallationanduse.
-
LPGas:SupplyPressure:Propane manifold
pressure: 11.0” W.C.
ImportantSafetyInformationforEnd-Users
•
Neverleaveanoperatingportablefirepitunattendedorwithsomeonenot
familiarwith
itsoperationoremergencyshut-offlocations.
•
Bothchildrenand adults shouldbe alertedtothehazards ofhighsurface
temperaturesandshouldstayawaytoavoidburnsandclothingignition.
•
Youngchildrenshouldbecarefullysupervisedwhentheyareintheareaof portable firepit.
•
Keeptheapplianceareaclearandfreefromcombustiblematerials,gasoline,
andotherflammablevaporsandliquids.

2 Product Features and PartsList
6
FirePitInsert
Installation and Operation Instructions
Pan
LP Tank Hose
•LP tank not included
•LP tank enclosure or mounting
bracket is not included.
•LP tank must be securely
fastened to an enclosure or
with a bracket to a solid
surface to avoid tipping.
Lid
Sport Pit Shell
•Regulator
•Tip Switch
•Safety valve
Thermocouple
Burner
SPORTPIT20-BLK

3 Selecting the Fire Pit Location
7
IMPORTANT
NOTE: All portable fire pits are designed and intended for outdoor use only.
It is recommended that material such as granite, marble
or other dense stone be kept away from heat and
especially flame due to risk of cracking. HPC is not
responsible for damage resulting from failure to follow
these recommendations.
•
Selectalocationthat
-
Providesenoughhorizontal roomtoenjoythe portablefirepitwhile
allowingasafe
distancefromtheheatandflame.
-
LP tank must be mounted to a solid surface. Use an enclosure or
mounting bracket designed to fit the LP tank. Follow the instructions for
installing the LP tank to ensure it is secure.
•
Portable firepitscreateveryhightemperatures.Forclearancesrefertotable
3.1. Clothingorotherflammablematerialsshouldnotbe placedonornear
firepit.
ClearancesaroundPortableFirePit
Fire Pit Clearances
Up to 65K
SidesSurrounding PortableFirePitfromStructureorCombustibles
36" (12" for
noncombustible)
Overhead Clearance above Product
84"
Tank attachment (RV, Camper or Tank)
54”
Table3.1–Sport Pit Clearance

4 Overhead Structures and Sidewall Clearance
8
Table4.1–Sport PitClearance
Note: Normal flame height is 6”-8”

5 RemoteLP TankSystemEnclosureRequirements -IfApplicable
9
IMPORTANT
IMPORTANT
IMPORTANT
OnlyselectmodelsofPush-Button/Match-Lit
(FPPKandMLFPK)firepitsarepermissibleforsmall
tankuse.PleaseseetheHPCproductcatalog,visit
www.hpcfire.com, or contact your HPC dealer for details.
Locate the hose out of pathways to avoid accidental
damage and prevent it from becoming a trip hazard.
ForanenclosureusinganLPtanksystem,followtheserecommended
specifications:
•
Youmust followlocalcodes.
TheremoteLPtank/enclosureshouldbea
minimumof54inchesfromthefirepit.
•
Onesideoftheenclosureshallbecompletelyopen;OR
•
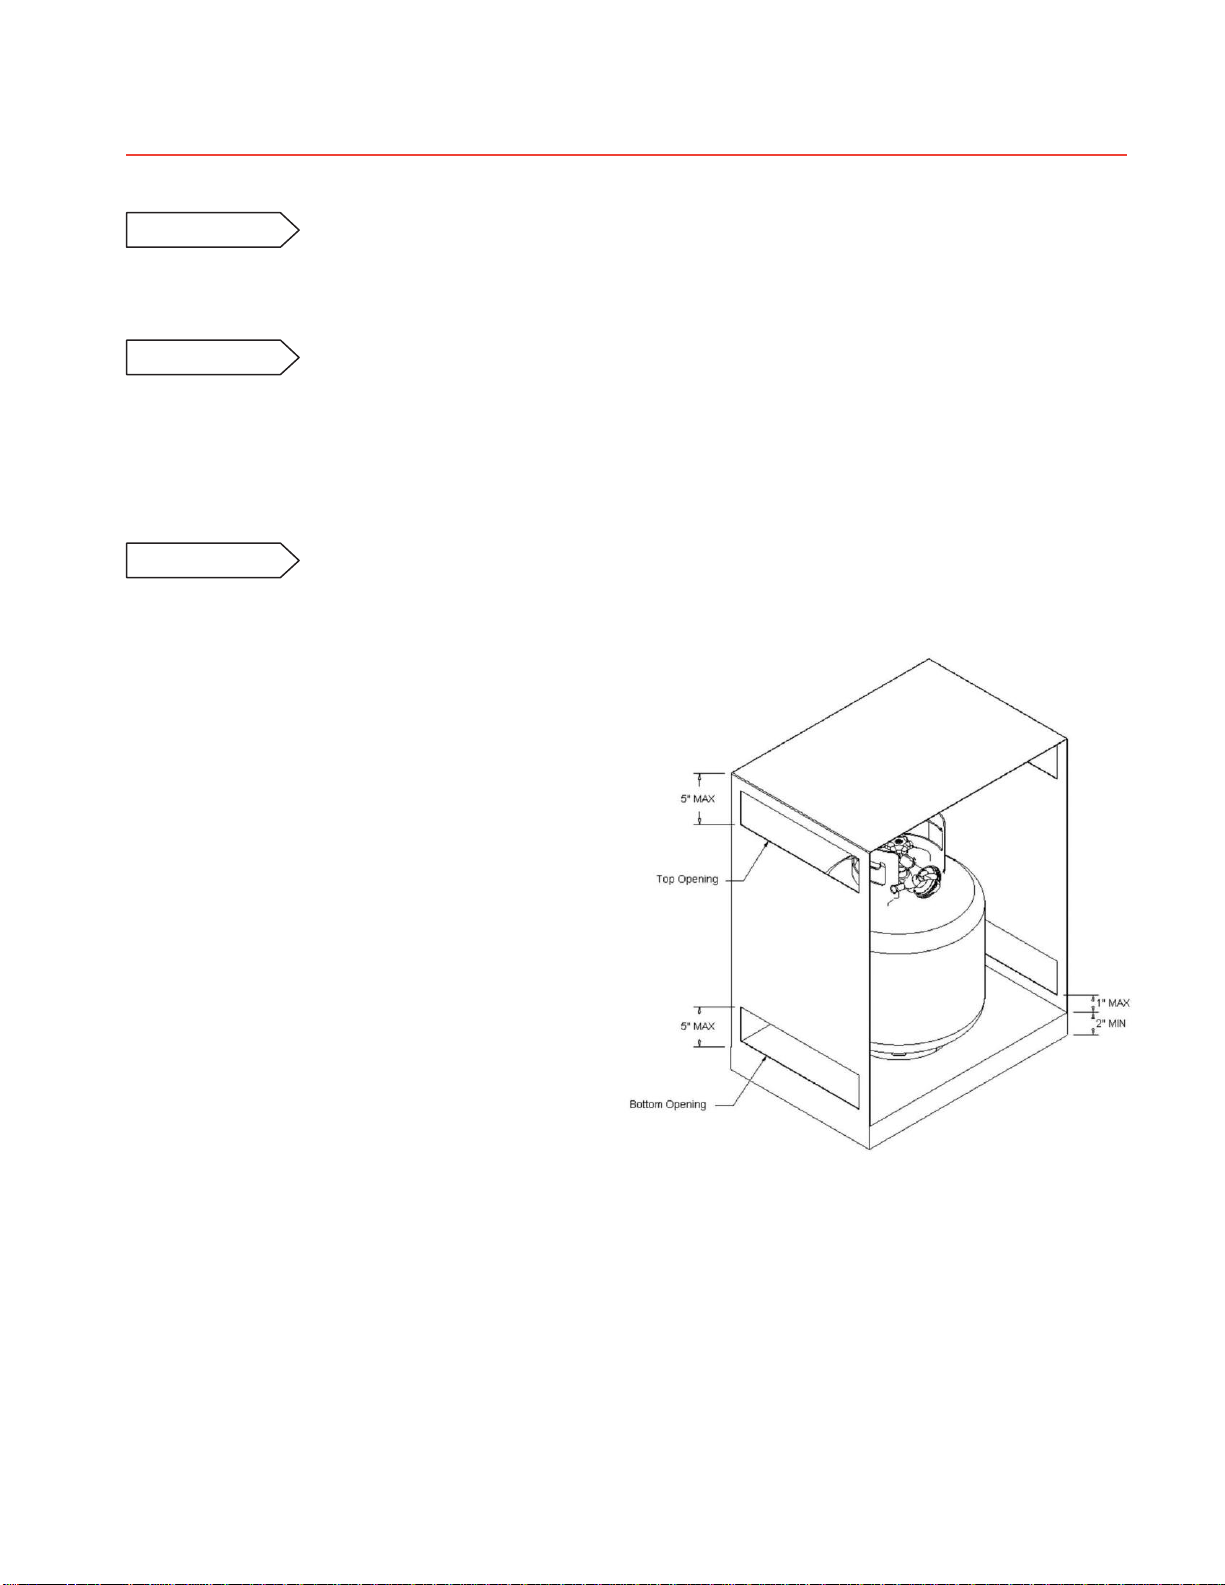
Foranenclosurehavingfoursides,a top,anda
bottom:
-
Atleasttwoventilationopeningsshallbeprovided
inthe side walls ofthe enclosure,located within 5
inches(127mm)of thetopoftheenclosure,equally
sized, spaced at a minimum of180 degrees, and
unobstructed.Theopening(s)shallhaveatotalfree
area of not less than 1 in2 lb. (14.2 cm2kg) of stored
fuelcapacity.SeeFigure6.1.
-
Ventilationopening(s)shallbeprovidedatthefloor
leveloftheenclosureandshallhaveatotalfreearea
of not less than 1/2 in2 lb. (7.1 cm2kg) of stored fuel
capacity.Ifventilationopeningsatfloorlevelareina
sidewall,thereshallbe atleasttwoopenings.The
bottomofthe openings shall be 1 inch (25.4mm) or
lessfromthefloorleveland theupperedge nomore
than5inches(127mm)abovethefloorlevel.The
openingsshallbeequallysized,spacedataminimum
of180degrees and unobstructed. SeeFigure 6 1.
•
Everyopeningshallhaveminimumdimensionssoasto
permit the entrance ofan1/8-inch(3.2mm)diameter rod.
Figure6.1–Top andbottomsideventilationopenings
forLPtankenclosure.
.

5 RemoteLP TankSystemEnclosureRequirements-IfApplicable
10
•
Ventilationopeningsinsidewallsshallnotcommunicatedirectlywithother
enclosuresoftheappliance.SeeTables6.1and6.2.
LP Tank Size
Top Opening
Bottom Opening
20LB(9.1KG)
20 in2 (130cm2)
10 in2 (65cm2)
Table6.1–LPtankenclosureopeningspecificationsbytanksize.
LP TankEnclosure Specifications
2 Openings for each top and bottom - 180° apart
From LP tank base to bottom of opening - Max. 1" (25.4mm)
From floor to base of LP tank - Min. 2" (50.8mm)
Table6.2–LPtankenclosureopeningspecifications.
•
Thecylindervalveshallbereadilyaccessibleforhandoperation.Adooronthe
enclosureto gain access to thecylinder valves is acceptable,provideditisnon-
locking and can beopened without the use of tools. Designs using a cover to gain
accesstothecylinderandcylindervalveshallbeprovidedwithhandlesorthe
equivalentataminimum of 180degrees aparttofacilitate lifting ofthecover.
•
TheenclosurefortheLP-gascylindershallisolatethecylinderfromtheburner
compartment to provide:
-
Shielding from radiation;
-
Aflamebarrier;and
-
Protectionfromforeignmaterial.
•
Thereshallbeaminimumclearanceof2inches(50.8mm)betweenthefloorofthe
non-disposableLP-gascylinderenclosureandtheground.
•
Thedesignoftheenclosureshallbesuchthat:
-
Anon-disposable LP-gascylindercanbeconnected, disconnected,andthe
connectionsinspectedandtestedoutsidethecylinderenclosure;and
-
Thoseconnections,whichcouldbedisturbedwheninstallingthecylinderin the
enclosure,canbeleak-testedinsidetheenclosure.

5 RemoteLPTankSystemEnclosureRequirements–IfApplicable
11
Propane Cylinder: Safety Requirements
•
Thisappliance hasbeen designed for use witha 20-lb sizepropane
cylinder
(not supplied).
•
Thepropanecylindershould becheckedby yourpropane supplier prior to
installation and use.
•
Neveruseacylinderwithadamagedvalve.Aworncylindermaybehazardousand
shouldbechecked by your propanesupplier.
•
Useonlya propanesupplycylinder constructed and markedinaccordancewith the
specificationsforLPgascylindersbytheNationalStandardofCanada,CAN/CSA
B339,Cylinders,SpheresandTubesforTransportationofDangerousGoods;and
Commission,asapplicableortheSpecificationsforLP-GasCylindersofbytheU.S.
Department of Transportation (DOT).
•
Donot storeaspareLP-gas cylinder underornearthisappliance.
•
Neverfillthecylinderbeyond80percentfull.
•
Onlyusethehoseassemblyprovidedwiththisappliance
orreplacement
pressureregulatorsandhoseassembliesasspecifiedbythe
manufacturer.The
regulatorsupplies apressureof 11 inches water column atthe
applianceand
hasa QCC1typefitting.
Propane cylinder specifications
•
Thepropanecylindermustbeprovidedwithacylinderconnectiondevice
compatiblewiththeconnectionforoutdoorappliances.
•
Thepropanecylindermustbesuppliedwitha shut-offvalveterminatingina propane
cylindervalvetypeQCC1andincludeacollartoprotectthecylindervalve.AQCC1
cylinderhasa positiveseating connection, which willnotallowgastoflowuntila
positivesealhasbeenachieved.Itisalsoequippedwithanexcessflowdevice.In
orderto attain full flow to the appliance, the valve must beinthe off position when
thecylindervalveisturnedon.
•
Thepropanecylindermusthaveasafetyreliefdevicehavingdirectcommunication
with thevapor space ofthe cylinder.
•
Thecylindersupplysystemmustbearrangedforvaporwithdrawal.
•
Thecylindershallincorporatelistedoverfillprotectiondevice(OPD).

5 RemoteLPTankSystem EnclosureRequirements -IfApplicable
12
LocatingtheLPtank:
SecuringtheLPtank:
1. Use an enclosure or L-bracket designed to hold a
20 lb. LP tank. Fasten the L-bracket to the bottom
of the propane
tankusinganutandbolt.Ensurethe
nut
is tightandwillnotloosen.
2. Selectthelocationforthepropanetankfollowingthe
guidelinesabove,Figure6.2.
3. Screw the bracket to the mounting surface. For
concretesurface,useaconcreteanchor(not
supplied).Ensurethatscrewis tight sothatthe
cylindercannotmove.
fs
WARNING
•
Always ensure L-bracket is securely fastened to
prevent the LP tank from tipping.
WARNING
Failure to follow location and mounting guidelines
for the LP tank could result in serious injury.
WARNING
•
Locate the LP Tank and enclosure out of pathways
to avoid accidental damage and prevent them
from becoming a trip hazard.
•
Locate the hose out of pathways to avoid
accidental damage and prevent it from becoming
a trip hazard.

5 RemoteLPTankSystemEnclosureRequirements–IfApplicable
13
Connecting the Cylinder:
1. Ensurethe gasregulatorhasnokinksandis
smooth.
2. Removethecaporplugfromthecylinderfuelvalve.
3. InserttheblackQCC1regulatornipple ontothe
QCC1fuelvalve andtightenuntilsnug.Donotuse
tools.
4. Perform a leaktest on all joints prior tousingthegas
appliance.Aleaktestmustbeperformedannually
and each time a cylinder is hooked up or if a part of
thegas systemisreplaced. This includes all fittings
on the inside of the Sport Pit.
•Test procedure for checking gas leaks
1) Ensure your propane tank is closed
2) Mix 10% liquid soap with water in a spray bottle
3) Spray and apply the soapy water at each of the
fittings on the Sport Pit, includes regulator, hose
and orifice.
4) Open valve of the propane tank without turning on the Sport Pit. This pressurizes the hose.
5) Check all fittings, if there is a leak, you will see bubbles forming.
6) If there are no bubbles, it is safe to use. If there are bubbles, the fittings need tightened or resealed with
proper plumbers’ sealant. Always consult a licensed plumber.
5. Followtheinstructionsfor naturalgashook-upif
the
appliance is tobe connected directly to a house
propanegassupplyline.

6 InstallingtheFirePit
14
IMPORTANT
IMPORTANT
To prevent damage, unhook the portable fire pit from the
gas
supply for pressure leak tests.
Burn Testing: It is the responsibility of the qualified
installer to test for gas leaks at all connections.
•
Performallleaktestswithleakdetectororleakreactant.
Installation Steps:
1. Setportable firepitinproperlylocation.
2. Position portablefirepitfollowingsafety
recommendations
withaccesstoallgas
connections for testing.
Read Section 3 –Selecting the Fire Pit Location
formoredetails.
3. Shut off gas supply to portable fire pit.
4. Connect portable firepittoLP tank.
5. Turnon gas supply,purge gas lines ofairand
performleaktestonallinletconnections.
Repairasneeded.
6. Light portablefirepit.Itmay take several seconds
topurge air from the lines. Read Section 9 –
Operating the Fire Pit
7. Onceportablefirepitis lit, perform leak test
onallgas
connections.Repairasneeded.
8. Turnoff portablefire pit and allow it to cool.
9. Applymediaas described in Section 8, Adding
ApprovedMedia.Whenfillingthepan with lava
rockand/ordecorativeglass,theinstructionsin
Section 8 must be followed.
10. Turnon portablefirepitagainandperform leaktest
with
mediacorrectlyinstalled.Ifgasleakisdetected
verify
correctmediaapplicationandrepairas
needed.
11. Verifycorrectoperationandlighting.
12. Leavemanualwithenduser.

7 AddingApprovedMedia
15
WARNING
FOR GLASS MEDIA USAGE WITH LP GAS- WHEN USING APPROVED
DECORATIVE GLASS TO COVER BURNER APPLY ONLY ENOUGH TO HIDE
BURNER. APPLYING OVER 1/2” MAY CREATE BACK PRESSURE AND GAS
LEAKAGE FROM AIR MIXER RESULTING IN LP POOLING UNDER FIRE PIT.
WARNING
FOR GLASS MEDIA USAGE WITH LP GAS- THE UNIT MUST BE TESTED WITH
MEDIA OVER BURNER FOR CONFIRMATION OF NO BACK PRESSURE CREATING
GAS TO LEAK OUT OF AIR MIXER VENTURI HOLES. THIS MAY HAVE TO BE
WARNING
Never use any material that is non-porous or holds moisture such as gravel,
pebbles, river rock, etc. When heated, non-porous material will not allow heated
steam to readily escape which can break and cause personal injury or damage.
Material that holds moisture can boil and fracture unexpectedly when exposed
to heat.
•
IMPORTANT
The portable fire pit is designed to use approved media
correctly
installed over the burner to achieve proper
combustion.
•
Neverinstallameshorscreenunderthemedia.
•
Mediaaffectsflamepatterngreatly.
Please follow the instructions below to addthefinishingtouch to your portable fire pit.
Incorrectmediainstallation willcausethe flame on thermocouple tosuffocate
andturnoff pit
ordelaymainburnerignition.
Decorative Glass Application
Fill pan with media. Cover burner with approx. ½
inchofglass.Donotoverfillpanwithglass.
AllLPinstallationsmustbe checkedfor back
pressurewithmediainstalled.Failureto dosomay
resultinpersonalinjuryorpropertydamage.

16
8 Operating the Fire Pit
•
Before use, besureto test all gas connections for leaks. Do not use portablefire pit if
there is
anyevidenceofleakinggas.Ifleakinggassuspected,turnoffthemaingas
supply
andrepairimmediately.
•
The hose should be inspected before each use of the portable firepit and
replacedprior to useif thereisevidenceofexcessiveabrasionorwearorif the
hoseisdamaged.
Thereplacementhoseassemblyshallbethatspecifiedbythe
manufacturer.
•
Donot usetheportablefirepitifanyparthasbeenunderwater.Immediately calla
qualified
servicetechniciantoinspectthefirepit.
•
Neveruseanymaterialthatisnon-porousandholdsmoisturesuchas gravel,
pebbles,riverrock,etc.Thismaterial,whenheatedwillcausethetrappedmoisture
toboilandfractureunexpectedly.Thismaterialisnotsufficientlyporous toallow
heatedsteamtoreadilyescapewhich canbreakandcausepersonalinjuryor
damage.
•
Solidfuelsshallnotbeburnedinthe portable firepit.
•
Leaves,sticks, wood,paper,clothing, food material, shouldbekeptawayfromthe
portable firepit.Clothingorotherflammablematerialsshouldnotbehungfromthe
appliance
orplacedonorneartheappliance.Keeptheapplianceareafreefrom
gasoline,and
otherflammablevaporsandliquids.
•
Portable fire pit is not for cooking.
•
Makesurethatthere is no vegetation or other objects over the topor sides of
theportablefirepitthatcouldinterferewithsafeoperation.Seeclearancesin
Section 3 –
Selecting the Fire Pit Location.
•
If lava rock is wet, allow the portable fire pit to burn for 45 minutes prior to
coming within
15feet of the fire pit.
•
Only operate portable fire pit on flat surface. Do not use on an angled
surface. The portable fire pit has a built-in tip switch and will cause it to shut
off if the appliance is greater than a 45° angle.
•
Whenthe portable firepitis notinoperation,turnoffgasvalve.
•
Portable fire pit is not recommended to not be used during rainy conditions.
•
When not in use, the portable firepit must always be covered.

17
8 Operating the Fire Pit
DANGER
If you smell gas:
1)
Shut off gas to appliance.
2)
Extinguish any open flame.
3)
If odor continues, keep away from
appliance and immediately call
gas supplier or fire department.
Sport Pit Start-up
1. STOP!Readthesafetyinformationon
“If you smell gas”, Section 1 –Important
Safety Information.
2. Confirmthereis nodebris in the portable
firepit(as
mentionedinwarnings)
includingwater.
3. Placelonghandledlighterormatchwhile
burning on top of the portablefire pit.
4. Press the valve knob and turn it to “on” position
slowly, hold it for about 10 seconds
5. Afterburnerlights,removelighterormatch and
release the knob.
6. Adjustflametodesiredheight.
NOTE: Ifburnerdoesnotlightturnvalveoff and
wait 5 minutes,thenrepeat steps 3-6.
7. Ensure portablefirepit,childrenandpatronsare
supervisedbyaresponsibleadultthatisfamiliar
withemergency shutdown.
8. Flammablematerialsshouldnotbeplacedonor
neartheportablefirepit.
This product is intended to be connected
to an LP small tank
Sport Pit Shutdown
1. Turn“OFF” gasvalve.
2
Once theportable fire pit is cooled, use
appropriatecover to protect appliance.

9MaintainingtheFirePit
18
8 Operating the Fire Pit
9 Maintaining the Fire Pit
Service
We suggest that our products
beservicedbyaprofessional
certifiedinthe USbythe
National Fireplace Institute
(NFI)asNFI Gas Specialists.
•
Anyguardorprotectivedeviceremovedforservicingmust
be replaced prior to operating the portable fire pit.
•
Wesuggest that our products beserviced annually by a
professionalcertifiedinthe USby theNationalFireplace
Institute (NFI) as NFI Gas Specialists.
•
Ensuregasis shutoffand portablefirepitiscool beforeservicing.
•
Always keep portable fire pit covered whennotinuse
andfree
ofdebris.
•
Insome areas ofthe country, spiders or insects have been known to build
nestsand/orlayeggs in the venturi holesof the air-mixerfor LPunits.
Thiscancausefueltofillthefirefeaturecavityandresultinpersonal injury
orpropertydamage.Periodicinspectionbyaqualifiedservicetechnician
oftheair-mixerisrequiredtoensureyourfirefeatureperformsproperly,
Figure10.1.
•
Burner Cleaning: One time a year.Ifflamesexhibit any abnormal
shapesor behavior,or ifburnerfailsto igniteproperly,thenthe burner
holesmayrequirecleaning.Theappliancecanbecleanedbycarefully
removingthe media to allow access to burner. Use abrush to carefully
removedust, spiderwebs,andlooseparticlesfromfireringitself.If
evidenceofdamage, fireringmustbereplacedwith
fireringspecified
bythemanufacturer.

10 Troubleshooting
19
Service
We suggest that our products be
servicedbyaprofessionalcertifiedin
theUSbytheNationalFireplace
Institute (NFI) as NFI Gas Specialists.
Table11.1belowindicatessomepotentialcausesand
counter measures tothe symptoms indicated in bold.
Please contact your retailer or certified technician
for service and repair.
Problem
PossibleCauses
Solution
Burner will not light
Airingasline
Bleedairfromgaslinebyslowlyopeningvalve
Propane(LP)-checkgaslevelintank
No gas flow - gas not ON or line obstruction
ConfirmgasisONupstream
Possibledebrisinline-insulation,dirt,plastic,etc.
Tip Switch engaged
Shut gas off and level appliance
Burner will not stay lit
Thermocouple not sensing
Possible dirty. Also, debris or media blocking.
Burnerobstructed
Confirmnowaterordebrisinburner
Improperly appliedortoomuchmedia
Re-apply media (Section 8)
Toowindy
Use when less windy orwith our wind guard
(Seepage23,Figure12.1)
Low flame when
turned to High
Improperlightingprocedure
Portable firepitvalvemustbeOFFwhentankis
turnedON.
TurntankONslowlytoallowpressure
toequalize,
then turn ON fire pit
Lack ofgas
Checkgaslevelof LPtank
Supplyhoseispinched
Repositionsupplyhoseasnecessary
Flame is creating large
amount of soot
Venturi holes
areblocked with debris-
grass, dirt, etc.
Thoroughlycleanorifice-(Section10)
Noise when lit
Propane(LP)-Hummingregulator
Not a defect - normal occurrence on hot days due
to
internalvibrationsinregulator
Table11.1–Troubleshooting
Table of contents
Other HPC Outdoor Fireplace manuals
Popular Outdoor Fireplace manuals by other brands

AZ Patio Heaters
AZ Patio Heaters F-1108-FPT owner's guide

Sunnydaze Decor
Sunnydaze Decor NB-CF24 Owner's manual and instructions

Fiap
Fiap premiumdesign FireTower manual

Heininger
Heininger FMPPC2 owner's manual

Regency
Regency PTO28CIT - NG Owners & installation manual

Firegear
Firegear FPB-29DBS22MT-N Installation and operating instructions