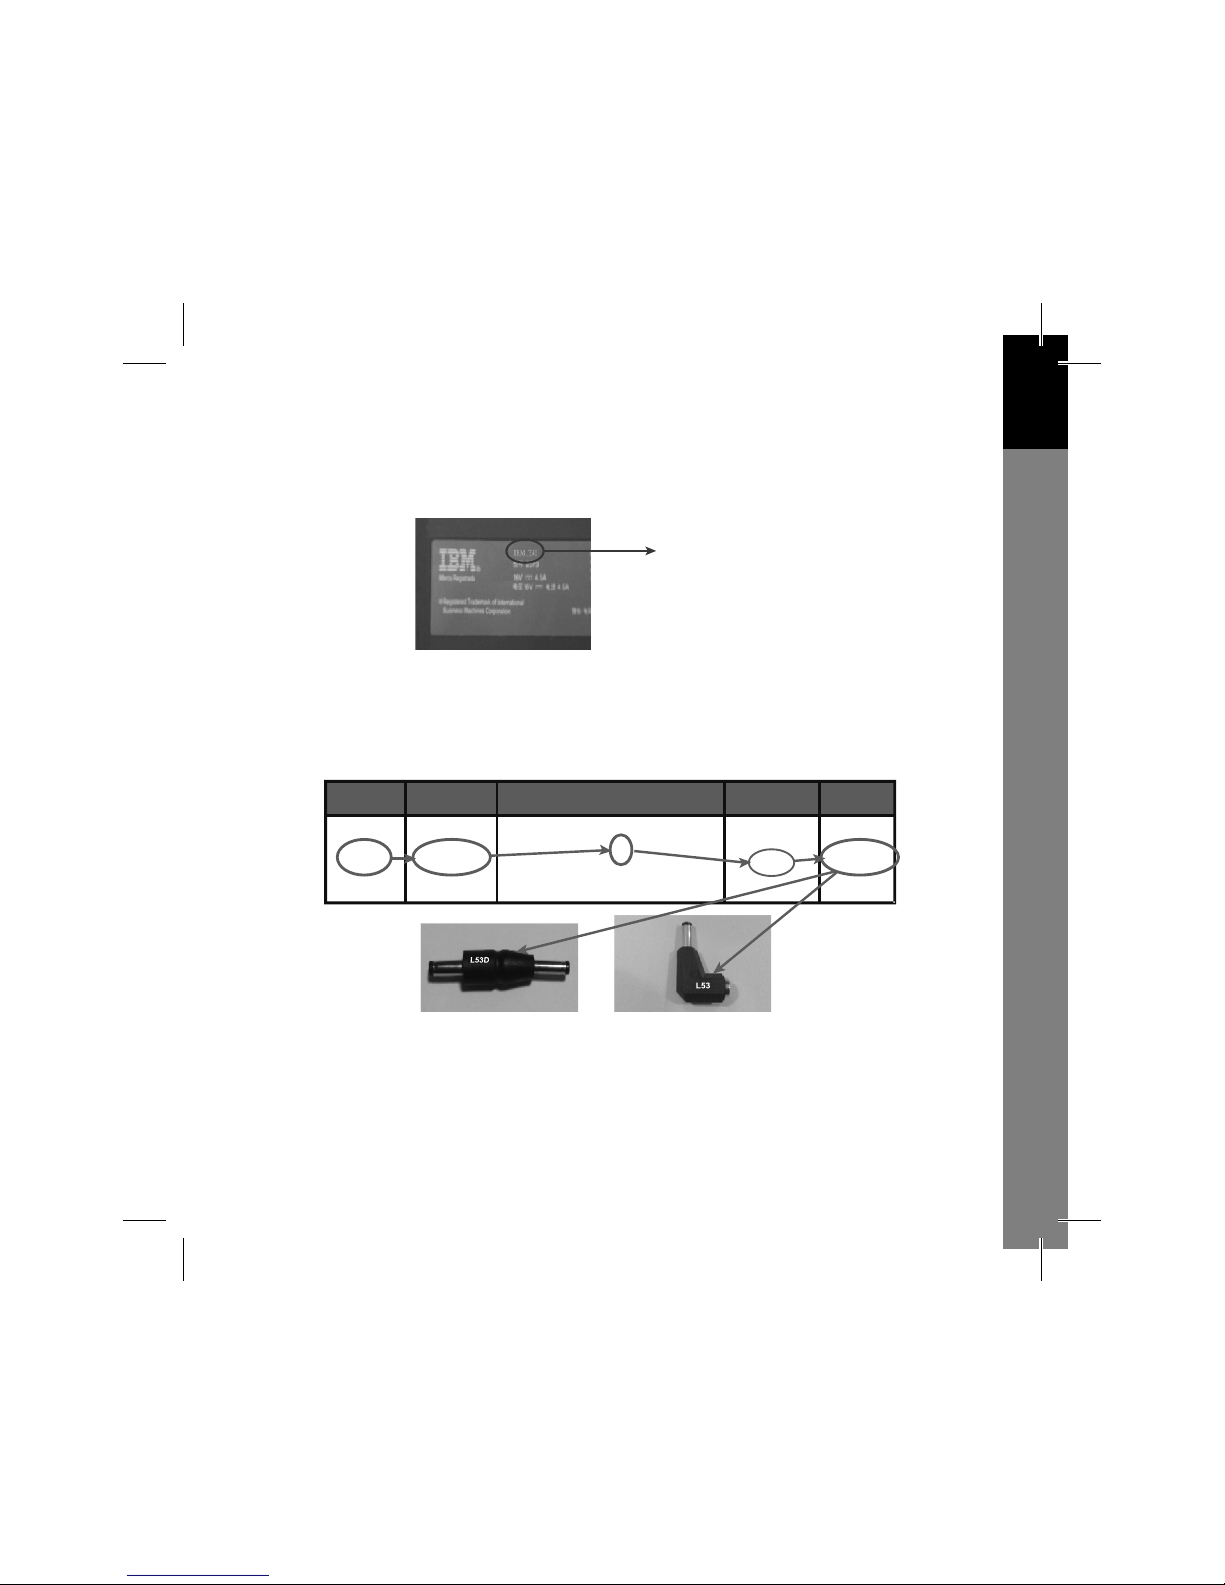
HQ HQ-UBT-4400 User manual

English Deutsch Français Nederlands Italiano Español Magyar Suomi Svenska Česky
HQ-UBT-4400
HQ UNIVERSAL NOTEBOOK LI-ION
POWER PACK 4400MAH
READ INSTRUCTION BEFORE USE!

1
English
DeutschFrançaisNederlandsItalianoEspañolMagyarSuomi
Svenska
Česky
User Manual
Thank you for purchasing our HQ-UBT-4400. Please read the user manual carefully before
your operation and keep it in proper place for your future reference.
Safety Precautions
In order to prevent the leakage, heat or explosion with battery, please pay attention to.
Danger!
Battery leakage, explosion or fire may be caused if you do not read
the following precautions carefully.
Do not throw battery into water or make it wet.
Do not use or store battery near heat source (like fire or heater).
Do not throw the battery into fire or heat the battery.
Forbid the short circuit with the positive and negative polarities of battery via lead or other
metal objects, forbid to transport or store the battery with necklace, hair clipper or other
metal objects.
Forbid striking, casting or shaking the battery.
Forbid piercing the battery shell via nail or other sharp objects, forbid to hammer or trample
the battery.
Forbid disassembling the battery in any way.
Warning!
Battery leakage, explosion or fire might be caused if you do not read the following precautions
carefully.

2
English Deutsch Français Nederlands Italiano Español Magyar Suomi Svenska Česky
Do not throw battery into microwave oven or pressured vessel.
Stop using when unusual smell, heating, distortion, color-change or other abnormalities
with the battery.
Move away from the fire when leakage or unusual smell with battery.
Leaked electrolyte may cause fire or explosion.
Do not wipe your eyes if the leaked electrolyte enters into, wash with water and ask doctor
for help immediately, the eyes may be damaged if not treat timely.
Attention!
Do not use the battery in extremely hot environment, like inside the car with direct sunlight
or in summer. Otherwise, the battery will be overheated and lighted that will influence the
battery performance and shorten its service life.
If you want to store the battery for long time (over three months), you have to keep 50% of
the rated capacity (charge once every 3 months), store it in a dry place with the temperature
of -10˚C ~ 40˚C, and avoid the contact with corrosive objects and keep away from the fire
and heat sources.
Teach the children how to use the battery according to the user manual, and pay attention
to guarantee their correct operations.
If the battery leaks the electrolyte into skin or cloths, wash the- affected area with flowing
water, otherwise it will cause the skin inflammation.

3
English
DeutschFrançaisNederlandsItalianoEspañolMagyarSuomi
Svenska
Česky
Function illustrator
The press button for capacity indicating
and USB output changing
Capacity indicator
Charging indicator
The sliding button between
16V/19V selection
Charging USB output port
Discharging
Operations
1) How to use
Step 1:
Read the user manual carefully to make sure the proper operation with the battery pack.

4
English Deutsch Français Nederlands Italiano Español Magyar Suomi Svenska Česky
Step 2:
Refer to the guidance of your notebook computer or check the label on notebook computer to
confirm the brand and model. Take IBM T40 as an example.
IBM T40
Step 3:
Check the compatible list (packed with battery), select the correct input and output tip and the
voltage level according to the notebookbrand and model.
Brand Series Model Voltage Tip No.
IBM
ThinkPad
ThinkPad Thinkpad A
ThinkPad T
ThinkPad X & R series
ThinkPad Transnote
16 V L53/53D
Step 4:
Set the battery pack‘s output voltage at proper level by pushing the voltage switch.

5
English
DeutschFrançaisNederlandsItalianoEspañolMagyarSuomi
Svenska
Česky
Step 5:
Press the switch (in the middle) on battery pack, check LED indicator. If only one or no indicator
lights, it means the power is not enough, you have to charge the battery pack first (refer to
how to harge).
Step6:
Make sure the battery pack is fully charged, connect the selected output tip and output cable
together, then insert one terminal of output cable into DC OUT port of battery pack, and the
other terminal with output tip into DC IN port of your notebook (you can not insert into in
opposite port). Thus, the battery pack is ready for power supply of your notebook computer.
The system adopts 5 indicators of LED1~LED5 to display different power status. Press
indicator switch (refer to illustration) when the battery pack is in discharge or idle status, if you
press the switch POWER, the system will display the rest power of the battery for 4 seconds,
details of indicator status are as follows (rest power is R P):

6
English Deutsch Français Nederlands Italiano Español Magyar Suomi Svenska Česky
0 RP 20
20 RP 40
40 RP 60%
60% RP 80%
80% RP 100%
1LED
2LEDS
3LEDS
4LEDS
5LEDS
The blink of the first LED means the power is less than 10 % or the battery group voltage is
less than 10.3V. The power check is the separated module which will not consume the battery
energy if no press on indicator button. When one the first LED blinks, the battery pack enters
the warning of low power, at the time, please save the file and charge the battery pack in
time.
Step 7:
In case of large output power or abnormal use, the battery pack will give an alarm when the
internal temperature is too high. The alarm is shown by the second LED light blinking. If it is
continued using, the battery pack will shut off automatically. And when the internal temperature
decreases to a safe degree, the battery pack will turn on and unchain the safety protection
automatically. Then it can be used continuously. The above is normal phenomenon.
2) How to charge:
Connect the selected input tip with the notebook original AC adapter, then connect the
terminal with input tip of the AC adapter with the input port of battery pack (input port refers to
Illustration), and connect the other terminal with electricity source to charge, the indicator is
in red during the charge and turns to green after the charge. Do not discharge your notebook
during the charge for improving the charging efficiency. Otherwise, the charge time will be
longer.

7
English
DeutschFrançaisNederlandsItalianoEspañolMagyarSuomi
Svenska
Česky
Charge Tip Original Notebook AC adapter
3) Main Output of Power:
Connect one terminal of the output cable to the output port of battery pack (Output port refers
to illustration), and the other terminal to the device requiring charge Note: make sure the
battery is at proper output voltage level before connection . If the battery pack discharges, it
will offer power supply to notebook firstly and charge the built-in battery with small current, but
the battery using rate will be lower, so the better way is to supply power to notebook after your
take out the built-in battery.
Output Cable Output Tip
4) USB Output of Power Supply:
Connect USB input devices with battery pack, then press theindicator switch to charge the
devices.

8
English Deutsch Français Nederlands Italiano Español Magyar Suomi Svenska Česky
Specifications
Weight: about 450g
Charge input: 16V~ 25V, 2.5A ~ 4A adapter input
Discharge output: voltage: 5V, 16, 19V
Current: ≤ 3.2A
Max. constant output power: 50W
Charge time: about 2.5~ 3.5 hours
Output Watthour no.: 48.8Wh/4400mAh
Cycle life: at least 300 times
Dimension: 170x85x23 mm
Accessories
1) 7pc input connecter tips
2) 1 output cable+8pc output connecter tips
3) 1 user manual
1 compatible list & 1 specification list of output tips

English
DeutschFrançaisNederlandsItalianoEspañolMagyarSuomi
Svenska
Česky

English Deutsch Français Nederlands Italiano Español Magyar Suomi Svenska Česky
HQ-UBT-4400
HQ UNIVERSAL NOTEBOOK LI-ION
POWER PACK 4400MAH
LESEN SIE VOR DER ANWENDUNG DIE ANWEISUNGEN DURCH!

1
English
DeutschFrançaisNederlandsItalianoEspañolMagyarSuomi
Svenska
Česky
Benutzerhandbuch
Danke, dass Sie unser HQ-UBT-4400 gekauft haben. Lesen Sie das Benutzerhandbuch vor
der Inbetriebnahme bitte sorgfältig durch und bewahren es für später an einem geeigneten
Platz auf.
Sicherheitsvorkehrungen
Um Auslaufen, Hitze oder Explosion zu verhindern, achten Sie bitte auf:
Gefahr!
Es kann zum Auslaufen, zur Explosion oder zum Brand der Batterie kommen, wenn Sie sich
die folgenden Vorkehrungen nicht sorgfältig durchlesen.
Werfen Sie die Batterie nicht ins Wasser oder machen sie nass.
Benutzen oder lagern Sie die Batterie nicht in der Nähe einer Heizquelle (wie Feuer oder
Heizgerät).
Werfen Sie die Batterie nicht ins Feuer, und erhitzen Sie sie nicht.
Schließen Sie die positiven und negativen Pole der Batterie nicht durch einen Draht oder
andere Metallgegenstände kurz, transportieren oder lagern Sie die Batterie nicht mit
Halsbändern, Haarklemmen oder anderen Metallgegenständen.
Stoßen, werfen oder schütteln Sie die Batterie nicht.
Durchbohren Sie das Batteriegehäuse nicht mit Nägeln oder anderen scharfen
Gegenständen, hämmern und treten Sie nicht auf die Batterie.
Bauen Sie die Batterie in keiner Weise auseinander.
Warnung!
Die Batterie kann auslaufen, explodieren oder brennen, wenn Sie die folgenden Vorkehrungen
nicht sorgfältig lesen.

2
English Deutsch Français Nederlands Italiano Español Magyar Suomi Svenska Česky
Stellen Sie die Batterie nicht in einen Mikrowellenherd oder ein unter Druck stehendes
Gefäß.
Benutzen Sie sie nicht mehr, wenn Sie einen ungewöhnlichen Geruch, Hitze, Verformung,
Farbveränderung oder andere Abnormalitäten an der Batterie wahrnehmen.
Entfernen Sie sich vom offenen Feuer, wenn die Batterie ausläuft oder ungewöhnlich
riecht.
Auslaufendes Elektrolyt kann Brand oder Explosion verursachen.
Wischen Sie sich nicht die Augen, wenn ausgelaufenes Elektrloyt eingedrungen ist.
Waschen Sie sie mit Wasser, und suchen Sie sofort ärztliche Hilfe. Die Augen können
Schaden erleiden, wenn sie nicht rechtzeitig behandelt werden.
Achtung!
Benutzen Sie die Batterie nicht in sehr heißer Umgebung wie in einem Auto mit direkter
Sonnenbestrahlung oder im Sommer. Sonst wird die Batterie überhitzt und angezündet,
wodurch die Leistung der Batterie beeinflusst wird und ihre Lebensdauer verringert wird.
Wenn Sie die Batterie längere Zeit lagern wollen (mehr als 3 Monate), müssen Sie 50%
der Nennkapazität einhalten (einmal alle 3 Monate laden), sie an einer trockenen Stelle mit
einer Temperatur von -10˚C - 40˚C lagern, Kontakt mit korrosiven Gegenständen vermeiden
und sie von Feuer und Wärmequellen fernhalten.
Sagen Sie Kindern, wie die Batterie entsprechend dem Benutzerhandbuch zu benutzen ist,
und passen Sie auf, dass sie richtig mit ihr arbeiten.
Wenn das Elektrolyt der Batterie auf die Haut oder Kleidung ausläuft, waschen Sie den
betroffenen Bereich mit fließendem Wasser, sonst kommt es zur Hautentzündung.

3
English
DeutschFrançaisNederlandsItalianoEspañolMagyarSuomi
Svenska
Česky
Funktionsillustrator
Der Druckknopf für die Kapazitätsanzeige
und den USB-Ausgangswechsel
Kapazitätsanzeige
Ladeanzeige
Schiebeschalter zwischen
16 V und 19 V
Laden USB-Ausgangsanschluss
Entladen
Operationen
1) Wie ist sie zu benutzen
Schritt 1:
Lesen Sie das Benutzerhandbuch sorgfältig durch, damit der Akkupack richtig funktioniert.

4
English Deutsch Français Nederlands Italiano Español Magyar Suomi Svenska Česky
Schritt 2:
Zu Marke und Modell siehe Notebook-Anleitung oder -Typenschild. Nehmen wir IBM T40 als
Beispiel.
IBM T40
Schritt 3:
Überprüfen Sie die kompatible Liste (mit der Batterie verpackt), wählen Sie die richtige
Eingangs- und Ausgangsspitze und die Spannung entsprechend der Marke und des Modells
Ihres Notebooks aus.
Marke Serie Modell Spannung
Spannung
IBM
ThinkPad
ThinkPad Thinkpad A
ThinkPad T
ThinkPad X & R series
ThinkPad Transnote
16 V L53/53D
Schritt 4:
Stellen Sie die Ausgangsspannung des Akkupacks auf den richtigen Wert ein, indem Sie
den Spannungsschalter drücken.

5
English
DeutschFrançaisNederlandsItalianoEspañolMagyarSuomi
Svenska
Česky
Schritt 5:
Drücken Sie den Schalter in der Mitte des Akkupacks, überprüfen Sie die LED-Anzeige. Wenn
nur eine oder keine Anzeige leuchtet, bedeutet das, dass nicht genug Energie vorhanden ist.
Sie müssen den Akkupack zunächst aufladen (siehe "Wie wird geladen").
Schritt 6:
Sorgen Sie dafür, dass der Akkupack voll geladen wird, schließen Sie die ausgewählte
AusgangsspitzeandasAusgangskabelan, steckenSie danneine Klemme des Ausgangskabels
in den DC OUT-Anschluss des Akkupacks und die andere Klemme mit der Ausgangsspitze in
den DC IN-Anschluss Ihres Notebooks (Sie können nicht in den entgegengesetzten Anschluss
einstecken). Nun ist der Akkupack bereit, Ihr Notebook mit Strom zu versorgen.
DasSystemhat5 Anzeigen(LED1-LED5),umdieverschiedenenEnergiezuständeanzuzeigen.
Drücken Sie den Anzeigeschalter (siehe Abbildung), um zu sehen, ob der Akkupack geladen
wird oder untätig ist. Wenn Sie den POWER-Schalter drücken, zeigt das System 4 Sekunden
lang die Restenergie der Batterie an. Im Folgenden Details zum Anzeigestatus (Restenergie
ist RP):

6
English Deutsch Français Nederlands Italiano Español Magyar Suomi Svenska Česky
0 RP 20
20 RP 40
40 RP 60%
60% RP 80%
80% RP 100%
1 LED
2 LEDs
3 LEDs
4 LEDs
5 LEDs
Wenn die erste LED blinkt, bedeutet das, weniger als 10 % Energie oder die Spannung der
Batteriegruppe beträgt niedriger als 10,3 V.Die Energiekontrolle ist eine gesonderte Baugruppe,
die keine Batterieenergie verbraucht, wenn Sie nicht auf die Anzeigetaste drücken.Wenn eine
der ersten LEDs blinkt, warnt der Akkupack vor geringer Energie. Speichern Sie bitte sofort
die Datei und laden den Akkupack rechtzeitig auf.
Schritt 7:
Bei starker Ausgangsleistung oder unnormaler Benutzung gibt der Akkupack Alarm, wenn
die Innentemperatur zu hoch ist. Der Alarm wird durch die blinkende zweite LED angezeigt.
Wenn der Akkupack ständig benutzt wird, schaltet er sich automatisch ab. Und wenn die
Innentemperatur auf einen sicheren Wert abfällt, schaltet sich der Akkupack an, und der
Sicherheitsschutz wird automatisch abgeschaltet. Dann kann er dauerhaft benutzt werden.
Das Obige ist eine normale Erscheinung.
2) Wie wird geladen:
Schließen Sie die gewählte Eingangsspitze an den Original-Netzadapter des Notebooks
an, dann schließen Sie die eine Klemme mit der Eingangsspitze des Netzadapters an den
Eingang des Akkupacks an (Eingang siehe Abbildung), und dann schließen Sie die andere
Klemme zum Laden an die Stromquelle an. Während des Ladens ist die Anzeige rot und
wird nach dem Laden grün. Entladen Sie Ihr Notebook nicht während des Ladens, damit die
Ladeeffektivität erhöht wird. Sonst dauert das Aufladen länger.

7
English
DeutschFrançaisNederlandsItalianoEspañolMagyarSuomi
Svenska
Česky
Ladespitze Original-Notebook-Netzadapter
3) Hauptausgang der Energie:
Schließen Sie eine Klemme des Ausgangskabels an den Ausgangsanschluss des Akkupacks
an (Ausgangsanschluss siehe Abbildung), und die andere Klemme an das Gerät, das
geladen werden soll. Anmerkung: Sorgen Sie vor dem Anschluss dafür, dass die richtige
Ausgangsspannung eingestellt ist. Wenn der Akkupack entladen wird, speist er zuerst das
Notebook und lädt die eingebaute Batterie mit einem geringen Strom auf. Aber die Menge,
die die Batterie braucht, wird geringer sein, so dass es besser ist, das Notebook zu speisen,
nachdem Sie die eingebaute Batterie herausgenommen haben.
Ausgangskabel Ausgangsspitze
4) USB-Ausgang der Stromversorgung:
Schließen Sie die USB-Eingangsgeräte an den Akkupack an und drücken dann den
Anzeigeschalter, um die Geräte aufzuladen.

8
English Deutsch Français Nederlands Italiano Español Magyar Suomi Svenska Česky
Technische Daten
Gewicht: etwa 450 g
Ladeeingang: 16 V- 2 5V, 2,5 A - 4 A Adaptereingang
Entladeausgang: Spannung: 5 V, 16 V, 19 V
Strom: ≤ 3,2 A
Max. konstante Ausgangsleistung: 50 W
Ladezeit: etwa 2,5- 3,5 Stunden
Ausgangsenergie: 48,8 Wh/4400 mAh
Zyklenfestigkeit: mindestens 300-mal
Abmessungen: 170x85x23 mm
Zubehör
1) 7 Eingangssteckerspitzen
2) 1 Ausgangskabel + 8 Ausgangsanschlussspitzen
3) 1 Benutzerhandbuch
1 kombatible Liste & 1 Liste mit den technischen Daten der Ausgangsspitzen

English
DeutschFrançaisNederlandsItalianoEspañolMagyarSuomi
Svenska
Česky
Table of contents
Languages:
Other HQ Accessories manuals